DIY garden paths step by step instructions. Self-laying a garden path using a jellied form. Features of tracks made using a mold
Molded garden paths are an alternative to paving stones, natural stone, bricks and cast-in-situ concrete. For those who want to equip the paths in the country and cheaply and beautifully, this is the best option. With this choice, you will have to work hard with your own hands and spend some time.
Wonderful imitation of stone with the help of moldsFeatures of tracks made using a mold
It is most correct to use forms for laying footpaths, as they have a small thickness and limited strength. Each template is poured separately and the solution must set before the stencil is removed from it. All this takes a lot of time. At the same time, the use of matrices for making paths in the garden has several advantages:

Choose a matrix or make it yourself
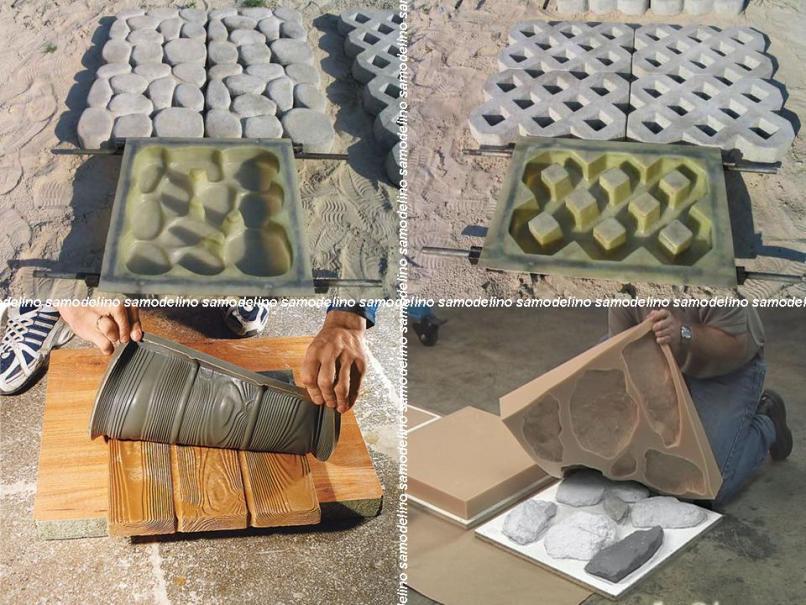
 The easiest option is factory-made ready-made forms, samples of which are shown in the photo. First, they are inexpensive. Secondly, thin and smooth bridges of the mold have a variable cross section, which makes it possible to extract the matrix without destroying the concrete casting. The template is reusable. There are ready-made matrices made of plastic, silicone, rubber and metal.
If you want to make unusual garden paths, you can make molds for them with your own hands from wood, metal, silicone, and other improvised materials. In this case, it is possible to create several different stencils of the required dimensions, which will provide a diverse structure of the track.
Note that to speed up the paving of the coating, several forms will be required. In this case, you need to purchase enough templates, or make more with your own hands.
 You can buy silicone matrices or make your own.
 The most durable homemade form is obtained from silicone, but it will take a lot of work to create it:
- First you need to decide on the prototype. It will be right to pick up several different samples for a change.
- Formwork is made around the prototype to prevent silicone from leaking.
- The sample and formwork are covered with lithol so that later the finished matrix can be easily removed.
- Fill the mold space with silicone, removing air. The operation is performed with a brush and spatula treated with a detergent. The base of the mold must be at least 2 cm thick.
- After the silicone has completely cured, the mold is carefully removed. The hardening of the material will take from 2 to 4 weeks.
For many, it is much easier to make molds from metal:
- The basis will be a metal tape 1.5-3 mm thick. For a walking path, a width of 3-4 cm is sufficient, for a platform for a car, tiles 5-6 cm thick are required.
- The tape is bent in accordance with the required pattern and connected by welding or riveting.
- Welding points, protruding parts of rivets and burrs are cleaned so that the mold can be easily removed.
- It is convenient to use as a tape - rings cut from metal pipes and barrels. It is possible to use other improvised materials.
 Some examples of wood molds
 The easiest way is to make molds for tracks made of wood. Of course, such a matrix will last less than silicone or metal. In this case, sufficiently large gaps will be obtained between the coating elements, which can be planted with grass:
- it is best to choose larch slats 15-20mm thick and 60mm wide;
- individual structural elements are interconnected by self-tapping screws;
- uneven inner surfaces of the mold are cleaned with emery cloth;
- the matrix is treated with impregnation to protect against moisture and extend the service life;
- before use, the mold is coated with lithol.
The process of laying the track using the form

The process of pouring a garden path using a mold is quite simple. The matrix must not be removed before the cement has set.
In order not to stop the paving process, it is desirable to have several templates at once so that after filling the last form, the first one can already be used again.
Using the template, we make the track device according to the following scheme: 
Original forms for paths

A relatively easy way to spruce up a pavement is to add color to the concrete. Such a track will not lose color over time.

If you use acrylic paint, you can paint individual fragments of the coating in different colors. The dye is applied to a dry and clean surface in several layers with intermediate drying.

Another opportunity to decorate the path in the country is fragments of ceramic tiles. Pieces of tiles are pressed into the mortar until the mold is removed.

The original path in the country can be arranged using burdock leaves as a stencil. The leaves will be slightly different, which will ensure the individuality of each element.

Professional builders know that after casting concrete, a cat will miraculously pass through it, and there will be its tracks on the coating. You will not leave the cat any chance if you do it first. In this case, it is better to lubricate your hands with Vaseline. In this way, you can capture the image of any other objects. Whatever option you choose to make a track using molds, it will be cute and practical.
We suggest watching a video on the relevant topic.
Walking barefoot on asphalt is less pleasant than walking on seashells, polished cobblestones or logs warmed by the sun. The road surface, without which a metropolis is unthinkable, is inappropriate in a country estate. Almost daily, the owners walk around its territory without shoes, and the kids crawl on all fours anyway.
When gardening, it is important to pay attention not only to the quality care of fruit plantations, but also to remember the general arrangement and appearance of the garden. Do-it-yourself garden paths not only create the convenience of moving around the household, but are also a special part of the overall design. In this article we will talk about the arrangement of tracks with our own hands.
Garden paths - how to combine beauty and convenience
A dacha, a private house, a cottage require not only the arrangement of the interior, exterior, but also embellishment of the area around. Often, owners want to combine practicality and aesthetics in one project. You can realize the idea by laying garden paths.
What you need to know and consider when building
Any design begins with a concept, a thorough study of the area and a plan. The first step is to determine the directions, length, width of future tracks, imagine their shape, decoration. Next, you need to analyze the bearing capacity of the soil in order to choose the right type of building material and only then plan.

It is necessary to draw up a drawing on paper, there will be an opportunity to correct, redo, supplement. You should pay attention to several important factors:
- Component parts must be resistant to the aggressiveness of the environment - high humidity, fungi, corrosion.
- It is good to tolerate temperature fluctuations of different seasons.
- Provide for a possible increase in loads (car, loaded wheelbarrow).
- The optimal angle of inclination of the canvas to avoid the accumulation of water from precipitation.
Advice from a landscape designer - in compact areas it is better to lay not straight garden paths, but with undulating bends and turns. This visually expands the space, deepens the niches for plants.
From what to build a track, each owner decides independently, based on financial capabilities, needs and fantasies. Every coating needs a base. An ideal option would be a compacted earth embankment or crushed stone pillow.

The most popular do-it-yourself materials for garden paths:
- A natural stone. It looks noble, aesthetically pleasing even with non-smoothed corners.
- artificial substitute. The grace of nature, faceted by man.
- Clinker bricks will add bright colors to the garden.
- Gravel or large polished pebbles will provide originality.
- Wood is an affordable, simple, but short-lived species. Looks impressive separately and in composition.
- Decking - garden plastic parquet. New material, resistant to UV, water, mildew, rot.
The decorativeness of the structure to a greater extent depends on the methods of laying blanks. The canvas can be solid, even or consist of separately located elements of different geometric shapes. Having laid out a path of large "leaves", "butterflies", "flowers", it is easy to enjoy comfort and a pleasant walk.

Types of garden paths
Everyone who has a dacha and even a small, but own personal plot, will think more than once about ways to decorate and transform it. There is not always enough money to implement ideas and fantasies. Many will ask: “What then to do?” The answer is quite simple: if you want to ennoble garden paths, but there are no funds for a landscape designer and expensive components, then you should pay attention to improvised and more affordable materials.
For arranging garden paths with your own hands, various types of stones, boards, saw cuts, river pebbles and even plastic bottle caps will come in handy. Now a little about each of the options.
Natural stone walkways
They fit into any site design. They look natural, and with proper styling can last for ages.
These tracks look very impressive. If stones are left after the nearest construction, you can use them. Or those that remain after laying the alpine slide will do. They have uneven shapes, which makes them ideal for a scenic path.
 Natural stone walkway
 Initially, you need to calculate the number of pebbles. One of the methods is a rough layout of stones. So you can estimate whether the amount of material you have is enough.

Sprinkle the place for the track with sand and compact it with high quality. It turned out in some way a "pillow" for pebbles. They need to be processed, adjusted in shape, made more uniform. For good docking and grinding, you can use a grinder or other not too powerful types of tools. Having prepared the stones, they are placed in a mosaic composition.
Since all stones are different in size, they are adjusted to each other with a rubber mallet. At least one of the sides of the stone must be flat for the path to turn out as it should.

When the mosaic is ready, you need to start sealing the seams between the stones. Otherwise, they will start to overgrow. Although some may prefer another option, as natural as possible: a cement-sand mortar is used for grouting.

concrete walkways
They are very similar to stone. First make a bed, the depth of which is approximately 10 cm. Then pour sand on the bottom and tamp it down. Fill the top with a mixture of concrete and sand, set the formwork around the edges. Until the solution has hardened, pour pebbles into it. Lay out the intended pattern from it. A drainage system must be installed next to such a path.
Sometimes a concrete path is made using a ready-made form. It is easy to buy at a hardware store. And then just pour the concrete mixture into the mold in the place you need, level it with a trowel, remove the excess and remove the mold. This is a very easy and fast way, besides, you can lay out such a form at least in several rows.
 How to make concrete walkways with your own hands using ready-made forms
wooden walkways
Wooden paths will serve for a long time, but in the beginning they require care. You can lay them out from sawn boards or timber, using what is left of building a house.
 wooden walkways
 Prepare boards and sticks, the latter can be replaced with steel corners or pipes. Treat them with protective impregnations or bituminous mastic. After soaking, nail the boards to the bars. Mount the track from above, using hemp of various calibers for this. Paint them in one or more colors.
But in domestic climatic conditions, the most modern impregnations will not protect the boards from deformation, rotting and corrosion, therefore, imitation wood is more often used as a material for paths - tiles with an appropriate pattern.

It will be possible to pick up samples so perfect that no one will detect the difference at a distance. It is felt only after tactile contact. The tiles reliably depict the natural texture of pine, beech, oak and other species in the context - as a result, the ersatz is indistinguishable from the original.
DIY gravel garden paths
Gravel is a simple material that has good flowability, allows moisture to pass through, and is relatively cheap. Paths of any width and length can be poured from it, it is even possible to give them a different shape. Such a path looks neat, harmoniously fits into any landscape. Doing it yourself will not be difficult.
 DIY gravel garden paths
 The procedure for the execution of a gravel path
- First you need to mark the track on the site. Marking is carried out with pre-prepared wooden pegs. You can stretch a string between the pegs if you find it difficult to determine the direction "by eye".
- Next, according to the markup, a bed is prepared. To do this, dig a trench in the ground. The depth of the trench can be about 14 - 17 cm.
- Prepare gravel. It is advisable, if possible, to review it and remove unwanted impurities (broken glass, sharp large stones, etc.). Enumerating gravel should be done with thick gloves.
- The gravel is backfilled to the depth of the trench. You can level with a rake or with your hands (also use gloves).
- Next, the laid gravel is rammed.
- At the end, along the edge of the path, you can lay a curb stone. This will give an even more spectacular and finished look. The stone is fixed with a cement foundation. You can lay it either flush with the canvas, or slightly above it.
This algorithm is also suitable for constructing a garden path made of sand. Accordingly, gravel is replaced by sand, and then all work is carried out according to the same scheme.
DIY garden paths made of bricks
This is a very fragile type of material. Before laying it is necessary to check for strength. First, mark the path with string and pegs.
Remove the soil (25 cm), put the drainage below. In this case, it will be simple, but the main thing is that water does not penetrate. Crushed stone must be poured on top of the drainage system. Boards are laid sideways along the edges. Then the brick is laid. You can come up with many different patterns of bricks.
 Clinker path
 The garden path lined with brick chips looks great. It is permissible to pour it on a concrete path. A beautiful mosaic is laid out from broken bricks. If the bricks are of different colors, beautiful patterns are laid out of them. You can leave space between them to fill it with small pebbles, pebbles or soil, so that later there is a green island.
 Homemade brick and stone walkway
 sandstone path
They are made dry or use cement pouring. This method is similar to laying a stone path, and the first one is more natural and original.

Dig a trench, removing some of the soil. Pour sand into it and tamp it down. The middle part should be higher than the edges. You need to go up the slope a bit. This is such a dehumidification system. Next comes the processing of stones.
Sandstone can be of various sizes and shapes. Try on each stone before processing.
Align the stones, making the gaps as small as possible. Processed stones are laid out as you like. For a classic track, you need a bucket of sand and the same amount of mixture with cement. Under each pebble, you must first put the first, then the second. Moreover, the cement should protrude slightly. You need to press the stone firmly. The made path must be washed so as not to spoil the aesthetics with cement residues. Seams are filled with soil or sand.
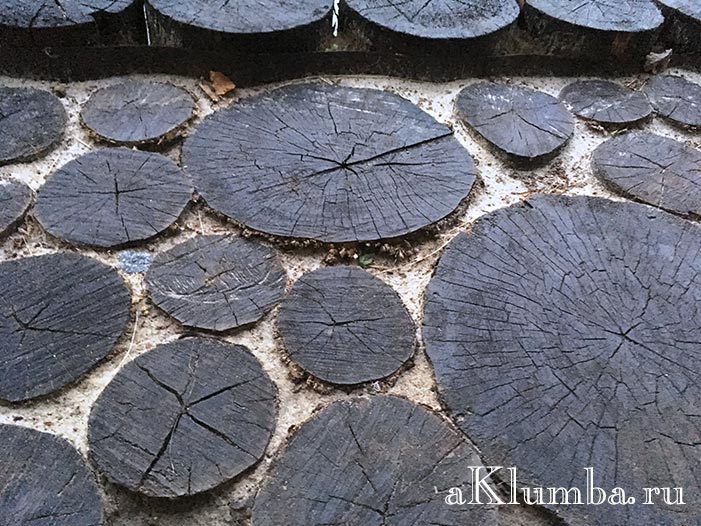
Walkway made of wood saw cuts
Such a path will look very beautiful and attractive.
 Walkway made of wood saw cuts
 Saw cuts must be taken of different sizes, stacking them so that there is no free space between them. Before laying, the round timber must be treated with an antiseptic composition.
 Saws for a garden path
Another option is to use round timber in the form of curbs, and fill a layer of gravel between them.
Staying in the country, I want to move away from city life, because if not a forest, then a garden, some lucky ones even have a lake or a river. In a word, whatever the surrounding landscape, it encourages rapprochement with nature.
An interesting idea is a path stylized as a forest one. It is fragments of ordinary tree stumps. Round plates of various sizes are laid along the edge of the pond and concreted.
The side of an artificial reservoir is made of them. It is pleasant to sit on such stumps to sunbathe, the contact of the feet with them also gives rise to positive sensations.

Plastic garden paths
Such country paths are sold as modules, ready-made. Their installation does not require preparation and surface treatment. They are very easy and quick to attach, very economical, characterized by durability and long service life. They can be laid out on any site, in the form of any composition. They are environmentally friendly and aesthetic.
River gravel paths
Working with these stones will be difficult, time-consuming and will not end quickly. They are laid in a pre-limited space in wet sand and compacted to the desired depth. The process takes several days.
 River gravel paths
 It happens that the design of country houses is based on the imitation of the styles of bygone times - the ancient era, British classicism, etc. Then you should choose plates ornamented in accordance with the general concept of the site and the residential building. They may have impressions of Mediterranean pebbles, ancient bricks, etc.
Paths from caps from plastic bottles
The most original and interesting way is to lay out the path or part of it with plastic bottle caps. Due to the fact that the covers have a variety of colors, you can make patterns and mosaics, even coming up with whole pictures.
The only negative of this improvised material is its collection, because you will need a lot of covers.
Garden path made of reinforced concrete tiles
Stages of work:

 Do-it-yourself garden path made of reinforced concrete tiles
  Mosaic tiled ceramic tiles
  Paving stones, stone path
  The slabs are laid on a layer of sand, lawn grass is sown in between. Mowing is carried out with a conventional electric lawn mower. The photo was taken 3 years after installation.
 These are just the basic materials from which you can make country paths with your own hands. Human fantasy is limitless, so by the next summer season, they will probably come up with something else. Paths for summer cottages are made by hand from any, sometimes unexpected material. For example, from glass bottles. You can create combinations of different types of material in one composition.


Remember that such paths carry not only convenience and benefits, but also beauty, joy for the eyes, harmony. Imagine, invent, create.

The independent choice of materials for garden paths and the driveway to the cottage is sometimes difficult. Then you just need to set aside time for a scrupulous study of catalogs or a means for consulting with specialists. The result will justify all these costs.
Video master classes


The desire to improve one's own life and live in comfortable conditions contributes to the popularization of private construction. The owner, who has built a house on his own plot, has the right to equip it in accordance with his taste preferences, and this does not always require large financial injections. However, not only the building itself needs high-quality arrangement, but also the adjacent territory, an integral element of which are country paths. Sooner or later, every owner of a suburban area faces the need to make garden paths, since they perform not only a practical, but also a decorative function. By arranging garden paths on your site, you can move around its territory in any weather, and also protect flower beds and beds from accidental ruin by inattentive family members. It is impossible not to take into account the aesthetic function of garden paths, as they are the first thing that meets us behind the country gate and leads to the porch, forming the first impression of the house and its owner. Since the paths are an element of a holistic stylistic solution of the site, it is important to design them in the same style with the rest of the site elements, since only in this case they will complement the landscape design of the site and allow you to correctly place the necessary accents. In order not to face the problem of stylistic inconsistency in the future, it is important to pay due attention to the manufacture of garden paths. If you choose to ignore this advice, a natural-style garden may have an urban path that resembles a sidewalk, and an English garden may have a minimalist Japanese path that looks unnatural. After reading our article, you can avoid this and carry out the competent manufacture of garden paths with your own hands.
Garden paths: main functions
Often you can hear about the spontaneous occurrence of garden paths on the site, which appear in the places of the most frequent movement on its territory. They have nothing to do with the paths made by hand, and will last until the start of the rainy season, with the beginning of which you will have to spend the lion's share of the time looking for rubber boots. But the situation will change radically if you pay attention to the creation of solid garden paths, which, in the course of their long-term operation, will add grooming and nobility to the site. Well-made garden paths not only perform a practical function, but also carry significant aesthetic value. Their functionality is so diverse that they simultaneously unite all the buildings located on the site, forming a single ensemble, and allow the zoning of the site, highlighting its functional areas: a recreation area, a garden, flower beds, outbuildings, etc. In the case of a competent organization of garden paths, they will help you to correct the shortcomings of landscape design. If in the process of making garden paths you strictly follow the chosen stylistic decision of your suburban area, you will be able to create a harmonious work of landscape design.

Varieties of garden paths: a brief description
There are many classifications of garden paths, implying their division according to their size, construction method, material used for their manufacture, etc. One of the most popular is the classification of garden paths according to the material used to make them.
- Concrete walkways are most popular among owners of garden plots, which is explained by the performance characteristics of the concrete from which they are made. Among especially demanded qualities - its frost resistance, durability and durability, and also rather low cost. Concrete tiles can be used for mounting not only footpaths, but also car access roads, while their configuration can be very diverse - tiles can be made in the shape of a triangle, hexagon or wave;

- Natural stone walkways are considered one of the most preferred options, combining both aesthetics and practicality. For the manufacture of tiles, basalt, granite, marble and other rocks are used, which are characterized by increased strength. The only drawback of natural stone tiles is its high cost, due to which it becomes available not to all segments of the population. Over time, grass grows in the joints between the tiles, giving the homemade paths an original flavor;
- Pebble, gravel and gravel paths are considered one of the most economical options, as the material used is one of the cheapest, and manufacturing is not labor intensive. In order to make such a path, knowledge of a specialized technology for making garden paths is not required, it is enough just to mark its boundaries, pour the selected material and level it. Experts recommend giving preference to this technology only if the manufacture of the track in another way is impossible under these conditions;

- Paths made of bricks, the main material for the manufacture of which is clinker brick, characterized by warm colors, ease of installation and low cost;

- wooden walkways are also popular, due to the availability, variety of material and aesthetic characteristics of wood. This option for mounting tracks is considered budgetary and involves their manufacture from wooden bars or saw cuts. In the climate of central Russia, it is necessary to use wood impregnated with an antiseptic solution that prevents rotting and slipping. But, despite all the measures taken, wood is one of the most short-lived materials;

- Walkways made of plastic low cost and easy installation;
- Paths made of metal tiles characterized by beauty and variety of patterns. The know-how of modern manufacturers is tiles, the surface of which resembles natural stone. At the same time, when choosing a metal tile for mounting garden paths, remember its slippery surface and give preference to a material with a corrugated surface;
- Paths made from scrap materials are also popular. For their manufacture, log cuts, a mosaic of pebbles and colored caps from plastic bottles, as well as broken tiles in concrete can be used. In the process of making such tracks, you will not only gain a lot of positive emotions, but also save money by adding originality to your site.

Ways to arrange paths with your own hands
garden paths- paths that appear naturally and do not need special planning. In most cases, they are trampled by people moving around the site in the same place, or compacted by the wheels of garden equipment. They serve to connect the most important points of the site - gates, gardens, gardens, etc. But experts do not recommend giving preference to paths of this type, since they are characterized by a number of disadvantages - overgrowing with weeds, erosion in rainy weather, puddles and dirt on the path. In this regard, it can be used as a temporary option, however, if you ennoble it - lay out a curb of paving slabs or cobblestones along the edges, the operation of the path can be extended for a longer period;

Paths with a backfill base- an option characterized by ease of arrangement. In order to carry out the installation of such a track, it is necessary to dig a ditch 10 cm deep, cover its bottom with geotextile and fix it along the edges with a curb tape. Thus, you will get a base that is covered with pebbles, gravel or marble chips. If you have sufficient experience, and this option seems too simple to you, you can make additional installation of stone or concrete slabs, which can be laid in an orderly or random manner. To ensure ease of movement along the path, it is recommended to “drown” the slabs in the backfill so that they are flush with the surface of the path;

Filled tracks with hard surface are an ideal coating that can withstand increased loads. The paving of such paths involves the laying of decorative elements, such as paving stones, paving slabs or natural stone, on a concrete base. Using elements of various colors during the installation of the track, you will give the object an additional decor. Experts recommend installing the track in such a way that it rises 5-7 cm above the ground, which will prevent its erosion and soil deposits;

Wooden garden paths- one of the favorite "country" options, which can be represented by a path made of wooden blocks or wood cuts. If you live in a dry climate, give preference to wooden bars or boards made from hardwood.

The technology for their manufacture is quite simple and involves:
- Preparation of segments of the appropriate size (length - 100 cm, width - 30 cm, thickness - 15-20 cm) and their laying on a gravel or sand base;
- Processing of each bar with a specialized composition or fuel oil that protects the material from high humidity and decay. For the same purpose, the lower part of the bar in contact with the ground is lubricated with bitumen. In some cases, a preliminary arrangement of a sand cushion is made;
Important! If you have given preference to such a combined coating, experts recommend laying it in the autumn, as in winter, due to the natural subsidence of the soil, the coating will be compacted.

A real find for home craftsmen will be old fallen trees, sawing the trunks of which into pieces - saw cuts, you can make an original garden path. In this case, you can use not only cuts, but also thick branches, the cuts of which can be used to fill voids between the main elements.
Important! To prolong the life of wooden paths, decorative elements must be treated twice with hot drying oil, and the space between the cuts and the ground should be filled with geotextiles or polyethylene.

What should be considered when making garden paths?
- Most experts consider a straight path not aesthetic enough, and therefore, they prefer to opt for harmonious winding paths characterized by smooth lines;
- If in the process of making a garden path you prefer tiles, its width should not exceed 50 cm;
- In the seams formed after laying the tiles, you can plant grass, which will give the path originality and, at the same time, naturalness;
- If you plan to install tracks, choose autumn days for this, as tracks made in winter will settle. But if this is not possible, during the installation of the garden path, make it a few cm higher;
- When installing the tracks, follow the recommendations of experts and make their edges with a certain slope, which will prevent the accumulation of water on the track;
- If you plan to use gravel for mounting tracks, take care to install curbs;
- When using natural stone for mounting tracks, remember that they will become slippery in rainy weather and give preference to tiles with a corrugated surface.

Form for making garden paths: main advantages
Garden paths are an integral part of the site, which in one way or another reflects the individuality of the owner. When making such a path, it is important to think over its design in such a way that it differs from the "bored" city paths and at the same time coincides with the holistic stylistic concept of a garden or suburban area. To install a garden path, you can purchase ready-made tiles or make molds for paths with your own hands.
The advantages of the latter option are obvious and are as follows:
- Significant cost savings achieved by making tiles on your site, and therefore, you do not need to transport the material, the production of which, moreover, is less costly, unlike buying ready-made tiles, process;
- The uniqueness of a hand-made tile is beyond doubt, since all the parameters of the tile - the configuration and dimensions are selected based on the characteristics of your site;
- Practicality and reliability of the design, for the installation of which tiles made by hand were used. This is due to the unlimited possibilities in the process of manufacturing tiles - the thickness of the material can be made to any thickness, which will allow using tiles even for arranging car parking;
- Originality and aesthetics of tracks. In the process of pouring the form for the tracks, you can decorate it with any decorative elements, such as pebbles or porcelain stoneware.

Forms for garden paths can be made from various materials. Consider what materials can be used, and the technology for making molds:
- Wood. First of all, it is necessary to make a frame, for which the bars are fastened to each other. The next step involves mounting the bottom of the mold, for which you can use a sheet of plywood or iron. To increase the decorative effect of tiles made using these molds, their bottoms are decorated with decorative elements that are glued to the bottom of the molds to prevent them from moving during the pouring process. As for the front side, it is recommended to decorate it with ceramics, pebbles or gravel. If the frame you are making is large, it must be reinforced with a reinforced mesh. After you have filled the tile, leave it to dry completely for 2-3 days. After that, remove the tile from the frame and let it dry for another 5 days;
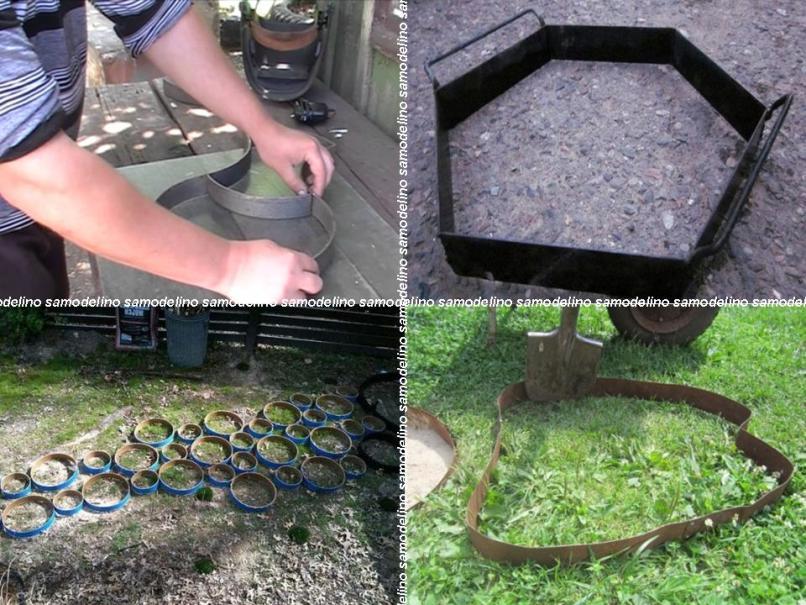
- Hoops from a wooden barrel and an iron sheet. Using such materials, you can make original forms for natural stone. The advantages of the hoop are that it can be bent in any way, and using several of these shapes, you can significantly speed up the process.

A garden path made using such molds does not require the preparation of a special base or the obligatory use of formwork for the manufacture of a garden path. Laying of finished tiled elements is carried out in a recess on the site. To do this, lay the form on the surface to be mounted and deepen it into the soil with a hammer. Remove the earth from the mold up to 5 cm deep and moisten the mold and the bottom with water, then lay some sand or gravel on it. Fill with concrete. Leave the form for a few minutes before the initial drying and stretch the form. Now it is reusable until the track is completely ready. After two or three days, the final drying of the track will occur, and it will be ready for constant use.

Important! If you are installing the track in the summer, make sure that the tile does not crack during the drying process, for which just cover it with polyethylene.

To ensure long-term and efficient operation of the garden path, in the process of its manufacture it is important to follow the recommendations of experts, which differ somewhat for different materials. As an example, consider how to make a concrete walkway using a traditional plastic mold.
- Before proceeding with the manufacture of tiles, fill the area where the future path will be located with sand and gravel, and then trample this path well. In the process of compacting the territory of the future track, make sure that the surface is perfectly flat, and if any defects are found, add sand to level it. Pay close attention to this stage, as the shrinkage of the area under the track will render the future track unusable;

- Before pouring the mold with concrete mortar, lubricate its inner surface with a special compound that can be replaced with soapy water, vegetable or machine oil. This is necessary in order to facilitate the removal of the form. If you use a ready-made special composition, it can be applied once, improvised compositions are applied before each pouring of concrete;
- Before placing the form on the track, wetting the sand under it. After that, put the form in place of the future track and slightly press it into the sand;
- To prepare a mortar for pouring, you will need one part of M400 cement, three parts of small or medium-sized crushed stone and three parts of river sand. In addition, prepare a dye (one package of a special pigment weighing 750 g will paint over the amount of tiles required to install a 9-sq. M track) and a plasticizer, which can be either dry or liquid. The plasticizer is an essential component of the solution, as it increases the frost resistance of the tile and gives it a water-repellent effect;

- The filling of the plastic mold must be done as carefully as possible, it is important to ensure that each of its corners is filled with a solution that should not be excessively liquid.
- After filling the form, the cement remaining superfluous is removed using a rail or other device.
- Using a plasticizer, you can remove the frame frame in 15-20 minutes. Removing the frame must be done at diagonal corners.
- Following our recommendations, you will be able to make the first tile, the complete drying of which will take at least 3 days. The rest of the tiles are made in the same way.

This technological process of manufacturing a garden path is not particularly difficult. By following our recommendations, you will not only save money, but also create an original stylistic solution for your garden.
Making a garden path video
Neat paths gracefully winding between green spaces and landscape decor are an essential attribute of any garden. So, if you want your site to be truly well-groomed and complete, by no means neglect the paths. Fortunately, for their arrangement you do not need to spend fabulous sums and involve professional designers - you can make beautiful paths with your own hands, seriously saving both on materials and on work. How? There are many answers to this question, because there are a huge number of types of garden paths that can be laid at low cost. Next, we offer you instructions for the most popular options with accompanying photos and videos - after reading them, you will definitely be able to effectively ennoble your site.
Wooden round logs are a very simple, but original material for garden paths. Raw materials for them can be found at every site - for sure, there are old trees everywhere, which it would be time to replace with new seedlings. It is advisable to use larch or oak - they are the most resistant to external influences, which means they can boast a long service life. The path of saw cuts is made according to the following scheme:

Advice. In order to protect the path from moisture and increase its durability, equip the simplest drainage - pour a layer of fine gravel between the sand cushion and the cuts.
Durable stone paths
One of the most durable garden path options is natural stone. Here you can use cobblestone or but - they are equally durable. The path is laid out as follows:
- Mark out the garden path.
- From the area where the path is planned to be laid, remove the top layer of the drain. The depth of this layer should be 7-10 cm more than the height of the largest stone prepared for the path.
- Fill the resulting trench with a 10 cm layer of sand, carefully level it and compact it.
- Alternately lay the stones on the sand cushion, pressing them firmly into the base. The distance between small stones should be no more than 2-3 cm, and between large ones - up to 8-10 cm.
- Carefully fill the remaining gaps with cement mortar. When the track sets, fill the seams with earth or fine sand to make them look more natural.
 Stone garden path
 Classic concrete paths in the country
Concrete is a traditional material for laying paths, which is always popular due to its low cost and ease of use. Everyone can definitely make a cast track:
- Mark the boundaries of the path - drive in pegs along its contour and stretch the wire between them.
- Within the marked contours, dig a small trench - up to 30 cm deep.
- Lay on the bottom of the base a layer of gravel 5 cm and the same layer of sand. Seal the resulting pillow.
- Cover the base with a chain-link or any other thin metal mesh.
- Install lumber formwork along the perimeter of the future track.
- Prepare a cement mortar: 1 part dry cement, 1.5 parts sand, 2 parts gravel and 1 part water.
- Pour the cent and evenly, with vibrating movements, using a spatula, distribute the composition over the entire area of \u200b\u200bthe track. During installation, pierce the mixture with a rod to prevent the formation of voids.
- Using the rule, finish the alignment of the path and cover it with polyethylene.
 concrete walkway
 In 3-4 days the track will be ready. During this time, remember to gently moisten it with water to protect the concrete from cracking and give it maximum strength.
Advice. To make the path more interesting, even before the concrete mixture finally sets, “drown” various decorative pebbles, glass or shells in it.
Budget garden paths made of tires
Transport tires have long been widely used in summer cottages: they make flower beds, ponds, swings, and now also garden paths. This trend is not surprising, given the performance characteristics of the material: tires are resistant to moisture and temperature extremes, easy to care for, do not slip and are durable. You can equip a garden path from them like this:
 Tire garden path
 - With a knife, divide the tires into two parts: rolling tracks and sidewalls. To make the knife easier to enter into the rubber, regularly lubricate it with oil or soap.
- Cut out the resulting rings of ribbon. Trim them to length and trim the edges.
- Take wide wooden boards and carefully fasten rubber bands on them with nails so that they completely cover the wood - there should be no empty gaps between the elements.
- Remove the top layer of soil with a depth of no more than 5 cm along the entire length of the future path and press wooden boards into the base. If desired, the rubber can be painted.
Country paths made of bricks
Another traditional material for garden paths is brick. It is recommended to use clinker products, as they are characterized by high resistance to various kinds of chemical and mechanical influences. It is important that the bricks are intact and without chips, otherwise the path will turn out not only unaesthetic, but also unsafe.
 Brick garden path
 The track is laid out like this:
- Mark the path: drive a peg around the perimeter and pull a rope between them.
- Dig a trench along the marked contour - up to 25-35 cm deep.
- Along the trench, lay the limiters from the bars or boards.
- The space between the limiters, that is, the "body" of the track, cover with a 10 cm layer of gravel and carefully compact it. Lay a layer of sand no more than 5 cm high on top.
- Remove the limiters and make curbs in their place: on both sides of the path, lay one row of bricks in the “on the ribs” position.
- Form the interior space of the path with the bricks: lay them in their usual position, gently tapping with a wooden spatula or rubber mallet so that they sit down.
Advice. Bricks do not have to be laid closely - to give the path a more original look, leave small gaps and fill them with pebbles. In addition, you can not even close the gaps - after a while, grass will sprout in them and decorate the path.
Variety of wooden walkways
Wood is one of the most fertile materials for making garden paths, as it can be used in completely different guises. Consider two common options: board paths and bark paths.
Site preparation in both cases looks the same: Plank path
Further technologies diverge. So, if you are making a path from boards, prepare the constituent elements: adjust them in length and width and treat with an antiseptic. If desired, you can give them a sinuous shape. Further along the edges and in the center of the trench along its entire length, install wooden supports and fix them with cement mortar. The final stage is to nail already prepared planks to the supports.
If you want to build a path from the bark, make sure that the material is durable - it should not crumble. Be sure to treat the bark with an antiseptic. Before fixing the material in the trench, lay a sand cushion on its base, and then drown the bark in it.
Tiled garden paths
Although tile cannot be called a very cheap material, it is still used very often for the manufacture of garden paths. There are several reasons for this: aesthetic appearance, good performance and ease of working with the material. The technology of laying a tile track will convince you of the latter:

Now you know many interesting ways to make a garden path with your own hands at low cost. Following simple instructions, you can implement any of the above options on your site, so feel free to get to work and discover new opportunities for ennobling the garden area.
Garden paths in the country: video
Provides for the creation of tracks. Moreover, the requirements for them are quite serious: they must be reliable, comfortable, functional, beautiful and very desirable - inexpensive. We will talk about how to make garden paths with your own hands at low cost in this article.
What to make tracks
The pavement can be solid or loose. To create a hard coating, the following materials are used:
- Concrete. Concrete walkways are not just ordinary gray tape. In addition, there are dyes and you can decorate it if you wish. There are also molds for pouring immediately on the spot. It turns out homemade paving slabs. Another option is to pour small concrete slabs of the right size on your own, then put them on the bedding. See photos for design examples.
And everyone in the household has forms for such a path - cut eggplants for water into cylinders, place them as needed and fill with a solution: beautiful and cheap
 And this is a concrete path with expansion joints. If you look closely, you can see that stripes are applied across. This is to ensure that the wet surface is non-slip.
 - Flagstone. This is a natural stone that has been sawn into plates. It is laid on a prepared base (more on this later), the gaps are filled with backfill. It turns out beautifully, reliably, non-slip. No wonder landscape designers love flagstone stone paths so much.
 Backfill is one of the important elements that shape the appearance
 - Brick. Ordinary ceramic brick is a beautiful material, but not for paths. It absorbs moisture, if then it freezes wet, it is torn apart. If you are going to make a path out of broken bricks, then you can walk along it more or less normally only for a couple of years. Then you have to redo it. The resulting cracks will need to be covered with coarse sand or fine gravel. A clinker brick will serve much longer on the track, but this option cannot be called low-cost: the cost of one piece is from several tens of rubles.
These are two types of bricks - ceramic and chipped granite. A clinker brick path is beautiful, you can’t say anything .... but maybe too beautiful for a garden?
- Wood. Such a seemingly unsuitable material, but with proper processing, it can last a long time. Moreover, many do-it-yourself wood tracks can be classified as low-cost. For example, they came up with the idea of using stumps and saw cuts of trees as borders or coverings. They also make flooring from well-finished boards - terraced is better, but if not, it will also work from the old floor.
Combination with pebbles - it's comfortable to walk And this is how to make a path out of boards
- Plastic. There are tiles for garden paths made of plastic - polyethylene or polypropylene. It has a square shape and a system of locks, which is attached to one another. It can be laid directly on top of the lawn or previously trodden in the country or on the paths. This option is fast and cheap. It can definitely be called "With little cost." It is better, of course, to make a filling of crushed stone and sand according to the rules, and lay plastic elements on top. It's a little longer and more expensive. There is also an immodest, but very beautiful version of plastic tiles for paths. There is also a "garden parquet". These are slabs or boards made of wood-polymer composite - WPC (they are in the photo, they look exactly like parquet). This material appeared relatively recently. It looks and feels like wood, but in fact it is a mixture of wood flour and polymer. These are very beautiful coatings, but their cost is by no means modest. Although not fabulous.
This is garden parquet. Gorgeous, but overpriced
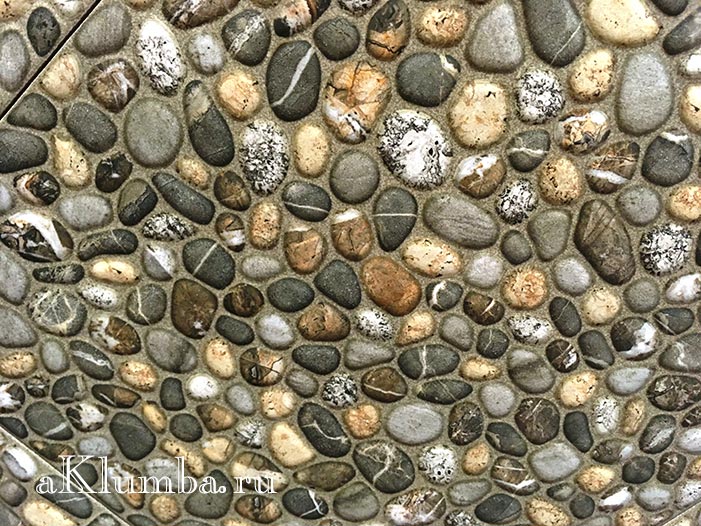
- Pebble. These are rounded natural stones that can be found on the banks of rivers or lakes. Flatter pebbles are more suitable for making tracks. There are different shades of gray, black, white, sometimes you can find burgundy. From these stones, laid one to another closely, mosaic paths of amazing beauty are obtained. But this is an occupation for the diligent and stubborn. Those who lack patience can find large flat boulders or large pebbles and lay them in the sand. It's not as luxurious, but no less reliable. You can also do with granite or other similar stones. It is important that at least one face is relatively flat. You put this flat part up, and bury the rest. The work is not easy, but it will be possible not only to walk along the path, but also to ride.
- Handy materials. Country paths are made from old tires and bottles.
There are also paved paths: these are gravel or crushed stone. Their peculiarity is that with a small layer of 2-3 cm and with sufficient compaction, it is convenient to walk on them. If the layer is slightly larger, unevenness is formed when walking, and such walking is tiring. Therefore, as you have seen in many photographs, gravel and crushed stone are used as backfill, in which rigid elements from other materials are laid. When done correctly, this is convenient: gravel conducts water well and puddles do not form. Those who do not like the gray color can be advised to paint it: many designers do this when organizing rockeries.

How to make garden paths with your own hands
It is not enough to know what you can make garden paths with your own hands. You also need to know how to make them correctly so that it serves more than one season or two. The laying of different materials may vary slightly, but there are several rules and actions that are repeated in any technology.
First rule: when laying or forming a track cover, it is made with a slight slope. If the material allows, a slope of several centimeters is made on both sides of the center. If, for example, a concrete path is poured, then the slope is formed in one direction - from the house, if it is nearby. The slope is made towards the lower part of the site if the path is located on a slope.

Second rule: under any covering preparation of the basis is required. If you lay the stones (for example) directly in clay or loam, of course there will be benefits - it will definitely be more convenient to walk, but the stones will “silt up” after some time. Simply trample into the clay. With a backfill, this will take much more time. And if you make another drainage cushion and a side, water drainage will be even more efficient, and everything will look even more beautiful.

Third rule: the level of coverage of the track should be a couple of centimeters higher than the adjacent area. Then the water will quickly drain, it will be more convenient to clean, and cleaning will be required less often: the washed-out earth will not flow either during rains or during irrigation, which are often done along the paths.
Step-by-step instruction
When making garden paths with your own hands, start with markings. In theory, the dimensions and shape should be marked on the site plan, and the markup should take place according to the project. But more often than not, everything is done on the spot. To see the future path more clearly, its contours can first be covered with white sand or something similar. If the shape suits you, you can drive in the pegs and pull the twine between them, but you can also work on backfilling.

Along a beautiful path, you can place a flower garden or flower bed. How to do them, read.
Beautiful do-it-yourself pebble path
If with flagstone, paving stones, brick, everything is more or less clear - everyone has already seen more than once how this is done, then it is not clear how to lay pebbles in patterns.

Below is a photo report on the process of making a pebble track. The main techniques are visible on it: lines are applied to the leveled sand, along which pebbles will be laid out. If these are arcs, they are made with a thread and two sticks / nails.

Picking up stones, they are laid out on the edge close to each other, slightly sunk into the sand.

A board is laid on a folded pattern, a rubber mallet is taken and they knock on the board, hammering the pebbles into the sand. So the whole drawing is deepened, making sure that the edges of the pebbles are at the same height.

Stones are "drowned" in the sand
They take a mixture of sand and cement (sand 2 parts, cement 1 part) and fill in the gaps, leveling the layer with a brush.

A fragment of a pebble path is carefully poured with water so that the backfill does not blur. Wait a few hours until the cement sets a little, then remove the excess with a soft brush.

It is important not to miss the moment: the mortar should not get dirty, but also become a stone. If you pick it with your finger, it should crumble. It's time to clean up the excess.
Path of wooden stumps and gravel: video
Old logs or trees can be turned into a beautiful walkway. They are sawn into logs of the required length, the front saw cut is polished, all wood is first treated with a bioprotection composition (it can be soaked with used oil). After drying, they are dipped in Kuzbass varnish and dried again. Then the front parts of the stumps are covered with paint of the desired color - which will protrude outward. Once again dried and only then put in the sand.
The process is detailed in the video. Here it is explained step by step how to make garden paths from stumps or logs with your own hands.
Making your own concrete driveway
The process is generally similar to the one described at the beginning. There are some differences that we'll talk about.
After the trench is dug and the bottom is leveled, formwork is installed along it on both sides. These are boards from 25 mm thick (thicker is possible, thinner is undesirable, plywood 16-18 mm thick can be used). Their height is the height of the track. If you are molding a slope, the boards should be set taking it into account - one side is slightly higher, the other is slightly lower.

The formwork is set to the level - concrete will be leveled on it
To make formwork, pegs are driven into the ground in increments of no more than 60 cm. Boards are nailed to them. It is better to smear the inner surface of the formwork with working off or other oil: so that it can be easily removed. Further, crushed stone is poured onto the bottom and rammed. But it is necessary to ram carefully: if you walk along the bottom, no traces should be visible.
Further, in order for the path not to crack, a metal reinforcing mesh is laid on the rubble. The thickness of the bar is 4-6 mm, the step is 5-10 cm. It is sold in pieces, they must be connected to each other with steel wire.

Then, to compensate for the expansion in the winter, you need to put wooden planks 1.5-2 cm thick. They are placed across the path, set so that the height of the planks is flush with the formwork boards. Compensation strips are set at least every 2 meters. More often you can, less often you can't. Why do it more often? For beauty. Squares look better than long rectangles.
A concrete solution of a grade not lower than M-250 () is poured into the finished frame. For him, take 1 part of cement, 3 parts of sand, 4 - crushed stone. Everything is kneaded into a solution of medium fluidity (thick sour cream) and poured into the formwork. When pouring, make sure that there are no air bubbles left. To remove them, the solution is pierced with a pin, slightly shaking it - bayonet. Ideally, if there is a surface vibator for concrete - it quickly compacts the solution, creating a perfectly flat surface. If it is not there, you will have to level with the rule, using the edges of the formwork as beacons.

A few hours later, after the concrete has set, the surface can be treated. You can leave it as it is, you can brush it with a stiff brush, making transverse strips, you can finally put pebbles, stones, flagstone, etc. into a not completely hardened solution. It's not very economical, but reliable. After a couple of days, the formwork can be removed, and you can already walk along the path.
Tire track on a budget
What they just don’t make from tires: swings, and ... tracks. It's simple: you need to cut off the sidewalls of the old tire, leaving only the tread. What can be cut? Bulgarian. Someone manages with a knife, but this is only if the cord is not metal.

The projector is cut across to make a track. Then cuts of 15 centimeters are made on the sides - it depends on the diameter of the tire. They will make it possible to deploy the rubber.

Make incisions on the curved edges - the surface is still non-linear
In this form, it can already be laid on the beds. Will serve for many years. This one is like garden paths at low cost.

This coating will withstand many years of active use.
As you understand, there are a lot of options for how to make garden paths with your own hands. It is impossible to tell and describe about everyone, but we try ...