Plasterboard finishing of a complex ceiling
A modern solution that allows you to give the apartment originality and style is the plasterboard finishing of a complex ceiling, including the design of two-level ceilings. There are many reasons for the popularity of drywall when leveling ceilings. The main reason is environmental friendliness and respectable appearance.
"Complex" ceilings, how simple it is!
If you ask any builder if there are "simple" ceilings, then an intelligible answer may not follow. A "simple" ceiling, and the technology of its finishing implies that the ceiling base itself can serve as a basis.
The concept of "complex" ceilings implies prefabricated structures, which are fastened to the walls. "Complex" ceilings are of two types:
Suspended
Stretch.
Two solid groups are similar in mounting and fastening methods. Suspended are ceiling structures consisting of metal frames and a ceiling covering (gypsum board). Stretch ceilings are the stretch and fastening of which is carried out on a solid frame or frame installed around the perimeter.
Universal plasterboard ceilings
Why is plasterboard ceiling decoration attractive to builders? Working with drywall allows you to hide the existing differences between the plates, bumps or bulges. Under the drywall slabs, you can successfully hide engineering communications and electrical wiring. A plasterboard suspended ceiling will allow you to place heat-insulating materials inside and install spotlights. 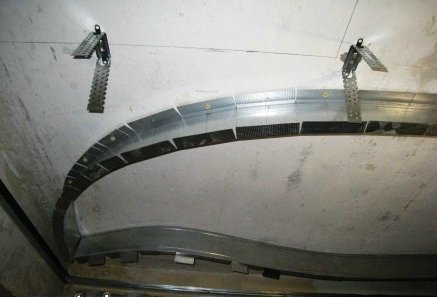
The most recognized are two-level or multi-level ceilings. For finishing, a ceiling plasterboard with a sheet thickness of 8 mm is used. Working with such drywall is a real pleasure: it is easily and simply cut with a regular construction knife, making it easy to create smooth transitions. Rounded and smooth elements look great on any ceiling. Ceiling plasterboard allows the simplest ledge to be rounded off and give it a unique charm of creativity. Well, if the ceiling is two-level, then the originality of the solutions can be safely doubled. 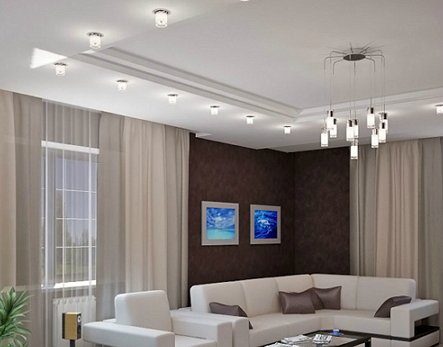
Plasterboard finishing of two-level ceilings
Before you start finishing a complex ceiling, you need to draw a sketch. On the working sketch of a two-level plasterboard ceiling, it will be necessary, in addition to the desired geometric figure, to mark all the locations of the racks and fastening profiles. It must be remembered that the multi-level ceilings will reduce the space of the room. The first base level will lower the surface by 5 cm, and the second level by 10 cm. If the ceilings in the room are sufficiently even, then they can be used as the first level without additional processing.
Installation of the ceiling covering frame starts from the first level.
The horizontality of the ceiling is carefully determined beforehand. This operation must be performed twice in order to eliminate any unwanted distortion. For these purposes, the most suitable tool is the water level. Surface marks with a masking cord are beaten off over the entire height. Then holes for dowels are drilled and UD profiles are screwed. Then parallel lines are drawn on the ceiling at a distance of 60 cm between them and we install the suspensions.

To work with drywall of complex configuration, metal profiles and special self-tapping screws for drywall are used.
Traditional metal profiles for drywall are represented by galvanized and metal forms with a thickness of 0.6 mm and a length of 2.5 m. 
Guide profiles that define the main frame and shape are connected to racks with stiffeners. Moreover, the length is determined by the size by which the second level of the ceiling will be lowered. It is best to immediately prepare the rounded corners so that they are the same shape and size. The main frame is fastened and mounted according to a given contour with the help of special hangers, with level height adjustment. Suspensions are placed at the same distance of 40 cm. The corners of the structure are rigidly fixed. Drywall sheets are pre-cut and the necessary holes are cut for installing spotlights.

When working with rounded elements for easier work, the workpiece is slightly moistened with water. This makes it easier to bend drywall and give the elements the desired shape. You can also cut the part on the back side with slots and break the material a little. After the elements of the second level are ready for installation, the figured plates are fastened with the help of self-tapping screws with fine thread "bugs". Self-tapping screws are screwed in, sinking a flat head into the surface of the plate. 
Modern plasterboard ceilings with illumination not only from spotlights, but also with the use of high lighting technology, fascinate. Disguised in the niches of multi-level ceilings, LED strips confidently replace old-fashioned and uncomfortable light bulbs and lamps. The advantages of the LED strip are obvious and shine with a bright inviting light. Moreover, RGB models allow you to receive lighting of various desired colors and shades. True, along with the tape, you will need to purchase a controller. But these are trifles, compared with the chic "complex" ceiling, the second of which no one else has. 
"Complex" ceiling - options are possible
And, finally, what "difficult" ceiling can do without a flexible metal Flext profile? Yes, almost none! A completely new technology for creating a closed flexible profile "broke" the construction industry. 
Two identical halves of a metal profile, combined into one flexible and reliable structure, allow you to create curved transitions at several levels of the ceiling covering. 
The uniform bending of the frame and the ease of assembly of the rough structure allow you to create stunning "complex" ceilings. Flexibility in one plane and the possibility of rigid fixation in a given position, and now you are already creating a multi-level ceiling from the Flext profile with your own hands.
You can verify the professional work on the installation of a "complex" ceiling by watching the video.