Do-it-yourself ceiling lighting
Ceiling lighting can transform the most boring room - if you lay the backlight correctly, you will create a sample of fantastic decoration of the room, and add originality. You can equip the ceiling lighting with your own hands, without the involvement of specialists, but in this case you will need to carefully study all the information on the upcoming process.
Table of contents:
Illuminated ceilings - types
One point needs to be clarified right away - the arrangement of ceiling lighting will “steal” a lot of space, in some cases it is necessary to cut the volume of the room by 10-15 cm. Therefore, if the room does not have a large area, or the apartment / house has low ceilings, then the option under consideration surface decoration is not suitable.
In general, you can lay the backlight on the ceiling in the following cases:
- the ceiling surface is made in a multi-level version;
- the ceiling is set to one level.
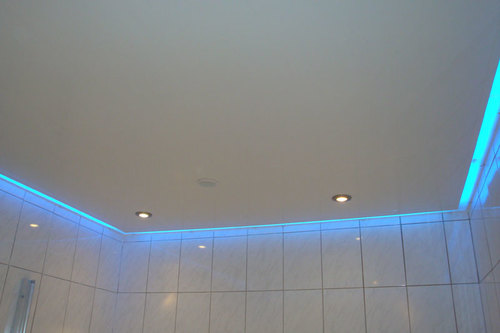
A single-level ceiling will be the best solution for rooms of small areas - the space will not be reduced much. But it will not be possible to create some kind of complex design of the original form - everything will be simple and concise.
What materials are used for ceiling lighting
You can equip the ceiling lighting with your own hands only using specific materials. Experts offer to use three options for the design of ceiling lighting:

How to make a do-it-yourself illuminated ceiling
The process of organizing a ceiling with lighting is carried out in several stages. But before starting work, you need to replace all the wiring that is laid along the walls and on the ceiling, otherwise, in the event of any breakdown, the ceiling will have to be redone again.
One-level ceiling with lighting
We recommend reading:For work, you will need to purchase certain materials, but first you need to draw a drawing - this will help you correctly calculate the required amount of building and finishing material. What you need to purchase to equip the ceiling with lighting:
- drywall;
- fasteners (self-tapping screws);
- profiles;
- suspensions.
It is highly desirable to work with a building level, moreover, a laser one - this will guarantee a perfect result.
 Work on the arrangement of a single-level plasterboard ceiling is as follows: a crate of profiles is installed directly on the ceiling surface, then drywall is attached. The most difficult thing in the whole process is cutting drywall into the required shapes. By the way, you will have to cut holes for spotlights in drywall sheets - be sure to check your calculations many times.
Note:when installing drywall sheets on the ceiling surface, it is imperative to leave a gap between the drywall and the wall.
Multi-level ceiling with lighting
This type of ceiling can be equipped exclusively from plasterboard sheets, but they can be combined with plastic, stretch ceilings and other materials. True, you need to take into account that if you want to make stretch ceilings with lighting, you will have to purchase a specific tool (for example, a heat gun), so it would be more expedient to invite specialists for this work.
Work on the arrangement of a multi-level ceiling with lighting should be carried out strictly according to the instructions:


And now you need to understand at what point it is necessary to lay the actual backlight. This is done before the installation of plasterboard ceilings begins, or already with a completely finished coating. Light strips are laid in niches (in the case of a multi-level ceiling) or attached directly to the profiles (in the case of a single-level ceiling). If the illumination is performed by spotlights, then work on their fasteners is carried out after the plasterboard sheets are installed.