How to make a lamp with your own hands?
Find out how to make a lamp out of wire, building mesh, so that flowers grow inside it. How to turn a snag into a lamp, and tree branches into a floor lamp?
How to make an original lamp?

A very interesting design item is obtained from the simplest materials, most of which are left over from a picnic. If you went with friends, relatives to nature, you must definitely remove the garbage behind you. This not always desirable job will be made more enjoyable if you ask to fold the plastic spoons separately. If you have children traveling with you, arrange a competition to see who can throw more and faster spoons into a separate garbage bag or bag.
You will also need water canisters. After a fun picnic, after arriving home, after some time, you can make original lamps from the containers left after the feast. Hand them to your friends, leave them for yourself to hang in the hallway, in the kitchen or in the country.
So, here's how such a chandelier is created with your own hands or with the help of your home. First put side by side:
- 5 liter oval plastic bottle;
- disposable plastic spoons;
- cable with cartridge and plug;
- low power LED bulb;
- pliers;
- glue gun;
- screwdriver
- stationery knife.
So that such original lamps do not lead to a fire, take an LED, and not an ordinary Ilyich light bulb.
For information: 4–5 W of LED bulbs correspond to 40 W, and 8–10 W to 60 W of conventional electric ones.

Carefully, so as not to cut yourself, remove the bottom from the canister with a knife.

Also, observing safety precautions, so as not to get hurt, cut off the handles of each plastic spoon completely. Applying a little hot glue from a gun to the cuts of the “blades”, glue them to the bottom tier of the bottle. Usually 17 pieces go here. Then, overlapping, attach the second and subsequent rows, arranging the elements in a checkerboard pattern.

To cover the neck, glue 10-12 spoon blades together, forming them into a ring.
![]()
Pass the cartridge with a light bulb and cable through the cut bottom hole in the bottle. If this "electrical" part causes difficulty for women, call the husband. If you don't have one, buy a cable from the hardware store with the socket and plug already screwed to it. You can borrow this working part of the lamp from the old one.

Put a “ring” of spoons on top of the canister, screw on the lid. To do this, let the husband drill a hole in it with a drill, and you yourself can do this manipulation with a hot nail or self-tapping screw, holding it with pliers. The original lamp is ready.

3 models of designer lampshades with your own hands
Ideas are in the air. If you are in the country and this piece of furniture is not there, it is easy to make it yourself from what is at hand. Take:
- hollow dishes;
- wire;
- mounting foam;
- gloves;
- paint;
- brush;
- pliers.
As a basis, you can use unexpected things: an old pot, a planter, an already unnecessary children's pot.
Turn over any of these auxiliary items, put on a plane upside down. Wind the wire, its turns repeat the shape of the future product, should be the same as the lampshade. With your own hands, but with gloves, pick up a can, squeeze a little foam out of it onto the frame, close the wire, let it dry.
After that, make the contours more even with a knife, cutting off the excess. Paint in your favorite color, white looks airy and elegant. Such a lampshade, made with your own hands, will decorate a country gazebo. You can make a few and hang them here. By avoiding big expenses, this way you decorate the space.

This lampshade looks stylish and modern, while the next one has a classic look. For it use:
- thick wire;
- pliers;
- small plastic water bottle.
Now roll the large outer ring from the wire. We will fasten it. To do this, cut 4 identical pieces of wire with pliers, fasten the first end of each to the small, and the second edge to the large ring. The upper part of the lamp is ready.
The size of the lampshade depends on whether it is made for hanging from the ceiling or for a table lamp. The first is greater than the second.
Roll the bottom ring out of the wire, it is the largest. Connect it to the second top five pieces of wire, distributing them evenly. It remains to decorate the frame of the lampshade. To do this, pass the wire through the second ring, twisting it in a wave and twisting it through the base. Do the same for the second ring.

It remains to sheathe it with fabric. Attach the flap from the second top to the bottom ring, cut to size, adding to the seam. Hem the large sides of the resulting rectangle. Sew the canvas on the side right on the frame, decorating this place with braid. That's it, you made a wonderful lampshade with your own hands.
If you want to get acquainted with the most modern ideas on this topic - please! In skillful hands, the construction grid will turn into a stylish lampshade.

With your own hands or, having called on a man, cut a rectangle from it with metal scissors. To fix the cartridge, twist a circle from the wire, fix it on top of the lamp with four pieces of wire.
If you do not have coarse mesh, use pliers to cut off the excess sections so that the distance between the strips of wire becomes larger. Paint the lampshade, and its frame is ready.
And now the magic begins. You can make an original lamp, which will benefit not only people, but also plants. Attach a planter with a flower at the bottom of the lampshade. You can tie, woven using the macrame technique, for the lower turns of the wire with a thick rope. Check that the fastening is secure.
If there is a man and a welding machine in the house, call on this tandem to make a metal ring with "beams" that need to be welded to the bottom of the lamp.

If you have a home climbing plant, such as ivy, pass its lashes between the cells of the lattice. The original lamp will become a house for a flower. It is better not to use ordinary electric bulbs, as they are very hot and can burn the leaves of plants. In addition, the air around the flowers will be too hot. Screw in an LED or fluorescent light bulb.
For such an original lamp, you needed:
- construction mesh or strong wire;
- brush and paint (optional)
- pliers;
- light bulb with cartridge;
- flower.
You can well fix cups with seedlings on such a lampshade, thereby finding an additional place for growing it and conditions for lighting in the evening.
We make a floor lamp, a table lamp with our own hands
Walking in the forest, do not pass by a rolled ornate driftwood. Put it in a bag, take it with you. Wash at home, if there is bark, peel off with a knife. Go over the surface with fine sandpaper, if required. Finish with wood varnish.

In order for the table lamp to hold well, the snag must be screwed with self-tapping screws to a solid pedestal. It should be heavy enough. Oak is suitable for him. If you find a broken branch of this tree in the same forest, saw off a circle 5–7 cm thick from the thick part.
It will also need to be sanded and varnished. When these wooden blanks are dry, connect them with self-tapping screws of sufficient length, first passing them through an oak stand, and then plunging them into a snag. You can also use nuts and bolts.
How to make a lampshade with your own hands, you already know. Therefore, make it and attach it to a snag, wrapping it with wire.
If the old floor lamp stand is no longer happy or you just want to decorate it, also use wood for this. See how good the birch racks look. Attach a branch of this tree to the lamp and see what kind of floor lamp you could make with your own hands.

How to crochet a lampshade?
If you are fed up with an old floor lamp, you can transform it with your own hands, giving it a "zest". Take the openwork braid, sew it on the top and bottom of the fabric lampshade. You can decorate with glitter by gluing them in the form of a pattern, evenly or randomly.
A floor lamp or a chandelier will turn out unique if you knit a lampshade for them with your own hands. This can be done with a crochet or thin knitting needles. For the first option, you will need:
- hook;
- cotton threads;
- pattern for knitting napkins;
- water;
- starch;
- ribbons.

Measure the top circumference of the lampshade, we need its diameter. Tie a chain from the air loops. Next, knit in a circle, based on the napkin pattern. Measure the height of the lampshade and the diameter of its bottom circle. Based on these data, draw a trapezoid or a rectangle (depending on the shape of the lampshade). Crochet this pattern. Sew on the side.
With single crochets, tie the upper circle of the lamp and this trapezoidal or rectangular part.
Boil a glass of water, stirring, pour in 200 ml of cold water, in which 1.5 tbsp is diluted. l starch. Boil for 1 minute, remove from heat, cool. Drop a knitted lampshade here, soak well, then wring out, let the water drain, and the fabric will dry, but remain slightly damp.
Put it on the plafond. In order for the knitted lampshade to hold well, you can skip several ribbons or ribbons between the loops and tie them.

Plafonds look very nice if they are decorated with crocheted flowers.

A solution of starch or PVA will help shape the knitted lampshade. Put it on the frame, apply glue, let dry.
In the second case (when knitting needles are used), you need to make calculations for knitting, draw a pattern according to the standards of the lamp, knit a trapezoidal or rectangular lampshade. Similar models are suitable for floor lamps, chandeliers of a strict form. If you need to crochet a semi-circular lampshade, make wedges first, and then connect them with single crochets.

Here is another openwork chandelier. It is pleasant to make kisei with your own hands and decorate the bottom of the product in a circle. But first you need to create the lampshade itself. The crochet pattern for this beautiful thing is presented right there.

A table lamp will look amazing on the bedside table if there is such a lampshade on it, the knitting pattern of which is also given.

If your son or daughter does not let you finish the work, demanding attention, invite the children to make a lampshade too, let them twist strips of paper into tubes with their own hands. It is better to wind them on a thin pencil or a wooden sushi stick, and then glue the free edge so that it does not unfold.
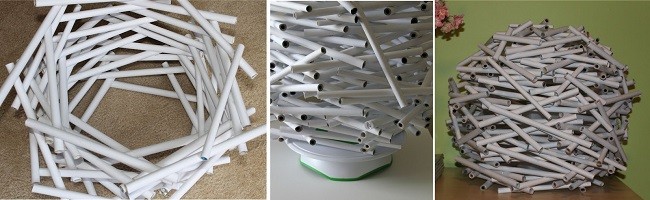
Now you need to glue the resulting blanks, using an object of a suitable shape as a frame, for example, a 5-liter canister. Having made the first inner layer, let the child move on to the second. There should be several of them to close the gaps. When the PVA is dry, cover a table lamp with this lampshade or hang it from the ceiling. Looks original and extravagant.

If you are interested in other ideas on this topic, watch the video:
A very interesting version of the lamp from the disks: