Wooden benches - an element of relaxation and design with your own hands. How to make a bench - step by step instructions
A garden bench is an indispensable attribute of relaxation, necessary in any summer cottage. It can be very simple (consist of one board with supports) or have an unusual shape and design, becoming part of the landscape design and decoration of the yard.
Since the construction does not require special skills, many owners prefer to do it themselves. If you also like crafting for the home and are planning to equip a recreation area in the garden or in the yard, we suggest that you familiarize yourself with how to make a bench with your own hands using improvised materials.
Types of shops
Bench for restThe first criterion by which they differ is the possibility of their movement from place to place, that is, they are portable or stationary. There are also differences in the design of benches, on this basis, the following types are distinguished:
- Bench without back. This option is easy to implement, although not the most convenient to use.
- Bench with a back (folding or regular). This design is classic and is used more often than others. It is especially convenient to have a bench with a folding back that can be lowered onto the seat when it rains, thereby keeping it dry.
- Circular bench. It is usually arranged in the garden under shady trees. Due to the considerable seat area, circular benches are great for a large family or a group of friends.
- Decorative bench (with flower beds, from non-standard materials or an unusual shape). The best solution for decorating the site is an unusually designed bench. Another of its advantages is the possibility of using a wide variety of materials (stumps, logs, wheels from an old cart, and the like).
When deciding on the type of bench, you need to take into account its functional purpose and, in accordance with this, select the design and its location. For example, it is better to equip a bench for rest and privacy with a comfortable back and place it inside the garden or in another place that offers a beautiful view. And near the entrance to the courtyard, you can limit yourself to a simple bench without a back, it is ideal to take a break from the road or put the bags you brought on it.
Pine bench
 Pine timber is an excellent material for a bench
 Pine is an inexpensive, easy-to-work type of wood, which explains its popularity. Let's consider how to make a bench from a pine beam, using the example of a design with a back. Our bench will be roomy and will allow several adults to sit on it at the same time. To make it, you will need a set of tools, which includes:
- electric planer;
- axe;
- drill;
- hacksaw;
- screwdriver;
- saw;
- roulette.
The bench will rest on two connected pieces of timber, which in turn are attached to paw-shaped legs. Ribs are stuffed onto the beams, which serve as the basis for the seat and back, and on top this frame is sheathed with a polished board.
First of all, you need to saw off two parts 1.7 m long for the beams and two more pieces of 60 cm each for the legs from the beam. Further, the beams are placed in the center of the legs and fixed with nails and special staples (they can be made independently from a wire with a cross section of 6 mm).
When the support is ready, you should cut off the blanks for the ribs, 3-4 pieces for the seat and the same amount for the back will be enough. They need to be ergonomically shaped with a hacksaw and an ax, then sanded. The ribs of the seat and back are interconnected with 120 mm nails, tightened with staples and nailed to the supports. To prolong the life of the tree, it is recommended to cover the frame with acrylic paint.
 Finished construction
 While the skeleton of the bench dries, we cut bars 2 m long, 10-15 cm wide and 2 cm thick for the seat and back. The blanks will need to be processed with a planer and laid on the frame, securing with self-tapping screws. It is advisable to open the surface of the wood with varnish or treat it with a water-repellent compound. The resulting bench, despite its considerable weight, can be moved to any convenient place on the site.
Fancy-shaped snag bench
After uprooting old trees, the question arises - how to dispose of the remaining stumps and snags? It turns out that it is very easy to make a shop with your own hands from such waste. Thus, you will solve several problems at once - clear the yard of debris and get original garden furniture, spending almost nothing but your free time.
 Bench made of snags
 Driftwood is ideal for creating benches with a back. You just need to pick up curved branches of the desired size and diameter (at least 15 cm), clean them of bark and excess knots, and then sand them. The resulting blanks are connected into a single whole with the help of nails or self-tapping screws. Then the structure must be treated with an antiseptic, varnished, and the unusual bench is ready.
Carved bench with armrests
Carved garden furniture emphasizes the good taste of the owners and creates a special atmosphere of comfort. Such benches are classic and will always look appropriate, both on the veranda and in the garden. Below we will tell you how to make a carved bench with your own hands.
The bench model under consideration is a portable structure, the feature of which is a comfortable back and armrests. Its sides will be decorated with curly cuts, the back and seat can also be covered with carved patterns.
 Shop drawing with dimensions
 To make a bench, you will need to prepare the following materials and tools:
- boards;
- PVA glue;
- paint or yacht varnish;
- screws;
- milling machine;
- drill and jigsaw;
- screwdriver;
- lathe.
All the details of the bench are first made of cardboard, and then, focusing on the templates, they are cut out of wood. Let's start with the sides. For them, you need to make 2 identical parts, designed to mount the seat and back, in which holes are drilled in the center using a saw thread, forming a trefoil. The sides of the parts are decorated with semicircular recesses, and their bottom is decorated with a pattern that partially repeats the shamrock. All patterns are cut with a jigsaw.
The supports that give stability to the structure are made from a bar with a thickness of at least 4 cm. The material should be processed with a milling machine and then sanded, moving clearly in the direction of the wood fibers. The edges of the supports and sidewalls should also be milled.
A thinner board is suitable for the seat and back (permissible thickness - from 2.5 cm, width - 18-20 cm). The optimal bench length for this design is approximately 1.2 m, respectively, the boards should be the same length.
 Carved bench design option
 To assemble the bench, you will need a proleg, as well as armrests and racks for them. The listed parts of the bench are fastened with the help of bosses located at the ends of the parts (protrusions with a diameter of 2.5 cm), by combining them with recesses on opposite fragments.
Now it remains to connect all the details, gluing them with PVA and reinforcing them with screws. Having assembled the bench, the surface is sanded with sandpaper and opened with two layers of varnish or painted.
Stationary bench from gabions
A gabion bench is a metal mesh tank filled with stones and equipped with a seat. Such structures are rare in our area, but in Europe they are already quite popular and adorn the landscapes of many sites and squares. Unusual appearance is not the only advantage of gabions, they are also easy to implement and quite inexpensive. We suggest that you familiarize yourself with the information on how to make a bench from gabions.
 Gabions as the basis for a garden bench
 The filling for the gabion is usually stone - sandstone, diabase, limestone and other similar species. You need to choose a specific filler depending on the desired decorative properties, for example, a bright bench will turn out from limestone, diabase will add dark gray shades, and sandstone will make it brighter (red, green, yellow). If there is no need to save money, then it is better to choose already hewn stones, since it is easier to lay them than uncut ones.
The lattice box that will hold the stones should be purchased ready-made. Usually, for such benches, a grid of durable galvanized steel is used, and its individual fragments are interconnected with special spirals (attached in the kit).
The assembly sequence is as follows:
- The parts of the box are laid out on the ground in the chosen place.
- The sides are connected to the bottom with spirals. This process is simple and does not require the use of additional tools.
- The side parts are fastened together. For convenience, they can first be slightly screwed with wire.
- Stones or other decorative material are placed inside the resulting box.
- A cover is fixed on the structure with spirals.
 Box assembly
 So that the bench does not sag, it is advisable to strengthen the sidewalls with additional jumpers attached to hooks or put a diaphragm inside. You can screw boards to the finished box or simply put a soft seat on top.
A simple bench from an unplaned board
If the designs described above seem too complicated, or if such materials are not available, then you may be interested in how to make a bench with your own hands from an unplaned board. The model is very simple, but at the same time comfortable - a portable bench with a back.
 Boards should be processed with a planer
 The main material is unplaned boards, which should be pre-treated with an electric planer. The dimensions of the bench may be different, but the optimal height for it is 90 cm. Production begins with cutting out the back legs. To do this, on a workpiece of a suitable size, we draw a curly leg of a bench and cut it out with an electric jigsaw. Then we circle the first leg on the next piece of the board and cut out the second part.
The back and front legs are connected with a rectangular piece of board, the length of which is equal to the width of the bench seat. To securely fasten them, you will need to cut grooves in the details of the legs. We act as follows - we saw through several parallel, closely spaced grooves, remove all unnecessary with a chisel, so that grooves form. We place a rectangular fragment of the board in them and fix it with self-tapping screws.
We got two sidewalls that need to be connected with transverse strips (front and rear), also planted on self-tapping screws. Now it remains only to mount the seat and back boards on the frame. The design is almost ready, but it is recommended to varnish it before use, otherwise the bench may begin to deteriorate after 1-2 seasons.
 Even a simple homemade bench can brighten up your yard.
 Of course, novice masters are unlikely to be able to immediately complete all the work perfectly. But do not be upset if your bench is not as beautiful as in the picture. The main thing is that the design is reliable, and small flaws can always be hidden by the original design. Do not be afraid to experiment and create something new, because making a shop with your own hands means adding a special flavor and comfort to your yard, which cannot be given by the same type of factory products.
Benches and benches in the country and in the garden are primarily a place of rest. But just putting up a bench is not interesting. After all, you can create a beautiful corner. In order not just to relax, but to enjoy nature and the fruits of your labor. There are many interesting ideas. Moreover, the simplest designs are often played up, such that any person whose hands grow from their shoulders can make these benches with their own hands.
Photo of original benches (ideas for summer cottages and gardens)
Everyone knows what ordinary benches look like - they have seen it more than once. But the usual - the simplest - something does not want to. Especially if you have already begun the process of decorating the site or are just planning. Why not start from the bench? And there and other decorations will catch up. It's worth just getting started.
In the garden or near the house, I want to have more greenery: beautiful and different flowers. - that's good, but why not combine them with a bench.
What could be easier? Two wooden boxes in which flowers are planted and between them a pair of planed and polished boards. You can put this bench near the wall, and fill a couple of long boards on the wall - there will be a back.
Not everyone likes wooden flower beds: wood requires care, and without it, it quickly loses its appearance. It is especially difficult to care for a tree that comes into contact with the soil. Instead of wooden boxes, there can be, for example, stone or concrete pedestals.

It is very easy to make such a bench in the country with your own hands. You can find ready-made concrete flower beds or do something similar. You can buy a board processed, or you can do it yourself. Instead of a board, there may be half a log - depending on the style in which the site is made out. It is easier to fix the seat with a metal corner. It is attached to concrete with dowels, to wood - with self-tapping screws from below or through bolts.
If someone has large plants in durable flowerpots, you can implement the following idea. In this embodiment, the bench covers the plants. To avoid surprises, flowerpots must be very durable ....

There is a similar version of a bench made of boards and without plants: it may need to be placed on or in. The supports are made up of boards of the same size, and the seat is made of timber.

Bench made of boards - a non-standard option
And another variation on the same theme: hollow building blocks are used as a support. Processed bars are inserted into the holes. This is the bench seat. Just round the edges of the beam, or it will be uncomfortable to sit.

For this garden bench, it is desirable to find large blocks with thick walls. If not, you need to securely fasten the blocks one to the other. The whole task is to fix the blocks first (for example, with studs), and then to them - the bars (with bolts or dowels).
Log benches
If your site is decorated in a rustic or ethno style, the standard approach will not work for you. It is best to use logs in this case - with or without bark - this is your choice.
Seat for a bench made of logs - sawn along the trunk of a large or medium diameter. The back is either a smaller diameter trunk, or just a cut closer to the edge. The legs can also be made from narrow pieces of logs (see the photo below).

Log bench - quick and easy
The legs and seats are interconnected with metal pins: a hole of a slightly smaller diameter is drilled under the pin in both parts. The pin is hammered into one of them, the second part is planted and also hammered, but they are not hitting the pin, but the wood. So that there are no traces, they lay a piece of an unnecessary board and knock on it with a hammer (or sledgehammer). Such a connection should be quite reliable, but to be sure, you can install two or three pins, or you can chop off a little log, making a flat area of the same size on both connected parts. By increasing the area of support, increase the reliability of the seat fastening: after all, the log weighs a lot.

Bench option without back
Another interesting option in the style of "ethno" is presented in the photo above. It is implemented in stone, but you can also make this bench from a log. The seat is a very thick board, the legs are the bulk of the large diameter deck. A groove is cut in the deck for laying the seat. If you have a tool (you can make a cutout with an ax, a grinder or a chainsaw), it's easy to do.
Often in the country you need a desktop. From a log you can make not only a bench, but also a table. A variant of such an ensemble is in the photo. Only the tabletop is made of boards, all other details are logs of different diameters or from half.

A greater degree of processing is inherent in the next bench in the same style. The back, legs, armrests are made of thick and not very thick branches, the seat is made of sanded and processed (peeled and sanded) unedged boards.

Another bench is almost also made. Only boards and branches are located in a different direction and a different view is obtained. A do-it-yourself bench of this type does not require much skill. In this case, the more careless the work is, the more decorative the result.

Wicker back - you will meet infrequently
Around the tree, you can make a platform for relaxation and a bench. The designs are simple, making the flooring is generally simple.

You can add a rest group and. And you can put it above the bench - this is the "progenitor" of the usual arch - one of the types of light gazebos. And so that relaxation is completely complete, you can do, or.
From metal and wood
Few people will put fully metal benches in their country house. They, of course, can be very beautiful, but in the summer they heat up to incredible temperatures, and it gets a little colder - you can’t sit on them, as they are too cold. Benches made of metal and wood are deprived of these shortcomings. The legs and supporting structure are made of metal, and the seat and back (if any) are made of wood. Moreover, there are also interesting benches in modern design.

Rectangles are welded from the profile, jumpers are welded to the side walls, on which the seat boards rest. Simple, stylish, reliable, functional.
In a more advanced form - with armrests, backrest, soft cushions on the seat, this design may look like in the photo. The wide seat turns the bench into a sofa, and cushions add comfort - fabric-covered furniture foam rubber. The tables are made in the same style - a frame made of corrugated pipe and a tabletop made of boards.
One important point: if you are making a seat or tabletop from several adjoining elements, they do not need to be joined back to back. There should be a gap of 3-4 mm between adjacent boards / bars. Wood swells and shrinks. In order for the surface to remain relatively flat during these processes, a gap is needed.

If smoother lines are needed - for families with children - you can bend the pipes and make garden benches and a table with rounded edges. This garden furniture is completely safe. The usual round or professional pipe is bent, leaving on the sides in the shape of the letter "P" with a wide back. The length of this back is the length of the bench. For the table, the dimensions are made a little larger: the legs and the back are longer.

Make two identical blanks on the table and bench. Next, cut the boards of the same length. For a seat about 40 cm, for a tabletop at least 55 cm. They are attached to the pipes with furniture bolts with a flat head. To prevent the caps from sticking out, a hole of a slightly larger diameter is drilled under them.
Board benches
The largest group is benches and benches made of boards. There are designs that are more reminiscent of sofas, especially if you put soft pillows on them - and you can lie down.

Garden furniture in a modern style is easy to assemble: rectangles with partitions made of thinner boards, interconnected.
Even the usual design of a country bench can become exclusive if you approach it with imagination: wooden wheels are used instead of legs and armrests. It turned out to be a designer thing.

A bench made of boards with a back and wheels instead of sides - looks interesting
And the simplest possible one is a board with legs in the form of the letter “X”. Such shops were built centuries ago, you can see them today.

From the boards you can make a bench in a modern style: in the form of the letter "P". With this design, the main task is to ensure rigid fixation of the legs and the seat: the bursting forces are not compensated by anything. In this case, it is important to take a thick board or timber so that it does not sag. You can put the board "on edge": so the rigidity will be greater. To increase reliability, you can install corners from below.

The photo shows a 45° cut. Having a miter box or a circular saw makes it easy to achieve an accurate cut. By precisely docking the workpieces and fastening them, we get an angle of 90 °. If the seat does not bend, it will serve for a long time ...
An interesting and reliable version of the bench is shown in the photo below. The legs are assembled from boards of different lengths: every second one is shorter by the width of the board for the seat. Interesting idea. It is easy to make such a bench: it is important to maintain the dimensions, and everything is connected very simply: with nails into the face of the seat.

original benches
Here, it seems, what else you can think of .. but it turns out, a lot. For example, attach the seat to a large stone.

Make a structure out of bamboo trunks.

Or stone.

Sitting in winter will be unpleasant, but beautiful ...
How to make a bench: photo reports
We will not make benches from stone - not everyone has the equipment, but from different pieces of wood - we can. Let's talk about the manufacture of simple, but unusual designs. So that a bench made with your own hands is a source of pride.
Bench without back
The design is simple, but it looks interesting due to the specific material. For the legs, a bar with rounded edges is used. If you have small logs, you can cut them on the sides. You get almost the same effect. Such material is not so rare, the legs are unusually assembled from it: the bars are laid one on top of the other flat. This adds zest and adds appeal.

This bench without a back has a length of about 120 cm, a width of about 45 cm, a height of 38 cm. You can round the edges of the beam with a cutter, or you can find a similar profiled one. It costs more, but it will be easier to work with it: it is already well processed and connects simply.
Depending on the found section of the beam, calculate the length that you need. Determine how many bars will have to be stacked one on top of the other to get the height you need. In this case, it took 5 bars per leg. Total 45 cm * 5 pcs - 2.25 m. It took 4.5 m of timber for two legs. A board 40 mm thick and 90 mm wide was used on the seat. For the seat you need 5 boards 1.5 meters long. It turned out 1.2 m * 5 pcs = 6 m.
First, we cut and process the boards for the seat. Their edges must be rounded. If there is no grinder or milling cutter, you will have to work with sandpaper, but you can find such a board or arrange at a sawmill to process it for you, and also grind it: there will be much less work. So, we cut the boards of the same length, grind and varnish (with or without tinting - your choice).

Fold the leg bars one near one, aligning their edges. Using a square and a pencil, draw lines where the fasteners will be placed. The distance between the lines is 7-10 cm.

You can take metal pins, or you can make dowels - carved from wood. Holes are drilled under them slightly smaller than the diameter, the depth of the hole is half the length of the pin. Then they are hammered into one part, a second part is pushed into the same hole from above. The connection is reliable, but to be sure, you can add glue, although then the design will turn out to be one-piece.
With a pin connection, the main task is to make holes strictly one above the other, so that the parts mounted on the pin give a smooth edge. We did part of the work - we drew lines where we will drill, now we need to measure the same distance from the edge. Let's create a template for this. We take a piece of plank with a width of about 1.5 cm. At this distance from the edge of the bars, we will drill holes. Having applied it exactly along the edge, we mark the intersections with the applied perpendicular lines.

We will install the pins in a checkerboard pattern, so we will drill holes through one intersection. We also make holes on one bar from different sides in a checkerboard pattern. In a similar way - on the pins - the legs are connected to the seat: two pins for each bar.
Technologically, this type of connection is correct, but it is complex and requires a certain skill. You can do it easier. Fold all the bars one on top of the other, secure with clamps, drill through in two or three sets - in the center and along the edges, connect with a long hairpin, with washers placed under the cap and nut. To the legs of the seat strip assembled in this way, you can nail it on top or try to make a pin connection.

The bench is made by hand. Remaining finishing work
If you nailed the seat, take some wood putty of a suitable color, add some very fine sawdust and stir. Coat the joints with this composition. When dry, smooth with sandpaper. Sand all parts to a smooth finish and coat with lacquer or wood paints for outdoor use (better not covering, but which leave the grain of the wood visible).
How and with what you can paint wood read. It refers to lining, but painting techniques remain the same, and the compositions must be taken for outdoor use.
DIY bench from broken chairs
In any household you can find two old chairs. They should be the same and still strong enough. We disassemble the chairs, leaving the part with the back and legs. We connect the two backs with the help of bars of a suitable section.

For greater rigidity at the bottom, at a distance of about 20 cm from the floor, where the chairs used to also have jumpers, we make another frame with transverse rails. It can be used as a footrest or for storage of any things.

After grinding, we paint the resulting structure. This time the paint should be ordinary: different types of wood can only be painted over with covering paints. Apply with a brush or spray bottle.
The point is small: cut the seat out of thick plywood (thickness 8-10 mm) and cover it with foam rubber and fabric.

Pallet garden chair/bench
Everything is useful in the economy. Even from cargo pallets you can make garden furniture. Moreover, there is no need to disassemble them: we use one for the seat, we will make the back from the second. All you need is well-crafted planks for the armrests and bars for the legs.

In one of the pallets, we strengthen the attachment points by inserting pieces of bars. After inserting, we fasten it with self-tapping screws on one side and on the other.

From a beam with a cross section of at least 100 * 100 mm, we cut four identical segments 80 cm long. We fasten them in those places that have just been reinforced. We leave 20-25 cm on the legs. We fasten with four long self-tapping screws - 150 mm and not shorter.

It is important to maintain verticality and leave the same distance on the legs. Then the seat will stand straight. If there are errors in height, you can try to file, but then you will have to cut from above - so that the armrests are even. So try to screw it straight. Deviations from the vertical can be dealt with only by screwing the leg again.

We attach a second pallet to the rear racks, and on the sides - planks for the armrests.

It remains to cut a piece of furniture foam rubber and cover it with a cloth. You can make pillows for the back. If you are not going to process everything thoroughly, but to make a loft-style chair, go over with sandpaper or a grinder, treating all surfaces to smoothness. You can cover with paint, giving the wood a dark color.

Drawings of benches made of wood


Video lessons
A few videos on how to make benches with your own hands.
One of the attributes of a garden or a recreation area in a suburban area is a bench, sitting on which you can read a book alone or, conversely, spend a few fun hours with friends. How to make an ordinary bench comfortable and at the same time turned into an element of garden decor? The way out is simple - a do-it-yourself bench for a summer residence. Only your own exclusive creation will fully satisfy your personal aesthetic needs.
Before you start sketching or drawing a product, you need to consider the place of its installation. The material of manufacture also depends on this. For example, in an old garden with large branchy trees, a wooden bench in a wrought iron frame looks good (as an option - a log product on a stone base), and in a young garden - a light, even openwork bench in a romantic style.
A small white bench stands out in contrast against a dark green hedge
If it is placed in a quiet secluded corner, near or surrounded by flowering flower beds, it will become a wonderful place of solitude and relaxation, where you can spend a few pleasant minutes alone with yourself after a labor “warm-up” in the beds.

An old brick wall, a gray wood bench and flowers look mysterious and romantic.
Often benches are an integral part of verandas, gazebos, summer picnic areas. In this case, there should be several products designed in the same style. One example is a garden table with two benches on the sides, where you can have a family tea party or play board games on a summer evening.

Deliberately rough and comfortable wooden structure - a table, two benches and an armchair
It is better to install the bench in such a way that it does not offer a view of the neighbor's fence or garage, but of a pond, flower garden or. The surrounding picture should be pleasing to the eye, and not remind you that you need to refuel the car or renew the paint on the gazebo. It is also appropriate to place benches on the playground, by the pool, near the main entrance to the house.

A bench by the pond surrounded by flowers and greenery is a great place to relax and think
One of the best places is in the garden, near the beds. It is better if the bench will stand in the shade, for example, under the spreading crown of a tree or under a canopy, as it is designed to rest from physical labor - digging, weeding, watering or harvesting.

Rest in the shade of a flowering bush is a real pleasure
You can think of a decorative frame: a do-it-yourself garden bench looks good surrounded by low flowering bushes, specially arranged flower beds, on a small hill or on a platform made of natural stone or.
Preparatory work is half the battle
First you need to take a piece of paper and make a sketch or drawing of the proposed product. Even at this stage, questions may arise: what height will be optimal or how many legs should the bench have? There are general standards that should be followed when drawing up a diagram:
- 400 mm - 500 mm - seat height;
- 500 mm - 550 mm - seat width;
- 350 mm - 500 mm - back height.
If you plan to create a product with a back, you should determine for yourself how the back will be attached to the seat. Depending on whether the bench is portable or not, legs are planned: for a non-portable product, they are firmly fixed in the ground.

It is not difficult to fix the legs of the bench: you need to dig holes of the right size and fill them with cement mortar, lowering the wooden parts there
According to the drawing, you can estimate how much material is needed for work. Usually, a product of this kind takes a minimum of financial investment: in the country there are always a lot of wooden blanks left over from the construction of a house or a bath, fasteners (self-tapping screws, nails, bolts, staples), paints and varnishes for wood processing.

If you collect the remains of wooden products and blanks from all over the country, you can come up with an unusual model
There is a utility room and the necessary tools. If the main material for manufacturing is wood, you should prepare: a plane, a saw, a jigsaw, a hammer, sandpaper, a tape measure and a pencil.
Making benches: six simple projects
You will never go wrong by choosing wood for work - soft, malleable in processing and at the same time durable, capable of serving for decades. From wood, you can create elements of various shapes and sizes, curly inserts, voluminous and miniature details.
Project No. 1 - a simple bench with a back
If there are difficulties with drawing up a sketch, you can use the finished drawing of a garden bench.

All parts are cut according to the dimensions on the drawing.
This bench is traditional for city parks, similar specimens can be found at river stations, near theaters or shopping centers - in those places where you have to spend some time waiting. The advantage of this option is the ease of preparation of parts and the speed of assembly. For work, you will need thick bars for support (3 large and 3 smaller), bars or boards for the seat and back.

The color of the parts can be changed using impregnation or varnish of a darker shade.
This model is portable - it can always be rearranged to another, more convenient place. In order for it to always stand level and not sway, when installing the supports, it is necessary to monitor the exact location of the parts - even a slight discrepancy will cause the product to skew.
At the end of the work - and this applies to any wood product located on the street - all wooden parts must be treated with a special impregnation against mold or varnished, which also contains protective components. Treated wood resists moisture, lasts longer and looks like new for a long time.
Project No. 2 - a bench in a classic style
This option is more solid than the previous one. A bench with a rectangular seat and the same back looks great against the backdrop of a house built from any material - wood, brick, stone.

Scheme of assembly of armrests and backs of a bench in a classic style
For a change, you can change the color, choose a shade that is closer to summer cottages. The back of such a bench is a real find for those who like to dream up and translate their ideas into wood. Straight vertical bars can be replaced with crosswise slats.

This bench can easily accommodate several people.
The upper horizontal bar would look good if it was covered with elegant carvings or colorful ornaments. Armrests and legs can also be curly - but it all depends on the desire and skill of the master. To make such a bench for a summer residence, it will take only a few evenings, and you can enjoy your vacation on it for more than one year.
Project number 3 - a table with benches
The garden set for relaxing with the whole family consists of a comfortable table and two fixed benches.

A convenient and practical table with a couple of benches is useful in any country house.
All large parts (table, benches) are assembled separately, and then assembled into a single whole with the help of 4 lower bars - 2 on each side.

Assembly diagram of the whole set
The table is a tabletop with legs set crosswise.

Table assembly diagram
The benches are assembled easily, from bars or boards of various lengths.

Shop assembly scheme
At the last stage, the benches are first fixed - to give the structure stability, then - the table, exactly in the middle.

Initial assembly - connecting benches
Simple in appearance, but comfortable table will become a gathering place for family and friends in the evenings - for communication, evening tea drinking, relaxation.

Such a table with benches can be placed directly on the lawn
You can download more detailed drawings and photos of this project.
Project No. 5 - video master class
Variety of material, shapes and styles
Wood is a traditional, “warm” material for making benches, which is why products made from it are so different. Instead of machined bars, you can take natural material of natural shapes - and we have before us not just a bench, but a real masterpiece.

The original bench is made from large pieces of sawn and processed logs.
It turns out that stone benches also exist, but they are valued rather than for functionality, but for aesthetics. You want to sit on a stone product only in the warm season, but you can constantly admire it.

A small stone bench harmoniously fits into the flower landscape
They look elegant and elegant, but only a professional blacksmith can create a bench for a garden with his own hands from metal.

Wrought iron bench among the violent colors looks more than appropriate
Combined benches and benches look interesting, built of stone and wood or decorated with textile items - capes, pillows.

Small pillows in pink and white, neatly laid out on a bench, make the garden corner cozy and homely.
That's all for today. We hope you found something useful for yourself. If you have any questions or wishes - you are welcome in the comments.
A garden bench is not just ordinary furniture designed for relaxation. With the help of this furniture, you can decorate your backyard, create whole compositions that will fit perfectly into the surrounding space of the garden or yard. It is not difficult to make a garden bench with your own hands, the main thing is to choose the design of the furniture, its location and the material from which it will be made.
Garden bench materials

Plastic
Lightweight plastic furniture has a lot of advantages: it is easy to move from place to place, it is easy to take care of it, it has an affordable price category. You can choose any color option that fits perfectly into the landscape design. Cons of plastic furniture: quickly covered with scratches, fades in the sun, looks cheap.


 Or even a chair. By the way, chair cushions are foam chips in plastic bags. Warm, cozy, extravagant
Wood


This material is ideal for creating furniture: it absorbs heat, looks noble, and is easy to process. For the manufacture of benches, any type of wood is suitable, the main thing is that the material is sufficiently well dried and does not have external defects.


Stone


This natural and beautiful material fits perfectly into any stylistic direction of landscape design. Stone compositions look solid, noble and unusual. But, despite many advantages, natural stone has several disadvantages. Sitting on a stone bench is not very comfortable, and it is not safe for health either. Therefore, together with the bench, it is imperative to make warm covers or pads. Stone compositions are installed permanently, they cannot be moved from place to place.
Metal

Garden benches, made by hot or cold forging, are a real decoration of a garden or a place to relax. The designs look beautiful, stylish, especially if additional decorative elements were used. Metal is most often combined with wood, glass or other material.
Requirements that a garden bench must meet
Convenience

First of all, you need to think about the ergonomic design of furniture for relaxation. It should be comfortable and comfortable. It is best to make furniture with a back on which you can lean back and relax.
Safety

The garden bench must be strong, carefully assembled and withstand heavy loads. For these purposes, it is best to use high-quality materials and accessories.
Resistant to changes in humidity and temperature

Since the furniture is made for the garden or courtyard, the material must withstand all climatic changes without defects and damage.
Prices for garden benches
garden benches

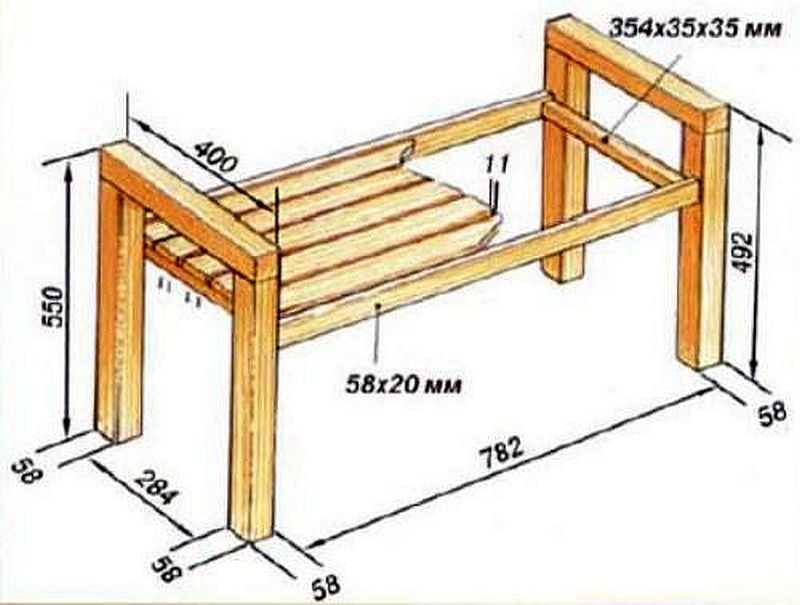
Bench design
The length of the seat and back will be 1500 mm. Three people can comfortably accommodate on this furniture. Seat height - 450 mm, back height - 900 mm. The back is preferably positioned at an angle of 18-20 degrees. The seat width is 400 mm.
Material and tools for making a wooden garden bench
- Wooden boards 1500 by 150 mm, 35-40 mm thick. Three blanks for the seat and two for the back.
- Blanks that act as legs and holders for the backrest - 900 by 150 mm, 35-40 mm thick.
- Blanks for the front legs of the bench - 360 by 150 mm, 35-40 mm thick.
- Beams 40 by 40 mm will be used to reinforce the structure of the bench.
- Self-tapping screws.
- Electric jigsaw for cutting boards.
- Electric planer for grinding the surface of boards and chamfering.
- Screwdriver.
- Sandpaper.
- Lacquer and primer.
Making a wooden structure

Step 1. Boards for the manufacture of benches can be purchased immediately in size, if there are none for sale, the wood will have to be cut into blanks using a jigsaw or a miter saw.


After the wood is cut to the desired length, it must be carefully processed. The blanks for the back and seat need to be sanded. All ends of the boards also need to be processed with an electric planer, it is desirable to give them a rounded shape.

Step 2. The long back legs of the bench, which additionally serve as a frame for the backrest, need to be set to the correct angle of inclination. To do this, you need to mark two wooden blanks with a length of 900 mm.
The first is the height of the bench - 400 mm. This section of the board does not need processing. Starting from the segment, you need to make a cut of 20 degrees along the rest of the board, which forms the angle of inclination of the back of the bench. The cuts on the two rear legs should be the same both in height and in the angle of inclination. Otherwise, the bench will be skewed.

Step 3 The legs are assembled first in the design of the bench. The distance between the front and rear legs is 280 mm. The legs are connected with a beam, which is cut to the entire width of the bench - by 500 mm. It is advisable to do double strapping - top and bottom.
Step 4 After the two sides of the bench are assembled, you can connect them together with boards designed for sitting. The boards are screwed with self-tapping screws to the upper strapping beams. It is desirable that gaps of equal size remain between the wooden blanks - 1-2 cm. These gaps contribute to air circulation and moisture removal.

Step 5 Strengthening the structure of the bench. In order for garden furniture to be stable and durable, it is desirable to strengthen its design. For these purposes, you need to make the lower trim along the legs with the help of beams. Two blanks, having a length of 1500 mm, are screwed to the front and rear legs of the bench. If there is not enough lumber, you can use one cross-beam, which is attached to the bottom rails of the strapping.
Step 6 Bench back assembly. The bench is almost ready, the last touch remains - the fastening of two boards that act as a backrest. The first board is recommended to be fixed at a distance of 200 mm from the seat. The second - at a distance of 380 mm from the seat.
Step 7 Finishing coating of garden furniture. To protect the wood from environmental influences, it is desirable to use varnish. Impregnation will protect the bench from moisture, mold, insect pests.
Lacquer will give the furniture a beautiful and elegant look. To give the wood a shine, you need to thoroughly polish the material, and varnish the blanks several times.

Video - Detailed instructions for making a garden bench


Video - Shop in 6 minutes
Find out some interesting options on how to do it from our new article.
DIY metal garden bench
You can decorate a personal plot not only with wooden furniture. Metal benches are another way to create a cozy and comfortable place to relax. To make a metal frame, it is not necessary to master the technique of hot forging.

 An example of a bench made of metal and wood
 You can apply the technology of cold forging, in which the frame of metal blanks is welded into a single structure. In the manufacture, you can ennoble various decorative elements, unusual inserts and additions.


Tools and materials for the manufacture of a garden bench by cold forging
- Angle grinder with discs for cutting and polishing metal.
- with a set of electrodes.
- Pipe bending device. This can be a mini-machine "Snail" or a bench vise with which you can bend metal according to a template. This device is necessary if a complex shape of the back with rounded edges is planned.
- Square metal pipes (30 mm by 30 mm).
- Decorative elements of hot forging to decorate the structure.
- Seat and back material (wood, MDF, plywood).
- Roulette.
- Level.
- Primer for metal.
- Protective coating for wood.
Step-by-step instruction

It is quite difficult to make a complex and elaborate design of a bench without experience. But to make a simple and durable design can be easily.
Step 1. Develop the dimensions and dimensions of the bench. A standard-sized garden bench has a length of 1500 mm, a width of 400-500 mm, and a back height of 800-900 mm. Corner forms of furniture are the easiest to make, so for the first time it is better to try to make a model simpler with your own hands.

Step 2 Making a frame for a seat. The metal pipe needs to be cut into 4 fragments: 2 by 1500 mm and 2 by 400 mm. All details in a rectangle. To make the seat more durable, you can weld 2 additional stiffeners into the rectangular frame.
Step 3 Leg manufacturing. The metal pipe needs to be cut into 4 identical pieces of 460 mm each. These blanks need to be welded to the corners of the bench. It is recommended to weld additional stiffeners between the front and rear legs.

Step 4 Back making. Two workpieces with a length of 440 mm and one workpiece with a length of 1500 mm must be welded together. Then this design is welded to the already finished part of the bench. The back should be attached at an angle of 15-20 degrees. In this case, sitting on the bench will be comfortable.
Step 5 To make the back of the bench stronger, you can additionally strengthen its frame with stiffeners, transverse or longitudinal.
Step 6 The metal frame of the garden bench is ready. The final work is the cleaning of all welding seams, polishing the metal and coating the frame with a primer.
Step 7 Wooden back and seat. Wooden boards or beams are the most suitable material for finishing a metal bench. The wood for the back and seat must be carefully planed and polished, the chamfers are processed. The tree needs to be cut into blanks that can be mounted both along and across the back and seat. It all depends on the length of the material.

Step 8 Using an electric drill, it is required to drill holes in the metal frame of the bench for mounting the wooden trim of the bench. To connect metal and wood, it is recommended to use bolts with rounded heads and nuts.

Step 9 After the back and seat are bolted to the metal frame, the wood needs to be stained or varnished. This will protect the material from environmental influences.
The bench for the garden is ready. Due to the fact that the metal pipe is hollow inside, the furniture is not very heavy and can be moved from place to place. Well-crafted metal and wood easily tolerate high humidity and temperature changes, so that a hand-made bench will last for many years.

 Garden bench for the prevention of diseases of the spine: side support, back and front leg, armrest, rectangular frame bent at an obtuse angle, wooden seat, wooden back, armrest section with through holes, swivel, side view Side support, rear and front leg, armrest, rectangular frame bent at an obtuse angle, a wooden seat having a width less than the width of the seat contour, and a wooden backrest, spherically curved upwards, an armrest section with through holes, a hinged joint, a wooden seat and backrest in the form of a bar, shifted along the grooves in end positions, side view Wooden seat or backrest attachment, vertical hole and metal plate with hole


 Relaxing on a garden bench is a pleasure
 Video - Making a garden bench from a metal corner
A bench is simply necessary in the country or in the garden. Its main purpose is as a place to relax. He who knows how to work, he must be able to rest. Someone simply sets up a bench, while someone creates an interesting corner, which certainly has a good rest. You can just relax, or you can just enjoy the surrounding nature and the results of your work. There are many ideas worth considering. Of particular interest are ordinary designs that can be repeated by anyone familiar with wood and owning a primitive set of tools.

Everyone can imagine what the most ordinary bench looks like, but not everyone likes simplicity and most opt for original solutions. Everyone wants to have something that is not, for example, a neighbor in the country. Almost all gardeners start with decorating their dacha or garden plot, and there are also many options here. As an option, you can do the design of the site from the installation of a bench, having previously decided on a place of rest. After all, a place of rest is not needed later, it is needed now. Therefore, the design of this place should be taken up at the first stages of the process of decorating a summer cottage or personal plot, and only then proceed to the design of the rest of the territory.
As a rule, summer residents are very keen on growing various green spaces and flowers. Especially, there are a lot of them near buildings. Alternatively, you can combine plantings with a recreation area by installing a bench not far from the cottage. In this case, everything will look organic: green spaces, flower beds, and an original bench.
 Two flower beds made of boards and a bench between them
 There are a lot of options: from the simplest to the most sophisticated. The simplest option may consist of two wooden boxes in which flowers are planted, and two boards built between these boxes. Boards must be planed and well sanded. This design can be placed directly near the wall of the cottage. You can attach a pair of the same planed boards to the wall, which will serve as a kind of back. Instead of wooden boxes, you can install concrete pedestals that can last much longer than wooden elements.

It is very simple to build such a structure, and most importantly quickly. As for the boards, they can be bought ready-made or made to size yourself using unprocessed boards. But in this case, you will have to work hard, but the bench will not cost anything, and the result will certainly please. If concrete flowerpots are used, then the boards can be fixed with metal corners. The only problem is the difficulty of drilling holes in concrete. In no case should a puncher be used, since a flowerpot, even a concrete one, will easily crack, especially if it is made independently.

You can not fasten the boards, but instead of the boards put a huge log, which is not necessary to fasten if you install it correctly.
As mentioned above, there are many options, and they are created on the basis of the real possibilities that the owner of the cottage has. Alternatively, you can simply set up a bench to relax away from flowers and green spaces. After all, it is not a secret for anyone that various insects are hiding in flowers and between the leaves of plants, which do not in any way encourage rest, but, on the contrary, make them leave behind the worst memories of the rest.

Hollow blocks can be used as a bench, into the voids of which processed boards are simply inserted, which can serve as seats.

To make it comfortable to sit, the sharp corners of the blocks should be rounded. Well, if these blocks are heavy and large. If the blocks are small, then they can be fastened with studs into one piece.
log bench
The site can be designed in any style, but almost everyone is moving away from standard approaches to solving the problem. Everyone wants to have something of their own. But not everyone knows that the new is the improved old. As a variant of the new, but somewhat improved old, this is the option of using a log as a bench. As a seat, you can use a log of large diameter, sawn lengthwise. A log of a smaller diameter, also sawn lengthwise, is used as a back. Or a smaller diameter trunk, but cut closer to the edge. Narrow pieces of logs are used as legs.
 Log bench - quick and easy
 Legs and seats are connected to each other with metal pins. Holes of a slightly smaller diameter are drilled under the pins. The pins must fit into the holes with force. At the same time, half of the pin is hammered by blows on the pin, and the second half is driven by blows to the tree. As a rule, they do not hit the tree itself, since traces of the hammer may remain, but with the help of a wooden tip. Such a connection must be reliable, although there are many mounting options.

In the photo, a little higher, you can see another option, in the style of "ethno". Its organization is associated with the presence of a stone, although this option is quite feasible in the presence of a log. A fairly thick log is used as a seat, and part of a large diameter deck is used as legs. In one and the other part of the deck, grooves are cut out for the seat. An ax or grinder is used as a tool. Alternatively, you can resort to using a chainsaw. These are not post-Soviet Friendships or Urals, which have significant weight, and they, perhaps, are convenient for felling pine trees in Siberia. If you adopt the Stihl chainsaw, then with its help you can make not such works of art.
It is also possible to make a table out of logs, which is simply necessary in the country. In the photo you can see the results of such actions. The table top is made of boards, and the rest of the ensemble is made of logs of different diameters.
 Table with benches made of logs
 The next bench, built in this style, has a completely original design. Here, the legs and armrests are made of branches of various thicknesses, and the seat is made of processed, high-quality unedged boards.

Another bench is made in the same style. The only difference is that the boards and branches have the opposite direction. The result is a completely different look. As far as execution is concerned, no special skill is required here. The more careless the end result, the more valuable it is. In any case, this is how others perceive such an approach. Most likely, people are tired of imaginary perfection and they prefer handicraft and primitivism.
 Wicker back - you will meet infrequently
 Alternatively, you can arrange a recreation area around the tree and install a bench.
 Resting place under the tree
 It is not at all difficult if you install a swing and a gazebo nearby. Above the bench itself, it is better to build a pergola that looks like an arch. For a good rest, only a pond, fountain or waterfall is missing.
Benches made of metal and wood
As a rule, no one dared to build a metal bench. In the summer, they can heat up to such temperatures that it makes no sense to talk about rest at all. In the case of a cold snap, the picture is the same. The bench becomes so cold that it is impossible to sit on it. But the benches, where a combination of metal and wood is used, are the most in demand. As a rule, the frame is made of metal, which ensures high reliability of the structure, and the seat and back are made of wood, which provides a certain comfort.
 Bench from a profile pipe
 If the design is improved and soft armrests, soft seats and backs are made, as in the photo, then such a design can compete with the most modern options for rest benches. To make the seats, armrests and backs soft, it is enough to cover the furniture foam rubber with a suitable material. In a similar style, it is possible to build a countertop.
On a note! When using wood, it is desirable to leave gaps of up to 5 mm between individual elements. This is due to the fact that when the humidity of the environment changes, the dimensions of the elements also change.
 Stylish benches made of metal and wood
 In the process of creating a recreation area, care should be taken that there are no sharp corners, especially in metal structures. This is very important if you have children. All elements of the ensemble, such as benches, tables, garden chairs, are made from round and square pipes, bending them so that smooth transitions are obtained.
 Table and bench made of pipes and boards
 The presence of metal allows you to bend structures of any shape, although you can’t do it that easily and you need a special device. The presence of such capabilities allows you to bend structures in one go, without using other tools for this, such as a grinder and a welding machine. The main thing is to think over the design to the smallest detail. If a tree is used, then only well processed. Burrs or chips should not be allowed to be present on the wooden elements.
Board benches
The most popular option is plank benches. There are quite a lot of options. There are even designs similar to sofas. If you put soft pillows on them, then you can lie down.
 This garden bench is more like a sofa: with sufficient dimensions, you can lie down
 Designs of garden furniture, based on a modern approach, are assembled in an elementary way. As a rule, they consist of rectangles with partitions made of thinner wood, interconnected into one.
If you strain and make your imagination work, then from an ordinary shop you can build a work of art if, for example, wooden wheels are installed instead of legs and armrests.
 A bench made of boards with a back and wheels instead of sides - looks interesting
 One of the simplest designs of a country bench consists of one board, to which legs are attached in the form of the letter "X". Similar shops were built by our ancestors, although they can be found today.
 Traditional shop design
 Using a tree, you can build a bench in the form of the letter "P". In this design, it is very important to ensure a secure fastening of the seat and legs. This option involves the use of a thick board or timber for reliability. Alternatively, you can install the board "on edge", for greater rigidity, and for greater reliability, it is recommended to fasten it with metal corners.

This photo shows an option where washed down is carried out at 45 degrees. With the help of a special tool, this is not difficult to do. If all the parts are connected, you get an angle of 90 degrees. If the board is thick and the seat does not sag, then the bench will last quite a long time.
In the photo below you can see another version of an interesting solution, which is characterized by increased reliability. Boards of different lengths are used as legs. The difference in length is the thickness of the board: every second board should be shorter. The structure is connected with nails. Moreover, through one board, the nails are hammered either into the board for sitting or into the board for the legs.
 Bench in modern style
 original solutions
Along with the classical approach to the process of making benches, there is also an original one, although appropriate materials and tools are needed to solve such a problem.
For example, a bench can also be built from a large stone if an appropriate wooden platform is attached to it.
 Bench made of stone and boards
 In the presence of bamboo, a seat is also made from it, which will take on a more exotic look.
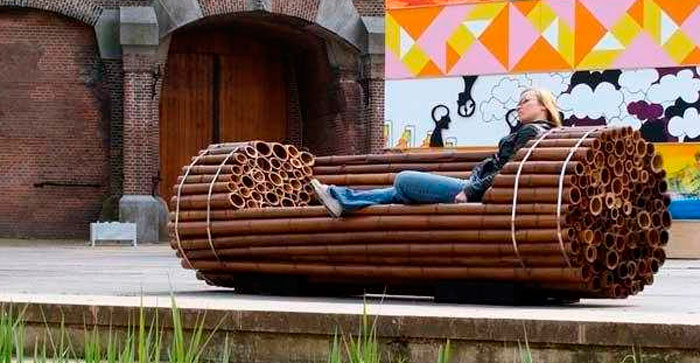 From bamboo, and whole
 Or stone.
 Sitting in winter will be unpleasant, but beautiful ...
 It all depends on the flight of fancy. The real owner does not have unnecessary things or materials in the country. With a reasonable approach, you can attach any thing, and it will not just lie around in the country or lie dead weight in the garage or in the barn.
How to make a bench: photo reports
Naturally, not every owner has a set of tools for making stone benches, but everyone has a minimum set of tools for working with wood, especially since these are very simple and affordable tools. Therefore, it makes sense to consider wood structures. Everything that is done with one's own hands is ultimately a matter of pride.
Bench without back
The design, although simple, has a rather spectacular appearance due to the material used. A bar with rounded edges serves as legs. In extreme cases, such a beam can be prepared independently from round logs of small diameter, trimmed from 4 sides. The result is the same beam. Therefore, there should be no problems with the construction of the bench. The legs of the bench will be made from this material. To do this, lay the cut bars flat (horizontally) one on top of the other. It is this design solution that brings a certain exclusivity to the design.
 A simple shop looks interesting due to the material
 The backless bench is 120 cm long, 45 cm wide and 38 cm high. It is possible to round the edges of the beam in any way. In order not to strain too much, you can already find a ready-made, profiled beam. Although, it will cost a lot more, but working with him is a pleasure.
Depending on the size of the bench, it is not difficult to calculate how much timber is needed. If a bar is taken, with a section of 70x70 mm, then with a height of legs of 380 mm, it is enough to put 5 bars one on top of the other. We consider: 45 cm multiplied by 5 pcs. and get 2.25 m of timber. Since there are 2 legs, the timber will go 2 times more, which means 4.5 meters of timber. A board is taken as a seat, 40 mm thick and 90 mm wide. Given the width of the bench, you will need 5 boards, 1.5 meters long. If you calculate more accurately, you will need 1.2 m x 5 pcs. = 6 m board.
At the first stage, boards are cut according to size. In this case, it is necessary to round off all sharp edges. To do this, you can take a planer or just large sandpaper and carefully process the boards. In order not to do much on your own, there is another option: you can simply negotiate at the sawmill and get a well-crafted board, especially since they have all the possibilities for this. It remains only to take and cover them with varnish.
 Finished boards
 After that, they begin to manufacture the legs, for which the beams are cut into identical segments, 45 cm long, after which they are stacked one on top of the other in 5 pieces. The next step is to connect the legs for stability. In this case, the bars can be fastened with metal pins or with the help of wooden dowels. The distance between the fasteners is 7-10 cm. As a rule, such a connection is made using glue, then the connection is more reliable.
 Lines where pins will be placed
 Pin connection requires precision drilling of holes, otherwise the bars will not be on the same line. For this, it is better to use a template. In addition, the dimensions of the elements of the legs must be the same, then it will be possible to accurately mark the place for drilling the holes. For those who are familiar with drafting, tape measure and pencil, it will not be difficult to get everything right.

The pins should be installed in a checkerboard pattern, so it is necessary to mark with this feature in mind. In the same way, the boards are attached to the legs at the rate of two holes per board.
From a technological point of view, this is not a bad connection option, but it requires a certain skill and experience with wood. The connection step can be simplified if the leg bars are stacked one on top of the other and rigidly connected with a clamp. Then the accuracy of drilling will be ensured. Alternatively, the beams can be connected using long metal studs and nuts with washers. In this case, it is enough to drill through 2-3 holes.
The seats can be nailed to the legs, which greatly simplifies the entire manufacturing technology of such a bench.
 The bench is made by hand. Remaining finishing work
 When using nails, it is desirable to hide the hats, as they will then rust, which is completely undesirable. To do this, the nails are hammered so that the hats hide almost 5 mm deep into the tree; for this, you can use a guide. After that, putty is taken, a little sawdust is added to it so that the color matches, and the recesses are puttied. After complete drying, the places are carefully sanded with sandpaper. So that the place where the nails are hammered does not stand out against the general background, they are covered with a suitable varnish.
The technology for varnishing wooden surfaces is quite simple, especially since it is described in detail in the instructions for use.
Bench for giving from broken chairs
If there are two old chairs and there was not enough imagination to adapt them somewhere, then you can make a bench out of them. Only the same and strong enough will go. If they are loose, then they will have to be repaired. The chairs are dismantled so that the backs and legs remain. After that, two chairs, or rather what is left of them, are installed side by side and connect their backs with the help of slats of the appropriate thickness.
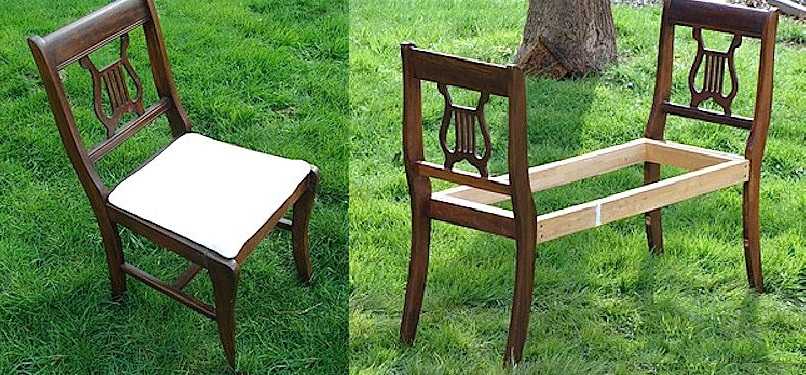 Bench from old chairs
 To make the structure rigid, at a height of 20 cm from the floor, the structure is connected with the same rails around the entire perimeter. Subsequently, these slats will serve as a footrest, and if the bottom is sewn up, for example, with plywood, then you can store some things here.
 We paint the made structure
 After the structure is reinforced and sanded, it can be painted. In this case, ordinary paint is suitable, which can hide some of the flaws in the whole structure, and especially in old chairs. It remains only to cut a sheet of plywood, lay foam rubber on it and cover it with some kind of fabric. At the same time, one should take into account the fact that the bench will mainly stand on the street until the very cold weather. Therefore, it is better to opt for, for example, leatherette. In any case, the material must be moisture resistant.
 Finished bench from strands
 Pallet Garden Bench Chair
For a reasonable owner, any material has its own value. Garden furniture can be easily made from cargo pallets. Moreover, it is not particularly necessary to disassemble them: a back is made from one pallet, and a seat is made from the other. It remains only to think about what to make the armrests and legs from.
 Here's what should happen
 One of the pallets is reinforced with additional bars, which are fastened with self-tapping screws.
 Strengthening the corners of the pallet
 After that, a timber is taken, with dimensions of 100x100 mm and an arbitrary length, after which 4 identical segments are cut off, up to 80 cm long. They are attached in those places where the reinforcement bars, set in advance, are located. As a result, there will be enough legs, 20-25 cm long. For fastening, self-tapping screws are used, at least 150 mm long. In the process of work, it is necessary to make sure that the bars are screwed correctly so that the legs of the same length can be installed.
 Attaching the legs for the armrests
 If after these steps it is not possible to obtain an absolutely even structure, then the legs can be filed at the end if the bench does not settle evenly.
 The legs are screwed
 The second pallet is attached to the rear pillars, and on both sides there are planks for the armrests.
 Almost done
 If there are no such plans, then you can simply carefully process the wooden elements with sandpaper, after which the bench is simply painted with any paint, any color.
 Finished product: pallet chair
 Working drawings of wooden benches