How to upholster an old armchair. The advantages of self-restoration of the chair, the order of work. Properties that upholstery fabric should have
Self-upholstery of upholstered furniture is not as simple a task as it might seem at first glance. To make the updated chair look modern, stylish and appropriate, you need to study the technology and strictly follow the instructions.
If the upholstery on the old chair has become unusable, do not rush to throw it away, just drag it with a new fabric.
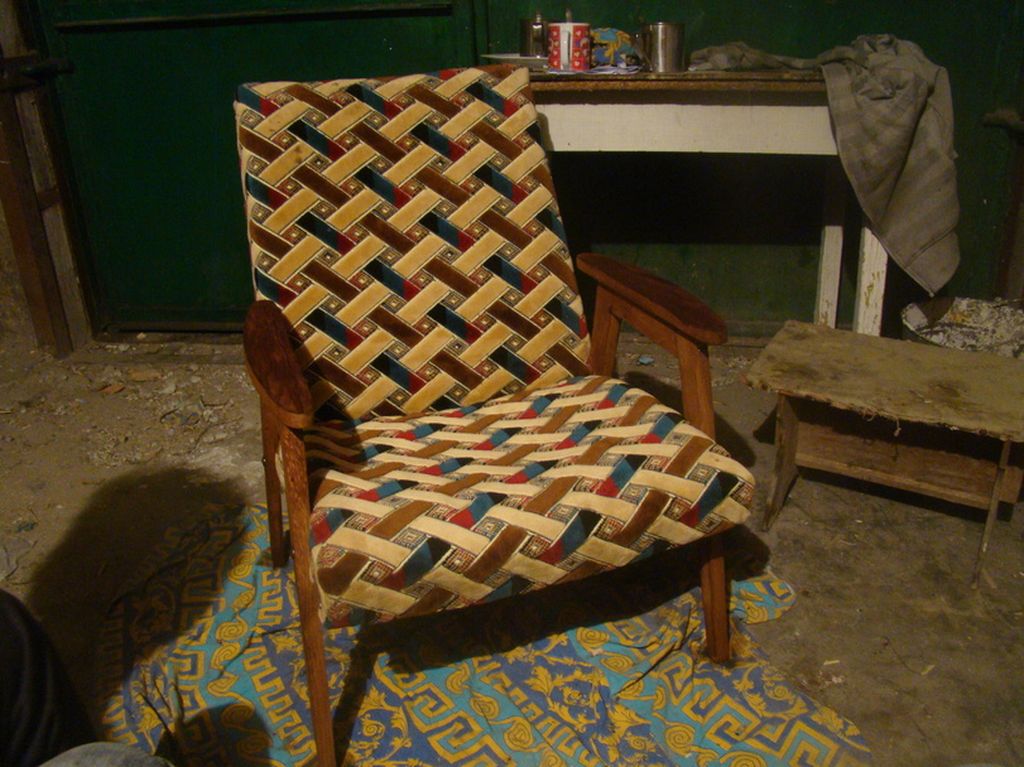
In order for the restoration to be successful, you need to take into account all the subtleties, only with a thorough approach to business, the updated furniture will look good. This scheme of work can be used to update any upholstered furniture. But if a worn-out sofa or chair has a complex shape, it is better to turn to professionals (Fig. 1).
Preparatory work
For the upholstery of the chair, you will need not only materials and tools, you must also have sufficient sewing skills and perseverance. Do not ignore the preparatory stage, otherwise difficulties may arise at the most inopportune moment.
For a successful stretch you will need:
- screwdriver;
- pliers;
- anti-stapler;
- furniture fabric;
- foam rubber;
- synthetic winterizer;
- strong threads;
- scissors, needles, pins;
- sewing machine;
- stapler with staples.

Figure 1. Diagram of the chair.
If the chair has wood details, you will additionally need sandpaper, stain or furniture varnish.
First of all, you need to photograph the furniture from different angles. This will greatly simplify the assembly process and avoid incidents. After the subject of alteration is imprinted, you can proceed to the next step.
The chair needs to be taken apart. Remove all decorative items and pillows. If you make a surface constriction and leave the wooden parts in a worn form, the overall impression will be hopelessly spoiled.
Next, you need to very carefully remove the old upholstery. It is important not to damage the fabric, as it will act as a pattern. You can use an anti-stapler, a screwdriver and any other tools with a flat edge for these works. After the fabric is removed, you need to measure it and calculate how much fabric you need to sew a new upholstery. It is important to take into account the stock of material for folds and tucks.
It is necessary to assess the condition of the soft part of the chair. If the foam shows signs of dirt and wear, it should be replaced. It is better to do it right away so that in a few years the updated chair will not surprise you with a change in shape.

Figure 2. Fabrics such as tapestry, jacquard, gunny, velor, chenille are suitable for upholstery.
After that, you can go to the store for consumables. For work, you need foam rubber 3-5 cm thick, standard or increased rigidity. Such a sealant is used for the production of furniture, and it can be purchased in specialized stores. You will need upholstery material, it is better to choose a fabric labeled "furniture". Tapestry, jacquard, matting, velor, chenille are suitable for finishing upholstered furniture (Fig. 2). When buying, you need to take into account the stock of material. The presence of a pattern on the fabric will increase the consumption by about 1-2 steps of repetition of the elements of the image. And, of course, threads of a suitable shade must be taken durable, designed to work with furniture. Reinforced threads 45-70 LL are suitable (lavsan is an analogue of polyester).
Intermediate stage of restoration
After all the tools and materials are prepared, you can proceed with the restoration.
The first step is to update the armrests, legs and all wooden elements. They must be carefully processed with sandpaper, covered with stain or varnish and left to dry.

Figure 3. Carefully remove the old upholstery from the chair and detach all parts to further create a new pattern.
Next, you can proceed to the manufacture of new upholstery. The old one, if this has not been done before, needs to be torn open, trying not to damage the fabric. Each detail must be numbered and set aside. After that, you need to mark and cut out the new upholstery (Fig. 3).
It is best to do this on the floor. Marks are applied using a special marker, chalk or a simple pencil. Cutting is more convenient with large sharp scissors. After all the details are cut out, you need to process the sections so that the fabric does not bloom. The easiest way is to hem it using the double hem method or lightly singe over an open fire. When choosing the second method, you need to act very carefully, checking the reaction of the material on unnecessary trimming.
After that, you need to sew all the details of the new upholstery on a sewing machine. It is better to “try on” a new cover several times than to redo everything.
After the upholstery is ready, you can proceed to the main part of the work on the restoration of the chair.
Padding and assembly
You need to drag the chair in stages in disassembled form. For example, first cover the seat, then the back and small parts.
Lay the frame of the part in front of you, place foam rubber on it. The edges of the softening layer may protrude slightly beyond the frame: this will soften the ribs and make it more comfortable to use the updated furniture. If thick and dense foam rubber is purchased, the corners can be cut off by making the transitions rounded.

Figure 4. An example before and after the reupholstering of the chair.
The synthetic winterizer layer will protect the foam rubber from displacement and greatly simplify the process of installing a new upholstery. This non-woven material must be placed on top of the foam rubber and fixed to the base with a stapler.
Then you can go directly to the upholstery. The fabric part must be applied to the base, carefully straightened. You need to start fastening according to the scheme, this will avoid displacement and skew of the material. First, using 4 staples, fasten the fabric to the ribs, approximately in the middle. Further, proportionally, pulling the fabric, fasten with staples. For example, 2 - on one side, 2 - on the opposite side, and so on.
It is important that the material does not sag, but also does not stretch unnecessarily. Constant control will fit the chair with high quality.
After the last bracket is fixed, you can proceed to the hauling of the next part. To make the updated chair look presentable from all sides, the back can be covered with lining fabric, also securing it with staples.
After constricting the last soft part, you can start assembling. It is at this stage that a detailed photo of the furniture will come in handy. Remember how you disassembled the chair, and repeat all the steps in reverse order. All screws and fasteners must be tightened. If the chair is on wheels, it makes sense to replace them with modern bearing ones.
If all the steps were carried out correctly, you should see a beautiful updated chair (Fig. 4).
The ability to fit a chair with your own hands is a very useful skill. It is worth one day to spend time and effort on studying the technology, and tomorrow you will be able to update the interior of your house or cottage on your own and without significant expenses.
In the article I will consider the conditions and possible options for the restoration and alteration of the Soviet armchair. I will tell you about the features that must be considered when restoring old furniture. I will write down the requirements for the necessary materials and tools. I will consider the types of reworking an old chair, and provide original ideas for updating furniture.
The main features of the restoration of the old chair
The process of restoring damaged furniture is not a partial restoration of parts, or the replacement of upholstery, it is giving a new look to an old chair, an opportunity to refresh. Alteration is carried out in the case when the legs stagger, the upholstery is erased, the springs stick out, or the structure is loosened.
A feature in the process of restoration is that it is quite difficult to produce it on your own, so this business is entrusted to professionals.
You can partially redo and restore upholstered furniture on your own:
- dismantle the upholstery;
- make a constriction;
- repair or replace legs.
It is worth trying to restore furniture with your own hands with sufficient experience in furniture repair or with a lack of money for high-quality material.
Of the minuses of the restoration, one can only note the lack of professionalism in the restoration business.
Advantages of restoration at home:
- cost savings;
- the value of the interior item increases;
- the interior is refreshed.
Necessary materials and tools
First you need to pick up a set of tools and materials.
You can use a standard set of tools, and a set of brushes and paints for a painter. Not available tools are purchased according to the recommendations of the master, so as not to harm the details during work. Furniture made of pure wood is afraid of floors, so it can dry out.

Required materials and tools:
- chisel, spatula;
- hammer, screwdriver;
- stationery knife, wood glue;
- set of brushes, roller;
- acrylic paints, water-repellent varnish;
- grinding machine, foam rubber;
- stapler, sandpaper, new springs;
- screwdriver, awl, large needles with silk threads.
The main types of alteration and materials
The restoration of upholstered furniture, as well as the restoration of an old chest of drawers, is divided into types that can be combined.
Padding
This method does not affect the restoration of the frame. Here the upholstery fabric is pulled. It is attached either to the old coating, which is not recommended by the masters, but this makes the chair voluminous. Or change the coating along with the filler.

High quality and durable fabrics
- velor, velveteen;
- eco-leather, jacquard;
- flock, tapestry;
- microfiber, chenille.
For the inner upholstery of the filling, a dense crinoline is suitable. The density and elasticity of the material will not allow foam rubber and springs to stick into the upper upholstery.
The stretch is done like this:
- parse armchairs, even if it contains wooden handles or a back;

- unscrew the bolts that fasten the legs to the frame;
- remove the armrests, disassemble the bottom;

- remove upholstery from the seat, armrests, back;
- the old upholstery is applied to the new fabric, the details are cut out according to the exact parameters;
- foam rubber is cut according to the parameters of the bottom with an addition of 2-3 cm;
- springs are attached to the bottom, then the filler, the structure is fixed with internal upholstery;

- armrests sheathed with foam rubber and inner fabric, the back is restored as its bottom;
- the details of the cross are attached to the frame, lined with outer fabric.

The constriction is made for a soft version. Furniture with the presence of wooden parts is subject to complete repair.
Upholstery
Restoration method for a chair with a rigid base. It looks like furniture with clear geometric lines, upholstered in dense fabric with dense foam rubber inside.
Recovery requires:
- remove the top lining;
- remove the filler and its fasteners;
- new parts are cut out on old parts;
- the structure is checked for looseness, the damaged frame is replaced or restored;
- the filler is fixed to the new base with a stapler, then the upper upholstery.
This method of restoration is suitable for armchairs with a solid wooden base.

Repair
General view of the restoration work. Combines the process of upholstery, upholstery and complete replacement of the base. The design is checked for damage, the legs are replaced, a metal mount is added for strength.
Restore the surface with paints, varnishes, additional tools. This method of restoration is quite complicated, the chair is given to the work of masters.
What accessories may be needed
When restoring office chairs or models with movable wheels, casters or crosses are needed. In order not to injure the surface of the laminate or parquet, purchase sets of rollers with a mechanical lock.


Complete overhaul:

The master can update the chair more qualitatively, but it is possible to restore it yourself. It is necessary to choose high-quality upholstery material. Restore the appearance of furniture to match the interior of the room. Then there will be no need to purchase new furniture.
Surely in every house there is old furniture, which is both a pity to throw away and difficult to update. Of course, if this furniture is very bulky or is only a miserable remnant of furniture, then it would be better to part with it. But in the case when it just doesn't look good and is a little broken, you can try to work with it.
Do not rush to take the broken chair to the trash, if the breakdown is not very serious or the upholstery is simply worn out, you can repair the old chair yourself.
Now we will talk about the repair of an old Soviet-style armchair with wooden armrests. Repairing such a piece of furniture is quite easy on your own, since chairs are also repaired in a similar way, and you do not have to spend a lot of money on materials, and even more so on work. And the process will not take much time and will be very exciting.
Tools and materials

The old upholstery is carefully cut off with a clerical knife, then it will serve as a pattern for the new upholstery.
Before embarking on repairs, you must immediately prepare materials and tools. Some instruments can be borrowed if the funds do not allow you to buy them. So, to repair the chair with your own hands, you will need:
- wood glue for wood;
- stain and varnish of the desired shade for the legs and armrests;
- brushes;
- thick foam for seat and back decoration;
- wooden boards;
- furniture stapler;
- pencil and tape measure for marking;
- Sander;
- screwdriver, hammer and nails;
- self-tapping screws;
- cotton fabric;
- scissors are large;
- putty on wood;
- sandpaper;
- upholstery fabric.
When preparing the material, keep in mind that it is better to take a fabric that is dense and does not fall apart. And all additional wooden parts must be pre-treated with impregnation against the fungus and dried thoroughly. Then you can start repairing.
Back to index
Disassembly and preparation

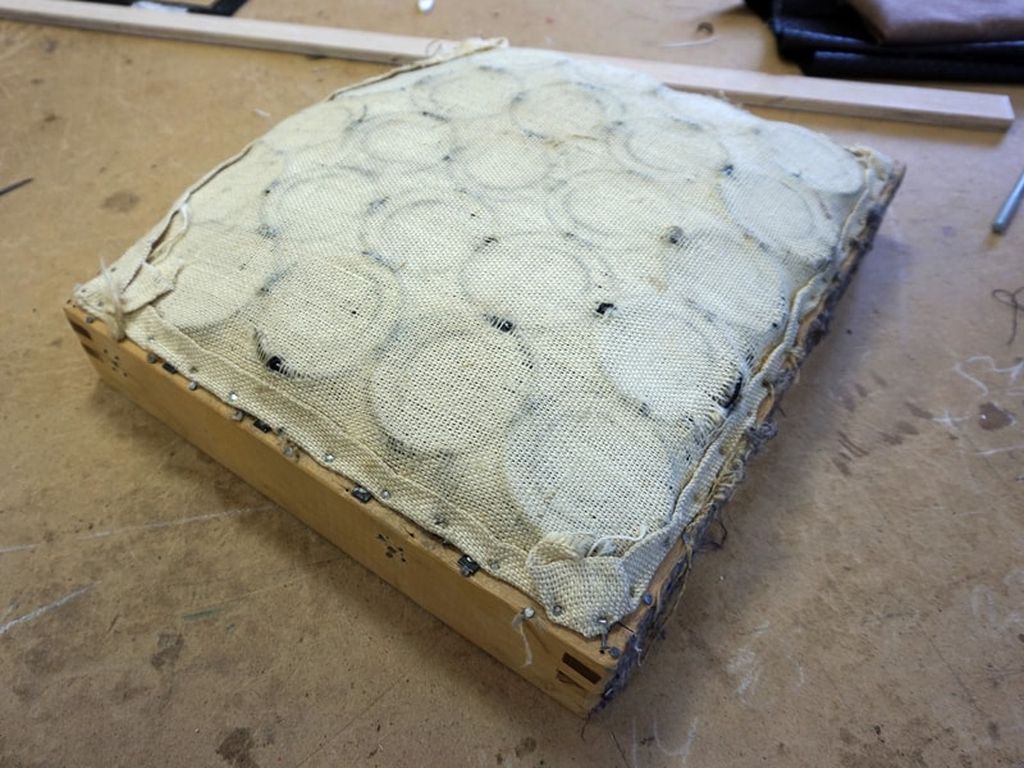
The foam rubber is cut out along the contour of the seat with a margin, glue is applied along the edges and the foam rubber is stretched.
To begin with, the entire chair must be disassembled into armrests, backrest, seat and backrest. This is easy to do if you first completely free the chair from the upholstery and soft filler. After that, using a screwdriver (chisel), all the bolts are unscrewed and the chair is disassembled into parts. This will make restoration much easier.
Now we are going to repair. First of all, the wooden parts must be considered: if they have cracks or chips, you need to fix everything. Minor defects are removed with putty or ordinary wood glue. But if the parts are very damaged, you can replace them or line them with new boards that are cut clearly to the same size.
When the glue or putty is dry, start sanding. This process is carried out using fine or coarse sandpaper. The exact texture depends on the fibers of the wood: the thicker they are, the rougher the paper should be. You need to sand carefully so that the surface of the tree becomes as smooth as possible. Putty places also need to be worked out with such a sandpaper. If sanding is not enough, you can use a grinder.
When it is ready, you need to clean all wooden parts from dust with a dry rag and cover with stain. When it is absorbed (this is about 7 hours), it will be possible to varnish the tree. To achieve maximum naturalness, make the varnish layer thin. This will be enough to protect the tree. You need to wait about 3 days for it to dry (ideally).
Back to index
Assembly of the frame and installation of the filler

The new upholstery fabric is stretched and fixed with a furniture stapler on the back of the seat.
Now your task is to reconnect all the parts of the frame with each other. This is easy to do with self-tapping screws in the same places where the connections were before. Just additionally fix the screws with carpentry glue - it will be more reliable. Immediately check the evenness and strength of the joints and, if necessary, knock everything out with a hammer.
Now you need to replace or tighten the furniture straps from the bottom of the seat. They are pulled crosswise with maximum force. They are fixed with special nails. Then the bottom of the chair over the belts is covered with a durable fabric that will protect the belts from premature wear. The fabric is also stretched and fixed with small nails and furniture staples.
The next step is to work with the filler. First, an ordinary cotton fabric is stretched and fastened to the seat and backs with brackets, and foam rubber is already glued to it and additionally fixed with brackets. It is pre-marked and cut out. Try to cut the foam a little with a margin. Glue it carefully. In this case, the glue is applied clearly along the edges with a thin layer, paying special attention to the corners. In no case do not apply it in the middle. The front part of the foam on the seat and on the back should be larger and slightly curved in order to sit comfortably.
There can be a great many reasons to update old chairs or decorate new ones with your own hands. This is the need to adapt furniture to the interior, the desire to correct design flaws, restore chairs inherited from the grandmother or found for nothing at the flea market. In this article, we will talk about 4 ways to transform your “four-legged friends” (including office and garden chairs) beyond recognition, and also present 70 cool photo rework ideas.
Method 1. Painting a chair
Even the most old-fashioned or just ordinary chair, say, a "Viennese" wooden, plastic, folding or office chair, can be transformed with the help of staining. The main thing here is to choose the right color. Here are some inspiring examples where color alone saved furniture from landfill.


Old Viennese chair before and after renovation

A few more examples of reworking the most common bent beech Viennese chairs, which can be found in almost every house or cottage.

And here are some cool ideas for painting stools.

Inspired? Then let's get down to practice!
To paint a chair you will need:
- Acrylic paint, and preferably chalk paint in one or more colors;
- Synthetic flat brushes (separately for primer, paint and varnish);
- Protective gloves (it is better to buy at a pharmacy);
- Primer for wood / metal (depending on the frame material);
- Wax or matte varnish (polyurethane or acrylic);
- Sandpaper of medium and fine grain.
How to paint a chair with your own hands:
- Prepare the chair for painting: wash it to remove coarse dirt and dust, then sand it with medium-grit sandpaper to remove the top layer of old varnish or paint. The surface should be slightly rough.

- If you want to update a metal chair, then it is not necessary to sand it (although it is still safer to sand the top gloss), but before priming / painting, the frame must be degreased with white spirit.
- Also, you can avoid the tedious sanding step if you use chalk paint, but you can’t do without a primer.
- If your stool is varnished, it can be removed with a special varnish remover.
- If the chair has damage, such as scratches, chips and cracks, putty them with furniture putty.

- Wipe the chair from dust, wait for it to dry and apply a primer on the entire frame in two layers, allowing each layer to dry for about a day. Between coats, it is advisable to sand the primer with fine-grained sandpaper (No. 220 is suitable).
- Take a new brush and paint the chair in 2-3 coats, letting each coat dry completely. Make sure that the paint does not form smudges.

- If you want to paint a chair with a scuffed effect, then first some places (for example, the edges of the seat, back and armrests) need to be painted with a dark paint, say dark gray or dark blue, and then waxed over them. Next, you should paint the chair with the main paint in 2-3 layers. And, finally, having slightly worked with a fine-grained sandpaper, expose the dark “substrate”.

- Do you want to achieve the effect of the perfect factory painting? Then be patient: each layer of primer and paint (with the exception of the finish layers) will have to be sanded with fine-grained sandpaper. So the coating will turn out to be as even and reliable as possible.
- To paint only certain parts or parts of the chair, use masking tape.
- Treat the chair with wax or matte varnish. Voila, your "four-legged friend" has found a new life!
Helpful Hints:
- Don't know what color to paint the chair? You can't go wrong if you paint it white, because this color is the most versatile, goes well with any bright upholstery;
- Before staining, stucco decor can be glued to the back of the chair using wood glue;
- Achieve the effect of a very old and dirty chair in Provence style, you can use dark brown wax;
- Chalk paint is a relatively new type of paint that is not yet commercially available. However, we recommend using it, because due to its density, increased adhesive properties and super-fast drying (in 30 minutes), it saves a lot of time and effort. In Russia, you can buy chalk paints from designer Daria Geyler, and in Kazakhstan - at Vernenskaya Manufactory. Also, you can always order paints from foreign manufacturers - Annie Sloan and Rustoleum.
It’s better to figure out how to paint an old chair with your own hands this video master class will help you.
Method 2. Seat upholstery
Most often, if the chair has a soft seat, then painting the frame is not enough to completely update it - you need to change the upholstery. Here are some photo examples of how upholstering a seat can turn an old chair into a stylish piece of decor.


Office chair before and after painting, reupholstering the back and seat
By the way, if your chair or stool does not have a soft seat, then you can make it yourself: first, cut out the MDF base exactly in the shape of the seat, then follow our master class, upholster it and, finally, screw it onto the chair frame with screws.

To make a soft seat for a stool, it is enough to glue the foam rubber directly onto the base, and then cover it with a cloth, hammering the stapler staples onto the inside of the seat.

Upholstered stool

For work you will need:
- Anti-stapler (or its alternative);
- Furniture stapler and staples with a height not exceeding the thickness of the seat base;
- Textile;
- Foam rubber about 4 cm thick;
- Batting or synthetic winterizer;
- Scissors;
- Knife-serreytor for bread (with teeth);
- Screwdriver.
How to reupholster a chair with your own hands:
- First we need to remove the seat from the chair frame with a nail puller or a screwdriver.
- We remove the old upholstery with an anti-stapler and remove the filler if it is dilapidated (if it is in good condition, then it can be reused). Next, wipe the base of the seat from dust and dirt.
- If the wooden base of the seat seems too old and unreliable to you, use it as a template to cut a new seat out of plywood.
- We put the seat on the foam rubber, trace its outline and cut it out.

- We cut the fabric and batting in such a size that they can wrap all sides of the seat (along with foam rubber), leaving 10-15 cm free. These surpluses are needed to make it more convenient to stretch the material.
- So, we got four blanks: base, foam rubber, batting / synthetic winterizer and fabric. Now we need to put it all in a sandwich. First of all, we spread the batting, put foam rubber on it, and on the foam rubber - the base of the seat with the wrong side up. Next, we simply bend the edges of the batting onto the seat and, slightly pulling the material, fix it with a stapler. The corners of the batting can be cut off, or you can simply bend and fasten in the same way.

How to restore a chair seat
- After all the batting is attached to the seat, trim off the excess.

- If desired, the foam rubber can be pre-glued to the base or stitched around the perimeter with a stapler, retreating 5 mm from the edge of the seat.
- The most crucial moment has come - the stage of reupholstering the seat with a cloth. Spread the fabric inside out and place the seat on it. Next, fold the edges of the fabric along one of the sides and fix with a stapler. Now stretch the fabric slightly over the opposite side of the seat and fix it with a stapler in the same way.

Repeat the procedure on the remaining two sides and proceed to the design of the corners - they need to be wrapped as shown in the photo below.

Chair after restoration
- We return the seat to its place and fix it with "native" fasteners.

Helpful Hints:
- The upholstered seat of the chair can be additionally decorated with furniture carnations around the perimeter.
- Upholstery fabric should be selected in accordance with the style of the chair. So, for example, a traditional jacquard fabric is not suitable for a modern chair, and a classic chair with an elegant back is unlikely to “make friends” with a fabric with a new-fashioned geometric print.
- The same fabric from which your curtains are sewn is ideal for upholstery of a chair. In the interior, such a coincidence will look very harmonious.
- The print on the fabric may overlap with the carved crossbars as shown in the photo below.

For a more visual master class of upholstery of an old chair seat, see this video.
Method 3. Decoupage of a chair with paper
Do you want to decorate a chair with a cool print or cover up minor defects like scratches and stains with drawings? This can be done using the decoupage technique.

chair decoupage idea

chair decoupage idea


chair decoupage idea

chair decoupage idea


You will need:
- Any paper with the desired print, for example, it can be multilayer napkins, pages from magazines and books, maps, posters, wallpapers, etc.;
- PVA glue;
- Brushes 2 pcs (for applying glue and varnish);
- Scissors;
- Transparent matt varnish acrylic or polyurethane;
- Water (if necessary);
- Roller for working with large formats.
How to update decoupage chairs:
Step 1. Clean the chair from dirt and stains, paint if necessary, following the first instruction in the article.
Step 2. Cut out the fragment that you need from the selected polygraphy. The workpiece can be either large (for example, in the shape of the seat and back) or very small.
- If you are using napkins, then first you need to separate the top layer with a pattern and only then cut it out.
- If you want to cover the whole chair, including the legs, the paper needs to be randomly torn into small pieces of about 10x10 cm, as shown in the next photo slider.
![]()
- To decoupage the back and seat, they must be removed from the chair frame with a screwdriver, and then used as a template for cutting the workpiece (see photo below).

Step 3 Lubricate the place you want to decorate with PVA glue liberally and attach your drawing to it, then smooth with a brush with the remaining glue, releasing all air bubbles and smoothing out the wrinkles.

- If the cut out print is small, then it is better to grease not the chair, but the reverse side of the workpiece itself with glue.
- If the paper is very dense, then it needs to be moistened a little in water - so it will become more plastic.

- A top layer of adhesive is not required but is often desirable (it should be thin anyway).
Step 4. Repeat step 3 with other parts of the chair and leave the glue to dry for about a day.
Step 5. Coat the decorated areas or the entire chair with 4 coats of clear lacquer, allowing each coat to dry completely. Ready!

Method 4. Decoupage of a chair with a cloth
It would seem, how else can you radically modify the chair with your own hands, except by painting. In fact, there is another cool way - decoupage with a cloth.
- A chair updated in this way will last a surprisingly long time even under heavy loads. And if individual threads are knocked out of the fabric along the edges of the chair, you can simply cut them off and process them with a layer of PVA glue.

Decoupage idea for an old chair
You will need:
- Textile;
- Wooden chair;
- PVA glue or special glue for decoupage;
- Sharp clerical or dummy knife;
- Brush for applying glue.
How to update a decoupage chair:
Step 1. Using a screwdriver, remove the back and seat from the chair. If you want to paint the chair, do so before taking it apart.
Step 2. Spread the fabric on a flat surface, put the seat on it and circle it along the contour, stepping back about 2.5 cm from the edge, then cut out the blank.

Step 3 Coat the outside of your seat with PVA glue, then place the fabric over it and smooth it out. Once the fabric is leveled, coat it with PVA glue and leave to dry overnight.

Step 4 When the fabric is dry, make sure it is completely stiff. Next, cut off the excess fabric with a sharp knife exactly along the edges of the seat.

Step 5. Now again treat the perimeter of the seat with PVA glue to prevent wear at the edges.
STEP 6. Repeat steps 2-5 with the back of the chair and other details you want to decorate and finally put the chair back together. The main condition for the successful restoration of the chair is that the pattern must exactly repeat the shape of the surface to be decorated.

Here are some more photo ideas for decorating a chair with fabric.

Decoupage of an office chair with a fabric with additional protection with polyurethane varnish

Decoupage ideas for stools


One of the easiest and most unexpected ways to update an old chair is to repaint its upholstery. This option will help if the upholstery is not damaged, but, for example, you need to hide stains or just want to change its color. You can repaint the upholstery using paint from a spray can or from a can. Choose a universal paint or acrylic for fabric, and before painting, you can put a layer of a special primer. You can find paint and primer in construction, art and craft stores. The bonus of such an alteration is that the upholstery treated with paint acquires not only a new color, but also water-repellent properties, and stains from it can most often simply be removed with a damp cloth.
You will need:
Fabric paint;
A large brush for covering wide surfaces and a small brush that is more convenient to paint over the edges;
- a container for mixing paint;
Spray bottle with water;
If desired, masking tape can be used to protect the wooden parts of the chair from getting paint on them, and the primer can be dispensed with without it).
1. First, remove the cushions from the chair. Clean out all the dust, wipe the upholstery with a damp cloth, if there are significant greasy stains, it is better to treat them with a stain remover so that they do not prevent the paint from lying flat.

2. If you want, prime the surface of the chair. You can do without it. In this case, first soak the upholstery with water by spraying it with a spray bottle. Don't forget the seat cushion(s). Before the upholstery is dry, dilute some paint with water in a 1:1 ratio and saturate the upholstery with this mixture. This step is especially important if your chair is upholstered in thick fabric. Before painting, you can protect the wooden parts of the chair with masking tape.

3. When the first layer is completely dry, you can proceed to the second. This time paint the chair undiluted. Carefully go over the brush in all corners, painting over all the necessary areas of the upholstery.


5. If you wish, you can decorate the finished chair with decor by putting it on glue. Ready!


More upholstery chair ideas:


2. How to drag a chair: a master class

This method is, of course, more difficult than repainting. However, by reupholstering, you can almost completely update the old chair, getting rid of holes and scuffs and getting an almost new item for your interior.
You will need:
Hauling fabric (choose a strong, dense fabric);
Scissors;
Sewing machine and thread;
Furniture stapler and staples to it;
Glue gun;
Braid for decoration;
Screwdriver to remove the staples from the upholstery of the old chair.
1. Using a screwdriver, carefully remove the staples holding the upholstery to the chair. The removed parts will serve as patterns for new upholstery parts of the same type. You can remove not all the upholstery or, if desired, not remove it at all. Then you will have to take measurements from the chair and build patterns for new upholstery parts.

Photo: awesomesauceasshattery.com
2. Cut out new fabric upholstery details, not forgetting at least 2 cm allowances. Start shooting them to the chair with a furniture stapler, as shown in the photo.


Photo: awesomesauceasshattery.com
3. The piece for the back of the chair back may need to be constructed from several pieces to fit well on the chair. After sewing it, attach the part with a stapler to the back, bending the edges of the fabric.

Photo: awesomesauceasshattery.com
4. Tape and a glue gun will help to hide the attachment points of the part of the back of the back.


Photo: awesomesauceasshattery.com
5. Finish off by sewing a new chair cushion cover.

Photo: awesomesauceasshattery.com
More upholstered chair ideas:


Photo: fourgenerationsoneroof.com


Photo: lovelylittlelife-hannah.blogspot.com

3. How to restore an old "grandmother's" chair: a master class
Such chairs a few decades ago were in almost every Soviet apartment, and in some houses and dachas they have survived to this day. By the way, today such "grandmother's" chairs, like other items of Soviet design, are back in fashion. No wonder: the design of such a chair is simple and durable, it is comfortable, elegant and concise. In order for an old piece of furniture to decorate your interior, the chair needs to be restored.
Work technology:
1. Remove the wooden parts of the legs and armrests, clean them of old varnish, if necessary, glue and cover with several layers of new varnish.
2. Carefully remove the old upholstery fabric. If necessary, replace the foam by attaching it with a furniture stapler.
3. Using the old upholstery pieces, cut out new ones and attach them to the chair with a furniture stapler.
4. Screw the details of the legs and armrests.
Ideas for reworking the "grandmother's" chair:
