How to make a crepe paper collage. DIY collage in vintage style. fabric collage
This dog is made using paper appliqué technique. Her graphic image is composed as a collage of cut squares of colored paper and magazine pages. This great work was done by Nina Boesch from New York. We are used to thinking that applique is an activity for children. But, articles periodically published by me on the blog, about accomplished artists involved in collages and applications professionally, proved the opposite. That the appliqué technique for paper crafts that children are fond of can serve as the basis for a work of art and become a big deal, revealing the talent of an artist in you.

Sometimes adults need to pick up paper, scissors and glue. Immersed in the creative process - decorate your world.

Decorate the interior with a stylish DIY craft in the spirit of "Breakfast at Tiffany's".

Or make a picture with your favorite athlete in a teenager's room.

Or the superhero Batman.
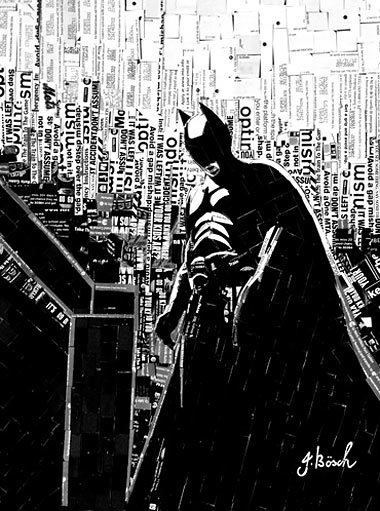

The streets of this big city, with its skyscrapers, canals.

Embankments. The collage technique allows not only to make silhouettes of the city's environs, but also emphasizes its spirit of freedom. The one that combines such a banal and familiar technique in the professional works of the author.

Create freely - from what you have at hand, with your soul, and it will be read in the works. As read in the works of Nina.

If you are making a paper collage, then the main task will be to get really interesting pictures to cut out. Where can you get them? First, buy fashion magazines - they have a lot of beautiful and unusual pictures. Second, find some colorful gift wrapping paper. Fancy paper is also often sold in the children's art section of bookstores. You can use paper that you yourself previously dyed in several different colors.
If you have a printer at home or have the opportunity to use it at work, download pictures of interest to you from the Internet and print them. National ornaments, optical illusions, Japanese hieroglyphs are well suited. Interesting textures are obtained if crumpled paper and fabric are driven through a copier.
A lot of useful information can be found on special sites that provide archives of draft images, patterns and vector graphics for professional designers.
As additional decorative elements, you can use small dried flowers, pieces of fabric, dried leaves, threads, shells, beads. Before creating a composition, additional elements can be tinted with indelible paints for ceramics or glass. Multi-colored beautiful letters look very stylish, attempts to make a picture from a font and inscriptions in foreign languages.
The basis of the collage should be thick cardboard, and not an ordinary landscape sheet, which will bend and lose its shape under the glued clippings. Before you start sticking pictures on paper, you can make a general background with paints. To get an interesting non-uniform background, take the glass, apply paints of several colors on it and add drops of water. Press the cardboard against the glass and prints in the form of beautiful stains will remain on it.
.jpg)
To give the cutouts an unusual look, you can trim them a little with special curly scissors or pierce them with a hole punch. Before you start gluing on paper, you should make a pencil sketch of the composition on the sheet. The larger and smaller the details, the more interesting the collage will look. Use at least 10 elements taken from different sources. For cutting small parts, nail scissors are well suited.
To make the collage even, do not take cheap sticky pencils. Pictures pasted by them may fall off the next day. The best quality sticky pencils are usually made in Germany. Do not use PVA glue, it leaves fingerprints and smudges on the paper, warps it a little. Rubber-based glue is best. When it dries, any unnecessary residue is easily removed by hand. Ornaments cut out of self-adhesive paper fit very well on the collage.
.jpg)
A few ideas for collage content:
The picture can reflect your life plans and what you want to achieve in the future. If you hang it in the room, it will motivate you to achieve your goals. You can use a photo of yourself for this and paste it in the center.
A similar option is to make a congratulatory collage with wishes, for example, for a friend’s wedding.
One of the most popular collage themes is faces in which lips, nose and hair are made up of various unusual objects that reflect their inner world. This way you can make portraits of your friends or your enemies.
To decorate the house with original and beautiful paintings, it is not at all necessary to be able to draw well. A little imagination, good taste and materials at hand, and now you have before you a one-of-a-kind author's collage, ideally suited to the style and color scheme of the interior. The collage technique not only allows you to show maximum creative freedom, but also preserves pleasant memories of memorable events, travels and people.
You don't need expensive materials or special skills to create a vintage style collage. The objects around you will serve as a wonderful source of inspiration. Everything will come in handy: old postcards and photos, beads, ribbons, newspaper and magazine clippings, paints, dried flowers, lace and shells. Moreover, each collage is an absolutely unique work that cannot be repeated.
How to create a vintage style collage with your own hands? There are two main approaches to creating compositions in this technique. You can start from the materials at hand, or you can proceed from the theme and style that you want to create. In this master class, I propose to analyze the basic techniques that can be useful for creating a collage in a retro style, characterized by the use of vintage or artificially aged materials and objects, and which fits well into Provence, country, rustic or even classic interiors.
Basic rules for creating collages:
- collage is not a disparate heap of objects. The basis of any successful collage is a thoughtful, harmonious composition.
- decide on the main theme and the main image of the composition. Usually it is located in the center, but even if you move it to one of the corners of the work, the main attention should still be focused on the main image.
- pay attention to the color scheme, it will help highlight the central image. When choosing a collage color scheme, it makes sense to refer to the color wheel that most designers use.
- the color scheme can be monochrome, that is, based on shades close to each other, or bright and contrasting. In any case, try to limit yourself to 2-3 primary colors so that the composition looks harmonious.
- do not be afraid to use unexpected and voluminous objects, because the collage does not have to be flat at all
- use symbols, signs, quotations and allegories, this will give more content and depth to the work
- if you doubt your abilities, make a preliminary sketch of a collage on paper, preferably in color
- move objects at work, choosing the most spectacular arrangement. If possible, take a picture of the most successful option, so that later you can focus on it.
The list of materials for a collage is always conditional. You can replace some of the proposed options with those that you have at hand, however, you should carefully consider the recommendations regarding the selection of the base, glue and other technical points.
materials
- primed canvas as a base
- acrylic or gouache paints for painting
- colored paper, old books and notes, wallpaper, wrapping paper for decoration
- postcards, photos, stickers or magazine clippings
- ribbons, braid, beads, buttons
- fabric scraps, thread
- natural material: twigs, shells, dry flowers
Tools
- sharp scissors
- stationery knife
- PVA glue for gluing the background
- hot glue gun or reliable Moment-Universal glue for attaching heavy parts
- self-healing cutting mat that protects the steel surface from damage or equivalent
- special mascara with aging effect and foam sponge
- pastel crayons or colored pencils
- brushes for paints and glue

How to make a DIY vintage style collage
The past is an inexhaustible source of inspiration in collage work. You can artistically decorate old family photos or old postcards in the form of a three-dimensional collage, or compose a composition from finds found at a nearby flea market or in a grandmother's chest.
We start by choosing a background, theme and suitable materials. I recommend using a primed canvas as a base, preferably on a stretcher. It is convenient to paint the canvas with paints or decorate with paper, besides, it looks good if it is hung on the wall with or without ramie.
Pay attention to the composition. If, like me, you decide to use a rectangular image as your centerpiece, it makes sense to use a rectangular canvas as well. For a square or round motif, it is better to take a square canvas.

To make the work more dynamic, the composition can be made asymmetrical. For example, I used a diagonal version of the composition with an accent in the center.
For a vintage collage, of course, it is better to use old, yellowed paper, old postcards and photos, clippings from old magazines. Old sheet music, maps and posters can also be a source of inspiration. For this work, I used an antique postcard from the early 20th century depicting a girl sitting in a boat. The theme of the pond was inspired by the brownish-green color scheme and the decor in the form of various plant motifs. Of course, you will certainly use other materials, this is just an example of how the decor and color scheme can support the main theme of the composition and be directly related to it.
If there is no fear of materials at hand, the paper can be aged artificially, for example, by printing the old image you like on a printer and giving it a shabby look later.
Ways of artificial aging of paper:
- Brew strong black tea and pour it into a bowl or small saucepan. Put paper in it. The longer the paper is in the tea, the darker it will become.
- take an ordinary tea bag and just rub it on the paper

The background of the collage can be completely sealed with the selected decorative paper, or it can be painted with paints. For work, I recommend using acrylic paints. They are sold in separate jars and tubes, have a rich and lasting color and fit well on the canvas. It is convenient to apply them with a wide and flat brush made of synthetic fiber, practically without wetting with water and mixing, if necessary, on the palette.

The paint should be applied in an even, opaque layer, if necessary, adding the necessary additional shades to the main color. After the canvas is completely covered with paint, it must be allowed to dry completely.
It’s just that a photograph on a colored background looks boring and not expressive, if you add paper appliqué elements to it, it will certainly turn out to be much more interesting. We begin to select paper.
In scrapbooking stores, you are sure to find many options for interesting paper with various patterns that can be useful in your work.

You don't need to glue anything at first. We apply various elements and look closely at how they interact with each other. When the location of the largest parts is determined, photograph it, or carefully mark the edges of the parts with a simple pencil. The largest parts (notes in my case) can be glued using PVA glue. We apply the glue in an even, thin layer, glue the paper, carefully smoothing it in the direction from the center to the edges so that there are no bubbles and wrinkles.
Background paper can not only be cut with scissors, but also carefully torn off, leaving deliberately raw edges. In addition, aged paper can be wrinkled a little, this will also emphasize the effect of time. These are simple, but very typical details for vintage compositions.

Don't be afraid to experiment with materials: in this case, you can see that the old, broken notes are quite organically combined with new stickers. Textile elements also fit well into the vintage style, especially if you use thin lace or braid that has already yellowed from time to time (similarly, you can soak the new material in tea).

Note the interesting effect of using a special brown ink designed to enhance the illusion of aging. Using a soft foam sponge with their help, you can slightly emphasize the edges of the composition or highlight some accents. You can find these inks at scrapbooking stores.
A similar effect can be achieved by crumbling brown pastel chalk and gently crumbling with a brush or soft cloth.

A collage is usually a multi-layered composition. This photo shows how the work continues in the various layers. After the background has been painted and notes have been glued to create a diagonal composition, you can move on to smaller details - place the appliqué elements and stickers, toned the corners of the canvas. I decided to highlight the central photo, so I emphasized its edges with tinting.

For vintage style, the use of old beads, copper parts, worn buttons or stamps is quite typical. Since my collage also exploits a natural theme, voluminous natural elements will also be a great addition to it. Even the pieces of glass found on the shore and turned by the sea found their place!
In order for twigs, copper stripes or other heavy parts to adhere well to the base, they should be glued with a silicone glue gun or transparent, reliable Moment-Universal glue.

The details of the collage should be interesting to see up close, but it is important not to overload the composition so that the main focus is easy to read. Periodically move away from work in order to evaluate its progress from the outside.
When the collage is ready, it can be placed in a frame or hung on the wall in its original form.
Literally, collage is translated from French as “gluing”. Now collage is a kind of design technique, which consists in making combinations of different materials, such as various pictures, photos, fabric, foil and others. This method of diversifying the surrounding space has been used since ancient times. With the advent of photography, photo collages appeared - pictures pasted on any basis. How to make a photo collage as a gift for friends and family quickly and simply with your own hands with the selection of a topic - we will tell in our article.
When creating a photo collage, you should follow several basic steps, which we will discuss below.
How to make a photo collage with your own hands in a simple and step-by-step master class
We choose a topic.The very first and rather important step is choosing a theme for the photo collage. Usually these are some memorable moments of life, important events, such as a wedding or anniversary, graduation party or travel. And sometimes the entire biography of a person is reflected in one photo collage.
We select photos.
The moment of preparing photos is the most important step in creating a photo collage. You need to sort the images, choose the highest quality, crop them to the desired size. If desired, you can scan the pictures and process them in a special program, setting a certain new style.

And, of course, you can not do without registration. Here you can show your creativity and imagination. For example, a birthday collage can be decorated with bright elements, and photos can be placed in colorful frames. Such a photo collage will certainly cheer you up and create a sense of celebration.
Making a paper photo collage.No special skills and artistic talents are needed to make it. But how then to make a photo collage with your own hands? Easy with step by step instructions. To make a simple photo collage, prepare the following:
- cardboard for the base;
- Photo;
- double sided tape;
- decoupage varnish (optional).

Prepare images by cropping them to the desired size. If you are using plain cardboard, you can pre-tint it. Then attach the photos to a sheet of cardboard using double tape and cover with a layer of varnish. You can do without it. First, place the shots around the perimeter of the base to achieve symmetry, and then fill in the middle in random order. Ready! Now you can hang the collage on the wall and decorate as you wish.
We collect a photo collage on matchboxes using an interesting technique
Now let's take a closer look at a more complex and interesting version of the collage. It is necessary to prepare:- Photo;
- empty matchboxes;
- cardboard;
- glue;
- paints;
- scissors;
- decoration items.
Lay out the boxes in a rectangle shape. The most convenient format is 6 x 12. Photos will be placed in these boxes.

Glue matchboxes onto a cardboard base, and then paint with a brush or spray paint. Instead of staining, you can use decorative paper.
While the glue and paint are drying, prepare your photographs. Cut them to fit the box.
When the base is dry, place the photo in the cells. If there are not enough pictures, cover the empty spaces with colored paper.
It remains to decorate the collage with decorative elements, such as ribbons, flowers and other similar items. Work completed. Such a photo collage can be presented to one of your friends and relatives, or left as a memory.
Materials and tools needed to create a framed collage:
- frame (furniture facade is used here);
- elastic;
- stapler for furniture;
- stationery clips;
- a photo.
Attach the elastic bands to the back of the frame first. The most convenient way to do this is with a stapler, but you can also hammer in small nails or screw in screws. The number of rubber bands depends on the size of the frame.
Then attach clips to the photo. Use a flat object such as a ruler.
It remains only to arrange the photos on the rubber bands with the help of clips. That's it, you can hang the collage on the wall.

Instead of cutting paper photos with scissors, you can first process them digitally. Spend some time at the computer, it will make collage making easier and faster.
Here you can not do without a graphic editor. Photoshop is perfect for this purpose. With it, any beginner will be able to assemble a photo collage.
First you need to choose the size of the base for the composition. As a background, any picture or photograph is suitable.
Before creating a collage, process the photo by adjusting the brightness, contrast and colors. Experiment with filters and effects.
Add a photo to the collage. The size of images is adjusted using the transform function. Photos can be rotated and resized in every possible way.
Decorate an almost finished collage with graphic elements or brush strokes. Add photo frames, different objects cut out from other images.
You can learn more about homemade photo collages in the videos below.
Video on the topic of the article
The collage technique is great for activities with children. Since this is not only creativity, but also a kind of game. And there is no shortage of necessary materials. You can always find old magazines or colorful promotional books from hypermarkets with promotional goods at hand. It will be fun and just cut and glue everything in a row, creating a kind of chaotic mosaic. But it is better to streamline this work somewhat, subordinating it to any particular topic.
You can easily find many worthy examples of this in the materials of this section. And you will not only find it, but, we hope, use it in your classes with your wards.
Collage is a wonderful game art for children!
Contained in sections:Showing publications 1-10 of 476 .
All sections | Collage. Master classes of children's collages, examples of work
In August, our group hosted "Vitamin Week". From Monday to Friday, the guys replenished and shared their knowledge about a healthy lifestyle life: sculpted "Vegetables, fruits - healthy products", read proverbs and sayings about health. The result of this week was a joint Work above...
 (Subject application with elements of non-traditional drawing technique with crumpled paper and salt) Target: to develop in children the creative abilities of non-traditional artistic creativity. Tasks: - to teach children the techniques of non-traditional application techniques and the image method with ...
Collage. Master classes of children's collages, examples of work - Master class: collage "Garden Flowers"
Publication "Master class: collage" Garden ... "  I present to your attention a master class on creating a collage on the theme "Garden flowers", from natural material. Initially, I planned to make this work from smooth pebbles, but unfortunately we don’t have the sea, I didn’t find suitable pebbles, so I decided to try to use it in ...
 MAAM Pictures Library
 I present to your attention another work of pine cones. Flowers in our life are not just a plant, they are a symbol of beauty. Each flower has its own meaning and meaning, blooms at its own time, identifying the seasons. With the advent of spring, primroses bloom: ...
 Collage in the life of a preschooler is of great importance. There is a significant difference between collage and teamwork. Collective work is the work of children, represented by homogeneous objects, for example, within the framework of the lexical topic - "Mushrooms". But it's worth...
 As part of the ABC of Safety summer project held in our senior group No. 2, the guys and I had a series of conversations about road safety rules, repeated all the rules of the road. To consolidate this material. we decided to make a joint collage - "Safety in ...
Collage. Master classes of children's collages, examples of work - Collective work on non-traditional applications in the preparatory group. Collage "Flowering Garden"
 Greetings to all colleagues who have looked at my page! I bring to your attention a photo report of an applique lesson using non-traditional techniques and drawing elements. Purpose: To develop creative abilities in children by means of non-traditional artistic ...
 Children's collage "Funny frogs" Tasks: - creation of conditions for the realization of the individual creative abilities of children in collective activities; - the formation of a sustainable interest in the fine arts; - to form an aesthetic and artistic taste; - introduce...