We make a home mini-bar. How to make a wine cabinet with your own hands? Bar cabinet in the kitchen
There are a large number of ways to make a mini bar with your own hands from improvised materials. Each of them requires proper preparation, as well as the availability of appropriate skills, along with excellent aesthetic taste.
If you correctly approach the process of creating a new piece of furniture, you can eventually get a really high-quality and reliable cabinet for storing alcoholic beverages, which will serve for a long time without any problems.

List of required tools
Before you make a mini bar at home, you need to prepare the appropriate tools and useful materials that will come in handy in the process, regardless of how it is done.

Be sure to prepare tools such as:
- screws or screws;
- thick wire;
- caps for screws;
- screwdriver;
- saw or hacksaw;
- grinder or sandpaper;
- jigsaw;
- screwdriver, etc.


Depending on the chosen method of creating a mini bar at home, additional tools may also be needed.


Work materials
On the network you can find more than one photo of a homemade mini bar. Such interior items are created using a wide variety of materials. That is why it is first necessary to decide on the method of their creation.

There are the following options for creating a mini bar at home:
From a wheel from a cart. The latter is fairly easy to find in the countryside. At the same time, the older the wheel is, the more atmospheric and interesting the result is a mini bar.


From PVC pipes. Such a piece of furniture goes well with interiors made in the style of hi-tech, minimalism or loft.

From the nightstand. This option is one of the simplest, as it requires only the correct design. In most cases, existing shelves in bedside tables or its door do not need to be changed.

From a canister. This option is not suitable for standard interiors. The main difficulty in creating this type of mini bar is to properly cut the wall of the container and use it as a door.

From improvised things. It can be a wine box, a large globe, wooden shelves, etc.


Thus, you can create a mini bar at home from many different materials that have lost their original purpose due to various factors.

Using a wagon wheel
Using a wagon wheel, it's easy enough to create a beautiful rustic-style mini bar. This can be done in this way:
- Initially, with the help of boards or a furniture board, you need to equip an ordinary table. This can be done with screws or self-tapping screws.
- Inside the table, it is necessary to fix the wheel from the cart or its half.
- Having made rings from wire, they must be fixed inside the previously installed wheel.
- All screws that were used to fasten different elements to each other should be masked with plugs.
- Hangers for glasses must be made using the already used wire. In order to make them more reliable, the corresponding fittings can be purchased at a hardware store.

If the mini bar will stand near the wall, one of its sides can be made deaf. If you install two wheels inside under the table a short distance from each other, bottle holders may not be needed.

Canister application
There are several methods on how to make a mini bar out of a canister. Each of them involves the preliminary preparation of a container from which you need to beat off the smell of gasoline or oil. For this, acoustic soda and other strong detergents are used.


A distinctive feature of creating a mini bar from a canister is the need to use non-standard tools, such as:
- boron machine;
- Bulgarian;
- drill;
- file.

The 20 liter canister must be washed and marked accordingly with a marker. After that, the line must first be drawn with a boron machine. After that, it is necessary to cut the painted future door with a grinder.


The resulting part of the canister must be processed with a file, after which the sealing gum is fixed around the perimeter. It remains to screw the hinges on the door and fix them on the container. Inside, it remains only to put wooden shelves.

Woodwork
Creating a mini bar at home from wood is very simple. This is due to the fact that working with such material is familiar to many. In addition, it is far from necessary to use boards, because you can take an old bedside table to give the main volume to the future bar.

Having prepared the grinder, screws, boards and the bedside table itself, we make a mini bar out of wood. Inside, mirrors can be used to give a more beautiful design. They should be fixed with glue.

The action algorithm should be as follows:
- marking boards;
- cutting out the necessary elements with the help of a grinder;
- surface treatment with varnish;
- fixing mirrors;
- decorating the outer volume of the bedside table.


This type of mini bar is suitable for classic interiors. Its distinctive feature is that it can be arranged in absolutely any direction of design.


Photo instruction on how to make a mini bar with your own hands


If you are a wine enthusiast and you already have a large number of bottles of wine in your home, then you need to find a place to store them. The original wine rack in the dining room, kitchen or even in the living room, will give the interior even more organicity, will become a decorative element. You may prefer to make a wall shelf, while others opt for floor cabinets, which are perfect for those who don't like running to the store every time they need a bottle of wine. A wine rack is a functional element in your home, but that doesn't mean it can't be decorative as well. The choice of wine shelves is rich, but the prices for them "bite". Make an interesting shelf and storage space for wine bottles with your own hands for less. Not everyone loves wine, but admit it, almost every house has a couple of bottles, donated on some special occasion. Therefore, if you want to save these presents for certain holidays, then you should store them properly. Keep your favorite wines within reach for dinner parties and celebrations with one of these thoughtfully designed wine racks. The following 18 homemade shelf ideas will definitely come in handy for creating an original and functional wine rack. Take a look and make your choice!
1. An old board and a few cast-iron bolts from the railway
Ideal for storing large bottles. Fits both in the living room and in the interior of the kitchen.

2. A unique wine rack that will decorate the wall
Another good wine wall shelf idea

3. Modern wine rack
Ideal for a dining room or kitchen, this shelf will hold your favorite wine collection.

4. Rustic Shelf
This shelf saves space. Just find the nails and remove part of the fence.

5. Stylish shelf
Save space and add style to your living room

6. Curved shelf
This small piece of aluminum will hold your bottles perfectly. Plus, it takes up so little space.

7. Shelf in industrial style
This wooden frame with pipes adds character to the interior.

8. Another Industrial Style Shelf
Make a new wine rack out of old pipes

9. Unusual pipe shelf
Unusual, but very practical shelf, which also saves space
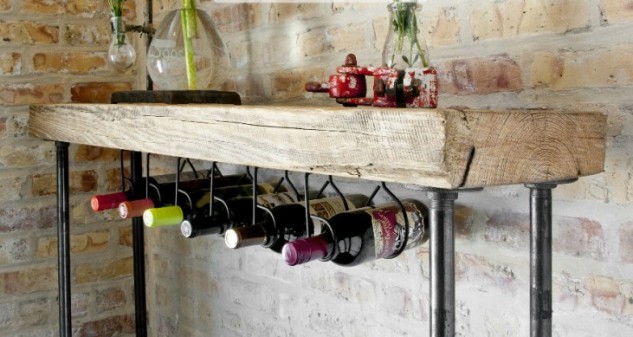
10. Wall table with wine bar
Nice bar under the table. A great way to store wine bottles without wasting space

11. Shelf of cylindrical building blocks
Ideal for a rich collection, it will become your personal bar that will give you the freedom to choose your favorite drink without leaving home

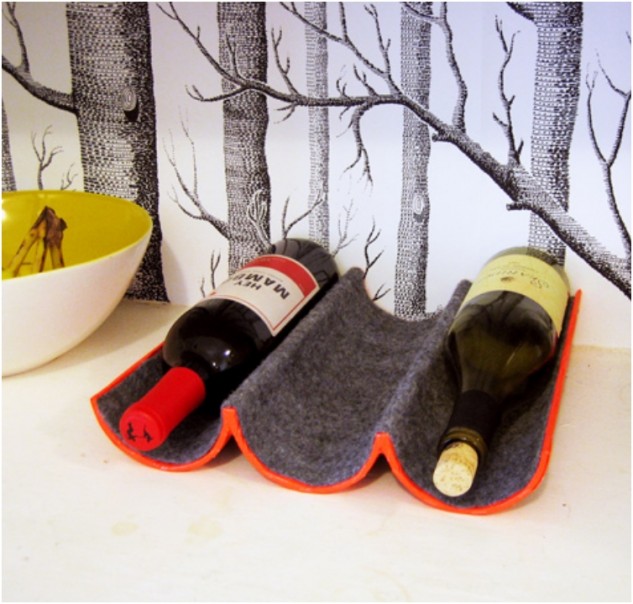
12. Wooden shelf with leather straps
Another original but cheap way to make a shelf

13. Acrylic shelf
A unique shelf that will give the interior even more elegance
14. Shelf from a cardboard tube used in postal shipments
This charming shelf is suitable for the kitchen or living room, because it does not take up little space.
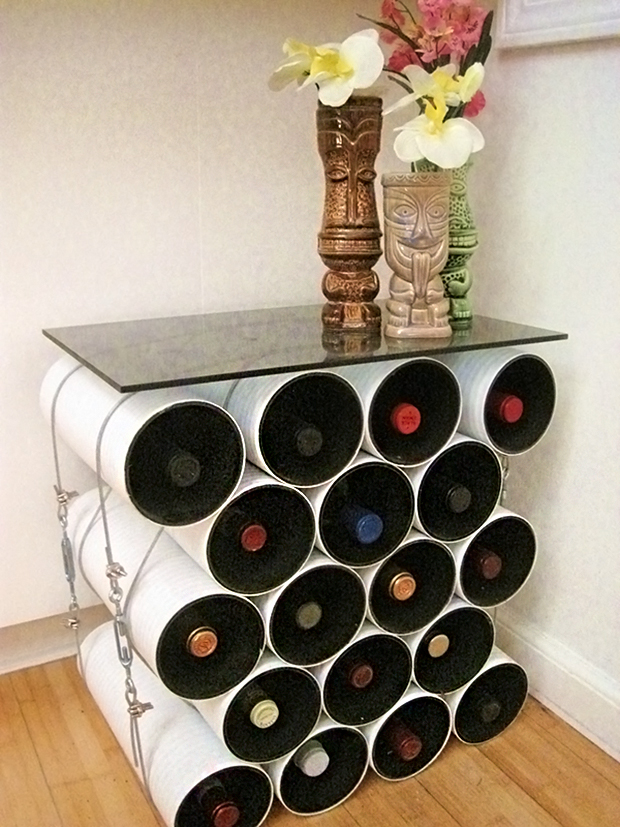
15. Table-cabinet made of pipes
Use your creativity, make such an original table-cabinet from polymer pipes

16. Minibar from the wheel
This shelf will also decorate the interior of your home.

17. Wooden box shelf
Take a wooden box and just drill holes to the right size

18. Barrel shelf
Recycle a wine barrel: make holes in it and turn it into an amazing wine rack
We continue to hunt for inspiring design ideas. Today, under the camera flashes, home bars from real interiors from around the world fell.
Why go somewhere to relax and have a drink when you can set up your own bar? This does not require an investor, a separate room and large investments. Your starting capital will be the imagination and ideas from this collection.
1. Bar with a message inside
The interior decoration of the bar cabinet with gold leaf symbolizes the value of the contents. And to all who dare to encroach on these treasures, leave a formidable message. 
2. Bar cabinet in the wall
Draw attention away from the contents of your bar with beautiful, custom-made wooden doors. So that they look like a work of art in their own right. 
3. Bar cabinet
The designers of Robin Gannon Interiors, who decorated this American home, preferred not so much a spectacular as a functional bar cabinet - it has a place for dishes and cutlery, as well as wine racks. 
4. Bar cabinet
A bar cabinet can become a pedestal on which symbolic things will rise above the entire interior. 
5. Open shelving
A drink rack can be part of an ensemble - a bar counter and chairs, as in this Munich apartment. 
6. Open shelving
An ordinary cabinet can be converted into a bar: just place a couple of wine shelves inside, and hang a slate board above the cabinet, as in bars. 
7. Beverage cart
A cart can also be a great alternative to a full-fledged bar. For example, there are models that are used in restaurants and hotels, with many sections and drawers. 
8. Bar cabinet-ship
Well, a real sea wolf will suit a wardrobe-ship, on the deck of which you can place dishes, and in the lower compartment - stocks of alcohol. 
9. Bar cabinet with roomy doors
Cabinet doors can act as additional shelves for storage. A slate board with active discounts on cocktails will be responsible for creating the proper atmosphere. 
10. Bar cabinet
Even boards and iron from an old court can inspire the creation of a bar cabinet. Overly brutal look can be diluted with a funny bar stool or a vintage advertising poster, as in this Vancouver house. 
11. Wine crate cabinet
The atmosphere of the bar can be created with the help of accessories - a cabinet made of boards from wine boxes and a container for wine corks. 
12. Antique cabinet
This cupboard was made in the middle of the 19th century for a church. It is decorated with carvings with a biblical story, with Adam and Eve in paradise, which did not deter the owner of the apartment from placing a bar in it. 
13. Wardrobe with glass doors
For industrial-style interiors, even an old cupboard with glass doors - like those used in hospitals to store medicines - is suitable for a bar. 
14. Wardrobe + bench + table
And why not opt for a bar corner that combines all the elements - a bench, a wardrobe, a bar counter? And even a place to feed your pet! 
15. Cabinet in the library
Cultural leisure is different for everyone: someone spends time reading books, someone is not averse to having a glass. So why not combine these areas into one leisure center? 
16. Shelf in the closet
Even on one shelf in the closet, you can create a small bar: with a tray for drinks, a mirrored back wall and LED lighting. 
17. Repainted cabinet
In this Canadian loft, an ordinary IKEA closet has become a drink storage. The owners simply painted it in the right shade, giving it a touch of antiquity. 
18. Antique refrigerator cabinet
You can breathe a second life into such a refrigerator cabinet - for example, place a bar in it. Such rough furniture will look organically in rustic interiors and in rustic style interiors. 
19. Wardrobe with bar attributes
And for lovers of westerns, you can equip a saloon - a traditional bar of the Wild West - with a skull and a wooden signboard. 
20. Built-in bar
Any empty opening, an unused niche can accommodate a bar rack. For example, from a closet or pantry. 
21. Built-in bar
Such a bar built into the wall can be made both open and with doors. Alcoholic drinks, for example, are hidden in the closet, and dishes are left on the shelves. 
22. In the doorway
Any unoccupied corner near the house is a potential place for your bar. All you need is a countertop, a cabinet, a refrigerator and a tray for drinks. 
23. Under the slopes of the roof
And even under the bevels of the attic floor, where it is difficult to find suitable furniture, you can easily place a bar area with a locker and a couple of shelves. Mirror mosaic will visually lift the ceiling. 
24. In a niche from the fireplace
The owners of this Californian home decided to take a niche from an unused fireplace - to place in it a bar with refrigerators for drinks and a countertop. 
25. Bar corner
A slate board will help create the atmosphere of a bar: here you can jokingly write menus, promotions and discounts on cocktails. 
26. Shelf in the closet
The bar as part of a furniture set has a number of advantages: it can always be hidden so as not to be tempted. And in the open state, the door can act as a table. 
27. In the doorway
Ordinary wooden shelves as a bar showcase - such an addition to the kitchen set will help turn any unoccupied corner into a bar. 
28. In the doorway
And if wooden structures seem heavy, it's time to think about glass shelves, which most accurately convey the bar style. 
29. In the doorway
If there is no place for a real male lair, any empty corner is suitable for this. Finishing with stone and wood will give the desired brutal spirit. For storage - ordinary wooden shelves, stands for wine and boxes. 
30. In the doorway
And the backlight will help to visually enlarge even a small nook for the bar: the space can be expanded due to the top and back light. Owners of a private house can think about arranging a light well. 
31. In the doorway
Take a look around - even in a small apartment there are empty corners. For example, corridors, doorways, where you can place a bar. And you can visually separate this zone using a contrasting color of the walls or lighting. 
32. In the doorway
It is logical to place a bar next to the kitchen table: then the need for a bar counter disappears by itself. And on the countertop you can organize a bartender's corner, with a shaker, an ice basket, a pestle. 
33. In the doorway
Your bar can be decorated in an eco-style: with a woodpile, plants, simple hanging shelves and a table top. 
34. In the doorway
The gap between the bookcases and the window should not be empty! A few glass shelves, a mirror and a wardrobe - that's all you need for a bar corner. 
35. Shelves in the closet
In any closet there are a couple of free shelves that can be arranged as a bar. Just highlight this area with a contrasting color and light. 
36. In the doorway
You can create a full-fledged bar in an empty corner with the help of appropriate paraphernalia - a refrigerator for drinks, wine shelves and, of course, a sign. 
37. Bar cabinet-wall
Well, if it is not possible to make a niche for a bar and holes for bottles in the wall, it's time to think about a wall cabinet, which can also be used as a partition. 
38. Under the stairs
Do not stop at non-standard layouts, various bevels and angles. This is the place for hanging shelves for the bar! 
39. In the doorway
The bar can also be an extension of your kitchen: just choose the right cabinets from the same series. And to delimit the zones of the kitchen and the bar, place the latter in the corner. 
40. Under the slopes of the roof
Mirror tiles can be a great alternative to a bar mirror. With its help, a small corner under the stairs seems visually larger. 
41. In the wall
The space under the stairs should not be empty, the owner of this American house decided and placed a storage rack here. On the top shelf there was a place for a bar. 
42. On the balcony
Putting a bar on the balcony is an obvious solution. Where else would it be so nice to sit in the evening with a glass of wine and watch the sunset? 
43. In the wall
The drive-through is a great place for a bar that will be available both in the kitchen and in the dining room. 
44. In the doorway
A narrow cabinet for a bar, a retractable bar counter - even in small rooms it is possible to equip a bar. 
45. Rack of wine boxes
A budget option for a bar cabinet / display case - old wine boxes. Minimum cost, maximum atmosphere. 
46. Wine crate shelves
Wine crates can simply be stacked on the floor or intricate designs can be built on the wall, as in this Houston loft. 
47. Pallet rack
Pallets are also suitable for a bar rack - just stack them on top of each other, and use the resulting voids to store bottles. 
48. Bar + table + refrigerator
This is a multi-functional design: the bar cabinet is at the bottom, and the sections for ice and drinks cooling are at the top, and they can be covered with a tabletop for making cocktails. 
49. On the desktop
Why hide alcohol in the closet? In the absence of a bar showcase, you can display the entire assortment on a suitable table. 
50. Against the wall
A carpentry table will be appropriate in interiors with a masculine character, with rough and simple furniture.
Once upon a time, bar counters were used only for their intended purpose: to sit down and have a drink in a drinking establishment. Somehow they migrated to the kitchen, and took root there. The detail turned out to be very convenient, especially since it has undergone noticeable changes and the modern bar counter for the kitchen has a diverse design. Its variants can be very different in design and style, and their functional purpose can also be different.
Purpose and types
If the area of the kitchen allows, the bar counter in the kitchen is set for its intended purpose: sit down for a cup of coffee or something stronger, something to eat. Then her “equipment” is appropriate: holders for glasses, wine glasses, glasses, a shelf / holders for juices, bottles, etc. nearby. They put it resting with one edge on the wall or edge, sometimes they are placed in the form of a skeleton - in the middle of the free zone.
In small kitchens, it is often multifunctional. It can also be used as a divider into zones - a dining room and a kitchen, in very small areas it is often used as a dining table. Moreover, it can be located outside the box - against the wall.

In medium-sized kitchens - 10-12 meters - it is often made in the form of a peninsula - a small ledge on the side. In order to make more rational use of space, the place under the table top is occupied by shelves or a cabinet. This design is very simple - the countertop of the bar often relies on several pieces of straight or inclined pipes fixed on the cabinet table.

Bar counter in the kitchen - peninsula
Such multi-stage kitchens have recently become popular: it is more convenient to perform various operations in the kitchen on surfaces with different heights.


But, nevertheless, more often a bar counter for the kitchen is present in studio apartments to distinguish between two zones: or from the hallway - who has what is combined. Moreover, it is often a continuation of the desktop-island or peninsula.

They do it in the form of a partition. In this case, the base is most often made of drywall, and the surface is “attached” to it - from above or from the side.


In general, there are many options, variations and different types. Adapt the idea that you like to your conditions, and you can begin to implement.
Dimensions and dimensions
There are no strict rules in this regard. There are some recommendations that are violated in about half of the cases. Recommendations apply only to the height and width of the countertop:
- It is customary to make a bar counter in height of 1.1-1.2 meters. Then special high chairs are placed near it.
- In width - at least - 30 cm, optimally 50-60 cm. You should not do less than 30 cm: even a small plate already on such a tabletop will be in danger. And it's just uncomfortable: neither put your elbows, nor lean on properly.
The length, shape, number and shape of the legs are all up to you. Speaking of legs. The traditional racks that were in drinking establishments are a countertop on a pedestal. But for the kitchen, for some reason, a countertop on one pipe from floor to ceiling is considered a “classic”.

By the way, in this form it is almost never used. More functional analogues with cabinets and cabinets prevail.
Bar counter for the kitchen: stages, manufacturing methods, photo reports
The easiest option to perform is precisely the classic one: a tabletop attached to a wall or furniture with one edge, and resting on a pipe with the other. With a tabletop there are options:
- Make from a wide board, preferably not coniferous - their wood is too soft.
- Order from the same company that made the kitchen set. If you bought a ready-made one, you will have to look for similar material from the photo or carry a small spare part with you around the workshops to demonstrate what you need.
- Make it out of thick plywood, then decorate it with something - stick plastic, tiles, mosaics.
Everything else is better to choose in a store selling furniture fittings. The choice is very wide, and the range of prices is generally amazing. For example, a pipe of the same diameter can cost three times more. But such a difference is not without reason. With cheap Chinese pipes / nets / baskets, chrome plating begins to flake after a while. German fittings have a very high price tag, but a lifetime warranty, the Poles are in the middle both in price and quality. The choice is yours.

In the photo above - a homemade bar counter, which was made from a thick board. It rests on one side on a shelf attached to the wall (also made of inch boards). The second support is a traditional pipe. A hole of a suitable diameter is drilled under the pipe in the body of the countertop. Under the countertop on the pipe, a nozzle-stop "fixing ring" is installed, the hole is closed from above with a decorative ring. There is also a "thrust" or universal fastening of the pipe to the floor and ceiling, as well as various holders and shelves for it.
If the tabletop is attached directly to the wall, corners are usually used for these purposes. You can take reinforced, and choose the color based on the finish. But this type of fastener is installed so that it is not visible - stepping back a few centimeters from the edge. You can put several small corners, or one solid.

If you decide to make a bar in the kitchen along the wall, you can use decorative brackets for the shelves. Their bearing capacity should be enough for the countertop, especially since you can put several pieces. An example of assembling a bar counter of a simple design with a pipe in the photo below.
Photo report No. 1: a homemade countertop and pipe rack
The tabletop was cut out of a window sill (massif), the edge was rounded, sanded, toned and varnished. Spare parts - a bar leg, brackets and a fixture to the floor - were bought in the furniture fittings department.

We fasten the emphasis to the tabletop, to the edge - the corners. Everything sits on self-tapping screws with a flat cap. The job takes 7 minutes.

Having attached the assembled rack to the wall, we mark on the wall the places where it is necessary to install the dowels. We circle the pipe on the floor with a marker: we will set the thrust bearing at this mark. According to the marks, we mount the stop for the rack, put the dowels in the wall.

We put the rack in place, fasten it with screws. All. Ready.

Bar counters with shelves
If you don’t like the design with a pipe, you can do without it, but you will have to remove the upper part, which is located under the ceiling. Instead of a leg, for example, you can make the same shelf as near the wall. The view will immediately become more dynamic and modern.

And in general, the entire structure can be assembled from wide boards, joining them at a right angle. Looking at the photo below, you will understand what I mean.

Bar counter for the kitchen in a modern style (for minimalism and high-tech too)
In modern interiors, broken lines generally fit better. If the kitchen is in the style of minimalism or high-tech, then it’s hard to fit the classics there, but something consisting of broken lines will look very good (a few sketches in the picture below).

A slightly more traditional version is shown in the photo. That doesn't make it any less interesting. A non-standard approach, even in small doses, significantly changes perception.

Option of bar drain - table
Bar counter on the base
All this we considered options without reason. But the tabletop can be attached to some cabinet. If the countertop is located exactly above the table surface, we take a pipe and standard fasteners to horizontal surfaces. If, as in this case, the surface of the bar counter is displaced, there is a special inclined fastener.

Attach the tabletop to the cabinet - easy and simple
The cabinet can be made independently. Actually, the main thing is to assemble the frame. It can be sheathed with furniture plywood or some other finishing material - it depends on the style of your kitchen. The frame can be made of wooden (dry) slats, or you can also weld a metal corner.

As an option - to assemble from drywall profiles, sheathe them or GVL. Another option is to lay a brick base. But this, if the bearing capacity of the floor allows.

With a drywall base: photo report No. 2
Often choose a drywall base device. The material is inexpensive, the technology has been tested, the mechanics are familiar, the result is at least good. In the order of work, no news: we assemble the frame. In this case, wooden bars were used, but it is also possible with the use of profiles.

The main thing is to observe the verticality and horizontality of the planes, put the racks exactly at 90 °. Everything is checked by a good building level, it is better to track verticality with a plumb line: it has no error. When the frame is assembled, it is sheathed on both sides with drywall or GVL.

We putty marks from self-tapping screws, corners and joints. Further, it depends on the type of finish chosen: some require puttying (water-based painting), others do not. In our case, textured paint was chosen, it is applied in a thick layer, and you can - directly on drywall.

It remains to install a countertop on the bar counter. Choose which one goes best with the rest of the furniture in your kitchen.
Photo report No. 3: Bar counter with a sink
It was the first experience in creating furniture (and in general something worthwhile) with their own hands, as a result, some design flaws were made. Not the most successful design turned out, although they do not argue about tastes.
Source materials:
- cheap countertops bought on sale;
- remnants of the cabinet from;
- bars;
- a couple of purchased doors;
- plumbing filling: sink, siphon, mixer and required pipes, hoses, fittings.

Tabletops are folded with the letter "G", connected by steel plates, sidewalls are attached
Tabletops are laid out face down on the floor. They are connected in the form of the letter "G" with the help of glue, with which the ends are smeared and a steel strip with perforation, into which self-tapping screws are twisted. The strip, of course, is fixed from below.
The sidewalls were supposed to be ennobled (presumably with a laminate), therefore, the remnants available in the household were used - an old door and a piece of a cabinet. They are screwed with corners, aligned with the edge of the tabletops. And this is the first mistake. And visually, such a cabinet looks heavy, and sitting is uncomfortable. The sidewalls must be moved from the edge by at least 10 cm.
After the sidewalls were installed, the cabinet was turned over and placed in a permanent place. All other work was carried out on site. A hole for the sink was cut out, the plumbing part was installed and connected.

Laths are nailed along the floor - along the walls and slightly stepping back from the outer edge (5 cm indented, 10 can be more convenient), shelves are made. The cabinet on the side of the sink is closed with a door, the shelves on the left remain open. The space is partially finished with wooden planks.
At first, they thought to put several different “bells and whistles” on the pipe, but semicircular edges remained from the countertops. It was decided to use them on the pipe. Panels for decorating balconies (purchased in Leroy) were used as the exterior finish of the pedestal. They almost approached in size, and the remaining gaps were closed with a twisted cord. As a result, a homemade bar counter with a sink cabinet looks like in the photo below.

There are also some comments on finishing. First, the cord will soon be saturated with various liquids, will have a pale appearance and a strong “aroma”. To delay the appearance of the smell, it can be covered with something, even with the same PVA glue. The second is that the countertops are simply docked. Water will get into the gap, various small debris will fill up. Even at the stage of "docking" the edges must be smeared with a sealant (transparent, silicone, not acrylic). It is also possible and necessary to process the edges of the cutout for the sink. Then the countertop will not swell. The joints of the tabletops can be trimmed with furniture overlays, they can also be used instead of a cord. Another budget option is plastic corners and the same T-shaped strips.
Bar counter for the kitchen on the remains of the wall
If the kitchen is combined with a balcony, a piece of the wall remains. The place where the window used to be. If there is no desire to destroy it, you can make a bar counter.

There are two options:
- At the height that is, put the countertop. This will be another work surface or shelf. Above it, on pipes at a height of already about 1.1-1.2 m, fix another plane, which will actually be a bar counter.
- Report / grow the wall to the desired height and place the countertop.

Both options are not bad, but the one on the right in the photo is more practical: two surfaces in the kitchen are always better than one. Please note that the dimensions of the tabletop are larger than the width of the "legs". This is no coincidence: this way you can sit more or less comfortably without turning sideways.
And if you are not too lazy to remove this wall, you can do something more convenient - so that you can put your feet up. An example is in the photo.

Photo design ideas


Desktop - as a basis


Bar counter made of brick or stone - stylish


Related videos
If you want to put the bar in the open, you can borrow the idea in this video. The guy built an interesting rack from snags and a thick board found in the forest.
Most often, questions arise about how to make a countertop for a bar counter. You can decorate it with a mosaic. And how - see the video. In general, the mosaic laying technology is simple: on a special white glue, followed by grouting between the tiles. It is difficult to form an uneven edge. Here's how to do it - watch the video.
Tabletop glued from bars
Home mini bar, like wine cellar at home, this is often not a whim, but a necessity for hospitable hosts who often have guests. It should also be equipped by true connoisseurs of high-quality alcohol, because the nearest bar does not always have really worthwhile specimens. The compactness and at the same time spaciousness of the mini-bar is its main distinguishing feature.
Why do you need a mini-bar in the house?
At the word bar, many will imagine a huge rack with high chairs and all over the wall with all kinds of alcoholic drinks. Naturally, it makes no sense to equip such a home, besides, there is not enough space. A home mini-bar for drinks is a compact furniture for storing alcohol, and it is often stylized as familiar or not very items in the house. It could be a globe, a barrel. Bars-transformers can turn into a mini-rack with a slight movement of the hand.
The models presented in stores are often comfortable low tables on wheels or shelves up to 1.5 m in height. They have special shelves for and holders for glasses.
Reasons why you should get a mini-bar:
- It is compact, most of them can be easily moved. This allows you to put it even in, without sacrificing useful space.
- The cost is low, even if you buy materials and assemble a suitable bar for yourself.
- It decorates any home. Brings a touch of originality to the design.
- Such an alcohol storage system frees up a lot of space in and out, as it is designed specifically for storing bottles, and has suitable shelves for this.
- The presence in the design of such an attribute will give the interior functionality and certainly decorate it.
- It symbolizes the richness of style and emphasizes the image of the owners, because ordinary vodka is not put in such bars, often it is something more refined and more expensive.