Stool seat replacement ideas. How to make a professional restoration of chairs with your own hands using improvised means? It's quite easy! Broken leg repair
An old chair inherited from a grandmother, with worn upholstery, peeling varnish, can become a pearl of the interior if you put your hands on it. To cope with this task, you need to familiarize yourself with the technique of restoration work, arm yourself with the necessary tools and be patient. Consider the stages of turning a used piece of furniture into a chic rarity, dear to the heart as a memory of loved ones.
Ways
There are various approaches to renovating old furniture. Restoration is a classic approach that involves restoring the original appearance of an object with all the previous characteristics. This method is used if you need to restore a valuable piece of furniture in its original form. A fairly complex technique is assumed here, which will require the use of special-purpose chemicals to restore the coating, carpentry work to eliminate functional malfunctions, it may be necessary to replace part of the wood or veneer.


This requires special skills and professional carpentry tools, the acquisition of special types of wood. Full restoration of chairs is justified for collecting purposes or in case of damage to one of the items of an expensive set. This is a rather expensive process, so it is better to entrust it to professionals.


If for certain reasons it is impossible to contact a carpentry restoration workshop, then repairing old chairs can be done at home with your own hands.
It is necessary to start recovery work by sequentially performing the following steps:
- First, we think over the design of the future piece of furniture, how it will look in the interior, what color it should be, what needs to be redone for ease of use.
- Then we disassemble the chair into its component parts, determine the degree of wear of the parts and the need to replace some elements, measure each part.
- After that, we make an estimate for consumables according to the size of the parts of the chair, with this list we go to the store and purchase everything you need.
- Finally, we replace worn parts and varnish or paint. If the chair has retained its strength, it is enough to simply repaint it to make a new piece of furniture. You can paint an old peeling highchair in a bright new color and paint it with a simple pattern, which the child will be incredibly happy about.
Instrument preparation
Having determined the degree of deterioration of structural parts, it is necessary to stock up on the necessary tools. Let's try to figure out what is needed for the repair.
To strengthen the frame, you will have to acquire a chisel, wood glue or PVA glue, wooden blocks to replace furniture spikes or spacers. The spikes are used to fasten the frame parts.


If the legs of the chair are loosened, the spikes must be removed, smeared with glue and inserted into the structure, after which the elements must be fixed for several hours. At home, you can use a regular belt for screeding parts.

Chairs can be varnished, stained or painted. To remove the damaged coating, you need to sand the surface of the chair - it is not necessary to completely remove the old layer of paint or varnish, just level it. Here you will need sandpaper of large and small fractions or a grinder. With a complete change in design, it is worth using a special composition that dissolves paint - technical acetone.


After preparing the frame for a new painting, you need to apply a primer for paint - usually it is gray or white. You will need paint and varnish materials. They are selected depending on the conditions of use, whether this household item will be adversely affected by moisture, steam or the sun. Instructions are included with each dye. After getting acquainted with it, choose the right one.


Before varnishing for the preservation of wood, it is treated with stain, wax or oil. These furniture products are available in different colors to match the different colors of natural wood. After covering the frame of a wooden chair with a water-based stain of the desired color, a layer of varnish follows, when using a polymer-based stain, varnish coating is optional.


Next, you have to decide what the seat trim will be. If it is a hard seat, then paint according to the same rules as the frame. If you have to deal with a soft seat, you need to stock up on foam rubber and upholstery fabric. Here a furniture stapler with staples of suitable size will come in handy. The fabric can also be fixed with the help of special furniture nails and a hammer.


When working with a spring block, it may be necessary to replace the springs or the entire block. You need to ask in advance if these materials are available for repair work or if you need to change your strategy and abandon springs in favor of foam rubber.
Structural disassembly
The connection scheme of the chair is well known, it is not difficult to disassemble the structure yourself. First, the back and rear legs are unscrewed. The assembly of the chair takes place in the reverse order, then all the grooves will fall into place. If the chair is mounted on glued spikes, you need to melt the joints with hot water - for this, a hot wet cloth is applied several times or a steam generator is used.


Detected cracks are filled with a mixture of sawdust and glue or glued and tightened for fixation until dry. If the stud joints are damaged, new plugs are made to replace the old ones, and to strengthen the side joints, a thorn-groove fastening and gluing are used in them. It is necessary to drill a thin hole to the spike and pour glue into it with a syringe, fix it until it dries. If the legs are inserted into special grooves in the bottom of the chair and the chair wobbles, then the legs are removed and the upper part is wedged, it becomes larger and fits into the groove more tightly.

If the highchair is being updated, in addition to the above, it may be necessary to replace the hinges or the turning mechanism for transformation. Most wooden highchairs are made up of a large number of parts to ensure the safety of the child. It's a good idea to glue them again with wood glue for strength.
When disassembling a folding chair, it is enough to remove the axial pins connecting the backrest and the seat and unscrew the seat. Chairs on a metal frame are simply unscrewed, for models with cast frames, only the seat and the soft part of the back are unscrewed for constriction.
The seat of the chair can be equipped with a spring block. The block itself does not need to be dismantled and torn off from the base, if necessary, replace individual springs.


Recovery process step by step
So, at the first stage, our chair is disassembled, the damage to the structure is eliminated, the old paintwork is removed, and you can start updating directly.
At the second stage, we apply a primer corresponding to the type of material to be painted on the cleaned surface. After it dries, re-treatment with finer sandpaper follows. Then we apply the first layer of paint or varnish and after drying we check - if the base is translucent, we apply one or two more layers.


Each material has its own characteristics when staining. An anti-corrosion primer is applied to the frames of iron chairs with the first layer, after drying, the main color is applied, and if the paint is transparent, then it is applied in stages in two or three layers. When painting metal chairs, it is better to use metal enamels.
The frame of a wooden chair is first treated with wax, applying a little product to a piece of rag and carefully rubbing it into the wood, or brushed with an oil primer. Next, one or more layers of acrylic paint are applied. Such coatings of the new generation are easy to use, have no smell, dry quickly, and are suitable for indoor use.


To restore Viennese chairs, use a varnish coating on a wax base or on a primer.
For plastic chairs, painting is undesirable, since the flexibility of the material will provoke peeling of the paint, it is better to sew covers or pillows from a suitable fabric on them.
Finally, at the last stage, you need to update the upholstery of the soft parts of the chair. After the old upholstery is removed, the foam rubber of the required thickness is cut out according to the shape of the seat base, it can be fixed with glue. The fabric is cut out, taking into account the hem allowance around the foam rubber with plywood.

With a furniture stapler on the reverse side, the fabric is fixed first from opposite sides so that it is tightly stretched, then the corners are folded end-to-end, folded along the base and fixed with staples in several places on the reverse side so that the fabric does not bulge. It is better to use a fabric with a floral print or plain. The geometric pattern requires a special arrangement of lines. The drawing may be skewed, so skill is needed here.

When hauling a seat with springs, batting or other dense material is first laid, then a layer of foam rubber. The fabric is cut out and attached using the same technology as with one foam rubber, but here it is important to stretch the upholstery more to smooth out the relief of the springs.
Assembly and finishing
When the chair frame is updated and the soft parts are tightened with new upholstery, all that remains is to assemble the structure. The basic rule is to assemble in the same order as disassembled. The legs and back details must be installed in the same grooves where they were originally, so the design will not lose strength. The plywood on which the seat is attached is usually screwed to the frame; in Viennese chairs, glue acts as a fixative.

Knowing all the stages of chair restoration, it is not difficult to create a stylish and unique object with the help of finishing from an unattractive piece of furniture. Just by painting the chairs in pink, blue, pistachio colors, you can get a bright color accent of the interior in the fusion style.
When updating old chairs, decoupage technique is used. This operation is performed with the help of glue, varnish and a paper-based pattern, it is also convenient to use napkins. Paper with the selected pattern is cut or torn into pieces, then these fragments are fixed with glue on the frame and seat, after drying they are varnished. As a result, this piece of furniture is completely transformed and becomes an art object.


In modern interiors, designers often use one or two antique items. For this purpose, chairs of ancient designs are required. First, they are painted with white paint, then a thin translucent layer of gold, bronze or silver paint is applied to the entire chair or its individual parts, depending on the environment and the finish of the entire interior. The final step is a layer of craquelure varnish. It creates small cracks throughout the coating, giving a luxurious touch of antiquity.


It's a shame to throw in the trash a thing that is included in the furniture set. Do-it-yourself restoration of chairs will help not to break the package. Also, do not be upset if something breaks down that plays the role of an exclusive, dear to the heart, memorable item. And here restoration can work wonders.
Chair paintwork
What is your favorite chair? These are wonderful moments of returning to childhood ... Or the memory of a loved one ... Or even a chair can be passed down from generation to generation. Or something else, but so dear, with which you just don’t want to part.
But, unfortunately, a thing cannot be eternal. The furniture is scratched and peeling off. alas, it becomes unpresentable. However, restoring old chairs with your own hands will help keep the item for some more time.

Often, before varnishing, the chair must be completely cleaned of old paint or varnish. This process requires patience and perseverance from the master. But the pay for the work will be fully consistent with the efforts invested.
Chair decoration
Sometimes it makes sense to radically change the color scheme of furniture. Chairs painted in white or gold look very creative. Often craftsmen choose other colors for the wooden part of the chair: blue or light blue, pink or bright red. But then the upholstery should be pure white or with a golden ornament. The grace of this design takes people back to the time of Catherine II, reviving the palace luxury.
White furniture can be decorated with gilded ornaments, simply drawn or made in the form of a bas-relief. Blanks for this kind of jewelry can be purchased in stores or cast independently from plaster and glued. Do-it-yourself restoration and decoration of chairs in antique style will bring charm and originality to the design. Sometimes the edges of the upholstery are decorated with beautiful braid, tassels.

The image of the room will also be changed by chairs painted in a cubic style. And someone will like floral or vegetable colors more. In any case, the surface coating will protect the object from corrosion and increase its service life. Therefore, the practical benefits that such a restoration of chairs with their own hands will bring are also obvious.
Comprehensive instructions for replacing failed parts
In addition to the appearance of products, the owners of beautiful antique chairs are concerned about their functionality. Therefore, the restoration of wooden chairs with your own hands includes the replacement of some parts in the product. For example, it is difficult to carve a broken rail from the back of a chair absolutely identical to the remaining ones. Therefore, it is recommended to make the necessary number of rails of a different configuration, but of the appropriate size (height and thickness). You can even try to buy them in the store, although it will be very difficult.

Viennese chair repair
Very often, the slats simply fall out of their nests. Viennese chairs usually suffer from such a defect. Do-it-yourself restoration in this case occurs according to the algorithm described above. Only here it is no longer necessary to remove all the rails from the lower grooves. It is enough to clean the vacant hollow from the remnants of dried glue, fill it with an adhesive compound and strengthen the dropped part in it.
Soft chair repair
Furniture plays an important role in our life. For example, upholstered chairs look elegant and stylish in the interior. And they are much more comfortable to sit on than regular ones.
The most common repair is the restoration of chairs with your own hands, when it comes to upholstery that has lost its visual appeal. Spots or even holes that cannot be removed by anything often appear on it, ugly scuffs, once bright colors fade. And sometimes you just want to change the entire design of the room, redo it in a different color scheme.
Restoration of a soft chair with your own hands will not take very much time. Even an inexperienced master, a teenager or a woman can produce it. It is only important to choose a sufficiently strong upholstery fabric and professional furniture foam rubber.
Calculation of fabric when replacing upholstery
Often in the interior use a set of furniture. In this case, the upholstery is usually replaced on all chairs at once. Therefore, it is necessary to calculate in advance the size of the fabric required for the restoration.
First you need to measure the width and length of the seat. Do not forget to add a centimeter on all sides for the hem of the fabric. Most often, this part is square, measuring 50 by 50 centimeters, that is, 50 square centimeters.
Then, if the chair has a soft back, the same must be done with this part of the object. By calculating the amount of upholstery needed to restore one chair, you can calculate the amount of material needed for all chairs. By simply multiplying the result by the number of items (usually 6 pieces), the restorer will get the number of square centimeters. They need to be divided by the width of the upholstery fabric, which was looked after in the store. In the answer to this problem, the number of necessary "linear" centimeters will appear.

It is best to buy a little more material, with a margin, because otherwise, the master may have to sew the fabric, because a piece will remain in one strip when cutting, and in the other - also a piece.
And to avoid this, the master will still need the ability to lay out patterns on fabric in such a way that there is as little unused fabric as possible. It will not be difficult to do this if you need to prepare the number of details from the newspaper in advance.
Upholstery replacement
If the restoration of old chairs with your own hands consists only in the fact that the master needs to change the fabric on the soft part of the object, then this will take quite a bit of time.
It is enough just to unscrew all the parts that require repair, that is, the seats and backs. Then the old upholstery is removed from them, a new one is applied, a hem is made, the edges are nailed with small furniture studs with wide hats. In the absence of such, small pieces should be cut out of cardboard or leatherette. Before hammering, you need to put them on nails so that they tightly hold the fabric, and do not slip through the holes punched in the fabric.
First fix the front of the seat. Nails are distributed quite often, after 0.7 centimeters from each other. If necessary, small folds are made, which are permanently fixed.
Then the second symmetrical side is punched, stretching the fabric. After that, work with the sides, leaving free corners. Before stuffing, they should be carefully stretched, straightening the fabric so that there are no wrinkles on the front of the upholstery.
The last step in this repair is fixing the corners of the upholstery with staples. With a thickness of plywood or fiberboard used for the frame of the upholstered part of the chair, equal to 3-4 mm, four-millimeter brackets will be required. Be sure to take this fact into account! Naturally, if the frame is made of a material 10 millimeters thick, then ten millimeter staples are taken.
Replacing the stuffing material in the repair of an upholstered chair
The calculation of the amount of foam rubber is carried out in the same way as for upholstery fabric. Only now it is no longer necessary to add hem allowances. Instead of foam, you can use batting.
Sometimes it makes sense to replace the packing incompletely. Then it is enough just to apply a “patch” in the place of punching, cover everything from above with a thin layer of batting or foam rubber.
If the padding is completely replaced, then all parts should be removed from the seat: self-tapping screws, staples, nails. It may be easier to cut a new part of the seat out of plywood or fiberboard, reinforce the padding on it, and cover it with new upholstery on top.
Gluing the joints of chair parts
Loose furniture can be repaired in two ways. One is to tighten the joints with self-tapping screws or bolts. They should not be screwed into the old grooves, but nearby, if possible. Sometimes the craftsman needs to use either a "patch" cut from soft metal.

The second way is gluing. Then the chair is disassembled into parts, the joints are cleaned of old glue. Having carefully missed the joints, the parts are connected and tightened with clamps.

Broken leg repair
The most difficult thing is if the “injury” of the chair consists in a “fracture” of the part. In an ordinary chair, you can completely replace a part by turning another one. But it is almost impossible to make a twisted or curved leg at home, which distinguishes, for example, Viennese chairs.
Do-it-yourself restoration in this case is carried out only with the help of glue. Moreover, the contraction of the part must be done not only in the places of gluing, but also at the ends of the leg, so that its size remains the same.

After drying, the joint is processed with sandpaper. For a more reliable fixation of the “fracture”, it is necessary to machine a groove on the inside, into which then glue the wooden plate, drowning it completely.
You can also use a metal part by putting it on self-tapping screws. The excavation site is then carefully covered with putty or a mixture with sawdust, leveled, sanded and processed.
Sooner or later, even the best chairs fail. It’s a pity to throw them away, because they have already become part of the interior, fell in love and keep a lot of emotional memories. If this is the case, then it is worth considering the practical reworking of old furniture and its repurposing into new interior items. What can happen from the most ordinary old chairs?

In the interior of a summer house or a house, decorated in a rustic style, objects with history look special. They give the space a special retro gloss and create a real touch of antiquity, which is so necessary in interiors of this kind. It is here that towel holders made from the backs of old chairs will be appropriate. It will not be difficult to create them, but they will colorfully fit into the design picture. You can safely decorate kitchens or bathrooms with such decor items.


Are the legs loose or broken on the chair? No problem! This does not mean that his life is over. If the body itself is strong enough and has an attractive appearance, then its best purpose is to become a garden swing. First, it is worth sanding a piece of furniture, impregnating it with an antifungal solution and painting it in a beautiful color. At the same time, the paint must be resistant to temperature extremes, precipitation and strong sun.


In the same garden, it is appropriate to put an unusual planter, also made from an old chair. Sometimes it happens that after the repair they completely change all the furniture, but there is no desire to get rid of the old one. In this case, the garden and even the interior of the house can be decorated with stylish flower stands. One has only to refresh the chairs with paint, cut holes in the seats and place large flower pots there (these can even be small tin containers).


Today it is fashionable to decorate the kitchen with items that are found in popular cafes or restaurants. They also include slate plates, on which menus or pleasant wishes to visitors are usually written. The most interesting thing is that making such a decor item is not at all difficult, and it will not require special costs. All you need is the back of an old chair and slate paint. By the way, young parents should also take this idea, because children love to draw with crayons so much.


It's amazing how many different and interesting interior items you can get using only old chairs. In addition, such old furniture with a new life is able to stylishly diversify the interior. Here, for example, is a coffee table made of a chair, which is also perfect for the role of a bedside table.
Shelves are never redundant, wherever they are - in the bathroom, in the living room, in the kitchen, in the hallway or even in the garden. A creative hanging shelf will turn out from the top of an old chair and will always delight not only with its functionality, but also with an attractive design.

We also made a selection. She's worth a look!
Do not rush to throw away old furniture. From a “four-legged friend” battered by life and honed by moths, you can get a real work of art with just a little effort and imagination. Today you will learn how to update an old chair with your own hands to give freshness and newness to your home interior.
Method number 1: decorating a chair with paint
Not only a real “old man’s” Soviet chair, but also a wooden “Viennese” and a folding country version are easily transformed with paint.

Coloring technology
To paint old chairs, you will need:
- acrylic paint;
- flat brushes made of synthetics (separately for varnish, paint and putty);
- gloves;
- putty;
- white spirit (for metal);
- lacquer remover (for lacquered models);
- matte varnish or wax;
- fine to medium grit sandpaper.

Restore old chairs according to this scheme:
- The first step is to prepare the furniture for painting: wash, sand with sandpaper. The surface should remain slightly rough.
- It is better to degrease the iron model with white spirit before painting.
- Treat lacquered furniture with a special lacquer remover.
- Mask all cracks and scratches on the surface of the legs and back with furniture putty.
- After that, paint the entire surface of the furniture in 2-3 layers, waiting for the complete drying of each layer. Open the product with varnish.

Interesting! If you want to achieve an interesting worn effect, then initially apply a dark shade of paint to certain areas, and then cover them with wax. Paint the entire area with the desired shade in 2 coats, and then go over the previously marked areas with fine-grained sandpaper to “expose” the dark areas.

- If you have not decided what color to paint the furniture in, then you can not go wrong by choosing a bright white shade. This color is versatile and goes well with all bright upholstery materials.

New! Chalk paints are a newfangled type of colorants that are not yet very common in stores, but we recommend using them because of the bright colors and super-fast drying.
- Use masking tape to paint individual areas of the surface.

Method number 2: seat constriction
Do-it-yourself restoration of old chairs by the method of constriction is the second most common technique after paint.
Interesting! Even if the stool does not have a comfortable soft seat, you can make it yourself.

Tightening process technology
For work you will need:
- dense upholstery fabric;
- furniture stapler;
- screwdriver or screwdriver;
- tape measure;
- self-tapping screws;
- overlocker for processing edges or a sewing machine.

An old upholstered chair is restored in this way:
- Turn the product over, laying it with a seat on the work surface. Using a screwdriver or screwdriver, unscrew the soft part from the frame of the product. If it is screwed not on self-tapping screws, but on nails, then pull them out with pliers.
- Measure the width and length of the seat, add 7 cm to each value, open the part from the new fabric. Finish the edges of the fabric blank on a sewing machine or overlocker.
- Lay the pattern face down on your work surface. Place the seat on it with the wrong side towards you. Make sure that the distance of future bends of the pattern is the same on all sides.
- Bend and fasten two opposite sides of the upholstery fabric to the seat with a stapler. At the same time, slightly stretch the material. The staples of the stapler are fastened in steps of at least 10 cm, and the corners are not yet fixed.
- Do the same with the rest of the sides.
- Lastly, pull the corners into the center of the seat and also secure with staples.
- Install the seat on the frame, fasten again with self-tapping screws. If initially it was held with nails, then it makes sense to replace them with self-tapping screws.

- A soft seat can be decorated with beautiful furniture carnations around the perimeter.

- Choose upholstery so that it matches the style of the stool. So classic jacquard does not look on modern designer furniture, and an old wooden chair with a back and patterns looks strange with geometric print upholstery.

- Often, chairs look perfect if their style uses the same fabric from which the curtains or curtains in the room are sewn.

The match looks harmonious.
Method number 3: sewing a cover with gathers in the corners
A clear advantage of sewing a cover is that this method is much cheaper than seat upholstery.

It is enough to purchase 2-2.5 m of fabric, correctly make a pattern and sew.

The fabric is selected on the principle of wear resistance, as products are constantly subjected to increased stress, especially in the dining room and in the kitchen.

To sew a cover on an old chair, follow these steps:
- First of all, you need a pattern. For measurements, you will need masking tape, paper or newspapers.
- Attach a large spread of the newspaper to one or another part of the product, mark the outlines of the furniture on paper, remove the excess with scissors.
- Prepare the second part, and attach it to the first, gluing it with masking tape. Having fully assembled the pattern, cut it in those places where the seams will be. Thus, you will get a more or less accurate pattern specifically for your product shape.
- Remember that you need to leave allowances for the seams and take into account the fractional orientation of the matter, especially if it will have a pattern in the form of stripes or large flowers. Pay special attention to the back. It happens that in order to recreate the exact bends, you will have to cut out a separate part along its side. If you do not have a goal to convey all the frills, it is enough to make wide allowances of 5-7 cm along the side cut of the back.

Important! It is better not to make the back cover very narrow, otherwise you simply will not be able to put it on the chair. Cut the back part wide or flared, then fold the excess into a pleat, and tie a beautiful bow at the back. If you like a "stretched" cover, then install a twisted zipper in one of the seams.

Method number 4: Decoupage of a chair with paper
Remaking old chairs with your own hands does not always require drastic changes. Sometimes a new chair will turn out from an old one if you mask minor defects, scratches and stains with an original fashionable print or beautiful patterns.

Decoupage will help you. Take:
- multilayer napkins with the desired print;
- PVA glue;
- a pair of brushes;
- scissors;
- matte clear lacquer;
- roller

To make original designer furniture out of old chairs, follow this algorithm:
- Clean furniture, paint as directed in Method #1.
- Separate the top layer of the patterned napkin, cut out the desired size fragment from it.
- If you want to change the whole decor of the old chair: from the back to the legs, then randomly tear the napkin into pieces of 10x10 cm.
- Lubricate the desired place of the future decor with plenty of PVA glue. Lay a cut-out piece of napkin on the desired piece of furniture, smooth it with a brush with the remnants of PVA, removing bubbles and smoothing out the wrinkles with a roller.
- The top layer of PVA should be as thin as possible. Leave it to dry for a day.
- At the end, cover the entire surface of the furniture with a transparent varnish in 3-4 layers, allowing each to dry.

As you can see, remodeling an old chair is not as problematic as it might seem at first glance.

Creative furniture decor solutions
- To give an old stool a touch of vintage, you can paint it pink, blue or cream. For painting, gold or silver paint is useful. On top of everything, apply craquelure varnish to the entire area. The effect of antiquity is created by small cracks from the varnish.

- An old stool will be saved by upholstery made of multi-colored straps. Weave them according to the “basket” principle, and fix them from below with self-tapping screws.

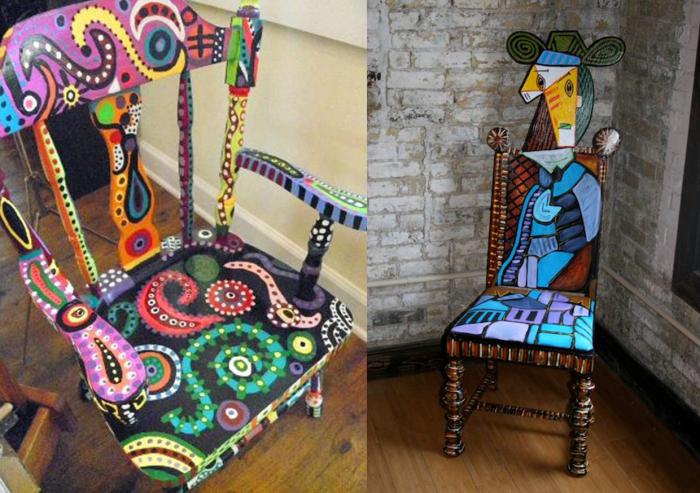
- Let your kids get creative with acrylics. Cover the result with varnish. You will not only receive designer furniture, but also a future family heirloom.

Now you know how to restore an old chair, turning it into an exclusive little thing for mere pennies. If you have other modernization ideas and restoration experience, share with readers in the comments.
Video: Restoration of an old chair
If you find that an old chair is completely worn out, do not rush to throw it away. Often old pieces of furniture bring with them pleasant memories of people and events in the life of your family. Yes, and what's the sin to conceal? Previously, furniture was made for centuries ...
Do not rush to throw away the old chair. If you update its upholstery, you can get a stylish, beautiful and durable piece of furniture. The restored chair may well serve not only you, but also your children. And we'll tell you how to do it!

How to update an old chair? Precleaning
To begin with, the surface of the chair must be cleaned of the old coating, whatever it may be. If there is a soft seat upholstery, it must first be removed. To do this, it does not necessarily require "male power". Try turning the chair upside down and you will see that the seat is held in place with screws that need to be removed. To do this, you need to arm yourself with a hammer (for knocking out the seat) and a screwdriver (straight or Phillips).

Now you can start removing the old coating. To do this, you can use the usual "sandpaper" of different grain sizes or a grinding sponge. It is important to sand the surface of the wood well. This will help to easily apply the coating of your choice in the future. Needless to say, this job is not easy. But it is possible to simplify the process a little by periodically moistening the surface to be treated. So, you can get rid of the dust.

Just do not be afraid that the old varnish becomes viscous from moisture. This is fine. After the chair is completely dry, you need to once again sand the entire surface well with fine “sandpaper”.
How to update an old chair? Process step by step
Now it all depends on your imagination. If you decide to varnish the surface of the chair, then you need to use a colorless primer so that the texture of the wood is clearly visible through the protective layer. You will have to use a primer layer in any case, even if you decide to paint the chair in the future.
The fact is that the paint lays down better and lasts longer if the surface is pre-primed. It is necessary to cover the surface with varnish in two layers. It is important that the first layer is well dried before applying the second. The varnish can be applied with a brush or sprayed on the surface.

You can paint the chair in any color. Now white furniture is considered very fashionable. And the upholstery of the seat can be chosen in contrast. Today, there are many ways to show originality, for example, using a stencil. Let it be flowers or any other ornament.
Another way to cover the surface of the chair is with beeswax balm. The surface is also pre-sanded and primed with drying oil, then covered with a thin layer of balm with a cloth. After twelve hours, the surface is polished with a brush.

Now you can start restoring the upholstery. The old one must be removed. Previously, it was attached to the seat with ordinary nails. You will also have to get rid of the foam rubber. It is necessary to cut out a new one according to the old standards. The fabric needs to be cut with a margin for hem. The upholstery material can be very different: as a special fabric for upholstered furniture, as well as regular linen or thick cotton. It is better to fasten the fabric with a furniture stapler. But if you don't have one, don't worry. You can use ordinary nails by nailing them with a hammer. It is important to remember that the material must be well stretched on all sides.
Now the seat can be inserted into its original place and fastened with screws.

How to update an old chair with a cover
There is another way to update an old chair - use a cover. It can be made from any fabric, hiding defects and imperfections without major intervention. The cover can be with a variety of frills, ruffles, bows, tassels ... You can make several options: a festive version and everyday. Show your imagination! Do not rush to throw away old furniture, try to become a designer, we are sure that you will succeed!


How to update an old chair. Decoupage paper
Do you have a dream to decorate a chair or mask flaws such as scratches and cracks? This is easy to do using decoupage. Any printed paper is suitable for this (magazine and newspaper pages, napkins, posters, cards, etc.). You need to fix the picture with PVA glue, and cover it with a transparent varnish.


Decoupage with cloth
Another way to update an old chair is decoupage material. A "new" chair will last a very long time. If suddenly threads begin to break out along the edges, they can be processed with PVA or cut off.

Other ideas
Multi-colored straps can become the salvation of an old chair. They just need to be twisted, like on a basket. To make a vintage chair, pastel paint and a pattern in silver or gold will help. Top coat everything with craquelure varnish.


Give free rein to your child's imagination. Let him paint the chair, and you just varnish his work.
How to update an old chair? A photo


