How to make a shelf out of pvc pipes. Making furniture from pvc pipes, how to do it yourself. Various interior elements made of PVC pipes
You can make a rack for a garage from various improvised materials, pipes are especially suitable for this. To assemble a storage system from them, it is not necessary to have a welding machine.
A few words about design options
Before you make the furniture in question, you should decide on its tasks and design.
Most often, racks from pipes of the following types are installed in the garage:
- wall- are a self-contained structure that is not attached to the wall. This makes the product portable. Another of its advantages is that the structure does not exert a load on the walls, which is important when they are not very strong, for example, framed or sheathed with drywall;

- Stationary- unlike wall-mounted ones, they have racks only on the front side, therefore, the supporting function of the rear racks is performed by the wall to which the shelves are attached. Therefore, such models are called stationary;

- - unlike stationary ones, these products have rear bearing racks, as a result of which the shelves are attached in a cantilever way, i.e. only from the back, while the front side just hangs in the air. The frame of such a product can be attached to the wall or be portable.
Note! Console models take up little space, but have a small carrying capacity, so they are not suitable for storing heavy items.

- Suspended- unlike all the above products, they are hung on the wall, so the entire load falls on the walls, not the floor. In fact, these are ordinary shelves, but more dimensional and interconnected by construction sites. They can be both console and regular, i.e. with front racks.

The most versatile are wall-mounted and stationary structures, as they allow you to store everything from tools and all sorts of little things, and ending with wheels and various heavy objects. If the garage is small, it makes sense to use suspended structures installed under the ceiling, as a result of which the lower part of the garage will turn out to be unloaded.
Wall mounted metal rack
First, we will tell you how to weld a wall or stationary rack from a pipe.
This work includes several stages:
- Design;
- Preparation of materials and tools;
- Construction assembly.

Project preparation
First you need to decide on the location of the future product in the garage, so as not to be mistaken with the dimensions. Write down the results immediately on paper.
Then you need to draw a diagram of the design. If , then its basis is made up of sidewalls in the form of two racks, between which jumpers are located.
The sidewalls are interconnected by beams. At the same time, lintels and beams form the basis for the shelves. Stationary racks have the same design, but without rear racks, often there are no rear beams. Therefore, jumpers are attached directly to the wall.
On the diagram, be sure to indicate the following design parameters:
- Overall height - to save space in the garage, it makes sense to make furniture as high as the ceiling. On the upper shelves you can store items that you rarely use;
- The length of the structure and the depth of the shelves - you have already written these parameters on paper, since they correspond to the dimensions of the site on which you want to place the product;

- The distance between the shelves - is selected depending on the dimensions of the items that will be stored on them. I must say that the distance between the shelves does not have to be the same. For example, rubber storage compartments can be made larger - 600-700 mm, and it is advisable to make the space between the remaining shelves smaller so that they fit more.
After preparing the project, you can start working.

We prepare materials and tools
First of all, you need to prepare the pipes. There are no specific requirements for their diameter or, for example, wall thickness.
Therefore, if you specifically buy materials for these purposes, estimate the future loads on the structure, and in accordance with them, select pipes "by eye". But, most often, such furniture is made from what is “at hand”, so you don’t have to choose.
Advice! For the rack, it is desirable to use profiled pipes, as they have greater strength. But, if you don’t have these, use the usual ones, i.e. round.
The only thing is, if you are going to make furniture not for a garage, but, for example, for a house or a summer residence (see), it is advisable to use chrome pipes for shelving, as they have a more attractive appearance.
In addition to the base material, you will need fittings to connect all the parts - 90 degree corners and tees. To find out the required number of them, count the number of joints at 90 degrees, as well as "triple" joints.

Flanges are perfect for the legs of the future design and fastening to the wall. The number of flanges that you need, also count on the diagram.
You should also prepare the material for the shelves - it can be plywood, OSB, boards or wooden slats. To fasten the shelves to the lintels and beams, use self-tapping screws and horseshoe-shaped brackets, which are matched to the diameter of the tubes.
To protect the product from negative influences and give it an attractive look, you will need paints and varnishes for wood and metal.

As for the tool, prepare a set like this:
- Bulgarian / hacksaw;
- Welding machine (if you do not have a welding machine, you can connect all the elements on the thread. In this case, you will need threading dies or another tool for this purpose);
- Metal files and sandpaper;
- Roulette and pencil;
- Electric drill;
- Electric jigsaw;
- Paint brush.
Important! If you make shelving for your home, do-it-yourself chrome-plated pipe is cut with a special cutter, which allows you to save the chrome coating.

It is also desirable to have a workbench with a vise, which will greatly simplify the work.
Construction assembly
The instructions for making the rack are as follows:
| Illustrations | Actions |
|
|
Mark the workpieces according to the dimensions of the parts specified in the project. |
|
|
Cut the blanks with a grinder or a special marking device. The result should be racks, lintels and beams. |
|
|
Cut the threads on the ends of all parts. |
|
|
So that fittings can be easily screwed onto the prepared parts, lubricate the threads with machine oil. |
|
|
Assemble the structure according to the project. First, the sidewalls are assembled from two racks and jumpers, and then connected by beams. If the structure is stationary, a flange is screwed onto the free end of the jumper. |
|
|
If the tubes are not chrome, paint them with paint. For these purposes, you can use automotive paint in a can. |


On this frame is ready. In the same way, the product is made by welding, the only thing is that the work is somewhat simplified, since there is no need to cut the thread.
Now you need to complete the shelves:
| Illustrations | Actions |
|
|
For the manufacture of shelves, mark the material from which you are going to make them according to the project. |
|
|
Cut the shelves according to the markup using a jigsaw or other tool. |
|
|
Sand the surface of the shelves with sandpaper or an electric grinder. |
|
|
Paint the shelves or varnish with a regular paint brush. |
|
|
To attach the shelves to the frame, use brackets and self-tapping screws. The latter are screwed in from below, as a result of which the fasteners are invisible. The main thing is that the screws do not go through the shelf. |


Note! Shelves are not required for all types of shelving. For example, it is more convenient to lay automobile rubber in the space between the beams. It also does not require shelves and a rack for pipes, which, most often, has a cantilever design.

With this, our rack is ready. By this principle, you can assemble a structure of any type.
Plastic rack
Recently, pipelines in houses and apartments are most often made of polypropylene pipes (PP), respectively, this material may be at hand in the garage. It is also quite suitable for making furniture.

Of course, a rack made of PP pipes has a slightly lower load capacity. However, in most cases, its strength is sufficient. It may well withstand various tools and other small things that are usually kept in the garage, or conservation in the cellar.
The process of manufacturing a plastic rack includes all the same three stages:
- Design;
- Preparation of materials;
- Manufacturing.
Preparation of materials
Since the design of the product is carried out in the same way, we will omit this stage and proceed immediately to the preparation of materials. So, in addition to polypropylene pipes, you will need fittings, as well as shelf material and brackets to secure the shelves. In fact, everything is the same as in the case described above.
Advice! For a plastic rack, you can make shelves from a plastic window sill. Such furniture will be resistant to moisture and other negative influences.

A set of tools will need the following:
- Welding machine (soldering iron);
- Cleanup;
- Scissors for cutting plastic pipes;
- Roulette and pencil.
Advice! The price of a good soldering iron is quite high. Therefore, for the manufacture of one rack, it is more expedient to rent it.
Manufacturing
The production of parts and assembly is carried out as follows:
| Illustrations | Actions |
|
|
Mark the pipes and cut them to get the posts, beams and lintels of the desired length. |
|
|
If the pipes are reinforced with foil, their edges must be cleaned. To do this, put a special device called a stripping on the edge of the part and turn it. Stripping like a pencil shavings will remove the top layer of the pipe along with the foil. |
|
|
Warm up the soldering iron. Wait until it turns off, then heats up again and turns off. |
|
|
Insert the end of the pipe and fitting into the nozzle and wait until the plastic softens. The heating time depends on the diameter of the parts and the device itself. Therefore, in the kit for the device there is a table indicating the ratios of all these values.
|
|
|
Insert the pipe into the fitting until it stops. Make sure that the fitting sits evenly, without distortions. In this position, the parts must be held without shifting so that the plastic cools down. According to this principle, assemble the entire structure. |


That's all the nuances of the assembly of the structure. As for the manufacture and fastening of shelves, this work is carried out according to the scheme described above.
Output
As you can see, pipes are an excellent material for making shelving, and besides, working with them is not difficult at all. But before you make a pipe rack, we advise you to take a few minutes and watch the video in this article, which contains useful information.
From gadgets.masterkit.ru we write about amazing inventions, useful gadgets, interesting ideas that might change the world, and also publish instructions on how to make something unusual and useful. Today we invite readers of our blog to update their interior.
“Could you play the nocturne on the flute of the drainpipes?” (from)
You can hold books, or shoes!
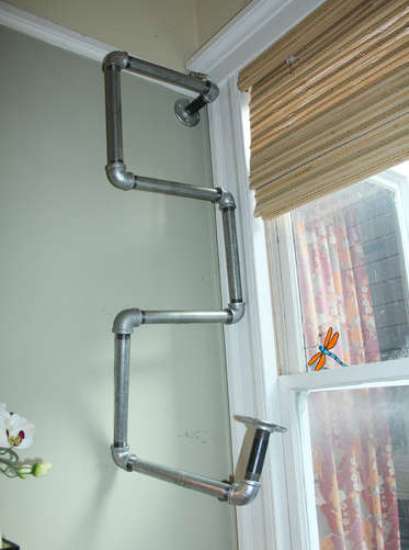
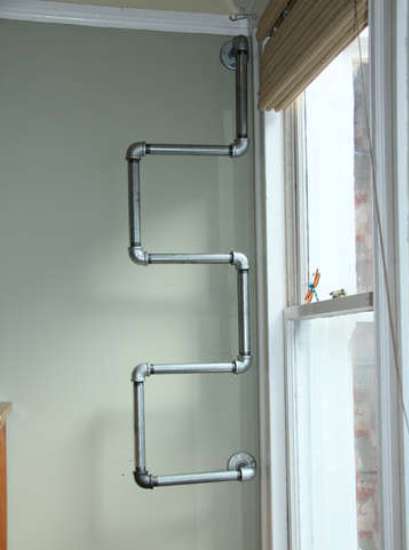
A water pipe shelf is a stylish project that can be done by anyone with their hands growing out of the right place. But by the way, the project is so simple that even if it comes from the wrong one, it will still work out. You just need to want to add something new to your interior.
The shelf is quick and easy to install, and its rugged, chic scuffed look makes this useful piece a great design statement for any room.
All pipes are threaded at the ends, which makes it possible to change the configuration of the shelf when the previous one is already tired.
Step 1. Materials
 Flanges and screws

Pipes and corner
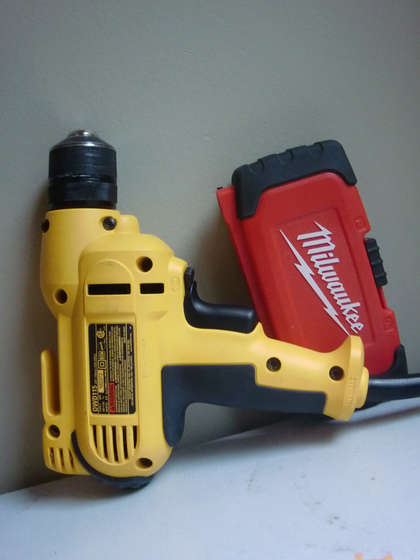
Drill and drills
materials
Flanges for installing pipes on the wall - 2 pcs.
Screws 12×2″ - 8 pcs.
Dowels - 8 pcs.
Threaded water pipes (12×1″) - 8 pcs.
Threaded water pipes (5×1″) - 2 pcs.
Corners of the "pipe-pipe" type (diameter 1 ″) - 9 pcs.
Instruments
Drill driver
Drill
Pencil
Yardstick
Step 2 Mounting the flange on the wall
 We try on the flange and outline the holes
 Drilling holes
 We fix the flange with screws
Search for crates
If you have concrete or brick walls without internal cladding, then drill the holes with a 6 mm drill bit and use the appropriate dowels for the screws.
If your room is lined with gypsum boards from the inside, then it is better to choose the places where the wooden crate runs to fasten the shelf. You can find it behind the wallpaper with a magnet, because the plates are attached to the crate with iron pins or nails.
Flange mounting
After the location of the shelf is planned, we determine where the first flange will be located and mark with a pencil the locations of the holes for the screws.
We drill pilot holes with a drill, the diameter of which should be slightly smaller than the diameter of the screw (in the case of plasterboard walls).
Screw the flange to the wall.
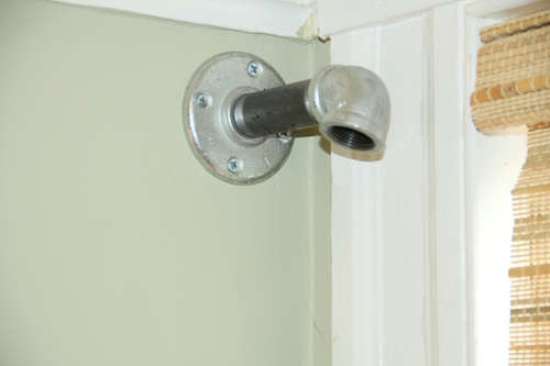
Step 3. Attaching the Pipe
 Screwing the 5″ pipe into the flange
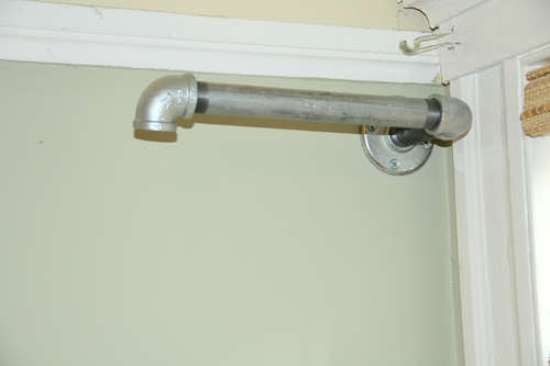
 We screw the corner onto the pipe
 We attach a piece of pipe 12 "
 Using a piece of 5″ pipe as a lever
 We mount the second corner

Let's dwell on these shelf sizes for now.
Let's start installing the pipes. We screw a 5-inch pipe to the flange. We screw a corner onto it, and attach a 12-inch piece to it.
Trick: To tighten the joint, use the 5" pipe as leverage.
Step 4 Mounting the Second Flange
 We assemble this node before joining the rest of the structure
We screw the last corner with a flange

Drilling holes for the second flange
We fix the flange to the wall, and the design is ready
Screw the second 5" pipe into the second flange and attach the elbow to the other end of the 5" pipe before attaching to the rest of the structure.
We determine the place where the flange is attached to the wall and mark the holes for the screws. We drill holes and screw the flange.
Step 5. Bookshelf
 The bookshelf looks like it was here
We put our books on pipes vertically or lay them flat. In the latter case, it is better to balance the bottom books, this will guarantee stability for the entire stack.
Step 6 Shoe Rack
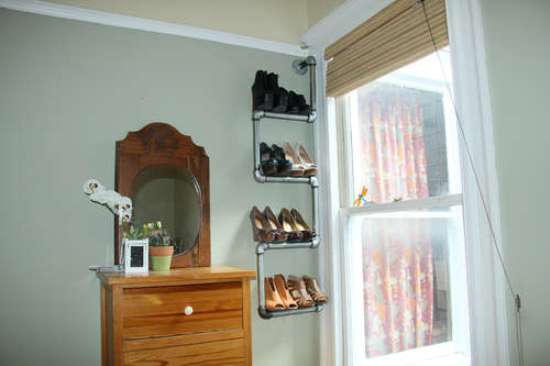 The shoe rack also fits perfectly into the interior.
Any girl will agree how amazing this shoe rack looks! Many people just like to look at their shoes, and on an ordinary wooden shelf, shoes look awkward and take up a lot of space. Now that you have our amazing kickstand, your favorite shoes can always be pleasing to the eye.
But the story doesn't end there.
The craftsmen continued the project and screwed on the light bulbs - and, indeed, the wires can be run inside the pipe. Agree, stylish!
 Paradoxical as it may seem, but harmony is evident!
By the way, a competition is announced for the method of attaching the base to such a structure. We will publish the most elegant engineering solution in one of our issues. Write to us by email [email protected]
Also in the new edition.:
Our gadgets: expense calculator, penguin voice note, video glasses.
Text messaging by hand using ... a pen (concept) - the possibilities of communication are expanding dramatically!
But this is already history! How much did the first mobile phone weigh and what did it look like?
Subscribe to the mini-magazine by email, get updates from our blog on Lifehacker by RSS.
Share the article with your friends through the social network buttons, it's so convenient!
Building a house or renovating an apartment is always accompanied by a bunch of leftovers from consumables. Pipeline repair is also no exception, because after replacing metal pipes with plastic ones, there are a lot of scraps left, as well as connecting elements - fittings that many owners simply throw away.
However, there are also such creative people who can make durable and original furniture out of such rubbish, for example, tables or chairs, as well as other household items such as an organizer. In this article, we will analyze in detail some of these PVC pipe ideas.
Do-it-yourself children's chair made of plastic pipes
Polypropylene is a hypoallergenic and non-toxic material, so you can make various children's furniture from it without worrying about the health and well-being of the child. By embodying ideas from plastic pipes with your own hands, you can easily assemble a table, playpen, chair, etc.
One of these simple projects can be a comfortable highchair, which is assembled from pipes and fittings like a designer. The size of each detail will depend on the size of the desired result, but below we will give instructions in which we will tell you how to make a chair for a five-year-old child.

To make a chair, you will need the following materials and tools:
- Glue for PVC;
- Approximately 3 meters of polymer pipe;
- 6 T-fittings;
- 8 elbow fittings (90°);
- Durable fabric;
- Saw with fine teeth;
- Sewing machine;
- Scissors.

Building a chair:
- The first step is to cut the pipe into segments: 7 pcs. 33 cm(A), 4 pcs. 20 cm(B), 4 pcs. 13 cm(C) and 2 pcs. 18 cm(D);
- Take two parts A and fasten at all ends to the corner fitting;
- Insert all elements B into each of the fittings;
- On each element B, put on T-shaped connectors, unscrewing their perpendicular part perpendicular to element A;
- Connect the T-fittings in pairs with elements A. As a result, you should get parallel legs of the chair;
- Insert all elements C into the free ends of the fittings;
- Next, you need to put the structure so that the ends of the legs "look" at you;
- Take two corner fittings and put them on the parts C closest to you;
- Slip the two T-pieces over the C pieces further away from you, turning them so that the center connections are facing you;
- Next, you need to connect the inserted fittings with parts A parallel to the legs of the chair;
- We insert parts D into the free ends of the T-shaped fittings and put on them the corner fittings, turning them “face” to each other;
- We connect them with element A, finishing the back of the chair;
- Make a seat out of fabric by stretching it between parallel bars;
- Glue all connections, after which, let the chair dry.
Office table with plastic frame
Buying even the cheapest office desk can be a big deal for some people, so we'll show you how to make a desk out of plastic pipes. This project differs from the previous one in its complexity, so you will have to think through some parts on your own, but we will try to explain everything to you as clearly as possible.
First of all, you need to decide on the size of the table. In our case, we take a finished worktop (915x2030 mm), under which we will assemble the frame. When choosing a countertop for your own table, pay attention to its weight and be guided by the rule: the less weight, the better for your table. The best solution for a countertop would be a hollow door leaf. You can also assemble the countertop yourself using flat boards, fasteners, a saw and a drill.

First of all, prepare 12 meters of plastic pipe and cut it into the following parts:
- 5 pieces of 7.5 cm;
- 10 pieces of 30 cm;
- 4 pieces of 50 cm;
- And 4 pieces of 75 cm.
Of the other parts for the frame, you will need the following:
- 4 T-fittings;
- 4 four-way fittings;
- 2 cross fittings;
- 10 caps for pipes and fittings.
Having prepared all the necessary details, you can begin to assemble a table from polypropylene pipes. The first assembly is best done without the use of glue, and after assembly, glue all the joints one by one. Start the assembly by constructing the sides of the frame, on which the countertop will rest.

Next, assemble the back, which will connect the two already assembled. To give the table additional stability, we recommend making a third leg on the back wall. When assembling the table, carefully monitor the parallelism of all elements in order to end up with an even design.
At the final stage, it is necessary to connect all the parts into a single structure, having received the table frame. Check it for strength, correct the irregularities, after which, glue all the joints.
To fix the table top:
- Lay the tabletop on the floor, turning it "face" down;
- Place the frame on top so that the top plugs fit snugly against the countertop;
- Circle adjacent plugs;
- Disconnect the plugs from the pipe, screw them to the countertop at the marked places;
- Install the table frame, and put the tabletop on it so that all the plugs fall into place.
As a result, you will get an excellent table made of PVC pipes with your own hands. This material is so versatile that you can even make a PVC pipe bow that will work just fine.
Shelving for summer cottages
After repairs, not only polypropylene pipes can remain in the house, but also a metal profile, from which you can try to make a shelving for a summer residence without using welding. For work, we need only a tape measure, a pencil, a screwdriver and a hacksaw.
First of all, it is necessary to design the future rack. Draw a diagram on paper, observing all dimensions. Next, you can buy a profile to an existing one, as well as find several sheets of plywood 15 mm thick. You can also make a PVC pipe rack with your own hands using a profile diagram.

Let's analyze the manufacturing process using a specific example:
- Take the profile and cut it into pieces: 4 vertical posts, 8 front and 8 rear crossbars;
- Collect 4 frames, which should become shelves in the future;
- Using self-tapping screws, fix the received frames on vertical racks;
- If desired, you can screw the rack to the wall and paint it, after which, lay the plywood on the frames, making the shelves.
Various interior elements made of PVC pipes
To decorate the interior, as well as create useful PVC pipe structures, you can use very short lengths of pipes. So you can make organizers from short pipes, where you can put shoes, writing utensils and other small things into the holes.
You can also easily make wine shelves from PVC pipes with your own hands. To do this, simply glue a few pipes, and screw the resulting structure to the wall. Similarly, you can make a holder for glasses. To do this, it is enough to cut the plastic pipe lengthwise, after which, fix it on the wall. The leg of the glass fits perfectly into the cut hole, and the rigidity of the polymer pipe does not allow it to fall out.


If your house does not have enough space for outerwear, then a plastic pipe hanger is an excellent solution to this problem. You can design and assemble such a hanger, starting from examples with a table and a children's chair.
In conclusion, I would like to say that plastic pipes are a cheap and light raw material for creating various decorative elements. Any object created by you can always be painted, covered with sparkles, or decorated with various elements, for example, shells glued on glue. Polypropylene rings can also be used for seasonal decoration of an apartment, for example, for the New Year, you can make a wall panel and fill it with New Year's paraphernalia, such as balls and figurines.
As you can see, in order to create a cozy atmosphere and decorate an apartment, it is not necessary to spend a large amount of money, because the main thing is a creative approach that will allow you to create the desired result at minimal cost.
Hello dear readers! If you look closely at the objects around us, while connecting your imagination, then you can find at least several options for each of them. It would seem, well, what can be made of PVC pipes, because they are used exclusively for the installation of sewers, in fact, this material is just a godsend for craftsmen. After all, the simplest PVC pipes can quite easily and quickly transform into incredible household items, below we have prepared for you a whole selection of relevant ideas on this topic, and of course, each idea is supported by a photo for clarity.
What can be done from PVC pipes.
How to give one form or another to PVC pipes.
In order for the pipe to subsequently be bent or flattened, it must be heated with a gas burner, and immediately given the necessary shape. As a last resort, if there is no burner in the house, you can heat the pipes over the fire of a gas stove. And you can cut the pipes with a metal saw or a jigsaw, you can connect all the parts using cold welding (for this you need to purchase a special adhesive).
1. Car trunk.
Here is a trunk for a car can be built from water pipes. No less interesting is the holder for a bicycle on a car.


2. Side on the bed.
So that the child does not fall out of bed at night, you can make an impromptu side.


3. Barrier for a doorway.
Such a gate can be made on the doorway, so that the child will not be able to leave the room.


4. Vase and flower pots.
By cutting off a cylinder of the required length from the pipe, and pasting it with a self-adhesive spectacular film, you can end up with a wonderful vase, inside which you can place a glass of water and put fresh flowers.


5. New Year's decor.
Festive wreath.
We cut pipes of different diameters into small cylinders of the same length, glue them together to form a wreath, paint with suitable spray paint, drill holes on top and thread the rope, hang the wreath on the wall, and put small Christmas balls into several cylinders.


Wall tree.
We take pipes of different diameters, cut them into cylinders of the same length. We prepare the canvas, stick cylinders on it, forming the outline of a Christmas tree, create a footboard from a large pipe, hang the composition on the wall, and put various Christmas decorations into different cylinders.

6. Children's waterfall.
To harden a child, you can prepare such an impromptu waterfall by connecting two hoses with water turned on to the footrests of the product, and making holes for water drainage in the top bar.

7. Children's house.
Children love to build various houses, huts and other shelters, you can make it easier for them by preparing a frame from PVC pipes and sewing a cover from waterproof fabric.


8. Awning for the pool.
Such an awning, in addition to creating shade, can also serve as a gate for water polo.

9. Holder for glasses.
A great idea for a street bar, a slot is created in the pipe along the width of the glass leg, the holder legs are screwed on top, for which the structure is attached to the ceiling surface.

10. Place for bicycles.
Such a "stall" for children's bicycles or scooters will help keep the yard in order.

11. Cells for wine bottles.
Bottles of wine can be stored in large cylinders of pipes glued together.

12. Stand for a drill.
The stand for the drill will help to create identical holes in strictly defined places of products.

13. Ladders for cats.
Cats are very mobile creatures that value freedom, so in confined spaces they begin to wither, so that this does not happen, they need to be constantly occupied with something, and such an interesting design with slides, stairs and rungs will help in this matter.

14. Vertical beds for strawberries.
Using a drill with a special round nozzle, large holes should be drilled in the PVC pipe, then the pipe should be dug into the ground, and soil should be poured into it, and then strawberry seedlings should be planted in the round holes.

15. Stand for kitchen appliances.
Such pipes can make a wonderful stand for forks, knives and spoons.

16. Stand for scissors, pencils and tools.
Pieces of pipes fixed on a wooden plank can serve as supports for pencils. And vertically arranged cylinders can serve as a supply for tools. To prevent tools from falling down, the bottom of the pipes can be foamed with mounting foam.


17. Notebook stand.
Their such pipes can make a wonderful stand for a laptop, especially since there are not very many parts required, a few tubes and connecting elements. In the end, the product can be painted from an aerosol can in any color.

18. Cells for shoes.
Summer shoes can be stored in tube cells, and to make them look more presentable, they can be pasted over with a suitable adhesive film.


19. Organizer for scarves and underwear.
The stores sell special containers with cells in which you can store linen or other accessories, but you can create such an organizer yourself by simply cutting PVC pipes into shallow cylinders and gluing them together.

20. Partition for weaving plants.
From such pipes, you can create entire fences or partitions, along which climbing plants will subsequently trail.

21. Stand and holder for curling iron or hair dryer.
Thanks to such stands, the hair dryer, iron and curling iron will always be in their places. And also after use, you do not have to wait for the curling iron or iron to cool down.


22. Pen for dogs and other domestic animals.
So that newborn puppies or kittens do not crawl in all directions, you can build a small aviary for them. Well, for more active animals, you can create a large full-fledged corral, not forgetting to cover it with a net.


23. Holder for a watering hose.
To keep your garden hose out of your way, you can store it on this great stand.

24. Frame for a summer gazebo.
Continuing the theme of what can be made from pvc pipes, we want to show you a great seasonal idea for a gazebo. This design can be covered with an awning on top or light curtains can be hung on the sides, which will now and then effectively rise even with a slight breeze.

25. Frame for a street cinema screen.
Fans of watching movies with friends will appreciate the idea of an outdoor screen, its frame can be made from pvc tubes, and the screen itself from the remnants of a matte stretch ceiling.

26. Skittles.
Children will be delighted with such a mini bowling alley.

27. Puppet theater.
To create such a children's theater, you just need to assemble the frame and hang the curtains.

28. Stand for sandbox.
It will be more comfortable for the child to play in the sandbox if it is raised above the ground, besides, the sand will not get into the shoes and under the baby's clothes.

29. Shelving.
Such a rack will allow you to keep the room in order, as it can accommodate an unlimited number of things and toys.


30. Frames for pictures and mirrors.
Rings glued to each other, cut from pvc pipes, will eventually serve as a wonderful frame for a picture or a mirror.


31. Lamp.
Lamps made from water pipes look very nice, especially if the pipes are decorated with rhinestones or complemented with curly cuts. To implement the idea, a base with a light bulb is installed in a pipe with pre-created beautiful and elegant slots, and a hole is created on the back of the product for the wire to exit, it remains only to plug the lamp into a socket and enjoy an interesting muted glow.


32. Table.
You can assemble a wonderful table from pvc pipes by covering it with a wooden tabletop or build a bench (at the end of the article there will be a video on how to make a bench from such pipes).


33. Chairs.
Such pipes make excellent garden chairs, smooth lines can be achieved by heating the pipes with a gas burner, giving them the desired shape with your hands and leaving it to cool in this state. But even an ordinary geometric chair will look great; the seat can be created from ordinary chintz or cotton fabric. But you can go further and create folding chairs that will be very appropriate on vacation, for example, fishing.
After repair or construction work, a lot of materials remain. Fans of handmade items will no doubt find their use. After repair work in the bathroom, you can easily make furniture from pvc pipes with your own hands, using leftover materials for this.
Depending on the type of furniture that is planned to be made, the set of materials and tools may vary. But basically, you will need the following tools to work:
- perforator;
- screwdriver;
- hacksaw;
- scissors or knife.
Materials needed for work:
- pipe cutting;
- glue;
- connecting elements of various shapes;
- plugs.
To make the furniture look more beautiful, paint is useful. Beds, tables, shelving can be painted in the color you like. For beds in the children's room, a delicate pink, blue, bright orange, yellow shade is selected.

PVC materials

Soldering iron for welding plastic pipes

Variety of types of plastic pipes

Types of plastic pipe connections

Stages of the plastic pipe welding process
Manufacturing and assembly process
Below are the diagrams, drawings necessary for the manufacture of furniture from pipes. With their help, you can make armchairs, chairs, beds, racks, tables, a huge number of decorative elements. Products are interesting, durable and safe.
Armchair
The original way to use plastic pipes is to make a chair out of them. There are many options for its manufacture. It all depends on the desire, capabilities and imagination of the master. Plastic pipelines can become a material for the manufacture of a chair. You can make it with pvc pipes, a knife and glue.
To get an unusual chair, you need to do the following:
- First, cut pieces of different lengths. The main thing is that the longest segments should be the same length. They will act as supports;
- long will be needed for the back, armrests;
- then the segments are glued together so that the surface of the armrests and the backrest is on the same level. To the bottom, the length of the segments changes.
Thus, it turns out an interesting chair that will decorate any room in the house. To make it even more comfortable, pillows are placed on it or sheathed with foam rubber. In such an armchair it is pleasant to spend time, read a book, watch TV.

Details under the letter "A" determine the width and depth of the seat. The length of the pipes "B" determines the height of the seat from the ground. Details under the number "C" are the height of the armrests, and under the number "D" are the height of the backrest.


The above method makes a table, a bed. Different segments are glued together - it turns out the base of the bed. On top of it you need to put a comfortable mattress, pillows, blanket. This is a perfect place to sleep and rest.
In addition, cribs are made from this material. To do this, you need to study the diagrams and drawings. Then prepare the desired size segments. They are connected with fittings. If you fasten the parts together with glue, they will be very strong and durable. Without the use of glue, the structure will turn out to be collapsible and can be removed at any time. The bed for the kid will be unusual, reliable and strong. If there is more than one child in the family, several beds can be made.
Another option for a bed for two children made of pvc pipes is a polyvinyl chloride bunk bed, photo. It is not difficult to make it, you only need a drawing, a diagram. Following the instructions, you can create a variety of bed options: single or double, bunk.


Table
You can make such furniture from polypropylene pipes with your own hands, like a table. Its frame will be made of pipes, and the countertop will be made of any other material. At the same time, it must be remembered that PVC pipes are not suitable for heavy loads. The lighter the table top, the better.
The size of the countertop in this case will be 91.5 x 203 cm. The following materials and tools will be needed:
- door leaf as a tabletop;
- fasteners for connecting parts;
- drill;
- saw.
You will also need segments of the size:
- 30 cm - 10 pcs;
- 7.5 cm - 5 pcs;
- 50 cm - 4 pcs;
- 75 cm - 4 pcs.
To assemble the frame, prepare:
- t-shaped fittings - 4 pcs;
- plugs for pipes, fittings - 10 pcs;
- 4-way fitting - 4 pcs;
- cross fitting - 2 pcs.
According to the scheme, first assemble the side elements. Then proceed to the back of the table. Pay attention to the stability of the structure. All details must be the same.
The last step is to collect all the elements in one design. Inspect the product for irregularities, sharp parts. Carefully process everything, glue the connections. A table is made in such a simple way.

Tool

materials

Preparing parts of the right size


Connecting Fragments


Rack
Armchairs, beds, tables - not the whole list of products that can be made from this material. Another useful piece of furniture is a shelving unit. Design parameters can be very different. It all depends on the size of the room where it will be installed, and the desire of the master.
First of all, it is recommended to make a drawing, a diagram of the future product. Next, prepare the required amount of a certain size of parts for them. Connect everything together. Plywood or other material can act as the base of the shelves. The only thing to keep in mind is that the materials are not suitable for heavy loads.
Such racks are used for flowers, toys in the children's room. Shelving can be installed in the garage. There products will be a great place to store tools and other things. You can place garden tools on the shelves: pots, tools. PVC products look unusual, neat, do not require additional decoration. Plastic shelves, racks do not harm the health of others, they are durable and environmentally friendly.


The nuances of working with the material
Models from water pipes are unusual, original. They decorate the room, garden plot. Do-it-yourself plastic furniture will bring zest to the interior and attract the attention of guests.
Furniture is made from plastic pipes. Two types of material are used in production: polypropylene (PP) and polyvinyl chloride (PVC). Each of them has its own characteristics and is suitable for the production of different products. Polyvinyl chloride is a cheaper material. It is more commonly used for sewer pipes. Its advantages include:
- strength and durability;
- ease of installation;
- low cost.
The disadvantage of PVC is that when exposed to high temperatures, the pipes begin to deform. Unlike them, products made of polypropylene are not subject to change in shape at high water temperatures. They are able to withstand liquid heating up to 60 degrees, and if the pipe is reinforced, even more.
Both materials are equally suitable for making furniture. In addition, there are a huge variety of items that are made from scraps. These are shelves, coasters, a frame for a mirror and more. Furniture is easy to assemble. The design consists of pipes and fittings, the elements are also glued together. Even a beginner can make pieces of furniture from pvc pipes with his own hands.


How to bend a pipe
Products made from this material look unusual. They will look even more interesting if they consist of curved parts. For example, a table with curved legs. In addition, various decorative elements are made from pipes, which come in different shapes. In such cases, bending the pipe is simply necessary.
For this you will need:
- funnel;
- sand;
- Scotch;
- plate;
- metal container;
- gloves;
- saw (hacksaw);
- knife (scissors);
- sandpaper;
- a device for bending pipes (it can be different, mostly improvised materials are used).
The process looks like this:
- cut a piece of the required length;
- seal one end with tape;
- using a funnel, pour in as much sand as will go in;
- heat the measured amount of sand in a metal container;
- put on protective gloves for safety, carefully pour sand into the pipe through a funnel;
- seal the other end with adhesive tape, then the sand will not spill out during the bending process;
- leave for a while, it will warm up from the inside;
- when it warms up, start bending;
- give the pipe the desired shape;
- at the end of the work, tear off the adhesive tape, pour out the sand;
- when the pipe cools down, it will be the required shape.

One end of the pipe is sealed with tape

Using a funnel, pour sand into the pipe

Having measured the required amount of sand, pour it into a metal bowl and warm it up well

Using the same funnel, pour the prepared sand back into the pipe.

Cover the other end of the pipe with tape. This is necessary so that the sand does not spill out during work.

Leave the pipe like this for a couple of minutes. During this time, it will warm up from the inside. The material will become soft and pliable.

While the sand is still hot, you can shape the cut piece of pipe into the desired curve or shape. After that, remove the tape and pour the sand back.
decoration
One of the options for decorating furniture made of pipes is to use different colors of the material. A table with blue legs will be a bright element in the room. Products come in different colors: white, black, blue, blue, yellow. Connecting elements also come in different shades. Thus, the pipes will be one color, and the fasteners will be another. Combinations of white with blue or black with red look beautiful.
If we are talking about armchairs, chairs, they are decorated with decorative pillows. The foam lining on the back and seat is sheathed with a beautiful bright fabric. Decorative pillows decorate the product, make it cozy, comfortable, original. They come with embroidery, buttons or tassels. The color range of pillows is varied. When choosing it, it is necessary to take into account the overall design of the entire room.
Children's furniture should be interesting, colorful. It is recommended to cover the chair, high chair with a durable fabric with a bright pattern. It can be a cartoon character, toy cars, dolls, stars and much more. Pay special attention to furniture made of pvc pipes for children, it must be safe, without sharp elements. Otherwise, babies may get hurt.
It is not difficult to make furniture from pvc pipes. It will become a highlight in the room, will attract the attention of guests. Plastic pipes are inexpensive, so you can save a lot of money, as new furniture is expensive.