What to convert an old stool into. How to update and decorate an old chair or stool with your own hands. Metal washers and bolts
If you want to update the furniture in your house a little, then check out the interesting information on how to restore old chairs. After all, most often they spoil the appearance of the room. And the hand does not rise to throw away a rarity. Moreover, such pieces of furniture can serve for more than a dozen years.
Benefits of working independently
By updating an old chair and making it modern, you benefit in two ways:
- You have the opportunity to change the image of the furniture to any desired. At the same time, adjust it to the main shades of the interior. And you absolutely do not need to look for similar furniture in stores.
- Save time and money. Often the restoration of furniture is carried out with the help of improvised means. Even the costs incurred by you for the purchase of consumables are only 20-30% of the cost of a new chair.
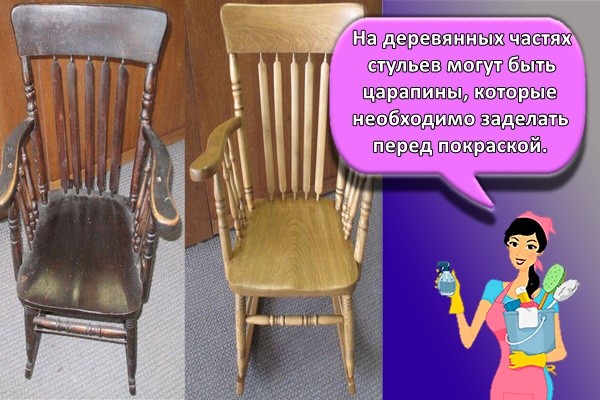
Important: before proceeding with the decorative restoration of wooden chairs, be sure to check all fasteners. Tighten loose bolts or replace with new ones. If there are cracks, chips, debris, they need to be repaired decoratively. To do this, use a special carpentry wax. It fills the voids in the wood, hardens and looks like an integral part of the chair.
Restoration methods
Option 1: coloring
To perform the work, you can choose any shade of paint. The main thing is that it be chalk or acrylic. They lie better than others on wooden surfaces and do not exude a specific smell after drying. Also, for the process of restoring a chair with or without a back, prepare:
- Fine-grained sandpaper.
- The brushes are flat. Better synthetic (you need two pieces - for paint and primer).
- Primer (for metal or wood, depending on which chair we will paint).
- Rubber gloves.

We perform the work step by step in the following sequence:
- First you need to wash the chair from dirt and dust.
- If you are working with wooden furniture, then it will have to be sanded. To do this, carefully go over all its surfaces with sandpaper. It is important that the tree acquires some roughness. A metal chair can simply be degreased with white alcohol.
- Old varnish is best removed with a special remover.

- Now we cover the furniture with a primer. Preferably in two layers. Let each one dry for 24 hours.
- After both coats of primer are dry, you can start painting. Apply paint in 2-3 layers. Dry each one well. Make sure that it does not form smudges.

If there is a desire to make antique staining, as in the photo, then apply a contrasting darker one under the top layer of paint. And apply the top layer not with a continuous coating, but with bald spots. More often, the back, seat rim, legs and armrests are decoratively distinguished in this way.
 Design option
 Option 2: varnishing
Dark wooden chairs without visible chips and cracks can simply be laminated. That is to cover with a new varnish. To do this, you will first have to process the entire surface of the furniture with a wash. She will remove the old layers of varnish. For further work, prepare:
- Wide and narrow brushes;
- Mordant;
 Stain shades
 - Lacquer on wood.
To make the chair look noble and like new, first cover it with a layer of stain. It darkens the wood. Brings it to a shade of mahogany or wenge (if covered in 2-3 layers).
When the stain is dry, alternately apply 2-3 layers of varnish. Let each one dry.

Important: when working with varnish and stain, use a protective mask or try to restore old chairs at home on the street.
Option 3: make a soft seat
This technique allows you to get a nice piece of furniture from an old chair. Moreover, the upholstery of the seat can be adjusted in style, pattern or shade to other interior items of the room (curtains, bedspread, wallpaper, carpet). For work, prepare the following tools and materials:
- A piece of plywood to fit the seat of the chair;
- Jigsaw;
- foam cut;
- Durable upholstery fabric (note that it must withstand numerous mechanical impacts well. In this case, folk, tapestry fabric, matting, etc. are excellent);
- Construction stapler;

- Emery;
- Primer;
- Acrylic or chalk paint of the desired shade (or varnish);
- brushes;
- Gloves.
If you are restoring a Viennese chair, then completely dismantle the old upholstery on the seat and back. And if you want to update just a wooden chair and make its seat soft, then use a plywood jigsaw to cut the exact blank according to the parameters of the seat.

On it or on the seat of a Viennese chair, fix the foam rubber of the desired format and thickness. Put it on glue.
Now cover the workpiece or seat with a cloth, fixing it from the inside with a construction stapler.

All wooden parts of the chair must be sanded and varnished or painted as indicated above. When the chair is completely dry, mount a new seat on it in reverse order.
 With new seat
 Important: if you are arranging a soft seat on a chair that did not have it before, then tuck the upholstery fabric under the seat and fix it with a stapler in the same place or nail the soft seat along the edge with decorative carnations. Looks very noble.
, among which are sometimes pieces of furniture that were very useful, but outdated, and they are usually changed.But even if you bought a new piece of furniture to replace the old one, something different, but no less useful, can be made from the latter.
Old chairs can be found in almost every home, and with a strong desire to replace them, but still you should not throw them away, as you can make other useful things for the home, garden and summer cottage from old chairs.
For example, from an old chair you can make a towel rack, a garden bench, a convenient pet feeder, and much more.
Here are the most interesting crafts that you can make using old chairs:
Remaking an old chair with your own hands: a street bench.
For such a shop you will need two or three chairs. These chairs can be spray-painted or left with a vintage look.
1.1. If the chairs are too high, you can file their legs a little.
1.2. You can purchase special cushions for chairs. Some are sold separately (in which case they should be connected with a line), but you can also find 4 pads connected together and cut off the excess.
1.3. To make three chairs look more like one bench, you can purchase or find two or three boards that need to be cut to the required length (the length of three chairs) and connected.
* If desired, you can round the ends.


1.4. Prepare a piece of fabric that is longer and wider than the length and width of the pads. Lay the fabric on the floor with the pattern down and place the pillows on it.

1.5. Lay the connected boards on top of the pads.

1.6. Bend the fabric and use a stapler to attach it to the boards.

1.7. It remains to put the boards with pillows on the chairs and add a few simple pillows for decoration.
New life for old wooden chairs: large dog feeders.
Tall dogs will find it easier if the feeders are a little higher, especially older dogs who find it difficult to lower their heads all the time.

All you need is a file tool, a bowl and a pencil.
2.1. Before you start cutting a hole in the chair, you must first process it with sandpaper.

2.2. Place the bowl upside down on a chair and trace around with a pencil. After that, inside the resulting circle, draw a circle of smaller diameter. This can be done with a pair of compasses or a plate that is smaller in diameter than the bowl.

2.3. Make a hole inside the circle with a drill, from which you can then start cutting the circle. You can first cut out a circle of smaller diameter and check the stability of the bowl in the formed circle. Make the circle even bigger if necessary.

2.4. Sand the inside of the hole with sandpaper.
* You can paint the chair and then insert the bowl.


Wall organizer from an old chair with a back.
By dividing the chair into parts, you can create a wall hanger or organizer, as well as a comfortable stool.

The back and seat will not be easy to separate, but then everything will be easy.
If necessary, process all the details with sandpaper and paint.
To make a comfortable stool you will need:
Tools for separating chair parts
Sitting from a chair
Durable fabric and pillow filling or regular small pillow
stapler
Hot glue (if needed) to hold the stuffed fabric together.
1. Attach the fabric to the seat with a stapler, but leave one side intact to fill the resulting pocket with pillow stuffing.

* You can also use a small pillow instead of filling.

2. Attach the seat back to the chair and you have a beautiful stool.
3. You will need hooks for the wall organizer. After you have screwed or glued the (self-adhesive) hooks, the organizer can be hung on the wall in the hallway, room or bathroom (on the door, for example), where you can hang towels on the hooks.
Converting an old chair into a menu board
You can make a beautiful menu board out of an old folding chair.


For this you will need:
MDF sheets
Seat separation tools
Blackboard paint
Sandpaper (if needed)
Paint or spray paint (if necessary).
1. Cut out squares of the required size for each chair from MDF (if there is one chair, then there is one square from MDF, respectively).
2. Paint the MDF square with chalkboard paint.

3. Remove the seat from the chair and bolt a painted MDF square in its place.

* In this example, for beauty, 2 old wooden parts were attached to the board, which fit the style of the board.
4. To make the legs stand normally, you can attach a chain between them.

How to convert a chair into a coat rack

You just need to detach the back of the old chair, sand it down and paint it.
After that, attach the hook of the size you need and hang the hanger in any convenient place.
Bathroom hanger from an old chair

You will need a chair back. It can be carefully cut, sanded and painted if desired.
The seat can be cut in half and one half can be used as a hanger shelf.

This shelf can be attached with bolts and special glue. To strengthen the shelf in its place, you can use the corners. This stage is optional, it is suitable for those who like to work with wood.
Such a hanger can be attached to the door in the bathroom, in the kitchen, in the country house or in any other room where it may be needed.


How to convert old chairs into shoe storage

Separate the seat from the chair. If this is not possible, then you will have to cut a large hole into which you will then need to insert the basket.
Find any basket (metal or plastic) and use a strong thread or wire to attach it to the chair (tie it to the frames of the chair).


What to make from an old chair: a swing
If you cut the legs of an old chair, sand it and paint it, then it can be used as a swing seat in the country or in the garden, for example.

You will need:
strong rope
metal rings
Eye screws
Additional details if needed.


Here is another version of the swing:

Chair second life: garden shelf

An old chair can be turned into a handy shelf for flowers or storage of various garden tools.
You will need a chair back and part (or all) of the seat. Just cut off the desired part of the seat (you may need to saw off the legs of the chair) and attach the shelf to the wall or door.
Sand the part with sandpaper and paint.

Do-it-yourself drink shelf from an old chair

1. Find a bucket that will contain ice and drinks. It is desirable that it be with handles that would rest on the frame of the chair.

2. Separate the seat from the chair, cut it down or make a hole in the seat.
* Using a strong rope, you can tie a bucket or a large bowl to a chair, in case there are no handles. It is most convenient to make holes in the bucket through which the thread is threaded.
The second life of an old chair: a flower bed

For a garden, you can create a beautiful flower bed using an old chair.
For this you will need:
A flower pot
Electric jigsaw
Sandpaper (for woodworking)
Paint (optional)
Sealing paste for smoothing unevenness in the opening of the chair (if necessary).
* If you want to attach more flower pots to the chair, you can use a pipe clamp to hold the pots or jars.


Photo of flower beds from old chairs with your own hands


The new direction of do-it-yourself decoupage of chairs originates in the Middle Ages. Back in the fifteenth century, housewives actively used it at home, making interior items more beautiful. Making decoupage on your own is very simple, the main thing is to be imbued with this art direction, and then it will be easy to give a second life to old furniture.
If you decide to try this type of apartment decoration for the first time, then decoupage of an old chair and table with wallpaper will be the most suitable option. Decorations can be made up of the remains of various wallpapers that lie in almost every apartment. If there were none, then you can buy absolutely any, there is no difference how you will make decoupage.

Decoupage table wallpaper
Before you start decorating a stool with your own hands, it must be thoroughly cleaned. It is necessary to eliminate all cracks and splinters, and this is best done with sandpaper or a grinder. The final design depends on the clean surface of the furniture, as even a small greasy speck will spoil the appearance and shorten the life of the finished product.
The easiest way to start decorating chairs is with a patchwork technique. It is the simplest and most understandable, because it uses whole pieces of wallpaper. A sheet is glued to a clean surface and left to dry completely. As a result, you can varnish the surface so that the brightness of the pattern does not pass over time, especially for a wooden chair.
Decoupage of home furniture with napkins

Decoupage with napkins
For beginners, napkin decoration will also be a good option. Decoupage of a chair with your own hands in this way is not much different from wallpaper, but requires a more careful approach. Napkins can be stocked up in a simple store, as well as in special departments for needlework. This design is suitable for almost any interior of the apartment, because the variety of napkins is as large as the wallpaper.
Don't forget to prepare the surface. The painting will last for a long time and with high quality only with a clean surface of the furniture. DIY chairs can be presented in different styles, it all depends on your imagination. Decoupage motifs can be taken on the Internet, there are various designs for almost every type of room.
Decoupage fabric on furniture
If the apartment has unnecessary and beautiful weaving, then with it you can decorate old chairs, tables, cabinets, stairs and much more. Pieces of fabric are more durable than paper. This design will last longer, and care for it will be as simple as possible. The advantage is that you can not only glue home furniture with a cloth, but also simply fit it.
The Crafts Fair offers thousands of finishes for home furniture. It is there that you can watch a step-by-step master class that will teach you how to properly control the work process, as well as present some of the subtleties of this lesson. The design of the manufactured furniture depends on the apartment in which it will stand. So first you need to decide on the pattern, so that in the end everything is in perfect harmony with you.
Materials for decoupage with a cloth We cut the fabric, grease it with glue, let it dry for 40 minutes We cover the bedside table with 2 layers of PVA glue, using such a roller
Sprinkling with glue, we glue the fabric to the bedside table using the patchwork technique. We decorate the drawer of the bedside table. Additionally, we decorate with a rope

Result
What do you need for decoupage?
How to make your furniture beautiful and original? This question is asked by many housewives. Even a highchair can be decorated with decoupage, because the materials used for work are absolutely harmless. A decoupage chair will cost ten times cheaper than buying a new model. For standard decoration, you will need:
- PVA glue;
- napkins, fabric, wallpaper;
- sandpaper or grinder;
- stool, table, chest of drawers, wardrobe or any other furniture;
- washcloth;
- acrylic lacquer;
- tassel.
It will not be difficult to purchase such a painting kit, and the final work will look simply amazing. Decoupage of chairs with your own hands, a photo of which is presented in large numbers on the Internet, will be an excellent option for updating the surroundings of the apartment. Many decorate on wood because this surface perfectly accepts glue with any materials.
Now it has become fashionable to use shabby chic in the interior, a new direction of the original interior. In the shabby style, you can decorate chairs with a back, stools, tables and chests of drawers. In this way, you can even decorate a wall in a room that does not stand out in any way. This style brings warm bed tones, small patterns of antiquity and the unique charm of irreplaceable wear. This do-it-yourself decoupage of kitchen furniture will surprise any gourmet.
Decoupage of a coffee table with your own hands, photos of which are available in large quantities, can be a great option for a bedroom, kitchen or living room. Decoupage in the Provence style can be harmoniously located in any living room, because this style in modern furniture is conducive to relaxation and comfort.
You can do decoupage on a stool with your own hands in absolutely any style. In addition, any home furniture is suitable for such restoration in the best way.
Chair decoupage
Cut out blanks It is better to make a copy of the drawing and print it on a laser printer Let the finished product dry properly, and then cover it with several layers of varnish
Using a sponge, apply PVA glue to the entire surface of the chair. To avoid possible bubbles, before putting the paper part on the glue, dip it in cold water. Result
Step-by-step instructions will tell you how to decorate a chair, kitchen, bedroom and other rooms with original interior items. A room decorated in this way will delight its owners with individuality, and most importantly, they will have a small piece of the love with which each element was decorated. It doesn’t matter what you decide to do, decoupage of a stool or decoupage of a children’s chair, the main thing is to take this issue seriously so that the result serves for a long time and pleases the eyes every day.
Difficulty: medium
Working time: 1 day
Materials: acrylic paint, varnish, primer, napkins, glue, brushes, sandpaper, stencil, candle, sponge
Those who are engaged in decoupage will understand me, normal people will turn their finger at their temples ... But this stool has already been presented to normal people for judgment, called a beautiful restoration of an old thing, and then they decided that they really saw a tree, until I disappointed them ...
But first things first.
First, I will present the goods in person, so that it is clear what I am talking about. The stool is not huge, but still a few angles need to be changed.
First seat up. This is a commodity face, so to speak.
Then a sidelong glance, although it is impossible to grasp the immensity, but you can try ... for a general impression.

Larger legs and sides, decorated with a stencil - so they are decorated on all sides.

And here's how it looked originally ... quiet horror.

Those who are interested in this wondrous metamorphosis will need:
Primer (I have GF-021);
- acrylic paint for radiators (compatible with the above primer, read carefully on the label. This is a guarantee that everything will be done as it should);
- natural sienna and natural umber paints (I have Ladoga, in tubes);
- round brush bristles No. 10;
- brush number 2, squirrel;
- a napkin that you like;
Sandpaper;
- PVA glue;
- candle;
- sponge;
- means for degreasing.
Few? But we've had enough.
So what do we have? Old stool. It is actually wooden, but all this charm was buried under several layers of oil and nitro paints. In order to start decorating, you need to get rid of them.
Initially, my beautiful-hearted dreams were - to remove all the paint, to burn out the wood, to varnish it. The oil paint came off easily in layers, succumbing to brute force and sandpaper. Nitro - none. It's like she's burrowed into a tree. The stool has acquired a mottled appearance - almost all nitro paint, pieces of wood. It's impossible to clean it up.
So it became clear - if I want a wooden stool, then I will need to imitate a tree ... on a tree that cannot be reached.
I did not specifically photograph the inner surface, but the entire stool is made completely from the outside and from the inside. Otherwise, this is no longer a craft, but so, a fake ...
So. We arm ourselves with sandpaper of varying degrees of graininess and bring the surface to the maximum possible level. This is the most labor-intensive and impartial stage. Prepare in advance that it will take a lot of time and effort. Wear gloves - handles need to be protected. And even better - attract someone stronger :)
But the paint will have to be removed. Otherwise, you can lose all the work - the paint will crawl, swell ... Nightmare! Do we need it :)
When all the paint is off, wipe the stool with a rag, removing wood and paint particles, and degrease (I use paper handkerchiefs and nail polish remover with acetone).
We cover with two layers of primer, maintaining the time of each layer according to the instructions.
Then - two layers of acrylic paint for radiators. Again, we wait for the time according to the instructions. Even if the paint dries quickly, believe me, you should not rush. There is no point in risking possible negative consequences like yellow spots on a napkin, right?
We glue the selected napkin ... more precisely, its upper layer on PVA glue diluted with water 1: 1.
I do it using the file method, I think there are enough master classes on this topic without me :)
One note - I prefer to spray the napkin from the inside with hairspray and iron it, thereby increasing its elasticity. Specifically, these napkins fit perfectly and without dancing with tambourines, but habit is second nature...
I cut off the edges of the napkin slightly, but you don’t have to do this - we’ll still give it the look we want!
We dilute a small amount of sienna and umber with white paint to get a faint shade, and cover the entire stool. Accuracy is not needed here. Let the brush move freely!
Then along the edges of the stool, along the ledges, we lightly walk with a candle.
Squeeze out the sienna and umber from the tube onto a plastic plate. Three parts umber will need one part sienna. We don’t stir everything at once, but with a dry brush (round, bristle No. 10) we take a little of both paints, and in one layer, but tightly, we cover the surface of the stool. Try not to lead several times in the same place, the brush should move widely, freely. Then the bristles will leave traces characteristic of the fibers of a real tree.
First, I advise you to cover the jumpers - horizontally. And then, until the paint is dry, the legs are vertical. Then the paint that got from the horizontal stroke on the legs will be instantly directed to the desired, vertical, channel.
Practice first on the inside of the stool so as not to pinch the brush in your hand. Squeeze - it can get dirt. And we need a tree and, preferably, an oak!
Dry paint dries quickly, after about half an hour the stool can be turned over and proceed to the other side.
The seat is the critical part. You need to decide whether you will "tear" the napkin, and if so, how much. Or keep whole? It's beautiful too.
I found it organic to put more "trees" around the edges and even show it a little in the middle of the napkin. Like, the seat is worn out!
Make thinner strokes - "breakthroughs" with a brush number 2.
When the paint has dried, we take a fine sandpaper and skin those parts where we walked before with a candle. We skin easily, without fanaticism. The paint will come off on its own, giving the stool the look of old, worn wood.
We arm ourselves with brush number 2. Mix a little sienna with white and highlight, select the edges of the torn napkin. And then, with one umbra, we make shadows in a circle. You can add tornness with short strokes.
This gives the impression of depth. The napkin is simultaneously visually implanted into the tree and remains on top of it, forming a single whole.
Old furniture reminds of the past, has a design that is different from modern modernity. Peeled paint, frayed upholstery, loose legs - how to use such products? You can give them in for repair, which will cost a lot. At the same time, it is not difficult to make the restoration of chairs, which everyone can do. The work does not require the qualification of a cabinetmaker. It is enough to carefully and carefully perform simple operations, having a set of tools and materials at hand.
Do-it-yourself repair and restoration of chairs will cost much less than reconstruction in professional workshops. Antique chairs are made of natural wood.
Chair elements requiring restoration repair:
- destruction of the coloring layer of the surface;
- scratches, cracks;
- fastener violation;
- failure of the skin, soft lining.
In addition to the financial side of the issue, the opportunity to do the restoration with one's own hand is important, showing oneself in a new capacity: a carpenter and a designer.
Appearance improvement
To give an old chair an attractive look, several methods of restoration are used:
- repainting, lamination;
- repair of elements or the entire frame;
- upholstery lining;
- decorating with various materials.
The whole structure, including the back and seat (without upholstery), can be given the tone of natural wood or painted in bright colors. Soft seats, chair back upholstered with new material. Restoration of a chair is more difficult than a chair. A high-quality hauling is required with a complete analysis of the structure, with the replacement of the back lining, seats. Restoration of leather products under the power of professionals.
An old, cracked stool is easy to restore. Restoration consists in strengthening the legs, seat and repainting of all elements.
New elements in decor
Chairs of the Soviet period were deprived of special decor. Modern materials and technological methods allow you to restore chairs in this way using:
- tapestry;
- flock;
- decoupage;
- craquelure;
- sesal;
- shabby chic.
During the reconstruction, it is possible to use any color range of paints, fabrics for upholstery.
Minimum costs
Restoration of chairs does not require significant cash outlays due to the affordability of prices for finishing materials and the insignificance of volume.
How to restore with your own hands
To make the restoration of chairs, it is necessary to prepare tools and materials. Which ones - depends on the design of the restoration repair.
Tools and materials
Wood products are processed with special compounds and tools.
Quick drying varnish
For wooden surfaces, polyurethane varnishes are used that are resistant to moisture, chemical, mechanical stress.
Dye
For the restoration of chairs, enamels are used:
- Acrylic. They create a durable, elastic coating that retains its properties for 3 years. The painted surface does not fade in the sun, does not give in to abrasion, is easy to clean, dries in 24 hours.
- Alkyd, with varnish content. Drying time - 2-3 days. The treated surface is protected from decay, resistant to water, chemicals, and abrasion.
- Polyurethane. They form a protective layer that protects the wood from moisture, scratches, chemical attack for a long time. A solvent must be used before use.

The most budget option for staining when restoring chairs is the use of acrylic enamels. Good coating quality is combined with a low price and the ability to combine with color.
upholstery fabric
Before decorating old chairs with new fabric, they need to be repaired and painted so that the updated upholstery does not look dissonant against the backdrop of dull paint, wobbly legs.
Tapestry
For the upholstery of chairs, a single-sided tapestry of light density is used. Fabric Benefits:
- high wear resistance;
- decorative;
- durability.
The quality of tapestries is determined by the manufacturing method: 2 or 3-layer weaving from natural and artificial fibers. The fabric does not wrinkle.
Flock
Flock is a pile material obtained by spraying artificial or natural raw materials onto a dense base. Soft, wrinkle-resistant fabric is water-repellent, breathable and easy to clean.
Flaws:
- electrified, attracting dust;
- is destroyed during the processing of alcohol-containing liquids;
- some varieties are wrinkled.
Flock is used as upholstery:
- mixed (nylon coating, base - cotton with synthetics);
- polyamide;
- polyester.

Mixed flock has the best qualities.
Mat
Gunny is a material woven from natural fibers.
Advantages of matting upholstery during restoration:
- wear resistance;
- softness;
- breathability;
- ease of care;
- not susceptible to dust mites.
The disadvantage is the "love" of cats to sharpen their claws on it.
Foam rubber
When choosing a layer for restoration, you need to pay attention to:
- for thickness;
- density;
- strength;
- elasticity.
The foam for the seat should be 3-5 centimeters thick, have increased rigidity and density. For chairs, foam rubber of the HL, EL brand is used. The numbers standing next to each other testify to the density and degree of compression.
The most popular marking is 2536, which means a density of 25 kilograms / cubic meter; deformation resistance - 3.6 kPa.
Plywood
Plywood is a multilayer material made from natural wood veneer. When replacing the seat during restoration, a plywood sheet with a thickness of 3 to 4 millimeters is used.
Sandpaper

Metal washers and bolts
Carbon steel furniture bolts can be zinc plated, chrome plated. The kit comes with washers and nuts.
Springs
Replacing springs in antique chairs during restoration should correspond to the original version: a flat snake, a bonnel.
Scissors
To cut upholstery and foam rubber, you will need tailor's scissors made of special steel, with a special shape and sharpening angle.
Roulette
The small dimensions of the structural materials make it possible to use a metal tape measure up to 1 meter during restoration.
Wood saw
A classic hacksaw with a standard shape allows you to make cuts in the longitudinal and transverse directions. A spike saw may be needed to cut the grooves. Tooth pitch - 3.0-3.5 mm. For curvilinear cutting of plywood, a jigsaw is used.
screwdriver
A hand-held power tool will allow you to quickly and accurately tighten the fasteners using a special nozzle.

Screwdriver
In inconvenient places for tightening screws, self-tapping screws, use a screwdriver of the appropriate diameter.
Bolt strengthening
If there are cracks, chips, then they must be repaired using wedges or putty.
Seat replacement at home
A frayed seat is replaced in stages. To begin with, it is freed from worn-out upholstery elements, foam rubber.
Cutting a piece of plywood to size
A template is made along the old contour. Transfer to a new piece of plywood and cut out with a jigsaw. Clean the ends with sandpaper.
Foam base sticker
Foam rubber is glued onto the base with an overlap of 3-4 centimeters. The corners are aligned with the contour of the seat.
plywood fasteners
Fix the plywood around the perimeter.
Stretching upholstery fabric
Fitting the base with foam rubber with an overlap of 4-5 centimeters on the underside with alignment in the corners. The stretch is made either along the outer contour of the seat, or along the perimeter of the seat inwards.

Final fixing
Using a furniture stapler and staples, attach the upholstery around the entire perimeter.
decoration
There are various ways to design the seat and back.
Coloring
The fastest way to restore is staining. The prepared surface of the entire structure is primed. The paint is applied in 2 layers.
lamination
A two-layer varnish coating is called lamination. The chair can have the color of natural wood, any color scheme.
Decoupage
Decoupage is the application on a solid seat, back of applications. The picture is cut out of paper and glued to the surface.
The final fixation occurs with the help of a varnish coating.
Adhesive tape or film
Adhesive tape and film have a different texture:
- polymer;
- paper;
- from foil.
Thanks to her, the chairs acquire a durable, beautiful coating.
Art painting

Craquelure
To give the chair an antique look, the technique of artificial aging of the paint layer is used. With the help of special varnishes, coloring agents, cracking of the selected thickness is simulated.
Veneering
On the seat and back of the chairs, the veneer can be glued in the form of a geometric pattern. For finishing, sliced or peeled veneer is used, up to 1 mm thick.
Details update
Refresh the product by adding appliqués made of materials unusual for furniture to its design.
Sisal
Agave plant fiber is sold in craft stores in the form of rope of various thicknesses, plates and skeins. With the help of PVA glue create a picture. After drying, it is transferred to a chair and varnished.
wool yarn
Woolen threads are used for decoration in a similar way to sisal. They are less durable, absorb moisture. It is preferable to create original compositions on the back.
Shabby Chic
The style of fashion, decor, the essence of which is the creation of the illusion of antiquity. All furniture should be in this style. Shabby chic means painting in pastel colors with traces of several layers, faded images of angels and roses.
Elimination of defects
Small shallow scratches
Small scratches will be invisible if they are treated with an iodine solution.
small cracks
Cracks up to 1 mm are rubbed with a putty compatible with subsequent staining.
deep scratches
Deep cracking is covered with mastic of turpentine and beeswax (3:4).
Replacement of broken parts
Chips from the legs, back, frame are glued with wood glue, following the instructions.
Frame restoration
The frame, undermined by a bug, can be repaired with putty. The resulting cavities are cleaned, filled with a wood treatment agent. Sanded after drying.
Features of working with Viennese chairs
Old chairs for restoration are completely disassembled, with the numbering of parts.
When restoring antique chairs, the following must be observed:
- combination of upholstery color and frame tone;
- use as a filler of foam rubber;
- uniform style for the same type of chairs.
In order for the lacquer-enamel coating to be of high quality, careful grinding is required, applying 2-3 layers after complete drying.
Master classes
Chair reconstruction includes several stages:
- Preparatory. Selection of tools, purchase of materials.
- The seat is removed from the frame, freed from upholstery, filler.
- Frame elements are inspected and repaired.
- Putty is applied. After drying, the surface is cleaned with sandpaper.
- The frame is painted in stages: 2 times the legs and the lower part; 2 times back and upper contour.
- A seat is cut out of plywood according to the template.
- Foam rubber is cut out according to the template with an allowance of 3-4 centimeters.
- Foam rubber is glued to the base.
- The upholstery fabric is stretched over the base with foam rubber, with an overlap on the underside by 4-5 centimeters. Caught with a stapler.
- The upholstery is fixed around the entire perimeter.
- The finished seat is inserted into the frame.
The next stage is started after the putty, adhesives, paint, varnish have completely dried.