Curtains from wallpaper. Original do-it-yourself wallpaper blinds: master class. Roller blinds from leftover wallpaper
Do-it-yourself roll wallpaper blinds are an economical option for those who appreciate comfort and coziness. They can be created from wallpapers and auxiliary tools thanks to the step-by-step instructions that are described in this article. They can be placed in any room of the house or apartment, whether it be a bedroom or a living room. Below is a detailed master class that will ennoble the premises of the dwelling. In addition to the auxiliary instructions, the article presents a video that shows in detail each step of making homemade blinds from the most ordinary wallpaper.
The main types of light-protective products
Devices that are designed to protect the premises from the penetration of unwanted sunlight. As a rule, they come in two varieties: vertical and horizontal. They consist of plates (lamellae) of the same size. These plates can be either fixed or rotated around an axis to control light or air flows.
Types differ in the type of construction, as well as the material from which they are made. The incredibly complex mechanism of the product with divided lamellas quite often fails due to broken components. Even high-end models are not protected from breakdowns. That is why the main advantage of homemade models is their reliability.
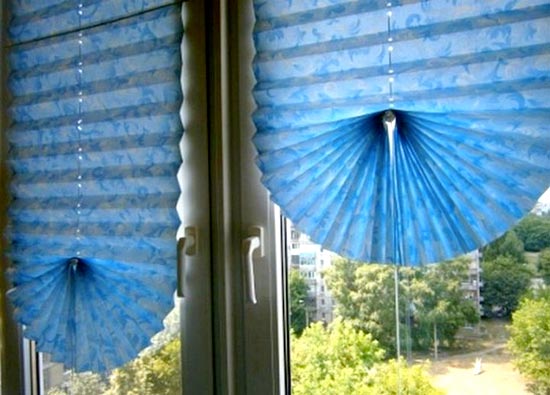
Wallpaper blinds: a practical, aesthetic and very budget option for decorating a window
If you understand the types of this device in more detail, then you can distinguish the following varieties:
- Pleated. Fabric fabric that folds in the form of an accordion. It is powered by special cords and ropes, at the ends of which clamps are fixed.
- Vertical. They are a structure, the lamellas of which are arranged in a sequential order. They can be easily rotated to the desired angle and adjusted with a cord.
- Roll. They are a piece of material that is folded using the existing mechanism.
- Horizontal. The essence of the work is based on the "ladder" system. The plates are placed in a horizontal order. Regulation of this type occurs with the help of a rotating drum.
How to make your own
It is easy to create a working design of this device using inexpensive materials at hand, even for those who are very far from hand-made. The manufacturing process will not take much time and effort, and the cost will be minimal.
List of materials that will be useful in the process:
- Remains (if there is no desire to buy a whole new roll for further work);
- Lace and meter;
- Scissors;
- Pencil and eraser;
- Scotch tape (simple traditional and double-sided);
- The most common clamps.
- Hole puncher;

Thanks to the huge variety of wallpaper patterns, you can get a product that will suit any style of interior.
All these components can be found in any household, so there should not be any difficulties in finding them.
Advice. When choosing wallpaper for creating blinds, it is important to pay attention to such an indicator as color: they should have a pastel shade so that the room is not too dark.
After all the materials are prepared, you can begin to manufacture the product. It is important to follow the step-by-step instructions exactly in order to get working blinds as a result, which will well protect the room from excessive light penetration.
Manufacturing master class
Today you can find countless interesting variations on the manufacture of this useful and beautiful product. As a rule, each of them has the same instructions, depending on the type of product.
Detailed plan for creating blinds:
- First, you should correctly take measurements: determine the perimeter and decide which ones will fit more into the room.
- It is required to add another quarter to the length number, but the width should remain the same. This must be done so that after manufacturing the design is working.
- The length of the cord should have a margin, as they will need to be tied at the ends.
- The next step is to prepare the wallpaper canvas. If they are with an ornament, then it must be correctly chosen and it is important not to disturb it during the cutting process.
- A fragment of the wallpaper must be folded into an "accordion". The thickness of each fold should not exceed 5 cm. If you make the width of the folds thicker, the product may lose its appearance. Correctness can be checked after all manipulations - the end of one of the sides of the canvas should look like the letter "L". He will become the bottom of the product.

Making blinds from wallpaper with your own hands is not difficult and consists of a few simple steps
Final moments in the process of creating blinds
There are a few decisive steps left to help make blinds that protect from unnecessary bright light:
- The next step is to find the middle of the canvas. Here you need to make holes with a hole punch. Secure with tape on the back and repeat the action.
- Insert the cord into the hole, and then straighten the canvas to find out what length is required. The upper end must be secured with a knot.
- Next, you need to prepare the mount to the window frame. Double-sided tape should be attached to the entire length of the upper end of the blinds.
- Glue a piece of adhesive tape on the last strip on the left side.
- Draw the bottom in the form of a "peacock tail". Fasten the five lower folds and fasten them with tape. Wrap the cord on the opposite side.
- Attach the clip to the cord. It needs to be pulled up to the top, if it is necessary to raise the blinds, close the window - lower the mount along the cord to the bottom.
Advice. To ennoble the appearance of the blinds, you can decorate them with various decorative elements and decorations that match the style of the product and the interior.
The manufactured product is not only spectacular, but also useful, practical, functional. It is able to decorate any room, save money and the process of its creation will not take much time. In addition, you can feel like a real designer and plunge headlong into the exciting process of creating this product, which is necessary in every household.
Few people know, but do-it-yourself wallpaper blinds are an excellent solution that helps to save a lot on buying store options. For manufacturing, you will need a minimum set of tools, and the resulting product will be an excellent interior decoration and sun protection. There are several ways that help to carry out the manufacturing process quite quickly.
Before making blinds from wallpaper, it is advisable to familiarize yourself with the advantages that this solution provides:
- Availability. The cost of the product will be significantly lower than the purchase option, even when using more expensive materials. And if you calculate the cost of paper blinds, then even an annual replacement will be much more profitable.
- Ease of manufacture. Indeed, the work does not require special skills and does not take much time. The main thing is to be careful and accurate.
- An excellent decorative element. Most of the products found on sale do not have an attractive appearance, and do-it-yourself blinds give room for imagination.
- If you choose washable materials for work, then the resulting curtain can be subjected to wet cleaning.

Naturally, the main disadvantage of this design is fragility. The service life is about a year, during which the visual appeal decreases.
Tools and materials
First of all, you need to take care of the availability of the necessary tools.
For work you will need:
- Wallpaper that matches the color, you can use leftovers.
- Sharp scissors. To avoid the appearance of burrs and creases.
- An awl for piercing holes, which can be replaced with a nail.
- Meter and ruler.
- Pencil. A felt-tip pen is not recommended, it leaves marks.
- Cord. As a decorative alternative, a satin ribbon is suitable.
- Tape, glue, stapler.
- Retainer. A special element used in clothing to limit drawstrings.
- You may also need a hammer and a wooden block.

Everything you need is prepared in advance, for the procedure you should use a comfortable workplace.
On a note! When creating this kind of curtains, you want to get an excellent result that you won’t be ashamed to hang on windows, so many people buy whole rolls of expensive materials. The choice of substandard or leftovers, which are significantly discounted, will help reduce costs.
DIY options
Homemade blinds can be made in a variety of ways, each of which allows you to get a slightly different result.

Classic way
Work is carried out on a free flat surface. This is necessary in order to avoid distortions during unwinding of rolls and performing the necessary actions.
Video: Master class for making blinds from wallpaper with your own hands
Making blinds from wallpaper is as follows:

It turns out a rather original element of the interior, on which a minimum of time and money was spent.
More complicated way
There is another option where it will take more time, but the result will be more attractive.
Step-by-step production of blinds from wallpaper with your own hands:
- Preliminary marking of the window frame is being carried out.
- Stripes 10 cm wide are cut. All parts must be even, without distortions.
- The fragments made in this way are folded in half and glued along the cut edges. That is, a flattened tube should turn out.
- Next is the most difficult moment: each part has a center line at the top and bottom. Thus, the strip is divided into two parts.
- Glue is applied to this line, and the next fragment is glued on top. Each part is glued in the center to the other, you should get an "accordion" with holes.
- After connecting all the elements, the product is left to dry completely.
- Stepping back from the edge of 100-150 mm, holes are punched and cords are passed through, which are fixed from below with a retainer, and from above with adhesive tape.
- To strengthen the structure, you can use a thin wooden rail, to which the upper edge of the wallpaper is glued, and a rope is passed through the holes made and rings are tied.

The principle of operation of the curtain is the same as in the previous version.
roller blind
Do-it-yourself wallpaper curtains can be rolled, but you will need an unwinding mechanism to work.
For this, the following manipulations are performed:
- The dimensions of the desired area of the window are determined.
- The resulting length is multiplied by 2 and 25% is added.
- The necessary fragment is cut off, folded along the length, the edges are fixed.
- The upper edge is fixed to a pre-prepared mechanism, and decorative elements are attached below for gravity. You can use special magnets that do not allow the bottom edge to hang out.
Such a design should be made of quality materials of higher density. Of course, this option turns out to be much more complicated and expensive, because you will need to use the promotion mechanism.
Thus, with wallpaper, you can perform many different manipulations that allow you to achieve an interesting decorative effect.
Roller curtains protect the room from the penetration of sunlight and curious prying eyes. But due to the high cost, it is sometimes difficult to acquire them. An excellent solution to this problem are roller blinds made by hand from wallpaper or fabric. They are practical, comfortable and look at home. Make and attach them quickly and easily to anyone.
Roller blinds from wallpaper
Roller blind from wallpaper
Rolled wallpaper curtains have a number of advantages:
- Saving. The cost of their manufacture will average 400 rubles, while the cost of good roller blinds in stores reaches 2 thousand and more.
- Fashionable decoration element. If beautiful and stylish wallpapers are chosen for the manufacture of such curtains, they will become a bright and original decoration of the interior of any room.
- Protection. Self-made paper curtains will reliably protect the room from streams of light and prying eyes.
- Ease of manufacture. The creation process will take about 2-3 hours.
- Ease of use. To care for paper curtains, a vacuum cleaner and a dry cloth are enough; if washable wallpaper was used to create them, then wet cleaning is also allowed.
- Can be installed on all types of windows. They can be mounted on window frames made of wood, plastic or aluminum.
Tools and materials
Make roller blinds from wallpaper with your own hands using:
- wallpaper. You can use the leftovers after the repair or purchase a new roll. It is better to use dense material.
- Accessories. You can use cornices, runners with hooks, a bracket with a chain, ropes, weights, etc.
- Mechanism for attaching curtains.
- A set of accessories.
- Meter ruler, centimeter tape for taking measurements.
- Pencil.
- Sharp scissors or utility knife.
- Awl or other object for piercing holes.
- Curtain fastener. For example, an element of clothing found on the laces of a hood or a small clothespin.
- Double sided tape.
- Clay.
Step-by-step instruction
The process of building rolled curtains from wallpaper is quite simple. With a centimeter or ruler, it is necessary to accurately measure the window. To calculate the height of the future curtain, add a quarter of the calculated value to the height of the window.
Preparation and cutting of paper web
After clarifying all the parameters, they begin to cut the wallpaper and create the curtains. This process consists of the following sequence:
- Prepared wallpaper must be spread on the table. To prevent wrapping on the edges, you can put some heavy object. On the canvas you need to make the necessary markings.
- Next, mark the folds. The ideal option is strips 3-5 cm wide. In order for them to be as even as possible, it is recommended to connect the lines using a ruler.
- Along the marked lines, using the edge of the ruler, it is necessary to assemble the future curtain into an accordion.
- In the finished accordion, you need to find the middle part and make a hole with an awl or other sharp object. When making another model, a couple of holes should be made, moving away 15 cm from each edge.
- Through the hole it is necessary to stretch a cord or rope with melted ends. Its lower edge must be fixed in the latch, leaving a margin of about 4–5 cm so that the curtain can be pulled out in length. Tie the excess rope into a knot.
- To attach to the window, a piece of double-sided tape should be glued to the upper fold. To build a more durable device, you can use a wooden lath, to which you need to glue the upper end of the canvas, and stretch the cord through the prepared holes.
- In models with a cord in the center, the lower zone can be designed in the form of a fan. To this end, the cord should be pulled down, and the lowered parts should be connected to each other with double-sided tape, a beautiful clothespin or glue.
- It is necessary to put on a latch with one opening on the rope. To raise the curtain, you need to pull it up, to close the window - lower it.
- To increase the life of paper curtains, it is recommended to strengthen their extreme parts with self-adhesive paper or tape.
The photo shows the main stages in the manufacture of roller blinds from wallpaper.
attachment
Installation of paper roll curtains is carried out using adhesive tape, which is glued to the frame of a plastic window. You can also use screws or hooks. To attach the curtains to the wall, it is better to take screws. Exclude fluctuations of the lower part by special magnets.
Also, roller blinds can be attached to the wall using cornices.
One of the highlights is choosing the right fabric. She must be:
- natural;
- water-repellent;
- reflective.
For sewing, you can use almost all types of materials, but it is preferable to use special fabrics with antistatic or antibacterial impregnation. Matter can be of the same color or multi-colored with a pattern, different degrees of transparency.
Polyester is the most popular curtain fabric.
Tools and materials
For the manufacture of fabric roll curtains you will need:
- Fabric of a different type or color for the front and back sides - 2 flaps.
- Wooden bars corresponding to the width of the window frame (required for fastening and weighting the curtain) - 2 pcs.
- Scissors.
- Measuring tape or measuring ruler.
- Cord.
- Ring screws - 5 pcs.
- Screw hooks - 3 pcs.
- Threads.
- Needle.
- Sewing machine.
- Drill.
- Iron.
Step by step instructions for making
The process of creating a fabric roller blind with your own hands consists of the following steps:
- Before starting work, measure the window frame. In accordance with the measurements taken, cut out two rectangles from the prepared material with the proper parameters, leaving reserves for seam allowances: 10 cm in length and 3 in width.
- Sew fabric patterns with the front surfaces to each other on three sides. One side must be left unsewn and the product turned out through it. After that, this section should be stitched and ironed with an iron.
- Face down, you need to lay the future curtain on a flat surface and arrange “pockets” for the slats. To do this, you need to bend the edges 1.5 cm from the bottom and 3 from the top and sew. Planks should be placed in the resulting recesses. The top bar is for attaching the curtain, and the bottom one is for weighting it.
Creating Fasteners
It is necessary to carefully screw a pair of screw rings on top and on the front side and another screw ring at a distance of 5 cm from one of the ends of the bar into the upper bar through the canvas.
Attaching a Cord
To fold the curtain, you need to attach a cord to it. To do this, unwind and cut off two different segments: the length of one should be equal to three lengths of the curtain, and the other - three and a half. The cords must be threaded into the rings on the top bar of the curtain, while the longer piece must be attached to the ring, which is at a greater distance from the common side ring. Next, stretch both cords along the wrong side, thread through the screw rings, bring them out through the common side ring and connect.
If you plan to place it on a plastic window, it is better to screw a pair of hook screws into the frame in advance, which should be located strictly opposite to the upper rings on the curtain. To fix the curtain in the folded state, it is recommended to attach an additional hook screw to the side of the frame, onto which the cord will be wound.
Production of a lifting mechanism for roller blinds
A device for lifting roller curtains can be easily built by yourself. For this you need:
- staples;
- video clip;
- scotch;
- screwdriver.
Manufacturing steps:
- Attaching staples. They are attached at the edges on top or in front of the window frame. One bracket should have a hole for a round pin (it is installed on the right side), and the other one should have a square-shaped hole (it is attached on the left side). The gap between the brackets corresponds to the length of the roller. Staples are placed at the same horizontal level.
- If the roller blind is located inside the frame, the staples must be placed 3 cm below the top of the curtain. If the curtain will be installed outside, it is better to fix the brackets 5 cm above the window opening.
- After installing the brackets, you need to install the roller and fix the curtain on it. To do this, the curtain should be placed on a flat surface with the front side facing out and a roller placed on it. It is necessary to wind the edge of the fabric on it and fix it with tape.
- The prepared ribbons need to be thrown over the roller and fixed in the middle with a stapler.
- The roller with the curtain must be inserted into the brackets and its operation must be checked by fully opening and closing the curtain.
Installation of roller blinds
 Fixing the roller curtain takes no more than 15 minutes
Installation of a roller curtain can be carried out in three ways:

The installation method should be chosen depending on the style of the room, the ability to open or close the window, remove the curtains for washing.
The main disadvantage of the ceiling mounting method is the impossibility of opening the window for ventilation when the curtains are lowered.
You can mount the mount yourself in just 10-15 minutes.
Mounting the lifting mechanism on a plastic window consists of the following steps:
- The surface of the window frame must be degreased in advance with a special agent or solvent.
- Double-sided tape should be heated with a hair dryer, remove the protective film and attach on top of the window frame.
- The upper part of the roller blind must be fixed to the adhesive tape, after removing the second protective layer from it.
And also the curtain can be attached to a wooden or metal bracket. This will require more time, special tools and materials.
Making roller blinds from wallpaper or fabric is not so difficult and even beginner needlewomen can do it. If you approach the process with responsibility, you will end up with inexpensive, interesting and original curtains that will become a real decoration of the interior.
You can make original curtains with your own hands from the wallpaper that you have left after the repair. This is a stylish and unusual window decoration solution and is also very economical as you incur almost no cost to make them. Such curtains will be beautiful and practical, perfectly protect from the sun's rays. We offer a master class on making different types of curtains from battles. For this you will need:


- wallpaper, it is recommended to use non-woven (they are dense, can be painted in any color, which ensures their functionality during operation and universal use in different interiors);
- stationery knife or scissors;
- pencil;
- roulette;
- awl or hole punch;
- scotch;
- glue;
- rope, lace or ribbon for decoration.
How to DIY pleated
Making your own such curtains is a great option if you need to quickly close the windows to protect the room from sunlight, especially in the summer. Pleated pleats are vertically and horizontally directed. When choosing pleated, it must be taken into account that vertically directed stripes make the room visually higher, and horizontal stripes expand the walls. Organize the space in the room.
To make such curtains, you need to prepare the following materials: wallpaper of the required width, a large ruler (or wooden slats), threads, a hole punch or an awl, buttons, glue, several hooks. From the remnants of the wallpaper, you need to make a rectangle of the right size. The width should be the same as the width of the window. The length is twice the height of the window. After the wallpaper has been chosen correctly, one of their ends is glued to a rail or ruler, and then folded into folds with an accordion. When the entire cut is folded, its second edge is glued to another ruler. Fold the curtain with an accordion, with two slats at the top and bottom. Please note that the width of the folds should be at least three centimeters. The glue must dry. Then, using an awl, 2 holes are made along the edges of the accordion, while piercing both paper and rulers. It is necessary to pass the thread through the holes, making two loops on one edge, and fix the ends of the threads to the buttons on the other. On the loops made at the top, the product must be hung, and the buttons at the bottom will hold the curtain down so that it does not fall apart. After we prepare the hooks, which have an adhesive part, and fix them on the window frame. Hang curtains on these hooks. The bottom of the curtain can be designed in the form of a "peacock tail". To do this, glue the five lower folds of the canvas together, secure with double-sided tape. The cord is brought out to the back side, the excess is cut off. A retainer is attached to the cord. It usually consists of one opening. The latch must be pulled up, if it is necessary to raise the curtains, lower the mount along the cord down. It is also possible to make pleats on 2 cords, which are parallel to each other. The work in this case will be similar, with the difference that you will need a double latch. As a conclusion, decorate the pleated to your taste, decorate the lower edges of the threads with a variety of materials, such as beads.

Do-it-yourself pleated manufacturing scheme
Pleated pleats are very easy to manufacture, great for many rooms. As protection from the sun - this is a good option for an attic, a cottage in the country. By choosing the right materials, you can get the effect of diffused light or twilight, which make the room comfortable for you. You can verify this by looking at the photo below.

Great window decoration
We make Roman blinds with our own hands
As evidenced by numerous master classes, it takes more time to make Roman blinds with your own hands than for pleated blinds. For the manufacture of Roman blinds, you additionally need to prepare cardboard, wax, a saucepan and a paint brush. Prepare your cardboard. Paraffin is heated and applied with a brush to cardboard sheets. Then, while the paraffin is liquid, wallpaper is applied to the cardboard, and then ironed. On the reverse side of the cardboard, we also glue the wallpaper with paraffin. Then, holes are made along the edges of the cardboard with an awl, into which a thread is threaded, which is fixed to the cornice or pipe. Roman curtains can be fixed to the window using double-sided tape.
Roller blinds from leftover wallpaper
A very interesting way to make rolled curtains with your own hands from small remnants of wallpaper. You can see how this is done by watching a video on the Internet. For future roller blinds, thin strips are initially cut, which are rolled into tubes. Then these tubes are painted with stain in different colors, and also varnished, then they are assembled into a single piece, connecting the edges of the tubes with a chain of air loops. Such unusual roller blinds can be supplemented with tape or braid to control the position of the curtains. The canvas is attached to the frame using self-adhesive double-sided tape.
Paper curtains in the technique of "vytynanka"
If you still have plain light wallpaper, you can create original paper curtains with your own hands using the “vytynanka” technique (patterns, ornaments, animals, landscapes, etc. are cut out on paper). Large bulges are used as unique paper curtains for windows. Curtains made in this way can be different in technique, silhouette or openwork. They are overhead (the elements of the product are stacked on top of each other) and coordinated (the whole image is made of many elements that are folded in turn, resulting in a harmonious ornament). To make a curtain, you will need tools (a wooden rug, stationery knives with different blade sizes, scissors, a metal ruler), a product template (diagram), as well as your perseverance and diligence. Then you can make such an interesting curtain with your own hands, as in the photo.

openwork curtain

silhouette curtain