Do-it-yourself wooden flooring in the country: device and manufacture. __________________________________________ with what to combine wooden flooring on the patio Timber flooring on the street
If the surface of your suburban or suburban area has a complex terrain, a wooden platform will help to comfortably equip the area for recreation, it is practical and easy to use. Due to the fact that the flooring is raised above the ground, it not only visually expands the area in front of the house, but also allows you to use part of the landscape that is unsuitable at first glance (for example, hilly terrain).
The flooring attracts with its capabilities - you can always sit comfortably on such a site, it can be used as a place for games or family vacations. The pattern of wood flooring depends on the size and method of laying the boards, as well as on the type of finished structure.
Wooden platforms can be equipped not only in open space, but also around trees, as well as on the roof of the house. In addition, the wooden base is great with lawn grass, flower borders, gravel and even stone slabs. Dense vegetation will not only smooth out the straight, clear lines of the platform, but also create the illusion of a secluded corner in the garden.
If a bush or a tree grows on the site of the future platform, do not rush to remove them, it is better to harmoniously combine the wooden platform and elements of nature. Around a tree (bush, stump, large stone), be sure to make a frame. In no case should the flooring be attached directly to the tree - this will reduce the reliability of the structure.
Please note - if the flooring will surround the tree, the necessary living space should be provided for it (because the trees not only grow up, but also increase in diameter). If the opening between the tree and the platform is too large, it is advisable to install a bench in this place.
In addition, wooden platforms can be used as a veranda - for this, some homeowners install platforms on the upper floors or roof of the house. Terrace flooring in the country can significantly transform the landscape design of your site.

Wooden scaffolds (decks) are multifunctional structures that can become not only part of the house, but are also used in the arrangement of the courtyard, pool, artificial reservoir.
Additional reliability to wooden platforms (terraces), especially if they surround a reservoir, is given by railings, and low internal partitions and floor flowerpots with live plants turn the site into a cozy and picturesque place to relax.
The main types of wooden flooring
Depending on the laying method, several types of wooden flooring are distinguished:
- garden parquet (can be used with only in the warm season);
- patio;
- deck flooring;
- wooden terrace.
Patio- This is a cozy island for relaxation, which is located in the garden. It can be done in a romantic, oriental or minimalist style. A patio made of wood is in perfect harmony with any landscape design. Since this area is separated from the house, it is recommended to install a canopy to protect from rain.
It can be made in any shape, the dimensions and complexity of the design are limited only by your imagination.

- This is perhaps the largest building. Typically, decking is rectangular in shape and surrounds the entire perimeter of the house. However, to create a terrace, you can also use a flat roof of the house. Due to the large area, on the terrace you can place sun loungers or chairs for relaxation, garden furniture, a hammock. Bright color accents can be created using decorative elements, such as cozy sofa cushions, whimsical lamps.
If the flooring is installed permanently, it is necessary to determine the need for additional details - steps, railings, lighting systems.
Scaffolds can take any form:
- simple (square, rectangular);
- complex (multi-level, cascade structures).
How to properly prepare the site
Features of the correct preparation of the site before starting the installation of the flooring depend on several factors:
- the height of the installed platform;
- surface topography.
If a roof, balcony or patio is used as the basis for the decking, preparatory work will be limited to checking the strength and sweeping the area. But if the platform will be placed simply on the ground, you should mark the site (using pegs and stretched string) and clear it of weeds.

Since the base of the deck must have excellent drainage, we recommend removing a few centimeters of soil and filling it with gravel (this will protect the space under the platform from the settlement of small animals and rodents). Support pillars are best not just dug into the ground, but fixed with a concrete solution (use a ready-made or dry mix).
What can a platform be made of?
To equip the platform, you can use boards made of hardwood or coniferous wood, however, if the budget allows, we recommend giving preference to decking - a special terrace board made of hard exotic trees (for example, yew or garapa). Hardwoods include alder, modrina, aspen, and conifers - spruce, pine, larch, smereka.
Conifers are highly wear-resistant, however, to extend the service life, wood should be treated with special antiseptics. Terrace boards for additional protection against moisture can be impregnated with special oil.
The boards are pre-cleaned of the bark, and also treated with antiseptic and moisture-proof solutions. If you want to give the flooring a certain color, after installation you can apply tinting or varnish the boards. Lacquering will favorably emphasize the natural pattern of the wooden base. If you want to have a light finish, you can whiten the boards with a weak lime mortar, this will not only create a decorative effect of weathered boards, but also protect the platform from mold.

The main methods of laying wooden flooring and installation rules
The simplest type of flooring involves the standard laying of boards parallel or diagonal to the sides of the base. This method allows you to visually expand the space.
A more complex pattern (for example, herringbone, rounded, at an angle of 45 degrees, diagonal, angular, checkerboard) is laid according to a previously made sketch. Complex drawings should be combined with the decoration of the facade of the house and the surrounding elements. In addition, the more complex the pattern of the flooring, the stronger the base should be, the best option is double logs from massive beams.
How to make a wooden platform with your own hands

It is not at all difficult to build a wooden flooring on your own - for this you need to have at least minimal carpentry skills. To make a wooden platform in the country with your own hands, you will need the following tools:
- construction roulette;
- screwdriver;
- a hammer;
- saw (ideally - circular);
- square;
- beard
- chisel, clamps (useful for leveling curved boards);
When building a deck, you can use boards of any size, but the most popular are boards 5 * 7.5 cm, 5 * 15 and 5 * 10 cm - they are not only convenient to use, but also more resistant to deformation. Smaller bars are easily deformed during operation, so it is better not to use them. Too wide boards (more than 20 cm wide) are also not recommended, because water will accumulate on their surface, which will lead to the destruction of the material.

If you want to create an original floor on the terrace, you can use boards of different widths.
Boards are attached to the base with nails, screws, but special clips can also be used. For more reinforced fastening in places with the greatest load, you can use building glue (applied with a special gun). If you decide to use nails, it is better to hammer them in manually, without resorting to the help of an air gun, because it drives the nails deeper than required. Screws should be screwed in with a screwdriver (electric drill).
The flooring laying algorithm includes the following steps:
- Fixing boards.
First of all, the construction of a wooden platform begins with knocking down the edge to which the logs are attached. The extreme supports are additionally reinforced with waterproof plywood inserts (not more than 0.3 cm thick). The laying of wooden flooring begins from the side of the wall of the house, leaving a small gap (with the exception of the ends, they must fit snugly against each other).

The gap provides the necessary ventilation and drainage of the wooden structure, thereby protecting the boards from deformation due to moisture. In addition, wood can shrink or, conversely, expand during operation - this fact should also be taken into account during installation. For example, if you use freshly sawn boards instead of dried ones, they can be laid end-to-end, without gaps, since the wood will shrink a little over time.
Boards must be laid along the length of the deck to prevent cracking and warping. The flooring is laid out with a slight slope (in the direction opposite to the house) - for better water drainage. Each board must be attached to the log using nails or screws. If the flooring design requires the mandatory presence of the same gaps, they can be made using nails (90 mm), which are fixed on the side of the fixed board and removed as necessary.
If you need to make gaps of different widths, use wooden spacers or nails of selected sizes. When all the boards are fixed, the nail heads should be “drowned” with the help of a beard.
- Trimming protruding edges.

In order to evenly cut the protruding edges of the boards after they are fixed, draw a straight line along the sides of the flooring with chalk and cut off the protruding ends of the boards (if you are afraid to saw off the excess, you can additionally install a special rail to guide the movement). The saw blade must be sharp so that the cut is tight and even.
To maximize the strength of the flooring, the boards must overlap at least three logs. For greater reliability, the boards are nailed with several nails.
Before proceeding with the installation process, you should make sure that all boards are level. If they are curved, the installation process will require additional steps. First, the ends of the curved boards are nailed to the joists. Nails are nailed to the place of the bend, which are attached to the intermediate lags. If the bend is on the inside of the board, you need to install a chisel opposite the bend, press it and fix the board with nails.
If the bend is on the outside, the board is also leveled with a chisel, only it is first driven into the log and used as a lever. If you perform all the actions yourself, without assistants, we recommend using clamps to facilitate the work.

If you plan to additionally cover the boards with an antiseptic or paint, this should be done before the final assembly of the structure.
Tip: if pre-impregnated boards are used for the installation of the flooring, the antiseptic should be applied only to the ends.
Since wood is a flammable material and has a low level of fire safety, the surface of the finished platform should be treated with special solutions (flame retardants).
The paths on the site allow you to move freely between zones in any weather, without sinking ankle-deep in mud and without dragging the soil on your soles. They will become an element of landscape design, given not only the practical, but also the visual component. When choosing material for the tracks, they are guided by the general style of the design of the site and their financial capabilities. Wooden paths in the country are always universal - they are combined with lawns, and with flower beds, and with paved terraces, they can really be made independently, they look great without a border, and the cost depends on the chosen variety. Many users of the FORUMHOUSE portal ennoble the landscape with the help of wooden paths.
Do-it-yourself wooden paths
Wood as a material for garden paths is not the most popular category, but it is quite in demand, due to its high decorativeness, relative durability and availability. Although a cubic meter of processed board costs decently, many use construction residues for paths, which significantly reduces the cost. But even if you take new lumber, due to the lack of wet processes during laying and taking into account the peculiarities of the preparation of the base, the tree can be cheaper than other varieties. According to the manufacturing method, there are two types of wooden tracks.
Do-it-yourself wooden walkways
The main canvas rises above the ground level, the frame is laid on the prepared base. The boardwalk is raised above the ground to provide free air access - such ventilation will significantly extend the life of the track and protect it from waterlogging. It turns out a real "wooden sidewalk". This design needs a slight slope - it helps water to roll off the surface of the "sidewalk", even after heavy rainfall the canvas will dry out faster.
The basis for the flooring is a frame of longitudinal logs, on which, by means of fasteners, crossbars from a board or timber are fixed. It is possible to alternate segments of the same length, but different in width segments, it all depends on the idea. To avoid warping, a wide board is attached to three or four self-tapping screws (nails) from each edge, two are enough for a beam, hats are heated in depth to avoid injury to the legs when walking barefoot.

In order to move normally along the flooring, calmly pass by an oncoming one or, if necessary, roll a wheelbarrow, a track width of 80 cm or 1 meter and a board thickness of 25 - 50 mm are sufficient.
If family members have a solid weight, or the path in the garden will be used for transporting weights in a wheelbarrow, an additional, middle log is laid.
How to process a tree on a path
To protect the logs in direct contact with the ground, they must be treated with liquid bituminous mastic or a similar agent. The crossbars, if necessary, pass with a planer, grind with sandpaper, after which they are impregnated with antiseptics, dried and mounted on the frame. Two assembly options are possible - close, without gaps and with equal gaps between the elements. The wrong side of the flooring is also covered with mastic, the front surface is painted or varnished. Pre-treatment of structural elements with a coating before assembly is more effective than in finished form; it is easier to cover the assembled flooring with bitumen and tinting.
Garden path from boards: how to make a sidewalk at their summer cottage
Although the flooring can be laid on a flat surface and without prior preparation, so that it lasts as long as possible and does not have to fight with weeds during operation, it makes sense to follow the technology. There are two ways to prepare - for logs or for the entire width of the track, preparation is carried out in several stages:
- The soil layer is removed with a depth of 20 - 30 cm, the bottom is compacted;
- A layer of sand is poured, rammed, spilled, a layer of fine gravel is poured on top, rammed.
If possible, geotextiles are placed between the layers so that the materials do not mix, this increases the drainage capacity of the pillow.
If the device of wooden flooring is planned as temporary, you can do without a pillow, geotextiles, roofing felt, conveyor belt or similar materials are laid under the logs, weeds are treated with herbicides.
How to make wooden garden paths
Among the users of the portal, wooden floorings are well-deservedly popular.
Andjey FORUMHOUSE Member,
Moscow.
They came to make wooden paths in the country, the remnants were used - bars (larch, substandard) 3 cm thick and 10 to 2 cm wide. In the future, I will paint with some kind of impregnation. The soil was chosen for half a bayonet, a small layer of sand (tamped), geotextile, and small gravel on it. On crushed stone - logs from the remains of a log and a beam of the 100th, 10 cm high. The logs were covered with mining.

Ilya79 Member of FORUMHOUSE
A board 25 and 50 mm, transverse solid, covered the planks with an antiseptic with coloring, the width between the lags was by eye so that the boards protruded slightly from the edge (about 10 cm). I decided not to make a span between the crossbars: it is difficult to mow the grass, you scratch the trees.

Julia397 FORUMHOUSE member
We decided that we would have in the country wooden walkway from planks. So far, 21 meters of canvas are in the plans, 4.5 meters were knocked down over the weekend. For the next, we plan to finish knocking down and start polishing and painting in the color of the house.
 Path from boards
frog555 Member of FORUMHOUSE
I am also for paths from boards in the country, clean and barefoot nice to walk on the concrete "roads" so do not run around after a bath.

Alternatively, the flooring is made from used pallets from building materials - a pallet. For laying in its original form, choose pallets with a narrow span between the elements. Such a device does not have great decorative effect, but it requires minimal effort and time to work. Not the most beautiful, but as a prefabricated temporary hut - the best option, proven by summer practice.
To make such a path more decorative and last longer, pallets are treated with protective compounds and a full-fledged flooring is knocked together from them. More time is spent, but the result is much more attractive, and the cost of the track, both in the first and in the second option, cannot be cheaper.
As opposed to the budget option from pallets, decking decking paths are special wooden tile modules from a terrace board (pictured). This garden parquet is laid on a flat base and surpasses home-made varieties in external data, those who made it leave only positive comments, but not everyone can master it due to the high cost.
 Wooden garden paths
dug in
Wooden elements in such paths in the country are dug into the ground flush with the surface or protrude slightly above the ground, the voids are covered with drainage materials - crushed stone, coarse sand, granite screenings. Boards, saw cuts of logs, stumps, branches, thick timber, dies are cut 10–15 cm long. Since the tree is completely immersed in the ground, it needs enhanced protection from moisture, it is advisable to soak the washers in an antiseptic solution or hot drying oil, the bottom the saw cut is covered with bitumen, the top one can be varnished or waxed. The laying of saw cuts is arbitrary, to increase the decorative effect, small ones are inserted between thick round timber. If a beam is used, imitation of brickwork with dressing of rows is relevant.
Unlike flooring, which can be placed directly on the ground, dug-in paths made of saw cuts and timber require careful preparation of the base, as they will be in the ground and exposed to the external environment.
To avoid water stagnation and premature wear, an effective drainage cushion of sand and gravel is made under the saw cuts, at least 10 cm thick.
The bottom of the trench dug according to the marking is rammed, covered with geotextiles, after a layer of sand, compacted and spilled, a layer of rubble and the last layer of sand. The cut is put on the substrate, the alternation of different diameters increases the decorativeness of the track, the chocks are tapped with a rubber mallet, the horizon is controlled by the building level. The gaps are filled with fine gravel, coarse sand, granite screenings, clay.
The path from the saw cut perfectly fit into the landscape of the site of the forum member NikNikTar.
NikNikTar FORUMHOUSE member
From the remnants of aspen logs from my construction site and the abandoned freebie behind the fence, I sawed washers 15-20 cm thick, took out the soil and laid it in peace on the geofabric and sand cushion, having previously bathed them in Senezh. The gaps were filled with chopped aspen trunks (there is a lot of it on the shore of the lake) and covered with sand, and the top layer was rubbed with fine granite chips. Aspen paths fit very organicallyin the area, pleasing to the eye, but slippery after the rain. I would not dare to make them as the main ones, but as an element of design and for sedate movements between small architectural forms on the site and walks in the garden - that's it.
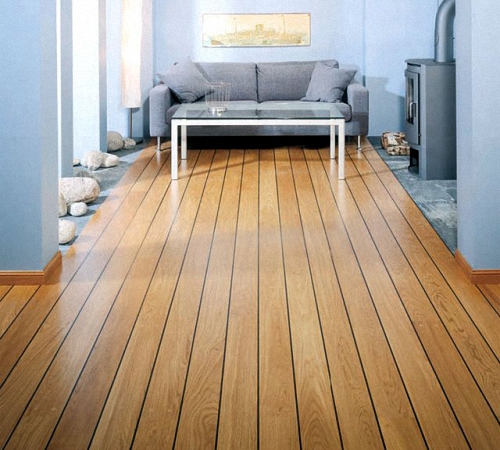
Wooden flooring in a house or other room will create a comfortable atmosphere and ennoble the appearance of the room. The method of laying the flooring depends on the type of board that is used for finishing work. In this article, we will consider the features of choosing and installing wooden flooring on our own with the recommendations of specialists.
Choice of wood species for flooring
Wooden flooring will provide a beautiful view of the building as a whole, as well as create a cozy atmosphere. Wood is an ecological material, and therefore this home decoration option is very popular. It is quite difficult to produce professional flooring on your own, especially without experience. But if you follow the instructions and recommendations of experts, you can make the flooring yourself.
Before you start laying wooden floor boards, you need to choose the right building material. In such a case, it is important to take into account the family budget, the characteristics of the microclimate in the room, the approximate load on the floor, as well as the type and purpose of the room. All aspects indicate the choice of the necessary materials that will be practical during operation.
For small rooms, it is advised to select a coniferous tree, for example, fir, pine, cedar and the like. For living rooms, such boards have a low cost, while they are durable and resistant to wear. Regarding the average price of wood, oak is considered the most popular material. For flooring in a wooden house, aspen or alder, which are widely used in construction, can also be used, and they are advised to be purchased for children's rooms or bedrooms.
Features of the choice of wood:
When choosing wood for flooring, it is important to keep in mind the characteristics of the material that are important to consider:
1. The tree must be dried, because the raw material will quickly deteriorate and lose its appearance. Overdried products can also be deformed.
2. It is important to inspect the boards for any damage, cracks or resin stains. It is not recommended to choose such products.
3. You need to buy floor covering with a margin of about 15 percent.
4. It is important that the products are at least 2 meters long, and they must be from the same batch, which indicates the same quality of the building material.

Types of products for flooring
For the installation of wood flooring, different types of boards are used, which are:
1. Massive board.
2. Parquet products from solid wood. Such material has several grooves on different sides, which distinguishes the board from a typical product. The length of such a board is 0.6 to 2 meters, and the approximate thickness is about 1.8-2.5 centimeters.
3. The glued parquet board differs from the previous product in appearance, while its performance remains the same. Such a product consists of 3 layers. The top layer of parquet is made of expensive tree species, the thickness of which is 4-5 mm. Other layers are made from less expensive breeds.
4. Parquet is a plank of small dimensions, which have grooves and tongues.

Solid wood flooring
Do-it-yourself wooden flooring from similar materials looks quite functional and beautiful. The use of a natural board will cost a lot, but it will allow you to create a unique design for your room. Boards are an environmentally friendly material. Massive boards are made up of spikes and grooves, which facilitates the installation of the floor. The standard parameters of the board are a length of 2 to 6 meters, a thickness of 20-60 millimeters.
The technology of wood flooring has the following sequence:
1. After purchasing the material, it must be brought into a warm room for at least three days so that the product “gets used” to the microclimate of the room.
2. The main thing is that the temperature in the building should be about +20 degrees, and the humidity should be 45-60 percent.
3. After collecting the materials, it is necessary to determine the center line of the room. To do this, measure the width, and split it in half, which forms the position of the line.
4. You need to measure an even distance from the center to the wall, and from this area you can start laying the floor. The distance from the wall can be 15 millimeters, where we denote this line. In this area, we take up the installation of floorboards, and between the base and the line we insert wood gaskets.
5. Do-it-yourself flooring of a wooden floor must begin with the installation of the first row of boards, placing them exactly along the line. Products are advised to align and attach with the assistance of self-tapping screws from the wall so that after the head of the self-tapping screws it can be covered with a plinth.
Need to know! The length of the fasteners should be more than the thickness of the wooden flooring by about 1.5 times. To do this, you must first make holes.
6. On the other side, the boards are attached to the logs at an angle and fixed in the grooves at an angle of approximately 40-45 degrees.
7. We insert subsequent rows of boards into the grooves of the previous rows. From the other side, the products are fixed into grooves using screws. If the length of the product is less than the parameters of the room, then it is necessary to lay 500-100 mm products so that the junctions of the ends are not located on the same line.

9. The final step is to fix the boards to the wall, so that the fastener area is hidden after the plinth. To do this, you need to screw the screws into the boards and drown the cap by 3-4 millimeters.
10. The floor must be left for 8-14 days so that all parts dry, after which its surface can be varnished in several layers.
The technology of fastening the floor with a massive parquet board
The method of laying massive parquet boards practically does not differ from the arrangement of wooden flooring of a conventional board. Parquet products differ only in length. The main characteristics of parquet from the board are the length from 0.5 to 2 meters, the thickness of which is 1.8 - 2.5 cm. The product has grooves and spikes on all sides.

The technology of installation of solid parquet boards has the following features, which are described by experts:
2. When laying, it is important to adhere to the “spread out” method so that the gaps do not coincide with each other.
3. If a plywood base is used in the construction of a wooden deck, then it is important to glue the parquet to it. For this, glue or mastic can be used, while additionally the products are fixed with self-tapping screws. Glue should be applied over the entire area without voids.
4. In the process of work, it is advised to apply a diagonal placement of the parquet panel, and not just the traditional one. The most aesthetically pleasing look is the position of the boards at an angle of 45 degrees to the area where the doors are located.

Features of wood flooring with glued boards
The peculiarity of such a board is contained in the fact that it does not lend itself to deformation from exposure to different temperatures. To the question: how to make wooden flooring, it is recommended to use the "floating floor" method or with the assistance of staples. Aspects of technology are contained in the fact that the boards are not attached to the rough base, but are glued to each other on all sides.
The parameters of glued parquet panels are from 0.5 to 2 meters in length, and the thickness can be from 2 to 6 centimeters. This product is glued together from 3 layers, the upper part of which is made from expensive tree species and has a thickness of 5 mm. The parameters of the product are contained in the fact that the glued panel does not change its parameters at different temperatures, and this is due to the technology of gluing the layers.
The peculiarity of laying a glued parquet board is contained in the following stages:
1. The laying option resembles the manufacture of wooden decks from solid boards. After purchasing the material, it is important to place the boards in a room or building and leave it there for several days.

2. On the opposite side of the front, the boards need to be treated with protective agents or drying oil, this will avoid waterlogging the material.
3. As in the process of working with massive boards, we assign the central line of the room, and also measure the area from which we will start laying the parquet. 1.5 cm must be retreated from the wall or other objects.
4. The central product of the parquet begins to be laid with grooves to the wall, and other items must be laid without the use of glue.
5. After laying the last board in a row, it must be cut so that 8 millimeters remain to the wall.
6. A new row must be started not with a new product, but with the previous cut one.
7. After you have made two rows of wooden flooring, the video of which is presented at the end of the article, you need to align them using a cord. After that, they are accepted for gluing the product or fixing it with staples.

8. The main and longitudinal spike of the parquet board must be glued. Attach the products carefully, and in addition it is recommended to use a hammer and gaskets. During the knocking down of the boards, glue should appear between them, which is important to remove with a spatula and wipe the surface with a piece of cloth.
9. The last part in the row must be fixed with a coupler.
11. After that, leave the floor for 7 or 10 days until it dries completely and the parquet is bonded. Further, the surface can be finished with paints and varnishes.
12. If, after drying the floor, there are some irregularities or swelling of the boards, then this must be removed with a sandpaper. In this case, a difference in the thickness of the product by 0.1 mm is allowed, and grinding is carried out along.
13. After laying the boards, mechanical damage may appear, which is important to repair. In this case, it is recommended to use mastic, if there are significant defects, then you need to use large volumes of the product, because after drying it is able to shrink. Deep deformed areas need to be repaired in several layers.

wood plank flooring process
There are different options for wood flooring, photos of which can be seen on this site, however, each installation method is different depending on the material used. For example, for laying the floor in a garage or non-residential buildings, it is not necessary to purchase an expensive parquet board or use massive boards. It is recommended to use products whose thickness can be from 2 to 6 centimeters. They do not have spikes and grooves, so when laying it is important to monitor the tightness of the edges. Most often, planed boards are used for the attic or other buildings.
The technology for mounting boards has the following sequence:
1. We mount the first board and attach it to the joists.
2. Next, lay the second product. To do this, the staples are driven into the logs at a distance of 10-15 cm from the board. It is important to know that the staples are driven into the first lag, and the next after every 2 meters. Standard staples have the ability to split logs, so special fasteners are used.
3. The second board must be driven in so that the nail heads or self-tapping screws are recessed by 4 millimeters. In this case, it is important to ensure that the gaps between the boards are not more than 1 mm.
4. All other boards are laid in the same way. The compaction technology should be left for those products that do not adhere to the joists, forming wooden deck boards.
5. The last covering boards must be mounted freely. And the final board should be located at a distance of 13-15 millimeters from the wall. If necessary, part of the board must be sawn off.
6. If the house is built of wood, then wedges must be driven between the wall and the boards. Boards are advised to press and fasten using self-tapping screws or nails.
7. If the walls in the house are plastered, then a sheet of plywood is driven in between the floor and the base to protect the surface from damage. Next, we mount the last board between the plywood and the wall, cutting it if necessary. If the distance between them is too large, then you need to install wedges that are hammered and fixed with nails.

It is important to know! When installing boards, hammer blows should be determined not on the board, but on the wooden gasket, so as not to leave damage on the surface of the product. Otherwise, you can use a rubber mallet to avoid warping the wood.
There are different options for flooring, which are determined by the type of wood material used, such as solid board, parquet panels, and the like. In the absence of experience in such work, we advise you to seek help from specialists who will do the installation quickly and professionally.
Like many good design ideas, decking has gone through a period of super-popularity that has not done them any good. Having become a fashionable novelty, they were often used in the most inappropriate situations, after which they were subjected to undeserved accusations of a variety of sins. As a result, decking went out of fashion as quickly as it came into it. The root of all these contradictions is that wooden flooring, like other hard surfaces, is ideal for some places and situations, and completely unsuitable for others.
TO BE OR NOT TO BE DECK DECK…
If you analyze the nature and properties of wood as a material, you will immediately guess where it is best to use it. Wood is much lighter than brick or tile and is therefore great for balconies and rooftops where a beautiful and practical yet lightweight finish is required. The fact that wooden platforms are not assembled directly on the ground, but on a frame, means that they can be installed on top of an existing hard surface without dismantling or breaking it. In addition, the platform can be placed on stands of any height, which means it can be raised over an uneven area or slope without wasting time and effort on dragging the ground and leveling. 
But at the same time, it will become obvious to you that in some places a tree should never be used. Even wood treated with a pressure preservative will rot if exposed to less than ideal conditions. For example, if water drips from trees on a wooden deck, or if it is left in the shade for most of the day, mold will soon appear on it, the tree will become slippery and begin to break down. If the flooring is well blown from above and below, this will improve the situation a little, but still from time to time, in order to get rid of the fungus, it will have to be pressure washed.
DESIGN OPTIONS
Your decking can be any shape, size or design - let your imagination run wild. For example, if you want to create a corner of the tropics in your garden, put the deck on poles as high as stilts, plant trees with large leaves around it, and put pots with exotic plants on the deck itself, including creepers that will wrap around the railing - on a hot day, you can easily imagine that you are in the middle of the jungle. With the help of design, it is not difficult to create other illusions - for example, the proximity of water. Make the deck long so that it resembles a dock or pier; install it on thick poles, and assemble the flooring itself from weathered, aged wood. The railing can be made of ropes and the flooring can be decorated with shells, sand or sea pebbles, and plants that are often found on the shore can be planted nearby. 
Due to its light weight, wood is one of the most suitable materials for creating roof terraces. It can be slightly raised above the main surface of the roof so as not to interfere with the flow of water; it is easy to cut recesses for pipes in it. Most flat roofs can be converted into additional living spaces, but only with prior consultation with a structural engineer and possibly reinforcing the old roof.
OPTICAL ILLUSIONS
By using different boards and different ways of laying them, you can easily change the visual perception of a space. Flooring made from narrow boards seems wider, and from wide boards it seems narrower. Laying the boards diagonally or straight away from the entrance (for example, from the door leading from the house to the patio), the flooring will appear more spacious. If, on the contrary, the boards are laid across, the long and narrow platform will become shorter and wider. This technique is especially useful for elongated gardens, as it makes the space more proportional and visually brings the far edge closer to the viewer.
Instead of making one large deck, you can install several smaller ones at different levels, or even separate them with short passages. In a small garden, this will divert attention from crowding and visually increase the area.
CREATING A NEW LIVING SPACE
Hardwood flooring feels like an extension of the home and living area, much more so than any other hard surface. Therefore, home furniture, lamps and accessories that would look ridiculous in another part of the garden will be appropriate here.
At the same time, wooden decks can serve as both an outdoor living room and a place to store many necessary things. Drawers can be placed under the seats to store garden tools, pillows or children's toys. Or you can make the flooring lift and arrange a warehouse under it; in this case, it will be necessary to arrange a hatch or a small door. Of course, all these storages will have to be waterproofed with durable plastic.
PERGOLAS AND RAILINGS
You may want to arrange a pergola canopy over part of the deck flooring. In this way, you will provide yourself with protection from the sun on a hot day and a base for climbing and other plants. Pergolas are sold ready-made and are easy to install, but you can also build them according to your own design. The choice of plants for them is huge: think roses, clematis or grapes.
In addition to the pergola, consider a balustrade or a simple railing. Of course, if the deck is built on a raised platform, they are absolutely necessary and must be at least 1.2 meters high, and the balusters must be placed often enough that children cannot squeeze between them. However, railings are also worth considering if your decking is at ground level. They can be used as an additional decorative element, and in addition, they organize vertical space, which is important if your deck is large, flat and built on a level. 
DECK PLAN
If your flooring is not just square or rectangular, but more complex, it makes sense to draw a drawing to scale in advance. On the drawing, you are more likely to find all the problem areas and find ways to saw the tree as little as possible. Go to your nearest warehouse or shop and find out what sizes the boards you need come in. Do not be too lazy to make as detailed a drawing as possible.
Do not forget to mark on it the supporting beams (logs) located around the perimeter, as well as inside the frame at intervals of approximately 45 centimeters; it is from them that the main structure of the flooring is created. Also mark the vertical posts that support the deck: one in each corner and every 1.5 meters around the perimeter. If your flooring is large, the posts will have to be placed inside the frame.
For decks built more than 60 centimeters above ground level, it is good to consult a civil engineer who will correctly calculate the load; otherwise, your new flooring may collapse, damaging the wall of the house in the process. The same goes for balconies and roof terraces: it is essential to make sure that the house is able to withstand the new load. Check with your local authorities if you need a special permit for such construction.
PURCHASE OF MATERIAL
The easiest way is to buy all the materials for your building in finished form: sawn, the desired shape and with ready-made grooves. Often there are flooring kits on sale that you just have to assemble. If you are going to build a deck under the trees, you should definitely buy decking - boards with ready-made longitudinal grooves that speed up drying and prevent the foot from sliding on wet wood. However, if you want something unusual, the material should be chosen independently.
TYPES OF WOOD
Boards for outdoor use should be at least 2.5-5 centimeters thick, otherwise they can warp from dampness and temperature changes. With this requirement in mind, choose any material to your liking - from railway sleepers and thinner.
Floor boards are made from two types of wood: soft and hard. Solid wood is more expensive, but it is more durable and stronger. Soft wood is much cheaper, but it requires constant care, otherwise it will last at best for five years.
Solid woods include oak and teak. These trees grow very slowly and as a result the wood is dense and hard. However, it is precisely because of the slow growth that it is expensive. Green (uncured) oak plank is especially durable, but it is very expensive and can warp and warp over time. Soft wood includes pine and other conifers - they grow quickly and are therefore much cheaper. 
Nowadays, there is hardly a person who has not heard about illegal, barbaric deforestation. If you decide to build your deck with hardwood, please make sure it comes from a forest that is carefully maintained and constantly replenished. Usually such wood is provided with a special label. A self-respecting supplier or trade center should know where the wood came from, and if they cannot answer your question accurately, it is better to buy materials in another, more worthy place. Softwood should also come from a trusted supplier.
WOOD PROCESSING
Be sure to check that the wood you are buying has been pressure or vacuum treated with a preservative. Only such processing guarantees that the preservative has penetrated deep enough into the wood. Buy wood only from reliable suppliers and remember that without proper treatment, wood will not last long.
CONSTRUCTION OF THE DECK
In many ways, decking is much easier to build than, say, a tiled deck. The main thing here is to correctly determine the depth to which to lower the support pillars into the ground, and correctly make the strapping. In addition, it is important that all nails, screws and bolts are of the correct length and strong enough. Once the harness is installed, putting boards on it is not at all difficult.
If you built a high deck or a deck on a slope, there will be an empty, well-viewed space under it. You can close it with boards nailed to the pillars, you can fill it with gravel, bark chips or other loose material, or you can plant plants on all sides, but in this case there should be good fertile soil between the pillars.
SITE PREPARATION
Site preparation and how much effort and time it will require depends on the height of the deck and the nature of the surface on which you are going to build it. If you're installing low decking on an old patio, balcony, or rooftop, you just need to sweep the area well and make sure it's level and strong enough. But if you are building a deck on bare ground, you will have to work a little more.
First you need to mark the site with the help of pegs and twine, check if there are water pipes under it, and also mark them. Destroy all perennial weeds growing on the site and cover it with a protective film. If your site doesn't have good drainage, think about ways to improve it. If you are building the deck at ground level and want it to last for a long time, you may need to remove the soil to a depth of about 10 centimeters, fill the hole with gravel and tamp it down well.
INSTALLATION OF DECKING
First of all, mark the places where the support pillars will stand, then dig them into the ground and fix them with concrete. If you're building on uneven ground, don't worry - the posts can be leveled when the frame is placed on them, but for now just make sure that the lowest post is no lower than the intended deck height.
Next, proceed to the manufacture of the strapping. If you do not want water to linger on the surface of the flooring, give it a slight slope. Select the slope direction and adjust the height of the external structural beam accordingly. If you are installing flooring at ground level, it is a good idea to take care at this stage of the work that the space under the boards does not attract any small animals. To do this, it is enough to fill the gaps between the supports with gravel: the animals may crawl into it, but they are unlikely to want to build a nest.
Once this is done, the floorboards can be laid. Starting at the edge, lay the boards in the direction you choose, attaching them to the supporting beams with nails or, for a neater result, with recessed screws.
When all the boards are in place, the tree can be painted. If there are plants nearby, use only water-based paint that is safe for them.
CONCRETE MIXTURES
To fix the posts in the ground, you will need to make a concrete mixture. Depending on the conditions, it can be used either dry or already diluted with water. Convenient packages with such a mixture, to which it remains only to add water, are sold in all hardware stores. It turns out a little more expensive than if you mix the solution yourself, but for small quantities this difference is not significant. If you are installing the posts in damp or damp ground, a dry mix is ideal for you - it will quickly absorb moisture from the soil; a mixture previously diluted with water may simply not seize in such a situation. Dry must be tightly / tamped around the perimeter of the post and find some way to keep the post upright until the concrete hardens.
If you decide to dilute the mixture with water, make the solution fairly steep, that is, add the minimum amount of water to it necessary for it to set. Tamp it around a post and it will harden very soon. 
Deck decking is installed on poles that are anchored into the ground with a concrete base.
HOW TO BUILD A DECK DECK


1.
If you are building a deck at ground level, dig a hole in the ground 30 centimeters deep for each support post (for higher decks, the depth should be 45 centimeters). At the bottom of each pit, pour scrap brick, gravel or lay a concrete block. Insert a post into the middle of the pit and fill the empty space around it with a thick concrete solution. Use a spirit level to make sure the post is vertical. Let the concrete cure (approximately two days).
2. In order to make the strapping, with galvanized screws, drill external, horizontal beams to the support posts at the desired height. With a spirit level with a rule (a long straight bar) constantly control the installation of the beams. Using nails, self-tapping screws or brackets, install intermediate logs between the outer beams at an interval of 45 centimeters.
3. Attach the floorboards to the logs and beams using recessed screws, leaving a gap of about 5 millimeters between them (in order to accurately remove the gap, use, for example, a wooden chip - this will make your work easier). The deck boards must protrude at least 5 centimeters beyond the strapping. When all the boards are drilled, draw a transverse line along the protruding ends and cut off all excess with a saw.
6 colors Beauty and the Beast red rose in glass dome...
289.16 rub.
Free shipping★★ ★★ ★★ ★★ ★★ (4.80) | Orders (998)
How to make wood flooring with your own hands - photos, drawings of the device and construction
Of the many floorings on personal plots, dachas and country houses, you can make 2 simple but at the same time very beautiful (which of course does not cancel other designs).
The first homemade flooring is located low, i.e. directly above the ground, the second flooring is higher, and is equipped with railings and steps for entering (descent) into the garden or vegetable garden
You can make flooring away from the house, or you can attach it directly to the house.
In both cases, the flooring will still have to be done so that it fits into the landscape design of the site.
At the same time, take into account the fact that when changing the number or length of any parts in relation to the proposed structures, the spans between the joists should not allow the floorboards to sag strongly.
But before you start construction, do not forget to coordinate your project with specialists in order to take into account parameters such as the depth of the foundation supports and the distance between them, depending on the type of soil.

Do-it-yourself low flooring (Fig. 1)
The construction of a low deck (Fig. 1) for recreation or work does not require large financial or time costs.
Since the flooring is small (2.4 x 3.6 m), it is suitable for many home gardens and creates a pleasant and secluded corner in the garden.
For the foundation, use ready-made concrete blocks with stud anchors. If the platform is horizontal, then the racks can be excluded, and the beams can be placed directly on the anchors.
If the slope is noticeable, then you will need racks of different heights to maintain the horizontality of the flooring.
In this case, in the upper part of the slope, the beams can be placed directly on concrete blocks (Fig. 2).
To climb onto the deck, you can make a step from pre-treated with an antiseptic or painted boards (50 × 150 mm), a large flat stone or concrete slab.
In order to make this flooring you will need:
|
DETAILS |
SIZE, mm |
|
lumber |
|
|
Racks |
100×100 |
|
beams |
100×200 |
|
lags |
50×150 |
|
deck boards |
50×150 |
|
front board |
20×250 |
|
CONCRETE PRODUCTS |
|
|
Foundation |
Finished block |
|
Base |
300×300 |
|
FASTENERS |
|
|
Nails |
80-90 mm long for flooring; anchor nails |
|
Fasteners |
Anchors, steel connectors |
|
Note. For flooring details, use lumber treated with an antiseptic. Use corrosion resistant fasteners. |
|
Do-it-yourself high flooring (Fig. 3)
The corner flooring attached to the house is very attractive and seems to increase the area of \u200b\u200bthe dwelling.
In this case, the flooring is planned from the side of the garden and can serve as an entrance to the house.
Having set the height of the flooring, it is enough to adjust the dimensions of the racks and the number of steps of the stairs to it (Fig. 3-7). You can do without racks, making the flooring only a step above the level of the garden.
Regardless of which flooring you choose, do not forget that if its height is more than 750 mm, then a fence with a railing should be provided. The latter can also be performed on low flooring - he will only benefit from this, becoming more attractive.
At the same time, for convenience, round the corners of the railing, and on the back side of the handrail of the stairs, in order to better clasp it with your fingers, select a groove.
In order to make the second flooring you will need:
|
DETAILS |
SIZE, mm |
|
lumber |
|
|
Racks |
100×100 |
|
beams |
100×200 |
|
lags |
50×150 |
|
inserts |
50×150 mm |
|
Support beam at the wall of the house |
100×200mm for decking |
|
deck boards |
50×150 |
|
front board |
20×200 |
|
steps |
50 × 300 mm stringer; 50×150 mm tread; 50×100 mm risers |
|
fencing |
Racks 100×100 mm, railings and stair handrail 50×150 mm; fencing boards 50 × 200 mm; jumpers 50×100 mm; dowel 038 mm |
|
CONCRETE PRODUCTS |
|
|
Foundation |
300×300 mm finished block |
|
Base |
Concrete blocks 450×450 mm; cushion for stairs 450×150 300 mm deep |
|
FASTENERS | |