Making boxes for storing things with your own hands. Making boxes for storing things with your own hands A beautiful box for small things with your own hands
Every home has small items such as paper clips, pins, beads, buttons, etc. which are very difficult to find at the right time. Often they lie in a variety of, sometimes not at all suitable, places and only interfere with maintaining order. A box for small things will help solve this problem. To make it with your own hands, you will not need any special skills and a lot of time, and in this material you will find several original ideas with a detailed description of the work.
Let's make a box for small things with our own hands in several versions
To make it easy to find the right thing in a large box with small items, the box should have at least a few areas fenced off from each other. In this example, we will make an organizer with several levels of trays on which paper trays are located.
For work, you will need a shoe box and several covers from similar boxes, paper (white, colored or decorative with a pattern), scissors, glue "moment".
Production of paper trays.At the beginning of our master class, you need to make paper boxes that will stand on trays of lids. Their number depends on the size of the box, the number of levels. It is desirable to calculate their size so that a whole number of trays fit into the box vertically and horizontally. For example, 3x5.
We begin to fold square sheets of paper. We bend the sheet horizontally in half, unfold, then bend vertically and unfold again. In the same way, we make folds along both diagonals.
Then 4 corners are evenly bent to the center. We bend the two sides of the resulting rhombus to the center, return it to its place and repeat with the other two sides.
Fully expand the workpiece. Now you can see a grid of small squares on it. We apply glue to the central part and bend the corners, forming a box.
We also bend 2 more opposite sides. The tray is ready!
We put the first level of trays on the bottom of the box, the next - on the lid (slightly smaller, since it should be included in the box). If there is still room in the box, the third level can be done in the same way.
We lay out beads, beads, buttons, pins, paper clips, any other little things and devices for needlework on trays. You can use the box!
At will, we decorate our organizer: you can paste over it with decorative paper or fabric, place embroidery, decoupage, volumetric decor from buttons, ribbons, etc. on it.

Let's make a box for trifles from corrugated cardboard
This durable and neat box is almost as good as a wooden organizer. It is easy to use and even a beginner can do it.

We cut out the details for the corrugated cardboard lattice, as shown in the photo below. We make cuts in the middle of the part and carefully separate 2 layers of cardboard between them. This is necessary so that the edges of the future lattice are even and flat. It turns out quite aesthetically pleasing.

Fold the lattice pieces in half. It is not necessary to glue them, as they hold well when assembled. You will need 2 longer strips (longitudinal) and 3 shorter ones (transverse). The assembled grid will look like this:
We cut out a scan for the base of the box from cardboard. In the places of the main folds, we make a ridge - we make cuts and remove 2 layers of cardboard. Along the edges, you should also get single-layer sections.
We carefully bend the scan along the lines, press the folds with our fingers, so they will turn out to be the most accurate. We bend wide single-layer sections for gluing inward. For convenience, scoring lines are drawn along the sections and at a distance of 3 mm from them, for example, using the tip of a compass.
Cut out 2 rectangles of the same size for the inner layer of the lid and the inner bottom of the base.
We begin to assemble and glue the box with instant glue. First, we bend and glue wide single-layer sections. We glue the inner bottom, having previously made cuts for attaching the grate.

We glue the inner layer of the cover, then glue its edges, folding the cardboard in 2 layers. We bend and glue single-layer sections.
We lay the grate on the bottom and pour glue into the slots along the short sides. We insert the grate into the slots, press it. Then we glue the walls of the box. We glue the magnets by cutting round holes for them in 2 layers of cardboard.
It is important to choose magnets that are suitable in thickness. If the thickness is more than 3 mm, before gluing the box wall, special nests must be glued in the form of an additional layer of cardboard. Magnets should be strong enough, one of the best options is figured ones. In addition, you can make loops for the lid. They will need to be fastened with pieces of a ruler made of wood or plastic.
The easiest way is to cut the loops out of cardboard according to rectangular patterns and punch them in the middle.
The little box is ready! You can decorate it to your taste.
Video on the topic of the article
A selection of video tutorials on making boxes for small items:
In every house there is at least one empty box left after shopping. In most cases, they are simply thrown away. However, few people think that they can be used to make an original and unusual box for storing things and various small things.


Stores offer a wide variety of decorative boxes in various sizes, colors and styles. However, the prices for such accessories are not always affordable. With a little effort and imagination, everyone can make an original box with their own hands. The purposes of their use in the apartment are many. Boxes in the interior can become an original decorative element, as well as serve as a place to store various things. The table shows the most popular ideas for using decorative boxes.


Storage box decor
|
Where to apply |
What to store |
material |
|
|
Bedroom or living room |
small |
Bijouterie; Jewelry; Accessories; |
Different types of trees; Porcelain or stone; |
|
Underwear; Hosiery; Cosmetics; Hair accessories; Photo albums; Sets and accessories for needlework; Chargers for gadgets; |
Carton boxes; |
||
|
Bed sheets; Towels |
Thick cardboard; Plastic; |
||
|
small |
Toys for fine motor skills: beads, mosaics, etc.; any children's "treasures"; |
Thick cardboard; |
|
|
Accessories for creativity; Constructors; Children's tableware; |
Plastic; Paper tubes; |
||
|
Large children's toys; |
|||
|
small |
any seasonings |
||
|
Unused utensils; Towels |
Paper tubes; |
||
|
Any, but better with a water-repellent effect; |
|||
|
Hallway |
small |
Headphones; Lost little things; Spare laces; |
Plastic; |
|
Shoe care products; |
Thick cardboard; |
||
|
Bags or backpacks; |
|||
|
small |
Moisture resistant materials; |
||
|
Hair accessories; Personal hygiene products; Cleaning products; Iron, hair dryer, hair curlers; |
Moisture resistant materials; |
||
|
Towels Laundry items; |
Moisture resistant materials; |
Also, large-sized boxes made of dense material can be used as pouffes in the interior of a living room or hallway, on which you can not only sit, but also use to store things.

DIY storage box ideas

DIY cardboard box decor

Original decoration of cardboard boxes
How to make a box or a box of newspapers with your own hands.
This material is the most economical, and the finished products are original and look decent in the interior. The master can independently choose the shape, size and color of the finished decorative box. To make this accessory with your own hands you will need:
- Newspaper tubes - you can make them by tightly winding a newspaper strip diagonally onto a thin knitting needle. The edges are fastened with glue;
- Base (box or any salad bowl, according to the shape of which the product will be created) and cardboard bottom;
- acrylic paint;
- Scissors;
- PVA glue;
- Decor elements.

DIY storage box decoration

Storage box decor
Making boxes from old magazines or newspapers with your own hands must start from the ground. The easiest way is to use a cardboard base, on which newspaper tubes are glued around the perimeter at an equal distance (about 2-5 cm). Before weaving, newspaper tubes must be dyed in the desired color. Weaving consists in bringing the working tube back and forth of the vertical tubes alternately. When one of them ends, it must be “growth” using a new tube and PVA glue.
Decorating the finished box can be done with any materials you like.

DIY storage box ideas

Original decoration of cardboard boxes

DIY cardboard box decor
What to use to decorate a decorative box
If you can’t weave a box with your own hands, you can use old shoe boxes, for example, and decorate it beautifully. What can be used for this:
- Wallpaper or wrapping paper - just glue the cardboard box using double-sided tape or PVA glue;
- Fabric - any old thing can become a material for decorating boxes (for example, old jeans or a T-shirt);
- Paper napkin with beautiful drawings - make decoration using decoupage technique;

DIY storage box decoration

Storage box decor
Decorating the box with fabric
In addition to the basic storage box and a piece of fabric, you need:
- Scissors;
- Threads and needle;
- PVA glue;
- Double-sided tape or silicone glue;
- Decorative elements (buttons, beads, lace, etc.).

DIY storage box ideas

DIY cardboard box decor

Original decoration of cardboard boxes
The fabric must be cut in the form of a cross of five rectangles. These rectangles are the sides of the cardboard box. Leave a margin of 1-1.5 cm on each side. Place the box in the middle of the pattern and glue the base with double-sided tape. After - glue each side alternately so that the edges of the fabric overlap slightly and wrap deep. The inside can also be glued using a light fabric, or the bag can be sewn to fit the size of the box. On the edges you can make a double-sided Velcro. So the inner bag can be removed and washed in case of contamination.

DIY storage box decoration

Storage box decor
Decoupage box decoration
This type of decor is the most financially costly, since it requires a lot of tools necessary for work:
- decoupage glue;
- iron;
- acrylic lacquer;
- baking paper;
- synthetic brush;
- acrylic primer;
- paper napkin with a pattern;

DIY storage box ideas

DIY cardboard box decor

Original decoration of cardboard boxes
The preparatory stage includes priming the box in two layers, each of which must dry, and then clean them with fine-grained sandpaper to a smooth surface. The next step is painting with acrylic paint. Then follow these steps step by step:
- Lubricate the entire surface of the box with acrylic glue and allow to dry;
- Lay the napkin evenly on the surface of the cardboard box, smooth out all the bumps;
- Iron the surface with a hot iron at medium temperature through parchment;
- Cut off the excess edges of the napkin;
- Cover with a thin layer of varnish.

DIY storage box decoration

Storage box decor
This process must be repeated for each side of the box. After the varnish has dried, iron each side through the paper. If desired, you can additionally paint the resulting storage accessory with acrylic paints.
Creating an author's decorative box for storing things with your own hands is within the power of everyone. This article describes the basic decor options, which can be continued indefinitely. And each new thing will become a unique decoration of the interior.
Video: DIY shoebox decor
50 photos of DIY storage box decor ideas:


After shopping, not only pleasant emotions remain, but also cardboard boxes from under shoes and other accessories. Many of them do not have an attractive design, but you can fix this even without being a professional decorator. Indeed, in ordinary cardboard boxes they can decorate the interior, and become convenient storage systems for which it is convenient. We have collected ideas after which you will definitely not want to throw them away.
What can be stored in cardboard boxes?

Small lockable boxes are a godsend for owners of small spaces where the issue of storage systems is acute. They are compact and easy to use, they can be hidden under the bed, put on a closet, put away in a niche or mezzanine. Their advantage is in small dimensions and spaciousness.
Here is a small list of what can be stored in cardboard boxes:
Kids toys. Especially, designers and puzzles with small details.
Cosmetics, jewelry, hair accessories. This idea will be rightly appreciated by girls who love to take care of themselves.
Chargers for phones, tablets, laptops. Often these items do not have a specific place, and so they will always be in one place, which will reduce the time to find the right charge.
Towels, baby clothes, diapers. In the nursery of a newborn, such boxes are indispensable. They systematize the storage of personal hygiene items for the baby. True, it is better to sew a textile cover for such a box, which can be removed and washed.
Art supplies. Creative people always have a lot of tools to implement their ideas. For artists, these are pencils, paints, sketches, brushes, paper, for lovers of sewing and knitting - scissors, threads, yarn, needles. You can keep all these items in order with the help of cardboard boxes.
Shoes. No matter how paradoxical it may sound, you can store ... shoes in shoe boxes! For example, in winter, put summer sandals and sandals there, and hide boots and shoes in the warm season.


How and how to decorate cardboard boxes?

Not all boxes have an elegant design and are suitable for decorating the interior, but this is quite fixable. Anyone who has a little free time, patience and inspiration can make a cardboard box exclusive.
For this, the most common materials that can be found in every home are suitable:
Wallpaper and wrapping paper. There are remnants of wallpaper in every apartment where at least once there was a repair. When working with wallpaper, you need to stock up on double-sided tape and PVA glue.
Textile. An unnecessary sweater, an old skirt, stretched pants - all these items of clothing will also come in handy when decorating boxes. And skillfully using them, you can turn unnecessary things into an exclusive work of decorating art.
Burlap and jute. Not everyone has these materials, but they can be useful if you need to decorate a box in an ecological or Provencal style.


A few tips for those who decide to decorate cardboard boxes with their own hands:
Before starting all the work, you should immediately think over the design of the boxes, try on wallpaper or fabric on them that will be used for decoration.It is advisable to decorate the boxes at a spacious table that is well lit. Ideally, if it is located by the window and natural light freely enters its surface.
A working person should not be disturbed by foreign objects on the table.
Tools that may come in handy: transparent and double-sided tape, scissors, PVA glue, thread, paper clips, stapler, scissors, stationery knife, ruler, chalk, pencil.


There are many more interesting ideas that will help you rationally use the space in the apartment and make it more functional. To be sure.
In order for everything to be in perfect order in a house or apartment, each little thing has its rightful place, a good housewife needs storage containers.
In this article, the website news portal offers you several options for making do-it-yourself storage boxes from improvised materials that can be found in every home.

You can put bedding, towels, children's clothes, photographs, toys, needlework, etc. into ready-made boxes. Boxes can also be a place to store dirty clothes waiting to be washed.
DIY storage basket

To make such cute baskets for storing small things, you will need a plastic bucket (suitable for sour cream or mayonnaise), wooden clothespins, glue, a tourniquet and a small piece of beautiful openwork fabric.
Wooden clothespins must be disassembled and the halves glued to a plastic bucket so that the basket still seems to be wooden.
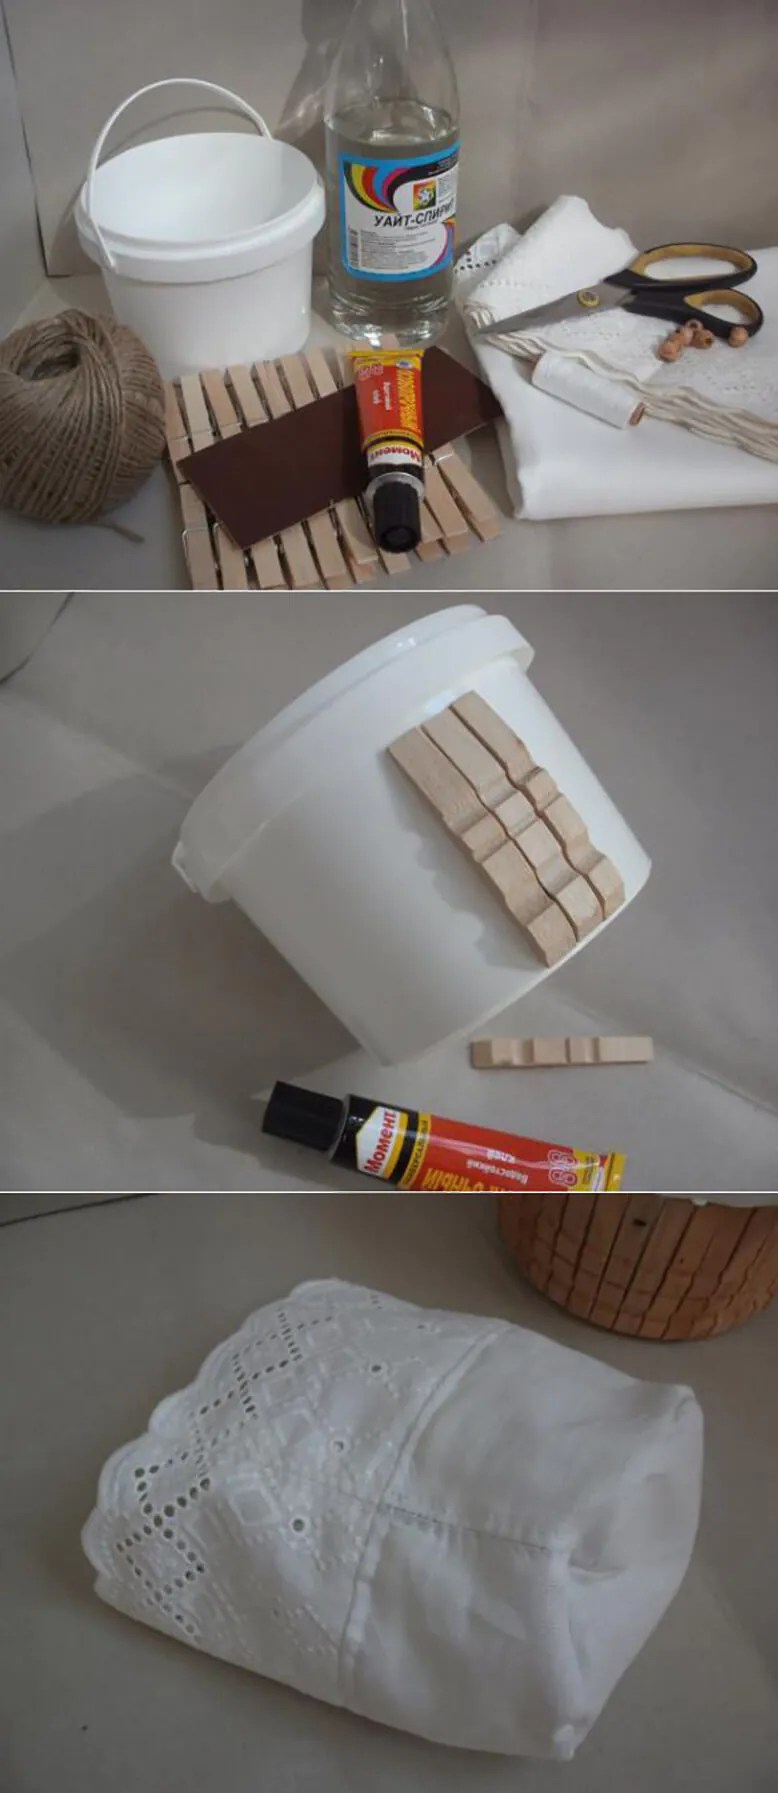
Then make a bag out of the fabric that will match the volume of the plastic bucket you have chosen and put it inside. Wrap the handle of the bucket with a tourniquet.
You can also wrap the bucket with cloth or knitwear if no wooden clothespins are available.

You will need a capacious cardboard box, a decorative rope harness and glue.
Cut off the top of the box. Lubricate the box with glue, and then carefully wrap it with a rope bundle from the bottom up. The rope harness will give the box strength and practicality. Place a cloth bag inside the box.
DIY storage container

If there is a man in the house, then this option for making storage containers will be appropriate. The entire container is made of a metal mesh, wheels are attached to the bottom, which will allow you to easily move the object in any direction.
DIY storage box

If the house has unnecessary tight knitwear (for example, a sweater or scarf), then any cardboard box can be transformed and made useful and beautiful.
DIY storage box made from newspaper tubes

This option for making a storage box is laborious and time consuming, but the result will pleasantly surprise you, because it will look like it was made from rattan.
DIY storage box

This option is suitable for lovers of everything unusual and extraordinary. Here you can get such a stylish suitcase for storing small things from the most ordinary shoe box.
Storage Ideas

And a few more options for making boxes and other containers for storing things.
In almost every home there are a thousand little things for which you need to find a place to store and so that such a container fits logically into the interior of the room. The easiest option is to make decorative boxes with your own hands from improvised materials, they can be decorated in a suitable color or use fabric with a pattern.
Decorating the finished box (MK)
Using a ready-made packing box (most often from under shoes) will be an ideal option for storing the necessary little things. You can also use cardboard boxes for paper, household appliances, dishes or other suitable sizes.
To decorate such a box, materials are suitable: colored paper (plain or for decoupage), colored cardboard, ribbons, sparkles and beads, seashells, coins, etc. In such a situation, it is best to use any imagination, but with the condition that the box harmoniously fit into the interior of the room. Most often, the box is sheathed or pasted over with a cloth, you can use a piece of foam rubber for softness.
If the box is intended for small things, then inside you can use sheets of cardboard to divide the space into several compartments of various sizes.
When choosing a box, you need to consider its purpose:
- determine the desired size;
- the box can be taken from under the paper, teapot or iron;
- buy a piece of fabric of a suitable size and color, glue and sewing accessories.
 Any cardboard box will do.
 The fabric is most often glued or sewn on both the outside and the inside of the box for softness. Here is a step by step guide on how to do it:
1. You need to make measurements of the box from all sides and cut the fabric according to these dimensions.
2. Sew the prepared pieces of fabric. The material can be taken in the same color or for different sides - contrasting tones (choice to your taste).
3. All sides of the box are smeared with glue, and the fabric is glued to the box.
4. After drying, the internal and external seams are sewn with a needle manually.
5. If necessary, you can make handles from colored braid for the box.
6. Decoration of the box - a flight of fancy.
 The process of decorating a cardboard box
 On video: master class: decorating the box with a cloth.
Boxes of various materials
Various materials can be used to make boxes for books, linen, shoes or various small items that are needed in every home. It may not necessarily be cardboard, other products suitable for hardness, density and texture are quite suitable.
From cardboard
Do-it-yourself decorative boxes made of cardboard or thick paper can be of any shape - from the classic parallelepiped, cube to the original shape (heart, star, oval, etc.). The principle of manufacturing the product is very simple. First you need to draw the details of the future box, taking into account the allowances for gluing. Then cut and connect with glue. Such a box can be closed with a magnet, Velcro or a conventional removable lid of the same shape. The decor of such a box depends entirely on the taste of the hostess.
 An example of creating a cardboard box
 On video: do-it-yourself cardboard box.
From wood or birch
Do-it-yourself boxes made of birch bark are now very popular. They are woven from birch bark strips or woven in the shape of a box. Details in such birch bark baskets can be fastened with a fishing line. To make boxes from wood, you will most likely need male hands to help cut sheets from plywood or a small board. For fastening and cutting patterns on the lid, it is also better to involve a man.

From newspapers
Another interesting option (but laborious) is weaving baskets from newspaper tubes. Manufacturing technology is as follows:
1. Tubes are prepared separately in large quantities. They are wound on an iron needle, the tip is fixed with glue.
3. The strongest tubes are glued to the base (box), retreating a few cm between adjacent ones.
4. Then the process of braiding the base begins directly (according to the principle of basket weaving).
5. After finishing, the edges of the tubes are either fixed with tweezers inside or cut off. The resulting wicker box is dyed and decorated with pieces of fabric, ribbons, shells, etc.
 The process of weaving newspaper tubes
 On video: master class: a basket of newspaper tubes.
From plastic bottles
Bottle boxes are made using the middle part, which is cut out and rectangular parts are made:
- In total, you need to prepare 6 parts for the box.
- With the help of a hole punch, holes are cut in each such blank around the entire perimeter.
- Then the parts are crocheted and connected with threads.
- Small sidewalls are also made for the lid so that it tightly closes the box.
- Further decoration of the casket-box is a flight of fantasy of the hostess.
 The process of making a plastic box
 On video: plastic bottle box.
Boxes for linen (MK)
Such decorative boxes for storing books, shoes, linen and various small things can be made in large quantities, for this there are many different options. One of the practical options for a dressing room is a whole set of boxes with inscriptions or photos of shoes, so as not to look for the right pair every time. Standard shoe packaging boxes are used here, preferably one size.

A very necessary thing in a women's wardrobe is a linen organizer box with different cells for each piece of clothing. Such an organizer can be made again from cardboard:
1. It is necessary to accurately measure all dimensions inside the box: the frame of the box with cells must exactly match the dimensions so as not to move in the future.
2. Strips are cut out of cardboard, glued on both sides with paper or cloth, the frame must be carefully fastened, pasting all the corners from the inside and outside.
3. Strips for partitions are cut for cells, it is easiest to make cells of the same size.
4. Similarly, we glue the strips of cells on both sides, leaving 1 cm from each edge (ears) for gluing subsequently to the frame.
5. For fastening together in the strips, cuts are made at the right distance: in the longitudinal parts from the bottom, and in the transverse parts - from the top; the strips are inserted into each other through the slots - a lattice is obtained.
6. The grille is inserted into the frame and fixed with “ears” into the frame (glued or stapled).
 Making a laundry storage box
 Boxes with cells made in this way can be decorated by pasting over with colored paper and any decorative trifles (lace, ribbons, etc.).

By the same principle, a container for sewing supplies is made using a ready-made shoe box. Only it is better to make cells of different sizes (for scissors, pads with needles, coils). The lid in such a box is better to make a folding one and fasten it with a button.
The easiest way is to buy a ready-made box in the store. But a thing made by one's own hands is always unique and unrepeatable. Therefore, any housewife would prefer, with her work and imagination, to create the necessary boxes for storing all sorts of little things in her household on her own, saving money.