DIY designer shelves Chipboard shelves: tips for choosing a material. Bright and cozy interior
Of course, furniture is a necessary element in creating a home interior and comfort. A big role is played not only by its functionality, but also by originality. And what could be more original than a shelf that you made yourself? In addition, it can be made from any improvised means, for example, wood, plywood, glass.
Also, no one forbade everyone to change the usual form of this furniture. Such a homemade product will be an exquisite highlight in your home, which will also help get rid of old and huge cabinets.

So let's figure out how to make a shelf with your own hands.
How to make a simple wooden shelf?
If you add a different number of modules you need to the base, you can easily give it a completely new look. Please note that you need to look at the condition of your materials - they should not be crooked, cracked or covered with fungus. And if everything is ready, you can start creating a shelf.

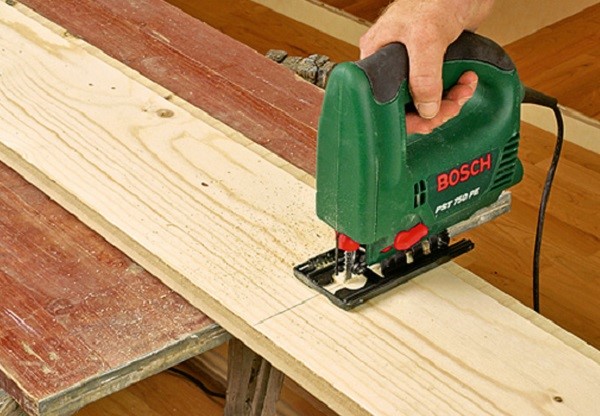
Step one. Markup. For example, let's take a rectangular shape. We take a pre-prepared drawing of the structure and transfer the measurements to the boards. When we have completed this stage of work, we proceed to the next one.
Step two. Sawing. A jigsaw is best suited for this, but other tools are not excluded. Make sure the cuts match the markings. The result should be two short and two long boards.

Step three. Treatment. Made blanks must be processed. Sand each element, cover with stain and varnish. Then the design will serve you longer.

Step four. Assembly. Lay the bottom horizontally. We mark eight millimeters from the edges and then draw lines. Please note that they must be parallel to the slices.
Next, on the drawn strips, we mark the places where holes for self-tapping screws will be made. Same with the top. After that, side boards fixed with self-tapping screws are attached to the lower part of the product. Put the top board on top, fix it.

This is the easiest wood wall shelf you can make. And you can build on it by building new products.
How to make a corner shelf
Corner shelves are often used to save space in the house. They look more modern and practical. And remember, you can embed them anywhere.

The manufacturing process, in fact, does not differ from that described above, but there are some peculiarities. One of them - the upper and lower parts are made up of two elements with ends sawn at the right angle.
Then the process is carried out as follows: to begin with, the two parts of the top are glued together and clamped for a while. Do the same with the bottom bar. Polished, covered with a soil mixture and fixed according to the algorithm written above.
So - the work is almost the same, but a new, convenient, practical product is already appearing.

Shelf for books
On the Internet you can find a huge number of photos of book shelves. But the execution algorithm for all is more or less the same, it only differs in the addition of new modules.
Take, for example, the view of a labyrinth. We take standard tools. The markup is done exactly as described earlier. Trimming headers is a little more complicated. All boards are cut at 90 or 45 degree angles as you like.

If you decide to do the second option, then be sure to use a miter box to make symmetrical sections, otherwise the desired result will not be achieved.
The product is assembled simply - glue the sections, fasten each corner with special slotted furniture screws (two for each corner). Then attach to the wall.

How to make hanging shelves with your own hands?
Hinged shelves are also made easily and quickly, but in addition to blanks, it is worth doing the materials that will hold this shelf. For example, take a hinged shelf on the belts. Therefore, - belts, this is exactly what the structure will hold on to. We add 4 belts to the materials and tools, at least 75 cm long.

Step one. We make belts. To achieve a good result, it is necessary to ensure that there are identical and even edges of the belts. Otherwise, they are cut with a knife. Then the belts are folded in two and, stepping back from the edge of at least two millimeters, make marks.
Step two. We attach the straps to the wall. Two holes are made in the wall. Now attach the belt and secure with a screw. The result is a long loop. Attached next to it is another one.

Step three. Accommodation. A board is laid horizontally between the loops and attached with self-tapping screws. Put another one on top, similar to the first. The result is a two-story shelf (if you wish, you can add). And everything is ready.
Conclusion
As you can see, it's easy, fast, reliable and cheap. If you have a fantasy, a desire to create - all this can be easily embodied in the creation of your new furniture. So, everything is in your hands.

If you want to change your interior, give the room sophistication, solve the problem of lack of space - handmade shelves are the best option. Save your time and money with us!
DIY shelves photo


A win-win option for decorating any room is shelves. A multifunctional decor item that allows you to place a huge number of things so that they look neat. They take up little space in the room by placing them on the walls and give it a more sophisticated look. Human imagination and hands are able to create the most unusual and beautiful shelf design that will harmoniously fit into the interior. Furniture stores provide a wide range of different design solutions, but why overpay when you can make your own shelves.
A win-win option for decorating any room is shelves.
There are several types of shelves according to the type of their placement.
1) Floor - installed on the floor. High structures are additionally attached to the wall. They are not stable, it is better to play it safe. This type includes mainly shelves for shoes, flower shelves, for books, TV or small items and decorative elements. High floor shelves (more than 1 meter) are called racks.

A multifunctional decor item that allows you to place a huge number of things so that they look neat.
2) Wall-mounted - attached to the wall, thanks to special fasteners. Designed for storing books, decor elements, photo frames, family photo albums. In the kitchen, shelves often contain containers with spices or other kitchen utensils. In the bathroom, jars with toothbrushes and paste, combs, hair dryers, towels, etc. are installed on them. In the hallway, a wall shelf will be a great storage place for hats, gloves, umbrellas, handbags.

Use in a bedroom or living room is also appropriate.
3) Suspended - they are suspended from ceiling beams, pipes running under the ceiling, or attached directly to the ceiling. Suspended models are more often used in the bathroom and kitchen, where the pipes are located under the ceiling and are not hidden in decorative boxes. Use in a bedroom or living room is also appropriate.

Designed for storing books, decor elements, photo frames, family photo albums.
Design and construction. Product types
The design of the shelf must be fully consistent with the interior of the room, otherwise it will look like an extra item. To avoid discrepancies, you need to choose the type that harmoniously complements the interior.
| Shelf types | Description |
| classic pattern | Restrained minimalism and standard form are the main features of this type. Great "fit" into the classic interior, in offices, classrooms, libraries. Making a classic shelf with your own hands is easy. Feel free to get to work. |
| corner placement | Corner structures are made in a classic style. They are convenient in rooms that have a small area (baths, kitchens), but they are also appropriate in large rooms. Corner shelves are divided into two types: internal and external. The second ones are installed at a protruding angle, which makes them unique. Their creation is somewhat more complicated than the classic ones, but not too much. |
| modes | This type of shelves is a design made of different materials of different lengths and widths. Modus shelves create a 3D effect due to their volume. Abstraction is the main feature of modes. Will decorate any room of modern style. A well-thought-out project is easy to assemble, so you can make such shelves yourself. |
| Exclusive | In this category, you can include all the unique shelves that have the most non-standard solutions. It is not easy to create such a masterpiece yourself. But you will find the answer to the question of how to make a shelf exclusive? |

The design of the shelf must be fully consistent with the interior of the room, otherwise it will look like an extra item.
Choosing a material?
Traditionally, wood is used to make shelves, but metal, plastic, glass, and even cardboard materials are also suitable. When choosing a material, you also need to rely on the interior of the room. Perhaps things that have already served you well and just lie in the pantry are suitable for you, then the cost of the shelf will be minimized.

Gold is better combined with light-colored wood, and silver can be chosen for dark shelves.
If you found an old ladder, then you will get an original book shelf. In this case, you just have to process the appearance of the stairs and make fasteners. The rustic book shelf is ready. As you can see, making shelves on the wall with your own hands is simple and easy, the following examples will once again confirm this.

Traditionally, wood is used to make shelves, but metal, plastic, glass, and even cardboard materials are also suitable.
Perhaps there was a large coil lying around in the pantry, on which a rope or wire was once wound. Now it will make an excellent floor shelf. The coil needs to be processed, all irregularities, roughness removed, then covered with stain and varnish. If you want to paint it, then it is better to treat it with a primer that will level the wooden surface, then the paint will lie perfectly.

You can also use fabric lining and rope.
An old pallet that just takes up space, finished painted and placed vertically on the ground, makes a beautiful outdoor flower shelf. From them create designs of a different plan. By sawing the pallet into pieces, you will get several shelves that can be hung on the wall, both outdoors and in the house. Here is another option on how to make shelves on the wall with your own hands, in your piggy bank.

Perhaps things that have already served you well and just lie in the pantry are suitable for you, then the cost of the shelf will be minimized.
The old water pipes that have been gathering dust since the time of Stalin under the pretext of “may come in handy” have finally come in handy. These pipes, which have a vintage look, make a great shelf for books or other things.

Making shelves on the wall with your own hands is simple and easy, the following examples will once again confirm this.

Buy or do it yourself? That's the question
You can not rack your brains and go on a trip to furniture stores, so as not to find there something that might suit you. The option that you can find the right shelf is not excluded. But, most likely, it will be approximately similar to what you imagined, and its cost may also not be what you expected. To save yourself from frustration and save money, you can make shelves with your own hands. Why is this option better?
- As mentioned above - savings. Shelves made from materials you have at home or old junk can save a lot of money.
- Possibility to create a unique, inimitable shelf project.
- Robust build - solid construction;
- Use of strong, durable materials.

If you want to paint it, then it is better to treat it with a primer that will level the wooden surface, then the paint will lie perfectly.
Materials needed to create a shelf with your own hands
For the manufacture of the shelf, you can use boards, bars, impact-resistant types of glass, pipe remains, plastic parts, various wooden structures (food boxes, pallets, Soviet-era TVs), cardboard.

Also, the option of drawing drawings on the side parts of the shelf is not ruled out.
All parts of the shelf are attached to each other and traditionally use screws or nails for this. But there is a rope method, when all the components of the structure are connected in series with a rope. An equally original way of attaching each part of the shelf is to use bottles, preferably of the same size. And if you put lanterns in the bottles, then the shelf will take on an unusual look.

You can find in your pantry or in the attic the most unexpected things that can be used as shelves, giving them a second life.
If you do not have the above materials, you should go to a hardware store to buy them. In the store you can also buy fasteners, stain, primer, paint, nails or screws and everything you need to make a shelf.

Visit a decorative utensils shop and you will realize that decorating a shelf is easy.
Required Tools
You can't assemble a shelf with your bare hands. We will talk about the tool that is useful for making the shelf below.
1) The very first woodworking tool that comes to mind is a jigsaw, but just a hand saw will do. A jigsaw is a convenient, dexterous, fast tool; with its help, blanks for a shelf will be made in a matter of minutes.
2) A grinder or sandpaper of different abrasiveness will help to sand the surface of each part of the shelf. The grinder will cope with this task quickly, unlike skins, which take time to work with.
3) Electric drill - helps to drill holes, both in the components of the shelf and in the wall for fastening.
4) Screwdrivers or a screwdriver - are needed to screw in the screws, connecting the component parts of the shelf to each other. Evaluate the feasibility of using a screwdriver if you need to tighten four self-tapping screws. They can be dealt with with a screwdriver.
5) Self-tapping screws, screws, confirmations - connecting elements. Upon completion of work on the shelf, they are masked with plugs matched to the color of the shelf.
6) Varnish for wood coating - this coating must be of high quality. The shelf will be used regularly, so its appearance should be preserved for as long as possible. We recommend an alkyd wood varnish with a urethane additive for strength.
7) Paint brush - necessary for applying paint and varnish coatings to the surface of the shelf. Choose a medium sized brush.
8) Square - a special measuring tool, the design of which has a right angle. It allows you to check and arrange the parts of the shelf relative to each other at right angles. If you don’t have a square in your arsenal of tools, you can use improvised means: ceramic tiles, a sheet of cardboard, a photo frame, etc.
9) Manual milling cutter - this tool will help decorate the shelf with patterns, give straight lines a non-standard shape. Decorative patterns will make the shelf even more beautiful.

You can not rack your brains and go on a trip to furniture stores, so as not to find there something that might suit you.
How to make shelves on the wall with your own hands: step by step instructions
Consider the manufacture of a classic wooden wall shelf.
We determine the place. Where will the shelf be? What material is needed to make it? Its shape, design and dimensions. If you use improvised materials for its manufacture, proceed from their size and quantity to determine the size. When buying materials, the situation is different, you buy as much as you need.

To save yourself from frustration and save money, you can make shelves with your own hands.
When choosing wooden boards, make sure that they are the same color. When processing wood, dark fibers appear more. This stage must be taken responsibly, otherwise it will turn out to be a shelf, the constituent parts of which will have a different look.

Robust build - solid construction.
Marking and preparation of shelf parts for assembly. The boards are laid on a flat surface for work, after which the markup is transferred to them according to the drawing.

For the manufacture of shelves, you can use boards, bars, impact-resistant types of glass, pipe remnants, plastic parts.
Check for correct labeling. After you are convinced of the accuracy of indicating the cut points, you can start cutting.

All parts of the shelf are attached to each other and traditionally use screws or nails for this.
Time to start processing parts of the future shelf using skins or a grinder. The surface of the wood must be smooth, without roughness, so that the paintwork is light and even.

If you do not have the above materials, you should go to a hardware store to buy them.
After the parts of the shelf have dried, you can start assembling. Assembly begins with the bottom board, which is laid on a flat work surface. It has holes marked on it. We retreat from the cut line of the board by approximately 8-10 mm in two places and draw a straight line parallel to the edge. On the marked line, mark points at a distance of 5 centimeters from the edges of the board. Drill holes for self-tapping screws at these points. When the marks on the bottom shelf are ready, make the same markup on the top of the shelf. The holes are ready, it remains to screw in the screws. We take the lower part of the shelf and set it perpendicular to the working surface. After we apply the sidewalls and fasten them. We install the resulting structure with the lower part on the table and fasten the upper part to the sidewalls. We fasten the fasteners to the sidewalls from the back side adjacent to the wall.

You can't assemble a shelf with your bare hands.
decoration
Decorating is an equally important stage in the manufacture of bookshelves. Of course, you can leave it in the original video, but to add sophistication and uniqueness to your creation, you can use minimal decorative elements. Let's say the front of the shelves are sealed with thin gold or silver stripes, which are sold in all stores that offer decorative items. Gold is better combined with light-colored wood, and silver can be chosen for dark shelves. You can also use fabric lining and rope.

Decorative patterns will make the shelf even more beautiful.
Also, the option of drawing drawings on the side parts of the shelf is not ruled out. Painted drawings. They are made in the form of a mosaic from improvised materials (coffee, shells, ropes). Visit a decorative utensils shop and you will realize that decorating a shelf is easy.

We install the resulting structure with the lower part on the table and fasten the upper part to the sidewalls.
Give free rein to your hands, turn on your imagination and decorate your home!

Decorating is an equally important stage in the manufacture of bookshelves.
Wall shelves are able to harmoniously complement the design of the room. The range of their purpose is very wide. Depending on the location and application options, they choose the material for their manufacture and think over the design. What features should be taken into account before you start creating a wall shelf with your own hands, and what are the main stages of the process, let's get acquainted in detail.
Variety of wall structures
The main purpose of the wall shelf is to place a lot of small items, while organically combining the functions of storage and interior decoration. Depending on this, the option of installing a furniture structure is determined. There may be several of them:
- The most common way of placement is to make a wall form, when the product is attached to the wall, at the bottom of which other pieces of furniture (sofa, bed or table) are often located.
- A kind of highlight among wall structures can be a do-it-yourself hinged shelf. The key difference lies in the method of fastening: instead of traditional brackets and loops, ropes, chains and straps are used.
- Depending on the organization of the living space, from time to time there is a need to make a corner shelf. Moreover, in addition to the common way of using the internal areas, sometimes they harmoniously use the outer corner of the room.


A little imagination, and you can make a wall shelf design with your own hands in various variations. The following models are widely used:
- The ease of manufacture with your own hands is distinguished by the console - a shelf fixed perpendicular to the wall.
- If desired, the design is supplemented with side walls and the back is closed.
- To create a kind of rack with your own hands, it is enough to combine several single consoles together.
- Recently, combined specimens with an extraordinary arrangement of horizontal and vertical walls have gained wide popularity.
- Numerous decorative models of wall shelves are original. Their main function is to create an exclusive design element in accordance with the chosen style.
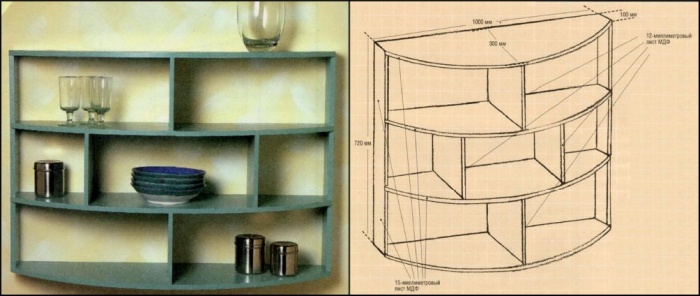
Occasionally, the facade of a do-it-yourself structure is supplemented with glass. This is practical when storing items that do not have a decorative function. A small part of the designs of wall shelves that you can decorate with your own hands is shown in the drawings below:


The nuances of the choice of material in the design
No construction work is complete without a preliminary plan.
Remark ! Before you start designing a shelf with your own hands, you need to decide on the material for the base.
When choosing it, take into account the place where the furniture structure and its main functions will be installed. The scope of wall shelves is as follows:
- Book lovers and students will definitely need bookshelves based on wood and its derivatives.
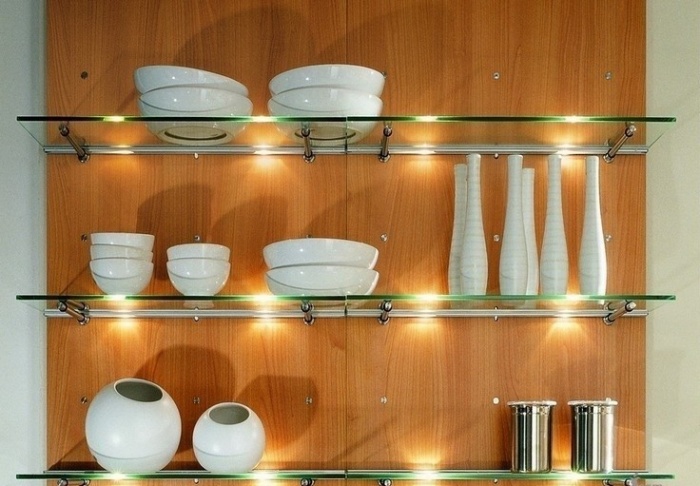
- To store jars of spices or decorative items in the kitchen (in the role of which original plates or exclusive mugs act), narrow shelves equipped with low sides are used. In this case, it is most appropriate to use wood for manufacturing, although, depending on the chosen design, glass specimens can also look harmonious.
- The arrangement of the bathroom is not complete without the installation of glass shelves, complemented by chrome elements. This is due to the basic requirement for the material - it must have a high level of moisture resistance.
- Universal shelves allow you to show your imagination with the choice of material during self-production. They are intended for setting flowers or various souvenirs, and the base is selected taking into account the overall design of the room. It can be classic wood, durable metal, complemented by forged elements or glass, which creates the effect of lightness.

Mounting options
The type of fastening plays an important role in the design of the shelf wall structure. Having studied the options for fixing, it will be easier for you to determine the most suitable method.
Classic loops
The traditional fastening of wall shelves is the use of hinges. They are optimally suited for products made of wood and its derivatives. An important condition is that the material must have sufficient thickness. The whole process takes place in several stages:
- The hinges are fixed on the side of the furniture structure with self-tapping screws.
- After measuring the distance between the holes, the required segment is marked on the wall.
Attention ! Compliance with the horizontal line is an important point when fixing the wall shelf.
- At the indicated point, holes of the required diameter are drilled, designed to insert the dowel.
- A self-tapping screw with a neat hat is screwed into the clogged dowel, on which a shelf is hung.

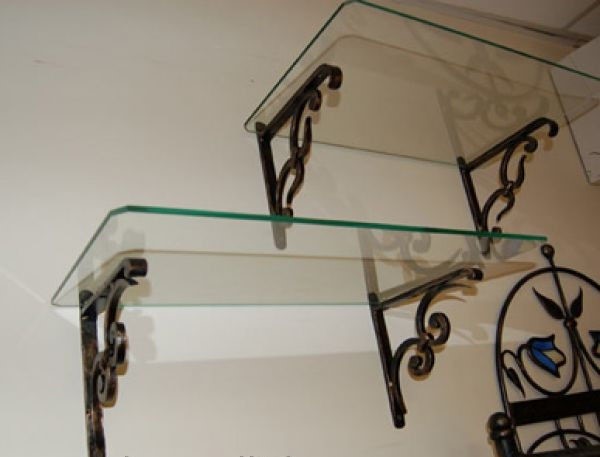
Fixing glass shelves
The use of loops is not suitable for all materials. Installation of wall-mounted glass shelves is carried out using special fasteners for fragile products. Fasteners are made of two parts and are often supplemented with elastic gaskets, a glass shelf is inserted between them. The lower part of the device for reliable fixation of the wall structure is equipped with a clamping screw.
A common model for mounting a glass shelf is an instance called a pelican, capable of holding a wall structure with a thickness of 8 to 34 mm. In addition to glass, it can be used to fasten other materials with similar dimensions.

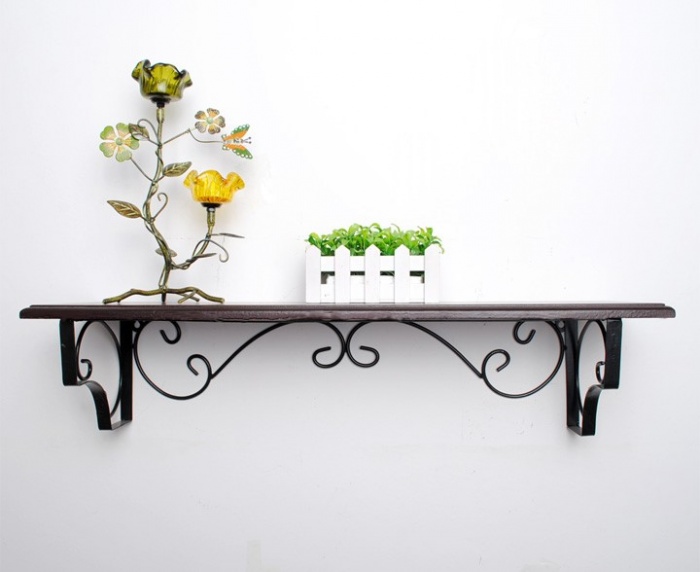
Concealed mounting and decorative brackets
The hidden installation of the wall shelf is distinguished by simplicity and originality. In this case, the fastener is completely masked. The essence of this method is as follows:
- at the end of the wooden structure, a recess is prepared for the pin and the body of the fastener;
- the mensol holder is fixed to the wall, after which a shelf is put on it.


Wall shelves with decorative brackets allow you to create an individual design of the room. They can be made in a production way or belong to exclusive copies. Photos of wall shelves decorated with hand-made brackets are presented below:


Manufacturing process
Depending on the chosen design and material, the process of self-manufacturing a wall shelf has its own characteristics.
Wood
If you want to make an original wooden wall shelf with your own hands, you will need:
- Base material. In addition to natural wood, you can take MDF, chipboard or GVL, this will greatly facilitate the surface treatment process.
- An electric jigsaw that can replace a hacksaw.
- Drill and grinder.
- Line with a pencil.
- Building level.
- Wood glue or liquid nails.
- Lacquer or stain.
- Brackets, dowels and screws.
The whole process of DIY wall shelf production is simple. After drawing up a plan or taking a finished project as a basis, the dimensions of the structure are transferred to the material. It is better to cut the wooden base with a jigsaw, which provides a perfectly even cut.
All elements of the wooden shelf are carefully polished; in the presence of significant defects, I use putty for wood. At the initial stage, you will need sandpaper No. 40, sanding paper No. 80 and 120 will allow you to get a perfectly smooth surface.

Connect the parts of the wall structure with liquid nails or wood glue.

Mounting marks are made on the shelf and wall. The brackets are connected to the shelf, and a recess is made in the wall with a drill, after which the dowels are inserted.

At the final stage, self-tapping screws are screwed in and the wall shelf is suspended.

Glass
Rooms with a small area are best equipped with glass wall shelves that create an atmosphere of lightness and visually increase the space. If the experience of working with glass is not enough, it is better to turn to specialists who, at the same time as cutting fragile material, will perform high-quality processing of sections. The following steps for mounting a wall shelf are within the power of anyone who can hold a tool in their hands and are similar to the procedure for attaching a wooden structure:
- Using the level, mark the attachment points on the wall.
- The Pelican design needs two dowels.
- After removing the decorative trim, you will find holes where you need to screw the fasteners.
- The decorative overlay is put in place and the glass is inserted.
- At the final stage, the screw is tightened.
This completes the installation of the glass wall structure.

Conclusion
A competent combination of a wall shelf with other details of the situation will create a harmonious design of the room, which is distinguished by individuality.
Do-it-yourself wooden shelves look very beautiful and aesthetically pleasing, but not everyone knows how to make them.
Now in stores you can buy shelves of any shape and for any purpose, but it happens that the quality of store products is not always satisfactory.
It is better when the apartment has hand-made wooden shelves.
When you make shelves yourself, you can not only choose the quality of the material, but also develop the design of the future shelf.
According to their characteristics, the shelves are wall or floor. The article discusses what types of shelves are and how to make them yourself.
Variety of wooden shelves
Currently, each owner can make any shelves with his own hands - for this you do not need to have a large workshop or garage.
Even in a small apartment, you can build such a structure, the main thing is to understand what type of structure you need.
Types of wooden shelves:
- standard. This design has a simple look, without any decorative elements, so the model can be easily made even on the balcony of the apartment;
- angular. As a rule, they are divided into two types - internal and external. Most often, such shelves are used in rooms with a small area.
- mounted. This type includes those structures that are attached directly to the wall. So products take up less space and often serve to store small items;
- there is another option for wooden shelves - modes. These include models that have a chaotic form, so to speak abstractionism.

In everyday life there is a huge variety of shelves that are present in any room. Even in utility rooms one cannot do without such a design.
Do-it-yourself wall shelves can be made in various shapes, complemented by a variety of ornaments.
For decoration use any material that comes to hand. In the photo in any magazine or catalog, you can find an example of how an amazing design can be made from glass and wood without special skills.
But if you are not a professional, but decided to try to make furniture yourself for the first time, then it is recommended to use soft wood.
The advice is justified by the fact that such wood is easier to process and is not very expensive.
Craftsmen who have experience in such a craft and use complex tools make exclusive models where a carved insert may be present.
To make a shelf with your own hands, you must have the following set of tools:
- jigsaw;
- grinder;
- drill or screwdriver;
- roulette;
- hacksaw;
- pencil.
This is a standard set that can be useful for creating a wooden masterpiece.
Of course, you can make a wooden structure with only a hacksaw and a screwdriver, but complex configurations will not work with such a set of tools.
So before starting manufacturing, it is better to immediately prepare the necessary tool.
If the shelf will be treated with varnish or other protective coating, then an additional tool, such as a brush or roller, can be used.
Confirmates differ from screws in that their use can be made invisible on the surface, and they can also be covered with plugs that will match the color scheme of the product.
Before a shelf is made, it is necessary to determine the maximum load on it - the thickness of the wood used will depend on the parameter.
For example, for the manufacture of conservation racks, it is necessary to purchase fairly thick wood to make a powerful shelf.
If these are wall structures for books or souvenirs, then you can get by with an ordinary board, the thickness of which is 25 millimeters.

The maximum load on the finished product can be calculated taking into account the following factors:
- board thickness. To store things with a lot of weight on a shelf, for example, for preservation, boards should be used, the thickness of which will be at least 50 millimeters. For maximum load, it is necessary to use boards that do not have knots and cracks.
- attachment type. Wall shelves can be fixed in different ways - depending on the type of fastening, the maximum load on the part is determined. Brackets are considered to be the most reliable fastening. Due to their mechanical properties, they allow to increase the load on the attached structure. Often use bars that are attached to the sides of the shelves. Fastening loops that are attached to the top of the product are considered less reliable fasteners.
- fulcrum, or rather, on how many mounts the shelf will hold. Let's say for a shelf whose length is more than three meters, two fasteners along the edges will be very small. To strengthen the structure, it is necessary to add at least two more fasteners - it is better if these are brackets. This factor is taken into account to create shelves in storage rooms.
When choosing a material for future furniture, it is necessary to take into account all factors, because the maximum load of the product and its service life will depend on this.
For shelves located in the sleeping quarters, you can use laminated chipboard, especially since it can be cut to size right away if the store provides such a function.

Manufacturing process of wooden wall shelf
To understand how to make a shelf yourself, you need to consider each step of the process.
First you need to decide on the place where this design will be placed, and then make a diagram of the product itself.
The diagram should indicate the dimensions of the structure and the number of necessary parts.
It is better to purchase the material when all dimensions and the method of attaching the future structure to the wall are known.
This data will help you not to buy too little material or, conversely, too much. Knowing the method of attaching the shelf to the wall, you can easily find the right mount.
How to make wooden shelves yourself? Before starting work, it is necessary to prepare the workplace and wash your hands, because light wood gets dirty easily.
When everything is ready, you can start manufacturing parts.
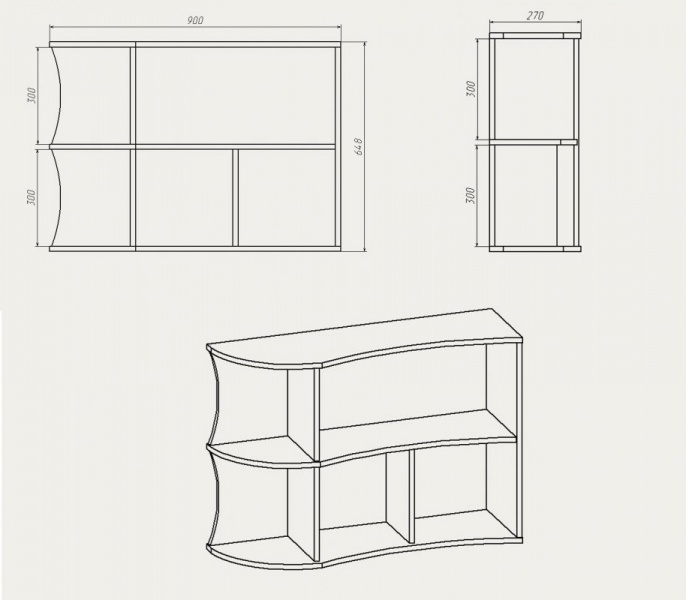
Consider a simple example of a bookshelf, which is not difficult to make. Let's take a raw board, the thickness of which should be at least two centimeters, and the width should be within 15 - 20 cm.
We divide the board into blanks, the approximate length is 800 millimeters - this will be the base of the product. After that, we make side parts with a height of about twenty centimeters.
When all the details are ready, we proceed to grinding work. Here you will need an angle grinder with a special nozzle.
Finished boards should be sanded until they are perfectly smooth.
Wood processing ends here, you can start assembling. We connect all four parts into one common box - for this it is necessary to drill holes with a small drill and fasten them together with confirmations.
Now inspect the finished product - if everything is fine, then we disassemble the structure back. After the shelf is dismantled, all parts are varnished or with a special paint for wood.
After waiting for complete drying, the product is assembled again, after which you need to fasten the hinges and hang it on the wall. That's the whole principle of work on collecting the simplest bookshelf.
To make carved wooden shelves, such skills will not be enough - here you need to show creativity.
Sometimes decorative details can have a complex configuration that only the master can complete.
Therefore, if you do not have experience, then it is better to make more or less simple configurations without special ornaments.
It is worth paying attention to the painting process, because this stage is not as simple as it seems.
Wall shelves are visible from all sides, which means that you should not forget to process the bottom of the product.
It will be good if the ends of the parts are treated with a special edge made of PVC material.
Variety of wall shelves
Wall shelves are used to store small things, but you want them to be combined with the interior of the room. Based on this, the type of fastening of the structure is chosen.
The most popular is to place a shelf above other furniture, as a rule, it can be a bed, sofa or table.

With a little imagination, you can fix the design in such a way that it will not be just a storage shelf, but an interior item.
So, instead of brackets and other standard fasteners, you can use a rope or chain. Wall-mounted corner shelves are often used for bathrooms, and an outdoor model will look effective.
You can find options for shelves that do not have a rigid base, but a sagging one - such a design model is made using rails connected to each other with a rope.
You can also use combined models, where all the details have an extraordinary arrangement.
Shelves in the kitchen are often decorated with glass inserts or mirrors, which helps to create a unique entourage.
Often, wood carving is used on the side parts - this makes the product very harmonious.
In the kitchen, both closed shelves and open ones can be used. Moreover, these can be designs not only for flowers, but also for kitchen utensils.
In the bedrooms and in the hall you can find original products using a variety of materials.
Not only wood and chipboard, but also glass, plastic and even tin sheets can serve as such material. As shelves, you can even find an old suitcase or a structure made of water pipes.
If you decide to diversify your home interior, then it is better to use furniture that you made yourself, and not purchased in a store, because a stool, table or shelf made will be not just furniture, but part of your own author's design.
The main thing is not to install too many shelves, which will create excessive pressure instead of comfort.
Just remember, nothing is impossible, there is only technology to follow.
In a new review, the author has collected examples of shelving and shelves that you can concoct with your own hands. They must be used, of course, for their intended purpose. Having looked at the photographs collected here, you can easily make sure that there is nothing fundamentally complicated in the proposed version.
1. In the shape of a circle

The original round shelf, the edging of which is made of thin fiberboard, and the shelves themselves are made of an ordinary board, painted white. Of course, this design is not suitable for storing the entire home library, but it can accommodate a few educational books, a small houseplant and a couple of framed pictures.
2. Hanging shelf

An adorable hanging shelf that can be made from a few used books or notebooks of the same size. Such a shelf is not only suitable for storing cosmetics and small decor items, but in itself will be a wonderful decoration for any wall.
3. Arrow

Stylish bookshelf in the form of an illuminated arrow, made from the remnants of metal water pipes, will perfectly fit into the interior of a teenage boy's room or a bachelor's apartment.
4. Practical and unusual

An original and practical shelf that can be made from a small tray from an old cart and a few wooden blocks. Such a shelf is reliable and spacious and is suitable for storing a variety of things.
5. Charming shelving

Stylish and original rack, made from a slightly modified and white-painted door. Filled with favorite books, candles, family photos and small decor items, this shelving unit will be a real highlight of any space.
6. Narrow slats

Old skis that have been gathering dust in the pantry for many years can be used to create unusual shelves. Such shelves will perfectly fit into the interior of the nursery and are suitable for storing toys and books.
7. Stylish copper

Massive shelves made of wood, pasted over with a stylish copper-colored film, are perfect for placing house plants.
8. Old pallet

An old wooden pallet is easy enough to turn into an original shelf for storing magazines and family pictures.
9. Industrial style

Stylish storage system in the current industrial style, which can be made of wood or MDF boards, painted in gray and interconnected by a structure of metal water pipes.
10. Bright honeycombs

Original shelves made of bright gift hexagonal boxes attached to mirrors of the same shape. Of course, this design is not suitable for storing large heavy items, but it is suitable for storing small things and decor items dear to the heart, and will also become a unique wall decoration.
11. Stylish transformation

The drawers of an old discarded table can be used to create original shelves. Neatly painted and customized, the boxes can be mounted to the wall, both vertically and horizontally, and used to store a variety of things.
12. Rough design

Rough shelves made of untreated wood, opened with varnish or paint, will perfectly fit into the interior of a room decorated in a rustic or country style.
13. Abundance of cells

A huge wall-to-wall shelving unit made from many brightly colored wooden crates can be a stylish and budget-friendly alternative to a massive store-bought wardrobe.
14. Wicker basket
MDF shelves.
Compact MDF shelves with fruit slices painted under them will become a bright and functional decoration of the kitchen wall.
17. Rustic style

A solid piece of bark or unfinished wood can be turned into a fantastic hanging shelf that is an ingenious alternative to a standard bedside table.