Sculpting from polymer clay: a master class for beginners. New master classes using the material "Polymer clay (plastic) Crafts for giving from plastic bottle caps
Now there is no such needlewoman who would not take up modeling from plastic or polymer clay. But for those who do not know, plastic is not plasticine at all, although it looks like it at first glance. This is a kind of mass for modeling, which eventually hardens to a state of plastic, or which needs to be baked or boiled for this.
Anything is made from this wonderful material - jewelry, toys, things and furniture are decorated ... Finding it now is not a problem - in any needlework store there is a huge selection of domestic or foreign plastics of various shades! And you can also buy all kinds of accessories for it - stacks (knives, for shaping), boards, paints, bases, varnishes ...
Have you already made up your mind and bought a couple of plastic records or sausages? Now the fun begins! Wet your hands with water (and wash them well first!) and knead one bar. Now you can sculpt whatever comes into your head. If you use self-hardening plastic, it means that over time it will harden and become too dense for you to continue working with! If you have ordinary plastic, then the finished work needs to be boiled (but keep in mind that the color will fade slightly), or baked. Both the first and second should be done no more than 10 minutes and at least 5! If you overbake the work, it may crumble; if you underbake, it will be rubbery. After baking, let the finished work cool and you can varnish it. This will add gloss to it and give completeness.
1. Free sculpting
You can sculpt whatever you want - earrings, necklaces, bracelets, beads, key chains ... But remember the mandatory heat treatment of the finished work, so if you want to decorate a flash drive, it's better to use self-hardening clay.


1. Mokume-gane
Very unusual and beautiful technique!
Needle bed in the technique of mokume-gane:


Take plastic in different colors. Let it be contrasting colors or several shades of one - it will still turn out beautifully. Roll out each piece separately. To do this, you can use a bottle or a new rolling pin. There are special rolling machines, but they are not cheap and can only be found in specialized stores.
When the layers are ready, lay them on top of each other and roll them out again. Now you need to arm yourself with various items with which you can squeeze out cute prints - knives, pens, caps from felt-tip pens, bottle caps, paper clips, buttons ... Make a couple of prints in a chaotic manner, but do not push through to the end! Then carefully cut off the top layer of plastic. This can be done with a utility knife or blade. Voila! A chic base for beads, brooches, pendants, solid bracelets is ready.


2. Filigree and granulation
Unusual and delicate technique. The result is delicate, exquisite things. And it's all about the small bundles that are laid out on the finished work and small dots - grains that complement the work.


3. Technique "canes"
This technique is also called "sausage", millefiori or canne. One of the most difficult techniques for which you need to cut the plastic into small pieces and put it in a roll. If this roll is cut, then there will be a beautiful pattern inside. Therefore, often such rolls are finely chopped and made into beads or pendants. The drawing can be very complex or simple - it all depends on your perseverance. Carefully follow the photo tutorial and you will have wonderful sunflowers or such a cute sheep!


4. Harnesses
The difficulty is to create many identical harnesses. There is a special tool for this - an extruder, but in everyday life, harnesses can be rolled up without it. It's just that they won't come out all the same and not too thin! Look carefully at the photo of the master class!


What is decoupage, and how this terrible and unfamiliar word turns into a work of art - we have already told in previous articles. So, you can also do decoupage on plastic! You just have to bake it first!

There are two options - either you glue a finished drawing on a baked base (a cut-out part of a postcard or a napkin), or draw your own author's drawing on paper! An example of the author's technique can be such an original "sausage cat".


6. Plastic and salt
The finished work is very reminiscent of pumice! Unusual and stylish! Plastic needs to be thoroughly carried over salt before baking. Then wash in water and bake.


7. Sculpting on glass
With the help of plastic, you can decorate any vase, jar or glass in an original way. In short, everything that is made of glass and fits into the oven to bake it!

Master class on how to decorate a vase with daisies:


8. Impressions
To do this, in addition to plastic surgery, take: a leaf of a living plant, the print of which you will make, vaseline, water. The plastic should be kneaded very well - the softer it is, the better. To do this, you need to add a little Vaseline! Roll the plastic into a thin cake and put it on a board, tile or just paper on which you will bake your product and try to make an impression. Moisten the cake with water and place a leaf on top. Roll over the leaf with a rolling pin. You can remove the sheet and enjoy the accuracy and beauty of the work!
Remember that the main thing is not to overbake!

9. Watercolor technique
Beautiful technique with smooth transitions and stains. Prepare the beads in advance (do not bake!). Now roll out three thin sheets from three pieces of plastic (be sure to take different colors!). When the plastic dries a little, tear it into pieces and stick around the beads prepared in advance. Remember them a little in your hand so that the surface becomes smooth, and you can bake!


10. Kaleidoscope technique
This technique is similar to canes, but with much less fuss! You roll "sausages" of various colors and patterns and mold them all into one pile. Sausages can be rectangular, square, round, triangular! The more varied the better! In this way, you can imitate various natural surfaces - wood or stone, for example!


That's all the techniques I know of today. You can come up with a completely new, your own technique, because plastic gives so many opportunities for creativity!
Many interesting and original plastic crafts are made by craftsmen for decorating the interior of premises and garden plots. The material is easy to work with and inexpensive. You can create crafts from both waste material and new ones, depending on what the work is being done for.
Plastic cups and used bottles, spoons and forks of different colors are used, and what functional items are made from pipes made of PVC plastic. Crafts are simple, which can be done by children, and quite complex, which only experienced craftsmen can do.
In the article, we will consider several finished products from different plastic, how to work with it, what wonderful and useful things you can create. We will give detailed instructions for the manufacture of each element, present photos of the finished product. So, how to make crafts out of plastic?
Designer Christmas tree
In order to create such an apartment decoration for the holiday, you need to purchase several PVC pipes of different diameters. They must be cut into thin cylinders, the same in length. To cut plastic, they use a specially designed tool - pipe shears, a battery pipe cutter, there is also a roller-type pipe cutter. If you are doing such plastic crafts for the first time and do not have these devices in your closet, then do not be discouraged, because you can always use a hacksaw.
The only disadvantage of such a tool is that it leaves burrs on the plastic. But this does not matter either, it is enough to process the edges with sandpaper or clean them with a knife. For the trunk of the Christmas tree, you need to leave a piece of 30-40 cm from the pipe of the largest diameter, depending on the size of the plastic craft.
Then you need to prepare the base for the wall panel. It can be a shield made of plywood or fiberboard, you can purchase a colored one. Further on the floor are all the pipe sections - from the smallest to the largest - so that a triangular shape is obtained. It is more convenient to first lay out large elements, and already between them fill the voids with small details.
To attach the elements to the base, strong Moment Plastic glue is used. It is transparent, so visually the decor item will not spoil.
How to decorate an original Christmas tree?
After completing the main part of the work on making New Year's plastic crafts, start filling each cylinder. As for a regular Christmas tree for the New Year, Christmas tree decorations are also used for a designer one. A star of any color is attached to the top. Further decorative elements are distributed depending on the size of the cylinder.
You can make a lot of homemade toys with your child and place them beautifully in round voids. Beautifully look angels, balls. If a child wants to put toys there, then do not scold him, because this is his holiday. You need to decide how to decorate plastic crafts with your own hands together, with the whole family. This unites family members, and the creative process of doing such work captivates both children and adults.
Convenient stand for needlework
If you are serious about making crafts from ribbons, for example, making bows, gift wrapping, or, for example, decorating glasses and bottles for a wedding, then this handy stand will help you avoid chaos on your desktop. All coils with tapes are placed on a PVC plastic pipe, access to them is free, the tape is pulled out without any effort, you can immediately see where which color is placed.
Pieces of tapes are cut off without removing the roll from the stand. If you need to add ribbons of other colors to work, then the replacement is done simply by pulling a piece of pipe from the corner. When put on a new roll, the plastic tube is simply inserted back into place.
This stand looks very neat, it can always be washed with detergent. If one element is damaged, you will not have to throw out the plastic crafts with your own hands, it will be enough to replace one element by cutting the pipe to the desired size.

To make a frame from plastic pipes, you need to buy the material itself and an additional 8 corners with three inlets located at an angle of 90 °. Cut with a hacksaw or pipe cutter 4 identical segments, 50-60 cm in size. They will be located in the length of the craft from above and below. Then a pipe is cut for the sides. The length of each is also the same and is approximately 25-30 cm.
It remains only to insert the pipes into the holes of the corners and assemble the plastic crafts. The photo clearly shows what such a stand is. The finished product is light, clean, it is not a shame to place it on the desktop. If you want to add additional details to the stand, such as a cup for scissors or a pillow for needles, then they can be hung on an elastic band or on a plastic hook. It is attached with double sided tape.
Table Christmas tree made of plastic forks
Since we touched on the New Year theme in the article and examined how you can make a wall panel in the form of a Christmas tree from plastic PVC pipes, now let's make a DIY plastic craft for beginners. After all, this is a Christmas tree made from disposable forks. It has a small size and can be placed on the New Year's table or on a shelf in the room. Also, such a Christmas tree can be made for the school New Year's exhibition.
As a base, you can use a foam cone or a dense piece of foam rubber, cutting a similar shape out of it. To decorate the top, prepare a pack of ear cotton buds, which are placed in the form of rays of the sun, in a circle. In order for them to hold firmly in this position, you must first cut the cotton from one end. Plastic sticks are placed on a piece of plastic, cut out in the shape of an asterisk, and attached with Moment Plastic glue, or using a glue gun.

A longer stick is glued from the bottom of the top, which will hold the entire structure. Then, at the junction of all the parts (in the center), another star is attached. The top is ready, work begins on the do-it-yourself plastic craft itself (the photo is available above).
To create such a prickly beauty, you will need 30-40 forks, depending on the height and width of the cone. Each fork is cut off at the base. Leave a small even segment 1-1.5 cm long. Glue will be applied to it. Begin gluing the cone from below, moving around the circumference. Each next row is shifted by half a disposable fork so that the "branches" of the Christmas tree do not look like rows, but are "fluffy" on all sides.
The top is inserted into the top of the cone with a simple indentation, you can apply a little more glue to the stick so that the top of the tree does not fall off when carrying crafts, for example, to school. You can, while preparing materials for making plastic crafts (photo above), look for green forks on sale. After creating a bright and original masterpiece from plastic forks, you can cover them with a layer of glue and sprinkle with sparkles or tinsel cut into small pieces.
Snowman made of plastic cups
Thin plastic for crafts allows you to create works without glue. For example, from plastic disposable cups you can assemble such a wonderful snowman for the New Year holidays. This product is able to decorate not only the home environment, but also applicable in children's institutions, offices and other organizations.
The inside of a snowman made of plastic cups is empty, so light bulbs or multi-colored lights of garlands are often placed there. After turning on such lighting, the room will instantly change, and during a dance party, such a snowman will play the role of a lighting effect.
A do-it-yourself plastic craft (photo below in the article) consists of two main elements. This is the torso of the character and his head. They are made in the form of a torus, that is, they are not completely spherical, but with flat parts below and above. This is done so that there is a good adhesion of the elements to each other. Yes, and the bottom of the figure turns out to be flat and can confidently stand on the floor or table without rolling on its side.

White glasses are taken for work, laid out with the open part outward and fastened with a stapler to each other. Due to the fact that the cup is not even, but has the shape of a truncated cone, after bonding, the shape of a "donut" or a geometric figure torus will be obtained.
In order for the next row to be wider than the previous one, an additional cup is added. When you reach the required diameter as planned, you can subtract one element in each next row. This is done until the initial number of glasses is reached. For example, if we took 8 cups on the first layer, then the work on the layer with eight glasses ends. All layers are fastened together according to the same principle, that is, with a stapler.
When making the head, the figure is smaller, but the principle of operation is similar. It remains to attach the head and torso with paper clips. Then work continues, because you need to decorate the figure. This can be done in different ways, at the request of the master. A scarf is usually tied around the neck, a hat can be put on the head, a bucket made of paper or a cap sewn from fabric.
The carrot nose is simply inserted into the void of the cup at the right level. You can do the same with other details.
The second life of plastic is crafts made from it. Therefore, do not rush to throw away empty bottles or cans of detergent. After all, they can create wonderful objects. Let's consider further how to make such a beautiful set from plastic bottles - a cup and a teapot. You will need material of different sizes. For example, it is better to create a cup from a small half-liter bottle, buy a two-liter container for the bottom of the teapot, a smaller one - 1.5-liter - is useful for making a lid.

Do not throw away bottle cuts. Thin strips for handles are cut out of them. They are glued on transparent glue "Crystal" or "Moment Plastic". For the spout of the teapot, look for a small tube of thin plastic and, cutting a hole with a knife, insert it tightly into the teapot.
Now let's decorate the dishes. Acrylic paints can be used for painting. They are odorless and adhere well to plastic. The drawing can be different. The only caveat! It is better to melt each cut a little with a hot iron, then the child will not be able to cut himself on the sharp edge of the bottle. Do-it-yourself plastic crafts are easy to make, and you can come up with an infinite number of products, especially for children's play activities and for the interior of a garden plot.
original vase
On the frame-by-frame image of the process of making a vase from a plastic bottle, all stages of work are clearly visible. First, the height and color of the vase are thought out, because the bottles come in various colors. If the product is intended to be wide, then you need to take a two-liter bottle. The narrowed neck is cut off and thin strips are cut to one level, try to keep their width the same.
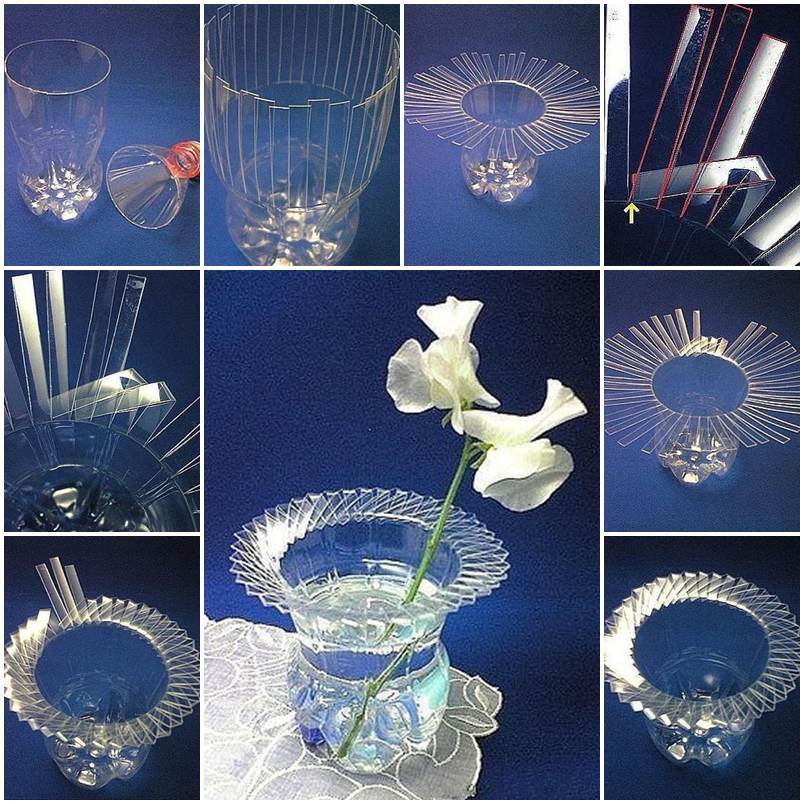
After that, you need to bend all the strips in the opposite direction at an angle of 90 °. Then the most difficult and painstaking part of the work begins - weaving the strips together. As you can see in the photo above, the elements are bent in turn. We skip the adjacent strip, and weave the first element into the next two.
So work continues until all the strips are beautifully bent and intertwined. You need to do this work clearly, smoothing the fold lines well. If the craft is done correctly, then the vase will have a beautiful and even edge. If at least one element is not executed accurately, or the fold is poorly smoothed, then the entire harmonic structure of the vase decor will be violated.
Flowers from spoons and forks
From plastic utensils, namely, spoons or forks, you can make such beautiful candlesticks, as in the photo below. Making them is easy. In one work, you can combine one and the other item of utensils. In one flower, the dishes are placed face up, in the other - down.
A cardboard circle is taken as the basis of the flower. If you do not have white, you can take any, even corrugated, and paste over it on both sides with plain white paper. Next cut the spoons and forks. In this case, the leg is cut off completely. They begin pasting the cardboard with spoons or forks in the outer circle, the second row moves slightly to the side so that each layer is clearly visible.

The plastic parts are smeared with superglue. After a candle is inserted into the middle, a circle is framed around it with foam balls. You can make crafts "Flowers" from plastic of different colors. For example, to make the first row from green forks is the green of the water lily. Then there is a row of white color, make out the middle in yellow.
If you stick such flowers on foam plastic, then you can run the resulting crafts into a pond or pool, they perfectly adhere to the surface of the water and do not sink.
Beautiful flower from the bottom of the bottle
To make such an original craft, you will need to prepare 2 or 3 green plastic bottles. The size of the container must be different. Outside, a large part will be located, two others are inserted inside it, for example, take 1.5-liter, liter and half-liter plastic bottles.

You will also need: a candle or a lighter, superglue, a decorative insert in the middle of the flower. It does not have to be the same color as the flower itself. You can use a contrast effect. Also, the bottles will look beautiful in different colors. All containers are cut to the bottom level.
Then the petals are cut out of its parts. Immediately after production, they have smooth and unattractive edges. This can be fixed with fire. You need to act carefully, you need to hold the bottom by the edge so as not to get burned. The edge of the petal is passed over the fire several times until it is curved and wavy. All petals are processed in this way.
In the end, it remains only to attach all the parts to each other by applying superglue to its central part. The second bottom is located with a shift to the side, so the flower will look lush and more voluminous.
Crafts from plastic for the garden
Other simpler flowers can also be made from plastic bottles, which are placed mainly in the garden, in the garden or in the front garden. For their manufacture, you can collect several bottles of the same volume. The color does not really matter, since the craft will still have to be painted. Acrylic paints are the best way to give colors bright colors.
First you need to cut off the top of the bottle with a neck. Do not throw away the lid, as we will still need it in our work. The stems of future flowers must be made of wire. To do this, take a thin metal rod and bend one side down. The other, flat part of the rod is buried into the ground by indentation.

If you want to have a whole bush of plastic flowers, then prepare more twigs. After the stem is buried in the ground, a green bottle is put on top. Its neck is directed downwards, and the upper part is cut into thin leaves. Lower the neck with pressure below ground level.
Further work is already being done on attaching the prepared flowers. They are already cut as in the photo, painted, the edges are rounded. You can make them rounded, details with corners or sliced \u200b\u200bnoodles will also look beautiful.
A hole is made in the caps of plastic bottles, you can use a drill or a sharp awl. After the lid is put on the rod, it bends a little and holds the flower in one place. For reliability, you can fix it with plasticine. That's it, do-it-yourself plastic crafts for the garden are ready!
The article presents several interesting crafts using plastic. As can be seen from the detailed instructions and photographs offered to the reader’s attention, it is not difficult to make such products, you don’t have to spend too much on materials, and you can easily create beautiful and original crafts.
Plastic is like plasticine - you can sculpt anything from it. According to the curing method, polymer clay is divided into baked and self-hardening.
In the case of baked plastic, the finished product is baked in the most ordinary oven that every home has. The result is a hard, almost plastic figurine that holds its shape remarkably well and retains its color. Self-hardening hardens in air without special conditions.
1) Plastic called "Flower" - the cheapest solution and suitable for children's crafts, it happens in briquettes of 6, 10, 12 colors
2) Plastic called “Sonnet” is sold in 57g briquettes, one color per package. It costs an order of magnitude more expensive than Tsvetik.

3) Fimo 57g briquettes at the same price as Tsvetik.

To make the craft even more beautiful and durable, you also need varnish.
The choice of varnish for plastic
Not every varnish is suitable for working with polymer clay. Because most varnishes (acrylic and acetone-based) react chemically with plastic. Some do not dry and always remain sticky, others dry, but after a while (about six months) they begin to stick. For plastic it is necessary to use a specialized varnish. Firms that produce plastic offer them a varnish of their own production.
In addition to specialized ones, which are difficult to buy, you can use a water-based polyurethane-acrylic wood coating.
Craftswomen praise the polyurethane-acrylic coating for water-based wood floors Varathane (Varatan) Crystal Clear Waterbone.


How to apply varnish?
Can be brushed evenly and gently to avoid bubbles. But the best result will be if you dip the product directly into the varnish, then rotate it so that the excess varnish stacks in a jar and hangs to dry. After about 5 minutes, blot the bottom of the product with a brush to remove a drop of varnish formed there.
Molds
Often when sculpting, the question arises about molds - how to cut the same figures? Molds can be from strips of plastic bottles, aluminum strips from cans, and anything else that you can get your hands on. So let's get started, we need a tin or aluminum can or a plastic bottle with smooth sides


Take a strip of material
and bend it according to our plan, leaving the edges bent to the side - we will seal them with tape. Adhesive tape, in addition to connecting both halves of the form, also protects the form from the fact that clay gets between the plates, so glue it with adhesive tape to the very joint.
And one more little trick. If you lay a plastic bag on top of the clay and squeeze the mold through the polyethylene, then the resulting piece of clay will have rounded edges.
In addition, the forms do not have to be closed!!!
In this case, you can make as many petals in a flower as you like. And with the same shape you can cut clover leaves.
hard plastic
If you got dried baked polymer clay, then sculpting a real disaster from it - it does not warm up, but crumbles in your hands.
This means that there is not enough plasticizer in the clay.
To prevent this from happening, store your clay in tightly sealed plastic bags.
But even if this has already happened, sunflower oil saves the situation.
Knead a piece of clay with a couple of drops of sunflower oil.
About proportions: for one whole package of hard clay you need only 2 drops of oil. If the clay is very hard, then a little more, but it is better to add oil only as needed - when you have already kneaded the clay to a uniform state, but it is still hard.
At first, everything will look scary - lumps of clay and sunflower oil, hands get dirty. The main thing is not to be afraid, but to continue, then you will get homogeneous and soft clay, from which you can sculpt like new.
If your piece of clay is already so oaky that you can’t even break it into small pieces, then you can either cut it into thin slices with a knife (dreary and long), or grate it (for this you need to use a grater that will never be used for food), or crushed with a hammer (I have not tried this method).
For such clay as “Tsvetik”, sunflower oil can be used without even waiting until it dries - it is initially very hard and oil (or vaseline) improves its quality noticeably.
Clay diluted with oil does not lose its qualities (color, strength, ease of modeling).
I repeat that this method is for those types of plastic that require firing in the oven, it is not suitable for self-hardening.
Baking polymer clay
What to bake? You need an oven - at least gas, at least electric. A microwave oven is not suitable for baking.
What to bake? What will be convenient for you from what is available: on a wooden board, on ceramic tiles, on a piece of glass, on a metal baking sheet (with lined baking paper), on cardboard, and so on. There is a small nuance here - if you bake on a smooth surface, then your product at the point of contact with this surface will receive a gloss as a result of firing - a very smooth shiny surface. If you do not need it, then you need to lay something under the product. I put either a paper napkin or a piece of denim. The baking temperature of polymer clay is not critical for these materials.
Precautionary measures. During baking, toxic substances are released from polymer clay, so it is necessary to ventilate the room (open window or exhaust hood).
After the firing is completed and the oven has cooled down, it is required to wash it, because the released harmful substances settle on the walls of the oven.
Some craftswomen, in order to avoid this, bake their products in airtight containers, so all toxins remain inside the container.
Baking temperature. On the packaging of polymer clay, they always write the temperature regime that is suitable specifically for your polymer clay. Most often it is 130 degrees Celsius, although for some types of plastic surgery it may differ, for example, FIMO has 110 degrees Celsius.
Subtleties: if the baking temperature is lower than required, then your product will be fragile. Conversely, if you exceed the temperature, the product will become stronger, BUT when baking, a large amount of toxic substances will be released, and there is also a chance that your product will simply fry.
Temperature control in the oven. When the temperature rises to the desired temperature, slightly open the oven door and fix it in such a position that the temperature is kept in the desired range.
How long to bake? On this, the masters all hold different points of view.
If you have a small product (the thickness of the plastic is not more than 0.5 mm), then 15 minutes is enough, and the larger the craft, the longer you need to bake. The longer the plastic is baked, the stronger it becomes (the main thing is to observe the temperature regime).
I bake all polymer clay products, regardless of their size, for about 40 minutes.
Can the product be baked? Yes, of course you can, if it is not varnished. You can pre-bake individual parts. For example, complex figures, such as people, angels, devils, tiger cubs. Sometimes pre-firing is required in several passes, for example, separately bake the eyes, then stick them in the face and bake the whole head, then stick the hair on it and bake again, and only then combine the head with other details into a whole composition and bake completely.
imprints
Let's talk about prints on plastic that are formed during sculpting. Different types of plastic store prints in different ways and it is also better to remove them in different ways. For example, take Cernit plastic. Fingerprints on it are not very deep and clear, they can simply be smeared with slightly moistened fingers and this will be enough. However, plastics such as Sonnet and Fimo store them well and if you try to lubricate one, you will certainly put new ones. How to fight for the smoothness of the product?
Let's consider several ways.
1) Skinning.
We sculpt the product as it turns out, bake it, and then sand it with sandpaper.
There are a couple of nuances here. First, during the skinning, the top layer is removed, which gives the product a slightly glossy look. All the plasticizer released during baking settles on the surface of the product. Small grooves form (the size of the grooves depends on what kind of sandpaper you used). The finer the sandpaper, the better for sanding, but even the finest leaves micro-grooves into which dust and other dirt likes to clog. Therefore, if you skin your product, then it is desirable to varnish it after that.
Secondly, during the skinning, the product seems to fade - this is a small crumb, formed during the procedure, settles on the product and in the resulting grooves. To return the color to the product, it is necessary to wash it thoroughly with soap and water after sanding. Especially all sorts of uneven and small parts, they are easier to wash with a brush (ideally with an old toothbrush). Some craftswomen sand right under running water, in which case the dust does not scatter in all directions, and the result is immediately visible on the product itself.
Advantages and disadvantages:
+ The method is good for large products, as well as for those that include the cane technique (no need to worry about the evenness of the product, the excess will be sanded after)
+ Hands feel plastic more subtly, the products are the thinnest and most accurate
+ During sculpting, hands do not sweat much.
- After such modeling, it is necessary to sand and varnish. If you do not have varnish, then this method is not suitable for you.
- The process of skinning is very tedious and lengthy.
2) Gloves.
The best way to deal with fingerprints is not to leave them at all!
Use simple rubber gloves or fingertips while sculpting, and your product will be free of prints in principle.
This method is ideal for thin and small work that cannot be sanded, such as flowers.
Advantages and disadvantages:
+ The product is ready as soon as it has cooled down after baking
- Hands sweat under gloves, which causes some inconvenience.
How to make a color transition manually.
For example, we take white and pink clay. We form two triangles of different colors from clay so that together they make a rectangle of approximately the same thickness.

We cut into a certain number of strips. The more strips you cut, the smoother the transition will be. In some cases, five pieces are enough, but more often about 10.

We thoroughly knead each strip in our hands until a uniform color is obtained - fold in half, stretch, in half again and so on, until the color becomes uniform.

Then we fold the homogeneous pieces in the same order in which they were cut.

Now we roll it with a rolling pin to force out the air bubbles between the pieces of clay. I have a glass bottle of nail polish remover as a rolling pin. And so that the clay does not stick to the rolling pin and the table, I cover it with polyethylene on both sides.

on 28.05.2017 146,245 Views
From plastic bottles you can make a lot of useful things for the garden and garden
Lovingly equipping the city dwelling, we are no less touching about our summer cottages. We try to ennoble them, create comfortable conditions for ourselves and add special notes of attractiveness to even rows of beds and berry bushes. Many summer residents have chosen the most affordable and flexible material for their creative experiments - ordinary plastic bottles. About what products can be made for the garden and cottages, we will talk further!
- house made of plastic bottles
- Country crafts from plastic bottles step by step: palm tree from plastic bottles
- Master class from plastic bottles step by step
Plastic crafts: some tips

Wonderful hanging pots for cacti from plastic bottles

Resourcefulness in ways to place many plants in the garden

Plastic bottles in skillful hands will be a wonderful decoration for your landscape.

Beautiful plastic flower
Crafts from plastic bottles step by step: from a flower pot to a fabulous tower
The idea of making useful tools and decorative items from plastic containers is not new. The first attempts led our grandparents to build low fences for paths. Assessing the plasticity and cheapness of the material, craftsmen from the people went further. And now summer cottages are decorated with full-fledged fences, funny figures and unusual devices made of plastic bottles.

A lovely ostrich from a pet container cannot fail to please your children!

Thanks to imagination and such excellent material as plastic bottles, we have almost limitless possibilities for creating crafts for every taste, any complexity and direction.

Pictures from caps of plastic bottles and other containers have grown into a whole art direction

Plastic bottles have long been in great demand among gardeners.

Gorgeous orange flowers from pet containers
Crafts and decorations for summer cottages and gardens from plastic bottles do not require the use of complex tools and specialized skills. The main thing is that there is time and desire, as well as enough material. Those who had both, convincingly proved the limitless possibilities of such needlework, and we have prepared a review of the best examples of crafts.
Do-it-yourself furniture, flowerpots and a vase from a plastic bottle

Comfortable and very stylish chair made of plastic bottles
A sheet of plywood, sixteen one and a half liter bottles, adhesive tape - and a comfortable and durable coffee table will appear on your site. Plywood can be replaced with plastic or hardboard, old countertops or plexiglass. From the same materials, slightly changing the design, you can make a garden bench. Some diligent and patient craftsmen manage to assemble full-fledged sofas and armchairs from bottles.

From plastic bottles, you can even make the basis for a full-fledged sofa, if you fasten them firmly and neatly.

Hanging flowerpot or base for planters
Do-it-yourself ottoman from plastic bottles

How to make a pouffe from a pet container
house made of plastic bottles
There are real builders among the summer residents who know that it is possible to build whatever your heart desires from plastic bottles. They collect gazebos, toilets, sheds and even from plastic bottles. The only difficulty of such structures is not in their assembly, but in collecting the required number of bottles.

House with a roof of 7,000 bottles

Plastic bottles are a good base material for building walls of a summer house, a greenhouse, a shower, a toilet or other partitions.

The walls of the greenhouse from containers on a wooden frame

The bottoms of plastic bottles will help to arrange garlands for the garden
Playground: flowers from plastic bottles and toys from plastic bottles

Crafts from plastic bottles will help decorate the playground
All kinds of crafts from plastic bottles (photos of their various variations for the garden can be easily found on our portal) are especially attractive for decorating a playground. Absolutely safe, they can become the basis for toys, and for fun decorations, and for creating plot compositions. Funny elephants, bees, hares and hedgehogs, bright flowers, cheerful lanterns will turn the countryside island of childhood into a fairy-tale kingdom.

A whole plot for a playground from caps of plastic bottles and canisters

From the caps of plastic bottles, together with children, you can make small crafts and large plot mosaics
plastic bottle doll

Examples of a variety of crafts that will help the gardener with placement, easy transportation and plant care

Piglets from large plastic bottles - stable stands for germinating seedlings or small plants

Craft for garden or lawn decor: pet container parrot
Crafts for the garden and useful little things

Multi-colored turtles will be a great decor element for your garden.
With what ease the "crazy" hands of summer residents turn used plastic containers into useful summer cottages, you can see by walking through the countryside. Here, on the trunk of a tree, a washstand was comfortably attached, and in the next courtyard, a gazebo was decorated with multi-colored ones with fragrant primrose and ampelous geraniums. We have also prepared for you several descriptions of crafts from plastic bottles for the garden.
Do-it-yourself bird from plastic bottles

DIY painted garden owl lanterns
Birdhouse from a plastic bottle

It is very easy to make a birdhouse from a plastic bottle

Cut in half plastic bottles will become pretty flower pots, it is important to paint them carefully. It is also advisable to take opaque bottles for this.
The ever-tangled and stuck twine for tying seedlings will stop tormenting you if you hide the ball in a plastic bottle. Just cut the bottle in the middle, put a ball in the top, pass the end of the twine through the neck, connect the parts, secure the cut with tape - and the comfortable storage is ready.
Drip irrigation from plastic bottles
Your seedlings will not wither, even if you are away for a few days: install semi-automatic watering. Once again, plastic bottles come into play. We cut off the bottom of the bottle, about 2/3, drill 4-8 holes in the cork, close the neck, bury the bottle upside down, pour water - and the seedlings are provided with moisture during your absence. A similar garden made of plastic bottles (photo confirms this) will significantly save your time and money.

Automatic watering "Aquasolo" - these are conical nozzles for a threaded bottle that do not require time-consuming drilling of slots, digging into the ground, and so on

Anthurium with a convenient system of automatic watering "Aquasolo"

Maximum and space saving: plastic bottles suspended one above the other with a notched tube of water passing through them
- For the same seedlings, plastic bottles make excellent containers. After cutting the bottle in half and taking the bottom, pour the prepared substrate into it, plant the plants and place them on a bookcase made of wooden planks. This design is also suitable for decorating a house with flowers.

Beautiful hanging pots made of plastic bottles will not only decorate the interior, but also make it unique.

Great flowerpot from a shampoo bottle with your own hands

Arrangement in the country of compact placement of seedlings or small plants
Bird feeder from a plastic bottle
Some crafts from plastic bottles for the garden amaze with the ingenuity of the owners. By putting a bottle on a hose and making many holes in the bottom, you will get a wonderful diffuser for watering the garden. From a five-liter container, you can build an elegant lamp on the veranda, and a mineral water container is suitable as a bird feeder.

Plastic bird feeder

Simple and handy hose spreader for garden watering
- Plastic bottles will help you save trees from pests. Cut the bottle lengthwise into two halves, fill it with a mixture of insecticides that is attractive to pests and dig at the base of the trunk.
- From bottles you can make a magnificent decorative all-weather and all-season flower bed. Just paint the bottoms of the bottles in different colors and assemble a wonderful carpet out of them by sticking them with the open side into the ground. The carpet pattern can be pre-reproduced on paper.

Making flower beds with pet containers has become very popular
- One Brazilian engineer made calculations and built a solar collector from plastic bottles. The design can be placed in a summer cottage, connected to a storage tank, and you will always have a warm shower.

Solar collector made from plastic bottles

Automatic watering of seedlings and ornamental plants in your absence with the help of a plastic bottle dug near the roots with small holes drilled in the neck or lid

Cut plastic containers suspended one above the other are the fastest and most economical way out of a situation where you need to germinate a lot of seedlings in a limited space

Making an owl from a plastic bottle with your own hands

Vertical bottle garden for sprouting and wintering plants - an opportunity to save space and provide good irrigation and drainage
Products from plastic bottles: artistic masterpieces

Gorgeous dandelions from pet containers will never cease to delight you and your guests
The fantasy of folk craftsmen is so diverse that it leads to the appearance of outlandish animals, and characters from fairy tales and cartoons, and exotic plants, and original thematic compositions in summer cottages.

We paste over the bottom of a plastic bottle or cup with dry twigs and get an unusual candlestick, protected from wind blows

Rainbow decor of the garden, workshop, garage: a fountain of spirals cut from multi-colored plastic bottles

Plastic bottles are used not only to decorate the garden, but also to decorate the home.
Country crafts from plastic bottles:
If you have a small pond on your site, you can decorate it with a plastic palm tree. It's not at all difficult to make it. You will need:
- 10-15 brown plastic bottles (for a palm tree trunk);
- 5-6 green bottles (it is desirable that they are long);
- iron or willow rod;
- an awl or drill for making holes;
- sharp knife or scissors for cutting bottles.

A palm tree made of plastic bottles looks very beautiful
Now let's start making jewelry.
- Cut all brown bottles in half. We take the lower parts and make holes in the bottom of each of them with an awl, equal in size to the diameter of the rod.
Advice! You can take the tops of the bottles, then you do not have to make additional holes.
- We cut off the bottom of the green bottles by about 1 cm. We leave one of the blanks with a neck, cut it off for the rest to make a loop.
- Carefully cut the green bottles lengthwise into three equal parts to the very loop.
- Cut all brown bottles in half. We take the lower parts and make holes in the bottom of each of them with an awl, equal in size to the diameter of the rod.

Making palm leaves


Combination of stem and leaves

Assembling a palm tree from plastic bottles
Using several rods of different lengths, you can create a real oasis. As you can see, it’s not so difficult to make crafts for a garden from plastic bottles with your own hands, the main thing is to find enough material and take one of the proposed ideas as a basis.

Part 1

Step-by-step guide: make fabric pots on the basis of plastic bottles. Part 2

Hedgehog from a plastic bottle and a twine rope: we grow seedlings and small creeping plants
Crafts for giving from caps from plastic bottles

From plastic covers you can create real masterpieces
Don't throw away bottle caps. Decorative crafts from caps from plastic bottles for summer cottages and gardens can also fit beautifully into its landscape. They will serve as an excellent mosaic material for decorating fences and walls of a country house.

Bright compositions made of plastic covers will help make your landscape design more fun.
Master class video (from plastic bottles of standard capacity):

A walkway made of plastic covers is not only economical, but also very beautiful.

Large-scale red and blue mosaic of caps of different sizes
Having conjured a little with the pattern, painted and drilled holes in the sides of the covers, you can use them to assemble a curtain on the door. The perfect insect repellant!
The lids can be turned into a beautiful tabletop or a practical doormat. Use them for decorative interior decoration.

Gorgeous door curtains made from plastic covers

Carport that diffuses sunlight

Beautiful Hawaiian style lanterns
Before starting work, remove the labels from the bottles and wash the container thoroughly.
For the stability of vertical structures, fill the bottles with sand or small pebbles.

Dragonflies from corrugated plastic bottles

Ingenious device for collecting fruits from trees

Hanging pots from pet containers with the image of animals will perfectly fit into the interior of a children's room
Choose bottles of different softness for crafts. For example, for the body of a dog or elephant, take a strong base, and for the ears it is better to use softer plastic.
Master class from plastic bottles (step by step):


