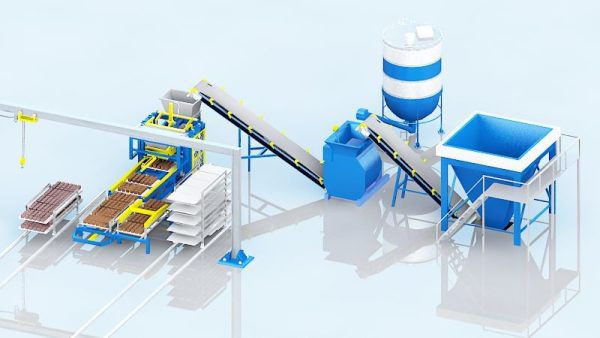
Facing the facade of the building with tiles. Tiles for exterior decoration of the house: making the right choice. Advantages of shell rock slabs
The building, which is approaching the final stage of construction - the choice of the facade of the house, needs two main points: protection from adverse effects from external influences on the structure and decoration of the house, which determines which style it will be assigned to.
 Ventilated façade system with porcelain stoneware cladding.
 Facing the facade of a private house can be done as follows (indicating the prices for work and the cost of the material):
- ventilated facades - the cost of work in the range of 1200-1300r / m 2;
- siding trim - cost from 400r / m 2; with lining and waterproofing about 9000r / m 2; material cost - 120 - 500 rubles / sq.m;
- brick finishing - the cost of work will be from 550r / m 2; material cost - from 1000 to 4000 rubles / sq.m;
- stone or tile - cost from 1300 to 2200r / m 2; clinker tiles - 3300r / m 2; natural stone - 4400r / m 2; material cost - 1000 - 1200 rubles / sq.m;
- plaster finish - cost from 500 to 1800 rubles / m 2; material cost - from 60 to 300 rubles / sq.m;
- coloring - the cost of work from 150r / m 2.
Any of these methods needs preliminary preparation before the main surface work and has its own individual qualities. The main thing that needs to be highlighted, in addition to technological subtleties, is the type of material for cladding and the quality of the wall.
 Ventilated façade system with natural stone tiling.
 Ventilated facades
The design of the façade is simple: cladding material (aluminum sheets or tiles) and substructure. An air cushion is formed between them. In addition, a heat-insulating layer is often made between the facing surface and the wall, then the “cushion” is located between the thermal insulation and the lining.
Advantages of this cladding
- use in areas of increased seismic hazard;
- durability (from 20 to 50 years);
- the load-bearing wall does not need to be leveled beforehand;
- installation is fast, since the installation is all-weather due to the lack of "wet" work;
- economy on heating, as the thermal insulation of this method is effective;
- noise insulation increased several times;
- resistance to adverse weather events.
 Ventilated façade system with tiling.
 The main part is considered to be a layer of insulation - it must be resistant to weathering, have high vapor permeability and withstand sudden temperature changes. The most suitable option for thermal insulation is based on stone wool. Slabs, which have a base of rocks of the basalt group, have dimensional stability, incombustibility, high thermal insulation and durability. The fastening of such facades takes place on a load-bearing wall, both made of concrete and brick. The underlayment structure consists of brackets mounted on a load-bearing wall and load-bearing profiles that are mounted in series on the brackets. With the help of fasteners, sheets for cladding are installed, and at the end the insulation is fixed with the help of profiles or dowels.
Ventilated hinged facades are not only visually attractive, but also functional. With the help of such facades, the general appearance of buildings in a certain architectural style is preserved or can be changed.
Severe climatic conditions are not afraid of ventilated facades, unlike other types of cladding, which have a short service life. Despite the cost of hinged systems, savings on heating allow you to recoup all costs. The big positive side of such a facade is the lack of need for repairs..
Finishing the facade of a private house with siding
PVC sheathing (vinyl analogue to wood) has been known to the world for no more than half a century, which was enough to evaluate its expediency, but wooden siding has been known for a long time.
 PVC siding.
 PVC siding
The advantages of this method are the following:
- The protective screen is formed thanks to vinyl siding. Since it is ventilated, there is no excess moisture and it is possible for the walls to "breathe";
- the screen is easy to clean;
- does not burn, but may melt. During melting, harmful compounds are released, which is why this method is considered environmentally hazardous;
- durable, so an old-style house can be easily modernized.
The manufacturer will already depend on the durability and ability not to fade in the sun.
Despite the cheapness of the vinyl sheathing itself, the auxiliary materials are expensive. After measuring the building and calculating the materials, one can only judge the final price of the siding. The most basic rule is the observance of technology during installation. In order for the facade not to have to be redone and not warped, it is necessary to calculate the expansion-compression of the PVC panel.
 Metal siding with a coating that reproduces the texture of natural wood.
 metal siding
It is the most resistant to mechanical influences, unpretentious and durable, fire resistant. Consists of galvanized steel and has a polymer coating.
A few drawbacks: in terms of texture and color scheme, the choice is small.
Metal siding conducts current (this is controlled by grounding), and this allows you to avoid the penetration of radio magnetic waves inside - a protective screen appears at the house, but mobile communication catches badly.
 Wooden siding.
 wood siding
The cost of the tree is not small, which increases the social status of the owner. The appearance of such a house is unsurpassed, although the durability is not at the highest level. Using new technologies, it is possible to create such wood that will last longer than usual. Wood treated under pressure (impregnation process) increases the density of wood, so resistance to adverse influences is increased.
 Finishing the facade with brickwork.
 Finishing the facade with brickwork
Often, brick cladding is already a pre-calculated version of the facade of a private house. Brick has always been considered the epitome of respectability.
If the building has already been built, for example, from wood, then when lining the facade with bricks, one should not forget about the ventilation system, since the wood can quickly deteriorate due to condensation.
Also, thermal insulation properties will not arise due to such a sheathing, if the gaps are not filled with liquid foam in a quality manner. The best option would be insulation with a basalt slab or mineral wool.
When making brickwork, one should not forget about the foundation with waterproofing.
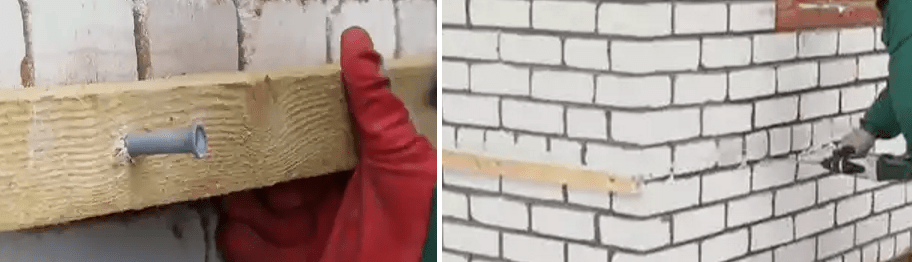
Whatever the old wall is made of, it should be connected to the new masonry with flexible ties at the rate of about 7 pieces per m 2. The height of the duplicated masonry should be no more than 7m with a pediment (without - 5m). Otherwise, stability, as well as strength, will be weak.
Decorative elements, as well as a combination of brick color schemes, will look positively on a monotonous smooth wall.
 Facade tiling.
 Tiling the facade of a private house
Although the design is simple, the execution requires special scrupulousness and adherence to installation technology. Also, such a facade is quite expensive.
For the successful construction of a tile facade, it is necessary that the masonry walls sit down. Each type of tile has its own adhesive. Tiles can be clinker, ceramic, cement-sand based, artificial or natural stone. Facade tiles must be designed for outdoor work.
This type of cladding is done for a long time, because it is not only spectacular, but also able to turn a boring house into an architectural masterpiece.
Walls that have been insulated can only be clad in this way if the ventilated façade has been sheathed after with magnesite board or OSB. The thickness and method of fastening depends on the load. It is allowed to perform tiling of a ventilated brick facade.
Grouting should be considered if you have brick or chopped stone tiles. You need to leave gaps from 5 mm, and the color of the grout can decorate the cladding. Also, larger tile options are suitable for basement cladding than for walls. Thus, the house will look more stable and grander. And the upper edges must be protected with a cornice and a visor from moisture.
Cladding of ventilated facades with clinker tiles

Glaze Collection
"Snow Peak" "Coconut Grove" "Sea Foam"
"Sunset" "Morning Dew" "Basalt"
"Nut" "Granite" "Wet sand"
The Cherry Orchard Lunar Eclipse Savannah
"Rocky Coast" "Caramel" "Honey"
"Malachite" "Iceberg" "Wheat"
"White cloud"
Collection "Natura"
"Europe" "Africa" "America"
"Asia"

Stucco home decoration.
The stucco facade is called "wet", as it includes wet work in the process. Plastering takes 2 to 4 weeks of work.
 Mineral plaster.
 mineral plaster
The most popular cladding due to its cheapness. Possesses weak plasticity and is short-lived. This does not apply to the minuses at all, since the price and environmental properties overlap the previous qualities. The walls are quite capable of "breathing", and the house can be ventilated in the usual way.
Mineral plaster is most often used for walls made of a material that “breathes” and is insulated with mineral wool or basalt slabs. Near a railway and a motorway, such a facade is inappropriate, because vibration can lead to destruction of the coating.
Operation on average about 10 years. It is undesirable to apply on newly built houses (except for frame ones), it is necessary to shrink the house.
 Decorative silicate plaster.
 silicate plaster
One of the best finishes for the facade of a private house. It is plastic, and also passes air, has antistatic properties, and therefore does not collect dust.
Considering the cost of the material, this is one of the most expensive "wet" linings. Installation work is also considered expensive. In operation, the facade of silicate plaster can serve 20-25 years.
 Thin-layer acrylic plaster (fur coat type).
 Acrylic plaster
Despite all its plasticity and moisture resistance, the protective film that forms on it does not allow the house to breathe. If the house is located near the railway and other places where there is strong vibration, then acrylic plaster is just right. Also, if the walls are insulated with foam glass or expanded polystyrene. It absorbs dust, so it is not used near highways. The house needs additional ventilation. Acrylic plaster is quite durable and its service life will be 15-20 years.
 Silicone plaster.
 silicone plaster
The most common "wet" cladding. It is elastic, "breathable", only it alone does not absorb chemicals and salts. If you follow the correct application technique, then the look, service life and strength will be good, even on the highway. Serves up to 25 years.
Calculation of the cost of the facade of a private house
- material for 1kg (if plaster) or 1 sq.m. (if brick, siding, block house, ceramic tile);
- insulation required for a specific area of \u200b\u200bthe facade;
Clinker tiles for the facade have the highest physical performance among all types of building materials. The main advantages are:

But there is also limitations. The first is high cost. The price of clinker tiles, depending on the brand, can be several times higher than the cost of ceramic tiles. The second disadvantage is fragility. According to its physical characteristics, clinker resembles glass, it has the same fragility. It is difficult to cut, the cut often has chips. In addition, as a result of sharp impacts, the material cracks.

Excellent performance characteristics are obtained due to a special production technology, unlike other clay building materials, clinker is fired at very high temperatures (at least + 1300 ° C). Under these conditions, clay and brick melt and turn into a glassy mass. The mineral dyes used give color, and special pressing molds change the structure of the front surfaces. During production, the technology must be followed exactly, otherwise the tile is deformed, the linear dimensions are violated, and the quality is significantly reduced. Production can be carried out only by reputable companies that have not only the most modern mechanisms and equipment, but also responsible highly qualified specialists in various specialties.


Before you buy a tile, you should decide on its characteristics. What to pay attention to?
| Options | Selection Tips |
|---|---|
| Price | The price of clinker tiles can reach 4000 rubles / m2. and more. Do not buy too cheap material, it is better to focus on the medium range. For elite buildings, purchase the most expensive products. Unfortunately, the price does not always correspond to the quality; in the building materials market, you can find goods with a high cost, but also of unsatisfactory quality. |
| Manufacturer | The best option - imported manufacturers. Domestic companies, unfortunately, do not always meet the quality requirements. Buy goods only from time-tested and numerous consumer brands. |
| The texture of the front surface | The more complex the texture, the better the facade looks. But it must be borne in mind that clinker tiles with such a texture require highly qualified craftsmen and additional costs for maintaining the facade of the building. |
| Colour | Universal advice - the color should be in harmony with the general appearance of the building. This applies not only to design, but also to the architectural features of the building. Little personal experience - consult with experienced architects or designers. |
At the same time as the tiles, choose glue and grout. The adhesive must be frost-resistant and withstand at least 50 freeze/freeze cycles. Clinker tiles are a very expensive material; you should not allow unpleasant situations due to poor-quality glue, which subsequently cause the need for repairs.


As for the grouts. All of them must necessarily compensate for the thermal expansion of the tile. The clinker is very brittle, with increasing loads it can crack. There are no universal recommendations for the color; the grout in each case should emphasize the beauty of the finish.


Laying clinker tiles
Exact adherence to existing technologies guarantees the quality and long-term operation of the finish. Do not try to speed up work by skipping individual operations, such actions will have bad consequences.
Step 1. Surface preparation. They must be smooth, dry and clean. Leveling should be done carefully, avoiding large differences in height. The fact is that the adhesive under the tile must be applied with a comb spatula, this is the only way to ensure reliable adhesion. A comb spatula only works on flat surfaces. The best option for laying tiles on plastered surfaces.
Step 2 Determination of the number of tiles.

The algorithm of work depends on the type of tile. If there are special corner elements in the kit, then their number is calculated separately. Next, determine the area of \u200b\u200bthe wall and give a small margin. For ordinary ceramic tiles, the margin is within 10%; for clinker tiles, the margin is reduced due to the high cost. You will have to work very carefully, to minimize the amount of loss of expensive material.
Step 3 Preparation of materials and tools. To work, you will need special glue and grout. From tools spatula, tape measure, level, rope with blue (chopping thread), electric mixer. We have already mentioned above that all materials must be of high quality, in terms of performance they must correspond to the weight and size of the clinker tiles and the climatic zone of residence.
Step 4 Markup. A very important point, the consumption of tiles, the speed and quality of facing works depend on the thoroughness of the marking. How to markup?
- Start marking the facade walls with window and door openings, in these places problems often appear. Using a level and a pencil or felt-tip pen, mark the position of the beginning of the row above the jumpers. Check the position of the windows with a level, if they are not on the same line, then the lower edge of the first row of one of them will have to be cut a little. Beat off the line above the windows.
- Measure the distance from the windows to the first row of tiles, taking into account the thickness of the joints. Take accurate measurements, do not allow errors of more than a few millimeters.
- Beat off the lowest line on the wall of the house, taking into account the previously made markings above the openings. Check its position again. To measure horizontality, it is better to use a water or laser level, an ordinary building one can make significant errors over a long wall length.
- If you have special elements for finishing corners, check their location and calculate how many tiles will go in length from one corner to the second. This is necessary in order to make the cutting point along the length of the tile invisible. The greater the length of the facade wall, the more carefully markup, take into account the number of corners and bends of the surface. The facade walls of prestigious buildings have original architectural elements; it is quite difficult to tile them.
- To constantly control the position of the tiles on the wall, beat off parallel lines at a distance of three or four rows, taking into account the thickness of the seam. Such lines greatly facilitate the finishing process and exclude the appearance of marriage. Remember that correcting mistakes is always much more difficult than preventing them.
Step 5 Fasten the mounting rail along the edge of the bottom line of the first row of tiles, it will keep the material from slipping until the adhesive has firmly set. The rail to the wall can be fixed with special fixtures or ordinary dowels. The holes from the fixation points are then sealed.

Step 6 Prepare the adhesive solution. Be sure to first pour water into the container, and only then pour dry glue. Read the instructions carefully, pour only the required amount of water. We have already discussed this topic above.
Practical advice. To inexperienced craftsmen, at first it may seem that the solution is very thick. Don't pour water right away! Keep stirring it, after a few minutes it will become thinner.
After the first mixing, leave the solution for 4-6 minutes to infuse. During this time, the remaining dry lumps of powder will absorb water and break easily when re-mixed.
Step 7 Laying starts at the corners of the bottom row. Prepare the workplace, remove construction debris and objects that interfere with work. If scaffolding is needed in the future, but you need to check their completeness and prepare for installation. When installing scaffolding, safety regulations must be observed.
Apply glue to the wall, press it with sufficient force.

To eliminate gaps, pass the comb trowel with glue over one place at least twice in perpendicular directions, gradually reducing its angle of inclination.

Very important. The amount of glue applied should correspond to the productivity of your work. At first, process small areas, with time experience will appear, the work will go faster.
There are two ways to lay clinker tiles: one row along the entire length of the facade wall or three or four rows in small sections. The first method reduces the probability of errors, but increases the time. If you work slowly, you will only have to apply the adhesive across the width of one tile, which is very inconvenient and time consuming. In addition, it is likely that before the second row is laid, the adhesive will already harden, it will have to be removed with a flat spatula, and this is a loss of material. Another problem is that it is difficult to apply glue with a spatula at the edge of the tile, this technology takes much more time. And the last thing - during such an application, a solution will definitely get on the surface, it will have to be removed - even more time is lost. But we cannot give definitive advice on exactly how to lay the tiles, it all depends on your practical skills. How much time is left is written on the packaging of the glue, and how much during this period you can glue the tiles is up to you.
Step 8 To improve adhesion, be sure to glue the tile on the reverse side with glue. The thickness of the adhesive is within millimeters. The fact is that the clinker almost does not absorb moisture, and this significantly reduces the adhesion coefficient. Smearing the reverse side minimizes the negative effect of low water absorption.


Step 9 Use crosses between tiles. The recommended width of the crosses is 10–14 mm, which is much larger than when laying ordinary tiles.

Continue laying the tiles over the entire surface of the facade wall, periodically remove the crosses from the lower rows and use them for the upper ones.

Processing of window and door openings

Proceed to them only after the experience of laying tiles on even facade walls has appeared.

Step 1. Lay the tiles on the windowsill. The rows must exactly match those laid on the wall. The surface of the window sills should be flat and sloped to drain water.
Step 2 Protect finished horizontal parts of window sills from dirt. You can simply stick newspaper or a piece of plastic wrap with construction tape.
Step 3 Try on the tile to the side surfaces of the windowsill. As a rule, they have different widths at the top and bottom, this discrepancy should be eliminated only at the expense of the top and bottom tiles. They will need to be cut at an angle.
Step 4 Using a level, draw a horizontal line on the side window sills, measure the dimensions of the remaining triangles. The extreme tiles are cut off on them.

Step 5 The aesthetics of the facade is greatly influenced by the junction of the lines of joints over the entire surface, pay due attention to this factor. After you have laid the first two corner tiles on opposite vertical slopes of the window opening, check their position with a level. They must lie on one strictly horizontal line.

Step 6 Glue all the tiles on the slopes in turn, periodically check their position.

Step 7 Upon completion of work on vertical slopes, proceed to laying tiles on the upper horizontal. The marking and sizing of the corner tiles is carried out according to the same algorithm as for the side vertical tiles. Laying technology requires increased attention. Check the condition of the adhesive, it must securely hold the tile until it is completely cured.
Features of cutting clinker tiles
The best option is to cut the clinker tiles with a professional machine with a diamond blade and water cooling. So you can get a perfectly flat cut surface and almost completely eliminate the risk of cracking or chipping. But such equipment is quite expensive, it is beneficial to purchase it only for professional craftsmen, for whom laying tiles is the main income, and not a pastime. If you do not have a machine, then you will have to cut the tiles with a circular grinder and a diamond disc.

Important. Diamond blades come in two types: for cutting concrete and ceramics. The disks are not interchangeable, it is forbidden to use them for other purposes. What are the differences between the drives? For cutting concrete, the plane of the discs has through slots to remove a large amount of dust; discs for tiles do not have such holes. They have only small depressions in the places where the diamond chips are applied. Slotted discs hit the tile hard, causing chipping. Always keep these differences in mind.
How to cut clinker tiles with a grinder?
- Prepare a flat and stable stand and ruler. Draw a cut line on the tile, always exactly on both sides.
- Cut the tile along the line no more than half the thickness in one pass. Never try to cut immediately in one pass of the disk, it will definitely crack.
- Turn the tile upside down and cut it in the same way, only reduce the cutting depth even more.
- Place the incised part on the flat edge of the table and, with a sharp pressure on the edge of the tile, break it off along the cutting line. The more confident your movements are, the less risk you end up with a marriage.
- Very carefully trim the edge of the cut with a grinder. Tilt the disk at the maximum possible angle, do not press it hard, remove the bumps gradually.

Keep in mind that it is very difficult to cut a strip less than one centimeter wide from a clinker tile. To do this, you must have experience with electric tools and clinker. If the technology requires gluing such pieces, then be prepared for a large amount of marriage.
Video - Master class for cutting clinker terrace slabs
Video - How to quickly cut clinker tiles
Grouting

Has its own characteristics. After a slight hardening of the adhesive with a special thin spatula, remove from the joints and clean the surfaces from adhesive residue. Start grouting no earlier than three days after laying, otherwise the tile may undermine, it will have to be re-glued. Prepare the grout solution taking into account the manufacturer's recommendations, which brand to choose, we described above. By consistency, it should be semi-dry.
Put a little mortar on a trowel or any flat surface, for embedding you need to have a long narrow tool across the width of the seams.

Lean the trowel against the wall, pick up small portions of the thick mortar with the tool and carefully seal the seams. Align their surfaces at the same time.
Practical advice. It is much faster to close up several rows of vertical seams first, and then horizontal ones. At the same time, remove the difference in height between them.


This method of semi-dry grouting significantly reduces the contamination of the front surface of the clinker tiles. Finishing cleaning is done with an ordinary brush.

Overcasting a seam with a brush gives it
appropriate structure


If you have sufficient skills, then you don’t have to use a wet sponge, the work will be done neatly and beautifully. If not, then the problem areas will have to be wiped. But remember that the surface of the clinker tile is easy to get dirty, but difficult to clean. After drying, the spots will reappear, the procedure will have to be repeated several times.


Clinker tiles absorb no more than 4% moisture. Such properties put forward special requirements for the consistency of the adhesive - it should not be liquid. Ceramic tiles absorb a lot of moisture, liquid glue is not a problem for it. At the same time, the glue should not be very thick. Why? Firstly, its adhesion is significantly reduced both with bearing surfaces and with tiles. Secondly, the mixture quickly hardens, the laying process is much more complicated.

Adhesive that has got on the surface of the tile must be removed immediately. Pay special attention to clinker with an uneven front surface. Don't wait for the glue to dry. The fact is that high-quality glue is then difficult to clean, it is very firmly attached to the texture. Use a clean damp sponge or cloth for cleaning.
The production technology allows for a slight difference in color shades in one batch of clinker tiles. To prevent the appearance of large areas with different colors on the facade, periodically take tiles from several packages. The facade will look beautiful, and some difference in shades will serve as an additional decoration. During the purchase, pay attention to the batch number, it is indicated on the package. If you need to purchase additional tiles in a few months, then there is a high probability that this batch will no longer be available.
It is not recommended to lay clinker tiles in very hot and windy weather. If it is not possible to wait for suitable conditions, then you can sprinkle the surface of the clinker tile a little on the reverse side with water. This will improve gluing, the reliability of fixation will increase.


Video - Technology for laying clinker tiles
Any owner of a private house wants his home to be cozy inside and beautiful outside. In this situation, the financial situation plays an important role. After all, the finishing material is so diverse in terms of types and prices!
 Facing the facade with tiles.
 Some use only natural stone for facade decoration, based on its practicality and durability. But this option is not cheap, so you often have to resort to an alternative option - facing tiles for the facade of the house. The most popular manufacturers of this finishing material that have taken root in Russia include:
- Spain;
- Bulgaria;
- Turkey;
- Germany;
- Italy;
- India;
- Russia.
Do not be surprised to see a domestic manufacturer on this list. Using the latest technical achievements, it is a worthy competitor to foreign ones. Interestingly, when buying material through online stores, you can save at least 10% in relation to the store cost.
Important aspects when choosing facade tiles
The main requirement is the resistance of the facade tiles to moisture and temperature extremes.
The material of facade tiles is significantly different from the tiles intended for interior work. The coefficient of linear expansion of the material will show how durable it is. A coefficient value that is too high indicates that the tile does not respond well to heat and cold.
Let's get acquainted with the types of facade tiles.
Types of facade tiles
 Front tile from a shell rock.
1. Natural stone
Such a decision will require a lot of money. The expensive cost of facade tiles made of natural stone is due to a complex and time-consuming technological process. A solid stone is first cut by a special machine into plates of various shapes and thicknesses, then it is ground and polished.
 Front tile from an artificial stone.
 2. Facade tiles made of artificial stone
The composition of the mixture for facade tiles of this type excludes the presence of natural stone in the composition. But there are also differences from the composition of ceramic tiles.
The composition of the "artificial stone" mixture includes:
- cement of high quality grades (400,500);
- sand as a fine filler;
- lightweight filler designed to reduce the weight of the stone;
- special additives for moisture resistance;
- individual additives for strength.
The process of obtaining "artificial stone" is no less laborious. To create a stone of different appearance, the manufacturer uses different forms. The solution described above is poured into them and solidifies. In some cases, a dye is immediately added to the solution, in others, the resulting tiles are painted after hardening. But it is imperative that the coloring components are moisture resistant, tolerate heat / cold and do not lose color under the influence of these factors and over time.
Ultimately, the tile has exactly the same texture as that of natural stone.
 Front ceramic tile.
 3. Facade ceramic tiles
The options for the appearance of ceramic facade tiles are much wider than those of the previous types. It has a variety of shapes, colors, textures, can be glazed or matte.
But the requirements remain the same - resistance to natural factors.
The main component of the mortar for producing ceramic tiles is clay. The process of its preparation before use is very long. Clay is soaked for a year, frozen, cleaned, crushed and crushed.
Only after that it acquires the necessary plasticity and molding properties.
Having moistened the clay with steam, it is placed on special presses and a tile is formed. Then the clay is fired at high temperatures and glazed.
 Facade clinker tiles.
 4. Facade clinker tiles
The most demanded type of a tile for facades is the brick tile. The exterior is made under a brick of various colors. This tile is very resistant to moisture and temperature extremes, has a long service life (about 50 years).
The tile is made from slate clay with the addition of chamotte, flux and a fine promoter. Such material has a special refractoriness.
After obtaining the desired shapes, the tiles are fired at high temperatures to obtain a fine-grained structure.
 The color mix contains palettes of the "Providence" color scheme, but without white tones for a deeper spectrum of earthy brick tones.
 It serves as a protective barrier to moisture and frost. This material can be used for both single-story buildings and multi-story buildings. Clinker tiles for facades adhere well to the insulation.
The great demand for clinker tiles is due to a number of its advantages:
- The facade of such tiles is easily repaired;
- Clinker tiles are characterized by increased impact resistance and resistance to frost;
- There is a secondary possibility of using this facade tile;
- It is this type of tile that has the largest variety of textures, colors and types.
To choose the right finishing material for your home, you must first calculate the finish, the cost of material and work.
 The wood ash color, blackened tiles give the standard red tiles an ancient look of antique brickwork.
 Calculation of material, cost of laying work
Facing facade tiles have standard dimensions, with the exception of single orders for other parameters - 350 * 165 * 10-40 millimeters. The calculation is done elementarily:
- the area required for tiling is calculated by multiplying the width by the height. Don't forget to subtract door and window openings;
we take into account the nuance - flat tiles are considered in square meters, corner tiles - in linear meters.
 The color mix (traditional antique) combines equal parts of standard red tone brick with blackened "fire scorched" tiles.
 The cost of facing tiles directly depends on the stone or the type of mixture from which it is made. It is worth saying that clinker tiles and "artificial stone" are approximately in the same price range - 900 - 1500 rubles per square meter. Ceramic tiles have a much wider range of prices - 600-3000 rubles per square meter. Facade tiles made of natural stone can be purchased from 1000 to 3000 rubles per square meter.
For facade work on laying tiles of all types, except for natural stone, you will have to pay 850-1000 rubles per sq.m. The cost depends on the material of the tile, its size and the height at which the tile is laid. The price for installation work on the installation of a facade made of natural stone is usually 10-15% lower and amounts to 800-850 rubles per sq.m.
 Laying facade tiles.
 Important points to consider when tiling the facade yourself
Quite a bit of practical knowledge and skills are required for self-facing a house. Some recommendations should be highlighted, they will help to carry out this process more efficiently:
- it is better to carry out styling in the summer when it is warm. The optimum temperature is 5-25 degrees. If the weather is hotter outside, then experts recommend slightly moistening the back surface of the tile;
- Before laying it is necessary to level the walls by plastering. And then the use of reinforcing mesh is encouraged.
So, we see that the variety of finishing tiles for the facade is striking in variety. The cost per square meter depends on the type of tile. Installation work on this type of finish does not indulge in cheapness, so you should think about laying it yourself. It is enough to consult a little with knowledgeable people and get acquainted with the recommendations of specialists.
Video: "Installation of clinker tiles on facades"
Gallery of works


|


All facades of capital buildings, from multi-storey buildings to cottages and country mansions, need a protective coating. The most effective method of protecting the facade from adverse weather conditions is to clad the outer walls with facade tiles.
The use of such cladding allows you to save load-bearing walls without repair for up to 50 years or more.
For facade cladding, the following materials are mainly used:
- clinker facade tiles;
- terracotta facade tiles;
- decorative facing tiles;
- facade tiles made of natural stone;
- facing tiles - porcelain stoneware.
Clinker facade tiles
One of the most competitive materials for facade cladding is clinker tiles:
- In conditions of ecologically unfavorable conditions, sharp changes in the temperature of the outside air and its humidity, this material is able to protect the facade of the building for many decades.
- An extensive range of colors and a variety of tile textures will give your building a bright personality.

Due to the chemical composition and manufacturing technology, clinker tiles have the following advantages:
- beautiful appearance;
- variety of colors and surface structure;
- high strength;
- low moisture absorption;
- durability;
- environmentally friendly material;
- frost resistance;
- resistance to ultraviolet rays, such a tile does not fade in the sun.
The only drawback of clinker tiles is its cost. Such tiles are much more expensive than ordinary ceramic tiles, but during long-term operation, clinker tiles pay for themselves.
The following requirements are imposed on the manufacture of clinker tiles:
- only pure, refractory, shale clay is used in production;
- tiles are fired at a temperature of 1300ºC;
This firing technology makes it possible to obtain a micro-grained structure of the product, without voids and large inclusions, which gives the tile a particularly high strength. Ordinary ceramic tiles are fired at a temperature not exceeding 1000ºC.
Adding various dyes to the mixture allows you to get tiles of a wide variety of colors - from pastel light colors to dark brown colors.

If you need a brick-like tile for the exterior of the house, then the dye is not added to the charge at all. In this case, the tile is obtained with a beautiful, warm yellow-brown color.
Installation of clinker tiles is quite simple and practically does not differ from laying ordinary tiles:
- it is necessary to carefully prepare the base;
- choose the right glue that can withstand low temperatures and not absorb moisture;
- choose the right grout for the joints - so that it does not absorb moisture and can withstand frost;

Terracotta tiles for facades
Terracotta tiles, also called architectural ceramics, are unglazed ceramic tiles made from fired kaolin clay without the use of chemical dyes.
A variety of shades is obtained from mixing different types of clay. The color of the tiles can vary from beige to dark brown.

The surface of the tile can be natural or glazed, glossy.
The tile is issued corpulent and hollow. Hollow tiles are much thicker and have good thermal insulation properties.
Advantages of terracotta tiles:
- durability;
- high frost resistance;
- heat resistance up to 1100ºC;
- low cost compared to a facade made of natural stone or clinker tiles;
- high aesthetic appeal;
- terracotta cladding is much lighter than natural stone cladding;
- ease of installation, the ability to mount with your own hands;
- environmentally friendly material.
Installation of terracotta tiles is carried out exactly like any other ceramic tile on a prepared base.
Terracotta panels are available with the following characteristics:
- moisture absorption up to 6%;
- thermal expansion - 0.4 mm per 1 meter, with a temperature change of 100ºC;
- panel thickness - from 10 to 60 mm;
- height - from 10 to 80 cm;
- length - from 40 to 200 cm;
- panel shape - radius, flat or irregular;
- natural color, depending on the type of clay.

Methods for mounting terracotta panels
So:
- Installation of terracotta facade panels is carried out on the prepared crate using clamps. First, a kleimer is attached to the frame, and then a panel is put on the ledges.
- Installation of panels on self-tapping screws. In this case, the panels are attached to the crate using self-tapping screws through special technological holes.
- Lightweight ceramic panels can be mounted on a prepared base using a special adhesive solution. These are composite thermal panels that have a polyurethane layer.

Decorative facing tiles

Decorative facing tiles are an imitation of chipped natural stone. In combination with decorative elements, it looks great on the facade of the building.
Decorative tiles for facade decoration are quite easy to install, with some skills, you can do this work yourself. To do this, you need to level the wall with a layer of plaster and let it dry.
You need to start from the bottom row. We set the first row with the help of a level, strictly horizontally, then the subsequent rows will be even.
Decorative facade tiles have a number of advantages:
- sufficient strength;
- not afraid of temperature changes;
- unaffected by adverse weather conditions;
- it is not subject to the action of chemicals, so it is quite easy to monitor the cleanliness of the cladding;
- increases the thermal insulation of the building;
- a wide range of colors and a large selection of tile textures makes it easy to realize any design fantasies;
- environmentally friendly material, completely safe for health.
Natural wall tiles for outdoor decoration
Natural facing materials have always favorably differed from artificial materials. The natural beauty of the stone harmoniously fits into the surrounding landscape.

Natural stone will give any structure a unique look. With its unique strength and durability, natural stone is significantly superior to its artificial counterparts.
Using a rich range of shades and a variety of shapes, you can create an interesting, colorful composition.
Natural stone tiles have many advantages:
- natural stone has a rich palette of colors and shades;
- does not include polyester resins that are harmful to health;
- does not enter into any chemical reactions;
- has an unlimited service life;
- very durable and frost-resistant;
- from the proposed range, you can easily choose the color, shape and texture of natural stone tiles to your liking;
The only drawback is the high cost of natural material.
Cladding of facades with porcelain stoneware

In the last 5 years, porcelain stoneware has gained the most popularity among facing materials. This recent invention has found wide demand both in Europe and in Russia.
This material has found application not only in facade cladding, but also for cladding internal walls, floors, sidewalks, and is actively used in the decoration of stairs.
The advantages of this material are undeniable:
- high strength;
- durability;
- fire safety;
- a wide selection of colors;
- low price (the price of porcelain stoneware largely depends on the country of origin, the texture and pigments included in its composition);
- installation can be done in different ways (with the help of kleimers, rustic fastening or on an adhesive composition);
Porcelain stoneware gained immense popularity due to its composition and production technology.
This material includes:
- White clay;
- feldspar;
- quartz sand;
- kaolin;
- coloring pigments.
As you can see, the composition of porcelain stoneware practically does not differ from ordinary ceramics, however, its components are mixed in a completely different proportion. This is the first reason why porcelain stoneware differs from ceramics, giving it completely different physical and mechanical characteristics.
The second distinguishing feature from ceramics is the production technology. Carefully crushed and sieved raw materials are moistened and pressed under high pressure, and then fired at a temperature of 1300ºC.
During this process, all components are sintered at the molecular level and form a monolith.
As a result, porcelain stoneware acquires the following advantages:
- absolutely environmentally friendly material;
- does not contain polyester resins;
- very high frost resistance;
- strength;
- resistance to mechanical damage;
- low thermal expansion;
- resistance to ultraviolet rays;
- a wide range of colors, a variety of shades, patterns, patterns;
- porcelain stoneware is resistant to acids and alkalis;
According to the European classification, porcelain stoneware was classified as category "A". And this is the highest quality facing products.
Exterior finish on OSB boards
If you decide to use OSB (oriented strand board) for the exterior cladding of the house, then traditional methods of exterior wall cladding can be used as a facade finish.
It could be:
- clinker tiles;
- decorative tiles;
- porcelain stoneware;
- block house;
- facing brick;
- siding.
External finishing of OSB boards is not only a decorative element of the facade. It also has a protective function.
This is an additional protection of the facade from wind, rain, snow, temperature extremes and ultraviolet rays.

Protection from wind and moisture is a special film that is attached to the outer wall over the OSB. At the same time, moist air from the house freely escapes, and moisture does not enter the house.
On top of the film, you can mount any material listed above, at your discretion.
Facade tiles allow you to make the walls of a new house beautiful and durable, or quickly restore and insulate an old house. There are 2 laying technologies: wet - on glue, and dry - cladding of a ventilated facade. In this article, we will figure out how to choose the right material for facing the house.
Quick article navigation
Material options
Types of tiles used for facade cladding:
- Porcelain stoneware;
- Facade ceramic (frost-resistant) tiles;
- Clinker;
- Agglomerate;
- Terracotta;
- Front concrete facing tile.
The shape of the edge and surface texture of the facade tiles, as well as its color, are very diverse: from natural tones imitating natural materials to bright saturated colors.
Porcelain stoneware

Porcelain stoneware is created on the basis of a mixture of dyes, feldspar, various clays, sand and mineral additives. The material can be plain, interspersed (salt-pepper type), can imitate marble or granite. Roasting occurs at 1200-1300ºС.
- Do not absorb moisture (water absorption coefficient 0.05%);
- Frost resistance up to 50 cycles;
- Ecologicaly clean;
- High wear resistance;
- The most popular sizes are from 100x100 mm to 600x600 mm;
- Porcelain stoneware for facades is made thinner (from 3 mm) so that it does not create a large load on the walls.
Most often, porcelain stoneware is mounted on a frame using the ventilated facade technology. This allows you to insulate the house and create an optimal microclimate inside.
Ceramics
Ordinary tiles are not suitable for outdoor use. It will quickly crack from frost. But some manufacturers produce special facade ceramics.


Clinker
Clinker tiles are obtained from slate clays, in which there are no impurities in the form of salts or calcium carbonate. Firing at 1300ºС. Production technology - extrusion.

Due to the presence of micropores in the clinker structure, it does not accumulate moisture and does not crack when frozen. In terms of frost resistance, it is ahead of even porcelain stoneware.

In addition, there are clinker thermal panels. This is a clinker tile with insulation. There are several systems of thermal panels. In some of them, the insulation is attached together with the tile. They are assembled as a constructor, inserted into the groove and attached to the wall with dowel-umbrellas.
In others, first a heater is attached to the wall, and then a tile. A special insulation with grooves for each row of tiles is used, which greatly simplifies the cladding.
Agglomerate
Agglomerate - facing pressed tiles for facades, obtained from crumbs of marble, quartzite or granite.

Quartz is the hardest component in the agglomerate. It gives the material strength and increased resistance to abrasion. It is a durable tile often used for cladding commercial facades. In terms of technical characteristics, it surpasses marble, looks beautiful and costs less.

Terracotta tiles
Terracotta is made from kaolin clay. Dyes are not used. Colors - light or red-brown, black. The firing temperature is 1000ºС. Invoice - under a stone, brick, a cut of a tree. It is afraid of moisture and flakes off over time. Fitted with a wet method.


concrete tiles


Cladding technology
Foundation preparation

Facing of facades begins with preparation of the basis.
- Clean the facade of limescale and paint residues;
- Seal all seams and cracks;
- Prime the base;
- Install reinforcing mesh;
- Plaster the walls;
- Prime again.
Dry mounting method
The design of the ventilated facade includes:
- Facade tiles;
- The membrane in which the air space is formed;
- insulation;
- Bearing base made of aluminum profile.
Technology:
- The wall is marked by level. It is necessary to draw a horizontal and 2 verticals. Window and door openings will require an additional number of brackets that are attached to the holes in the wall with dowels;
- Pull the insulation to the surface with dowels-fungi. Elements are arranged in a checkerboard pattern;
- Fix the membrane over the insulation;
- Arrange a frame crate from a galvanized aluminum profile. It is installed in the grooves of the brackets, fastened with rivets;
- Clamps are attached to the profile with them;
- Installation of panels starts from the ground. Facade tiles with metal fasteners, screwed to the profile with self-tapping screws, are recommended.
- The installation step of the fasteners is determined depending on the size of the insulation sheets, tile elements.

wet way
Facing tiles for the facade are also mounted directly to the wall.
- Use a mixer (drill with a nozzle) to prepare glue for outdoor work. Use one that can support the weight of your tile.
- The tile does not need to be soaked, but if its mounting side is dusty, dip it in water before installation. Highly absorbent bases are additionally moistened with water.
- For better adhesion, glue is applied to both the tile and the wall. One of the layers should be made under the comb, and the second on the strip (the minimum layer is stripped off with an even spatula).
- Installation of plates by pressing against the surface to be lined begins with the corners. The thickness of the adhesive after pressing must be at least 3 mm.
- Before the glue hardens, you need to level the tile in a plane and horizontally in level. The uniformity of the seams between the tiles is achieved with the help of plastic crosses.
A day later, the seams are filled with grout. It is selected depending on the type of tile. The wide seams between the tiles are filled with grouting with a semi-dry mixture or with a mortar gun. This must be done carefully so as not to stain the front side of the tile. If it is porous, it will be very difficult to wash it.