Bottle pen holder. Stand for pens with their own hands from the most unusual materials. Sew from fleece or fabric
To maintain order on your home desktop, you need to purchase, or even better, make your own coasters for pencils, pens, scissors and other stationery. A pencil holder will allow you to always keep writing objects at hand, and not look for them in the corners of the bottomless desk drawers. In addition, children can be involved in the manufacture of a pencil box, who will bring something new and interesting to its design. In this review, we will show various stationery stands that you can easily make yourself, you just have to choose the right idea and bring it to life.
1. Stand for pencils made of cut wood.
To implement the idea, it is necessary to prepare a low log cabin of a tree, after which remove its inner part with a chisel and install pencils inside.

2. Pencil from sewer pipes.
We cut sewer pipes of different diameters into small segments with a jigsaw or hand saw. We glue each of the segments in a row on a short thin board (previously, the board, as well as all pipe sections, can be painted from a spray can in shades that combine with each other).


3. Pencil in a vest.
Cut out a triangular piece of “shirt” from white felt, glue it to a can of coffee or canned fruit. Then you take a layer of gray felt, cut out a rectangle from it along the circumference of the can, in front, cut out a triangle according to the size of the pasted white “shirt”, bending the edges and stitching it with threads to the collar area. Stick the "vest" on a tin can, draw a tie with a blue marker on a white shirt or cut it out of blue felt.

4. How to make a vintage style pencil holder.
Paste the tin can with a pink cloth, then tie it around the top, bottom and center with a beautiful lace ribbon. On the end part, glue the pre-purchased accessories in the form of a flower with pearls (sold in sewing shops).

5. How to decorate a pencil holder with buttons.
Method number 1. We take an ordinary small glass jar of baby puree, then string red and white buttons onto a thin elastic band, tie the ends of the elastic band into a knot, and put the resulting composition on the neck of the jar.

Method number 2. On a tin, glue buttons of different sizes (the color can also be any), then paint the product from a spray can in gold or paint in a brick tone, and shade with gold.

6. Do-it-yourself pencil stand decorated with twine.
We take a tin can, cover it with a layer of transparent glue, and wrap it, tightly joining the threads to each other. Finally, a bow can be glued on the front of the product.

7. Pencil from the bark of a tree.
Carefully remove the bark from a dry tree and glue it to a glass or metal jar.

8. How to make pencil holders from toilet paper tubes.
On each tube we put vertical marks, we cut a fringe along them. We apply PVA glue to each petal of the fringe, and glue all the tubes to the cardboard layer. Then, with a marker, draw faces on the front of the stand.


9. Pencils with decorative primer.
We glue a plain sheet of paper on a tin can, which we then paste over with decorative pebbles.

10. Pencil in a marine style.
We take several tubes from paper towels, apply them to the base, cut out of cardboard. We glue each tube with white napkins, forming large folds (you need to glue the napkins on PVA glue). Then we glue the tubes to a cardboard stand, and paint them with water-based blue, yellow and orange paint (you can mix white water-based paint with different colors of gouache, in this case you need to mix white with orange, white with blue and white with yellow). At the end, we glue plastic fish, starfish, shells and artificial algae to the stand, all this can be bought at the pet store.


11. Pencil case.
We cut off the sharpened parts of the pencils, you can cut with a clerical knife or use a jigsaw. We lay the bottom row of pencils on the cardboard tightly to each other, glue each pencil. Then we begin to lay out the walls, place two pencils on the sides and glue to the base, in opposite parts we also glue the pencils, so we continue until the height of the pencil holder satisfies its appearance.

12. Pencil case decorated with burlap.
Glue a piece of burlap on a tin can, glue flowers formed from light linen fabric around the perimeter of the neck.
13. We paste over the pencil stand with wallpaper or kraft paper.
We cut off from the wallpaper or kraft paper a part corresponding to the size of the tin, the resulting part is simply glued to the jar.


14. Pencil in a shirt.
From white felt we cut out a rectangle corresponding to the length of the diameter of the tin, in the center we make an incision of about 2 cm, glue the collar to the can, cut in front, join at the back, bend the collar. We cut off a rectangle from an unnecessary shirt and glue it on a jar over the collar. Glue the buttons on the front and tie a tiny tie from a matching ribbon.

15. How to make a pencil holder from floppy disks.
In four diskettes, it is necessary to melt holes with a hot awl, in each diskette there are 4 holes (two on the sides and two from the bottom), in the lower, fifth diskette in a row we make 8 holes, the awl must be heated over a candle (be careful). Then we form a cube from floppy disks without an upper part, we connect all parts to each other with a flexible wire, connecting its ends in the inner part of the product.

16. Do-it-yourself pencil holder from a shampoo bottle.
We cut the shampoo bottle in half, but not in the middle, but above, the cut line can be smooth rounded or in the form of cones (this will be the hair of the future monster). From the upper unnecessary part, cut out the handles, and glue them at the bottom. From black paper we glue the mouth of the future monster, from white eyes and teeth. You can stick Velcro on the back and fix the monster pencil holder on the wall.
 17. Pencil in vintage style with lace.
We glue satin fabric on a circle of cardboard, glue lace along the edge of the podium. In the center of the circle we glue tubes of different lengths from under paper towels. We decorate them with fabric, lace and artificial pearls. Closer to the edge, we install a mannequin cut out of cardboard, and also decorated with lace, ribbons and beads. In the center we seat the figurine of a bird, and on the other side we put a small photo frame made in a suitable style.

18. Pencil from the catalog.
We divide the flexible catalog into five identical parts, lay it sideways, bend all five parts to the center, in the form of flower petals, gluing them with transparent glue. We go over the top of the pages with a layer of glue so that the pages do not fall apart. In the end, the product can be painted with spray paint, and the unpleasant parts can be decorated with beads or lace.

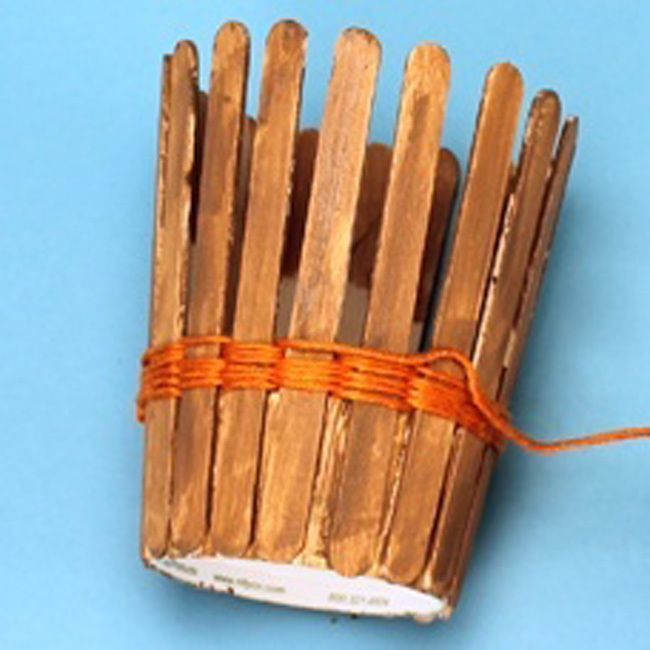
19. Pencil holder decor with ice cream sticks.
We glue the ice cream sticks on two tapes, then glue the resulting picket fence to a tin can. We supplement the product with a wide ribbon tied from the outside.

20. Decor of a pencil holder with a cloth.
We cut out rectangles from dense fabric corresponding to the size of the selected can. Then we decorate each piece with machine stitching with threads of contrasting color. We sew the case along the inside, turn it inside out and put it on the jar.

21. Pencil from a tree trunk.
We saw off a small part from a dry tree with a saw, then with a drill in the upper part of the stump we create many holes, into which we install pencils.

Unusual industrial pencil holders.
We also decided to show various factory-made pencil cases, some of them are really impressive. Below you can see what stylish and unusual stands for stationery are, they are available in the form of: camera lenses, monsters, hedgehogs, balls, Rubik's cubes, imitate stacks of folded paper, garbage containers, etc.


Today we showed you how to make a pencil holder, and more than one! Such beautiful pencil holders will not only bring your workplace in order, but also greatly embellish it. Try to make them together with the children, we assure you, the kids will be delighted.
All parents are familiar with the situation when, after drawing, pencils are scattered around the children's table. Pencil boxes are made of cardboard and usually don't last long. Therefore, in order for the child to have order on the table, you can make an original pencil holder from a plastic bottle.
- Plastic bottle;
- saucer;
- felt-tip pen;
- awl;
- narrow green ribbon;
- needle;
- sticker;
- scissors.
1. Cut off the top of the bottle with scissors or a sharp knife. The length of the pencil is approximately 16 cm, so the height of the remaining part of the bottle must be at least 25 cm.

2. Place a saucer on top of the cut off part of the bottle so that its edge coincides with the edge of the bottle.

3. With a felt-tip pen, we circle the edge of half of the saucer.


4. Cut the edges of the bottle along the drawn line with scissors.

5. We put the saucer again, but now we circle its lower edge with a felt-tip pen.

6. Cut off only one side of the bottle along the line.

7. Bend the valve from above so that the cut edges match. It turned out a box for pencils with a lid.

8. Now let's start decorating the pencil box. First, we glue the cut edges with tape to protect ourselves from cuts on sharp edges. With a heated awl, we make punctures along the edge of the lid.

9. In the same way, we make holes at the bottom of the bottle.

10. We thread a green ribbon into a large needle and “stitch” over the edge along the holes on the lid. You can use any color ribbon if you like.

11. In the same way, we “stitch” the bottom of the pencil holder.
Color a regular bottle with permanent markers for something quick and easy. If you don't want to use paper towels, you can simply draw something on the bottle with permanent markers. The pencil will turn translucent, and the plastic will look like colored glass.
- If you make a mistake, erase the line with a cotton swab dipped in alcohol. Wipe the area you erased dry and continue painting.
Color the bottle with acrylics or spray paint (available at art stores) to make the pencil holder look bright. To make the paint fit better on the bottle, try sanding it with fine-grained sandpaper. First, paint the whole bottle with one color, wait for the paint to dry, and draw something, like flowers.
Decorate a clear or painted bottle with stickers if you want to make something easy. If you don't have a lot of creative materials on hand, you can always stick stickers on the bottle. For example, you can paint a bottle navy blue or black, wait for the paint to dry, and cover it with silver or gold star stickers.
Wrap the bottle with plain, colored, or decorative tape to create a continuous pattern. Separate the end of the tape about 2.5 centimeters long from the roll and press it against the bottle, as close to the bottom as possible. Hold the tape close to the bottle and gently wrap it around the bottle to form a circle of tape. When you get back to where you started, stick about 1.5 centimeters of tape over the beginning of the strip and cut it off. Start the next circle directly above the previous one, or make it overlap the previous one a little.
- If the tape has gone beyond the cut line of the bottle, bend it so that it is inside the bottle and stick it.
Make your pencil holder even more beautiful by gluing buttons or large glitter onto it with a hot glue gun. You can cover the whole bottle with them or just small parts of it. However, it is better to glue buttons and sequins at the bottom of the pencil case. If there are many such decorations closer to the cut line of the bottle, the stand will turn out to be unstable.
- To make the pencil holder more colorful, paint it or cover it with paper towels using papier-mâché technique before gluing on the buttons or sequins.
Wrap the bottle with yarn or twine. Pass a strip of glue around the cut line and press the thread against it. Start winding the thread around the bottle, adding a bead of glue every few inches. When you reach the bottom of the bottle, pass another bead of glue and press the end of the thread against it.
Poke holes near the cut line of the bottle and thread multi-colored yarn through them. Using a hole punch, make holes around the cut line at a distance of about 1.5 centimeters from each other. Thread some yarn into a suitable needle and use the needle to pull the yarn through the holes. So the top of your stand will become more beautiful.
If your bottle is made of PET or PETE plastic, use an iron to straighten the cut line. This should be done after you cut the bottle, but before you start decorating it. To find out what plastic your bottle is made of, turn it over and look at the bottom and around the bottom. If there is a recycling sign with a number inside, then the bottle is made of PET/PETE plastic. Sometimes this sign is hard to see, so look carefully.
- Turn on the iron and check that the steam is turned off. Wrap the heating surface of the iron with a cloth or aluminum foil to keep it clean.
- Press the cut side of the bottle against the bottom of the iron.
- Lift the bottle every few seconds to check the condition of the cut line. As the plastic heats up, it will begin to melt, making the cut line even.
- Turn off the iron and let the bottle cool before you start decorating it.
September 1 is not far off, the time when all children will go to school, and students to technical schools and higher educational institutions, it will be time to gain knowledge. Students spend most of their time in educational institutions, but they spend just as much time at home preparing and doing homework.
In order for the material received in the educational institution to be better consolidated, a comfortable and beautiful workplace at home is necessary. Of course, a desk, a comfortable chair are important, and it is also very important that everything you need is always at hand. A desktop stationery set should cope with this task - a keeper of pens, pencils, erasers, paper clips and other such important little things.
 In this article, the Site news portal has prepared especially for you the best selection of the most original stands for pens and pencils, which you can easily make yourself from improvised materials. You can use a homemade stand for pencils and pens on your own, or you can present it as a gift to your girlfriends or friends, brothers or sisters.
Stand for pencils and pens do it yourself

Necessary materials:

- threads;
- scissors;
- plastic jar;
- wooden popsicle ice cream sticks;
- brush and glue.
Manufacturing:
We cut off the top of the plastic jar so that the bottom remains and a few more centimeters up. Using glue, glue wooden sticks to a plastic jar (see photo).
 Now we twist wooden sticks with multi-colored threads, filling the voids with threads.
 Use threads of different colors, then the pencil case will turn out to be especially bright and unusual.
 You can decorate the finished pencil holder with rhinestones, interesting stripes or buttons.
Do-it-yourself tin can pencil stand
Do-it-yourself stand for pencils and pens from newspaper tubes

Necessary materials:
- newspapers or magazines;
- toilet paper roll;
- glue;
- cardboard;
- double sided tape;
- threads;
- acrylic paints.
Manufacturing:
From a newspaper or magazines, wind the tubes, grease the ends of which with glue so that they do not bloom.
 Glue newspaper tubes vertically onto a cardboard roller with glue. For more reliability, tie them with threads.
 Make the bottom for the pencil case curly from a sheet of thick cardboard (it can be a flower, a leaf) and glue the bottom on double-sided tape.
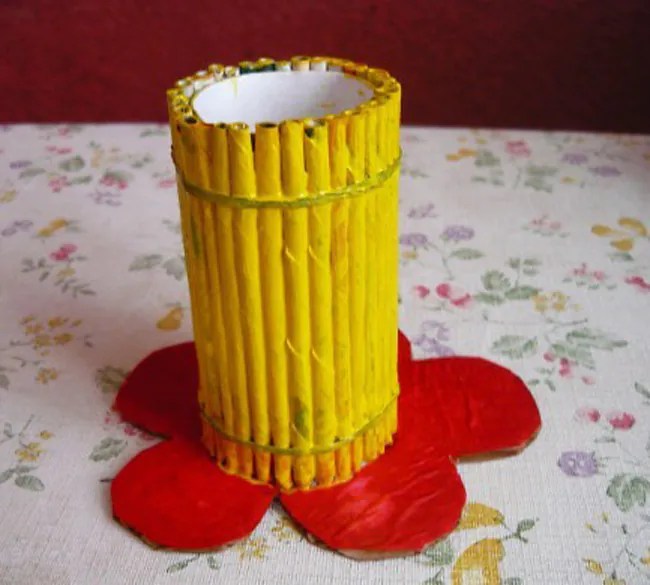 Now you can decorate the pencil holder and the bottom.
 You can decorate a ready-made stand for pencils and pens with the help of various elements - grass cut out of paper, leaves, flowers, etc.

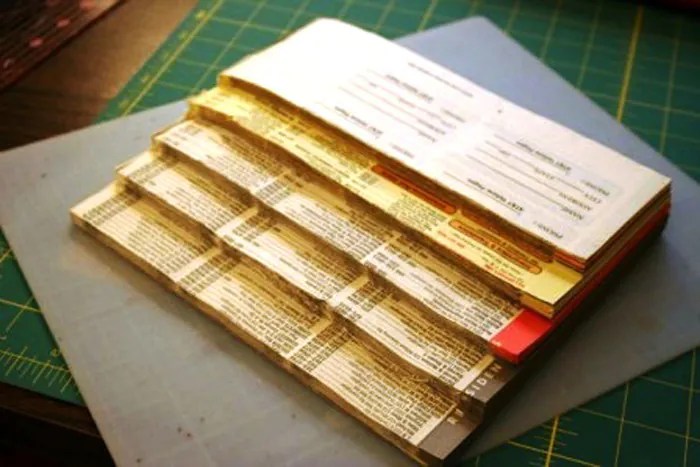
Stand for pencils and pens from the telephone directory

Necessary materials:
- thick book (telephone directory);
- glue;
- acrylic paints;
- toilet paper rolls;
- cardboard;
- scissors or utility knife.
Manufacturing:
We cut the telephone directory and wrap the pages of cardboard rollers, fix everything with glue. Cut out a figured bottom from a sheet of thick cardboard and glue it to the finished structure. Now you can decorate everything with acrylic paints.
 If you cut the telephone directory into pages of different heights (see photo), then you can end up with an original and unusual pencil case, different in height.

DIY gold pencil holder
Can holder for pencils and pens

Necessary materials:
- tin can;
- the cloth,
- glue;
- decorative braid and ribbons.
Manufacturing:
We measure the tin can and sew a cover for it from the piece of fabric you like. Sheaths the fabric with beautiful ribbons and braid. We put on a cover on the jar.
We fill the edges of the cover inside and glue them on the glue.
Mosaic pencil and pen holder

Necessary materials:
- can;
- a piece of foam;
- primer;
- stationery knife;
- acrylic paints;
- glue
- cement mortar, sealant, or putty.
Manufacturing:
First of all, a layer of primer must be applied to a previously cleaned tin from contamination.
 Using a sharp knife, cut out the squares from the foam sheet that need to be decorated with colored acrylic paints.
 We glue the painted foam pieces with glue to the tin, not forgetting to leave gaps between them.
 Now fill the gaps with a primer using a regular sponge. Wipe all the excess and the pencil box is ready.

Do-it-yourself tumbler stand for pencils
Stand for pencils and pens made of thread

Necessary materials:

- can;
- threads;
- glue;
- buttons, ribbons, ribbons and bows for decoration
Manufacturing:
A tin can must be carefully wrapped with multi-colored threads, periodically smearing them with glue so that they do not unwind afterwards.
Now you can start decorating. Decorate the pencil holder with buttons, beads, decorative ribbon and rhinestones.
The order on the desktop usually does not linger for a long time either in children or in adults. Proper organization of space and workplace will help adults organize the workflow more efficiently and teach children to be organized and organized. A glass for pens and pencils will help you organize your writing materials.
How to store writing instruments
In order for the desk to be in order, it is necessary to purchase or make a glass holder for pens, pencils, scissors and other stationery items. Such a stand allows you to keep the necessary office nearby, and not look in drawers, on shelves. A do-it-yourself glass for pens and pencils will appeal to children and motivate them to keep the work area in order. There are many different ideas on how to make such a stand yourself. Parents can only decide on the material and model and bring it to life with the child. By the way, not everyone knows the name of the glass for pencils and pens. Many people call it that - just a "glass", but the name "pencil case" or "desk organizer for office" would be more appropriate.

How to DIY
Making a glass for pens and pencils with your own hands is easy. For manufacturing, you can use the most diverse and unexpected decor ideas and materials. Most of these crafts do not take much time and are not financially expensive, because it is interesting to decorate a glass with materials that are almost always available in many homes. A pencil can be made from plastic tubes (plumbing), tin cans, toilet paper sleeves, wood, glass jars, flower pots. Of course, the appearance of a tin can or a paper sleeve is not very pretty, the raw materials are only blanks and need to be decorated.
What you need
To create a glass organizer you will need:
- raw materials (cans, bushings, material chosen for decoration);
- transparent glue;
- scissors;
- glue gun;
- threads, needles;
- ruler.
Some materials may also require additional tools.

Wooden pencil case
A glass for pens and pencils can be made from natural wood. To do this, you will need a wooden frame of a small height, in which you should remove the inner wood (with a chisel), giving it the appearance of a glass. The preparation is interesting and original. It does not need extra decor, as the tree itself is an interesting natural finishing material. You can also use the bark of a tree by pasting it over a tin or glass jar. Such a pencil holder will also look very unusual and natural.

Tin can decoration
You can make a glass for pens and pencils yourself using cans from coffee drinks and conservation. Such material is rigid, durable, and the decor falls on it easily and holds well.
- Knitted case - you can make a case from threads using the simplest knitting pattern, which will perfectly decorate a brutal tin can. For ease of use, so that the bundle does not fidget, it can be glued to the jar.
- Rope (twine) is another interesting way to decorate a glass for writing instruments. To do this, we wind the rope or twine on a jar pre-lubricated with transparent glue (you can use a glue gun). In this case, the threads should be tightly joined so that they adjoin each other without gaps. To give a complete look, you can decorate the product with a bow.

- Fabric - a rectangle should be cut out of dense fabric, clasping the jar in diameter. Then sew the inside and put on a jar. If desired, the decor can be diversified by gluing beads, pebbles, bows. These vintage-style pencil cases look very impressive, covered with fabric in combination with lace and satin ribbon.
- Burlap - a rough material in combination with a strip of linen or chintz fabric and lace will make a tin can a nice table and room decoration. In this case, it is better to glue the burlap to the bank. And then decorate.
- Wallpaper, self-adhesive, scrapbook paper - to give the appearance of a tin can, you can use any pieces of wallpaper, self-adhesive film and scrapbooking paper. If the surface of the jar is corrugated, the pattern may crumple somewhat, so it is better to choose smooth tin cans to make a glass for pencils and pens by yourself.
Other unusual options
Also interesting ideas are:
- Bushings - do not rush to throw out the tunnels from under the paper towels and toilet paper. They are perfect for storing pencils and pens on your desk. Decoration options can be different: they can be painted, painted or pasted over with corrugated paper.
- PVC tubes - a whole organizer can be made from plumbing tubes by gluing several pre-cut bushings onto the board. Before that, they can be decorated with a cloth, beautiful pebbles or spray-painted.
- From pencils - an interesting idea is to decorate a jar or sleeve with colored pencils. They should all be equal to the height of the jar. Each pencil should be glued vertically to the jar, pressing firmly against the previous one. You can tie a ribbon around.
As you can see, everyone can make a glass for pens and pencils if they wish, and ideas can be very diverse. A DIY cup for office supplies will save you money and be a cute little item to help you keep organized.
A pencil is one of the useful attributes on the desktop, which helps us keep our workplace in order and quickly find writing utensils. Quartblog has prepared for you some simple ideas on how to make pencil boxes with your own hands from what is usually available in the house. In addition, these crafts can be made with the child. Let the original pencil holders become an additional decorative element in your interior!
From jars
This is the most popular way to make pencil cases. Jars can be any: glass, plastic, tin. They can be pasted over with multi-colored paper, fabric, braid, ribbon, lace, painted with acrylics - it all depends on your imagination!


From cardboard and paper
Another easy way to make a pencil holder is cardboard or colored paper. You can use cardboard toilet paper rolls, shoe wrappers, old magazines or newspapers.


From plastic bottles
Use plastic bottles for shampoo, cream and other cosmetics. For example, funny monsters can be cut out of multi-colored bottles.


From natural materials
More precisely, from logs and twigs. Here you will need a man's help to cut out a suitable stump and drill holes in it for pencils. You can also take several branches of the same height and tie them with twine around the base.


Clay
Clay is a fertile material for creating pencil holders. You can either take self-hardeningpolymer clay and wrap it around some kind of base, or come up with an original design and mold it from sculptural clay or plasticine, and then paint it with paints.


From pencils
From papier-mâché
The papier-mâché technique allows you to create three-dimensional figures from shredded paper mixed with glue: use newsprint, and then color the pencil box with paints.

Crochet or knit
If you know how to knit, and even try to introduce your child to knitting, then you can easily knit a warm multi-colored cover on a base jar.


Sew from fleece or fabric
Soft and cozy pencil cases can also be made from fleece and fabric. Attach eyes, nose and ears to such coasters - you will get funny pencil animals for the children's room.


Decorate with twine, thread


Decorate with beads, buttons
If you like small and painstaking work, you can glue the pencil holder with small beads, pebbles, buttons.
The order on the desktop is an excellent indicator of the organization and orderliness of the thoughts of the person who works on it. Now on the Internet you can find many options for organizers for desktops. But it is much more pleasant to surround yourself with unique things that suit you. Everyone can make a pencil cup quickly and easily with their own hands and decorate their table with it.
It just takes a little patience and a little imagination. Material for creativity can be very diverse, sometimes it can be found just at hand.
We assemble a simple do-it-yourself pencil cup
For example, make a cup for pencils out of paper. But for such crafts, they are also suitable:
- flower pots;
- glass or tin cans;
- plastic bottles;
- knitting yarn;
- cardboard tubes;
- pencils or markers;
- modular origami.
Modular origami - the creation of three-dimensional objects from paper elements - modules. Using this technique, you can assemble a toy for a child, a desktop decoration, or a cup for pencils. Beginners should not immediately take on complex work and buy special paper. For training, newspaper sheets or magazine pages are quite suitable.
Craft materials:- sheets of paper in two colors (red and yellow here);
- ruler;
- scissors;
- cardboard;
- glue;
- slate pencil.
Using the cup as an example, you will learn the basics of creating paper modules for three-dimensional origami, connecting them into a cylinder, experimenting with shades of paper.
The work is painstaking, you need to be patient, but the result is worth it.
First you need to prepare the paper from which we will make the modules.
We turn ordinary paper into a module.Cut out 176 pieces of paper rectangles. We fold them as shown in the figure.

When all the modules are assembled, you can begin to collect the first circle. To do this, we thread two modules with sharp ends into the third. The first 8 rows will be assembled from modules of the same main color.
We create a circle of 24 modules. For beginners, it is not an easy task to correctly make and connect the first circle. Parts can be glued together. Then they won't fall apart.

In the 9th row, we begin to introduce modules of the second color, according to the scheme: 1 yellow module, 5 red ones, and so on in a circle.
Gradually reduce the number of red modules between the yellow ones. Similarly, we arrange all sides of the stand.

To decorate the bottom of the cup, you need to carefully turn its bottom over and seal it with another row of modules.

If desired, you can cut out a circle of cardboard, suitable in diameter, and glue the cup on it.
Making a cup for pencils out of paper: step by step instructions
Modular origami is a very beautiful and painstaking art. But there are times when the resource of time or paper is limited, but there is a desire to decorate the desktop with a cute and original stationery stand. A master class on creating a paper pencil cup will come to the rescue.
To create a cup, you need only one sheet of paper, but you should be extremely careful, the paper is very easy to wrinkle. So that your craft does not lose its appearance during work, you need to assemble the glass with light movements.
We make a square from a standard A4 sheet. To do this, take it by the corner of the short edge and bend it diagonally. Cut off the rest.
We bend the sheet diagonally and horizontally. In the further assembly, we will focus on the resulting lines. We fold the paper along the horizontal fold line so that we get a triangle.

The upper corner of the triangle must be bent about two centimeters, drawn along the fold line with a fingernail and straightened back to its original position.
We bend the lower right corner of the triangle to the left to the line outlined above.
We fold the lower left corner of the craft to the right to the same mark. Next, fold the left fold diagonally to the left again. We hide the lower corner down, between the layers of the product.
We carry out similar manipulations on the other side of the craft. Carefully smooth out the finished craft. Turn over and open the glass from the bottom. Use your fingers to smooth the bottom of the cup from the inside.
Our stand is ready.
Video on the topic of the article
You can find all the details and even more options for creating a cup for pencils by watching a video of do-it-yourself master classes.
Convenient organizers suitable for your own interior, with all the variety in stores, are not always easy and quick to find. But it is so important to collect all the pens and pencils in one place! A DIY stand is the solution to this small but annoying and annoying problem. As soon as once again you find yourself looking for at least one writing object, stop and look at what is at home - you will surely have a lot of suitable materials at hand, from which a nice stand can easily be assembled.
Do-it-yourself self-adhesive pen stand
You can even build a coaster out of paper - and everyone at home definitely has this material. And if self-adhesive paper is also lying around - at least for decor, at least for creativity - then it will turn out gorgeous.
Master class step by step:
- Cut out a paper square.

- Stick a self-adhesive on top, cut off the excess.

- You need 5 such details. On each of them you need to make a lot of folds, we start:

- We make the folds along the dotted lines, but you don’t need to draw them!

- Bend the corners. Bend inward along the red lines.

- Like this:

- Turned over - and again fold the sides to the center:

- We insert the resulting pockets one into the other:

- This resulted in a triangle:

- Make the same from the rest of the squares.
- In the white sectors, stick stickers to your taste - or rhinestones, as you like.

- Connect the two parts with a stapler to each other:

- Glue the junction on the outside with second glue:

- This is what should come out at the end if you connect all the parts, as shown above:

- The bottom is just made of cardboard - glue the contours of the workpiece from below with glue and press something heavy against the cardboard sheet.

- After drying, trim the edges:

Different do-it-yourself pen holders: ideas with photos and descriptions
From a tree. Such material offers many options for a desktop organizer. From a piece of thick branch with a hole drilled inside:

to original solutions:

From a bottle. For example, from shampoos and shower gels. They are so bright and cute that you can not even decorate them in any way. Or carve funny faces into them! From plastic bottles, there are generally a lot of options, the main thing is the base, this is the bottom of any bottle, decorated with any available methods.

Several bottoms can be fastened together to make a functional stationery organizer!

And there is a very fun way: to get a color on the jar, pour paint directly into it, screw on the lid and shake it. Once the paint is dry, you can move on!

From disks and floppy disks. They are almost out of circulation, so you are probably looking at them for a long time to throw them away. Although they can also find an alternative use, giving the so-called "second" life.

From cardboard sleeves from toilet paper. You just glue the sleeves with some beautiful paper and glue them together into an interesting composition. You can crop some of them to make it more beautiful:

From newspaper tubes. You will see from your own experience how malleable and pleasant the material is - depending on how it is then painted, the appearance will look, for example, if it is brown - it takes on the appearance of a wicker straw.

From pencils or felt-tip pens. It happens that you buy a set of pencils, but they turned out to be of poor quality. Throw away? It's a pity. And it can't be used. So assign them to another "service": let them be a stand for other writing accessories!

From cans. Oh, this is generally the most functional that can be! Combine jars of different sizes, connect them together, decorate with fabric, beads, paper, decoupage, threads, rope, and you never know what else!

Master class on a pencil case from a tin can
I would like to dwell on the last option - from metal cans. I must say that such a stand is almost eternal, so it is best to decorate it carefully and reliably. By the way, you can take a glass jar, but there is a risk of dropping it and breaking it. Measure all the dimensions of the jar and proceed.
- You need two rectangular pieces of fabric of different colors, the length of which is equal to the diameter of the jar plus a 1 cm seam allowance. Also cut out two circles equal to the circumference of the bottom. Connect each of the segments with smaller edges and sew the bottom.

- Make blanks of those details that will decorate the stand. They should be voluminous - then you will stuff them with cotton wool or padding polyester.

- Mark the places where the eyes will be placed with cross-shaped incisions.

- Turn the blanks inside out and fill with cotton wool.

- Slightly bend the edges of the cutouts for the eyes and drop glue (instant) there, insert the eye a little inward so that its edges are inside. Hold it down.

- Sew the bottom of the craft with a hidden seam.

- Make a soft “wrapper” on the jar out of synthetic winterizer - this is not necessary, but it will be better.

- Put one of the stitched blanks on the jar:

- Insert the second piece inside. Please note that it should not be turned inside out, i.e. seams out! And it is better to coat the jar with glue before that.

- Sew one fabric to another with blind stitches.

- Sew the animals (or something else, for example, flowers) to the jar:

- You can add more leaves!

Be sure to watch step-by-step videos with unique MKs!
Everyone knows that you can create interesting and useful crafts from empty plastic bottles. There are many ideas: they can be turned into vases, candlesticks, flower pots and even lampshades. September is just around the corner, so it's time to start preparing for the new school year.
Getting ready for school is important. Parents will have to buy a backpack, a pencil case, notebooks and stationery, the catalog of which includes not only paper clips and pens, but also desk accessories. Let's see where you can save money, and that is why the topic of today's post will be making do-it-yourself pen and pencil holders from plastic bottles. You are ready? Get to work!
First project
You will need:
- Plastic bottles,
- Awl,
- Scissors,
- Yarn.

1. Cut a plastic bottle in half and leave only the bottom.
2. Using an awl, make a series of holes at the top edge of the resulting cup.

3. Use a needle to thread woolen thread through these holes to decorate our homemade pen and pencil holder.

Second project
What do we need:
- Plastic bottle,
- thick awl,
- Oh screw,
- Small bolt and nut.
First of all, you need to cut the bottle into three parts, as shown in the photo.

Now you need to attach the cap to the bottom of the bottle. To do this, using an awl, it is necessary to pierce the plastic and thread the bolt into the hole.

If you did everything right, it remains to take the top of the bottle and screw on the cap, and our do-it-yourself pen and pencil stand is ready to use.