Rules for distributing sewer pipes in an apartment. How to sewer in an apartment without the help of a master? Revision and dismantling methods
A major overhaul is never complete without replacing the sewer system. But the prices for repair specialists force them to postpone these works for the next years or take up the matter on their own. Without prior experience, installing sewer pipes with your own hands will be very difficult, but the tips and tricks from our article will help you install them at a height.
Beginning of work
One of the main components of any apartment is sewerage. This system in the room is non-pressure and performs the function of removing general wastewater. They must be delivered from the apartment to the common riser of the house. That is, to perform their immediate tasks, the sewer must be at a certain slope. At the same time, it is necessary that the angle of descent allows you to set the direction of the wastewater and allows them to move quickly.

It is necessary to start work with the layout of the sewer system. If the owners of the apartment simply arrange a major overhaul with the replacement of old pipes, then the task becomes much easier. If you moved into a new building, and there is no sewerage in it, then it will be necessary to address the question of how the sewerage is arranged in an apartment building. Neighbors or housing and communal services workers can help in this matter.
What steps need to be taken during the planning stage? First of all, you need to decide on the future locations of plumbing and other important parts of the bathroom. Secondly, it is necessary to calculate the correct installation angle of the sewer pipes. Thirdly, you need to choose the right materials for repair work.
Material selection
Do-it-yourself high-quality sewerage wiring in an apartment largely depends on the right materials for work. Of course, the most important detail will be the pipes. Previously, this material had a very narrow choice. Cast iron was considered the most popular sewer pipe, but in our advanced century, a lot of new variety has appeared. Now, most often, owners use plastic pipes in their apartments:
- Polyethylene - their main advantage is low price. But we do not recommend dwelling on this option, because apart from the cost, pipes have no other advantages. They are highly susceptible to deformation, have low heat resistance and are rather unreliably sealed. Only "alternative" manufacturers continue to supply polyethylene pipes for sale. But after all, doing a sewer repair that will last a couple of days is not profitable and stupid.
- PVC - average cost. The hydraulic resistance of these pipes is considered the smallest. Between themselves, they can be connected using dichloroethane glue. But there are also disadvantages. First of all, limited heat resistance (up to 80 ° C), low strength and resistance to chemicals. Cleaning of PVC pipes is carried out exclusively with a plunger or an ultrasonic emitter.
- Polyisopropylene - one of the most expensive pipes at the moment. It does not have as smooth a surface as PVC, but is otherwise ahead of other types of sewer pipes. Withstands temperatures in excess of 130°C, so strong and resistant that it can withstand mechanical and chemical cleaning.
In addition to pipes, it is necessary to purchase material for their connection. The best option would be silicone grease. It was created intended for the installation of sewer pipes. Using silicone grease, the owner will be able to complete the repair work as soon as possible, and also reduce hydraulic resistance. If your choice fell on polypropylene pipes, then you need to consider that special cuffs are required for their installation. If they are unsuccessfully joined, the pipe will deform and create stress in this part of the sewer due to sudden temperature changes. But with the help of silicone grease, this can be avoided.

Calculation of the angle of inclination
As already mentioned above - the selection of the angle of inclination for the sewer pipe is a very important step. If the slope is too small, the wastewater will not be able to be delivered to the right place, and if it is too large, the water will leave quickly, and the contaminants will attach to the walls of the pipes, which will create permanent blockages. Therefore, there are well-defined limits of values. The minimum for a pipe with a diameter of 5 cm will be an angle of inclination of 3 cm / m, 11 cm - 2 cm / m, 16 cm - 0.8 cm / m, 20 cm - 0.7 cm / m. The maximum does not depend on the diameter of the pipe and is 15 cm / m (an exception will be options with a length of more than one and a half meters). A right angle for sewerage becomes possible with its vertical arrangement.
It is rather difficult to maintain the angle of inclination in the apartment with your own hands, since it is necessary to take into account not only the parameters, but also the features of the sewer pipes. Therefore, at this stage of work, it is better to take the help of a specialist.
Scheme of the sewer system
With the usual replacement of the sewer with a newer one, the stage with the scheme disappears by itself, since it is enough to remember the location and mount it according to the same principle. But in cases where there were problems with old pipes or they are completely absent in the new room, the quality of this item will be the main guarantee of a job well done.
The scheme for connecting plumbing fixtures should include the following items:
- rooms in which the work is supposed to be performed;
- in each of these rooms we designate the location of the details of the sewer system (it is imperative to indicate the dimensions of the elements and their distance from the walls). Moreover, the details are not only bathroom appliances, but also complete wiring;
- location of all fittings and service elements;
- the place where the central sewer riser is located.
After, it is advisable to give the drawn up scheme to specialists to check its correctness (the cost of such a service will not be too high).
Dismantling of old pipes
After all the previously performed actions, you can proceed directly to the repair work itself. If the house previously had a sewer system, then the first thing you need to do is get rid of it, that is, dismantle the old pipes. Relations with neighbors will play an important role at this stage. To do the dismantling yourself, we perform the following steps in turn:
- We select the places in the walls in which the pipes are sealed. You can choose another way to solve this problem, but the main thing is that the pipeline be "freed" from the walls.
- All bathroom appliances located in such rooms as the kitchen and bath are eliminated, and the rooms themselves are freed from unnecessary things.
- In places where new parts will be installed, draw contours on the surfaces with a pencil.
- We agree with the neighbors about turning off the water for a certain time.
- We block the riser on the floor.
- You will also need to remove the toilet bowl and flush barrel in the toilet.

- We disconnect the wiring of the sewer from the riser. In order to complete this process, it will be necessary to cut the pipe in two places, the distance between them should be within 12-15 cm. After that, we drive a wedge into the cut, which is located further from the riser. The last step is to disconnect the entire pipe and break off the cut.
- We drill holes along the previously induced contour (or you can beat the contour with a chisel and hammer) and remove the rest of the pipe. At the same time, it must be remembered that cast iron is quite fragile, and therefore it is necessary to perform actions very carefully.
- We proceed to clean the internal outlets of the pipe and toilet bowl. Next, we plug them tightly with unnecessary rags.
- We open the riser and supply water, which we inform our neighbors about. The main thing is to warn them, after what time you will have to start working again.
- Next, we disassemble the pipeline, starting from the far end.
Installation work
After removing the old pipes, we proceed to installation. There are two types: rough and fine. Today we will consider the second option, in which the installation is carried out starting from the riser. The basic rule of this type of installation: the size is adjusted not to the next, but to the previous sewer pipe. If you do the opposite, the wiring simply will not hold.
The installation instructions for sewerage in an apartment are as follows:
1. The first step is to make the transition from a cast-iron pipe to a plastic one. To do this, you need to install a special cuff. It is located in the outlet of the riser.
2. Having fixed the cuff in the 1st section of the sewer pipe, we check whether the mounting pipe is fixed.
3. Let's move on to cropping. This must be done carefully, respecting the dimensions.
5. We finish the installation using a sealant;
6. We collect the remaining pipeline behind the pipe sections, using the same principle.
7. To install the riser, you need to fit the toilet pipe exactly to the size, and then put it on the sealant, and install the toilet bowl back.
8. As soon as the sealant has completely hardened, it is necessary to check for sewage leaks, make it soundproof and install a water seal.

Many are interested in whether a water seal is an important detail in the installation of sewers. Without it, the pipes, of course, will work, but its installation is necessary. The purpose of a water seal in the sewer system is to prevent unpleasant odors. Therefore, if you do not have a desire to hear the stench of the sewer - do not skimp on this detail.
Mounting notes
Observing all the steps for installing pipes, the owner of the apartment will be able to independently install the sewer system. But sometimes these repairs become too heavy to carry out. Therefore, we found useful tips for installing sewerage in an apartment from real professionals:
- be sure to wear protective clothing before proceeding with the installation of pipes;
- so that there are no problems with installing the cuff, lubricate it with liquid soap. Then the part will be much easier to enter the pipe cut;
- to be more confident in the reliability of the connection of the system, before installation, lubricate the ends of the pipe with glycerin grease;
- if you do not live on the top floor, then it is not recommended to replace the riser;
- socket connection of pipes is carried out using rubber seals.

Joint sealing
To perform sealing, you will need to perform the following steps:
- choose the right sealant. To mount sewer pipes, you need to purchase neutral, silicone, and also polyurethane;
- it is necessary to process each of the plastic gaskets. Do not apply sealant in a thick layer, this will only worsen the quality of work. Also, do not forget to install rubber gaskets in the couplings;
- then you will need to apply sealant to the surface of the mounting pipe and to the outer wall of the mating sewer pipe;
- pipes are fixed in couplings;
- we wrap the resulting joints with cling film and level the sealant, without pressing hard, with the help of any tool (trowel, brush, roller, etc.);
- The film should remain at the joints until the sealant has completely cured.
After complete sealing of the sewer, you can start using it. But first you need to check the installed system for leakage.

Checking for leaks in the sewer system
Leak testing is a mandatory step. If you skip this process in the future, the sewer can simply break through and flood all the neighbors from below. To check for the presence of leakage - fill the full bath. Next, you need to open all existing taps in the room and remove the plug from the bath. If everything has leaked out and no puddles have appeared, you can sleep peacefully, the sewerage system is made at the highest level.

Conclusion
By adhering to the rules for installing pipes and the tips described in the article, you can easily and easily make a sewer in an apartment with your own hands. The main thing is to carry out all the processes in good faith and remember that the comfort of housing will depend on the quality of the completed system. If, after reading the information provided, you still have questions, we recommend that you watch the video on how to make a sewer in an apartment yourself. It is located below:
When planning a repair, which includes the replacement of sewer pipes, the transfer or installation of additional plumbing fixtures, you need to clearly understand how the sewerage system works in an apartment building. Without understanding how the system works, it is extremely difficult to avoid mistakes during installation. And such errors are usually expensive, because the only way to eliminate them is to completely redo the repair.
I must say that the sewerage device in the apartment is not particularly difficult. At least this sewage system is simpler than plumbing. The task of the sewerage system is simple: it is required to transport water from the water intake point (sink, washing machine, shower cabin, etc.) to the riser.
Consider how sewerage is designed and assembled in an apartment building, as well as the norms and rules for performing these works.
Sewerage device in an apartment building
In houses that were built according to standard projects in the 60-90s of the last century, the layout provided for the close location of the bathroom and kitchen, therefore, the sewerage system of any multi-storey building is basically the same.
As a rule, the wiring starts under the kitchen sink, then passes through the bathroom and toilet, where it crashes into a common sewer riser that runs through all floors. The riser has access to the roof, this is necessary so that the ventilation of the sewer in an apartment building can function normally.
The basic principles by which the system is mounted:
- The function of the intra-apartment sewerage is the delivery of water from plumbing fixtures to a common house riser.
- The system works on the principle of gravity, the creation of additional pressure, as a rule, is not required.

- In order for water to move without delay, pipes should be placed at a certain angle. The angle of inclination is determined by building codes.
- The slope must be maintained along the entire length, otherwise, blockages will often form in certain areas (especially in the places of turns).
Optimum pipe angle
Even small children know that water cannot flow uphill, therefore, when organizing gravity sewerage systems, it is very important that the end of the pipe at the reception is located higher than the tie-in to the riser. In addition, care must be taken that the slope is uniform along the entire length of the pipeline.
When the sewerage scheme of an apartment building is being designed, it is known that the lowest point of the pipeline in each apartment has a certain position - this is the place where the pipe is inserted into the common riser. As a rule, this point is located at a small distance from the floor slab.
Therefore, to solve the problem, it is necessary to correctly determine the height of the opposite end. To what height should the upper part of the pipeline be raised? This value is determined by two parameters:
- diameter;
- Length.

In building codes, the following values \u200b\u200bare adopted:
- When using pipes having a diameter of 85-100 mm, the slope should be two percent.
- For a smaller diameter (40-50 cm), a slightly larger slope is needed - three percent.
Advice! In practice, this requirement is met as follows: for each meter of a pipe with a diameter of 50 mm, the slope will be 3 cm. That is, if, for example, the sink is located two meters from the riser, then the upper end of the pipe must be raised relative to the entry point into the riser by 6 cm.
But can the sewerage scheme in the apartment function normally if the slope of the pipes is made more than recommended? It would seem that an increase in the angle of inclination should benefit the operation of the sewer system. Actually this is not true. If only pure water got into the sewer, then increasing the angle of inclination of the pipe would make sense.
However, contaminated water is sent to the sewer system. For example, grease, small particles of food constantly get into the hole in the kitchen sink. All these contaminants have a "tendency" to settle on the walls of pipes, forming blockages. In order not to have to clean the sewer system weekly, the sewerage device in an apartment building is made according to the principle of self-cleaning pipes.

In order for water to be able to wash off plaque from the pipe walls, it must move at a certain speed and fill a certain part of the pipe diameter. To ensure this condition, the optimal slope of the pipes is used.
Advice! In order for the pipes to be self-cleaning, two types of pipe laying are used in apartments: at an optimal angle (2-3% depending on the diameter) or vertically, that is, at an angle of 90 degrees. The latter option is used when the optimal angle of inclination does not ensure that the pipe rises to the height of the device connection point.
What devices can be connected?
In modern apartments there are appliances that do not need to be raised above the floor in order to connect to the sewerage system. This is a dishwasher and washing machine.
Since these household appliances are equipped with pumps that supply water under pressure, the connection points for these devices can be located at any convenient height. Thus, machines for washing and washing dishes can be placed at any distance from the entry of the pipeline into the riser and at the most "underestimated" sections of the system.
sewerage scheme
Plumbing fixtures are usually connected to the sewer system. Although there are exceptions. For example, a water heater and a heated towel rail do not form sewage during operation, so they do not need to be connected to a sewer pipeline.

Most often, do-it-yourself sewerage in an apartment is laid according to the standard scheme:
- The sewer riser is supplied with a cross, which has three outlets: two for connection with a diameter of 50 mm, and one for a hundred-millimeter.
- The main line, having a diameter of 100 mm, is used to connect the toilet.
- The first 50 mm line is used to connect plumbing fixtures located in the bathroom - a shower cabin, a bathtub, a washbasin, etc.
- The second fifty-millimeter line is used to connect appliances located in the kitchen. As a rule, this is a sink and a dishwasher.
- The remaining pipes of the system are branchings leading from the main highways to the devices. The connection sequence is determined by the location of the device. The farther away the fixture is, the higher it should be in relation to the injection point.
Advice! In apartments of a large area, two sewer risers can be installed. In such projects, the kitchen and bathroom facilities are usually located at a distance from each other.
Sewerage repair in the apartment
Since the eternal equipment has not yet been invented, sooner or later each owner will be faced with the need to change the sewer pipes. During the overhaul, the sewerage in the apartment can be replaced with your own hands.

Pipe selection
Today, rarely does anyone install cast-iron pipes in an apartment; most owners prefer plastic. Suitable for sewers:
- Polyvinyl chloride (PVC).
- Polyethylene (HDPE).
- Polypropylene (PPRC).
Advice! There is no fundamental difference when using the listed pipes in an apartment, so you can safely purchase any of the varieties.
Pipe assembly technology
The technology for connecting plastic pipes is extremely simple:
- Each pipe on one side has a coupling equipped with a rubber sealing ring.
- Connecting parts (fittings) have the same couplings.
- For docking, it is necessary to insert the smooth end of the pipe (without a coupling) into the coupling of the fitting part or other pipe. The o-ring seals the connection.

- It is recommended to first drive the pipe to the stop, and then move it a centimeter (no more) back. Such a trick will create a damper gap necessary to compensate for linear expansions.
Difficulties of redevelopment
When performing redevelopment, sometimes it becomes necessary to transfer the sewerage in the apartment. For example, if there is an expansion of the bathroom by attaching a corridor area to it, or if the kitchen is transferred to the room.
In this case, it is far from always possible to place the devices so that the water can move by gravity. To solve the problem, it is recommended to use special pumps for sewage.
Exploitation
All residents should know how to properly use the sewer. If households violate the rules for using the sewer, you will often have to clean the pipes, as blockages will form constantly.
The need to urgently clean the sewer, as a rule, arises if large debris has entered the system, for example, a plastic bag or a rag. In this case, it will be possible to clean the sewer only mechanically using a cable.

But regular cleaning to remove deposits of grease and soap on the pipes can be carried out using chemicals that are sold in the departments of household goods.
So, the scheme of intra-apartment sewerage, which is equipped with residential multi-storey buildings, is not particularly complicated. The main requirement for design and installation is the observance of the optimal slope of the pipes, that is, the pipes must be laid at a certain angle. Therefore, the problem of how to conduct sewage in an apartment can be successfully solved by every home master.
If it is impossible to fulfill this condition (for example, during redevelopment), forced sewerage in the apartment will help to solve the problem, that is, the installation of pumps that will supply effluents to pipes under pressure.
As a rule, sewer pipes that have become unusable cause a lot of trouble to the owners of the apartment and their neighbors. Few people like constant leaks and an unpleasant smell in the living room! Of course, you can turn to utilities for help, but in this case you will need to pay a decent amount of money to specialists. The topic of this article is the installation of sewers in an ordinary city apartment. How to calculate the required amount of materials? How to prepare the tool? How to dismantle the old sewerage and install new pipes? All this is our material.
If you feel the strength and desire to repair the sewer yourself, we suggest using our instructions. In the end, installing a sewer with your own hands is not such a laborious process, and every owner who knows how to handle a tool is able to mate with this work.
So, first you need to prepare the necessary material and tools.
Installation of the sewerage system: calculation of materials
What material will you need? First you need to calculate how many points of water intake in your apartment. Let's take for example a standard sewerage wiring diagram: a toilet, a bathroom sink, a bathtub, a kitchen sink and a washing machine. Perhaps you have additional plumbing fixtures, such as a bidet or dishwasher, in which case they also need to be included in the scheme.
Now you need to draw a diagram of the future sewage system on paper, specifying the distances between the devices. This will make it much easier to count all the angles, tees, pipes and cuffs (see Fig. 1).
The installation of a sewerage system has its own subtleties that must be taken into account even at the stage of purchasing materials. So, the following points are important to us:
- pipe diameter (for a toilet, a pipe with a diameter of 100 mm is needed, and for other appliances - pipes with a diameter of 50 mm);
- the diameter of the siphons on the bathroom, sink, etc. (corrugation on siphons can be 50 mm, 40 mm, 32 mm in diameter; corrugation on a washing machine with a diameter of 20-25 mm);
- the need to raise the sewer pipe to drain from the washing machine by 500 mm from the floor.
Thus, you need to put a rubber cuff on each siphon, for example 50/40, 50/32, 50/25. For the toilet, it is better to purchase a corrugation, this will simplify the task. To connect a PVC pipe and an old cast-iron pipe, you will need a transition cuff with a diameter of 126/110 mm. Finally, it is advisable to purchase a silicone sealant, which will greatly simplify the installation of the sewer system.
We recommend buying sewer pipes and accessories from the same manufacturer. For products of different brands, joint diameters or colors may not match, which creates some inconvenience in installation and operation.
Also, pay attention to the stiffness of the pipes. High-quality sewer pipes should not bend and deform.
Sewer installation tool
We turn to the selection of the tool necessary for the installation of sewers. You will need:
- hammer drill or impact drill
- grinder (for the installation of a new sewer, you can do with a hacksaw, but it is rarely possible to dismantle an old cast-iron sewer without the help of a grinder)
- small chisel
- various small tools (screwdrivers, pliers, hammer, adjustable wrenches, etc.)
A mounting gun is ideal for working with silicone sealant. However, it is not necessary to buy it for a one-time job. Sealant can be squeezed out with a hammer by inserting its handle into the tube.
Dismantling of the old sewer
Having prepared materials and tools, we proceed to the dismantling of old sewer pipes.
- Turn off the water supply in the apartment.
- Disconnect the water supply hose from the drain tank. To do this, you will need an adjustable wrench or a 22/24 open end wrench.
- Dismantle the toilet. Unscrew the fixing bolts with which the toilet is attached to the floor.
- Remove from the bathroom all plumbing devices that may interfere with you: sink, washing machine, bidet.
- Now you can break the old sewer. Pipes that are far from the riser can simply be broken with a hammer. Cast iron is a rather brittle metal and breaks easily.
- Dismantle sewer pipes that are dangerously close to the riser. Here you need to be especially careful. As a rule, a tee is embedded in the riser, from which the sewerage is distributed throughout the apartment. It is critically important not to damage the socket (Fig. 2) of this very tee. In order to dismantle sewer pipes near the socket without consequences, you need to use a grinder. Cut off unnecessary pipes with a grinder at a distance of 5-10 cm from the socket.

Now you only need to pull out a small piece of pipe from the socket. Sometimes, if you shake it a little, it easily falls out on its own. If this does not happen, then you need to be patient.
With a grinder, make cuts on the piece of pipe that remains in the tee. Cuts must be made along the pipe up to the socket itself, around the entire circumference of the pipe in increments of about 20 mm.
Take a chisel, insert into the incision. Start slowly tapping the chisel with a hammer. There is a good chance that the pipe will burst all the way inside the socket. If this did not happen, and all the incised sections have already broken off, then you need to find a weak spot in the pipe. Look from the end of the pipe, and you will notice that it has worn unevenly: in one place the wall is thicker, and in another it is much thinner. You need to expose a chisel and cut the pipe along exactly in the thinnest place. The pipe will crack in any case, and when this happens, you can easily get its remnants out of the socket.
Now you just have to thoroughly clean the bell from the old cable and mortar. The bell must be smooth, otherwise the cuffs will not fit into it.
Do-it-yourself sewerage installation
- Insert a rubber cuff with a diameter of 126/100 mm into the socket.
- Coat the joint with silicone sealant.
- Start connecting pipes.
As a rule, the first point of water intake is the toilet. Therefore, here you need to use a pipe with a diameter of 100 mm.
In general, PVC pipes do not have a diameter of 100 mm, but 110 mm, but everyone is used to a diameter of 100 mm, which is why it is indicated here. After installing the tee on the toilet, many immediately insert into it the transition to a pipe with a diameter of 50 mm. Do not do this. It is better to make a small insert after a pipe tee with a diameter of 100 mm, at least 100-150 mm long, and then switch to a pipe with a diameter of 50 mm. If possible, it is better not to use 90 degree corners and tees. It is better to put 2 corners of 45 degrees. It is desirable to give a slope to the drain of at least five degrees. It is better to fasten sewer pipes near each joint. Such pipes are assembled as a children's designer - they are simply inserted one into the other.
Each pipe has a rubber gasket, which ensures the tightness of the structure. Before connecting two pipes to each other, I recommend lubricating the junction with silicone sealant. Firstly, it will be more reliable, and secondly, it will be easier to connect the pipes together. It is important that there are no fractures at the joints, otherwise there may be a leak. Cuffs of the required diameter are inserted under all corrugations from siphons. If you have a distance of 50 cm between the points, this does not mean that you can buy one pipe 2 m long and cut it into four parts. You will need four pipes of 0.5 m each.
Sewer installation requires accuracy and minimal technical skills. If you are interested in this topic, we recommend that you pay attention to our material.
The quality of the home sewer system should not be inferior in reliability to the water supply or electrical network. If the sewerage in the apartment is installed with high quality with your own hands, it will last for more than a dozen years, subject to the installation standards and the use of high-quality consumables.
Doubt your abilities and afraid to make mistakes? We will help you competently design and install a sewer system. The main thing is to take into account all the basic requirements, choose the right pipes and adhere to the installation technology described in the article.
Before picking up pipes and everything you need, before starting work, you need to understand the principles of the functioning of the sewer system, including observing the angles of inclination so that the pressure in the riser is slightly above atmospheric.
Otherwise, atmospheric air will squeeze out unpleasant sewer gases directly into the apartment. If the internal pressure is too high, then the waste gases can throw out effluents from the siphons.
Let's take a closer look at all the nuances of the sewerage device in the apartment.
Pipe slope is an important condition for the functioning of the system
When laying the highway, it is necessary to observe the horizontal angle, which must be within certain limits. Insufficient will not allow drains to drain normally into the riser. If the slope is too high, the water will drain quickly, leaving dirt on the pipe walls.
Keep an eye on the slope to achieve optimal fluid flow in the sewer and the correct pressure in the pipes. Pipe slope standards must comply with SNiP (+)
The paradox is that with a high "fluidity" the sewer will become clogged.
The dependence of the pipeline laying slope on the section of the pipeline:
- 30 mm/m at 50 mm;
- 20 mm/m at 110 mm;
- 8 mm/m at 160 mm;
- 7 mm/m at 200 mm.
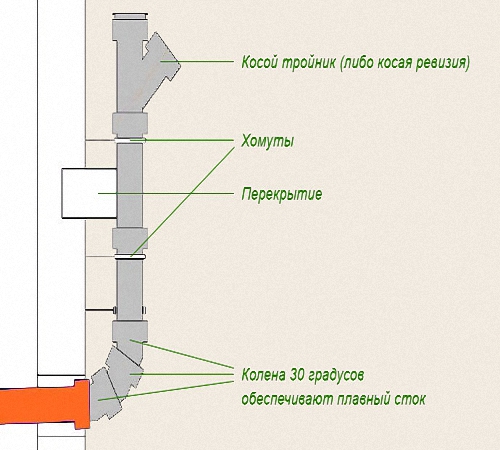
Thus, the maximum slope should be within 150 mm/m. Exceptions are bends up to 1.5 m long for some plumbing fixtures, such as a toilet.
It is possible to connect sewer pipes at a right angle only in a vertical orientation according to the principle of a waterfall.
Image gallery


Friendship with neighbors is half the success
In order for the replacement of the internal sewerage system in the apartment to be successful and with minimal hassle, good relations with the neighbors from above are necessary. They must refrain from using the sewer for the duration of the installation. To be extra safe, it is better to turn off the cold and hot water supply in the basement.
Based on this, all work should be carried out promptly, preferably on a weekday during the daytime, when most of the residents of the house are at work.
Operation Precautions
Sometimes a warning about the inadmissibility of using the sewer by neighbors can be ignored by some residents.

Take care of the safety measures when performing work, because the dismantling and replacement of sewer equipment is an increased risk event
You need to be prepared for an emergency situation and use the following protective measures:
- seal the walls and the floor with a film, fastening all the joints with adhesive tape;
- prepare a bathroom- clean the room and;
- use protective equipment- raincoat, helmet with glass, rubber boots.
A helmet is a must, because you will have to work with a heavy cast-iron pipe hanging over your head.
Fixing the main waste riser
The lion's share of success in a reliable sewer installation is a securely installed top of the riser. You should not rely on the remaining fasteners, because. over time they become useless.
Cast iron pipe may burst due to vibrations of the power tool. All this can cause a serious accident, for which you will have to pay.

A high-quality mounting unit also performs the function of a damper, absorbing vibration. A securely fixed riser will minimize the chance of an accident
The sequence of actions for fixing the riser:
- mount on both sides of the riser under the ceiling itself two crutches with a diameter of at least 12 mm;
- perform fixation with a solution or a stud with a metal collet;
- the stud should protrude beyond the middle of the pipe by at least 40 mm;
- fix the riser with half-clamps.
Under the half clamps, you need to put tight rubber gaskets (you can from the autocamera). Holes are drilled in the eyes of the half-clamps for the installation of studs. Each bracket is attached to the stud with a nut. They must be tightened alternately to eliminate the appearance of lateral force on the pipe.

The fastening of the riser must be reliable in all places - use strong crutches with studs, clamps and brackets that are suitable in diameter
It is impossible to fix the riser to the wall using one bracket or only one clamp. If the pipe fits snugly against the wall, then a small groove needs to be hollowed out under it in order to insert the clamp. Remember that cast iron is very fragile, so you need to be extremely careful.
How to choose pipes?
It makes no sense to talk about the advantages over cast iron, but the former are different both in cost and in composition.
Possible options:
- Propylene. Withstands up to +130°C, allows cleaning with a plumbing cable, as well as the use of active chemicals, with the exception of alkalis and acids, has a rough inner surface, which increases the hydraulic resistance.
- PVC. An inexpensive option that has the smoothest surfaces. It allows wastewater temperatures up to 80 degrees, is inferior to propylene in strength and chemical resistance, but has less hydraulic resistance. Cleaning with a plunger or ultrasound is allowed.
- Polyethylene. Cheap and unreliable. It is subjected to deformation, poorly sealed and has low heat resistance.
We opt for PVC or propylene, taking into account their technical and operational qualities.
The characteristics of different types of sewer pipes are described in detail in the articles:
How to choose pipe diameter?
The minimum diameter of 32 mm when laying sewers is used when there are separate risers in the system, and also when the common extreme point of the drain is at a distance of no more than 7 m from the riser. Under any other conditions, you need to choose pipes with a diameter of 40-50 mm.


The procedure for the installation of sewerage
To maximize productivity and efficiency, it is recommended to adhere to the following order:
- We determine the location of all plumbing fixtures if we plan to add new equipment or change the old scheme.
- We draw the entire sewer wiring diagram with chalk or a pencil. The diagram should indicate pipe routes, lengths, diameters and slopes for each section.
- We dismantle the old wiring system.
- We carry out the calculation of the number of pipes, consumables and fittings, sealant.
- We purchase all the elements, including transitional couplings from a cast-iron riser to a plastic one.
- We mount the system in free space, trying on pipes.
- We dismantle old equipment.
- We make installation of the pipeline, we adjust it to the joints.
- We connect the pipes and seal the joints.
- We install and connect plumbing.
- We connect the system to the riser.
- When the sealant hardens, we check the system for leaks.
Now let's dwell on the key stages of the work more carefully, finding out some subtleties.
Drawing up a sewerage scheme
If the installation of a new sewage system comes down simply to the bathroom, then you do not need to come up with some kind of new scheme. Everything is done exactly as it was. But if there were problems with the old sewer system and it is planned to add new plumbing, then it is necessary to accurately withstand all diameters and slopes.
To make sure that the sewerage scheme in the apartment is correct, it is better to give it to specialists for verification. It is significantly cheaper than ordering drafting from scratch.
The following elements should be indicated on the diagram:
- all rooms where the sewer will pass;
- the location of the elements for each room, indicating the distances from the wall, the length of each section, as well as the total length of the pipeline;
- a complete set of fittings, including inspection and treatment outlets;
- the place where the central riser is located.
The scheme should be as detailed as possible so as not to forget anything and not violate the technology.
Image gallery


Dismantling the old system
It is necessary to analyze the old wiring in order to choose the appropriate method of dismantling. If the plastic is changed, then, as a rule, it is simply pulled out of the joints with simultaneous scrolling.
Sometimes cast-iron pipes can be dismantled in the same way, but at the same time it is necessary to knock out the sealing of the joints with a chisel.
In all other cases, which are the majority, it is necessary to cut the cast-iron pipe with a diamond wheel from different sides. A wedge is inserted into the resulting hole, which must be hit several times with a kilogram hammer until the pipe is divided into two parts.
It is worth starting by disconnecting the pipeline from the riser, and direct dismantling is carried out, starting from the farthest section of the sewer. It is necessary to warn the neighbors, turn off the water in the riser and proceed with the dismantling.

Use a power tool to make two cuts in a cast-iron pipe for dismantling - it is extremely difficult to disconnect stuck pipes in another way
We disconnect the adjustable pipe, which is adjacent to the riser. This is done through two cuts at a distance of 150 mm from each other. First, a fragment of the pipe is broken from the side of the apartment using a wedge, and then a piece from the side of the riser.
Next, you need to hammer the old seal near the riser outlet to remove the remaining pipe fragment. Holes must be tightly plugged with rags. You can now allow neighbors to use the water supply while you dismantle the rest of the pipeline in the apartment.
Then we again introduce a ban on the use of sewers. Lastly, cut off the old riser to move on to replacing it.
Replacing the sewer riser
This is an extremely responsible task, which is best entrusted to seasoned specialists, otherwise the cost of an error may be too high.
If you are confident in your abilities, then you will need the following set of tools and consumables:
- two cuff adapters - plastic / cast iron and cast iron / plastic;
- two pipes of the appropriate length and diameter;
- two plastic 45-degree turns;
- compensator for plastic pipes;
- metal clamps with studs for fastening;
- plastic cross with a 50 mm outlet in the required direction;
- plastic insert with an inspection hatch.
First you need to strengthen the old riser at the very top. Make two cuts in the middle of the cast-iron pipe in the middle at a distance of 150 mm from each other. Insert two wedges into the lower cut on both sides of the pipe at an angle of 45° to the horizontal.
The composition should be neutral - it is better to use polyurethane or silicone. Sealant must be applied to each plastic gasket. You don't need to apply anything to the rubber seals.
You need to lubricate the outer part of the pipe, which will be in contact when connected, as well as the inside of the pipe. We connect each section separately. After the sealant has hardened, you need to check the entire system for leaks by running water into the drain from all plumbing, including the bathroom. In this case, there should not be a drop of water on the floor.
Conclusions and useful video on the topic
Installing a sewer in an apartment is a laborious process, but knowing the intricacies will help you make a competent installation. Use video tips to expand your knowledge and watch the professionals at work.
Now you know how to plan and conduct sewerage in an apartment. The process of dismantling and installing equipment is accompanied by many professional nuances, so if necessary, it is better to contact specialists.
Do you have experience in solving such problems? Or have questions about the arrangement of sewerage in the apartment? Please share your opinion and leave comments. The contact block is located below.
All household drains from numerous plumbing fixtures of the apartment are discharged through sewer pipes. Their installation is undertaken by developers, but homeowners have to deal with the repair and replacement of engineering communications. Sometimes a new building requires sewerage from scratch. The installation work can be entrusted to plumbers, but if there is free time and a desire to save money, then the sewerage system in the apartment is also mounted independently. The main thing is to know how to lay pipes and connect plumbing.
The first stage is planning

Before piping and installing plumbing, it is necessary to plan the sewer system. The scheme includes the following elements:
- location of plumbing fixtures: toilet, sink, shower, bathtub, dishwasher, bidet;
- length and diameter of pipes;
- distance from walls to plumbing and pipes;
- the location of the riser;
- diameter of siphons for connecting sinks and baths;
- number of connecting elements (fittings);
- location of revision points.
If it is not planned to connect new points, then you can not change the existing sewer wiring. This will simplify the calculation of the required material. The length of all pipes is measured on site, if they pass through the wall, then the size of each section will be required.

The diameter of the sewer pipes is not chosen arbitrarily, there are recommendations for their size:
- for the riser section - 110 mm;
- for the toilet - 110 mm;
- for baths, sinks and other appliances - 50 mm.
To connect some devices, a 32 mm pipe is sometimes used.
The slope also does not have to be chosen independently, pipes with a diameter of up to 50 mm are located at an angle of 3º, and 110 mm - 2º. This means that in a section of 1 meter, the slope changes by 3 and 2 cm, respectively. The correct location of the line ensures the movement of water in a gravity system.
Material selection

- smooth surface on which deposits do not accumulate;
- strength, resistance to corrosion;
- a light weight;
- durability;
- installation does not require welding.

To connect pipes, special elements are needed: bends, tees, transitions from metal, cuffs. It is better to purchase all the necessary material from one manufacturer, this guarantees the accuracy of matching all diameters. Sealing joints will require silicone grease, it is also bought in advance. So, for work we will need:
- plastic pipes with a diameter of 50 and 110 mm;
- fitting;
- sealing cuffs;
- plastic clamps, selected according to the pipe section;
- inspection hatch, which is installed on a common riser;
- silicone sealant.
Instruments:
- perforator;
- Bulgarian;
- a hammer;
- hacksaw;
- chisel;
- wrenches of various sizes.

Sewer replacement begins with a riser. This is the most difficult section, drains from neighboring apartments pass through it, therefore, while replacing the pipe, neighbors should be asked not to use the sewer for some time. Dismantling proceeds as follows:
- Opens access to the docking point of the riser with a neighboring site. This may require breaking up part of the floor.
- Part of the cast-iron pipe is cut out by a grinder. If it is completely impossible to cut through, then it can be broken with a hammer. Work must be carried out carefully, as a broken piece of pipe may remain inside and block the entire pipe.
- A tee is installed at the bottom of the riser near the floor. The straight plastic pipe selected for the riser is connected at the top to the rest of the cast-iron pipe using a transitional cuff. Fastening with a tee is carried out by a bell. The tightness of the joint is provided by a rubber ring and silicone sealant.
- The pipe is attached to the wall with clamps. In the area of the sockets, the pipe is fixed rigidly, in other places the fixation is floating.
After completing the installation of the riser, proceed to the wiring.
Sewer system installation

All plumbing fixtures are disconnected from pipes that need to be dismantled. After removing the old system, the location of the new highway is marked. When installing the pipeline, straight sections are preferable, bends and turns that provoke blockages should be minimal. Proper installation of sewerage with a small number of connections and a sustained angle of inclination ensures self-cleaning of the system. With each flush, the stream carries away the residue from the previous stream.

You can organize the marking of the pipe slope using a line on the wall or a cord fixed at the highest and lowest points of the sewer system. According to this marking, the installation locations of the fasteners are determined; for pipes Ø 50 mm, the clamps are placed every 50 cm. To relieve stress in the pipes, it is necessary to combine two types of fastening:
- rigid - the pipe is fixed with a clamp with a rubber gasket;
- floating - fasteners allow the pipe to move, performed without a rubber insert.

Before installing the pipes, they must be chamfered and the edges cleaned so that there are no burrs. The inside surface of the pipe and fitting must be clean and dry. When making the connection, the end of the pipe is inserted into the socket until it fits snugly. To enhance the tightness, silicone grease is applied to the rubber ring. The sockets should be located along the water flow. During the operation of the sewage system, thermal deformation of the plastic occurs. So that the seam does not lose its tightness when the material expands, a gap of 1 cm is left. This is done as follows: the pipe is inserted into the socket until it stops, then a mark is made of 10 mm and the part is pulled back to this mark.
In order not to have to redo the finished system, it is worth making a trial installation without tight connections. After making sure that the installation is correct and that all parts are present, you can perform the final assembly.

- Only straight plastic pipes can be cut. Most often, at home, the cut is made with a hacksaw, always at an angle of 90º.
- If necessary, perform a turn, it is better to use two 45º bends. They do not drastically break up moving drains, so they become clogged less often.
- The first to join the system is the toilet, then the rest of the plumbing fixtures.
- In difficult areas, a segment called a revision is installed. It has a hole closed with a rubber cap, through which you can inspect the inner surface of the pipe.
- Part of the plumbing is connected directly to the sewer, but there are appliances that require the installation of a siphon. This is a device with a bend in the form of a knee, inside which there is always water for a water seal. The siphon prevents unpleasant odors from the sewer system from spreading indoors.
- Sewer wiring is carried out not only along the walls, but also in the strobe. Before being placed in the wall, the pipes are wrapped with a soft material to reduce noise. To prevent cement from getting into the joints, they are sealed with adhesive tape. In the gates, the pipes are fixed in a floating way.
- The ends of the horizontal branches are closed with plugs.

After installation, it is necessary to check the tightness of the assembled system in all areas of the wiring around the apartment and at the junction with the riser. The reliability of the docking of a new riser with a neighboring pipe is checked after the water is drained in the upper apartment. To check, water is drawn into the bathroom, and then the cork is removed, both taps in the kitchen open, and the water in the toilet is drained. The reliability of the joints is easy to assess - they must all be dry.
Video
This video shows how to replace an apartment's cast-iron sewer wiring in Stalin with a plastic one:
A photo


