Candles in jars. How to make a beautiful candle in a regular jar Candle in a jar
Content
Candlesticks are a pleasure to create and even more pleasant to enjoy the flame of a candle, an original thing in the house, which can bring a touch of soulfulness, style, and originality to your home.
It is not a shame to present a candlestick from a jar as a gift or an additional souvenir. It takes not so much time and not so much money to make such a craft, especially if you have the necessary materials in your arsenal. We offer to consider 10 interesting ideas.

Option number 1
Pretty simple, but very interesting result. We need a glass jar: it can be a regular seaming container, a baby food jar, or a special beautifully shaped jar with an embossed inscription that can be bought at any glassware store.
For decor, use decorative ropes, braid, lace and transparent multi-colored stones. For fastening it is better to use a glue gun. See the result in the photo:

Stones can be attached very close to each other, or can be distributed in the form of an ornament over the entire area. They can also be put on the bottom of the container and pour water. To do this, use a floating candle.
Candlesticks from glass jars can be dotted with acrylic paints, wrapped with bright threads, painted with stained glass paints, decorated with foam plastic, plasticine and other available means, do not forget about it!

Option number 2
We propose to make a candlestick from a tin can. A tin can can be decorated using the decoupage technique, it can also be decorated with material, painted with acrylic paints or painted using spray paint.
Try also to use clothespins as a decor, they can be left in their original form or painted in interesting and bright colors. If there are tools, then a pattern can be applied to the tin using perforation, then the light of the candle will appear through the holes. Let's take a look at some photos:


And here is a peculiar version of Aladdin's lamp.
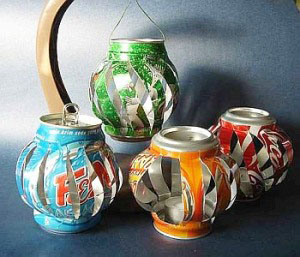
The good old version looks original when a tin can was cut into thin strips, and then twisted into beautiful patterns with the help of round-nose pliers. Tinplate is easy to use and durable as a candle holder.


Option number 3
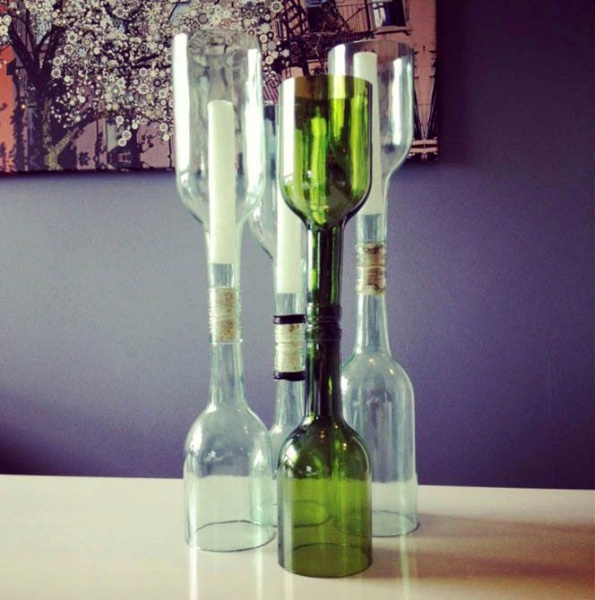
In this version, we are talking about glass bottles of champagne and wine. Did you know that cutting a glass bottle with your own hands is not so difficult? Below we will offer a video tutorial on creating a candlestick from an ordinary glass bottle. It is worth noting that it turns out very stylish and original, especially if you use colored transparent bottles. But colorless ones are also suitable, they can be decorated, decorated with different materials, decoratively poured with wax, decoupage and other techniques can be used. We offer several options for creating a candlestick or chandelier, see the photo:


Option number 4
How to make a candlestick from a jar and wax. We are talking about creating candles from jars with your own hands. For this you will need:
- glass jar;
- wax;
- pot;
- stick is long;
- aroma oils;
- sprigs of lavender or other herbs;
- wick;
- dye.
Take a bar of wax, cut it into small pieces and place it in a saucepan. Now you need to melt the wax using a water bath. When the wax melts, you can add some dyes and aromatic oils to it. Wax hardens very quickly, so it must be quickly poured into a jar.
And you need to pre-prepare the jar: lay out the sides with twigs, place the wick there, after winding it on a wooden stick.

Such a candlestick from a jar with your own hands turns out to be very original, delicate, natural.
Option number 5
To create the next candle, we use the previous version, only as a base for a candle we will use a small glass container from a cream or other cosmetic product. Leaves or flowers of herbs can be added to melted wax, the jar is decorated with ribbon or lace.

Option number 6
As a decor for a regular jar, you can use burlap, fishing net, shells, sea pebbles, sand. This will turn out to be such a marine option. Pour water inside the jar and use a floating tablet candle. You can create a whole composition of these sea candles.

Option number 7
Bank-candle in a cache-pot. This option, of course, is suitable for those who are familiar with planters and know how to make it, but it turns out, believe me, very beautifully. Especially if you make several of these candlesticks, using jars of different sizes, placing them somewhere under a canopy at different lengths. It looks amazing and attracts the eye from afar.


Option number 8
We use cans from under the pate or canned cat food. Take several jars of different sizes. They can be decorated with a cloth, decorated with different bright colors, sprinkled with sparkles - this is up to you. But we suggest you the method of placing candlesticks:
Option number 9
We do not use a candle, but use a garland. Such a lamp can be lit not only for the New Year, but all year round. Well, just a very simple option, but what a beautiful one!
For such crafts, use three-liter jars, and half-liter jars, and bottles of champagne, wine, massive and beautiful bottles of gin or rum. In general, what is in the house, then use it. You can make a special hole in the container, or you can use small battery-powered garlands.

Look what a beauty! It's impossible to take your eyes off!

And this is already a variant of a whole table lamp, such a hybrid. It looks very decent and can be used in an expensive interior.

The option with a glass jar is more suitable for a themed interior or cottage.

Use a small container and colored lights. Such jars can visually divide the room, highlight one of the zones in the evening.
Option number 10
Just don't throw away baby food jars. Of course, at some point, if they are not used, they can fill the whole house, but just such small and pretty containers are suitable for creating beautiful candlesticks. Then they can be given for the New Year or Christmas, especially when you don’t know what to give to a person who has everything and who is difficult to surprise. Use any decor that is in the house: dried flowers, pebbles, shells, rhinestones, fabric remnants, colored sand, cereals, plasticine and other materials.


The principle of creation is the same as described in option No. 4. Small jars will require a little less wax, so the process will go faster, and the result will be almost instantaneous.

Children will be very happy if they have such nightlights. Of course, they should only be used in the presence of adults, do not leave children alone with open fire.
And now, as promised, a master class on cutting a glass bottle and creating an interesting candlestick:
Post Views: 383
Here comes autumn. As always unexpected and unexpected. It's time for hot cups of coffee, in terry socks, under a woolen blanket by the fireplace. Or by candlelight in beautiful candlesticks. The flickering of a candle that shines with real fire will create an atmosphere of comfort and a romantic atmosphere in your home.
Today, the candlestick is not so much a functional as an aesthetic item in the design of space. Candle fire can make the atmosphere of any room more mysterious and exciting, but at the same time more calm and comfortable. Even if the candle is not burning, then an elegant candlestick will act as an excellent decor in your home.

Homemade candles and candlesticks are not only pleasing to the eye, but also add comfort and warmth to the interior of the room. It is not at all difficult to make them, and the result of the work can be both left with oneself and presented to someone close. We offer you some simple master classes on how to make candlesticks from jars with your own hands.
Such candlesticks will be appropriate:
- Inexpensive
The warm flickering of many candles in the garden will turn any ordinary evening in the country into a fabulous, cozy and romantic one. A minimum of materials, a little time and effort - and you can easily make garden lanterns - candlesticks with your own hands!

Beautiful, very cozy candlesticks for home and garden can be made from small glass jars. You can put a finished candle in a jar candlestick, or you can pour wax into it. Everyone decides for himself what type he needs. How to do it?
Glass jar candlestick workshop

You'll need:
- Pieces of wax.
- Saucepan.
- Wooden stick.
- Aroma oils.
- Dyes.
- Wick.
- Glass jar.
Step 1
To pour wax into a glass container, it must first be prepared. To do this, take a piece of material and cut it into small cubes. Place the crushed wax in a saucepan.

Melt the wax in a water bath
Step 2
Turn on the stove and put a saucepan of water on the burner, and place a container of wax on top. Make a water bath. Stir the wax with a wooden stick. Until it melts completely.
- Then turn off the stove and, without removing the wax pan from it, add the necessary additives: aromatic oils, dyes, and so on.
- Mix everything thoroughly with a wooden stick. The wax is ready.
Be aware that it can dry out very quickly. Therefore, immediately make a candle out of it.

Pour the wax into the jar, carefully holding the wick
Step 3
- Take a jar and fasten a wick inside it. To do this, drip wax on one end of the cord or use a special clip-tablet and lower it to the bottom of the container with a tube (see photo).
- Secure the other end of the wick so that it does not sink inward. To do this, wind it on a wooden skewer or make a special clip.
Slowly, so that the wick does not move or fall, pour the liquid wax into the glass container.
Step 4
When the wax on top hardens, it will be possible to remove the wick mount. If a recess has formed in the candle, pour the rest of the wax into it.
If you want a striped candle, pour in the wax, alternating colors and letting each row dry.

Striped or gradient candle in a jar

Such a candle looks original in small flat jars

Candle with lavender
There are also many options for other handmade glass jar candlesticks.
Flashlights - candlesticks can be hung on hooks, nailed to the fence, hung on the veranda, terrace or directly on the branches of a tree. If you have a wooden frame or pallet, make an entire garden chandelier out of candlesticks!
It is advisable to pour sand, grains or fine gravel into jars for candles to stabilize the candle inside

Hanging candlesticks for giving
A detailed master class on how to do it is at the link.

Suspensions from harnesses

Braided hangers
Very simple, but quite elegant and interesting candlestick can be made from a half-liter jar.
- Any glass jar, such as mayonnaise, will do.
- We remove the label, put spruce branches inside the jar and sprinkle generously with coarse salt.
This is a winter version of the candlestick, and our Christmas tree seems to be covered with snow. We place a candle in the initiated snowdrift.

Winter candlestick
Decor glass jars painted in dot or stained glass technique will turn the simplest bottle into an elegant vase or candlestick. In the photo below, homemade candlesticks are painted with contour paints. Also try to paint the jars with stained glass paints, it will be very beautiful!

Dot painting of a candlestick

Made with the help of a golden outline on glass

Moroccan candlestick from a jar - painted with glitter
It is very easy to make a stained glass candlestick from cans:
- Using a glass outline, you need to draw a picture on the jar. Instead of a contour, you can use glitter. Then paint the jar with stained glass paints.
- Let the painting dry for 1-2 hours. Then insert a candle into the jar and you can admire the result.
Such a special glass outline can be found in any "everything for decor" store.

Outline painting technique
You can also paint plates with tote technique -
Candlestick decorated with semolina from a glass jar looks very impressive.
- It is necessary to start work from the bottom of the can. It must be well greased with glue and rolled in semolina.
- Then draw arbitrary patterns on the walls of the jar with glue and also sprinkle them with semolina.
- When the glue dries, the pattern must be covered with paint and allowed to dry again.
- You can fix the result with hairspray.

There are never too many candlesticks - every romantic person knows this, as well as everyone who loves evening gatherings with friends by candlelight. Using a glass jar is an original and affordable way to decorate your home and give it a cozy atmosphere.

Banks decorated with glitter
If you decorate a jar with glitter, then such candlesticks are an excellent decoration for a wedding or New Year's table.
How to do it? See the article "" - the execution technique is the same!
Structural candlestick will turn out if a rope is wound around the jar. Its size does not matter, here you can focus on your own imagination and preferences.

- We cover the future candlesticks with paint. To do this, you can use a brush or washcloth. While the paint layer dries, prepare the candles.
- We fasten the twine and paint. At the final stage, we remove the rope. We place candles in the finished product and install it in the chosen place.
How to properly and evenly? See article.
In fact, making a candle holder from a glass jar is not at all difficult. Your imagination matters here. An ordinary jar can be decorated in different ways, and you get an original candlestick.

Canvas hearts are attached to the jar with silicone glue.

Decor with canvas and lace

floating candle

Decor with an old fishing net
For example, you can paste over the jar with stars cut out of foil. You can crochet it and use an unusual pattern to give it a unique and inimitable look. And you can glue the jar with colored pebbles.
You can also paint the jar with paints by depicting a drawing on it. Some even decorate with lace and it also turns out very beautiful and looks unusual. In the photos you can see some options for homemade candlesticks.
Master class of a candlestick from a jar and decorative stones

For this you will need:
- glass jars;
- silicone glue for glass;
- decorative glass pebbles of different sizes.
- Candle.

- Take a glass jar and peel off the label.
- On decorative glass stones, apply glue in turn and glue it to the jar. So go on glue each pebble in a checkerboard pattern starting at the top of the jar.

- Insert a candle inside the jar. Your magnificent candlestick is ready.

Pebbles are also attached to silicone or Moment type glue
Instead of glass pebbles, you can take marine or decorative ones for flowers! Get very effective
Master class of a candlestick from a glass jar with a window
For this you will need:
- glass jars;
- painting cattle;
- acrylic paint or spray paint
- twine, ribbon.
- candle.
Step 1
Take a glass jar, stick a piece of masking tape on its wall. If the stripes are thin, then make several rows superimposed on each other.
Step 2

Glue tape or masking tape in the shape of a heart
Cut out the silhouette from the pasted tape. In our example, this is a heart. Remove excess tape from the jar, leaving only the silhouette of the figure on the wall.
Step 3

Paint with acrylic paint using an aerosol can
Cover the jar with paint. It is most convenient to use a spray can. To do this, twist several newspapers into a tube and put a jar on them. Coat the entire surface of the glass container evenly with paint. Make another layer if needed. Instead of a spray can, you can use acrylic paint. But it takes longer to dry.
Step 4
Once the paint is dry, pry off the masking tape with something and peel it off. Decorate the neck of the jar with twine or ribbon. Place a candle inside. The original glass jar candlestick is ready.
Candlesticks from small glass jars. Many people think that the best candlesticks are made from tall or wide jars. After all, they can accommodate a lot of decor and due to their size there is a large field for creativity. But in fact, you can make a very beautiful candlestick from a baby food can. Sometimes just a couple of strokes are enough and a wonderful decor is ready.

Stencil for an openwork candlestick
How to make a candlestick from a tin can?
Small cans can be an excellent material for a beautiful New Year's candlestick.
This beauty is made from an ordinary tin can and paper lace, which can be made independently from ordinary wallpaper and a hole punch.

Candlestick in country style
- First, the jar is painted with acrylic paint.
- Then a thin strip of fabric lace can be attached to the paper lace. The resulting tape is glued to the painted dried surface of the jar.
- When the lace dries, it remains only to decorate the jar according to your own discretion. Additional decorative elements can be buttons, old keys, small souvenirs.
The resulting candlestick will decorate any table and will look spectacular on a snow-white festive tablecloth.
Also, similar candlesticks from a tin can can be hung on the wall as a wall decor.
From tin cans, hangers and pill candles you can make an original decor for an empty wall
A New Year's candlestick can be made in many ways. Why not add kitchen salt to the work. Fine particles will give the product a stunning shine. Due to soft lighting, the house will be filled with magic.
Advice! If there is no salt at hand, it can be replaced with semolina or rice.
Materials:
Twine;
scotch;
wire;
glue;
salt;
brush;
jar;
ribbon;
varnish;
acrylic medium;
sponge;
decorative elements: cones, berries, spruce branches.
1. Let's start making a candlestick from a jar for the New Year 2019 with our own hands. We lay out the necessary materials on the table, everything should be at hand.

2. We start by applying the medium to the jar. Set the container aside and let it dry. An hour will be enough.

3. Prepare a sponge. With its help, we apply varnish to the future candlestick. We do several layers and wait until the varnish dries.

4. Glue tape to the jar. It can be placed in any place, these areas will remain not covered with snow.

5. Paint over the remaining space with varnish, quickly sprinkle salt. Let the product dry.

6. Once all layers are dry, start decorating the candlestick. The master class will help you do the job without difficulty.

7. We take the wire, we wrap the neck of the can with it. We make a handle out of wire, attach it to the product.

8. We wrap the candlestick on top with twine, attach spruce branches.


9. We make a bow out of the ribbon, glue it to the rope.


The candlestick is ready. Anything can be used as a decoration. It is best to involve children in the creative process. They will be happy to offer original ideas and find interesting elements for decorating the product themselves.
The candlestick looks amazing. It will fill the house with soft lighting, give the atmosphere a piece of magic.
Original souvenir

For the New Year 2019, you can make a stunning candlestick from a jar with your own hands. This will require a minimum set of materials and a little free time. Since the holiday is near, it's time to prepare for it. Why not make interesting decorations for your home.
Christmas decorations help cheer up, remind you of the upcoming celebration. Children together with their parents will take part in the creative process, get a lot of pleasure from it.
Materials:
Paper;
scissors;
banks of any size;
spray paint;
decor elements.
Execution sequence:

1. We take a sheet of paper, cut out any New Year's stencils from it. It can be Christmas trees, snowmen, Christmas decorations, snowflakes.

2. Glue the resulting pictures to the jar from the inside. We also paint the container with a spray from the inside. You can take any paint, but white and silver look the most advantageous.

3. Let the product dry. Then we remove paper stencils.

4. We decorate the souvenir at our discretion. Spruce branches, lace, ribbons, New Year boutonnieres can serve as decorative elements.
As soon as the product is decorated, put a candle-tablet on the bottom, set fire to it. The house will immediately be filled with soft light.
Note! Decorative elements must be placed slightly below the edge of the jar. Don't forget about fire safety.

The original candlestick will be a wonderful decoration in the house. In addition, it can be presented as a gift to a loved one. The recipient will appreciate the gift and find a prominent place in the house for it.
If you want to bring the New Year holidays closer, you do not need to abandon the idea. Why not give an ordinary day a piece of magic.
Candlestick with drawings
For the New Year, you can make various decorations with your own hands. In addition to the usual toys and garlands, it is worth making candlesticks from a jar. Original products attract special attention. Many needlewomen get to work and delight the whole family with amazing souvenirs.
New Year is impossible to imagine without candles. If you want to make the atmosphere festive, you do not need to abandon the idea. The creative process is very interesting, will help to spend with benefit. Even children will be happy to draw on glass and create a work of incredible beauty.
Advice! It is best to prepare a jar with a wide neck. This will allow you to easily light a candle.
Materials:
Candles-pills;
white gouache;
towel;
soap;
glass jar;
brush.
Execution sequence:
1. Let's start making a candlestick from a jar with our own hands. We put all materials on the table. This will allow you to quickly complete the work, and not be distracted by extraneous matters.

2. Prepare a glass jar. First of all, we wash it well with soap and dry it with a towel.

3. Decide on the design. We put any drawings on the bank. It can be Christmas balls, snowmen, spruce branches.

4. We remove the product to the side. We are waiting for the paint to dry. We put a candle in a jar, light it.

The souvenir is ready. In the dark, the drawings seem to come to life. Why not arrange a fairy tale for the whole family and create a magical atmosphere in the house. What's more, it has everything you need. It remains only to light a candle and enjoy the amazing spectacle.
Interesting ideas for making a candlestick
There are many ways to make a candle holder from a glass jar. It is not necessary to invent something new. Some options are so simple that even children can make products.


1. Floating candles. To get a candlestick, you need to pour water into a jar and lower a tablet candle into it. Ribbons, bright stones, spruce branches can be used as decoration.
2. Marine theme. If you like marine motifs, you can make a souvenir in this theme. It is enough to lower the candle to the bottom of the container and sprinkle it with sand. Shells, starfish, multi-colored stones should be laid out around the tablet. The final touch is the twine that needs to be wrapped around the jar. The neck should be decorated with ribbon.
3. There are many ways to decorate a souvenir beautifully. Techniques such as painting with stained glass paints and decoupage are very popular. In addition, the container should be decorated with lace, twine, bright stones. It all depends on the personal preferences of the needlewoman.


How to cut a glass bottle with a thread
Everyone knows that there are no unnecessary glass bottles. Needlewomen know that any things can be used to make original products. There are times when there was no jar or glass at hand, but you really want to create some kind of attractive composition.
It is necessary to look around the house, perhaps a glass bottle is lost somewhere. It remains only to cut it and can be used for its intended purpose. Not many people know that this does not require special tools. It is enough to prepare a regular thread and at home you can easily do the job. The photo shows a step-by-step master class.
Materials:
alcohol;
cold water;
scissors;
hollow-ware;
Glass bottle;
file;
felt-tip pen;
ordinary cotton thread;
matches.
Execution sequence:
1. Wet the thread with alcohol.

2. We mark the cut line on the bottle.

3. We wrap the thread around the bottle along the intended line.

4. We tie the thread, cut off the ends. We put a container with cold water on the table, hold a bottle horizontally above it, set fire to the thread. We constantly turn the bottle over. This will ensure uniform heating of the container.

6. As soon as the thread burns out, immediately lower the bottle into a bowl of water. From the temperature difference, the glass will crack along the line.

7. We divide the bottle into parts. We process each of them with a file.

8. As a result, we get 2 containers that we can use to create decorations.
This simple method allows you to get glasses for creativity. A little patience and free time, and you will be able to do the job without difficulty. It remains only to decorate the resulting glasses and decorate the room with their help. Even a beginner needlewoman will cope with the task and will be able to start the creative process.

New Year's decor attracts special attention. To make the atmosphere festive, you need to think through everything to the smallest detail. Original candlesticks will be a wonderful decoration of the room. Master classes with videos will help to bring any idea to life. The house will be filled with soft and subdued light, it will become more cozy and comfortable.
Handmade is gaining more and more popularity. Extravagant jewelry, paintings, toys, decorative elements, gifts - this is only a small part of what enthusiastic craftsmen and amateurs create with their own hands. Today we will talk about how to make a candle at home.
This process does not require special skills and equipment. After reviewing our recommendations and detailed master classes, even beginners can start this exciting process.
CREATING A CANDLE: WHERE TO START
DIY candles are much easier to make than you might think. And the main advantage of such an activity is that the necessary materials are easily accessible. If you look carefully, you will find them even in your home.
MATERIALS FOR HOMEMADE CANDLE

Wax, stearin or paraffin are best suited for work. Moreover, it is better for beginners to start acquaintance with the latter, it is the least whimsical to use. You can purchase paraffin wax from the store or use the leftovers of old white candles.
WICK
As a wick, it is best to use natural threads, ideally thick cotton threads. Do not try to use synthetics: such a wick will quickly burn out and leave an unpleasant odor behind. To test the thread for naturalness, simply set fire to its tip. If it melts, forming a solid ball at the end, you have synthetics in front of you.

If you have conceived an unusual candle and are thinking how to make an original wick for it, then use colored floss threads. This is a great and natural material.
Remember an important rule: the thicker the candle, the thicker the wick should be.
It's easy to make your own. To do this, prepare a solution: dissolve 1 tablespoon of salt and 2 tablespoons of boric acid in a glass of water. Soak cotton thread or floss in it for 12 hours. Then dry them and twist a tourniquet out of them or braid a pigtail.
If this process seems tedious to you, carefully remove the wick from the finished household candle and use it.
CANDLE MOLD
First of all decide on the configuration of the desired candle, and then try to find a hollow object of the same shape. You may find it useful:
Cardboard packages from milk and juices;
. plastic cups from yogurts and desserts;
. egg shell;
. silicone molds for baking;
. glass goblets, wine glasses, glasses and glasses;
. children's pastries;
. figured forms for ice cream;
. tin and glass coffee jars;
. empty cans.
The only requirement is that the mold material must withstand heating up to 100°C.
Another interesting option is to pour candles into beautiful transparent glasses. They will not be available, but they will look very stylish and unusual.
Sometimes scented candles are made in tangerine or orange peel. The fruit is pre-cut in half and the pulp is carefully removed. You can also use large shells or coconut shells.

DYES
A white candle is elegant but boring. Naturally, the question arises of how to color the paraffin in order to get bright interior decorations.
For lovers of candle making, it is best and cheapest to take wax crayons for children's creativity. Would you like to receive a special candle? Look for mother-of-pearl crayons - your creation will be unique.

Do not try to use water-soluble gouache or watercolor - you are in for a fiasco. The dye will inevitably settle to the bottom or fall out in flakes. The finished product will look very unpresentable.
WARE FOR MELTING PARAFFIN
In order to melt the paraffin, you will need a small saucepan for a steam bath and an iron bowl. Experienced craftsmen recommend heating paraffin in a steam bath, considering other methods, including a microwave oven, to be fire hazardous.
We recommend that you first also use this method, proven over the years: place a bowl of paraffin in a container of boiling water. If the candle is planned to be colored, add the chalk immediately and mix the melted mass several times to obtain a uniform color.
FRAGRANTS AND DECOR
Any materials at hand are suitable for decorating candles. First, decide on the topic of your work. Pebbles and shells will effectively complement the candles in a marine style. For the New Year theme, use beads, small cones, small decorative balls, ribbons and bows. Decorate candles for Valentine's Day with hearts, sequins, bows, dried flowers, coffee beans, etc.
It is best to scent homemade candles with essential oils, which can be purchased at the nearest pharmacy. Another option is to find vanilla cinnamon in your kitchen. It is worth adding flavors to melted paraffin at the very end, after staining.
STEP-BY-STEP WORKSHOPS
We bring to your attention a selection of available master classes that will help beginners learn the basic techniques and techniques of work. If you already know how to create candles with your own hands, you can draw interesting ideas from them for implementation in your work.
COFFEE CANDLE
Do you want to create a romantic mood? Light a coffee candle - its divine aroma will take away all worries, leaving only a good mood and peace. It is especially pleasant in rainy autumn or cold winter. And it is also a great gift for any occasion and even without.

*photo by Valentine
For work you will need:
. paraffin;
. whole coffee beans;
. wick;
. two plastic cups of different sizes;
. wick holder - a teaspoon, wooden stick or plastic coffee stirrer.
If you did not find paraffin, take household candles, you can also get a wick from them.

Crush the paraffin into small pieces with a knife to speed up the melting process. If you took store-bought candles, gently crush them with the blunt side of the knife so as not to damage the wick.
Place the paraffin in a glass jar and lower it into a pot of warm water. Heat the water over low heat until the paraffin is completely melted in the jar - it should become transparent.

At this time, prepare the form for pouring. In a larger plastic cup, place the smaller one, after filling it with water. There should be a fairly wide space between the walls of the cups. Pour coffee beans up to half the height between the walls.

Pour the melted paraffin into the mold to the level of the grains, wait 10 minutes. Then pour the paraffin up to the edge of the mold and let it harden completely. This will take about an hour.
Carefully pour the water out of the inner beaker and remove it from the paraffin ring. Lower the wick into the workpiece so that it reaches the bottom of the glass. Tie its upper end to the holder and place it on top of the glass, centering the wick.

Pour melted paraffin into the middle of the candle. Place a few grains on top for decoration. Now, until the candle completely solidifies, you will have to wait 4-6 hours.

Carefully remove the frozen candle from the glass. However, it can be cut with scissors to facilitate manipulation.

If you want the grains to be more visible, blow the sides of the product with hot air from a hair dryer. The paraffin will melt and the surface will become embossed.
It turned out to be an excellent aroma candle, isn't it? Do you want to make it even more romantic? We invite you to create heart-shaped candles using the same technology, which will become an unforgettable gift for your soulmate for Valentine's Day or a birthday.

Watch the detailed video of creating a fragrant coffee candle and you will see that everything is even simpler than it seems at first glance.
RAINBOW CANDLES
Do you want to add bright colors to your home? Handmade interior rainbow candles will help you with this.
To make them you will need the following ingredients:
. paraffin;
. stearin;
. wick;
. cylindrical shape;
. dyes corresponding to the colors of the rainbow.
You will get more detailed information from the detailed video tutorial. For beginners, it shows all the stages of preparing a candle mass and creating a gradient transition of colors.
MULTI-COLORED CANDLES IN LAYERS
Spectacular multi-colored candles in a transparent glass will be the highlight of your interior. How to make them, see our master class, illustrated with step-by-step photos.
materials
Before you make colored candles with your own hands, prepare:
Clear wax;
wax pencils;
disposable paper cups;
glass cups;
wicks;
ice cream sticks;
aroma oils;
microwave oven;
grater.

Step 1. Grate ordinary transparent wax and fill paper cups with the resulting material. You only need to fill them with this material by a quarter.
Step 2 Microwave the cup for 45 seconds. Get it out. Stir the wax with a wooden stick. It should melt completely, if this does not happen, send the glass to the oven for another 30 seconds.

Step 3. Dip a wick into an empty glass cup. You can attach its other end to an ice cream stick and put it on top of the cup. This will make it easier for you to keep working. Pour some wax into a glass and wait for it to set. Thus, the wick should be fixed in the center of the cup.

Step 4 Remove the paper wrapper from the wax crayons. Grate them and add the desired color of crayons to separate cups with wax. For a third of a glass of wax, add shavings of one pencil to get a sufficiently saturated color.

Step 5. Send a glass of colored wax to the microwave for 2.5 minutes. Take it out and while stirring, add a few drops of the chosen aromatic oil. You don't have to, but with oil, your candles will give off a pleasant aroma.

Step 6. While holding the wick, pour the first layer of colored wax into the cup. To get an interesting pattern, tilt the cup at an angle and hold it in that position until the wax sets.

Step 7. Melt cups with wax of a different color in the same way and also, but at the opposite angle, pour them one by one into a glass cup. Each time, fix the container in different positions until the wax sets.

Step 8. Having formed a multi-colored candle, let the wax cool completely.

Bright and unusual candles are ready. You can use them for their intended purpose or give them to friends as souvenirs.

SOURCE: http://www.rukikryki.ru/
Another interesting idea is a square multi-colored candle. Wax pencils are also used for its coloring. If you are a beginner, be sure to check out the clear video tutorial, with its help you can easily make such a cool craft for a gift to friends and family.
OPENWORK CANDLES
Decorative candles can be of the most diverse design, because talented craftsmen do not get tired to amaze with their imagination and creative experiments. In support of these words, we suggest that you familiarize yourself with the method of making an unusual openwork candle.

For work you will need:
. paraffin;
. optional coloring and flavoring;
. wick and holder for it;
. cylindrical shape;
. small ice cubes.
Melt the paraffin in a water bath. If the candle is supposed to be colored, color the candle mass, if you wish, you can also scent it.
Set the wick in the mold so that it reaches the bottom of the mold. Do not forget to fix it on top of an impromptu holder. Pour in crushed ice, not reaching a couple of centimeters from the edges.
Pour the melted candle mass into the mold. Leave the workpiece until the paraffin has completely cooled. In this case, naturally, the ice will melt, and cavities will form inside the candle.

Carefully drain the water and remove the product by pulling on the wick.

Be careful, this beauty is quite fragile and requires careful handling. Such an unusual openwork candle will be a wonderful present for your family and friends. If you use paraffin from old candles for work, get this beauty for free.

You will receive visual instructions for action from detailed videos of creating openwork candles. After viewing them, you can independently make such beauty at home.
Video #1:
Video #2:
Option number 3: And if you are thinking about what to give your friends for the New Year, then surprise them with a handmade red openwork candle. It will be an unforgettable gift and will bring into the house a sense of celebration along with the Christmas mood. See the work of the master and be inspired by your own masterpieces.
MASSAGE CANDLES
The main ingredient for creating a massage candle is soy wax. By adding useful components to it, you can get a product with healing properties. It no longer acts as a decor, but as a home cosmetic product that makes the skin soft and well-groomed.

Healing properties of essential oils:
Lemon essential oil will help rejuvenate the skin and cleanse the pores.
. Orange oil has an anti-cellulite effect.
. Rose oil stimulates the regeneration of skin cells and promotes skin elasticity.
. Rosemary oil can clear the skin of age spots and make it smooth.
. Patchouli oil is great for moisturizing.
. Lavender oil will delight you with its healing effect.
Solid vegetable oils are also added to massage candles. For example, cocoa butter is used to moisturize and tone the skin. And with its regular use, cosmetologists promise you smooth and delicate skin.
Exotic shea butter can save dry skin from peeling. Coconut oil, rich in natural antioxidants, can smooth the skin.
The general algorithm for creating a massage candle:
1. melt the wax with hard oils in a water bath;
2. let the mass cool down a little and add liquid oils;
3. cool the mass a little more and add essential oils, extracts and vitamins;
4. pour the resulting candle mass into the mold, after inserting the wick into it;
5. wait for the candle to harden completely and remove it from the mold;
6. The hardened candle is ready for use.
We offer you the most common recipes for effective massage candles.
Recipe #1
Soy wax - 85%;
. avocado and shea butter (aka shea butter) - 5% each;
. patchouli essential oil - 2.8%;
. essential oil of ylang-ylang - 2%;
. vitamin E - 0.2% (a few drops).
Light the finished candle and let it melt a little. Put it out. Put some warm wax on your hand and you can arrange a rejuvenating massage session. Do not be afraid to burn yourself - the melting point of such a candle is much lower than that of paraffin.
Recipe number 2 "Massage candle with a calming effect"
Soy wax - 80g;
. shea butter - 40g;
. almond oil - 40g;
. cocoa butter - 20g;
. essential oils of sage and lavender - 2 g each.
A massage session of such candles is best arranged before going to bed. The calming effect of essential oils will help you relax and fall asleep soundly.
Recipe number 3 "Massage candle with anti-cellulite effect"
Beeswax - 100g;
. cocoa butter - 60g;
. ground chili pepper - 5-10g;
. essential oils of orange and grapefruit - 3 g each.
Make sure you are not allergic to any of the ingredients in the suppository. After the massage, you may feel a burning or tingling sensation, which is associated with the presence of chili in the composition.
Regular massage will help get rid of the hated “orange peel”, make the skin soft and supple.
WE DECORATE CANDLES USING DECOUPAGE TECHNIQUE
If you do not have a dye, but you want to create something bright and memorable, do not be discouraged. The simplest candle made from cinder can be turned into a work of art. To do this, you need to have a little patience and decorate the product to your liking.
CANDLE DECORATED WITH DRIED FLOWERS
Dried leaves, stems and flowers will help you create an exclusive candle, which will be almost impossible to repeat. The use of natural materials is limited only by the local flora and your imagination. That's when the ability to collect a herbarium will come in handy in full.

*photo by Lyudmila Klimova
For work you will need:
. any dried flowers;
. 2 candles - for decoration and ordinary;
. tea spoon;
. tweezers;
. nail scissors;
. paraffin for final coverage.
From the dried flowers you have available, compose the composition that you want to bring to life.
Heat a teaspoon over an ordinary burning candle (with the inside over the fire, because the spoon will blacken a little, and in order not to stain the candle, then we will carry out all the manipulations with the other side of the spoon).

Attach a dry flower to the candle to be decorated and gently iron its petals with the outside of the spoon so that they melt to the paraffin and do not stick out. Thick stems may need to be ironed several times while heating the spoon.

Excess stems that extend beyond the candle, carefully cut with scissors.
Glue the rest of the elements in the same way, choosing the desired location for them. Make sure that the edges of the leaves and petals do not stick out.

It remains to fix the result. Melt the paraffin in a water bath, pour it into a container into which you can completely dip the decorated candle.
Holding the candle by the wick, dip it into the melted paraffin, set it on a flat surface and let it cool. If the petals were not smoothed well and protruding tips remained visible, repeat this procedure again.

Such an elegant candle will conquer any heart and will not be left without attention. Complete it with a beautiful candlestick and it will become a unique decoration of your home.
DECOUPAGE OF CANDLES WITH PAPER TILES
The desire to decorate a candle could come instantly, but there are no dried flowers at hand. In this case, you can do with paper napkins. With their help, you can easily decorate a candle for any holiday.

Choose a napkin with the pattern you want. Cut out the desired elements from the napkin. Carefully remove the two bottom layers of paper from the resulting blanks. Further, the principle of operation is similar to decorating with dried flowers.

Attach the prepared element to the candle and iron it with a hot spoon. Sand the cooled surface with the rough side of a regular kitchen sponge. It is not necessary to immerse the candle in melted paraffin with this method.

Your masterpiece is ready. Make a beautiful arrangement of candles in the New Year's style, fir branches and colored balls. It will bring good mood and holiday atmosphere to your home.
PHOTO-DESIGN IDEAS
Want even more ideas for inspiration. Browse our selection of decorative candles. You are sure to find one that you want to repeat immediately.


We were able to convince you that it is possible to create unique masterpieces even from improvised materials? That is why candle making has become a favorite pastime for many beginners and not only masters.

Original form templates:


Now you know what candles are made of and how, you can get to work. Do not try to use the photo you like as a template and an unconditional ideal. Get inspired by ready-made works to create your own unique candles. A little diligence and perseverance - and already your masterpieces will be the standard to follow.
The flame of a candle creates a magical, soft light that gives any room a mystical touch. They create an atmosphere of comfort, and everything looks more mysterious by candlelight!
Very often, coffee cans settle on the kitchen shelves and in the depths of the cupboards. It is not known why we keep them and why we do not dare to throw them away. This is how a few empty cans turn into a whole problem. And if there is a problem, then you need to figure out how to solve it. In fact, everything is simple. Just a few steps outlined below and there are no unnecessary cans. But by the New Year holidays, original candlesticks will appear in the house.
What to depict in a candlestick? Will the silhouette be expressive? But what about those who can't draw? You can forget all these questions, because in this article you will find a ready-made recipe for making a candlestick with your own hands along with a template.

Template for a candlestick "Town"
The template must be cut out of paper using the instructions, and draw a town on the outside of the jar. To save the template just click on the image below. The picture will open in full size, and you can save it to your computer. To change the template size, open the template file in a Word document. Measure the circumference of the can. After that, the template must be increased or reduced to the size you need right in the created document. After you cut out the template, both parts of it must be connected in one line.


Frequently asked Questions:
What size and type of jar to use?
You can take almost any glass jar. There are not many requirements for the future candlestick. The walls of the jar should be as vertical as possible and not too ribbed.
Doesn't the painted snow rub off from the candlestick when touched?
No, if you did not apply snow with gouache paints or, for example, toothpaste.
Is it possible to make the effect of painted snow inside the candlestick?
It's better not to. Most paints are flammable and there will be an open flame inside the candlestick. If there was an LED light inside, then the snow would not pose such a danger.
And the most important thing! Do not install the paper template inside the jar! It is very dangerous! The template should only be on the outside of the jar.

Materials:
- Glass jar.
- Black paint. Acrylic is best suited for decorative work. You can also use specialized acrylic paint on glass, but it needs a special thinner, and it’s difficult to work with it without certain skills.
- Small synthetic brushes #2 and #4.
- Fleutz, that is, a wide flat brush. The hairs of the flute should be sufficiently resilient and not too soft. Synthetics or dense bristles are best.
- White acrylic spray paint or the so-called Santa Snow. Santa Snow is artificial snow for decorative purposes. If spray paint is too expensive and you do not plan to use it in the future, take acrylic in a jar or tube. I remind you that when using gouache paints, the snow will be smeared.
- Isopropyl alcohol spray and a clean cloth.
- Wire or wire hanger. They will be needed if you want to make the candlestick hanging.
- Old cardboard box.
- Small candle. The candle should not stick out of the jar. Tea lights are the best.
Instruction:


You can make several candlesticks by slightly changing the silhouette of the town and arrange them in several rooms. The feeling of a holiday will come to you as soon as the candles are lit.