How to make a watch from a record with your own hands: the best options. How to make a clock from a record with your own hands Clock from vinyl records how to cut
At first glance, old phonograph records may seem like an absolutely useless thing. But in the hands of real masters, they turn into real masterpieces, such as clocks from a record. Making them with your own hands is not so difficult, so if you want to make such beauty with your own hands, read this article carefully and you will learn everything you need for this.
How to make a clock from a record with your own hands?
Vinyl records have a great feature - they are easy to cut and melt under high temperatures, so you can create almost any shape you can think of from them. As for the wall clock, the latter can be done in several ways:
- using a jigsaw
- using a special grinder
- decoupage method


Let's talk in detail about each of them.
Cutting the clock with a jigsaw or drill
The principle of making a vinyl wall clock using a jigsaw or a special drill is the same:
- first of all, the necessary pattern is applied to the plate or a stencil is glued on top of it;
- then, carefully with a jigsaw or drill, the pattern is cut along the contour;
- uneven edges are sawn with needle files;
- a watch mechanism is attached to the product and the watch can be considered ready.

However, all this is easier to describe in words than to do in practice. The fact is that vinyl is a rather fragile material. And in order for beautiful patterns to start to turn out of it, you must either be able to work well with a jigsaw or get a good hand in this matter. Practice shows that cutting a complex stencil will not work the first time. Therefore, if you are new to this business, it is better to practice on thin plywood or something like that, and only then pick up a record.

And when you get good enough with the drill, you can make some very beautiful vinyl work. For example, these could be:
- patterns with a city panorama:

- a clock in the form of some animal or object:


- drawings dedicated to famous movie heroes or persons:

- a watch in a romantic style with butterflies or bows:

- beach themed patterns:

- watches for couples:

And there are an infinite number of such options. Also among handmade masters, patterns with birds, coffee beans, abstract motifs and many other topics are popular.
Here is an example of what all this is done in practice:
Decoupage plate clock
As we said above, the clock does not have to be cut at all. For their manufacture, you can use the decoupage method familiar to everyone, which involves gluing paper napkins with beautiful patterns onto the watch surface. The latter are additionally decorated with a wide variety of items, and as a result, the following products are obtained:


How to make a watch, and with what materials - you decide. But in our opinion, the best and most fashionable way is, of course, cutting with a drill. Therefore, if you want to learn how to make really beautiful and sought-after watches out of old vinyl records, you will have to make friends with this seemingly difficult instrument to use.
Do-it-yourself vinyl record clocks can be made using different materials: fabric, acrylic paint, decoupage cards, plastic blanks of various figures, coffee beans, shells. All materials for making crafts are available in handicraft stores, stationery departments and on the Internet. And clock mechanisms can be purchased from watchmakers, removed from an old clock or an alarm clock.
Necessary materials:
- 25-30 ml of acrylic paints (one or more colors);
- 1 clock mechanism;
- 1 vinyl record;
- card and decoupage glue;
- 100 ml of PVA glue;
- 2-3 large brushes;
- 1-2 small brushes (if you decide to draw a pattern);
- stationery scissors;
- numbers;
- second hands (optional);
- varnish (for acrylic paints).
Step-by-step instruction
- Rinse the vinyl thoroughly. Wash off the label.
- Prime with universal alkyd primer. Dry.
- Draw a pattern with acrylic paint.
- If you make a clock from a vinyl record with your own hands using the decoupage technique, then you need to cut out the pattern and stick it with PVA and decoupage glue:
- smear the plate with glue;
- moisten the picture for decoupage;
- put the picture on the plate;
- apply glue to the surface;
- with a brush, gently squeeze out air bubbles from under the card (from the center to the edges);
- dry with a hair dryer.

- Coat with varnish (in three layers).
- Draw numbers (or stick plastic ones).
- Use scissors to make a hole (in the center) for the clock mechanism. Turn the scissors several times to make the hole large enough.
- Insert mechanism, fasten.
- Paint the clock hands as needed. Let dry.
- Put on the hour, minute, and then second hands. Well fixed on the rod.


Important: if you need to cut something on a vinyl record, just heat it over a small fire (distance up to 20 cm). After that, the vinyl turns into a very plastic material, which can be shaped into different shapes or cut with a knife.
A good choice of decor will make a vinyl record clock a real masterpiece. Using one of the many techniques for decorating these handmade clocks, you can create a work of art that will make any interior fashionable.
Please note: to hang a vinyl clock on the wall, you can make a hole (for the fixer) using a hot nail or other metal object.
How to make a watch with your own hands? Yes, it’s very simple: having all the necessary tools, paints and materials, making a clock at home is not difficult. We will tell and show with an example how to make a home clock suitable for a specific (your) interior. Of course, some blanks may not be enough, but they can be replaced or made independently. But we went the other way: we bought all the missing parts (about them later) in a needlework store and on aliexpress (here, of course, we had to wait).
We will make clocks using the craquelure technique that will perfectly fit into a Provence or Shabby Chic room.
To make a wall clock with our own hands (we will make wall clocks) from an old record (yes, yes!), We need the following materials and tools:
- The old record itself (we choose the diameter at will);
- Clock mechanism (ready-made is bought);
- Clock hands (straight or openwork - selected depending on the design);
- Numbers - ready-made ones are bought or various items are used instead (for example, bottle caps, stickers cut out of cardboard and painted, spoons or forks, paper clips - there are a lot of options, it all depends on your imagination);
- Brushes - different (it is convenient for someone to work small, someone large) - necessarily both soft and bristly;
- Base paint (color of cracks) - in our case, pink;
- The main color is beige;
- Paint for decor - in our case there are two of them: golden "chameleon" and white acrylic;
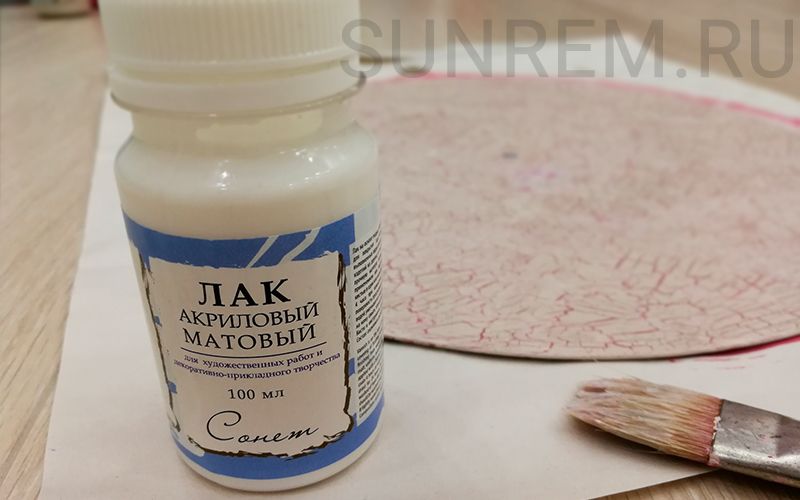
- Acrylic varnish - matte or glossy (but keep in mind - glossy will reflect light and time may not be visible);
- Acrylic varnish with sparkles (for decoration of numbers);
- Craquelure varnish is the most important component, without which it is impossible to work in the craquelure technique.

We bought the clock mechanism on the well-known Chinese site Aliexpress. I will say right away - we really liked it, because it goes silently (not quietly, but silently), you can hear it only then. when you raise your ear. You can find the link to the product here:
So, let's start making watches with our own hands from an old record using the craquelure technique.
Previously, the surface of our plate must be degreased and coated with a primer. For this purpose, we used a white acrylic art primer. After the primer dries, we cover the plate with pink paint, which will serve as a base and highlight our cracks:

It is necessary to paint at least two layers, and if a larger decoration of the watch surface is not planned, then three. Let's wait for the paint to dry.

In principle, such a watch surface can already be used, but we are not interested. In order for a watch made with our own hands from an old record to have a more expensive and prestigious look, we will continue to decorate it.
Now we cover our watch with craquelure varnish. In one or two layers - depends on the desired result, since:
The thicker the layer of varnish, the larger the cracks will be.


While the varnish is drying, let's take care of the numbers - paint them pink (we just mixed hot pink paint with white, we got a lighter pink):

And cover them with glitter polish. Well, this fad is also optional.

Also sends our figures for hours to dry.
The craquelure varnish is already dry, so now the most interesting thing is to cover our watch with beige paint in one layer. Cracks begin to appear almost immediately, after drying we get such an aged surface:

In appearance, you can’t even tell that it was once a record of the 60s. We will continue to decorate, but first we will cover the plate with a transparent acrylic matte varnish to protect the painted surface:
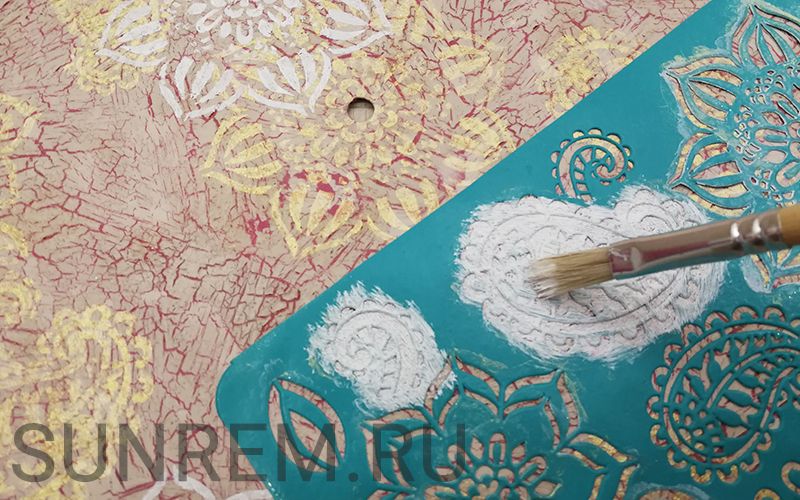
The most interesting moment in the manufacture of crafts at home is, of course, their decoration. Do-it-yourself clock decor can undoubtedly please your children, because this is a creative process. With the help of a reusable stencil (each one chooses for himself which one to use), we apply a chameleon pattern with golden paint:

The pattern can be applied both randomly and in compliance with some rules and symmetry. We chose the first option - we applied an openwork pattern to the surface of the watch in several places.
We wait for our golden flowers to dry and proceed to the next step - now we apply the same patterns with white paint:
We also wait for the flowers to dry and proceed to the final stage - the installation of the clockwork:

So, we looked at how to make a clock with our own hands from an old record using the "craquelure" technique with a detailed description and step-by-step photos of the work done. I repeat - we really liked the clockwork itself - quiet and does not lie.

A feature of this watch is that golden patterns applied with chameleon paint are visible only at a certain angle.
1. Find a vinyl record of the right size. We wash the label. It’s better to take the record with a white center (it’s simply unrealistic to kill the red one with white :))
2. We buy a clock mechanism in a craft store, online store or watchmaker.
The standard kit includes:
Clockwork
3 hands (hour, minute, second)
Center nut, washer
Optional wall hanging loop
3. We prime the plate with white primer from a can. I have a primer like this (alkyd, universal):
You can simply paint the plate with white acrylic paint with a sponge, however, with a spray primer, adhesion to the surface will be better and it will be easier to work on. We dry.
4. We make the background of the future watch: mix the paint, apply it to the plate with a sponge. We dry. (I applied a translucent layer of gold acrylic).
5. Cut out the motif from the decoupage card. Glue on PVA:
Smeared the surface of the PVA plate
Wet decoupage card
Put the card on the glue
Top once again well missed PVA
With fingers or a brush, they kicked out all the bubbles from under the card
Dry the surface (you can use a hairdryer)
I used Decomania cards: “Decalcomania “Richelieu” and a decoupage card on rice paper.
How to transfer the napkin to the surface (manufacturer's instructions):
1. In a capacious container filled with water, lower the decal sheet and leave for about 5 minutes.
2. We take out the wet sheet and let the water drain in a vertical position, controlling the process of peeling the pattern from the paper base.
3. Using the sliding method, we put the pattern down on the base and separate, by folding, the top layer of paper.
4. When the drawing is translated, use a spatula (flat spatula) to get rid of air bubbles by running it over the superimposed drawing.
5. Dry with a cloth swab, soaking it with excess water.
6. After drying, varnish.
We stick rice paper on the principle of working with a regular decoupage napkin.
6. Varnish: at least 3 layers. We draw with a contour or glue plastic numbers. (if the clock is large enough, you can buy numbers for the front door at the hardware store)
7. If in the process of work we sealed the hole in the clock with a decoupage card, we carefully cut the hole. Then we insert large scissors into the hole and turn it several times to increase the diameter of the hole (then the clockwork will pass without difficulty).
8. We insert the clockwork, put a flat washer, tightly tighten the nut on top. If your watch mechanism is equipped with a loop, it must be attached to the back of the plate. That is, the order will be as follows (if stacked): mechanism - loop - plate - washer-nut.
If there is no regular loop, you can make an impromptu replacement: glue two loops on the “Moment”, and then tie a rope or wire between them.
If necessary, paint the arrows in a contrasting color with a sponge (so that the arrows do not get lost on the clock). We dress the hands: first the hour, then the minute, we put the second hand on top of the pin. The hour and minute hands must be firmly seated on the stem. You are unlikely to be able to confuse the order, since the holes in the arrows are different in size.
9. Insert the battery. We hang the clock on the wall. Enjoy :)
What I like the most is that the clock can be made very quickly (no more than 4 hours for the whole job if you use a hairdryer), simply and, by the way, from a large number of different materials.
As a basis, you can use old discs, a primed canvas, a thin wooden palette. Clock mechanisms can be bought, or you can simply pull them out of an old wall clock or alarm clock.
Vinyl records with your favorite music make you feel a sense of nostalgia, so many do not decide to part with them after a long time. When they lie on a shelf, they collect dust and take up space. There is not much benefit from this, rather a turnaround. If you are not lazy, you can breathe a second life into them. Your work will not be in vain and will please the eye of both you and everyone who comes to your house. This accessory will give your interior originality, which is now so appreciated. If your house is filled with things from the last century, and a hand does not rise to throw them away, then an article on how you can make a clock quickly and easily from a vinyl record will be useful to you.
Making a clock is not so difficult from a vinyl record, as it seems to many at first glance. For those who cannot immediately understand the entire process of making such watches, a video tutorial will not be superfluous, which can be found after reading the article.
We analyze the main methods of making watches from a vinyl record
Installing clockwork with arrows.The simplest option, in which only the mechanism itself is attached to the surface of the plate. It must be glued on the back. The arrows go to the front side through a hole in the middle. For a more spectacular appearance, you can make a drawing. It can be glued or painted by hand with a brush. But lovers of minimalism will also like the option without drawings.
Simple form.This method is very similar to the first. The difference is that before attaching the clock mechanism, you need to give your watch a not very complex shape (hare, butterfly, heart, and others). Remember that while cutting out the shape, do not rush, because. vinyl can melt from high temperatures.

For sawing, you will need a drill with a nozzle or, if you do not have one, a manual jigsaw. Before you cut out the dial, you need to draw it with a pencil on the next watch. After finishing work, start cutting along the contour.
If you choose to use this option, don't be discouraged if you don't succeed right away. this is a rather complex process. Be patient and try again and again until you get good at using the tool.
Complicated form.You can apply a pattern on a vinyl record both independently and using stencils. This method is very complicated and if you do not have the necessary experience with tools, then wait with making watches. Instead, you can practice on plywood or other suitable waste material.
Decoupage.You can use decoupage to decorate your future watches. But if you want it to be noticeable that this is a vinyl record, then you should not use this method. Under the picture it will not be clear what material the product is made of. To achieve the same effect, you can simply take a sheet of plywood or plastic.

We study one of the options for making a clock from a vinyl record using decoupage technique
To work you need:
- Brush;
- Acrylic paints;
- Vinyl record;
- Special glue for decoupage;
- Napkins;
- Scissors;
- Directly the clock mechanism and hands.
We take a plate corresponding to the desired size of your watch and apply white acrylic paint to one of the halves. This will be our first layer. The paint lays down quite well, but to create a more even surface, it is better to do two or three layers.
Now it's time to move on to the next layer of the clock. We cover the entire area of the plate with a water-based finishing varnish. To create decorative cracks, it is worth using paint and varnish from the same manufacturer. Set aside work for 2-3 hours so that our products dry a little.
If we want our watches to be made using the craquelure technique, then it is worth covering the layer of varnish with cracking paint. It is worth remembering that the varnish coating should only dry a little. If you allow the glossy varnish to dry completely, and this will happen approximately 24 hours after application, then elegant cracks will not form on the surface. The size of the craquelure directly depends on how much time has passed between applying varnish and cracking paint. The longer the time interval, the smaller the cracks and vice versa. Consider also the fact that if the cracking paint is applied too quickly, it can mix with the varnish, which will not allow you to get the desired effect.
To create cracks on the half of the record that was not painted white, use yellow oil paint. And for the white part - chestnut.
Glue the cut flowers using a thick solution of vinyl glue (in the proportion of glue to water 1 to 3, respectively). To attach it, apply glue with your fingers, as the appliqué is very thin. Pay special attention to attaching the edges.
In the final step, you will need to install the mechanism with arrows using the hole in the center.
So, our watch is ready. This is just an example of making clocks out of vinyl. By connecting your imagination and diligence, you can create countless truly magnificent and original watches.
Video on the topic of the article
Watch our video compilation and get started.