Decor of old chests of drawers cabinets. New life for old chests of drawers. How to update an old nightstand
A chest of drawers is perhaps the most versatile piece of furniture. It can be found in the bedroom, and in the hallway, and in the living room, and sometimes even in the kitchen ... But standard models are usually sold in stores - without any special design frills. And that means everything is in your hands. Want to update your old dull chest of drawers? Have you looked at a new, very comfortable, but outwardly banal look? Rather, take a look at this selection of master classes to find out how to decorate this piece of furniture in an original way. And also - a low cabinet with doors and even a bedside table.
So, how can you decorate the front of a chest of drawers? We have divided the options selected for this release into 2 categories:- decor methods that do not require coloring (the first five);
- original ideas with coloring (five more).
What will you choose?
1. Wallpaper

They are suitable not only for walls, but also for the facade of the chest of drawers. Especially one with a lot of drawers and no handles (for example, MALM from IKEA). Measure each of the drawers, then cut the wallpaper to size and stick it on the fronts. Especially impressive - in combination with wall wallpapers on the same theme. If you want more practicality, cover with furniture varnish on top.
2. Sticker with large flowers

Vintage watercolors with flowers are an excellent decoration for anything, including a chest of drawers. Find a suitable picture on the Internet (the photo must be in high resolution), download it, order printing of the image on a self-adhesive film, and then attach it to the chest of drawers. If your chest of drawers does not have doors, but drawers, cut the film into equal parts before pasting. If you want to make this process as easy as possible, just buy a large multi-color sticker with a matte surface.
3. Classic sockets (for cabinet doors)

Do you like classic stucco and palace-style decorations? So this idea is for you. Decorative rosettes made of styrofoam or (better) polyurethane foam can be found at any hardware store. Paint them white, and cover the middle with lilac (to get the desired color, mix purple paint with white). And then glue to the front of the dresser. Looks elegant and unobtrusive.
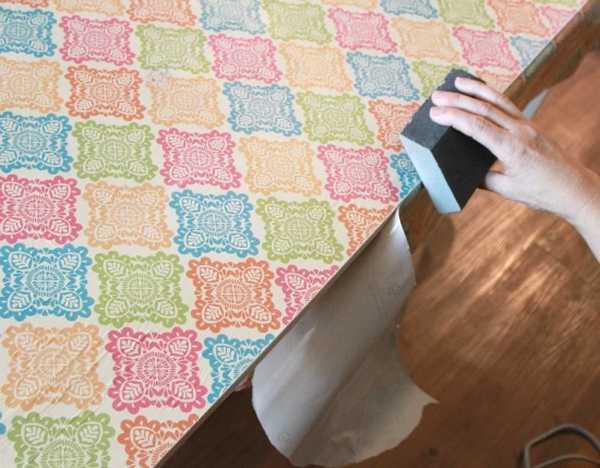
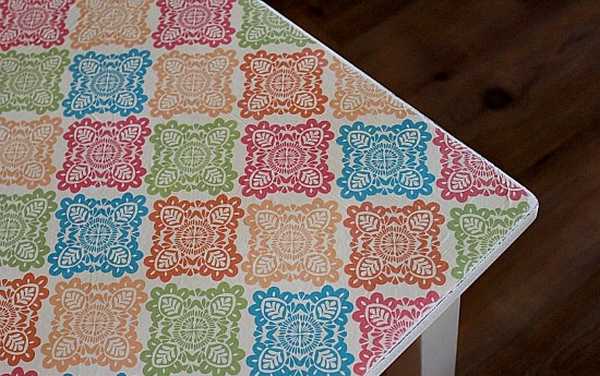
4. Patterned fabric

Looks like an expensive designer chest of drawers. In fact, it is very easy and inexpensive to do. All you need is a pretty patterned fabric and double sided tape. Cut the fabric into pieces of the desired size, glue on the facades, leaving an allowance of about a centimeter. Don't forget to cut a small hole for the handle. This idea is perfect for any furniture - a chest of drawers, bedside tables (as in the photo), a low cabinet. And even for a large closet, as you can see for yourself by looking at the master class from our other selection - (see guide number 3).
5. Seen from above

Did you get a low chest of drawers with a wide top from your grandmother? Refine this retro piece of furniture by gluing a few pieces of wrapping (gift) paper with an interesting pattern to the tabletop. If desired, the remaining elements (facade and legs) can be painted to match the paper. Tip: use painter's tape as a border to avoid unevenness.
__________________________
If you are ready to actively use paints, here are 5 more chest of drawer decor ideas with original coloring of its facade.
6. Colors of the sky

Shades of blue are soothing, balance overly bright tones and fit almost any interior. If you have a tall chest of drawers with lots of drawers, paint each one a shade of blue to create a gradient effect. In addition to being beautiful, it is also practical - now you will not forget which of the drawers contains what.
7. Sunset on the coast

Do you remember holidays by the sea, with picturesque sunsets and catching the sun in your palm? This beautiful phenomenon of nature can also decorate your home - in the form of a picture on a chest of drawers. All you need is spray paint in matching colors and masking tape. Paint over one half of each drawer, covering the other with tape, then repeat for the second. To complete the look, replace the handles with beautiful driftwood polished by the sea.
8. Sea waves

Subtle patterns, like ripples in the water from a light breeze, are easier to make than you think. You will need a relief paint roller (made of rubber), which is used to paint the walls, turning them into texture, plus two types of paint - blue (about 1 cup) and white (1 can). First, paint the chest of drawers white (in 2 layers), wait until it dries completely. And then apply the pattern to the surface of the drawer fronts, moving the roller along the long side. Your chest of drawers is already white, but did you like the idea? The task is simplified to the limit: just make patterns!
9. Lucky streak

Zigzag is a universal pattern for anything. And making it is much easier than you think. Stick masking tape on the right places, use a cutter to give it a zigzag shape. Prime the exposed part with white. When dry, peel off the tape and paint over the rest of the piece bright green (using painter's tape on the finished part).
10. Under the mask

Do you want to paint a chest of drawers with an interesting ornament, but you don’t have the talent of an artist? Use stencils. Apply paint to the workpiece, press down, remove when dry. In this way, you can create even those patterns that seem complicated to you.
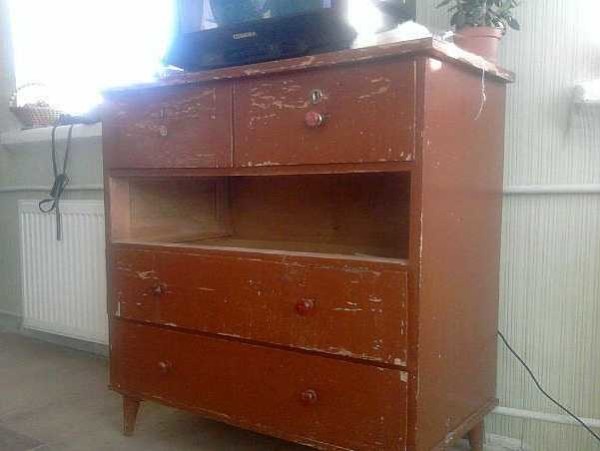
The times of shortage of furniture are long gone, and today we can buy whatever we want for an apartment and a house to our taste. But until now, many owners of furniture from the era of socialism are trying to repair them, to give them a new life. And this is not from greed or a keen attachment to things. Just such an object as an old chest of drawers may not be rubbish, the place of which is perhaps in the country, but a challenge to one's own imagination and the ability to create with one's own hands.
Restoration of an old chest of drawers: pros and cons
The processes of repair and restoration are similar, but have several significant differences. When repairing old furniture, we simply transform it most often: remove peeling paint, sand it, apply a new layer, and fasten loosened elements. Restoration is a deeper work that goes far beyond the boundaries of cosmetic repairs. In addition, a restored chest of drawers can become more valuable if it was originally a rather original, exclusive product.
Before you decide to restore an old chest of drawers, conduct a thorough assessment of its value. Inspect the product for tags or stamps indicating the name of the master and the time of manufacture. It may turn out that your chest of drawers is an old piece of furniture art, and, having started processing it, you will lose a truly valuable thing.
An old chest of drawers may be of antique value
Signs of antiquity can be the following:
- sharpening of internal corners as a result of long-term operation of the chest of drawers;
- uneven notch on the fastening screws;
- different distances between the turns of the notch.
The last two signs may indicate that the fasteners were made by hand, and not industrially.
All of the above can be seen with the naked eye. A deeper analysis will be carried out by a specialist whom you invite to evaluate the product. Until the final conclusion, it is not recommended to start restoration or repair work.
Restoration process from start to finish
So, you have decided to restore the old chest of drawers with your own hands. The work will be painstaking, requiring attention and time. Each step is extremely important, so try not to miss anything.
Old chest of drawers in need of restoration
For work you will need:
- putty and glue for wood;
- sandpaper of different grain size in a set;
- a hammer;
- Screwdriver Set;
- rubber mallet;
- gloves and respirator;
- toothpicks, toothbrush;
- a tool for cleaning accessories (tooth powder is suitable);
- brushes;
- paint and varnish.
Product cleaning
An old chest of drawers must be cleaned so that the surfaces and decorative details are not damaged. First, wipe the product with a sponge and soapy water. The water should be warm, but not hot, and as a detergent - household or stain-removing soap without chlorine.
Antique pieces of furniture, especially chests of drawers, are often decorated with small details and carved inserts. A toothbrush will help you clean them well.
Remove the furniture fittings (this will give you access to the surfaces under the parts for better dirt removal) and rub with a cleaner. For example, tooth powder works well for silver.
Clean hard-to-reach places such as crevices and corners with an awl or toothpick. Plaque and ingrained dirt can be removed with fine sandpaper. It should be used very carefully, otherwise the finish may fade as a result of strong pressure.
If you decide to change the color of an old chest of drawers or cover it with a new layer of varnish, the surface must be carefully sanded.
Preliminary preparation
After the old chest of drawers has been washed and dried well, repair or replace the damaged items. Finding suitable parts is likely to be difficult. To do this, it is better to contact an antique shop or a carpentry workshop to order the manufacture of the necessary decor items. You can also get professional help with installation parts there.
Check how well the screws and bolts are tightened, if the wood is cracked. Loose or rusty bolts must be removed and replaced with new ones. Fix small cracks on the surface with wood glue; those that are larger, cover with putty on wood, picking it up strictly in tone. If you plan to subsequently cover the chest of drawers with stain, then use a special putty.
Painting work
Now you rarely see furniture made of natural wood in a wide sale. An old chest of drawers may not match the modern style of your home. Therefore, in addition to a fresh look, this product can be given a new image. The easiest way is to paint it in one color, for example, white.
First of all, remove the old coating from the surface. Do this carefully so as not to damage the wood and leave no traces of the old coating in the cracks and corners.
Thoroughly clean the surfaces of the chest of drawers so that there are no bumps
Now sand the surface to get rid of bumps and small imperfections.
Sand the surface well
After sanding, proceed to putty. Carefully repair all chips and unnecessary holes. After the putty has dried, rub it with fine-grained sandpaper.
To paint the chest of drawers, use a special paint for wood. It may be necessary to re-sand the surface. To give the chest of drawers a gloss, a layer of varnish can be applied over the paint (naturally, after complete drying).
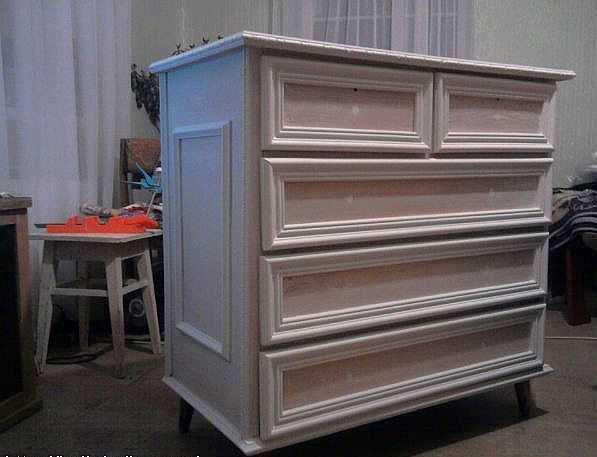
Replacement of old parts
The old chest of drawers used in our example had iron handles. Of course, they are beautiful and give the furniture an antique look. But unfortunately, some of these pens are hopelessly damaged. The easiest way out is to completely replace them with new ones that are more suitable in style. This is easy to do: drill holes of the desired diameter in suitable places and insert the fittings.
Replace your old dresser handles with new ones for a modern look.
As you can see, the chest of drawers has become completely different: new, modern and exclusive.
New life for old furniture
Decoupage chest of drawers
If pure white is not enough for you to breathe new life into an old chest of drawers, decoupage.
- Paint the surface with white acrylic paint. Let dry well.
- Cut out patterns from decorative paper napkins. Stick them on the dresser with PVA glue.
- After everything is dry, varnish the chest of drawers.
That's all, your chest of drawers sparkled with new colors! Decoupage is good because you can choose any pattern and pattern that your imagination allows.
Master class on decoupage chest of drawers (video)
Another repair option
This method will help you turn an old and boring bulky chest of drawers into a light and elegant piece of furniture. For the transformation, we will take the classic model without any special decorations: three wide drawers and two small ones.
Classic chest of drawers with three large and two small drawers
You will need the following tools and materials:
- means for removing an old layer of varnish or paint;
- sandpaper;
- chisel;
- matte putty;
- PVA glue;
- self-tapping screws;
- polyurethane foam decorative moldings;
- wallpaper;
- paraffin;
- acrylic water-based paint;
- transparent water-based varnish;
- 8 decorative handles.
Training
Unscrew the knobs on the chest of drawers. Examine it carefully from all sides. Pay special attention to the lid and legs: in these places, the wood is usually subject to the greatest damage. If the deficiencies are minor, it is not necessary to eliminate them. But in case of detection of more serious damage, sometimes it is necessary to replace some parts completely.
Free the chest of drawers from the old varnish or paint. The upper layers can be removed with a chisel; they usually come off easily. Carefully rub the remains with emery so that clean wood is visible.
Thoroughly clean the product of old paint and remove accessories
In places where noticeable bumps and dents are found, apply mastic with a spatula and level the layer. After drying, sand these areas with fine-grained sandpaper. Do this carefully, do not press too hard, otherwise you will damage the fresh layer of mastic. As a result, the surface should become perfectly flat.
The new drawer handles you buy may be smaller or larger than the old ones. In this case, you need to seal the holes left from the old handles that you removed with mastic and make new ones in the right places with a drill.
Note! There are handles that are attached to special screws. They do not need to drill holes. If you have the opportunity, purchase such accessories to make your work easier.
Dilute PVA glue with water. Using a brush, treat the entire surface of the chest of drawers. You can replace the glue with any primer. When the surface is completely dry, you can start decorating.
decorative elements
First of all, prepare the main elements of decor - frames for sidewalls and drawers. They can be made from conventional polyurethane moldings. In this work, the main thing is the correct measurements. The frame for the drawer should be located strictly along the edge. On the sidewalls it is better to make a small indent.
Correctly calculate the dimensions of the decorative frames on the boxes
It is also very important to properly trim the corner parts of the molding.
When you have prepared all the details for the frames, proceed to fix them. For greater reliability, fasten the frames with screws, then seal the places where they enter the moldings with mastic so that the hats do not stand out.
Cover with mastic the places where the screws enter the moldings
Now paint the installed frames with acrylic paint. Choose any color that you like or suits the interior of the room. For example, light coffee or beige is well suited for a French-style chest of drawers. Apply the paint in several layers, each time waiting for complete drying.
Paste wallpaper inside the frames. It is good if they have a thick texture and a fancy pattern. The ornament should be darker than the general background. After you finish pasting the wallpaper, carefully screw the handles into place.
For original decor, use wallpaper
The final touch is the coating of the chest of drawers with a transparent varnish. It should be applied in several layers.
Chest of drawers after restoration in the interior of the bedroom
To make the drawers slide out of the grooves easily, grease the wooden parts of the pull-out system with paraffin. Sliding will be greatly facilitated.
How to restore an old chest of drawers (video)
As you can see, turning an old bulky chest of drawers into a completely new and attractive interior element is not at all difficult, although troublesome. But all the difficulties fade before the result of the work. Tell us in the comments about your ideas for restoring and reworking old furniture. Good luck and enjoy your home!
Despite the fact that Soviet-era furniture is quite reliable and strong, it is not considered beautiful, let alone competing with modern furniture. In addition, by this time it was pretty worn out and in need of repair. Even in such conditions, the owners are sorry to part with it. To buy a new, modern one, you need a lot of money, because furniture has always been not cheap, and it is not cheap even now. In this case, there is one, alternative option to leave the old furniture and not buy a new one - this is to try to update the furniture with your own hands, giving it an attractive and modern look. Cabinet furniture is quite easy to remake, especially since there are all the materials necessary for this. In any case, it will be much cheaper to purchase materials for remodeling furniture than buying new furniture. One of the easy and affordable tricks is to change the color and replace the hardware. There will be no special problems with fittings, but with a change in appearance, everything is much more complicated. There are several options, but two are considered the most common - painting and gluing a special film or wallpaper.

The most affordable and easiest option is to paste old furniture with self-adhesive film. On sale you can find a film for every taste, both color and monotonous, of various colors, shades and textures. Many prefer wood effect film, but there are other options that meet the spirit of modernity. This approach can really turn an old wall into furniture that will have an attractive and modern look. It is not at all difficult, it is enough to do your work slowly and carefully, which will allow you to get an interesting result that deserves attention. To see this, just look at 2 photos. In the first photo, an outdated Soviet wall made of chipboard, and in the second - the same wall, but after renovation.

The wall has received a new appearance thanks to the use of compacted self-adhesive furniture film, cream color with a matte surface. Where there was an open part of the wall, there are glass doors pasted over with a translucent matte film. For edging used furniture layout, chrome colors, and also self-adhesive.
The work consists of the following stages:
- The old wall is dismantled, everything that is not needed is removed, including accessories.
- All surfaces are cleaned of dirt and degreased. To do this, use a soft cloth and detergent. After that, the product is washed off with warm water and vinegar and finally the surfaces are wiped with a dry, clean cloth.
- Fragments of the required size are cut out of the film, with a margin of up to 1 cm. After pasting, the excess film is cut off with a clerical knife.
- The surface before pasting is irrigated with water from a spray bottle. A wet surface will allow you to accurately position the film, as it can be moved, or even peel off if the first time it was not possible to glue it well.
- Before pasting, the protective film is removed from the film, after which it is laid on the surface. Having correctly positioned the film fragment, they begin to smooth it with a soft cloth in the direction from the middle and to the edges. The main thing is that there are no air bubbles under the film. In this regard, all work is done slowly and very carefully.
- When bubbles form, they are pierced with a thin needle and the air is expelled from them. This operation is also carried out with a rag, moving from the edges to the puncture point. After that, this place is carefully rubbed with a rag.
- After the film is glued, a thin cotton fabric is taken and superimposed on top of the film, after which an iron with an average heating temperature is used. The fabric is ironed along with the film.
- In conclusion, the finish (edging) is glued and fittings (handles) are installed.
- This technology is applied to each glued part. Glass is glued in the same way, only from the inside. After complete assembly, you will get a completely new furniture wall. In this way, you can breathe a second life into items such as bedside tables, chests of drawers, cabinets and kitchen furniture.
After the wall was successfully pasted over, the old cabinet was also updated and installed on the right. As a result, it turns out that the entire wall is filled with updated furniture. Using the same technology, you can also update old kitchen furniture - stick a self-adhesive film and replace the handles.

There is a second option for updating furniture, which is less expensive and, most interestingly, you don’t need to disassemble anything. In this embodiment, only furniture doors are pasted over and not with a film, but with non-woven wallpaper. PVA glue is used for pasting. So that the edges of the wallpaper do not bulge, they are cut into blanks, the size of which is 5 mm smaller than the size of the doors. Judging by the photo below, the result is not bad at all.

The advantage of such a finish is that the finish can be replaced with new wallpaper at any time.
As a rule, the surface pasted over with wallpaper lasts for five years. A similar technology was used in the finishing of the kitchen set. To make the surface washable, the wallpaper is covered with two layers of PVA glue. The most important thing here is to do everything carefully so that smudges do not form, since you will have to work with a brush.
Alternatively, the wallpaper can be varnished, but before that it is better to experiment on unnecessary wallpaper. It is important to determine what will be the reaction of the wallpaper to the varnish. When choosing a varnish, you need to know that acrylic and cellulose give a transparent surface, and polyurethane, after a certain time, will turn yellow. Polyurethane varnish is practically not amenable to the action of solvents and, if it is necessary to remove it, then mechanical action will have to be resorted to. Usually, coarse sandpaper is used for this or an electric drill with a nozzle is used.
How to update a chest of drawers
An old chest of drawers can stand in the attic for several years and lose only its appearance. As a rule, the old lacquer coating cracks, but otherwise, modern furniture can envy it. It does not dry out and remains as reliable and strong as it was before. In this case, the chest of drawers undergoes a more complex update, using painting and decoration, using polyurethane molding and wallpaper.
Stage number 1. All fittings are removed from the chest of drawers, after which the old coating is removed. As a rule, the old varnish coating is removed mechanically using sandpaper (large). All shells, cracks and chips are sealed with putty and wait for it to dry. After complete drying, the surface is polished with a fine emery cloth. The result is what is in the photo below.

Stage #2. Installation of polyurethane moldings. The main task is to choose the right moldings so that they are neither small nor large. Basically, products up to 5 cm wide are selected and very narrow if you look at them in profile.
Acquired moldings are very carefully and accurately cut into segments of the required length, and the corners are cut at an angle of 45 degrees. At the same time, care must be taken to match the pattern. The molding is attached with PVA glue. Alternatively, you can use self-tapping screws for reliability. At the same time, before screwing them, recesses are made for them. All recesses are sealed with putty very carefully, otherwise there may be problems when the putty dries.

Stage 3. All surfaces for gluing are treated with a primer. As a primer, it is possible to use PVA glue diluted with water in a ratio of 1:2. After the primer has completely dried, proceed to painting. As a rule, 2 coats of water-based acrylic paint are applied. Color - coffee with milk, although the photo does not match the color indicated due to poor color reproduction.
Stage number 4. Decoration is carried out on the basis of wallpaper made using silk-screen printing technology. Segments of wallpaper are cut clearly according to the size of the inner part, bordered by molding. The wallpaper is glued with PVA glue. After complete drying, the entire chest of drawers is covered with a water-based varnish in 2 layers.

Stage number 5. In conclusion, modern legs in the form of wheels for furniture are screwed to the chest of drawers and handles are installed.

If you carefully study the technology, then everything is much simpler than it might seem. Although, all stages require a certain accuracy, otherwise there will be problems with the appearance. In the same style, you can update the wardrobe. The result is not a bad set for a room or bedroom. Maybe not quite modern, but original and stylish, and most importantly - very cheap.
If old furniture has a varnish coating, then getting rid of it is very difficult. In the absence of obvious flaws, it is better to resort to the help of a primer for complex surfaces and only after that proceed with painting. This approach will minimize the effort to update old furniture.
Updating an old nightstand
The photo below shows the process of updating an old polished bedside table. First of all, polishing was removed, after which the surfaces were puttied and sanded. After that, it was painted with acrylic paint in two layers. In conclusion, paper from the gift bag was glued onto the door, thanks to which it was possible to obtain an original drawing. After that, the entire bedside table is covered with two layers of semi-gloss acrylic varnish.

All stages are not particularly difficult if you have the slightest skills. All processes correspond to the sequence of actions described during the restoration of the chest of drawers. The result exceeds all expectations.
 This old nightstand needs to be updated.
 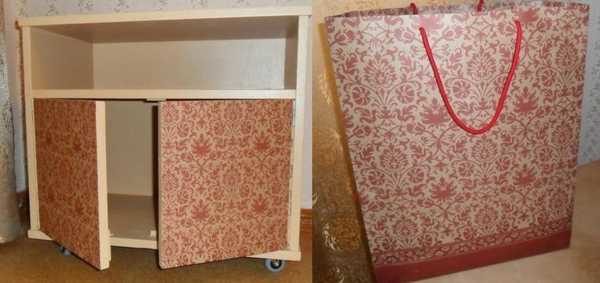 This package will serve as an excellent decor for the doors.
  The result of updating the old nightstand.
 Remodeling furniture with your own hands is simple and accessible to everyone, if there is a desire. Unfortunately, without desire, nothing will work. Below in the photo, you can see a bedside table, redone according to a very simple technique: the bedside table was simply pasted over with embossed wallpaper and varnished twice.
How to remake a table
Having adopted such technology, it is enough to simply turn an ordinary coffee table into a piece of modern interior. It is simply taken and pasted over with wrapping paper. This is a thick paper that sticks without problems and does not sag under the action of varnish.
First you need to do the legs and edges of the tabletop. They need to be painted in a light color so that they fit more with the new style. After that, you can proceed to further work.
Before gluing, a paper blank should be cut out a little larger than the size of the countertop. PVA glue is used for gluing. The surface is well rolled with a roller so that there are no air bubbles. The result should be a perfectly smooth surface.
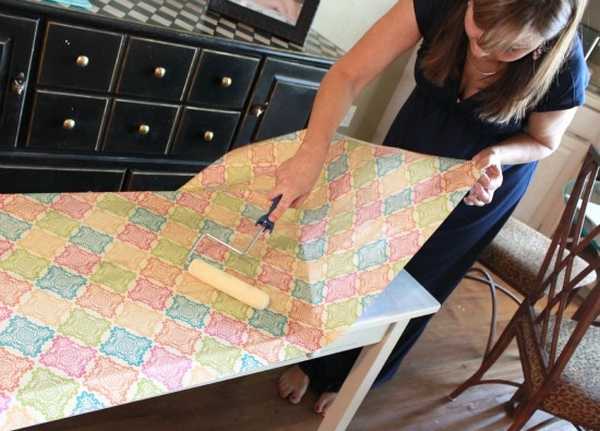
After that, remove excess material by running a fine-grained emery bar along the edge of the tabletop, pressing the paper against the tabletop. This method allows you to very evenly remove excess material, which is more like a professional action.
Finally, the surface is covered with two layers of varnish. In this case, the layers should be thin. Each layer is applied perpendicular to the previous one.
Alteration of furniture: photo ideas
Updating furniture is a common practice that does not require significant investments and allows you to implement creative author's ideas. This also applies to chests of drawers - perhaps the most functional furniture. The decor of the chest of drawers should be combined with the interior of the living room in which it is located. If you want to accentuate a discreet pastel design, a chest of drawers with an updated print and topped with a vase is a good solution. Another thing is if you need to create the perfect combination of color palettes. A properly decorated old chest of drawers will cope with any task.
Buying new furniture is not cheap. And the models sold in the post-Soviet space are not always original. Therefore, a master class on upgrading an old chest of drawers is useful for those who want to save money, as well as people with an artistic mindset who gravitate towards everything original. So, how to decorate a chest of drawers with your own hands?
Updating an old chest of drawers
Whether it is the restoration of a chest of drawers or the decor of a bedside table with your own hands - everything is done in stages. The first thing you need before starting work is the tools. Here is a list of what is required:
- small grinder;
- sandpaper or sanding sponge;
- stencils;
- putty knife;
- unnecessary toothbrush;
- screwdriver;
- wood knife;
- several brushes, different in width and composition of the pile (hard and soft), sponges;
- masking tape;
- acetone;
- industrial film;
- toothpicks.
From the materials you need:
- bulk paste or putty based on acrylic;
- glue for wooden surfaces;
- wood varnish, stain or primer with paint of a certain color (for decoupage - three-layer napkins).
You will also need gloves and a respirator.
If this is an artistic design, acrylic paint of the desired color will do. For those who want to modernize an old chest of drawers, a good option would be to replace furniture fittings: you can add new handles or mirrored panels.
Restoration
But for those who are not afraid of working with sandpaper, a spatula and acrylic paint, a stage-by-stage painted restoration of the chest of drawers has been prepared. The process consists of several steps: removal of the old paint or varnish coating, thorough sanding, checking for chips and other irregularities, local filling of defects, painting and final decoration of the chest of drawers.
But first you should look for defects in the interior of the chest of drawers. All broken bottoms, shelves and rails should be unscrewed with a screwdriver and measured. In accordance with the geometric parameters, you can buy new elements or make them yourself. If the second option is closer to you, be prepared to acquire an additional arsenal of tools and knowledge in the field of thorough furniture repair. Do not forget to do such a check before decorating a chest of drawers with your own hands.
Also pay attention to the screws, handles and legs. If the fittings are not the same, with differences in shape and pattern, then most likely these elements are made by hand, and if some of them are damaged, the analogue part can no longer be obtained. In this case, it is better to replace all fittings.
Cleaning and product preparation
Surface cleaning is done carefully so as not to damage important decorative elements of the product. First, clean the surface by wiping it with soapy water. Use a toothbrush to remove dirt and dust from hard-to-reach places.
To free the surface of furniture from paint or varnish, you will need industrial film and acetone. Cover the old chest of drawers with the last, and to enhance the effect, cover the product with industrial film. In the absence of a film, you can use oilcloth, cellophane and other improvised materials. Limit the air supply and leave the furniture for one hour. After this time, a layer of varnish and paint will lag behind the wood.
The decor of a chest of drawers with your own hands begins with work with a construction spatula. Remove loose layer from wood without damaging the surface. Remember to remove all paint.
Then comes the skinning step.
The surface free from small decorative elements is polished with a machine. For the latter, it is important to choose the right nozzle. Use sandpaper or a sanding sponge to sand the area of protrusions and small parts. Do not overdo the skinning, so as not to damage the chest of drawers.
Cracks, chips, scratches and other defects are carefully covered with putty on wood. It is better to give preference to water-based putty. For restoration, putty is selected by color, not by the name of the wood. It should only go into the recesses, so sand the surface again. If traces remain in the structure of the tree, stains will appear when stained with stain, which cannot be removed. Replace bottoms in boxes, skids and strengthen the frame.
Painting
The choice of paint, its brand and color depends on how you see the future decor of the old chest of drawers. This can be a stain layer if the wood structure is smooth sanded and looks good without paint. The stain is suitable for changing the color while maintaining the texture of the tree. You can cover the entire surface with acrylic paint, and then the design of the old chest of drawers will become completely different.
Both stain and paint are applied evenly with brushes or a roller. Works on time are the same: only the results on the fact of drying are different.
Stages of work:
- The choice of varnish, paint of the desired color and other materials.
- Tinting, staining or painting with a brush, roller. Maybe with a rag.
- A layer of varnish on the entire surface of the furniture. After drying - another layer or two. Can be replaced with transparent primer.
- Skinning to remove the raised pile of the array.
- Finishing coats of varnish.
- Wait until completely dry.
Design solutions
The decor of an old nightstand or a do-it-yourself chest of drawers is determined by the style of the interior. You can use wallpaper, lace, choose a floral print, fabric upholstery of drawers, paints or put names, memorable dates on the surface. You can decorate the entire front panel with coffee beans, buttons, beads, beads and other elements. If this is a living room, it is better to use presentable panels in a discreet color, but for a bedroom or a nursery, you are given complete freedom of choice. Decoupage technique, English style, voluminous decor, as well as antique decor do not go out of fashion.
Bedside tables are updated according to the same principle. But how to decorate a plastic chest of drawers? Decoupage is your best bet. The same work is carried out as above, with the exception of grinding. For plastic, special paints of various colors and primers are provided.
Decoupage
How to decorate a chest of drawers using decoupage technique? This is a real expanse for fantasy. Decoupage involves decorating furniture with the help of special cards and three-layer napkins. You also need to get white acrylic paint, PVA glue, scissors, a roller and a sponge. The process begins with the application of paint with a roller on the entire surface of the chest of drawers. Next, start cutting out the desired images. To give an old look after complete drying, you should walk over the product with sandpaper. This must be done carefully, along the lines of the wood.
Apply PVA glue to all parts to stick them to the chest of drawers. Lubricate the front side of the pictures with the same glue, which will protect them from external influences. If these are flowers or ornate patterns, they can be extended with patterns of lines and curls protruding from the surface of the bedside table.
Decoupage can also be done with fabric. This will decorate the facade to match the interior.
English style
But the design of a chest of drawers with your own hands is not limited to the idea of decoupage. For the English style, an old product is ideal, even if it has noticeable defects. You will need four colors: white, red, blue and brown. The first three are acrylic paint, the last one is oil. Of the materials, putty, spatula, topazure, masking tape, sandpaper, decorative nails, brushes and rollers are also useful.
The accessories are removed from the chest of drawers, and the product is cleaned. After the surface is covered with an uneven layer of putty: the more casually, the better. Cover the chest of drawers with white paint and mark the areas to be painted with tape. Dilute the scarlet and blue paints. The spotting that may appear during the staining process is only a plus. The tabletop and sides are treated with sandpaper. The finished work is covered with topazure (use a sponge for this). The ideal tone of toplazuri is “walnut”. After that, drive in decorative furniture nails and install fittings darkened with oil brown paint.
antique
But how to decorate a chest of drawers with your own hands if it is too old-fashioned? Lovers of country and Provence will appreciate the antique decor. This design is now popular, and you will need the following to work:
- sandpaper of various grain sizes and hardness;
- sponge;
- brushes and screwdrivers;
- lacquer craquelure;
- wax candle;
- 2 colors of acrylic paint.
Remove hardware, drawers and dresser tops. Treat the entire surface with sandpaper and wipe with a wet sponge. Apply the first coat of paint and leave to dry. The following abrasions will be intentional, and they are done with sandpaper and a candle. Then apply paint of a different shade (to your taste) and wipe with a sponge those areas that were covered with wax: in these places the paint will be erased. The finishing stage is the decoupage technique or author's painting. Then everything is covered with craquelure.

