Do-it-yourself cultivator from a bicycle. Manual cultivator - device and principle of operation, varieties and how to make a cultivator from a bicycle with your own hands
In the second issue of the magazine "Modelist-constructor" for 1971, a description of the motor-plough proposed by engineer V. Putov was published. Our readers have improved this motor plow, made it more convenient to use. Compare the design described in the "Modeler-Constructor" with the one we give today and try to find your own version. Perhaps your motor plow will turn out even easier and more convenient?
There is a motorcycle in front of you. It is very comfortable to work with. With its help, on a school plot of almost 3 hectares, the children carried out snow retention, then spring cultivation, plowing of ridges, harrowing, hilling, loosening. That's how much this little motor plow can do!
Pick up a strong frame from an old bicycle (preferably from Moscow), a handlebar of any design, a D-4 type bicycle motor, two drive sprockets from adult bicycles and one driven from a children's tricycle.
The frame does not need to be changed. The steering wheel is fixed tightly with a steel plate. It is necessary to strengthen the middle tube by inserting a tube of a suitable diameter into the saddle hole.
Place the intermediate gear assembly in the frame carriage. Turn the axis for it from steel in the shape of the axis of the carriage, but only with elongated ends, on which cut the MFA thread.
Take the drive wheel from an old header-mower. Attach lugs and an asterisk to it. Turn the axle of the drive wheel 300 mm long from steel. On the ends of the axle protruding to the sides, screw weights-counterweights for better adhesion of the wheel to the ground.
In the motor, you need to redo the clutch assembly. Remove the clutch box cover, then the drive gear, screw the threaded adapter tube onto the axle, drill a hole in the cover along the diameter of the axle and screw the cover into place. The clutch control lever is attached to the cover. Turn the pusher again - longer. Where the clutch lever was previously attached, install the sleeve - the cable holder.
Screw the motor to the frame with reinforced clamps. To increase its power, remove the muffler. The tension of the first chain is controlled by the position of the motor. The tension of the second is the position of the wheel.
Grouser spikes, plow,
hiller and cultivators are made of 3 mm iron. The tank for gasoline is mounted on the upper crossbar of the frame. Under it, you can install a fertilizer tank, the tube from which goes down under the plow or cultivator.
and. nozlov,
rune leader of the nrumka of young non-struntors of the Gorbatovskaya middle school of the Gornovskaya region
I - clutch lever pin, 2 - drive chain, 3 - clutch box cover, 4 - clutch lever, 5 - engine drive sprocket, 6 - clutch cable, 7 - engine drive shaft extension, 8 - engine drive shaft, 9 - box cover clutch, 10 - engine housing.
Owners of land plots know firsthand the labor-intensive process of cultivating the land. The use of a shovel, hoe, rake, of course, facilitates work, but is not very suitable for processing large areas, and requires no small physical effort.
But progress does not stand still - they came up with to facilitate human labor. For female gardeners, this is a useful find.
This technique is used in vegetable gardens, and on plots, in vineyards and orchards. One machine can replace many fixtures and takes up little space.
The options for using a hand cultivator are as follows:
- cultivates land before planting or sowing;
- loosens the soil for oxygen saturation;
- copes with splitting large clods of earth;
- pulls out weeds;
- helps in the care of flower beds;
- used for weeding the site;
- envelops the earth.
In the article we will talk about what cultivators are, what they are intended for and how to make them with your own hands. We will also analyze several specific home-made hand cultivators.
Possibilities of manual cultivators
For hard to reach areas or where a more careful approach is required, a hand rotary cultivator is well suited. It is brought to work by human effort.
Due to the "hedgehogs" it copes with the churning and loosening of the soil. It also turns the soil layers, which contributes to the fight against weeds.
There are also star cultivators that remove roots. They are usually easy to use, replace a shovel, and make digging much easier.

The manual cultivator is intended for:
- soil loosening;
- digging for further planting;
- removal of weed crops with roots;
- processing areas under trees, bushes;
- soil enrichment with oxygen.
Mini-cultivators are well suited for small areas, they do not take up much space, they are easy to move due to their low weight. Suitable for loosening the soil under trees, bushes and in hard-to-reach places. Land work is facilitated due to the correct distribution of the load on the muscles and the location of the person during work. 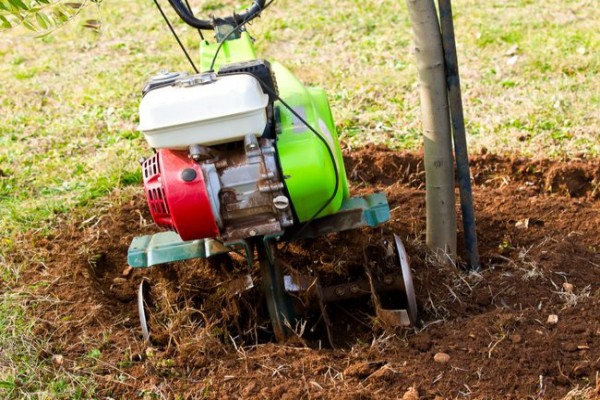
Varieties of cultivators
This technique is available in different models:
- disk
- paw
- rotary
- milling.
Almost all cultivators work according to the same principle: the mechanical part is started, which sets the device loosening the soil into motion.
Its classification depends on the purpose of the equipment: the difference in size, engine power, operation, and the extent of work. Given these criteria, they are:
- lungs
- moderate
- heavy.
For relatively small areas with soft soil, light equipment is suitable, usually flower beds, greenhouses. Medium weight equipment is designed for clay soil. Heavy equipment is universal, it is suitable for all types of soil.

Cultivators differ in the way they function:
- manual cultivators;
- with electric drive;
- on gasoline.
We will focus on hand-held cultivators, which you can make yourself to save money.
A number of advantages of manual designs:
- They are economical, do not require refueling.
- Replace several devices: a shovel, a hoe, a rake.
- They take up little space.
- Help to distribute the load on all muscles.
Manufacturing technology
From a pitchfork of the "Tornado" type
 It has the simplest design, somewhat reminiscent of a corkscrew. Consists of a vertical stand and a horizontal handle. Such a cultivator can be safely performed independently from ordinary pitchforks.
This will require a plastic nozzle, which is usually used for pitchforks, shovels, in the form of a handle. We slightly modify the nozzle so that the handle looks like a horizontal pipe. As it, take a part of a plastic pipe measuring 0.5 m.
Note: in order for everything to fit together, the diameter of the pipe must be slightly larger than the diameter of the nozzle.
- An incision is made along the pipe so that when everted, it fits on the handle.
- For reliable coupling and further practical use, fix everything with electrical tape.
- It remains only to give the pitchfork torsion in the form of a corkscrew. To do this, the teeth are bent with a hammer in the right direction.
Bicycle based
In order to make a homemade cultivator from improvised means, you will need an old frame from a bicycle and  one wheel.
Assembly method:
- A cultivator head is attached to the frame, which is either ready-made spare parts from an old device, or made independently from steel twigs. A small plow is suitable for the frame. And for ease of control, the handle is made of steel pipe.
- The crossbar is created from a pipe with a diameter of 2-3 cm.
- The whole structure is fixed with bolts, nothing should hang out.
- For convenience, the wheel is taken in medium size, securing it with locknuts.
- This type of cultivator is designed for weeding the earth between the beds.
Disc rotary
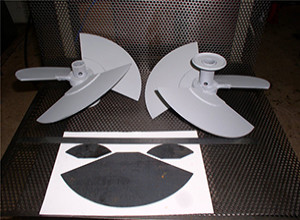
This type is designed for breaking up hard pieces and leveling the soil. The main working element is disks in the form of a sphere. The whole difficulty lies in their manufacture.
The order of work is as follows:
- Spherical plates 4 mm thick are made of metal. The bowls are knocked out with a hammer in the center of the plate itself.
- Discs are welded to the bushings, replacing them on the axle.
- The edge of the axle is fixed with special cotter pins in brackets.
- The ledge is made in a bracket, which is larger in size, a pipe and a handle are passed through it.
- In a smaller bracket, a rod with a diameter of 25 mm and a length of 26 cm is made. A rod 15 mm thick is also screwed in here.
- The convex corners of the cultivator are fixed with wing nuts.
- Due to the rotation of the convex corners, the large bracket bends, the rod rises, and the angle of the elements changes.
Chainsaw cultivator
 It is made on the basis of a chainsaw engine. It's good if you have all the components, if not, you need to buy more.
You will need materials:
- metal corner;
- fuel tank;
- a tube;
- rubberized wheels;
- star for the intermediate shaft (41 teeth);
- moped star.
First you need to weld a cube frame using metal corners for a walk-behind tractor. The frame size is 32 by 32 cm, the engine is mounted on the transverse corners on top, and the fuel tank is installed on the brackets below. Then, an intermediate shaft is attached to the corner vertically standing racks. For the running shaft, the bearings are attached to the longitudinal corners. From all this comes a walk-behind tractor supported on the surface of the wheel.
For handles, pipes with a diameter of approximately 30 mm are used. Good wheels will come out of rubber. Here a star for an intermediate shaft with 41 teeth and a main star (a moped one will do) come in handy. It remains only to assemble all the parts into one mechanism, and you will get a garden cultivator from a chainsaw (by the way, you can read how to choose a chainsaw).
This can be done even without blueprints. In addition, the cultivator is not very demanding on materials for refueling, unlike purchased models.
Cultivators greatly facilitate land work, help to qualitatively cultivate the land before planting, fight weeds and are simply indispensable for large areas. And if there is no money to buy these expensive machines, then it is quite possible to make it yourself.
How to make a hand cultivator from a bicycle tells this in detail video:
The cultivation of the land requires a lot of physical effort. It is especially difficult to work with rakes and shovels when you have to work a large plot of land. Do-it-yourself cultivators for the soil greatly facilitate human labor. The technique replaces many devices and is suitable for processing a vegetable garden, vineyard and garden plot.
Types and principle of operation of cultivators
The principle of operation of the cultivator is simple: the element that loosens the earth starts working after the mechanical part of the device is started. Depending on the external size, engine power and performance, cultivators are divided into three types: light, medium and heavy equipment.
- Light equipment is used in small areas with soft soil (flower beds, greenhouses).
- Medium weight is used on clay soils.
- Heavy machinery refers to universal equipment. It can be used for any soil.
 There are different types of cultivators: disc, rotary, tine and milling. By functioning, they can be: manual, electrically driven and gasoline-powered, as well as trailed, mounted, handle one or more rows.
When processing a land plot, everyone chooses the model they need. Hand cultivators are good because they can be made independently with minimal cash costs..
Advantages and disadvantages
Each cultivator, regardless of whether it is manual or electric, has its pros and cons..
- Manual cultivator. Easy to use and much more convenient than a shovel, compact. Does not load the lower back. It loosens the soil well, does not pull the roots all over the site. But this technique will not cope with unplowed land, as it has low productivity. It is best used in small areas such as flower beds or greenhouses.
- electric cultivator. Lightweight and compact technology, powered by the network. Easy to maintain. The lack of technology is the electrical cord. It can interfere during work, and due to its length, there is a limitation in the cultivated area. It has a low power and a small depth of tillage. Not intended for attachments.
- Petrol cultivator. Thanks to attachments, it has many functions. It is not connected to electricity, so it can move around the site. Suitable for processing small areas. Weighs a lot more than electrical equipment. It is difficult to care for it, and fuel is required for refueling.
Varieties of cultivators
Tornado
Tornado is the simplest version of a cultivator that you can make yourself. Outwardly, it looks like a corkscrew, which is mounted on a vertical tripod. From above the design is equipped with a horizontal handle. For its manufacture, simple pitchforks and a cutting attachment are used. The nozzle can be purchased at a hardware store. It has the shape of a handle and is used to work with pitchforks and shovels.

Bicycle cultivator
The design of this manual cultivator is more complex. It is made from parts of a bicycle: frame and wheels.

The cultivator is designed to remove weeds. Well handles the aisle.
Disc rotary equipment
The disc rotary cultivator is designed for harrowing and leveling the ground surface. They are good at breaking up large soil pieces. Equipment assembly:

The angle of installation of the discs can be adjusted using the wing nut, which is installed on the crossbar. By turning the nut, the rod will rise up and the large bracket will bend, changing the direction of the disks.
Cultivator from a meat grinder
In addition to making hand-held devices, you can assemble an electric model yourself. The design of the cultivator assembled from a meat grinder is very simple..
- For the manufacture of handles, two corners are screwed to the gearbox, and two pipes are welded to them.
- For convenience, the ends of the pipes are bent, and a suitable piece of pipe is welded between them, which will create additional strength for the handles.
- The axle for the wheels is welded to the corners. The wheel size is medium.
- The nozzle from the meat grinder is beaten off with a sledgehammer until the sleeve becomes cast iron.
- A shaft is machined from a simple scrap and installed in a nozzle. A grouser screw is also welded here.
- To make it convenient to turn the cultivator on and off, the engine switch is installed on the handle.
If it is necessary to make accurate loosening of the earth, the cultivator is moved slowly. Coarse plowing is obtained with the rapid movement of equipment, while the earth is plowed up with large clods.
From a chainsaw
The basis of the design is the engine from the chainsaw. Additional parts to be purchased: a metal corner, a tube and a fuel tank, wheels, a moped sprocket and a 41-tooth sprocket.
- From metal corners we make a frame measuring 32 × 32 cm. The shape of the frame should resemble a cube. The engine is mounted on transverse corners, and the fuel tank is mounted below on brackets. Intermediate shaft - mounted on vertical corner posts. Bearings are attached to the longitudinal corners. They are designed for the drive shaft. Motoblock with a center of gravity on the wheel is ready.
- Handles are made from a pipe with a diameter of about 30 mm.
Sprockets for the intermediate and running shaft, as well as the rest of the parts, are assembled into a single mechanism. The garden cultivator is ready.
How to make a manual cultivator for row spacing
To handle narrow spaces between rows, the cultivator must first of all be compact. For such work, a hand-held device called the "Hedgehog" is well suited. Having all the necessary parts, it is easy to make it yourself. To assemble the "Hedgehog" you will need: a U-shaped bracket with holes, a shaft, a handle and wheels with metal spikes.
- In order for the walk-behind tractor to easily move around the site, you need good wheels. To do this, take medium-sized steel pancakes and weld metal spikes to them. Spikes are easy to make, you need to sharpen the reinforcement in the shape of a cone.
- Finished cutters are put on the axis.
- The axis is inserted into the bracket and fixed on both sides.
- A fastener is welded to the end of the bracket and the handle is inserted.
The equipment is assembled and ready for cultivation and weeding between the rows.
From the trimmer
 A do-it-yourself cultivator made from a trimmer will help to process a small area quickly and easily. You can assemble it from improvised materials: a working gasoline trimmer, a grinder or welding, a garden pitchfork, a steel tube.
- To make a cutter, fork teeth are used, which are bent into the desired shape. Usually the soil is loosened to a depth of 10 to 15 cm, so the length of the teeth should be no more than 15 cm.
- Next, we make the working part. The fork tines are flattened to a width of about 1 cm.
- The cutters are sharpened with emery and fixed on a round penny.
- A nickel with a diameter of 10 cm should be perfectly even in shape. Cutters in the amount of three pieces are evenly placed on the penny. If you put more than three pieces, then the device will be heavily overloaded.
- The final part is the connection of the base with the cutters and the trimmer. Well, if the shaft tip is threaded. Then the trimmer is simply screwed to it.
The equipment is designed for loosening the soil at shallow depths.
Evgeny Sedov
When hands grow from the right place, life is more fun :)
Content
Cultivation is a method of processing the land layer without turning it over. Such shallow work of leveling, preparing for sowing, hilling potatoes, clearing weeds, harvesting can be facilitated by the use of hand cultivators. They will become indispensable helpers in small areas, in hard-to-reach places, when working in small greenhouses. If it is necessary to cultivate plots with an area of more than 3 acres, it makes sense to think about purchasing or creating a motor cultivator powered by electric or gasoline traction.
Types of manual cultivators
The variety of devices for cultivating the land is determined by the types of agricultural work that must be carried out from early spring to autumn. Some types of manual cultivators are used all year round to care for indoor plants or greenhouse plantations. According to the type of movement, they are divided into moving and point. The moving ones include all types of rotary openers, hillers, scarifiers, harrows. Point devices are tornado root removers, potato diggers, houseplant cultivators.
Rotary hand cultivator
The principle of operation of a rotary cultivator is based on the rotation of 4-5 end stars or cutters, the ends of which are bent and sharpened. They are driven either by an external mechanical drive or by manual pressure. Rotating cutters cut the roots of weeds, pull them out, and crush the top layer of the earth. At the same time, the surface is loosened. Such a device without a mechanical drive can only be used on improved lands. If processing of virgin soil is required, it is necessary to purchase an electric or gasoline motor cultivator.

Ripper
To improve irrigation, quickly remove weeds and fertilize on a personal summer cottage or garden plot, you need to buy a manual cultivator. It consists of 3-4 hooks bent to the bottom, which can be mounted on a long handle for processing the site or be fixed on a short handle for loosening the ground of indoor plants. It is possible to fix the ripper, as one of the interchangeable devices, on the frame of a wheeled manual cultivator or with a mechanical drive.
Root remover
To get rid of weeds, it is necessary to remove the root of the plant from the ground. A manual plant remover along with the roots will help to solve this problem. It consists of three sharp rods welded to the base, the ends of which are bent in one direction for screwing into the earth crust. The base is welded to a tubular element with an elongated cross handle. Such a device is called "Tornado" and works as follows:
- position the tool so that the weed is in the center between the tips of the rods;
- holding the ends of the handle, screw the root remover into the ground clockwise to the depth of the weed roots;
- pull out the plant along with the roots;
- shake off the ground along with the weed.
potato digger
Traditionally, villagers use pitchforks to dig up potatoes. A slight improvement in their design will turn them into an easy-to-use manual potato cultivator for people of any age. This requires a small transformation:
- the forks are not located vertically, but are bent at an angle of 30-50 degrees to the ground;
- a vertical pointed pin is welded to the tuleyka;
- instead of a handle, a metal pipe with a horizontal handle is inserted into the tuleyka;
- digging potatoes is done by sticking the tool into the ground near the bush, turning around the axis until the fork penetrates under the bush and tilting the handle until the tubers are removed.
For indoor plants
Manual garden cultivators are used for indoor plants, include a cultivator and a shovel. With the help of a ripper, the top layer of the earth is loosened, it becomes more accessible for the penetration of moisture, oxygen, and fertilizers. The spatula is used when transplanting plants, to add fertilizer. They are made of stainless steel with a rubberized handle. Hand tools for caring for plantings can be used not only for indoor pot breeding, but also in small greenhouses, greenhouses, when decorating summer cottages, personal plots, loggias with flowers.
flat cutter
The theoretical basis for the use in the reclamation of virgin lands, in contrast to flat-cut plows, was laid at the beginning of the 20th century, and was practically implemented in the 50s of the last century during the development of the Kazakh virgin lands. At the same time, the flat cutter cuts off the roots of weeds, produces loosening, but the top layer does not turn over, which does not violate the soil structure and increases productivity. A flat cutter consists of several pointed flat peaks or flat knives fixed on vertical rods of reinforcement, which, when moving, go to a depth of 10-20 cm, cut the upper layer.
How to make a manual cultivator with your own hands
Manual cultivators for tillage in the country can be made with your own hands. For this you may need:
- metal narrow strips or pins,
- wooden or metal cuttings with the possibility of fixing horizontal handles;
- a standard set of tools - a screwdriver, a hammer, a grinder, pliers, a vice, a chisel, screws.
- some products may require a grinder and welding work.
Making a cultivator
The most famous manual cultivator is Fokin's flat cutter. A design close to it can be made independently. For this you will need:
- steel strip 3-5 mm thick, 40-50 cm long and 4-6 cm wide;
- wooden round or square handle;
- 4-8 wood screws.
The manufacturing process will include several steps, for which you will need a vice, pliers, a chisel, a grinder. To make a flat cutter, do the following:
- drill 4-8 holes in the strip on one side for its fastening;
- bend the steel strip in the form of the number "7" with straightening its lower part;
- harden the workpiece - bring it to red with a blowtorch or put it in a fire, then let it cool;
- on one side of the square wooden handle, make a handle that is comfortable for the hand (if you have a round handle, make a flat surface with a chisel from one edge for attaching the strip);
- fix the strip on the flat surface of the handle with self-tapping screws;
- sharpen the horizontal part of the flat cutter on a grinding wheel.

Tornado
If it is not possible to purchase a Tornado fork root remover, you can do it yourself. The easiest way is to change the shape of the teeth of conventional forks - the bases of the teeth must be placed evenly around the circumference, and the sharp ends should be bent in one direction in a spiral. Instead of a handle, it is desirable to weld a vertical professional pipe up to the chest of the owner with a transverse handle of 80 cm in a shape resembling the letter “T” to the tuleyka. The handle should be comfortable to grip with two hands along the edges, and the increase in the lever will facilitate the process of cutting into the ground when turning it.
DIY star cultivator
The main tasks of the star cultivator are cutting the roots of weeds at a depth of 10-20 cm, mixing the topsoil. This task is easily handled by low-power manual electric and gasoline motor cultivators. Simplifying the creation of a home-made such unit can be used in the design of an old bicycle with the transmission of wheel rotation to the star by means of a chain drive. For those who want to make a simple star cultivator, you need to stock up:
- sheet metal 2-3 mm thick;
- smooth rod with a diameter of 5-8 mm;
- a tube 20 cm long and an inner diameter of 7-10 mm, which must correspond to the diameter of the rod;
- a tube 15-20 cm long and with an inner diameter of 30-40 mm to create a tulle; a metal or wooden handle with a diameter of 30-40 mm and a length according to the growth of the farmer.
Creating such a device on your own is fraught with the difficulty of solving the problem of rotation of stars or cutters without friction. The use of a complex mechanism with bearings for this purpose will create many additional tasks - the need for lubrication, protection from the ground, moisture. Instructions for making a simple star cultivator include:
- From the available steel sheets, the angle grinder cuts out 6-7 beam stars with a beam length of 5-8 cm from the disk and a hole in the middle.
- The tube is cut into 2-3 equal parts and welded to the sprockets.
- The resulting rotary disk element is mounted on a rod (rotation on it must be free).
- The rod is bent to give it a bottle-like appearance (while its ends are connected together, the arc of the bent rod should not interfere with the movement of the rotation element).
- The ends of the rod are inserted into the pipe and riveted or welded to the tuleyka.
- A stalk is inserted into the tuleyka and fastened with a self-tapping screw.
- A strip 3-5 cm wide is cut out of a sheet of metal, which is given a U-shape.
- The strip is attached to the rod closer to the tuleyka.
- After anti-corrosion painting, the tool is ready for use.
Cultivator from an old bicycle
An old bicycle can be an ideal blank for creating a cultivator. This requires a frame, steering wheel, and one of its rear wheels. A drawing of such an alteration can be found on the Internet. Do the following:
- remove the front wheel;
- turn the steering wheel with the handles outward and fix (can be welded);
- remove levers with pedals;
- half shafts with cutters can be fixed to the axis of the front star on both sides;
- if you leave the chain, then the rotation of the wheel will be transmitted to the star and rotate the cutters, to speed up the rotation, it is advisable to swap the large star and the sprocket on the wheel;
- on the lower part of the vertical seat tube, fix the pipe with fasteners with bolts for additional attachments - rippers, plows, hillers, slotters, harrows;
- the control of such a unit consists in pushing the handles with the wheel forward;
- You can adjust the depth of penetration of the cultivating tool into the ground by pressing down.

Advantages and disadvantages of manual cultivators
Agricultural work - digging, weeding - is hard physical labor. Therefore, any means of simplifying it will always be appreciated by farmers. Caring for indoor plants, a flower garden in the country will require the use of manual rippers, spatulas. Garden plots with an area of more than 3 acres will be difficult to process without a universal motor cultivator with a set of different attachments. For small plots, complex sites or greenhouses, the use of manual cultivation tools is justified. Their pluses are.
To ensure a good harvest in your beds, it is not enough to plow the land and sow it. During growth, and especially the maturation of crops, the land must be constantly cultivated. Hilling is carried out, weeds are removed, the hardened surface is loosened between the rows.
All this can be done with a chopper or a shovel. However, labor efficiency increases by an order of magnitude if the soil cultivator is mechanized.
Any owner can make such a device with his own hands. Special tools are not required, except perhaps a welding machine.
Needless to say, this idea is not new. Many decades ago, when the population of one-sixth of the Earth was experiencing a dacha and garden boom, such tools were popular. They were bought in hardware stores and, if possible, made on their own.
Consider options for how to make a homemade manual cultivator
The main types of tools:
flat cutter It is a mechanized version of a conventional chopper.
Rotary star. The principle of operation is to alternately cut the soil with flat knife-like elements.
Manual cultivator hedgehogs. The design is similar to the star, but the ground is pierced not by knives, but by sharp steel rods, similar to porcupine quills.
Tornado. It is a pitchfork with teeth twisted into a small spiral. It is not subject to mechanization, it just needs to be stuck into the ground.
How to make a manual cultivator for a summer residence from improvised materials?
Used materials and tools:
- Steel strips, pieces of reinforcement, or other metal blanks, depending on the model chosen;
- A wheel with a mount, or a finished frame (for example, from a bicycle);
- A pen. You can use a metal pipe or a shaft from a shovel;
- Welding machine (preferably);
- Drill, Bulgarian.
Cultivator "Tornado"

It is very easy to make it. The base is made of steel pipe. We weld steel bars to the end to form a square.
Then the rods are bent in a helical manner, and the ends are sharpened. You can use the shaft of a shovel as a handle, or adapt a bicycle handlebar as a lever. Then it will be easier to perform turning movements.
With such a cultivator, they loosen the soil to a great depth, dig out the roots of shrubs and prepare holes for planting trees.
Cultivator
The frame is made from square tubing. One weld point at an angle of 30°. We weld a fork for a wheel from a steel tape 3 mm thick to the frame. The type of wheel does not matter, it can be ready-made or homemade iron.