Chest from a cardboard box. Master Class. Chest for "treasures" from cardboard Master class on how to make a chest from a cardboard box
There are a lot of master classes on creating cardboard chests on the Internet. But I always had questions: what kind of glue is better to glue the cardboard so that it does not lead, how and how to strengthen the walls, the bottom of the chest, etc. And when I had the opportunity and the opportunity to make the chest, I decided to photograph all my actions, the stages of creation and leave , as a cheat sheet, so that next time it will be easier and faster to do it.
To make the chest I used:
- a ready-made corrugated cardboard box and additional sheets of corrugated cardboard, napkin flagella, vinyl wallpaper;
- PVA glue carpenter, PVA building glue, PVA glue contact, Moment Crystal glue;
- pencil, ruler, carbon paper;
- scissors, stationery knife, stationery scalpel;
- alkyd and acrylic paints;
- yacht varnish;
- metal fittings (lock, canopies), bolts, nuts.
In those places where I planned to screw the handles, locks and hinges, they glued pieces of plastic cut from a plastic bottle.

I glued the joints of the bottom with the walls with a dense cloth (I was afraid that without this the bottom would fall off the walls if something heavy was put in the chest).

Then, on the inside of the box, I glued additional cardboard walls. In the photo there are 3 types of glue, which (for the purposes of the experiment) glued. All three did an excellent job of sticking together firmly and preventing the cardboard from changing its shape.

Now the lid. Cardboard for the lid (2 pieces, i.e. 2 sheets). To begin with, each of them was pressed along the grooves of the corrugated cardboard (to make it easier to bend it later and give the lid the necessary shape without creases on the outside), then glued them together. I pasted wallpaper with protruding teeth on the sides of the lid for further connection with their help to the base of the lid.

The base of the chest is ready.


Since the chest is large (height - 42 cm, length - 54 cm, width - 32 cm), I was haunted by the question of its density and reliability, and therefore I glued another layer of cardboard and additional pieces of plastic for attaching metal fittings.

I glued the finished lid, consisting of two layers of cardboard, with a third layer, but not all, but in three places (the middle of the lid and its edges - along the length of the lid).

"Press" from improvised means.

She began to peck at the chest from the outside with thick wallpaper. I decided to use construction PVA glue. I smeared sheets of wallpaper with glue, waited a bit and pasted them on the chest. It didn't fit well, not securely.

Then she did it differently: she smeared the wallpaper with glue, folded it in half and left it for a few minutes. After that, the wallpaper adhered much better to the walls of the chest. The cardboard is not soaked, not warped.

View from the outside, after wallpapering.

Inside view. For each wall of the chest, I cut off separate pieces of wallpaper, taking into account that each of the 4 strips of wallpaper pasted over the outside of the chest and the inside. The bottom has not yet been covered with wallpaper.

I start decorating the chest on the outside. For a "forged" finish, I cut out narrow strips from corrugated cardboard and pasted them over with crumpled paper. To make them stick more securely, I pinned them with pins.

I did the same with the lid.


I first drew decorative elements on paper, then transferred them to corrugated cardboard through carbon paper and cut them out with a stationery scalpel. And also pasted over with crumpled paper, turning the paper from the front side of the decorative element to the inside (wrong side), thereby covering the "leaky" - corrugated sides (cuts).

I glued the inside of the lid with crumpled sheets of paper.

For the bottom from the inside, I cut out the cardboard of the right size, pasted over it with crumpled paper and glued the bottom.

And outside, I pasted wallpaper on the bottom.

To give a little volume to the decor, I pasted flagella from napkins (I think you can’t call it paper art). Pea rivets were glued to PVA glue by a carpenter, quickly and reliably.


After painting, the inside looks like this. I almost forgot, for such a large chest I bought black alkyd paint (acrylic art would need a lot and expensive), it can be seen in the upper left corner of the photo. Of course, do not compare it with acrylic - and the smell is sharp, and it dries for a long time - 24 hours.

In addition to the silver color, there are many highlights that look like paint, because the chest has already been opened with yacht varnish.

And now just a photo of what happened.


Chest in action.

Surprises? Read the recommendations below and you can easily make a beautiful DIY gift box. The children will love that Santa Claus brought them such a fabulous chest. Create an atmosphere of magic at home or at a children's party.
Which size to choose
A do-it-yourself New Year's chest can be made as a souvenir, for example, in the form of a keychain or a magnet, as well as directly in the form of a functional item intended for packing or storing gifts from Santa Claus. In such a chest, the size of an ordinary gift box, it is easy to pack sweets, small toys and put under the Christmas tree at home for your baby. If you need an interior decoration option for a festive event in a kindergarten, school or other organization, you will have to work hard and make a product the size of a box.

Tools and materials
To make cardboard boxes with your own hands, you will need the following:
- cardboard;
- sample;
- (pencil, ruler, eraser, square, compasses);
- scissors or a knife (depending on the size of the object being made);
- glue or thread with an awl to connect the elements;
- decor (textured paper, fabric, braid, lace, sequins, beads, beads, etc.).
As you can see, everything you need for work can be found at home!
How to make a magic chest with your own hands according to the template
If you have a finished product, for example, a package from a sweet gift, you can use it as a blank.

To do this, glue the seams and lay out the cardboard chest to a flat part. Place the stencil on cardboard and trace around the outline. If you need to make a smaller or larger chest with your own hands, it is enough to proportionally change the size of your scheme. Another way is to find a template on the Internet, print it to the right scale and also trace around the outline.

Whichever version of the template you choose, the steps for creating the chest itself will be as follows:
- So, before you is a contour blank, which you transferred in any way to the cardboard for the chest. Cut it out with a knife or scissors.
- Draw along the fold lines with a sharp, but not cutting object, such as a knitting needle or a non-writing ballpoint pen, or make small indentations or cuts in the form of a dotted line. This step will allow you to gently fold thick cardboard without any material kinks.
- Fold a flat scan into a three-dimensional structure and glue all the seams.
- The next step will be decoration. By the way, some elements should be attached before assembly, for example, fabric, if you are going to cover the chest with it.

How to draw a sweep yourself
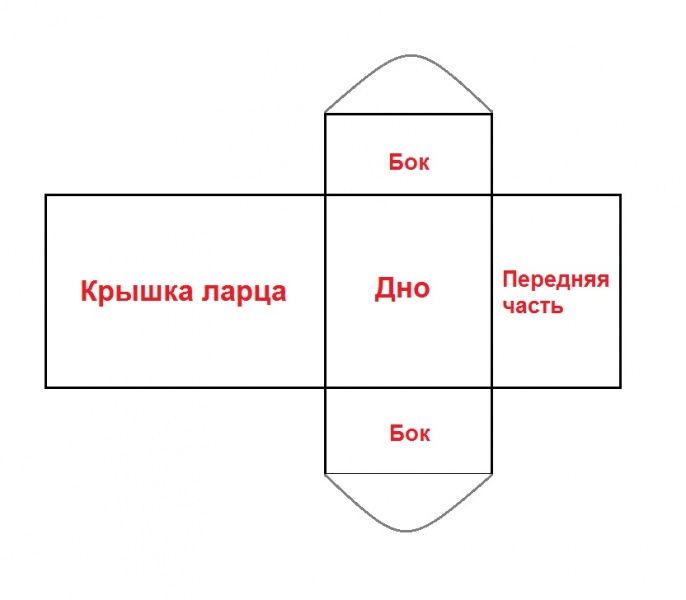
If you decide to make a chest with your own hands, but there is no template, you can create it completely yourself. In fact, the object is a rectangular box with a hinged lid, the end parts of which are made in the form of semicircles. To do this, you will need to draw a bottom rectangle of the required size on cardboard, and on each side another rectangle that will form the walls of the product. Don't forget to make gluing allowances. If it’s difficult for you to completely imagine a chest in the form of a flat diagram, take a regular box and unfold it. Use it as a sample for the bottom of the product.
How to make a lid
If you decide to make a chest of Santa Claus with your own hands, drawing a pattern yourself, you will have to work a little on the lid of the product.

For the first time, you can create it as a separate part, which is glued to the box base. Work like this:
- Draw two halves of a circle with a diameter that matches the width of the lid (or base-box).
- Draw circles of larger diameter around the workpieces. These will be the gluing allowances.
- Cut out the resulting two semicircles and make cuts along the allowances and bend them.
- Draw a rectangle with a width equal to the long side of the base-box. The length will be somewhat more difficult to determine: you need to measure the perimeter of the arc of the resulting semicircle (without allowances) and add to them the distance for gluing to the base (on the back) and the allowance for the front part so that the lid overlaps.
- Draw another rectangle equal to the size of the bottom. Also don't forget about the gluing allowances.
- Cut out all prepared parts.
- Glue the elements into a three-dimensional structure and attach to the base.
How to make a chest with your own hands without glue
If you don’t understand at all how to assemble a volumetric box from a flat diagram, where to make allowances, and there is no ready-made template, you can use this method of work, where glue is only needed to decorate the product.

Work like this:
- Draw two identical rectangles for the base of the box and the lid.
- Make two identical parts of the side parts of the base (the walls of the chest).
- Make two semicircles for the lid, as well as a large rectangle for making an arcuate surface. Determine the dimensions yourself, depending on what kind of chest you are making.
- Cut out all blanks. Decorate them with fabric, paint or designer paper at this stage.
- Make holes along those sides of the parts that will be connected to neighboring ones with an awl or a large needle at a distance of a few millimeters from the edge so that the workpiece does not tear (the distance from the edge depends on the thickness of the cardboard). Adjacent parts must have the same number of holes at an equal distance.
- Take threads that match the tone of the future chest or contrast threads and use a crochet hook or needle to connect the details of the product. The same can be done even with a narrow satin ribbon, only the holes will need to be made larger in diameter.
In this way, even those who find it difficult to figure out how to build drawings of boxes can make a chest of Santa Claus with their own hands. The only drawback of this method is that it will take a lot of time to make holes around the perimeter of the blanks and sew them together or tie them with threads.
Product decoration
So, you have seen that you can make do-it-yourself cardboard chests in different ways, and if you use a non-decorative base material, it is easy to cover it with a cloth or beautiful paper. If the product is glued, then decoration can be performed both before this stage and at the end of the work.

If you make a New Year's chest with your own hands by sewing together elements, you need to cover it with a cloth first in order to pierce holes in all layers at once. In addition to fabric and paper, the following decoration methods are suitable:
- glue a sequin pattern around the perimeter of the sides;
- lay out a bead pattern in the form of frosty monograms;
- use the decoupage technique instead of covering with fabric;
- apply volumetric decorations from satin ribbons, quilling elements, artificial snow, applications in the form of snowflakes and other thematic objects.

As you can see, a New Year's chest with your own hands can be made in many ways. Choose your favorite design and decor. Create spectacular accessories for the holiday!
Real high-quality chests made of solid wood have lost their relevance. True, they were recently used to store prophetic, expensive items and jewelry.
Today, the chest is more often used as an element of decor, a sign for themed events, and primitively as authentic boxes for storing jewelry and jewelry. In the article, we will look at several exciting workshops in which we will learn how to make a genuine chest out of each cardboard in an hour and a half.
What is the chest for?
How to make a beautiful chest of thick cardboard with your own hands and what can it be used for?
In addition, it will become easy
an indispensable feature when creating a children's pirate party or a wedding. A home-made thing can be intended for gifts or a ransom for the bride, where guests will put their envelopes with cash gifts.
If desired, the product can be decorated in a folk or New Year's genre, and using special paints, it is allowed to “age”, giving it the appearance of an old and shabby treasure chest.
Of course, the finish will largely depend on the individual preferences of everything. In the master classes, we will get acquainted with the thesis of assembling a decorative chest.
Master Class. Light chest
If you have always been far from hand-made, but decided to join this difficult but exciting business, you should start with the simplest version of the chest.
To assemble a genuine chest from ordinary cardboard with your own hands, you will need the following materials:
- cardboard box;
- stationery knife;
- plastic screws and nuts;
- stationery loops;
- PVA glue;
- cardboard strips.
Manufacturing process:
- To begin with, you need to make an appropriate markup on the box: on the end parts of the workpiece, draw semicircles and lines that will encircle the chest;
- According to the marks, cut off the excess parts of the box, as shown in the diagram;
- Next, you need to make a cardboard cover, which can be attached to the formed semicircles either with adhesive tape on the inside, or with clerical loops;
- In proportion to the size of the lid, make strips of cardboard;
- Frame the chest with a cardboard strip on 2 sides, fixing them with plastic nuts;
- If desired, it is allowed to attach a lock and handles made of thick paper to the finished product.
As you can see, making a chest on your own is easy. If desired, it can be filled with coins and decorative stones, then you will surely get a glorious pirate treasure chest.
Master Class. Chest box
How to make a chest box?
To make a comfortable box for storing expensive prophetic or jewelry, you need to take the following materials:
- cardboard;
- polymer glue;
- putty;
- fabric for interior "upholstery";
- PVA glue;
- tulle mesh;
- thick threads;
- acrylic paints (black and gold);
- a piece of leather or leatherette.
Manufacturing process:
- Take a small cardboard box and putty it on the outside;
- Cut out three semicircles from cardboard, on which a cover cut out of thick paper or cardboard will be attached;
- Be sure to apply a huge amount of polymer glue to the front of the lid. Then it will fit snugly to the chest;
- Using ordinary glue, attach the semicircular cover to the workpiece;
- When you putty all the bumps on the box, glue the tulle to it, and cut off the excess parts;
- Using yarn or thick threads, lay out patterns in the form of flowers or abstractions on the lid and end parts of the workpiece;
- Then once again coat the entire workpiece with glue so that neither the tulle nor the patterns come off during the use of the box;
- After that, the chest can be painted with black acrylic paint;
- Using a sponge, apply gold acrylic paint to the patterns;
- Glue a piece of leatherette of the appropriate size to the inside of the lid;
- Glue the bottom and the inside of the box with a cloth or textured paper.
This master class will require perseverance and observation from the needlewoman, because this scheme for creating a cardboard chest is not easy. However, the resulting product will please your eye for a long time.
Master Class. pirate chest
To make a do-it-yourself pirate small cardboard chest, you will need the following materials:
- Corrugated cardboard box;
- Acrylic paints (chestnut, golden, silver);
- Brushes and sponge;
- Scissors and pencil;
- Glue gun.
Manufacturing process:
- Cut out the details according to this pattern;
- Then assemble the workpiece, and “strengthen” its corners by gluing slices of whatman paper to them. Then the design will turn out to be more strong;
- As in the previous master classes, form the lid by cutting semicircles along the marked lines;
- Next, glue the curved cardboard cover to the semicircles using tape;
- It is desirable to glue the joints of the upper part of the cover with semicircles with paper so that the structure does not fall apart during operation;
- When the blank is ready, start cutting out decorative elements: handles and locks;
- To make pens with your own hands, it is enough to cut out two identical cardboard strips and attach them to the end parts of the casket;
- Then you need to paste over the entire box with ordinary napkins, and when the casket dries out, paint it with chestnut or black acrylic paint;
- Next, you need to glue decorative elements to the workpiece: a palace, “metal straps”, as well as handles, and then go over them with glue;
- Then all decorative elements are painted with either golden or silver paint.
How to positively make a chest lid out of cardboard?
The main thing in this process is to positively designate semicircles on both sides of the box, which must be symmetrical. For this, it’s cooler to use a compass or patterns. And before gluing the cardboard sheet to the workpiece, it must be bent so that the lid clearly lies in the shape of semicircles.
To assemble a beautiful do-it-yourself pirate treasure chest from cardboard, it is ideal not to be a specialist and do hand-made for several years in a row. As a result of the master classes expressed in the article, you will be able to quite easily make a beautiful chest with genuine finishes.
The main thing in this business is patience and perseverance. If you follow each recommendation step by step, you will definitely achieve the desired result in the final score. Happy needlework!
On the eve of the new year, I want to tell you how you can make various models yourself chests for your treasures.

Combines the simplest models chests the cardboard base from which the frame is glued out, then either pasted over with newsprint, or thick drawing paper, or crinkled paper. It is possible, if available, to fit your finished box pieces of suede, leather or leatherette (but it does not stick well, and folds from the moment). Then, at your request, either all this is painted with acrylic paints, or covered with fabric, or decorated using the decoupage technique, you can add papier-mâché and fur decorative elements. Of course, I like the leather version most of all, painted on top with acrylic and pasted over with gems 🙂
There are several options for making the base:
Can be carved box according to the corrugated cardboard scheme - its advantage is that it bends well, and the disadvantages are that it easily misses.

You can use a printer paper box with a lid (usually 5 packs of 500 sheets A4 paper are included in the box) or purchase a Russian Post parcel box of the right size.


You can glue from hardboard, thin sheets of fiberboard or decorative plywood, but for this you will already need a jigsaw.
You can make the base - the ribs of the chest from hard wire and sheathe, glue, tie, wrap around with beads and beads, etc.


Design examples chests different techniques:
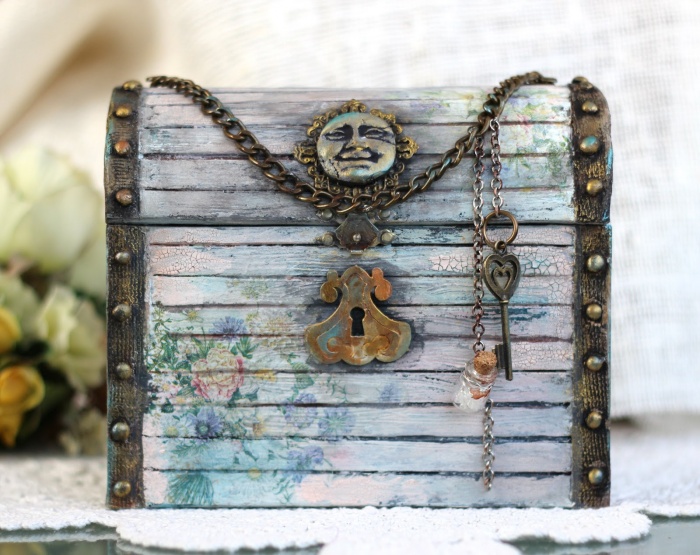
Decoupage 

corrugated paper 

Covering with fabric and fur 


Leather 
Design options for your chest a great many - the main thing is to make a solid frame and you can create a magical chest, which will delight and delight not only the household but also the guests. And especially relevant chest under the Christmas tree with a bright New Year's theme, and there is always enough room for imagination. Create and delight yourself and your friends with handmade gifts. And even when moving from one place to another, which unfortunately happens to me often, it can be used to pack furniture for Barbie and Ken, creating comfort inside 🙂 
Manufacturing master class chest-origami (Origami Treasure Chest (Robin Glynn)
Chest (sandyk) - a product with a hinged top cover. It is mainly used to store various things, jewelry, books, toys or other items. But it can also serve as a table or decor element. Often chests are made of wood, with elements of forged products. However, they are both heavy iron and lighter, but not so reliable - cardboard.
Previously, if there was a chest in the house, then this testified to the wealth of the family. Such a thing was useful both before, and can be useful in our time.

A beautiful and original chest can not only decorate your interior, but also be an original gift for your friends. Of course, you can buy it, but we invite you to try your hand at making it yourself. After all, you must admit that a thing made by oneself is valued much higher than an acquired one.

Yes, and it will take much less money to manufacture. For example, a cardboard chest is very cheap. In this article, we will look at how you can make two types of chests yourself.
wooden chest
Wood is a classic. Usually all products for storage were made from it. The material has earned a lot of positive reviews over the years. It is easy to work with, natural and 100% environmentally friendly. As a chest, the tree will last a long time. And the cost of the material is not so high. In Russia, wood is considered one of the available materials.

So, to make it yourself, you need to prepare the following tools and materials:
- jigsaw;
- hacksaw;
- screwdriver;
- self-tapping screws, bit;
- roulette;
- pencil;
- construction pistol;
- hot glue;
- clamps;
- emery skin;
- masking tape;
- paint brush;
- wood glue, paint, varnish.

In addition, you need to prepare boards of the required thickness in advance, dry them well so that your chest will last for many years and not crack.
Note! Wet boards are not recommended. It is better to initially buy dry material, ready for processing.

Where to start
For those who have never worked with wood, but have caught fire with this idea with a chest, of course, it will be a little more difficult than for those who have at least some idea in this matter. But with a lot of desire and patience, you will succeed. In fact, there is nothing super complicated in assembling the chest. First you need to make a drawing or diagram of all the details, then cut them out with a jigsaw. You can use the first piece as an example for the second. For convenience, you can number all the details with a pencil on the inside.
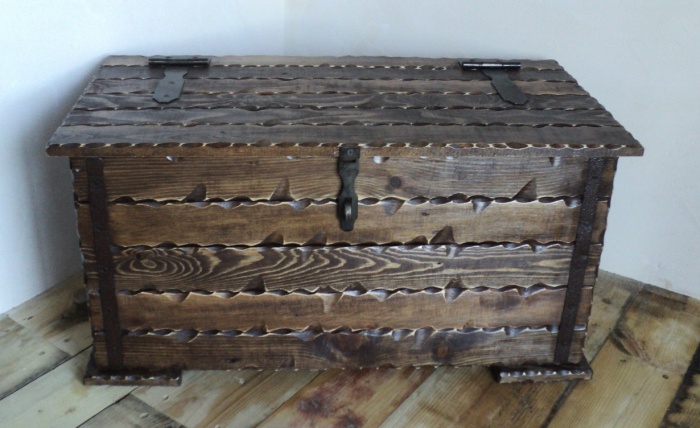
The size of the chest can be different, depending on what it will serve you for and what will be stored in it. This article will not give specific dimensions, as it is better for you to know what kind of chest will look good in your interior.

After you have decided on the dimensions and cut out all the details, you need to assemble the sides, and then attach them to the bottom, which is a solid plate. The top part (lid) will be attached last. To create a cover, simply stuff the boards onto pre-cut blanks in the form of a semicircle. To connect the parts, use self-tapping screws, but consider the length of the screw so that its end does not stick out in the middle of the chest.

If you do not want the self-tapping caps to be conspicuous, you can mask them with special putty or use false corners. This will give your chest a more antique look, make it original and beautiful. Other details of the main part and cover are provided by the fittings of your choice. Next, you need to fix the decorative hinges and the lock with the same screws, and these details will not only give your chest an attractive appearance, but also make it more durable.

Decorating a wooden chest
After the chest is ready, it's time to use your imagination. At this stage, the robot you need to make a beautiful decorative element from a simple, inconspicuous box. First of all, you need to sand the surface and corners with sandpaper. In order to give the chest an old look, it must be covered with a stain or a special varnish.

You can apply varnish with a regular brush or roller. After the varnish has completely dried, we apply a transparent coating that will give the furniture freshness.

If you wish, you can draw some kind of drawing on the chest. You can do this with a stencil. If you are good at drawing, then try coloring it by hand. You can make a pirate chest with your own hands by drawing a skull and crossbones on it. This is where your imagination can run wild.

There are many design options for wooden furniture - forging, inlay, carving and many others. If you are interested in the idea of a pirate chest, then forged products that can be ordered or simply bought at a hardware store will help you with this. Most importantly, don't be afraid to experiment! Then the product you made will please your eye, as well as surprise your guests.

Master class on how to make a chest out of a cardboard box
If the first version of the product is more complex, then it will not be difficult to make a cardboard chest. Yes, and the cost of construction will be scanty. You don't need any special complicated tools. You need something that is always at hand.

So, in order to make such a chest, you will need:
- Cardboard box.
- Scissors.
- Cardboard and paper.
- PVA glue.
- Paints (gouache or watercolor) in black and gold.
- Sponge.
- Ruler.
- Two brushes.
- Pencil.
- Napkins.
Having prepared everything you need, you can begin to work on manufacturing.
Stages of manufacturing a cardboard product
The first thing to do is cover. We will make it from the top of the box. To do this, draw lines from the inside with a ruler and a pencil. Thanks to this, the cardboard can easily bend in those places. Then cut out two identical semicircles, leaving teeth along the edges of the bend. Then glue them on both sides, bending the teeth onto the lid and gluing them with PVA glue. Next, you need to glue the outer and inner corners well with masking tape or a napkin well soaked with PVA glue. In addition, you can strengthen your chest by gluing an additional box lined with fabric or wallpaper inside the box. After that, wallpaper the entire chest, attach the handles on the sides, and proceed to painting and decorating.

Note! For decoration, use soft materials such as fabric, leatherette, cardboard, napkins, etc.
You do not need to use materials such as wire, copper, bronze, rivets for a cardboard chest. The thing is that they can only spoil your fragile structure. And attaching such material in some way will be almost impossible. From leatherette, you can cut out belts that need to be glued to PVA glue. You can decorate the chest with baked clay. Just roll it out like dough and cut out the shapes that interest you with a knife. Then pop it in the oven. After the clay is baked, stick it to the chest with glue.

Now you have to paint the entire chest in one color, let it be black. After the paint has completely dried, you need to gild the surface of the finished product. A sponge will help you with this. We put a little golden paint on the sponge and rub it on the surface in certain places, for example, on belts and other decorative elements.

To make legs for such a chest, you can use ordinary bottle caps, or wooden blocks, which will also be painted and glued. At this stage, we can say that your chest is ready. It can be used both for storing various small things, and just for decorating your room.
Conclusion
This is how easy and simple you can transform your home and make for yourself a convenient design for storing various little things. These tutorials will help you. Try, experiment, and surprise yourself.