Patterns for a chair of a bag from 4 parts. How to make a bean bag chair with your own hands, a detailed master class. DIY bean bag chair: advantages of frameless furniture
Making a bean bag chair with your own hands is quite simple. Such an element of furniture provides many advantages, because today the product is considered one of the most popular and stylish interior elements.
The structural diversity of frameless furniture allows you to adapt the item to individual requirements. You can make a spectacular and comfortable seat for yourself or children, relying on the step-by-step manufacturing instructions described in this article.
Beanbags are the best furniture product, as they provide for practicality and ease of use. Contrary to the belief that they are a "dust collector", bean bags are much easier to clean, since removable covers can be easily machine washed. Simple maintenance, safety make the product in demand and relevant. Over time, the filler can be added to the required volume of the chair.

Among the most significant advantages of furniture without a frame are:
- Mobility. Frameless furniture provides a small weight in comparison with armchairs, sofas with a wooden frame.
- Environmental friendliness. Natural fabrics and hypoallergenic filling make such furniture environmentally friendly.
- Security. The elements do not provide for corners, which allows you to secure the space for children.
- Ease of maintenance. The product allows you to quickly clean.
- Durability. High-quality filler does not absorb moisture, dust, keeps its shape.
- Convenience, comfort. Frameless furniture adapts to the curves of the body, spine, creating comfortable conditions for relaxation.

This type of product will help you relax after a hard day's work, they will perfectly serve as children's furniture.
What you need to make a bean bag chair
Before you make a bag chair, you need to prepare the materials.
You need to understand that to create a large-scale product, many components will be required:
- fabric for creating inner and outer covers;
- two large zippers for convenient use and maintenance of the chair;
- scissors;
- threads;
- filler;
- a sewing machine will simplify the process of work, providing a neat seam.
The volume of materials is determined by the desired dimensions of the product.

How to sew a bean bag chair - a step by step description of the process
When deciding to make a furniture element on your own, you need to competently approach the preparatory work. It is important to make a pattern, calculate the amount of materials for tailoring the product. We will consider each item that will help in creating a bean bag chair. There are many types of product design, which will make a stylish furniture element suitable for the interior.

Creating a pattern + ready-made patterns
It will help to make an even chair bag pattern. You can draw a diagram yourself by calculating the size of the chair. Initially, it is necessary to determine the type of binbeg, and then select the appropriate drawings. Different designs require different basic components.

The scheme of the drop chair mainly consists of a common main part (back, side elements), a seating area and the bottom of the product.

A round product, as well as a pear chair, is formed from wedges. Their number is determined by the required dimensions of the seat. In addition to the side elements, there are two circles for the upper and lower parts of the chair. We must not forget about the allowance for stitching the components.

Filler selection
More often, expanded polystyrene is used as a filler. Round granules allow you to create a light, comfortable product that will not be subject to liquid absorption, will become a breathable, hypoallergenic interior component. Balls do not absorb odors, dust does not settle on them. At the same time, expanded polystyrene has excellent thermal insulation.

Over time, foam balls can lose their shape. You can update the chair by adding polystyrene foam.
In addition to it, in the production of bean bags, the following are used:
- wood shavings;
- cereals;
- down, feathers;
- holofiber, synthetic winterizer.
When choosing natural materials, it is necessary to take into account allergenicity, the ability to absorb moisture, dust. Hollofiber, synthetic winterizer, foam rubber roll faster. Grains and shavings do not withstand wet exposure. Down and feather fillers provide for the possibility of allergies, are not very convenient to use.
The choice of material for the cover
There are a lot of options for using fabric for the outer cover. It is desirable that it be dense, easy to clean.
Often products are sewn from a material called "Oxford", reminiscent of jacket fabric. Tents are also made from it. The advantage is water resistance.

When choosing a more “cozy” fabric, you can pay attention to dense textiles - flock, chenille, microvelvet, eco-leather is used. Suitable gabardine, twill, jeans.

It is advisable to choose a material that will not stretch.
For the inner cover, a dense spunbond is used. It provides holes for ventilation, does not absorb liquid. But you can buy an ordinary dense fabric, while being breathable. If air is not supplied, the polystyrene balls will crumple.
Cover tailoring
The do-it-yourself pouffe chair is made on the basis of a pattern, a drawing.

To stitch the components of the cover you need:
- Transfer the pattern pieces to paper and then cut them out.
- Spread the material for making the inner cover on a flat surface.
- Attach the pattern components to the fabric, circle with chalk with an allowance of about 2 cm.
- This method creates the elements of the outer cover, only the allowance is taken about 4 cm.
- Cut, baste, or pin the wedge elements.
- Sew them on the machine and the wrong side for the inner cover. Then reinforce the seams on the outside for the outer bag.
- The side seams must be ironed.
- We must not forget about the place for lightning. Leave about 40 cm for sewing the lock on the upper back of the product.
- Baste and then stitch the zipper.
- Attach the bottom of the product to the workpiece.
It is better to make the outer cover a few centimeters larger than the volume of the inner bag. After filling the product, you can stitch the top of the binbag.

Filling with polystyrene foam is carried out by pouring the elements through the lock. For convenience, you can cut off the sides of a half-liter bottle, place it in a case, pour foam balls. The edges of the bag can be sprayed with antistatic agent.
Other popular models and techniques for sewing bean bags
We looked at the most popular and simple methods for assembling parts for making a beanbag. Round frameless pouffes become convenient products for children's rooms, gardens, as their dimensions can be varied, children can easily move them, they provide maximum security.

Drop chair
As a comfortable place to relax at home and in the office, drop-type chairs are often used. They provide a more rounded shape. Such products are relevant not only for use by adults, but also by children, because frameless furniture is considered universal for creating a comfortable interior design. They provide a compact and neat design.


Stylish drop chairs are made according to the principle of stitching the main element, including the back, sides, seats, lower component. No need to prepare a large number of wedges.
Pear chair
This type of beanbag provides for larger dimensions. It contains a high back. Features of tailoring are the need to prepare several wedges, the upper and lower parts. Comfort and convenience guarantees the presence of the back. The pear chair is actively used by children, young people, as well as the elderly.


The shapeless design makes the element comfortable for relaxation, as it adapts to the shape of the body as much as possible. Often it is used by pregnant women, as it allows you to fully relax.
Bean bag chair made from old jeans
A budget, but at the same time spectacular, interesting option is the use of old materials to create a stylish case. Denim is the most suitable type of fabric, as it has excellent durability, fits any interior design, looks stylish, and is resistant to damage.

The difficulty in making such a chair lies in the fact that it takes more time to prepare the pattern and stitch the elements together. Since denim clothing often does not have sufficient dimensions to make up large chairs, it is necessary to sew wedges from small fabric components. The production of drops and round seats, poufs will be optimal. They require less material, but at the same time look quite stylish, practical to use.
Video with a master class
You can make an ottoman bag with your own hands using various materials. A variety of drawings and designs allows you to implement interesting projects, adapting the parameters of the chair to your requirements. We provide the simplest instructions for compiling such products. Watch the video tutorial on assembling frameless furniture to understand the rules of work and create your own masterpiece.
The production of a beanbag is considered not too difficult work, but it allows you to make practical, functional furniture for the home, which will be comfortable for children and adults to use. The basis of successful design is the presence of a good drawing, the correct selection of materials.
If you have any questions about the topic of the article, write in the comments below. We will respond as soon as possible.
The mattress known to everyone today is the idea of talented Italian designers Francisco Teodoro, Cesare Paolini and Piero Gatti. Now this designer chair has gained wide popularity in all corners of the world. Until now, it does not have an exact name - a bean bag chair, a pear chair, a pouf, a bean bag. Nevertheless, the essence remains unchanged - it is comfortable frameless furniture with soft filler, which even a novice seamstress can make with his own hands.
What is good frameless furniture
A feature of this type of furniture is the absence of a rigid frame. The classic variation looks like a drop (pear). The chair is a bag with a soft loose filler that imitates liquid. An effect is created similar to that if the inner cover were filled with water - the chair takes the shape of the human body and evenly distributes its weight.
After just two minutes of rest in such a chair, you can feel the relaxation of the back muscles and the removal of stress from the spine. Due to the low thermal conductivity of the filler - foam balls - an additional warming effect begins to be felt very quickly. Styrofoam works as a heat reflector and warms the seated person with the energy of his own body.
Traditional frameless chair has a pear shape
Today, frameless furniture designers are constantly looking for new solutions. There are already models on sale not only in a variety of sizes (for a child, for one or more adults), but also in shapes (tear-shaped, round, rectangular, in the form of fantasy figures). The most active child will easily warm up and fall asleep in the bean bag, not to mention the mother tired of everyday chores. Therefore, the desire to have such an accessory for relaxation at home is quite understandable. However, it is not necessary to rush to the store for it. Even novice craftswomen can sew a bean bag chair.
The main advantages of the bean bag chair include the following aspects:
- Loose filler increases the level of comfort of rest.
- Frameless furniture is safe because it does not have sharp corners, which allows it to be used in children's rooms. And environmentally friendly materials reduce the likelihood of allergies to zero.
- The chair is very practical, thanks to its low weight it can be easily moved during cleaning.
- Periodic washing of the removable cover is sufficient to maintain cleanliness.
- The bean bag will fit into any interior, it is enough to choose its external design correctly.
Important! If you are planning a renovation and redesign, do not rush to throw out the old bean bag chair - just add filler to it, sew a suitable cover, and it will become the highlight of the new interior.
Photo gallery: options for frameless chairs
Contrasting covers will make the interior bright
A cozy bean bag chair in a fur cover will perfectly fit into the Scandinavian-style interior.
Round bean bag chair with foot pad
Large bean bag chair
Rectangular bean bag chair
Such a seat will bring a bright touch to a classic interior.
Tools and materials
The footage of the required material and the amount of filler varies depending on the dimensions of the conceived bin-bag.
In order to sew a medium-sized chair with a diameter of approximately 85 cm (for 1 adult), you will need:
1. Paper for building patterns, tracing paper or graph paper is best.
2. Fabric for sewing the inner cover - smooth synthetics. Cut length - 3 meters with a width of 150 cm. It is better to take a light material without a print so that it does not shine through the outer case.
It is better to choose a sliding fabric so that the chair better takes the form of a seated person.
3. Dense (preferably furniture) fabric for an external removable cover. The length of the cut is 320 cm with a width of 150 cm. It should be a little larger so that the inner bag with filler fits easily into it.
When choosing a material, give preference to durable canvases. It is better to choose materials that are dense, resistant to abrasion and frequent washing. It can be linen, denim, tapestry, velor, phlox, faux fur and even eco-leather. Choose the color in accordance with the overall color scheme of the interior.
4. Two zippers with a length of 40 cm and 60 cm (for the inner and outer cover, respectively).
5. Filler. In this case, we take 0.5 cubic meters of foamed polystyrene with a crumb fraction of about 0.5 cm. You can buy it online or at any specialized hardware store.
The minimum packing of polystyrene is usually the 0.5 cubic meters we need. m.
6. Sewing machine, reinforced threads.
7. Chalk or pencil, ruler, pins.
Filler selection
Most often, manufacturers of frameless furniture use expanded polystyrene granules as a filler. Styrofoam balls are considered the most hygienic filler, as they do not absorb dirt, sweat and odors. This is especially true when the bean bag is used in public places (cafes, showrooms, lounge areas). Expanded polystyrene is non-hygroscopic, and insects will not start in it. In addition, this filler is the most affordable.
Expanded polystyrene - the best filler for a frameless chair
For those who are looking for an environmentally friendly and natural alternative to Styrofoam, it can be advised to choose materials such as:
- horsehair;
- wood shavings;
- seeds, herbs, buckwheat husks;
- peas, beans and beans, rice, millet;
- wool, feathers or down.
However, when choosing an organic filler, it is worth considering that it will be possible to use such a chair only in a room with moderate humidity. Otherwise, the molding process may begin.
Important! Feathers and down can cause allergies.
If you decide to use wood chips, pay attention to their quality. Before filling the bag, be sure to inspect the chips and remove all the chips, otherwise you risk getting splinters or scratches. It is better to use shavings from cedar. It has a pleasant smell, which is famous for its healing properties and will repel insects.
It is also necessary to take into account that over time, a complete replacement or addition of an additional portion of the filler will be required, since it tends to wrinkle.
Pattern and step-by-step instructions for sewing with a photo
On the above pattern, there are two options for cutting the lower circle of the chair. The first option involves stitching the bottom of two semicircles, and the second - of four. You will need to cut out 6 side wedges, 1 top piece (hexagon), 1 handle piece, 2 or 4 bottom pieces from the fabric. We will sew the inner and outer covers at the same time.
Pattern for a bean bag chair in the shape of a pear with a handle on top, dimensions are given in millimeters
Sewing order
1. Transfer the pattern details to paper and cut out.
2. Spread the fabric for sewing the inner cover on the floor (wrong side up). Attach the pattern pieces to the fabric, trace and cut out, leaving a seam allowance of about 1.5 cm.
Try to place the parts as compactly as possible so that there is enough fabric. To do this, first think over the best layout option.
3. In the same way, cut the fabric for the outer cover, leaving 3.5 cm allowances.
Place the pattern details for the product on the fabric and cut out sparingly so that you have enough cut
4. Then you need to pin or baste the side seams on the wedges of the inner and outer products, all but the last. You will get two flat blanks.
5. Sew the side seams of both covers on a typewriter and smooth with an iron in steam mode.
6. Turn the outer cover over and topstitch all side seams on the right side.
You can use contrasting threads and decorative stitches for this.
Sew the side seams from the inside, and then additionally stitch them on the front side on the outer cover
7. Now fold the edge wedges on both blanks and baste. On the outer cover, sew the last side seam 40 cm from the top and 40 from the bottom (a little more than 40 cm will remain for sewing in the zipper). Repeat the operation for the inner cover, leaving about 35 cm for the zipper. Iron the seams.
8. Baste or pin zippers to the remaining unstitched sections on the workpieces. The center of the zipper should coincide with the center of the ironed seam, the extra length of the zipper can be freely located at the bottom of the future chair. Insert zippers. Now, outwardly, both of our products resemble an irregularly shaped pipe, tapering upwards.
The scheme of sewing a zipper to an ironed seam
9. Sew the arm of the chair. Fold the piece in half lengthwise, wrong side out, sew along the long edge and then turn right side out. Iron.
10. Turn the blanks of the covers inside out and sew the tops (hexagons). When basting the top to the outer "pipe", do not forget to insert the handle.
11. Sew the bottom pieces of both covers. Sew the resulting circles. Do not fasten zippers to make it convenient to work. Turn the finished covers right side out.
The outer cover for the bean bag chair will differ from the inner one with a longer zipper and a handle
Backfill filler
- Place one product in another, trying to combine all the details.
- Cut off the top and bottom of any plastic bottle to create a wide funnel.
- Cut off the corner of the filler bag and tape the top edge of the funnel to the resulting hole with tape.
- Place the lower part of the funnel into the ajar inner cover and fill it with styrofoam granules. Close both zippers.
The funnel method will allow you to quickly and accurately fill the chair with filler.
Important! The filler should occupy approximately 2/3 of the volume of the inner cover.
Other Popular Models
ball chair
This type of frameless chair is one of the most common. He was especially fond of football fans. Armchairs of this type can often be seen in sports bars and fan zones, as well as in the apartments of those who love creative details in the interior.
The ball chair will delight real fans, big and small
The size of the ball chair can be different: from very small (no more than 35 cm in diameter) to huge (diameter more than 110 cm). To sew such a chair, you need an accurate pattern. It should consist of polyhedrons of regular shape.
Pattern of details for a chair in the form of a ball, dimensions are given in millimeters
To make this chair you will need:
- 20 large white hexagons (detail 1);
- 12 black pentagons (detail 2);
- two zippers 25 cm long.
Don't let the dimensions of the pieces fool you: the length of each seam will be 22 cm.
The working methodology is generally the same as in the previous description: first, the details of the pattern are transferred to paper, then the fabric is cut and the details are sewn along all the basting lines. Follow the pattern: 3 pentagons are sewn to 1 hexagon “through the edge”.
All seams of the ball-chair should be as clear and even as possible. Otherwise, it may turn out to be asymmetrical and unsightly.
Baby chair
The bean bag chair for children differs only in smaller sizes and more cheerful colors. Its height usually does not exceed 60 cm. In the manufacture of a child seat, it is necessary to provide a covering bar for a zipper. This will save both mother and inquisitive baby from possible problems.
Children's version of the chair is best done in bright colors.
You can decorate the chair with a funny application, for example, with the image of your favorite cartoon character.
The easiest option: a rectangular chair made from old jeans
There is nothing more pleasant when a favorite thing takes on a “new life” and continues to delight us. You can sew a bean bag chair using old denim as the material for the top cover. This simple design idea has already been enthusiastically picked up by many handmade lovers. No pattern is needed for this chair. It is sewn from a square of cloth folded in half.
To make a chair out of jeans, you will have to remember the original patchwork technique - “patchwork”.
Old jeans are a great option for new furniture
So, the sewing process includes a number of simple manipulations:
1. Prepare old jeans (at least 8-10 pairs of trousers for one piece of medium size), fabric for the inner cover and 2 zippers 20 and 40 cm long. Cut the pants into more or less rectangular patches, removing the factory seams.
Cut the legs lengthwise, cutting off the seams
2. Then arrange the patches by colors or textures to your taste, iron.
Sort patches by color
3. After that, the edges of the parts can be processed on an overlock, or you can simply stitch them off, leaving them to fray in style.
4. Randomly select a plan for connecting blanks into a square canvas, sew them. Make sure that decorative details in the form of pockets and factory stitching remain on the front side. Prepare the same size canvas for the inner cover.
Sew a solid fabric according to the intended plan
5. Fold the square of the canvas in half with the front side inward. Lay a straight line along the long section, leaving a 35 cm length unstitched, approximately in the middle of the future chair.
6. Stitch a zipper (40 cm) into this segment, through which the filler will fall asleep. Leave the zipper open.
7. With the side seam of the "pipe" on the right, stitch the top edge of the fabric.
8. Now place the side seam in the middle of the "pipe" and topstitch the bottom cut. Turn the denim cover right side out through the open zipper.
9. Sew the inner cover with a zipper (20 cm) in the middle according to the same principle.
10. Insert the inner cover into the outer one and fill the chair with styrofoam beads, focusing on the feeling of comfort.
Thanks to the built-in zipper, you can add or remove balloons to your comfort level.
This handmade denim bean bag chair is sure to delight all denim lovers.
An excellent option would be to use jeans with embroidery or patterns. In this case, your chair will turn out to be very bright and original.
Video: a master class on sewing a frameless chair with your own hands (part 1)
Video: a master class on sewing a frameless chair with your own hands (part 2)
A bean bag chair, sewn with your own hands, does not force you to be limited to store offers in design and form, saves the family budget and gives unlimited opportunities for creativity in any style. Such upholstered furniture will surely become a favorite place for rest of all family members.
Since its appearance on the market, frameless upholstered furniture has won a strong place in the interior of residential premises. The brightest representative of this type of environment is a bean bag chair. It can also be found in libraries, cinemas and even parks. Not a single sofa will make you feel as comfortable as on this design. An additional plus of this type of furniture is that it will not be difficult to sew a bean bag chair with your own hands.
Bean bag, beanbag, pouffe chair - there are many names for a soft frameless chair. Not less and its varieties. It can take a variety of forms:
- square or rectangular;
- pear shape;
- round;
- in the form of a flower, some kind of fruit, heart, puck, etc.

The choice of form depends only on the preferences of the future owner of the chair. As a filler can be used:
- polystyrene balls;
- beans, peas;
- shavings, sawdust, feathers.
It is easy to buy any of the fillers. The most preferred is expanded polystyrene. It does not cause allergies, cannot mold, attract rodents or insects. For a country house, it is better to use only it. In addition, a soft ottoman filled with it will turn out to be especially comfortable - it will take a form that is convenient for a person sitting or lying on it, and its granules, unlike beans and peas, are not at all hard. It is better to choose small balls, as large ones will quickly crumble.
The amount of padding depends on the size of the bean bag. A chair for an adult may need from 250 to 350 liters. It is better to purchase 400 liters of polystyrene foam. The rest will come in handy for the future, since the material is crushed during operation and can be refilled about once a year.


The appearance of a do-it-yourself pear chair determines the material from which it is made. The fabric can be very different. First of all, it must be durable and practical. Better if it can be machine washed. Due to the variety of materials, a handmade pouffe can fit into any interior. For a laconic, strict style, classic or modern design, bags made of leatherette, faux fur, velvet, velor are suitable. For a nursery, you can choose a fabric with pictures, bright colors.
Before proceeding to study the question of how to make a bean bag chair with your own hands, it is worth deciding on the purpose, shape and size of the structure. The amount of fabric, filler, and other materials that will need to be purchased depends on this.
What will be needed for work?
In order to make an easy chair with your own hands, you need the following materials:
- lining fabric;
- fabric for an external decorative cover;
- filler;
- strong colored threads for sewing;
- two zippers for fastening covers;
- graph paper for drawings.
The lining fabric of a do-it-yourself ottoman bag must be durable, even rough. You can take an old duvet cover or pillowcase that you no longer plan to use (provided that the fabric is intact, without scuffs and holes). Threads and a snake for the main cover must be selected in a color that matches the color of the fabric.
From the tools you need to prepare:
- sewing machine;
- Ruler, pencil;
- Scissors.
If there is no sewing machine, and there is no desire to purchase it in order to make the ottoman yourself, then you need to prepare a thick needle for sewing, strong threads, a thimble. In this case, the process will be much longer and more laborious.
The main stages of manufacturing a chair
A do-it-yourself master class on an easy chair can clearly demonstrate how to make an ottoman. You can consider the most popular version of the pear-shaped bean bag chair. This design is convenient in that it has a kind of back that gently supports the neck and head.
First of all, you need a pear chair pattern. It consists of a round or hexagonal base and four or six petals. The combination of elements may be different, but these options are the simplest and most common.

Click to enlarge

With the preparation of a pattern for a bean bag chair, work begins. A drawing of all the details of the covers should be done on a scale of 1x1 on millimeter paper. Thus, it will be clearly seen how much fabric is needed for a do-it-yourself ottoman.
To increase or decrease the size of the future bean bag, if those indicated in the pattern do not suit you, on paper, all measurements of the details must be changed to the same centimeter value.
Having drawn a diagram on paper, the parts are cut out and, having secured with pins on the fabric, they cut it along the contour, leaving an allowance (about 1.5 cm of fabric after the border of the part). When stitching the elements, the allowance ensures that the chair does not spread along the seam.
Then you need to sew covers on a typewriter or manually, sew in zippers. The zipper in the inner case allows you to conveniently stuff it with Styrofoam and add it later. The zipper of the outer cover is needed to remove it for cleaning or washing. The joints of the parts should be sewn on the typewriter from the inside out, and at the outer cover, lay a line with a large seam along the front side. The seams then need to be smoothed out with an iron. You can attach a handle to the chair for easy portability.

After the covers are ready, you can fill up the filler. If it is polystyrene foam, then this should be done carefully, since it is very electrified and does not fall asleep neatly, but scatters throughout the room. You can insert the bag of material inside the cover, cut it open and carefully pull it out, holding the edges of the zipper. You can also build a funnel out of a plastic bottle or paper and pour the granules through it.
The cover should be filled in such a way that it keeps the shape of the pattern, but does not clog it to capacity, there should still be empty space for the most comfortable effect.
At the end, the outer case is put on the inner case, the zipper is fastened. A chair made by hand at home can be considered ready for use.

Finished product care
A handmade soft bean bag chair will last a long time if you take care of it. The options for this care depend on the material from which we sew the main cover. Not all fabrics are machine washable. This should be known in advance. For a nursery, it is better to choose practical fabrics that you can not be afraid to get dirty.
The design stuffed with foam balls is less whimsical than in the case of other fillers. An armchair stuffed with everything except polystyrene foam requires periodic replacement of the filler due to the following reasons:
- Dampness can lead to the formation of mold;
- Some natural materials, when caking, not only decrease in volume, but form a dense layer that must be removed;
- The appearance of insects inside the upholstery will entail the replacement of the entire filler and special treatment of the covers (it is better to change the inner one).
- Styrofoam also shrinks over time, but in this case, simply adding a new one is enough, and the ottoman will regain its former properties.

Having tried a ready-made easy chair for the first time, you can immediately understand whether it is done correctly or not. If the body does not fall to the floor, but lies on the stuffing and is gently enveloped from all sides, then the proportions are calculated correctly. Errors can be corrected by suturing the cover or by adjusting the amount of filling material. A well-made pouffe is so comfortable that every member of the family will surely want to have their own.
Ho-ho! Dreams tend to come true, especially if you really want them to come true. For hoo years Kostya and I have been looking at the bean bag chair, or as it is also called: bean chair, pear chair, frameless chair, Big Ben, cushion chair, etc. And somehow it didn’t work out to get this coveted thing: either there was a catastrophic lack of space in the last apartment, or there was no repair to accommodate such beauty, or we simply couldn’t find polystyrene foam anywhere (those same foam balls that fill bag chair).
During the time of nurturing the idea of \u200b\u200bcreating a bean bag chair with our own hands, we managed to accumulate enough information on how and from what to sew it, how to stuff it, how to choose the size. In addition, we found a beautiful natural fabric for the outer cover and an ugly, but knitted fabric for the inner cover. And we also found out that granulated polystyrene foam entered the permanent sale of the Epicenter retail chain. And when there was time and Kostya was accidentally brought to the nearest Epicenter, from where he dragged 200 liters of white balloons, it became clear that we would be sewing a bean bag chair very urgently. And so it happened.
So, how we made a bean bag chair with our own hands.
We needed:
- Fabric for the inner cover (2.5m x 1.4m). It should be a well-stretched fabric. We took an old knitted sheet.
- Fabric for outer cover (2.5m x 1.4m). Any dense non-stretch fabric (cotton, velor, furniture fabric, even leatherette) will do. Our fabric is thick cotton, it turned out to be very pleasant and soft on the finished chair.
- Expanded polystyrene 200-300 l. These are the balls into which we used to break unnecessary packaging foam plastic in childhood :) In construction stores, this happiness is sold in large bags. It is better to take smaller balls, they stray less. In Kyiv, as I already wrote, we found a suitable polystyrene foam for stuffing a bean bag chair with our own hands at Epicenter (200 l - 95 UAH), Leroy Merlin also has polystyrene foam, but not always in larger granules (300 l - 120 UAH). We bought 1 bag of 200 liters, although it was written in the recommendations that we would need 300-400 liters. When we stuffed the bean bag and began to test it, we came to the conclusion that it was just enough for us, since the soft bag takes the shape of the body better than the elastic one. The back rests very well on such a chair, and for a pregnant tummy it is generally an indispensable thing :)

- 2 zippers. For the inner cover - 50 cm, for the outer - 100 cm.
- Strong threads
- Paper for large patterns. We took craft. You can take old wallpaper.
- 2 Velcro 10 cm long. They will be needed to connect the inner and outer covers.
- Sewing machine. Manually, in my opinion, sewing all this is unrealistic ...
Stages of work:
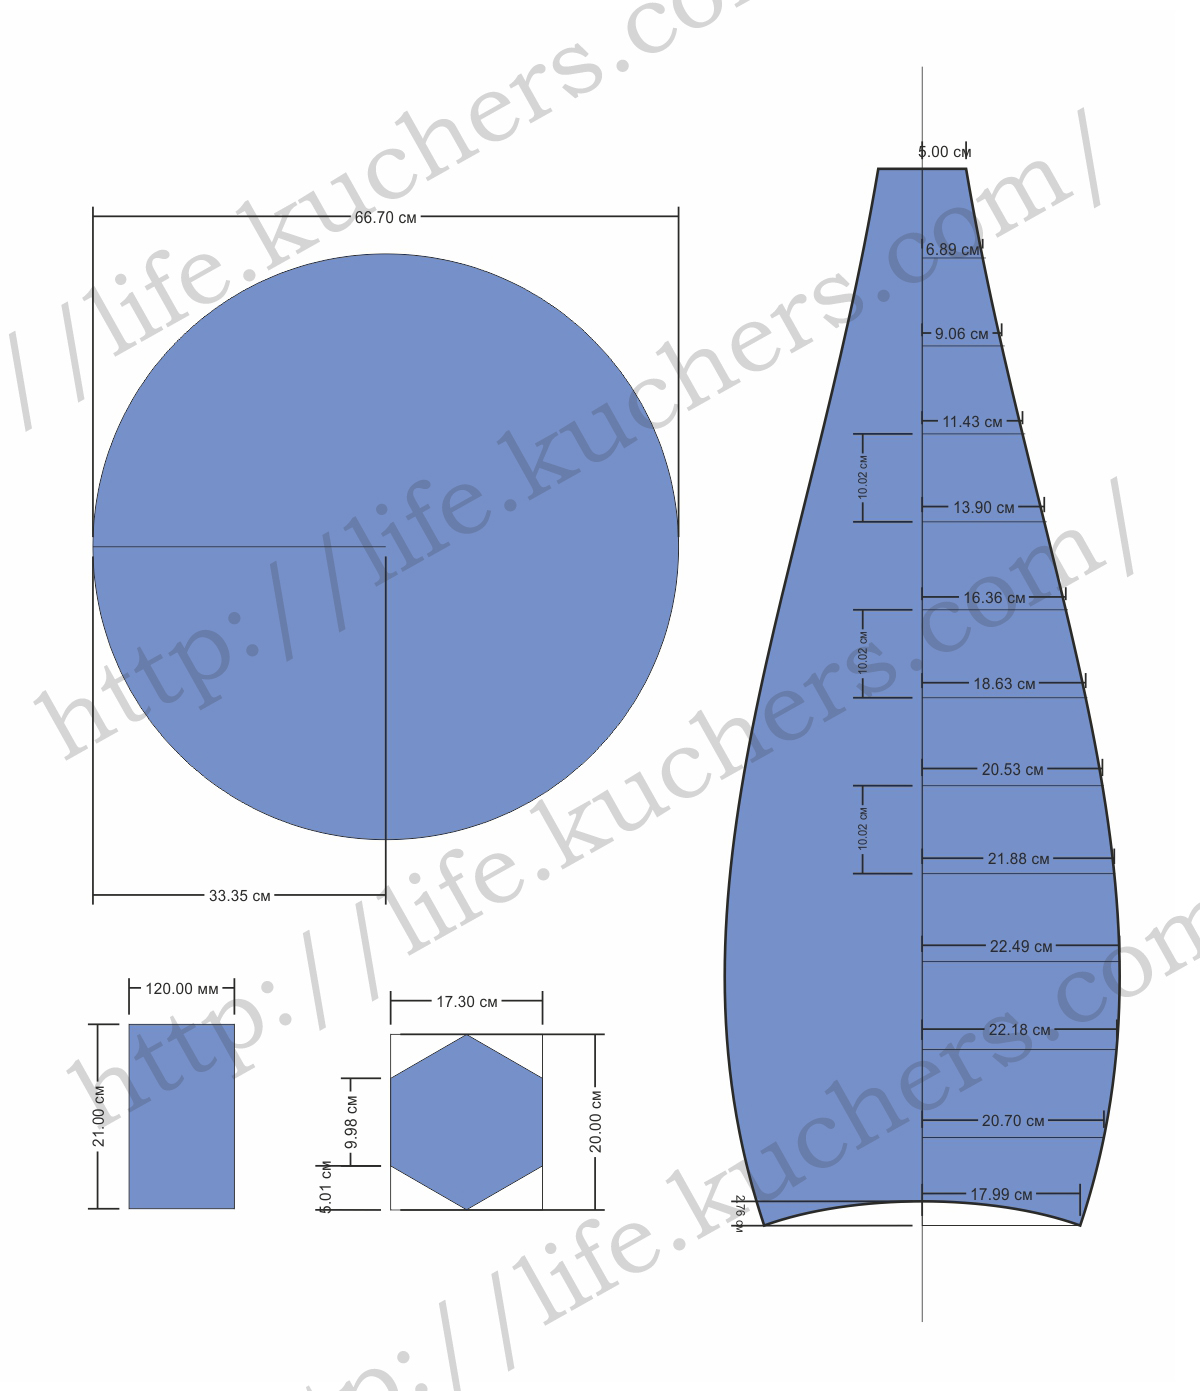
1. Build a pattern. A standard bean bag chair consists of 6 wedges and 2 round or hexagonal parts (the upper one is small, the lower one is large), and a handle is also attached on top. There are a lot of different patterns of a frameless chair on the Internet, but the meaning is the same. The appearance of the bean bag does not change much whether the bottom is a circle or a hexagon, the width of the wedges will be 40 or 50 cm. affects how your chair will end up looking.
We found and finalized the pattern of the middle bean chair (120 x 90 cm). It seems to me that the standard width is enough. If you increase only the height of the wedges to about 140 cm, then the length of the headrest will increase, that is, the chair is suitable for a taller person.
Bean bag patterns
To transfer the wedge pattern to a large sheet, you need to draw the middle of the wedge - the axis, put marks on it at a distance of every 10 cm and measure the widths indicated on our pattern, and then connect them in one line. This will be the side bend of the wedge. Then we fold the pattern along the axis and draw the second half of the wedge symmetrically. There is a deflection on the bottom of the pattern. We measure the specified deflection size from the height of the axis. Then we apply the ruler to the two lower edges of the pattern and bend it to the specified deflection mark and draw a deflection under the ruler. Cut out the finished pattern.

How to draw a deflection on a wedge pattern
In order to draw a circle, we take a non-stretching thread and tie a loop at one end (we will thread a pencil into it). We measure the length of the radius of the circle from the pencil to the finger on the ruler. We press one end of the thread to the center of the circle, thread a pencil into the second and draw a circle. Cut out.

How to draw a bottom pattern for a bean bag chair
To build a hexagon, you need to draw a rectangle, and then place the hexagon in it according to the specified dimensions. Cut out the detail.
Don't forget about the rectangle pattern for the handle.

Patterns for a frameless chair
2. Now we place the patterns on the fabric, as in the figure. This is necessary for a more rational use of the material. For the same purpose, the round part is cut into 4 parts. Before sewing a bean bag chair, they need to be sewn into a full circle. When cutting the fabric for the inner cover, we did not divide the bottom part, because the old sheet was large, and it was enough for us to place all the patterns in full size.

Placement of bean bag chair patterns on fabric
3. Cut out all the details, not forgetting the seam allowances (1-1.5 cm).
4. We sew the inner cover first. We sew the wedges together, sew a 50 cm zipper into the last seam.

This is what the outer case looks like without a bottom and top
5. Sew on the bottom. For convenience, it is worth connecting the wedges and the bottom with pins.
6. Then sew on the top hexagon. Do not forget to sew 2 Velcro on this part.
7. In the same way we sew the outer cover. On the inside of the hexagon, we sew 2 Velcro, and on its outer side we sew the handle of the bean bag chair (first, fold the rectangle in half with the wrong side up, sew along the edge, turn it inside out, and then sew it to the hexagon).

Finished inner and outer covers
8. When 2 cases are ready, it's time to stuff the inner case with Styrofoam balls. To do this, I advise you to go out into the entrance, or at least into the corridor, since the balls tend to crumble and scatter in different directions. Have a vacuum cleaner or broom and dustpan handy. The package with balls needs to be cut quite a bit in the upper corner. Otherwise, cutting off the entire top of the package, you run the risk of spilling a lot of balls past the cover. And this means that it will take a long, long time to clean them. Insert the opening of the bag into the cover of the bean bag chair and slightly shaking the bag, slowly pour the contents. This action is best done together. After filling the chair, fasten the clasp.
9. Insert the inner cover with balls into the outer one, fasten the upper parts of both covers together with Velcro. Zip up the zipper and enjoy your big bean bag, which you did make yourself :)

Velcro to connect two cases

Kostya is holding a bob-chair by the handle
All three of us spent the whole day testing this miracle of comfort and discovered the additional functionality of Big Ben. In addition to being a 2 in 1 chair and couch, it has a very good body streamlining, which allows pregnant women to finally place their stomach in a comfortable position.

Bean bag - the joy of the child :)
In addition, Xenia appreciated the bean and began to use it as almost a trampoline, slide and sofa at the same time. It is noteworthy that it is quite difficult for her to get out of the arms of the chair, which means that she strains her muscles and this is very useful. It is very funny to watch how a baby bogged down in a bag flounders, rolls over, pushes off and squeals with delight. In addition, the bumpy texture of the balls is still felt through the covers, and for small children's legs this is a wonderful massage.

Evening family reading
By evening, it was found that the enveloping effect of the chair helps to put the obstinate baby to sleep :) A couple of cartoon episodes, a comfortable position in the chair next to the mother and the cub is sleeping. Another property of the chair will please those who love warmth. It is very warm. As you know, polystyrene is an excellent insulation, and polystyrene balls that cover the body from all sides are warm so that you will not freeze, even if you really want to. Just remember to bring a cozy blanket with you.
Here is a new piece of furniture we recently got. We immediately appreciated its merits and made it habitable, even sometimes arguing who will sit on it. If you have any questions when creating a bean bag with your own hands, write to us and we will definitely answer them.
We wish you inspiration to create wonderful cozy things!
P.S. After 5 months of active use.
Bags began to flicker on the screens TVs in the studios of various television programs, the townsfolk wondered - is this design really comfortable for sitting? Soon, all those interested were convinced of the level of comfort of such a chair, but other questions arose - where to buy and how to enter this furniture in interior. More about this and how to create a bean bag chair do it yourself will be discussed further.
DIY bean bag chair: advantages of frameless furniture
Incredible comfort . Loose filling allows the chair to take the shape of your body, in whatever position you are. This significantly reduces the load on the spine and increases the efficiency of rest. The chair provides thermal insulation, keeping your body warm, which is equally important if you have back problems.
Absolute security . The bean bag has no sharp corners or edges, solid elements or small fittings, so it is suitable even for children's rooms. In addition, frameless furniture for children is made from environmentally friendly fabrics.
All-round practicality . Cleaning the room is not difficult, because the low weight of the chair allows even a child to move it. It is easy to clean the chair itself from dirt by simply washing the removable cover.
Styling Neutrality . By choosing the right color of the cover and the type of material, you can support the design of any interior. For children, charming soft chairs are made in the form of animals, emoticons, balls, colors, with various applications. A denim bean bag decorated with a print will look great in a teenager's room. AT modern interiors usually use plain frameless chairs that match the main color scheme premises. retro style or Scandinavian style can be supplemented with a velor or fur armchair.
Advice! Withwhen making repairs, just order or sew a new cover, and the chair will not disturb the design harmony of the room.
We sew a bean bag chair ourselves
First, prepare the materials and tools.
- Fabric for the inner cover. Opt for inexpensive durable fabric white color– other colors can be seen through the outer case.
- Fabric for outer cover.
- 2 zippers.
- Filler - expanded polystyrene in granules. Simply put, these are foam plastic balls that are sold at a hardware store.
- Sewing machine.
- Millimeter pattern paper.
- Pencil, crayon, ruler, pins.
Our chair will be pear-shaped, medium in size for an adult. With a fabric width of 1.5 meters, a cut of 3.5 meters is needed for the inner cover, and 3.6 meters for the outer one. The length of the zippers is 40 and 60 cm, respectively. The filler will need a quarter meter cubic.
We make a pattern in accordance with the pattern, observing the dimensions. There will be 6 pear-shaped wedges, a small hexagon is the top of the chair, and the bottom should be oval. Two fragments of the bottom shown on the pattern will be needed in duplicate. The oval is divided into 4 parts to save material when cutting.
We transfer the pattern to the fabric for the inner cover using pins and chalk. Leaving a 1 cm seam allowance, cut out all the details. We carry out similar operations with the second type of tissue.