What canopy over the porch. Beautiful awnings over the porch. Eco-friendly wooden canopies
Any porch needs a canopy. It is designed not only to protect from the rain entering and leaving the house. In winter, snow falling on the steps thaws, which then forms frost, which can lead to injuries.
In this article, we will talk about the choice of material for the construction of canopies and the various designs of these structures. In the second part, we propose to consider several options for drawings of visors and get acquainted with a step-by-step guide for their construction.


Canopies for the porch: the choice of material, design
What to make a canopy with your own hands, from metal or wood? In this section, we will talk about the features of these materials.
Material selection
Metal has qualities that make it ideal for building a canopy over the porch:
- High strength. Metal supports will withstand the roof of any severity, and the entire structure can have any area.
- The ability to build structures with any area.
- Fire safety.
- Availability and a wide range of material in stores.
- Ease of installation. A canopy on a polycarbonate porch with a metal frame can be built without even having welding skills - the elements are well attached with the help of hardware.
- Extensive modeling possibilities. The frame of the roof from the metal profile, if desired, can even be wavy. A wide variety of forged designs are available.
- Undemanding care.
Metal is especially good for building large porches with a canopy of a country house, with a large overhang above the site.

Canopy over the porch of a private house: photo of a structure made of a metal profile painted white
Wood is inferior to metal in terms of performance. Like that:
- Strength relative to the thickness of the material - a profile pipe 2 x 3 cm significantly exceeds the strength of a wooden bar of the same section.
- Resistance to atmospheric manifestations - the tree is afraid of prolonged moisture.
- Resistance to fungal attack - a do-it-yourself canopy over a wooden porch can begin to rot after a while.

Canopy over the porch of a private house: in the photo there is a wooden structure made of timber
Different types of design
If it is only about protecting the porch from precipitation, then you can choose the simplest design, with a simple and inexpensive design. It is enough to adhere to the well-known principle of “neat and clean”. Most often, these are canopies over the porch made of polycarbonate and metal profiles, of a dependent or independent type. Other roofing materials can also be used: metal tiles, soft tiles, corrugated board, slate, etc. The main thing is that their color and character match the design of the entire brick or wooden house.

Polycarbonate canopies over the porch: photo of the arched visor
Sometimes you need to make a canopy for a house decorated in some style - chalet, Russian, half-timbered, classic ... Here we already select the appropriate materials for the construction of the frame and roofing. For example, for a timber or log house, the only correct option would be a wooden structure with an opaque roof. It can also be a wooden porch with a forged canopy.

Decoration in Russian style
It is impossible not to mention the forged canopy over the porch, which you can’t do with your own hands, but you can order it in a specialized workshop. This is no longer just a shelter from the rain, but a significant part of the design of the entire facade of the building. Finishing here, as a rule, makes up a single ensemble with the design of the railings on the platform and the porch stairs. Additionally, the visor can be decorated with forged lanterns, flowerpots, etc. The photo of a porch with a canopy in a private house, located below, represents just such an option.

Polycarbonate canopy over the porch: forged construction pictured
And another version of the forged canopy over the porch. From it you can see what opportunities the use of forging gives - the visor has an unusual shape. This is not just a standard shelter selected from a catalog, but a piece work on the design of a porch with a canopy, carried out according to sketches. They can be made especially for the customer or even brought by him.
Note:wrought iron canopies over the porch look very good with polycarbonate. This material is almost transparent, so it allows you to fully appreciate the beauty of metallic lace.
Porch with a canopy: photo of a design model
Drawings and construction of canopies
It is not difficult to build a canopy over the porch with your own hands. This section describes the entire process, step by step.
Drawings of canopies for the porch
Below we give several options for arranging canopies over the porch. First, we propose to consider an arched structure on four pillars. It is suitable for massive porches with heavy front doors. It is built from a profiled pipe, galvanized or stainless steel. The supporting pillars are concreted into the body of the porch itself or screwed to it with anchors. The frame does not have a rigid attachment to the wall of the house. As a roofing material, polycarbonate or soft tiles are usually used here.

Before you make a porch with a canopy with your own hands, you need to consider different options for drawings
The second option is a forged canopy of a dependent design. There are only two bearing supports, the back side rests on the binding beam and two semi-trusses on the sides. The construction is light, not requiring the organization of the foundation. At the same time, the supports can be mounted both on the porch itself and on the platform in front of it - it all depends on the roof overhang in each case.

How to make a canopy over the porch: an attached forged structure
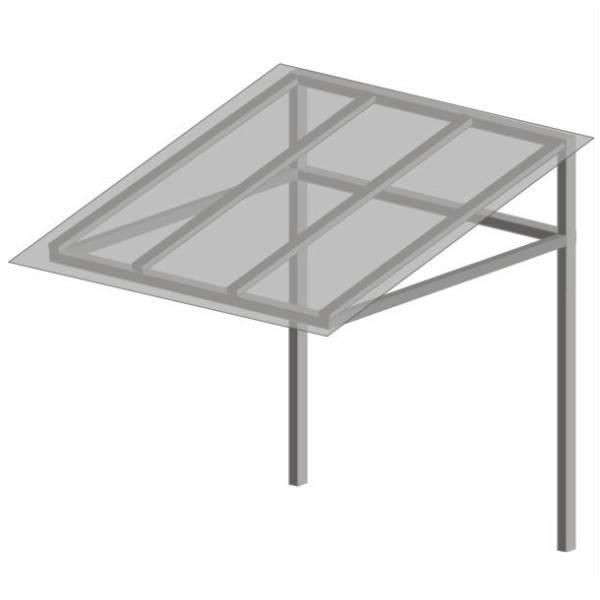
And the third example of a porch canopy drawing is an independent canopy. The simplest and lightest design that does not require the installation of support legs. Suitable in the case when the visor platform has already been built, and the fine finish is over. The frame is fastened to the wall by the short sides of the triangular trusses.

Choosing how to make a porch with a canopy with your own hands: an independent polycarbonate visor
Preparation for construction
The first thing to do is to create a sketch, and according to it already - drawings. According to them, we calculate how many materials and with what technical characteristics we need. For example, let's take a shed canopy with a metal profile frame and a polycarbonate roof. Materials:
- Support pillars - a profile with a section of 40x40 mm.
- The roof frame is a profile with a section of 20x20 mm.
- Polycarbonate.
- Cement-sand mixture for the foundation.
- Crushed stone for backfill.
- Welding machine with consumables for it. If we do not use welding, we prepare fixing hardware.

Single sided construction
Concreting of supporting pillars and installation of binding
On one side, our canopy is attached to the wall of the house, and the other side will be supported by two supporting pillars. The lower end they will be fixed in the ground, with the help of concreting. The level of penetration of the racks into the ground is 110-120 cm. We dig holes of the corresponding depth, the diameter is 20 cm more than the pipe section. We install the latter vertically and fill it with a cement-sand mixture by about 40 cm.
We take crushed stone and fill them with holes to the brim. We dilute the cement milk and pour it into the resulting "pie". We leave the pillars until the concrete hardens at the base. It's about 3-4 days. Next, you can proceed to the construction of the roofing part of the canopy.

Pillar concreting
To bind the back side of the canopy to the house, we take a rectangular profile pipe (50x30) or a wooden block of the same geometry. We mount it on the wall with the help of anchors, placing fasteners every 40-50 cm. If the binding is made of wood, then we must treat it with an antiseptic composition before installation.

Fixing anchor to the wall
Assembling the roof frame
Let's start assembling the frame. This must be done on the ground, on a flat platform. We start by welding the frame of the outer contour, then add longitudinal and transverse profiles. We lift the finished structure and lay it on one side on the binding beam, and on the other on the support pillars. We make fasteners there too. Be sure to control the progress of work by the construction level so that there is no distortion.
Note:after the installation of the canopy frame above the porch, it is necessary to treat it with an anti-corrosion compound. If the profiles already have such protection, we only cover the welding seams and the places where the hardware enters with anticorrosive. Only then can you start laying the roofing material.
Finished canopy
And a few words about the features of mounting polycarbonate. It is produced only with special hardware - thermal washers, which consist of a sealing gasket, an upper plastic "skirt", a cap and a self-tapping screw. It should be screwed strictly vertically, without overtightening. The following figure shows the correct and incorrect screwing methods.

Correct screwing of thermowells
A canopy over the porch area will not only protect from bad weather, but also provide another opportunity to emphasize the style of the exterior. How not to make a mistake with the choice, to choose a high-quality canopy that is in harmony with the exterior finish of the building - later in our article.
Why do you need a canopy over the porch?
Canopies over the entrance space can take on a different form and be defined by a variety of properties, depending on the selected materials and type of construction. We will talk about this in more detail later. And now we will outline a few points why it is important to get a little shelter above the porch of your private house:
- First of all, it is the possibility of convenient entry and exit from the home. For example, when leaving or entering the house, it takes time to close the umbrella, get or put the keys, close or open the door, and if the weather does not favor the yard, then the canopy will definitely not become superfluous;
- In addition to the fact that you personally and the people entering your monastery will not be subjected to additional wetting, a high-quality visor will protect a wooden or metal door from liquid exposure;
And, of course, aesthetics. A harmonious canopy will complete and emphasize the exterior of your house and yard, especially if you choose a material that resonates with other design details.


Types of visors above the porch
So, you've decided to build a nice visor, but you're not sure which one yet. Let's look at two groups of possible options and types of construction:
Monolithic construction acts as one with the wall, so this view can be called solid and ready for a long service. But at the same time, this feature dictates the disadvantages of such a product. The structure cannot be partially repaired or moved to another location. Such a visor is quite difficult to install, and therefore you will probably have to seek help from specialists.
Modular products very popular lately. Their structure consists of several parts that are fastened together. The design is easy to assemble, and also amenable to partial or complete repair, and all these procedures, if desired, you can perform on your own. Among the advantages you can point to a wide range of colors of these products - it will allow you to choose the most optimal solution for the exterior of your home.
Canopies also differ among themselves depending on the method of attachment. Such an important design feature must be taken into account already at the planning stage.
Mounted options strong and reliable, but only if they were built with supports. The visors are fixed to the wall itself, and the supports in this case will provide stability, extending the service life.
Suspended structures are made from lightweight materials due to mounting on special suspensions. For example, glass canopies look very attractive, especially in the case of a building in a modern style.


Variety of materials
In addition to the type of construction and how it is attached, visors also differ depending on the material from which they are made. In order not to miscalculate the choice and choose an option that will really last a long time, let's look at the most common ones, evaluating their advantages and disadvantages.
Peaks from corrugated board
It is one of the most widely used materials for porch awnings. It is often preferred due to its low cost, as well as ease of installation and maintenance. Such a product is practical and has a long service life. One caveat - the corrugated board is not durable, and therefore it is worth picking up thick modifications and covering them with a layer of protection.


Visors made of polycarbonate
Manufacturers offer a wide range of colors, among which you can find transparent ones, so you will surely be able to choose the most suitable one for your case. A nice feature is that such models are flexible, which will allow them to be given the necessary configuration. A visor made from this material will be strong, durable and fireproof. However, it can become cloudy due to sun exposure, so be sure to apply a sunscreen to protect it.


Peaks from a metal tile
It should be selected to match the tone of the roof and install the coating already at the stage of building construction. The design will please with a long operational period, unpretentiousness in care, but it will heat up from the sun and will not provide good sound insulation.


Forged visors
Forged products will never go out of fashion and will always look incredibly attractive. Only the inappropriate style of the structure or the high cost of such a visor can push away from such a choice. You don’t have to worry much about the latter, because you can reduce the cost of construction if you order an option that combines forging and polycarbonate, or the same metal tile.


Wooden canopies
One of the most favorite materials for decorators. And this is really a beautiful and harmonious option for a house with a wooden finish. There is a wide field for experiments here - make a pergola, a carved visor, paint it in any color you like or leave it natural. The main thing is not to forget about special impregnations to protect against exposure to liquids. As for the shape of the structure, give preference to uncomplicated compositions - two- or single-sided.


Glass visors
A canopy made of triplex or tempered glass looks very light and airy and is perfect for buildings in a modern style. Why stop at these types of glass? The fact is that standard varieties will not be able to guarantee high strength and durability. But triplex, which is a pair of glasses interconnected or strong tempered glass, can. The only negative point is the price of high-quality material, as well as the complexity of maintenance and repair.


Installing a canopy over the porch is not as difficult as it might seem at first glance. In most cases, you will not need special skills and craftsmanship.
To begin with, you need to make a detailed diagram of the visor with dimensions, as well as an estimate with data on the amount of material needed. In the process of creating such a project, consider the technical points:
- The width of the structure is one and a half times the vastness of the doorway;
- Calculate the length so that it is at least a meter more than the width of the doorway;
- The corners of the slopes must be at least 20 degrees so that the product can cope with the load from snowdrifts;
- The distance from the facade of the main building to the outer edges of the canopy should allow the doors to open freely.
First measure the width of the porch, and then add 30 cm to it for each side - this will be the size of the canopy. Determine the distance for the desired shelter, the height is calculated taking into account the layout of the house and the degree of inclination of the slope. This sketch will help you understand how long you need.
Next, form wood or metal: a beam, slopes, rafters and struts. Slopes and rafters should be the same in length. Connect these elements together with self-tapping screws (in the case of wood) or welding (if you work with metal).
Fix the frame. Fix the beam adjacent to the wall with screws (preferably stainless steel), and the struts with anchors. Lay the crate on the rafters (use bars or edged boards). If you want to work with a metal sheet or slate, then leave 20-40 cm between the laths of the crate.
Lay the roof on the rafters, and then fix it. Fasten the eaves (at the bottom of the slope) and the adjoining plank on the upper slope or wall. Create a drainage system - it can be a gutter or a pipe.
If you are building a canopy on a multi-layered wall covering, then secure the structure with stainless steel shoes on the outer layer. So that the insulation does not get wet in the future, take care of sealing the junction of the beams and struts.

Canopy over the porch - photo ideas
We discussed the nuances that you should pay attention to when choosing a canopy design, materials, as well as how to build it on your own. Next, we will show even more photos with ideas for arranging this attractive part of the exterior of the house. We wish you inspiration for creative searches, strength for new building exploits and pleasant viewing!


The canopy above the porch gives the exterior of the building a finished harmonious look. In addition, the canopy also performs a purely practical function, protecting the space in front of the front door from rain and snow. Modern buildings are usually complemented by visors made of profiled sheet, wood or polycarbonate. The frame itself can be wooden or metal welded. Forged looks very rich.
We will talk about the advantages and disadvantages of the main types of visors and how to make a canopy over the porch with your own hands in this article.
Features of visors from different materials
Usually, canopies made of wood or profiled sheet are mounted on wooden houses. A metal visor is also suitable for a brick or concrete building. In this case, the porch of a private house with a polycarbonate canopy of various shapes also looks good. The frame for the visor of a chopped or cobbled house is best made of wood. For a concrete building, a metal one is more suitable. The most important thing is to harmoniously combine the design of the canopy with the design of the exterior of the building itself. Perhaps these photos will help you make your choice:


Profiled sheet visors
A canopy over a porch made of metal (profiled sheet or metal tile) is distinguished primarily by strength and durability. In addition, this material is very easy to install. Such a visor will cost inexpensively and will give the building a modern aesthetic look.

The original canopy over the porch of metal
Visors made of polycarbonate
Very often in our time, visors are used over the porch made of polycarbonate. They cost a little more than profiled ones. However, they look more attractive. Translucent polycarbonate can have different shades and gives the porch lightness and airiness.

Canopy over the porch. Photo of a polycarbonate curved version
On a note: Visors of complex shape with rounded elements are best made from polycarbonate. The fact is that this material bends very easily.Wooden awnings
Often a canopy over a wooden porch is also used. Such a canopy in installation is even simpler than the first two types. Wooden visors can have a variety of shapes. In terms of durability, such structures are somewhat inferior to the first two types.

Wooden awnings over the porch. Photo of the dome and tent structure
canopy frame
A metal frame canopy will cost a little more than a wooden one and will last longer. However, it is more difficult to assemble. A forged canopy over the porch can add prestige to the building. But you can make such beautiful visors with your own hands only if you have blacksmithing skills. Usually, self-assembly uses simpler designs.

Forged canopies over the porch look very prestigious. Photo openwork aesthetic design
How to choose the size and shape of the visor
When drafting a porch, it is very important to choose the right size and shape of its roof:


Canopy size
Before we begin to figure out how to build a canopy over the porch, let's see how to choose the right width, depth and height. The size of the canopy should be such that the top platform of the porch and part of the steps are reliably protected from rain and sun rays. The standard visor is 120cm deep and 40cm high. Installed above the front door, it can be at any height. The most reliable in terms of protecting the porch and door is a canopy that protrudes at least half a meter beyond the porch on all sides.
On a note: Sometimes in private houses visors are arranged, including protecting the area in front of the porch. In this case, they have a width, length and depth of 1.5-2.5m greater than the same parameters of the march.
Interesting canopy design. Photo of a very wide visor
Construction form
The choice of the shape of the canopy depends largely on the features of the exterior of the building itself. The roof over the porch can be:
- Shed. Such designs are the easiest to manufacture;
- Gable. This type of canopy better protects the porch from slanting rain. In addition, it is easier to clear the snow. But in construction, such a design is somewhat more complicated than a single-pitched one;

Canopies over the porch. Photo (diagram) of single-pitched and double-pitched structures
- Dome closed. This type of canopy looks very elegant. Snow on such a structure practically does not linger. This is perhaps the most reliable protection for the porch;
- Arched semicircular. In construction, it is simpler than domed and looks very original. However, it protects the porch in the front plane worse;

Arched and domed designs
- Straight with an oversight. The traditional type of visor. Most often used in private homes;
- A canopy "marquise" is also used. It represents a visor, made in a semicircle forward;
- concave.

Canopy over the porch. Photo (scheme) of canopies of direct, "marquise", concave
On a note: It is best if the roof of the porch follows the shape of the roof of the building itself. So a shed canopy should be mounted if the roof of the house is shed. In this case, the “marquise” or concave options are also suitable, for a gable - respectively gable or arched, for a four-gable or multi-gable - domed. A straight visor looks good with all types of roofs.How to make a polycarbonate visor
Canopies over the porch made of polycarbonate have recently become extremely popular. In installation, they are somewhat more complicated than wooden ones. Next, consider the manufacturing technology of this particular type of canopy.
Material selection
Types of modern polycarbonate:
- Monolithic. This option can be transparent or matte. According to its characteristics, it is very similar to plexiglass. However, at the same time, it differs in less weight and does not beat;
- Cellular. This polycarbonate consists of two thin sheets connected by many jumpers, that is, it has a chamber structure.

Cellular polycarbonate can have a variety of shades
For visors, the second option is usually chosen. It bends easily and can have a variety of shades. The standard width of a cellular polycarbonate sheet is 2.1m. Usually on sale you can find material from 6 to 12m long.
Important: You should not choose too thin polycarbonate for a canopy over the porch. The best option for visors is a material with a thickness of 6-8mm.Visor sketch
The do-it-yourself visor over the porch will surely turn out to be more accurate if its scheme is first drawn in compliance with all proportions. The drawings will allow you to make it without errors and additional material costs.

Be sure to draw up a diagram of the visor
Frame manufacturing
So, how to make a canopy over the porch? Begin work with the assembly of the frame. It can be metal or wood. The latter option is less durable, and therefore less commonly used. The metal frame is most often made of steel tubes.
The device of the polycarbonate canopy frame includes several stages:
- The pipe of the required length is cut off. It is better to cut off with a margin. Excess can be removed later;
- Next, the pipe is bent. Perform this operation using a grinder. On the underside of the pipe, cuts are made every 15-30 cm, depending on the bending radius. If the pipe does not bend too evenly, additional cuts are made;

If there is a pipe bender on the farm, you can bend the pipe with it
- Places of incisions are seized by welding;
- In the same way, bend the second pipe;
- Finished arcs are connected by two longitudinal jumpers;
- Mount the crate by installing thin metal tubes or rods along the width of the resulting arched structure. Their number depends on its area;
- The places of welding are cleaned with a grinder;
- The finished frame is primed and painted in two layers.

The finished frame is best painted with alkyd enamel
sheathing
Further, the question of how to make a visor over the porch comes down to sheathing the frame. A polycarbonate sheet of the required size is bent and screwed to the frame with self-tapping screws. You should choose fasteners with wide caps and thermal washers. Holes for them are drilled in advance.
Important: The diameter of the holes should be slightly larger than the diameter of the self-tapping screws. The fact is that polycarbonate can shrink a little when the air temperature drops. For the same reason, you should not press the sheet to the frame too tightly. There should be a gap of 2 mm between the screw head and its surface.
The fastening of the skin to the frame is carried out using thermal washers
Mounting racks
The manufacture of the visor continues with the installation of racks. For their installation in the ground, they dig holes with a depth of about one and a half meters. They are usually located in front of the porch. For racks, you can use galvanized or ordinary steel pipe with a diameter of up to 50mm.
Important: Before installation, non-galvanized poles must be primed and painted in the same color as the canopy frame.Racks are installed strictly vertically in level. Next, the pits are covered with rubble and rammed. You can also fill them with concrete.

The column for reliability can be poured with concrete
Canopy installation
You need to install a canopy with an assistant, since even a polycarbonate structure has a rather significant weight. Pre-drill holes for fasteners in the rear arc of the frame. Drill holes in the wall itself. Next, the visor is raised to the required height. One person holds the structure, and the second attaches it to the wall. Dowels can be used as fasteners, but it will be more reliable to fix the canopy on the anchor bolts.

The canopy can also be fixed directly to the wall without the use of racks
If the visor is installed on four poles, two of them are attached to the wall with clamps or anchors, then two front supports are installed and the prepared canopy is fixed to the poles by welding. On this, the construction of the canopy can be considered completed.
As you can see, the question of how to assemble a canopy over the porch with your own hands is not particularly difficult. The main thing is to do everything carefully, observing the installation order.
An integral element of each entrance is a visor. Without it, the front door to a private house looks unfinished. In addition, it has an important practical purpose, which is a protective function. The article will discuss the varieties of designs, as well as the option for self-manufacturing a visor over the porch.
Visor requirements
The visor must be not only practical, but also safe, so there are a number of requirements that the design of the visor must meet:
- tightness;
- strength;
- attractiveness;
- sufficient width and length;
- compliance with the general mood of the building.

One of the main functions of the visor is protective. In this case, we are talking about both the residents and guests who will enter the house, and the front door itself. A good canopy is airtight, i.e. rain or melt water does not leak through the cracks in its flooring. This prolongs the life of the material from which the door is made. In addition, the visor casts a shadow on the porch, which prevents the rapid fading of the paintwork applied to the platbands and the door.

The construction of the visor must be strong enough. This means that it must withstand both its own weight and the wind load, which in some cases can be several times greater than the weight of the canopy structure, without much difficulty. In addition, in winter, with heavy snowfalls, part of the precipitation will linger on the peak. Its strength should be enough for the weight of the snow cover.

The visor is not a module that is made to simply be. It should be attractive and set the general mood. At the same time, the design of the canopy should not contradict the exterior of the building. This is expressed both in the lines of the frame and in the colors. The width of the visor must be such that the projection on each side of the door is at least 50 cm. Only in this case can we speak of a sufficient protective function.
Varieties of designs

The classification of visors is most often made according to the method of designing the roofing, and the names correspond to the name of the roof of a similar design. From this it follows that they can be:
- lean-to;
- gable;
- multi-slope;
- arched;
- domed;
- concave.
The first option requires the least amount of material for manufacturing and is light in weight. You can assemble such a structure without much effort with your own hands. It is a single plane, which is fixed to the wall at the required slope. This design has certain restrictions on the slope, therefore, with a long length, snow can accumulate on the visor. A visor with two slopes resembles a triangle. For the manufacture of such a design, two times more material will be required than for a single-sided one. In this case, the angle of each slope can be increased. This will make it possible to accelerate the removal of precipitation from above.

Multi-pitched canopies look great if they are installed on the porch of a house that has a hip or other roof of complex shape. It is quite difficult to make such a visor, so you will need to draw up a high-quality and thoughtful drawing, as well as the help of a specialist. Arched peaks represent a semicircular design. It should be chosen if the design of the house has rounded shapes with which the visor will be combined. In another case, it is better not to risk with experiments. This also applies to dome visors. They are somewhat similar to arched ones, but have an additional bend in the front of the structure.
Note! Concave structures are a type of single-pitched visors. Their disadvantage is poor drainage of precipitation, although they can be quite attractive in appearance.
roof deck

The choice of roof decking is an important step in designing an entrance canopy structure. All materials that are suitable for these purposes can be divided into two large groups:
- polymeric;
- metal.
From the first group, they most often opt for cellular polycarbonate. This is a really good material that has the following advantages:
- light weight;
- ease of installation;
- light transmittance;
- pleasant appearance;
- ease of giving a rounded shape;
- variety of colors;
- chemical resistance.

Polycarbonate is able to partially transmit light, which is useful for a visor. Before buying polycarbonate, you need to make sure that it has a protective film that minimizes exposure to ultraviolet rays. If there is no such film, then the material will quickly dry out and crack. Of the shortcomings of polycarbonate, its fragility can be critical. If hail is not uncommon in the area where the visor is planned to be installed, then it is better to choose a different type of flooring, since at the very first precipitation the polycarbonate will be completely damaged.

Of the metal roofing decks, the most common are corrugated board and metal tiles. They have similar properties, but the metal tile looks more attractive. Of the positive qualities of these materials, it is worth highlighting:
- mechanical strength;
- light weight;
- long service life;
- the possibility of self-installation;
- the possibility of giving a rounded shape;
- affordable price;
- wide choice of color schemes.

In terms of mechanical strength, metal decking is superior to polycarbonate. They can also be bent to a certain radius to get the desired shape of the visor. Metal tile and corrugated board are more resistant to wind loads. Strong hail is capable of leaving dents, but will not break through a metal sheet. Among the shortcomings of the material, its noise can be noted. Even a little rain will drum well on the visor.
Self-manufacturing
Any work begins with planning. It will help to correctly calculate the forces, means and take into account possible difficulties in achieving the goal. This is also true in the manufacture of a visor, so the first step will be its design.

Design

To make the design process easier for yourself, it is better to take a photo of the entrance beforehand. In the photo it is easier to choose the required dimensions and shape of the future design. This can be done both manually and in a graphical editor. When drawing up a drawing, there are several points to consider:
- construction width;
- extension length of the structure;
- number of supports;
- slope angle.

It has already been said above that the visor should be 50 cm wider on each side than the entrance, but this rule is not valid if there is a large porch. In this case, care must be taken that the visor closes the porch on the sides. The length of the stem can be adjusted according to your wishes. If the visor is too long, then additional supports are simply installed. The number of supports will depend on the complexity of the structure and its weight. Usually enough fastening to the wall and two supports. The angle of inclination is selected in the same way as for the roof that is on the house.

Preparatory work
The preparatory process is to purchase the necessary materials and missing tools. From the materials you will need:
- selected roofing;
- metal profile pipe with a size of 50 × 30 and 40 × 20 mm;
- fastening consumable;
- cement;
- sand.
From the tool you can not do without:
- grinders;
- screwdriver;
- perforator;
- roulettes;
- marker
- welding machine.
Do not forget about personal protective equipment, such as glasses, gloves and clothing made from natural fibers.
Mounting

First of all, from a profile pipe 40 × 20 mm, it is necessary to prepare the frame of the future structure. Workpieces are cut depending on the selected dimensions. Two of them should correspond to the height of the porch, the other two should correspond to its length. The size of two more blanks is selected in the process. These components should form a right triangle. First of all, details are welded together in pairs, the dimensions of which are known. They must be at right angles.
A special clamp or vise will allow this to be achieved. Boil the entire seam should not be in one pass, because the angle will be violated. It is better to make small tacks, level the workpiece, and then boil it completely. When everything is ready, you can measure the length of the hypotenuse. The grinder cuts out two more elements, and they are welded into place. Now you need to combine the triangles into the overall design of the visor. To do this, they are connected by strips in the corners. To increase the rigidity of the visor frame near the resulting rectangle, which will be adjacent to the wall, it is necessary to weld several transverse strips.

The next step is to mount metal elements under the crate, on which the porch roofing will be fixed. When the porch frame is ready, it can be installed on the wall. So it will be easier to fix it. In the legs of the triangle, which will be adjacent to the wall, several holes are drilled. They must match the diameter of the anchor with which the fastening will be made. The porch frame is leaned against the installation site and the location of the holes is transferred to the wall. A perforator drills holes in the wall.

Now you can clean up the porch frame. All rust must be removed from it. The easiest way to do this is with a grinder or grinder with the appropriate nozzle. After that, the porch frame is painted. When it dries, you can install the roofing material. If it is corrugated board or metal tiles, then they should be fixed with roofing screws with rubber seals. Polycarbonate can also be fixed with them, but you should not overdo it with respect to polycarbonate. If you tighten the screws too much, they will simply crush the flooring. Next, the visor rises and is fixed in place.

After installation, it is necessary to seal the junction of the visor to the wall. This can be done using various mastics or a piece of roofing material. With a large extension of the visor, racks are mounted. They must first be welded to the frame. Under them, two holes are dug 50 cm deep. The part of the visor racks that will be in the ground is covered with bituminous mastic, which will protect them from rusting. Racks are lowered into place and the space around them is filled with concrete mortar. Another version of the visor for self-assembly is in the video.
Summary
As you can see, making the simplest version of a single-sided visor will not be a problem even for an inexperienced craftsman. The main requirement is the ability to work with various power tools.