Do-it-yourself match fortress step by step. Crafts from matches - a simple little house. Match figures
Matches are an affordable and environmentally friendly material for creativity. Real works of art are created from wooden sticks - huts, castles, mills, fortresses and entire palaces.
You just need to be patient, work extremely carefully and accurately.
In this article, we will show how and with what glue you can make a pretty house from the most ordinary matches, and also talk about glue-free miniature building technology.
What safe glue to use for matchstick crafts
Different brands of glue are suitable for working with matches, however, to speed up the creative process, it is better to use quick-setting adhesives.
The most popular among the masters of match modeling today are the following types of glue:
PVA-MB (Russia) - universal adhesive based on an aqueous emulsion of polyvinyl acetate. Designed for gluing wood, so it does the job perfectly.
PVA sets and dries quickly enough, and when dried it becomes transparent, which is important in the manufacture of crafts.
Another advantage of PVA-MB construction and household glue is its low price (a liter capacity of glue in any building hypermarket costs less than 100 rubles);
Moment Stolyar (Russia)- modern glue, which is essentially an improved version of PVA. The presence of special additives in the composition ensures excellent adhesion and instant setting of the surfaces to be glued.
Glue is sold in convenient 250 ml plastic bottles with a convenient dispenser for spot application of glue, it costs about 150 rubles;
Moment Installation Instant Grip (Germany)- universal express glue for instant gluing of wood of any species. Bonds in seconds without requiring fixation of the surfaces to be bonded.
After drying, like regular PVA glue, it becomes transparent. Sold in plastic bottles of 100 g and 200 g, it costs about 150-250 rubles.
Step-by-step instructions - how to assemble houses from matches with glue
To understand the principle of work and get a hand, for starters, we recommend building a simple house of matches with any glue from those presented above.
The assembly process is not particularly difficult:
- On a sheet of cardboard, which will become the basis for the house, we lay two matches in parallel. In order for the “foundation” to be without distortions, sulfur should be removed from the first two matches. Then glue the second row of matches in accordance with the picture:
- Using a similar technology, we continue to lay the "logs" row by row until the house reaches the desired height;
- One drop of PVA glue (or equivalent) is enough for each "knot". Before laying the next row, you need to let the previous one grab:
- When the walls grow to the desired height, we mount the ceiling;
- On the finished "overlap" we apply two layers of glue for structural strength:
- Let's start making a gable roof. It will be in two parts;
- For reliability, we connect each slope in two rows with glue and an additional match:
- We connect the two parts of the roof into a single structure and install it on the finished box of the house;
- Our first glued match house is ready:
VIDEO INSTRUCTION
What else can you do with your own hands using matches
Many interesting models can be assembled from matches - it all depends on the imagination and desire of the author.
This craft uses a different way of connecting miniature logs.
Here is a short guide:
- From four matches we assemble the base of the future well in accordance with the scheme. Please note that in this case, all 4 matches lie in the same plane;
- Glue the next rows in the same way. There should be 10-12 in total;
- Then we prepare supports for the future roof: on the inside we glue two matches tightly to each other to two opposite walls. We build up the supports, using two more matches for each of them;
- Separately, we assemble the roof frame and install it on our finished supports;
- We "sheath" the roof, gluing the matches with a solid shield.
Having received the first experience, you can proceed to more serious modeling - to do, for example, church made of matches with glue or a small grinder.
VIDEO REVIEW
The most important thing is to lubricate all joints and joints well so that the structure does not fall apart. Excess glue must be periodically removed during work, preventing it from hardening.
When creating these crafts, glue is not used. The design keeps its shape due to the friction force that occurs between the matches. Using it, you can create both a hut on chicken legs, and a whole city, where each house is not like the other. This is a very exciting assembly method that makes you feel like an architect of a whole castle. But to create a masterpiece, you need patience and an accurate eye.
How to make a house out of matches
You will need up to 7 boxes of matches, a box from a disk (or a book, assembly will take place on it) and a coin with a diameter of about 24 mm.
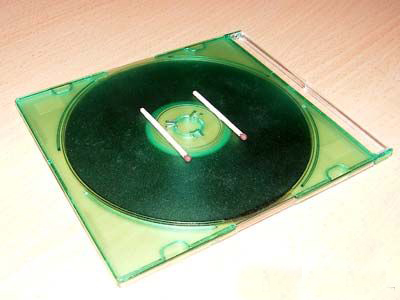
Place 2 matches on the disk box parallel to each other, at a distance slightly less than the length of the match.

Place 8 matches on top perpendicular to them. The distance between them should correspond to the width of the match. (Heads of matches in each row should be directed in one direction, their direction in subsequent rows alternates).

Lay another layer of 8 matches on top perpendicular to the previous one.


Place the matches around the edges, lay out a “well” of 7 rows.

Perpendicular to the last row, lay out 8 matches (the heads are directed in the opposite direction from the first row).

Lay 6 matches perpendicularly on top.

Put a coin press on the resulting design.


Pressing the coin with your fingers, insert the matches in the corners of the cube with the head up, so that their ends come out from the bottom of the flooring (first row).


Stick the matches along the walls in the same way.

Squeeze the walls of the cube from 4 sides by sliding them to the inner matches. Now the coin can be removed.


Take the cube in your hands and crimp on all sides.

Matches that were stuck around the perimeter, “drown” so that the heads press the top layer.


Place the figure upside down.
To form walls, insert vertically from 4 sides of the match cube.

Now form the walls by inserting matches horizontally.


Remember that at the bottom the extreme row consists of 6, not 8 matches. Insert the missing ones into the corner holes. Simultaneously push the vertical wall matches up.


Roof matches are laid perpendicular to the top row of the "ceiling" from the edges to the middle. The first row consists of 2, the second - 4, the third - 6, the fourth - 8 matches.


Between the vertically sticking wall matches, lay the "tiled" matches, their heads should be directed towards the middle. After that, push the wall matches all the way back.

Cut the matches into 2 pieces. Insert 4 halves of a match with sulfur side by side into the roof (pipe). Insert the rest into the walls, depicting the contours of the door and windows.
Products from matches with their own hands. Making a wheel
You will need a compass, a pencil, a ruler, thick cardboard (creating a template), glue, an awl and matches.

Print or build the template according to the instructions.

Glue the template onto cardboard. With an awl, make holes at the nodal points along the thickness of the matches.

Insert the matches vertically into the holes (support matches). They must be free of damage and defects.

Between the support matches, lay the carrier matches. They are overlapped, the heads are oriented in the same direction. The last and penultimate matches pass under the first, for this it is necessary to lift the end of the first match.

When the row is closed, press the carrier matches to the base.

By the same principle, another 4 rows are assembled.

When the rows are assembled, turn the craft over with cardboard up and start squeezing the matches according to the pattern.


If you use skewers instead of support matches, the wheel will be higher. It can not be squeezed out of cardboard, but used as a cup for pencils.
You can make the template smaller, but with more corners and lay the bearing matches in 2, 3 or 4.

19 square. Bearing matches are laid through 2 support ones.

21 square. Carrier matches are laid through 3 support ones.

22 square. Carrier matches are laid through 4 support ones.
How to make a castle out of matches with your own hands

The basis of the locks is match cubes. Before starting construction, add the required number of blanks.
The cubes stick together without glue.

Pull out 4 matches (NOT corner matches) from the side of the cube, clean off the sulfur.

Place the second cube on the matches.

To prevent the matches from sliding back, prop them up with toothpicks. Make sure the cubes are equally oriented.


Crafts from matches with your own hands. Paintings
Pictures from matches can be made in various ways in complexity.

You will need a sheet of paper, glue, matches and the selected pattern. Lay out the matches so that you get a landscape. When you like the result, start smearing matches with glue and laying them out in the same order on a sheet of cardboard. Even if you are confident in the pattern, first lay out the pattern without glue. This will help you decide which matches to fasten first, which last.

Transfer the drawing or inscription to thick cardboard. Glue the matches together and fill your drawing with them. Matches are glued vertically to the paper.

Collect cubes from matches and fasten them together in a flat design. Stick matches, alternating ends with and without gray, forming a pattern. If you can’t make cubes from matches, but you want to create such a picture, then for the base you can use a box lid or a sheet of foam.
Via matches you can not only light a fire at any time, but also fold the house without glue and nails. Many people know how to assemble match houses, but some people improve their skills even more and build whole houses from matches. locks causing the envy of others.
You will need
- matches
Instruction
- In order to learn how to build match castles, you need to master the technology of connecting match cubes - such a cube is the basis of any match house, and is the building material for a large castle.
- You can connect the cubes to each other without the use of glue and other devices. Before learning how to connect them, make two identical match cubes in the same way as if you were making the basis for simple match houses. To do this, lay out two matches as a base, and on them - six matches, alternating heads. Six more matches are placed on top of these six.
- Matches must be stacked until an even square is obtained. If necessary, you can glue some places of the cube so that the matches hold the volume.
- Having collected two cubes of the same size, pull out four matches from each cube, located slightly away from the corners of the cube. If the matches do not pull out, push them from below with another match.
- Clean the heads of the four ejected matches from sulfur with a knife, and then, in order to strengthen the structure, insert another match with a cleaned head into the center of the structure. Matches with cleaned sulfur heads will enter another cube more easily, which means they will hold tighter in it.
- Squeeze the workpiece tightly, and then fix the mounting matches from below by inserting supports from the scraps of additional matches. This will help the matches stay in place when you press down on them with the second die. Put the second cube on the fixing matches, also squeezing it with your hands, and then check whether the cubes are firmly fixed to each other.
- If the lock design is planned to be large and heavy, strengthen the junction of the parts with a couple of drops of glue. Make the right number of exactly the same cubes, and then connect them in the right order to form the walls and structure of your match building.
Content
Making crafts with your own hands is always an exciting and exciting activity. It can bring special joy if you do them with a child. This will help the baby develop both creativity and fine motor skills of the hands. For crafts, you can use various materials - plastic, paper, cones, leaves, chestnuts, threads, etc.
One of the available and inexpensive materials can be matches. There are many different techniques. For example, to make a house, neither nails nor glue are required.
What do you need to craft
To do this job you need:
- 1. Several packs of matches;
- 2. Any smooth surface that will allow you to rotate the product without disturbing its design, such as a CD box;
- 3. Coin of small diameter.
Making a house without glue
To get started, we have all the necessary materials on the table and proceed with the assembly. Two matches must be placed next to each other in parallel, but in such a way that the distance between them is somewhat less than the length of the match itself.
On these two, a flooring of eight is made. It is very important that the matches lie flat and perpendicular to the base. To make the house more beautiful, lay the flooring with the heads in one direction.

Then another one, also of eight pieces, is laid on top of the first layer. It should be perpendicular to the first layer. It is very important that the distance is equal, be careful when working.

Assembling the walls
After that, a “well” is made of seven rows, and the heads of the matches from which the “well” is laid out should be arranged in a circle. This is a very delicate and painstaking work that requires attention and concentration.


Above the "well" the upper flooring is laid out. Like the bottom one, it should be of eight pieces. It will be more beautiful if the direction of the heads of the upper layer is opposite to the lower one.

The second layer of the top is placed first of six pieces. The two extremes are added a little later. The resulting design is pressed with a coin from above. It is necessary so that the matches do not stick to your hands. Otherwise, the still unstable structure could collapse. Therefore, at this stage of work, you should hold the structure with your finger.

We strengthen the structure
To fix the structure, it is necessary, carefully holding, to stick four pieces vertically with their heads up in the four corners between the upper and lower layers. (That is why the top layer consists of six matches).

Do this carefully, carefully and make sure that the house does not jump off the base.


As a result, the base of the structure is slightly reinforced, which allows you to proceed to the main assembly stage.


After that, it is necessary to compress the walls from all sides and remove the coin. It won't be needed anymore.

Then take the house in your hands and align it on four sides.

For alignment, you need to press the matches located around the perimeter, so that they touch the flooring heads. The resulting square will be the foundation. Now the structure is sufficiently strengthened for further action.

At this stage, the resulting frame, with sticking out ends of the matches, will be more convenient to assemble by hand. So, the ends that were inserted around the perimeter will be the upper part, and the opposite side will be its base.

Making walls will not seem difficult if the cube is even. The walls are laid in two layers - vertical and horizontal. First, insert the matches vertically on one side.

The same manipulation is done with the three remaining sides. To make it beautiful, we insert the matches with their heads in one direction. For example, up.

Next, the walls are laid horizontally. As with the construction of the "well", the heads should be laid in a circle and alternate with the ends. After installing all the matches of the four walls, it is worth pushing the horizontal matches so that they are pressed against the opposite wall.

Making a roof
The house is almost ready. It remains only to build a roof. To do this, insert the required number of matches into the corner holes and pull the vertical half up. You can do this without fear, since the walls are sufficiently reinforced.

Matches, of which the roof will be placed perpendicular to the flooring. We start from the edge and alternate the direction, first two pieces, then four, then six, and in the middle row eight pieces.
The simplest and most accessible material for creativity, by right, can be called ordinary matches. Painstaking work with them perfectly helps to relax, develop patience, imagination, perseverance, accuracy and attention. And in talented hands, products made from ordinary matches can become original works of art.
Necessary materials
In this master class, we propose to make a match house without glue.
To build a house you will need:
- matches - 10 boxes;
- box for CD discs or a sheet of cardboard;
- coin - 1 or 2 rubles.
Match house without glue
For beginners, instead of a disc box, it is better to take a thinly rolled piece of plasticine or salt dough as a basis. It is easier to install vertical matches on such a basis.
Let's start collecting. The scheme of work is quite simple. Take two matches and put on the base parallel to each other at a distance of two centimeters.
Lay a floor of eight matches on top of them. The distance between the elements should be equal to the thickness of approximately one match. In this case, all heads should be directed in one direction. 
On top of this level, make another similar flooring, but lay the matches perpendicular to the previous ones. 
On top of the third level, lay four matches in the shape of a well, so that the heads of each match are directed in different directions. 
Lay six more rows of matches in the same way. Make sure the heads are facing the same direction. The result should be a "well" of seven rows of four matches. 
From above, cover the well with a layer of eight matches, repeating the very first flooring. 
Place six matches perpendicular to this flooring. Later, two more will need to be added to this row. 
Four matches must be inserted vertically into the extreme corners of the resulting "lattice". In the photo, these places are circled in red circles.
In order to make it more convenient to work and the elements of the house do not accidentally crumble, it is better at this step to put a coin on top of the structure and press it tightly with your finger. 


When installing vertical matches, make sure that at the bottom all matches stand in the same angles as at the top. For convenience, you can guide them with a toothpick.
Be extremely careful, because at this stage the house is still quite fragile and can collapse with any careless movement. It’s not a problem if the matches that lie on top move apart, a little later everything will fall into place.
Now insert vertical matches around the entire perimeter of the house, lowering them to the very bottom of the structure so that the match heads are at the same level from above.
The coin is no longer needed, remove it with tweezers.
Now the house has stable walls, but to make it really strong, squeeze all its sides with your hand. At this stage, it can already be picked up, it will not collapse, although the design is not yet completely reliable. 
Squeeze each side carefully. The tighter you squeeze, the stronger it will turn out as a result. Be sure to align all the matches so that everything is neat and nothing sticks out.
As a result, turn the product upside down. 
From the outside, start inserting matches vertically with their heads up, thereby strengthening the walls even more. 
Then start a new, but already horizontal layer of matches along the outer walls. Please note that the match heads must intersect alternately, as indicated in the photo. 
Strengthen four new corners with matches.
Now, around the entire perimeter of the house, carefully raise the upper vertical layer of matches to half the height. You can push them from below with another match. 
Now fold the attic as shown in the photo. 
Lay all the elements of the upper part of the roof crosswise. For a better understanding, look at the photo. 
When the roof is ready, make a pipe out of four matches.
Mark windows and doors with match heads, breaking the matches in half so that they are not noticeable from the back. 