Marine bottle. How to decorate a bottle in a marine style - do-it-yourself decor Decorate a bottle with your own hands in a marine style
In order to bring a little originality and creativity into the everyday atmosphere of life and your home, a little imagination, free time and a small set of available tools are enough. Any kind of handmade is now at the peak of popularity - on the Internet you can find many master classes for making a wide variety of decor items that you can decorate the interior with. A masterpiece of applied art can literally be born from unnecessary remnants and scraps of various materials. In this publication, we would like to draw your attention to such a type of arts and crafts as bottle decoration. We hope that our selection of 100 different bottle decorating ideas will inspire you to be creative in decorating your home, making a gift or creating a practical yet beautiful household item.

Creativity has no limits
There are many ways to create a decor for a bottle, and the choice of each of them will depend on what kind of end result you need. Whether you want to decorate a bottle for a gift or need decor for a wedding table, maybe you will store spices in a bottle or use it as a vase, maybe you are just looking for an opportunity to decorate your interior, bring bright colors or original ideas to it. In any case, everyone can find their own optimal way to decorate bottles.
So, most often bottles are decorated for the following purposes:
- as a wedding table decoration (usually two bottles of champagne are issued, but options are possible);
- a gift for any kind of celebration;
- decorative element for living room, bedroom, dining room;
- in the kitchen space, a bottle filled with spices carries a functional load and plays the role of a decorative element;
- in the bathroom, a bottle of colored sea salt performs a similar function


Bottle decoration for various celebrations
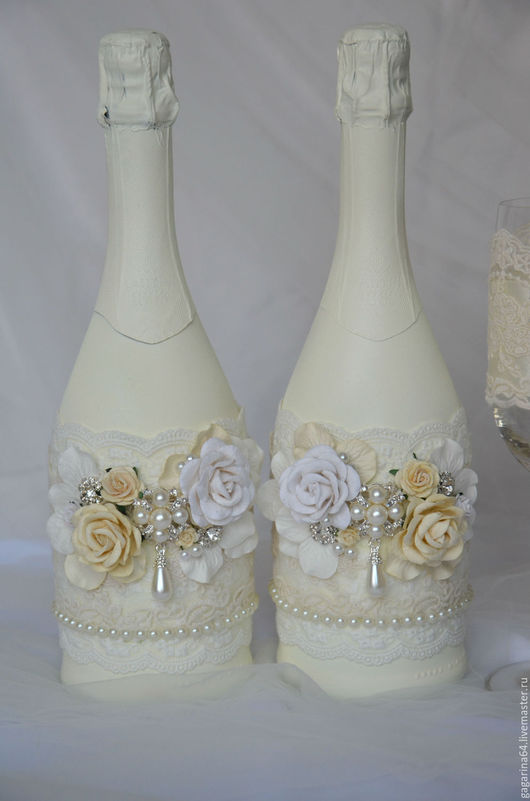
Wedding table decor
The wedding tradition of decorating the newlyweds' table with two beautiful bottles of champagne has been around for many years. After the wedding, the so-called "bulls" remain with the newlyweds and are kept in a place of honor. The first bottle is opened on the anniversary of the wedding, and the second - after the birth of the first child. Given such a long journey of wedding bottles, special attention is paid to their decoration. Recently, all wedding decoration has its own unique concept, based on which the color palette and decor of literally every piece of interior, table setting and all kinds of decor are selected.


But there are also universal options for decorating bottles for the newlyweds' table. The best part is that you can do the transformation of simple bottles with your own hands, in a short time and without spending a lot on materials. Most often, bottles are designed similarly to the appearance of the bride and groom - this is what is called a "classic of the genre", time-tested.


bottle as a gift
The best gift is a handmade gift. Such a present not only keeps the warmth of your hands and carries positive energy, but also indicates the exclusivity of the relationship, the special care of the donor in front of the hero of the occasion. A beautifully designed bottle can become a decoration of the festive table, and bring originality to the interior of the home.


New Year holidays
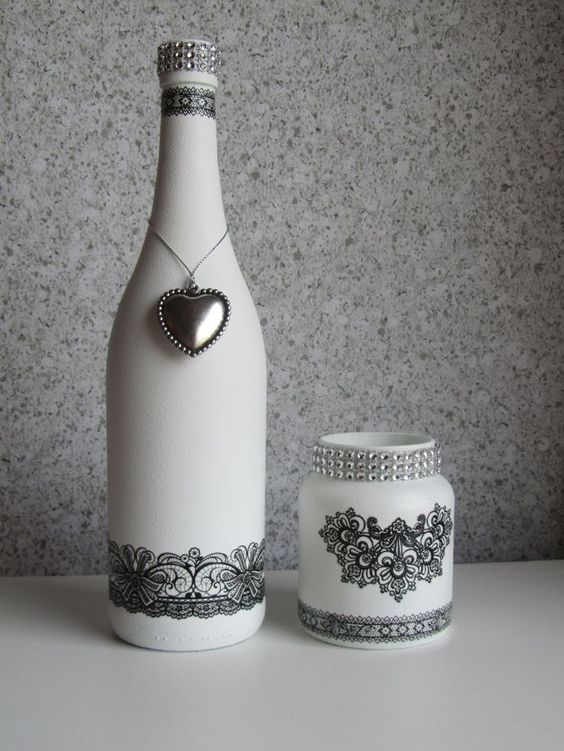
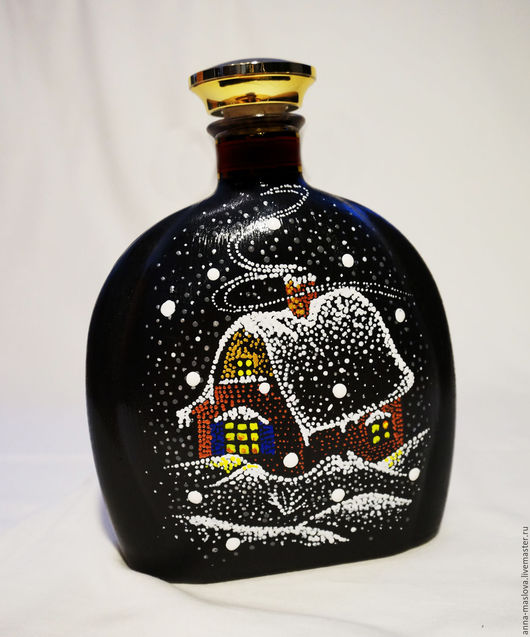
A bottle decorated in a winter, New Year's style can become both a decoration of a festive table and a part of the decor of a room where holidays will be celebrated. This can be as simple as painting the bottle white and coating with coarsely ground salt as an imitation of a snowy surface, or painting the product in the manner of patterns that frost leaves on the windows.


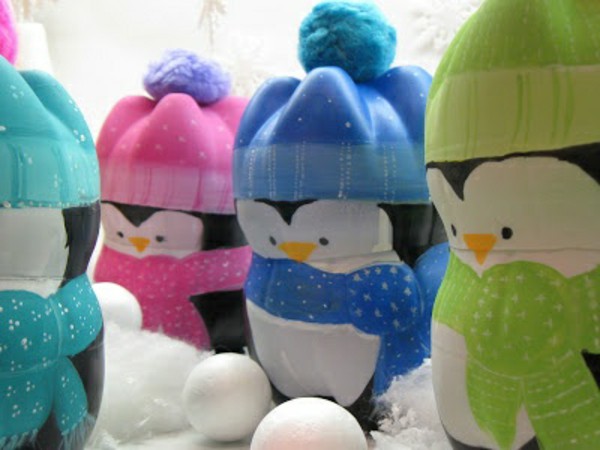
Not only glass, but also plastic bottles can be decorated in the form of a snowman or Santa Claus with a Snow Maiden. Here is an original version of decorating a plastic bottle in the form of a penguin - the most "winter" bird.

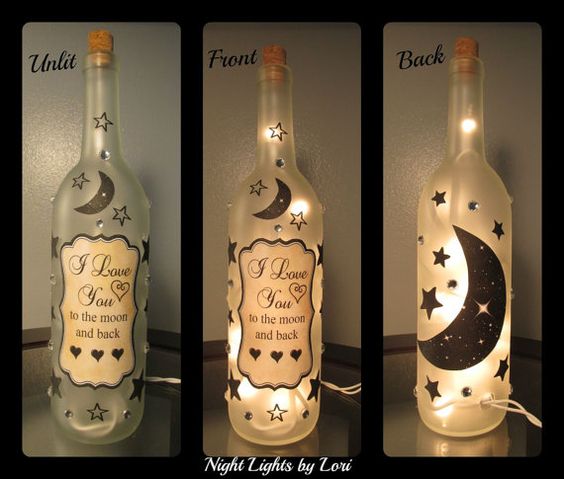
Gift for Valentine's Day or Wedding Anniversary
The main theme of the gift for Valentine's Day is the exploitation of images and crafts in the form of hearts, the active use of various shades of red, various ways of declaring love.


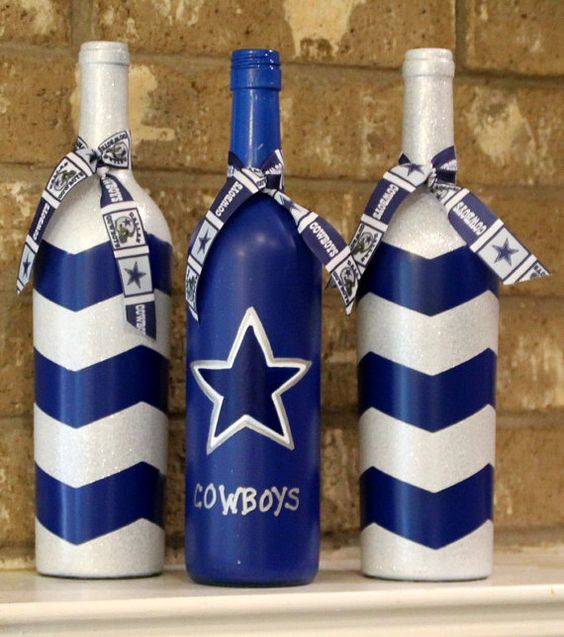
Bottles decorated to celebrate a wedding anniversary can be decorated with the first letters of the names of the spouses, the date of the wedding celebration or the number of years lived together. You can create a family coat of arms and use a stencil to apply it on the surface of the bottles.


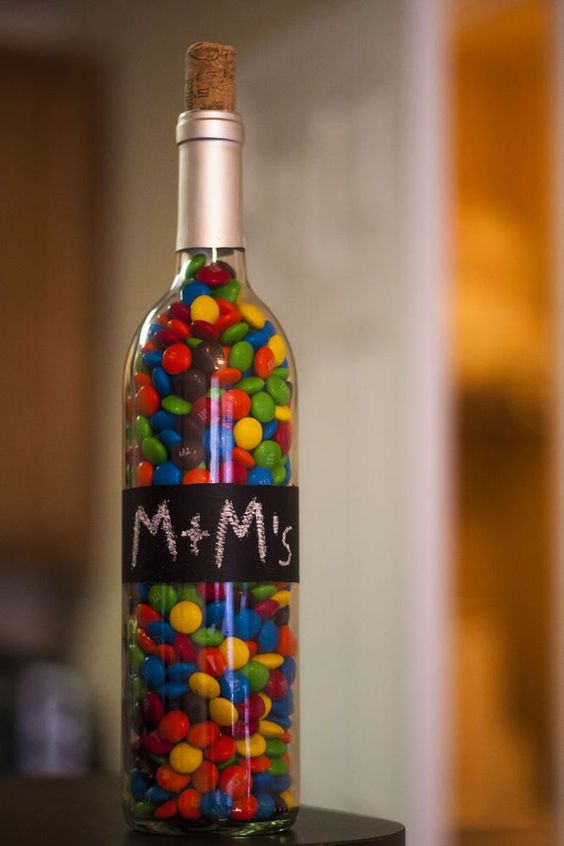
No one will refuse a whole bottle filled with delicious sweets. Even a child can make such a gift. A funny inscription or a glued flower, beads or sparkles is enough.
Decorating bottles for the interior
Sea style
Decorating bottles in a marine style is one of the most popular options. And the point is not only that you can pour sea salt into a bottle and decorate the bathroom interior or collect a collection of sands brought from trips to various beaches. The marine theme invariably reminds us of relaxation, travel, pleasant emotions and new experiences.


To decorate bottles in a marine theme, you can use twine and pieces of fishing net, shells brought from travels and small pebbles. And, of course, no one canceled the images of waves, marine life, elements of ships and gear, the use of all shades of blue.


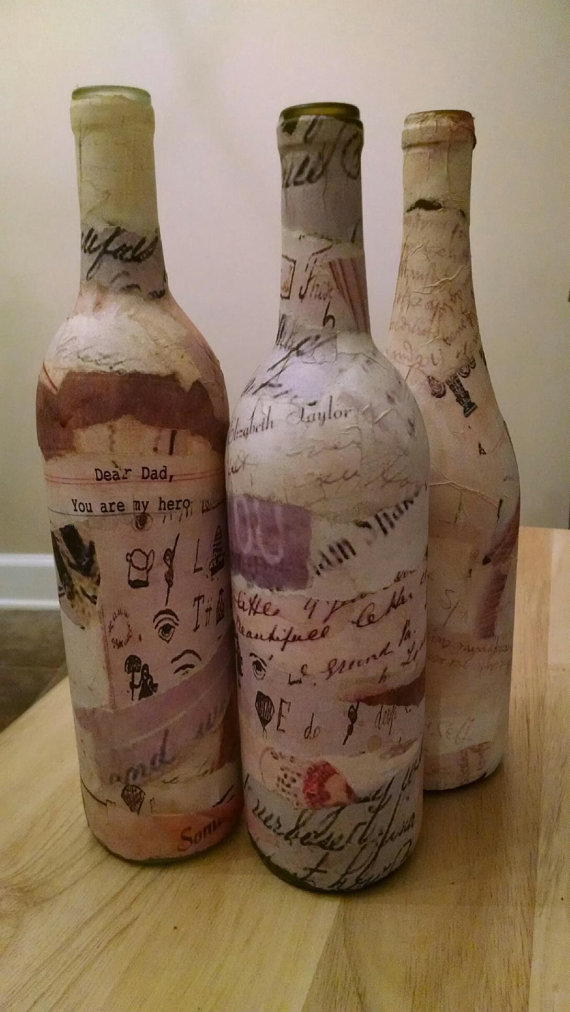
For an interior in the style of Provence and shabby chic
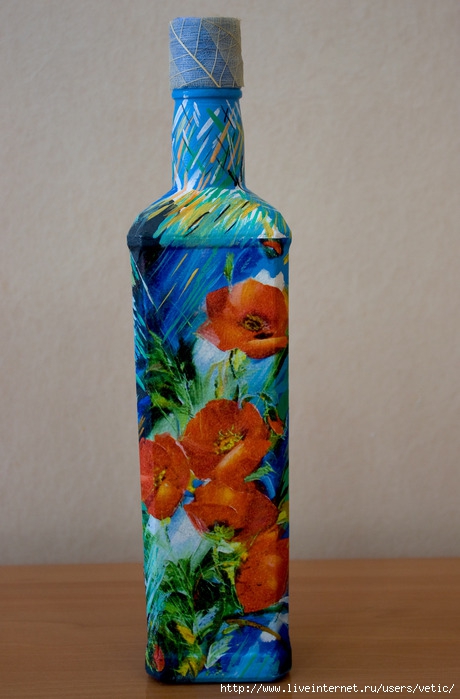
Most often, decoupage and artificial aging are used to decorate rooms decorated in the style of Provence or shabby chic. Not only are various images applied to the bottles (most often flowers and other plants, birds, insects), but also a coating is created that has cracks and even chips.

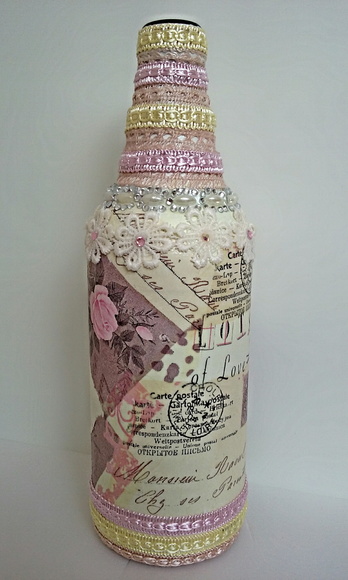


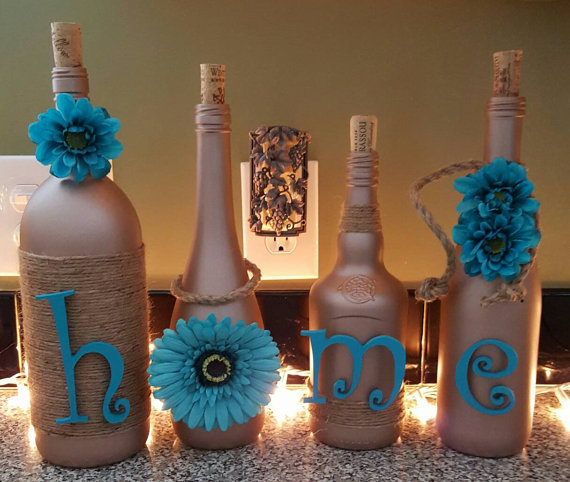
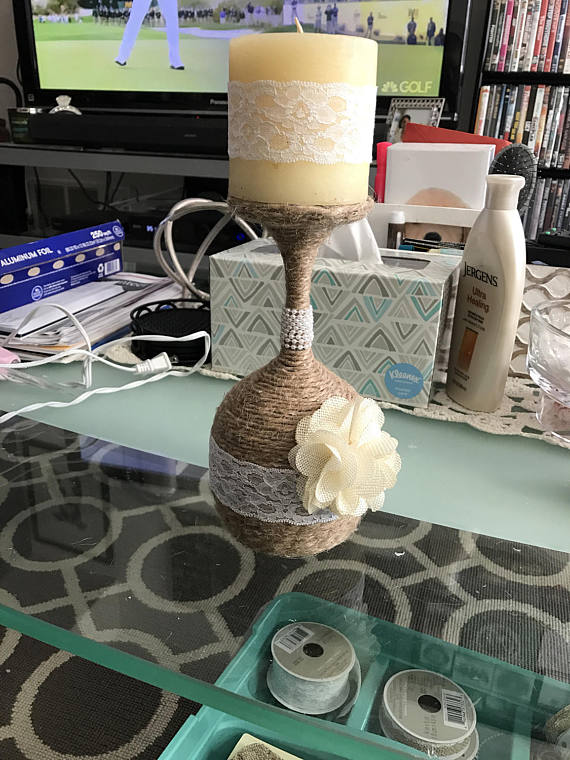
In the interior, decorated in the style of Provence and some other varieties of country style, bottles completely tied with twine or “twine” look great. Most often, such products are decorated with decorative elements - flowers, letters, an impromptu print.
Universal option
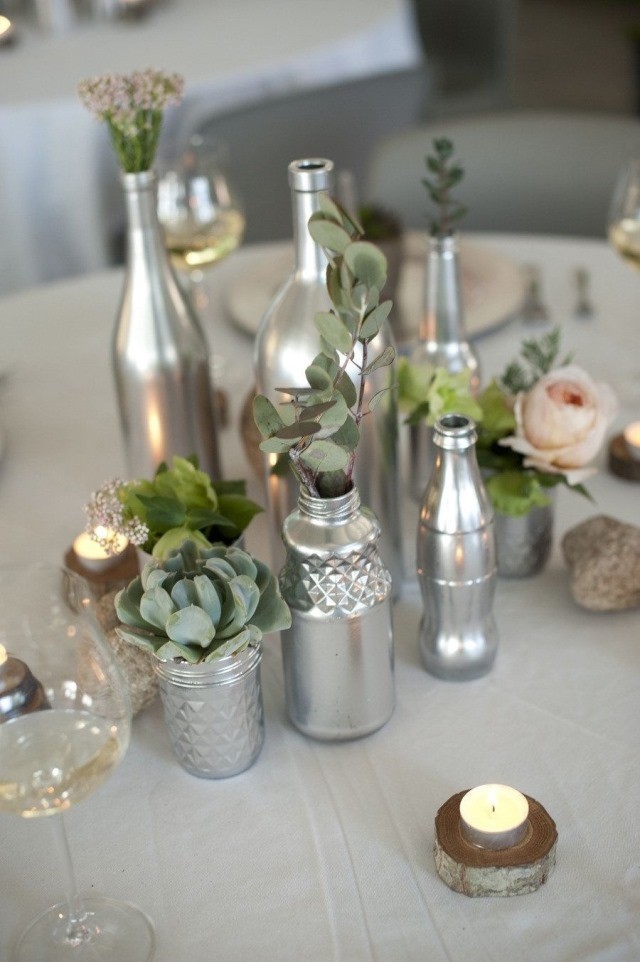
One of the easiest ways to decorate bottles is regular staining. You simply choose the shade you need and, after preliminary cleaning and disinfection of the surface of the bottle, paint it. Most often, various pastel shades, silver or golden color are used. A couple of such bottles can serve as a decorative composition or simultaneously play the role of vases.


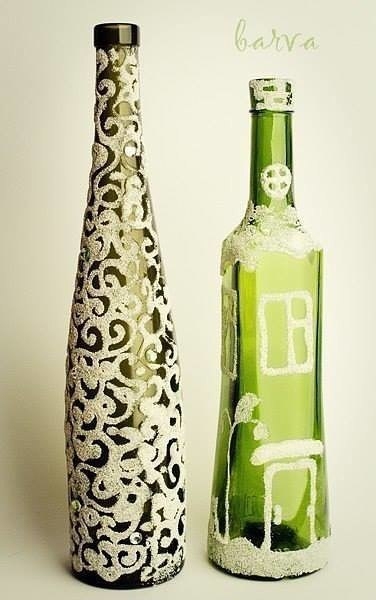
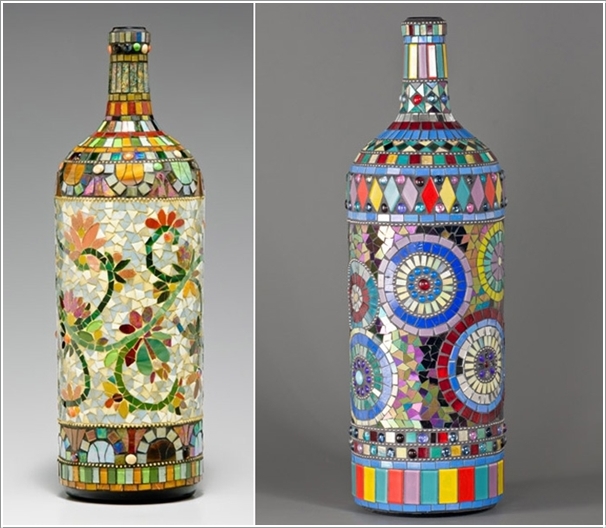
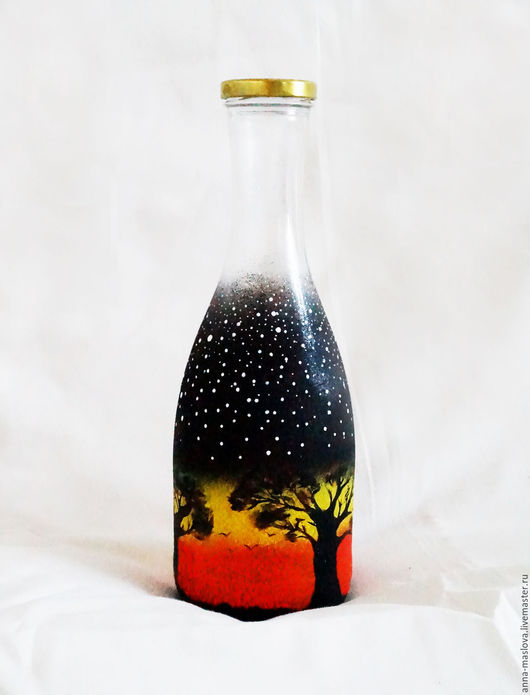
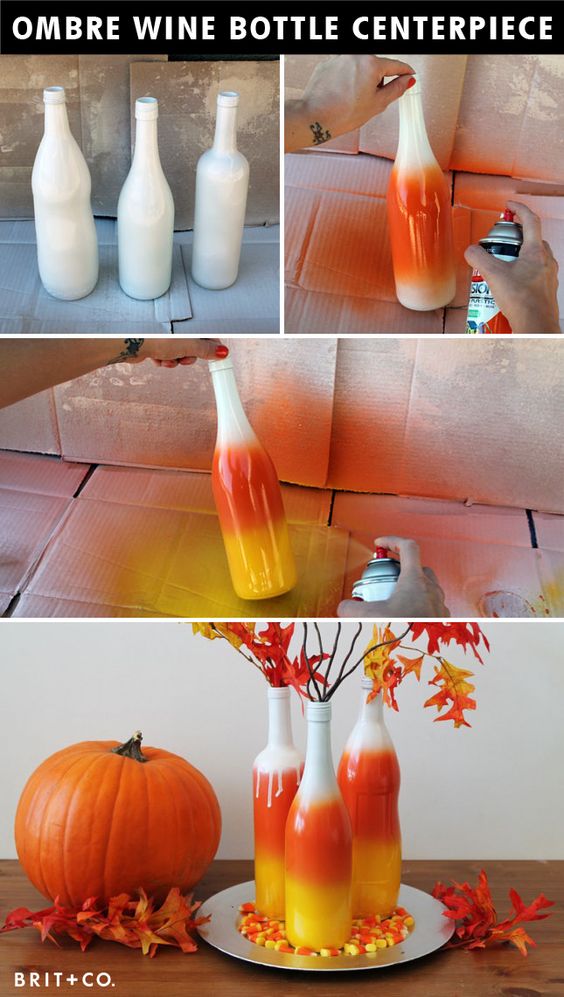
If art painting is a simple technique for you, then a simple bottle can be turned into a work of applied art:

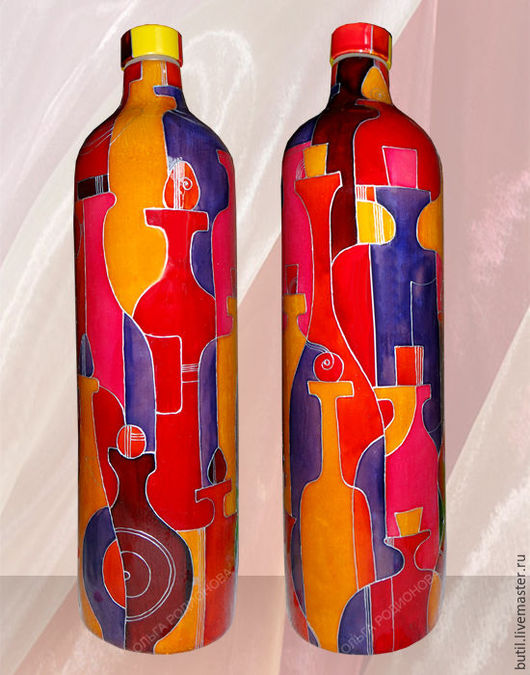
The composition of bottles painted using the amber technique looks beautiful. It is better to use the layout according to shades of the same color on all bottles (but they can be of different shapes).

On a painted bottle, you can apply a pattern using stencils or simply “freehand”, stick lace, create a texture with glue droplets, stick decorative elements - flowers, beads, rhinestones, pieces of colored glass, sparkles.


Very often, in combination with dyeing, decoration with twine, burlap and other types of fabrics (lace, hand-knit items, pompons) is used.


Black bottles are convenient because they do not need to be covered with paint. By itself, black is an excellent background for any decorative elements. A composition of several black bottles, decorated in one way or another, always looks contrasting, accentuated, advantageous.


The metallic glitter on the bottles is great for modern and high-tech interiors.


And finally: some creative and practical ideas
Bottles can perform the functions of not only a vase, but also a flower pot, or rather, a container. By cutting off part of the bottle in the remaining container, you can grow medium-sized plants and decorate both the interior of the home and the landscape design of the plot or private courtyard.


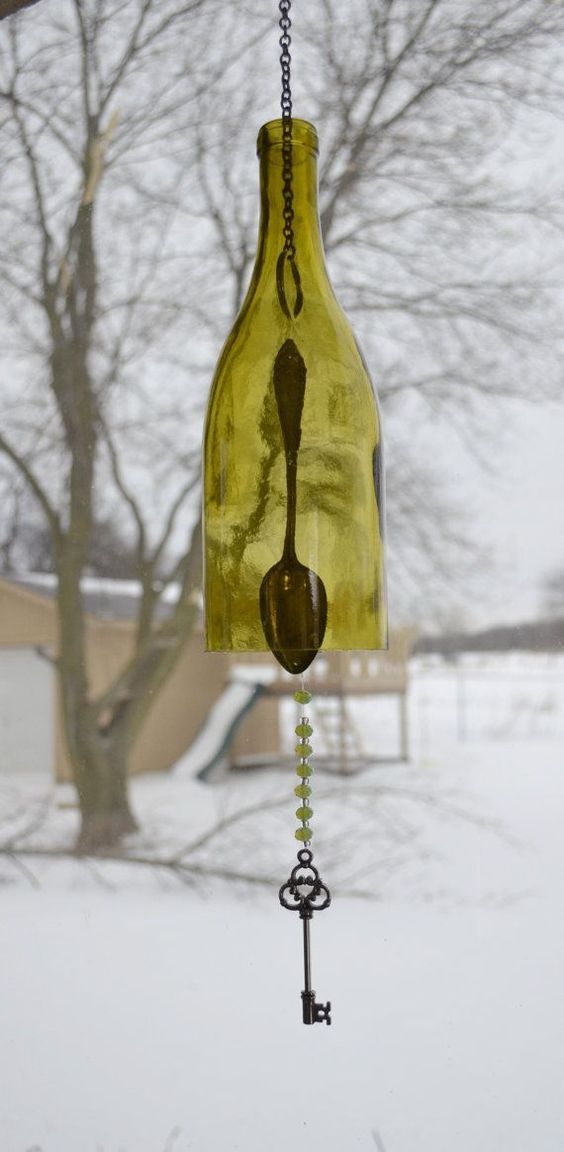
From the glass parts of the bottles, you can make a semblance of bells, a device for the so-called "wind music".

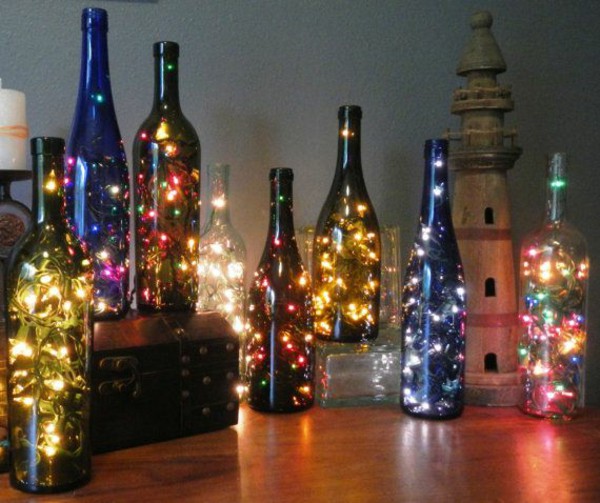
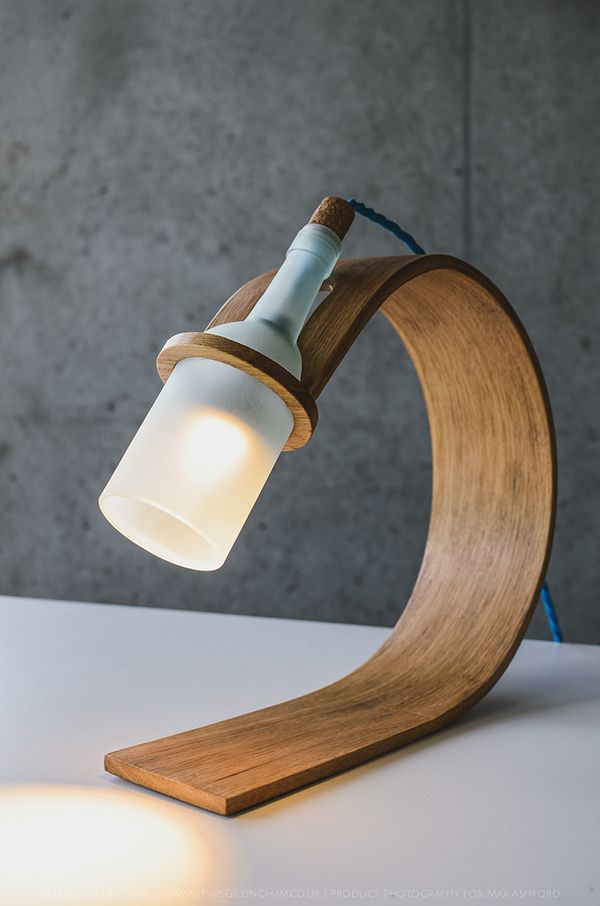
The bottle can be used as a stand for a table lamp if you make it yourself. The bottle can also be an independent decorative element for lighting fixtures in the room. You can lower a garland into a bottle painted in fragments or cut a “window” in the stele and put a small candle inside the bottle.


Bottles filled with rice dyed with food coloring can be a great addition to a kitchen or dining room. The color variety and originality of the design of the room will be provided.

A similar effect can be achieved when creating decor for kitchen and dining rooms. Colored cereals, beans and any other bulk products in transparent bottles look great. without requiring any additional decor.


For serving a festive table (with the obvious saving of countertop space), you can use bottles as a base for high coasters for plates. So on the table you can place more dishes and snacks, not to mention the originality of the approach to traditional serving.
Don't throw away bottle caps - they're a great crafting material. Of these, you can wish for coasters for hot dishes, lay out entire countertops, rugs and make such original decorative elements:


The master class was held by Elena Norshakevich.
Memories of summer... Probably, they come to every person in winter. We invite you to plunge into summer by creating this unusual gift bottle.
Materials.
Bottle for decoration;
Primer adhesive (for smooth surfaces - glass, plastic, metal);
Artistic primer;
Acrylic paints;
Acrylic varnish;
White acrylic putty;
PVA glue;
"Liquid Nails";
Nail polish remover, dishwashing liquid, glass cleaner, alcohol, vodka (something to choose from for degreasing glass);
Elements for decoration, for example: shells, a chain, buckwheat groats (or beads of various shapes and sizes), twine (sesame thread);
Napkin with a three-layer pattern;
Printing a picture on a laser printer;
Brushes, toothpick, sandpaper "zero" (the smallest), scissors, narrow and wide adhesive tape;
Polyurethane pressure roller with handle (usually used when wallpapering);
Sponge for washing dishes (new);
Empty plastic bottles with a spout (from hair dye, glue or other materials), washed clean.
Working process.
Soak the bottle in room temperature water to remove the labels. We remove the labels, wipe the bottle dry. Apply any degreaser to the bottle, wipe thoroughly, dry.
In this case, it is important that it is clear which drink is in the bottle. Therefore, the cover with the inscriptions will not be touched. In order not to stain the lid with a primer, we glue a narrow stationery tape along the lower edge of the lid.
We cut off about 1/4 part from the sponge for washing dishes and, with plugging movements, evenly apply a primer to the bottle with a sponge, without painting over the neck and bottom. We leave to dry. When the bottle is completely dry, prime the bottom and dry again. We remove the adhesive tape (Fig. 1).

Cut out the picture. We thin it with a wide adhesive tape. To do this, glue the adhesive tape on the back of the picture (with overlapping strips), smooth it and press it well. Then carefully remove the adhesive tape - a thin layer of white paper will be removed along with it.
We apply PVA glue to the desired area of the bottle and to the picture on the reverse side, glue the picture and roll it with a roller. So the glue is evenly distributed and no air bubbles form between the picture and the bottle. Leave until completely dry (Fig. 2).
 2
2
As planned, there will be a volumetric anchor on the back of the bottle. First you need to mark the drawing with a pencil. Then we dilute the putty a little with water to such a state that it is squeezed out of the bottles, but does not spread. We fill the bottles (one has a thicker nose, the other has a narrower one). To determine the desired consistency of putty, you can draw a pattern on paper and wait for drying (Fig. 3).

We apply the anchor pattern with putty. The whole anchor is from a bottle with a thicker spout, and the tip at the ends is with a thin one. When the anchor is completely dry, adjust its shape and smoothness with a toothpick. Holding it at a slight angle to the drawing, carefully remove the bumps. It is possible to polish the anchor with weak pressure with a “zero” sandpaper (Fig. 4).
 4
4
Using a gun with “liquid nails”, we glue decorative elements - a chain, shells, cereals or beads. We cover the chain with the same primer that was used for the bottle (Fig. 5.6). Leave until completely dry.
 5
5
 6
6
We make the main background putty. To do this, with a small hard brush, we collect putty and apply strokes in different directions to the bottle. You can give the desired texture with the same toothpick. Leave until completely dry. If necessary, carefully sand with sandpaper “zero” (Fig. 7).
 7
7
We apply artistic primer to the bottle, painting over all the recesses and details.
Mixing paint for the main background. We thoroughly paint over the entire bottle, except for the neck. After drying, we check that there are no unpainted areas left (Fig. 8).
 8
8
In the paint mixed for the main background, add white paint. We highlight the convex elements of the bottle with the resulting tone. It is better to do this with a dry brush, we pick up a little paint (Fig. 9).
 9
9
If a little paint gets on the neck during work, remove it with a damp cotton swab. We cover the dried bottle with varnish in one layer. So it will become clearer - whether the details have enough volume.
For the best effect, add shades to the recesses on the shells and on the main background - green or blue paint, diluted with water almost to a watercolor state. The main thing is moderation. We cover the dried bottle with varnish in several layers with complete intermediate drying. More layers of varnish can be applied to the picture than to the entire bottle - for more shine and gloss.
The final stage of work is decorating the neck. To do this, you need a napkin of a suitable color and sesame thread. Cut out a circle of the desired size from a napkin, remove the two lower white layers. We place the napkin on top of the lid and, making neat folds, press it to the neck of the bottle, tie it with a thread. The bottle is ready!
If you went to rest on the sea, then you probably could not resist and brought some of it with you - shells, pebbles, pieces of coral.
Use all this wealth to decorate the bottle in a marine style, described in our master class. The cost of crafts is a penny, and the pleasures are the sea! The souvenir will retain its decorative effect for a long time, decorating the house, pleasing to the eye and reminding you of a wonderful vacation. Make this beauty in the coming days, or save the link for the future if there is no opportunity to do needlework yet.
Preparation for needlework
To decorate a bottle in a marine style with your own hands, prepare materials and tools:
- shells, sea stones, corals (all this can be bought in needlework stores);
- glass bottle;
- sand;
- halves of beads under pearls;
- metal pendants of a marine theme;
- two or three champagne corks;
- jute twine of different thicknesses;
- natural or synthetic white mesh;
- stationery knife;
- scissors;
- nail polish remover;
- cotton wool or rags;
- transparent universal glue "Dragon";
- glue gun with a transparent rod;
- brushes.

Not only the cheapest, but also environmentally friendly! They can be made with children. We recommend immediately design using photos.
Step-by-step design technique
For decor in a marine style, a light blue bottle is ideal. If you have a container made of transparent glass, then use a green mesh for decoration. Remove all labels. To do this, you can simply soak an empty bowl in water. Carefully remove the remaining adhesive on the glass with cotton wool soaked in nail polish remover. Dry the outside well. 
Make a "sandy bottom" in the marine spirit. Buy sand from a pet store or sift from a sandbox. Apply all-purpose glue along the bottom in wavy lines. Smear it with a brush to the very bottom line. 
Deepen the bottle smeared with glue in a bowl of sand. If necessary, pour it on the bottle with a spoon to cover the entire glued surface with it. 
Once dry, brush off excess with a soft brush. 
In the deepening of the sandy bottom, attach the first flat shell to the hot transparent glue. To prevent a nautical-style bottle from spinning on its side, place a spoon under it. 
From the synthetic mesh, cut a strip 10-13 centimeters wide along the diagonal line of the squares. Loosen long edges. Fold one of the short sides tightly, you can even fix it with a thread, and glue it to the bottom line. For fixing now and then, use the glue gun. 
Cut the net along the bottom line with scissors and attach a few more seashells and pieces of coral on top. 
Add some beads under the pearls. Apply glue directly to the decorative elements. 
Make a print out of improvised means. Use a utility knife to cut off the base of one of the corks. 
Apply "Dragon" on the cork circles. Place a thin jute rope folded in half between the two circles and fix until dry. Attach metal pendants to the same rope. 
Pull the mesh up to the neck. Apply glue on top and wrap the neck with a thick jute rope, having previously fixed the cork seal and metal pendants on the sides you need. 

On the opposite side, using a glue gun, create a composition of shells. 
Use a utility knife to fit the base of the cork to the diameter of the neck. Stopper. 
A beautiful nautical-inspired bottle can be placed on a shelf to decorate a bathroom, bedroom, living room, or used as a practical vessel for light drinks. 


This souvenir is perfect for a gift. In order not to spend vacation money on gifts for friends, make them yourself! See how else you can. Various materials are suitable for decoration - leather, threads, salt dough and even unnecessary tights!
Check out ours to find classes for the coming year! Be with us on social networks to be the first to know about the release of new publications.
Seashells are the most budgetary and atmospheric souvenirs that you can collect on the beach and bring home. These little things will remind you of warm water, bright sun and colorful summer for a long time to come. In addition, they will become an unusual addition to the interior and create an atmosphere of lightness and carelessness in your home.
In creating an original interior, any decorations made by you with your own hands will come in handy.

Shell decor is an element of eco-style in the interior.
Homemade decorations allow you to create a unique design for your home. You will not find a similar interior in any of your friends, because you put a piece of yourself into each such handmade thing.

An important detail in the decoration of shells - such a thing will cost much cheaper than bought in a store.
Seashells brought from the sea are the ideal material for such creativity. Sea shells are quite easy to use and do not require special skills and talents. At the same time, there are a lot of ideas for decorating various objects with shells. They can decorate:
- Photo frame;
- Mirror;
- vase;
- casket;
- picture.

Sand, shells, starfish, pebbles - these are the natural materials with which you can create a unique style.
Large and small shells are also used as independent interior decorations. For example, a large voluminous shell can be an excellent pencil holder or even a flower pot.

Treat yourself to the atmosphere of the sea breeze - decorate the interior of your home in a marine style.
Shells can be used almost everywhere. The most logical place for them in the house is the bathroom, but they also fit well in the living room and bedroom. Even the most ordinary shell on a shelf or bedside table will look extraordinary.

It is also difficult to imagine an aquarium without them, where they are often simply necessary.

Seashells in the interior - these are always clean and shiny shells, as if descended from the pictures. However, nature creates them not quite like that.

In order for them to become ideal decorations and suitable for use in decor, you will have to work a little on them.
Pre-freezing will help prolong the life of the shells. Put all your sea treasures in the freezer. When they are frozen, take them out and use a knife to clean them from the insides.For an absolute result, boil the clams for about 15 minutes, clean and rinse again in water.

Shell decor is back in fashion!
At the last stage, the shells are bleached. Any bleaching agent can be used. Pour the shells and leave for several hours, then rinse, dry, grease with vegetable oil and varnish.
Decorate the mirror
The bathroom will be transformed beyond recognition if you decorate the mirror with seashells. Use gold or turquoise acrylic paint to create the background of a nautical-inspired composition.

Seashells, pebbles, small beautifully shaped beads will be a wonderful decor for mirrors.
When gluing shells, you need to take care of the strength of such an attachment. The glue should be suitable for wet rooms, because water and fumes will constantly get on the mirror.

Everyone can make such an original decor on their own.
Seashells in the interior bedrooms will look just as impressive, but here it is better to stick to a pastel color palette.

The decor of the mirror should be more restrained and match the style of the room.
Shell decor - this is beauty, which is very simple to create. For the design of the mirror will come in handy:
- Shells of different shapes and sizes;
- Thermal gun for needlework;
- Double sided tape;
- Imitation pearl;
- Pebble;
- Colorless varnish.

Decorate the frame with shells of different sizes and colors.
Rinse and dry the shells before starting work. Protect the mirror surface from damage by covering it with a cloth or paper.
- Choose the smallest shells. I wish they were the same size. Glue them along the inner rim of the mirror with a glue gun or double-sided tape.
- Proceed to the design of the second row with larger shells. The distance between them should be approximately the same. For better adhesion, apply glue to both the mirror frame and the shell itself.
- Fill in the spaces between the shells with pebbles and pearls.
- Let the glue dry, then cover the resulting composition with a colorless varnish.

Enjoy the resort atmosphere from the comfort of your own apartment.
Decorating photo frames
Even the simplest photo frame can become a stylish and original accessory. Shell decor will help you achieve this effect. In addition to sea shells, the same acrylic paint, as well as pebbles, sand, beads and sparkles will become your assistants. Details from a rope thread or starfish will also look interesting.

A frame made of shells will remind you of warm sunny days.
Arrange them on the shelves, hang them on the wall or place them above the fireplace. Such frames are simply created in order to place photographs from the seashore in them and remember the happy moments of your vacation on cold winter evenings.

You will not see such a frame with your neighbors - it exists only in one copy and is a manifestation of your individuality.
Vase with shells
Even a simple glass vessel filled with seafood will look interesting. Pour some sand into a vase, aquarium or wide glass, add sea pebbles and shells. Suchused for table setting for the holiday or simply placed on shelves, cabinets and bedside tables.

This vase will brighten up any setting.
Flower pots decorated with seashells inside or outside look original. Shells of an unusual shape can be placed inside the pot next to the flowers. And if you have a lot of identical shells of the correct shape, then it is better to stick them on the outer walls or rim.

A vase decorated with colorful shells will bring originality to the interior.
Unusual seashell decor ideas
Above we have described the most popular ways to use shells in the interior . In fact, there are many more of them, and among them there are quite unusual options.
- Shell topiary - a round tree with a foam base, which is pasted over with shells, pearls and other decorative elements.

Today, topiary is a fashionable decoration for any interior, which is gaining more and more popularity.
- Panel - wood, plywood, cardboard, mesh or burlap are used as a background. Sometimes it is sprinkled with sand or laid out with pebbles. Shells are arranged in a chaotic manner or lined up in a certain shape.

Such a product can decorate any room.
- Decorative letters - stencils are cut out, which can add up to a word or indicate the first letters of the names of the owners. Finished letters are decorated with sea shells in the same way as ordinary photo frames.

If there are a lot of shells and they are very large, then you can make individual letters by gluing them together.
- Candles - take one or more voluminous shells. Fasten the wick inside, fill it with wax. A stylish accessory for the bathroom or bedroom is ready.

Shells are almost finished miniature candlesticks that are just waiting to be supplemented with paraffin wax and a wick.
- Garlands - shells are hung on a rope in one or more rows or attached to a Christmas tree garland in place of light bulbs. The second option looks more festive and is useful for decorating parties.

They will not only decorate the interior, but also allow you not to turn sea gifts into a pile of garbage.
- The dream catcher is a popular Native American amulet to ward off bad dreams that can be crafted with a nautical theme. Somewhat difficult to perform, but the result looks very impressive.

Decorations in the form of beads, feathers and shells make the Dreamcatcher bright and elegant.
No matter how many shells you bring back from vacation, they will always find a use in the interior. Working with such material is easy and interesting.

Exclusive handmade shell decor will remind you of the best moments of your seaside vacation all year round.