Panel of circles on the wall. We make panels with our own hands for the interior. Panel on the wall of ceramic tiles
Home is the place where you want to feel as comfortable as possible. There are various ways to make it even more cozy. But it is especially nice when the decor elements are made by hand. Decorative panels in the interior always attract admiring glances, and making them from improvised materials is not difficult if you follow the technology correctly and follow the instructions step by step.
What it is
The panel is an element of decor and its purpose is to decorate the interior and fill the empty space on the walls or ceiling. Sounds very similar to the description of the painting, doesn't it? How does it differ from the picture, if both decor options are designed to decorate the room? The answer is simple: the picture is the subject of the art of painting, and the panel can consist of anything. Dough, plastic, gypsum, beads, fabric, wood - there is no limit to fantasy when it comes to making panels and the material for decoration can be anything. If you want to make your interior unique, then the panel will do just fine!
Scope of work
The first step in creating a wall panel is to decide on the design of the future product. If you already know where it will be located, then this complicates the task. It is necessary to weigh the color scheme, the dimensions that it will have, whether the material from which it is planned to be made fits into the overall picture of the interior.
So, we decide: size, color scheme and what materials will be used. This is the first step. If possible, it is worth drawing a sketch of the planned product. This will help to take into account all the nuances in the execution of the task.
If a piece of cardboard, canvas or any other solid surface is taken as the basis, then markings are made on it: where and how the decor elements will be located. If the base is fabric, then it is stretched over the base (for example, on a piece of plywood, board or plastic), and the rest of the fabric is fixed from the back. After the craft is completed, it is placed in a frame and hung on the wall.
There is another option for making panels on a fabric basis. You will need to take a solid base, for example, a drywall sheet of the right size and glue foam rubber to it. On the resulting soft base, the fabric is stretched. In this case, you can do without a frame.
After all the preparations, you can proceed to the main part of the manufacture: decoration.
Types of panels with your own hands
Consider the main types used in decoration:
| fabric | These are all variants of embroidery, appliqués and tapestry techniques that are made on fabric. The execution technique can be anything: from hand embroidery to machine embroidery, made by mass production. |
| Stone | Often made in mosaic technique. Natural stones are used, which are considered noble: basalt, marble and others. Rarely in such products there is also an artificial stone. |
| from ceramics | They are made using ceramic tiles and are usually placed in the bathroom or kitchen. |
| sculptural | Volumetric version of the product, which is made of special plaster, gypsum or metal. |
| Graphic | Everything that is done with the help of various types of printing. It can be reproductions of paintings, photo printing. |
| Other types | Here are handmade products that are made using any improvised materials. Salt dough, wood, dried flowers and plants, shells, clay, beads - there is no limit to the imagination for decoration. |
Here are examples of the manufacture of various types of panels:
From prints of fruits and vegetables
When creating this panel, a child can also participate, as it is very simple to perform. The bright, colorful design of this creation is perfect for the kitchen.
For manufacturing you will need:
- Solid vegetables or fruits (it can be apples, any citrus fruits, pears, cabbage, etc.);
- Paint (gouache, oil, acrylic);
- The basis on which the decoration will be made. It can be cardboard, a board, a fabric stretched over a sheet of drywall.
The surface of the base is pre-degreased and painted in the desired shade. Cut fruits and vegetables in half and dip them in the paint. The dye is best poured thinly into a plate. We apply the painted fruit with the cut side to the base and get a stamp.
Stamps are made anywhere on the base, but images that look symmetrical look best.
From paper
There are many options for making paper creations. Let's look at the main ones:
From round paper structures
This product can be made with your own hands in an hour and is a great way to decorate the interior, as well as get a lot of positive emotions.
Let's prepare the materials:
- colored paper;
- Paperclips;
- Scotch;
- pins;
- stapler.
Procedure:
- A sheet of paper is folded into an accordion, like a fan.
- We bend the accordion in half.
- We fix the edges at the fold with a stapler so that the accordion does not fall apart and a small fan is obtained. We connect three such fans and get a circle.
- Accordions of different colors can be combined into one circle, then the panel will turn out even brighter.
- Connect many circles together by attaching them to the wall with safety pins. The size of the circles and the composition itself can be as large as desired and take any shape.
From photos
In fact, this is a collage of photographs or artistic pictures, which can either have a specific theme or be completely abstract. Photos are combined into one composition and fixed on the wall or other base. Design option: combine many images of sea and sky.
From colored paper
There are a lot of options for making crafts from colored paper. Today we offer the option "Flowers from Hearts", which is suitable even for a children's master class. It is very simple to perform, is an excellent tool for the development of fine motor skills of the child, and it looks amazing!
We will need:
- Office colored paper;
- The basis for the panel;
- Pencil;
- Scissors;
- Cardboard;
- Paints;
- Tassels;
- frame.
Let's get started:
- Cut out the heart template. To make one flower, we need eight of these hearts. All hearts in a flower must be the same size.
- Fold the heart in half and get a petal.
- We glue a flower from such petals onto the base. It can be cardboard or a wall.
- To make flower leaves, you need smaller green hearts.
- We lay out the flowers in any order, depending on the general shape of the desired panel. It can be a heart shape, or you can lay out flowers in the shape of a tree. Show your imagination and bring it to life!
From newspaper tubes
Newspapers can be great for making DIY panels.
Necessary materials:
- Newspapers;
- Knitting needle;
- Glue;
- Wire;
- Brush;
- Knife;
- Acrylic paint.
Procedure:
- We cut the newspaper sheet into two parts with a knife.
- Apply a thin layer of glue to these parts.
- We wind sheets of newspapers on a knitting needle diagonally. You should get thin tubes.
- We take acrylic paint and paint over newspaper tubes in the desired color.
- We coat the resulting flagella with glue again and wrap the ends of each newspaper tube so that a spiral is obtained. Both ends must be twisted in opposite directions if you want to get the shape of a seahorse. You can make a circle: for this you just need to roll the entire tube in a spiral.
- We fix the spirals with rubber bands and leave for 24 hours to dry.
- We remove the rubber bands and make up the desired pattern from the resulting elements. Elements can be immediately mounted on the wall, or create a panel on a pre-prepared basis.
Circles from newspaper tubes can be painted in different colors, combining several shades in one circle. Circles with a gradient look interesting: a transition from one color to another.
From wallpaper
This is an interesting solution that will enliven your interior and give it even more comfort.
There are several ways to make a panel of wallpaper yourself:
- Patchwork technique
Cut out fragments from existing wallpaper. Pieces can be of any shape, but must fit together. Consider the general view of the entire future composition. For example, you can cut flower squares from three different types of wallpaper and combine them together in several rows in a certain sequence. In this case, paired elements do not have to be arranged symmetrically.
- Whole wallpaper technique
We take the wallpaper with the desired image (for example, a sakura branch), carefully cut it out and paste it into the frame, or glue it on the wall and decorate it with moldings or panels.
- Style Combination
The design here is only limited by your imagination! Combine whole pieces of wallpaper with small cut-out fragments. This is a modern and inexpensive way to decorate your home.
Important! If you can’t decide on the style of the future composition, then you should take a closer look at the image of flowers and plants in soft colors. It is always appropriate and looks beautiful.
From salt dough
This type of panel is one of the most budgetary, since its manufacture requires a minimum of material and usually everything you need is always at home.
We offer a variant of a stucco panel, where the arms and legs of your child will be printed. This creation will allow you to decorate your baby's bedroom in an original way and keep the memory of his childhood for a long time.
We will need:
- Flour;
- Salt;
- Colored gouache (optional).
Procedure:
- We take flour and salt in proportions of two to one. Two cups of flour are mixed with a glass of salt, then water is added. The approximate volume of water for this amount of flour and salt will be 125 ml.
- Knead a stiff dough. If it sticks to your hands, add more flour. The dough should be elastic and not stick to your hands.
- If you want to make the panel colorful, then it's time to add gouache, decorating the dough with it.
- Roll out the dough. Its approximate thickness should be about 2 centimeters. The shape of a piece of dough can be any.
- We bring the dough to the baby and gently press his palm and foot into the mass. The pressure should be light, but sufficient to leave a mark.
- We make two through holes in the dough - this is for the future ribbon, on which the panel will then hang.
- Put everything on a baking sheet and cover with baking paper.
- Preheat the oven to 90 degrees and put the dough there to dry. This will take approximately two to two and a half hours. It is necessary to turn the dough gently once, in the middle of drying.
- We paint the resulting panel with colored or white gouache, thread the tape into the holes - voila! A very touching and cute decoration for your home is ready!
From fabric
Making panels with fabric came into fashion not so long ago: only in recent years, hand-made lovers have turned their close attention to the fabric. Such a product is ideal for an interior in the Provence style. Consider the main types of woven panels that you can do with your own hands:
Patchwork
Various techniques are used to make such panels, but they all have one thing in common: this is the use of scraps of fabric in the work. There are many patterns of such products on the Internet. Panels can be both on a fabric basis and on rigid structures. You will need any fabric for making: from pieces of tulle to scraps of old bed linen.
Felt for creativity
The felt panel is one of the most popular among needlewomen. You only need pieces of felt of different colors, a pattern of future details of the picture, threads with a needle or glue and a base on which it is planned to fix all the details of the panel. Felt is a very fertile material for creativity: it will help to bring all fantasies to life. A felt panel will be a great decoration for your living room or hallway.
Burlap looks like an extremely nondescript material, but it begins to play with completely different colors when craftswomen use it in their work. Burlap can be wrapped around a frame for a panel, can be used as a basis for other materials: beads, lace and others. This coarse material perfectly emphasizes the tenderness and sophistication of other fabrics.
A wool panel is the simplest product in the wet felting technique. This is an interesting process in which the wool is compacted in a certain way to make felt. The drawing on such a panel can be anything: it all depends on the skill of the needlewoman.
If you want to take a one-color piece of fabric and draw a certain picture on it, then keep in mind that this is not as easy as it seems. It is worth practicing on a draft, and then move on to the fabric that you plan to use on the panel.
From beads
In this version of the panel, all or part of its elements are made of beads. To begin with, the elements themselves are made, and then they are already fixed to the base and, if desired, framed.
From thread and nails
This is far from new, but a very interesting way to make a panel with your own hands! Minimalism reigns here in the choice of materials, but this panel does not become insipid and boring, but, on the contrary, attracts admiring glances.
The whole point is that carnations are hammered onto a solid base. This can be done randomly, or it can be done according to a certain scheme, which can be successfully found on the Internet. Threads are stretched between the nails in several layers. Thanks to this, a certain pattern is created.
From buttons
Ideal option for beginners! Buttons can be used to decorate a panel made of fabric or paper, or you can create a product made entirely of buttons. This will require
- PVA glue;
- Buttons;
- The foundation.
Order of execution:
- Draw on the basis of the sketch: where the buttons will be located and what pattern they should depict together.
- Glue the buttons with PVA glue to the base.
The design can be anything: inscriptions, abstraction, flora and fauna, and others.
Mirror panel
A modern panel created from pieces of mirrors. Complex variants of it can only be made by specialists, while simple ones are very accessible for independent work. The mirror panel will become an additional lighting in the room.
Necessary materials:
- Mirror tiles;
- Liquid Nails;
- Base with wooden planks, if you plan to stick the mirrors not directly on the wall.
The principle of operation is clear: we combine various mirror pieces and fasten them in the right order to the wall or other base with liquid nails.
They are usually made in an abstract style from a variety of wood species. Wooden panels with inlaid semi-precious stones look very advantageous in a classic interior.
Dry flowers and leaves
Great for kids creativity. We decide on the plot of the future work, and then on a solid base (cardboard, fiberboard) with glue we glue dried flowers and leaves (juniper twigs, tree leaves - any flora will do). Grains, seeds and twigs will be an excellent addition.
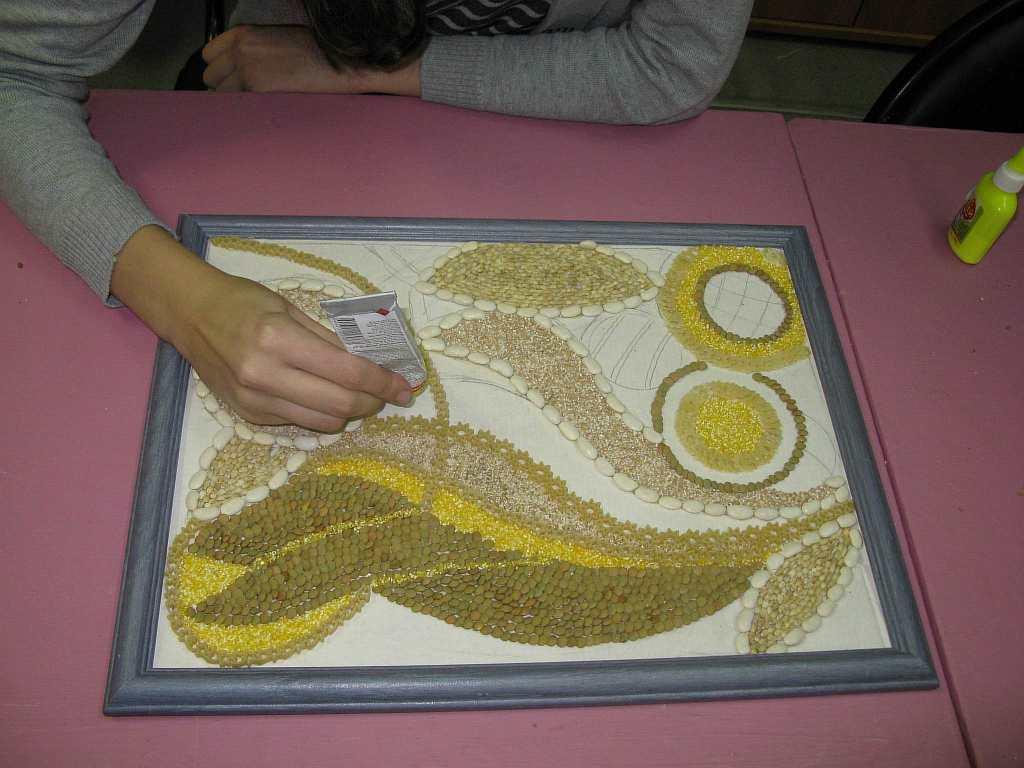
Grains and seeds
A sketch of the future picture is applied to a solid, already painted base. Then, cereals and seeds are attached to the base with PVA glue. Large grains need to be glued each individually, and a small scattering, for example, rice, should be poured onto the glue already applied to the base.


The panel is a wall decoration. Whether it is modern, trendy, beautiful, sophisticated, neutral or overtly accented is up to you. The trend of the season is homemade panels.
Burlap is an excellent basis for needlework. At first glance - rough, dim, even nondescript matter.
But for a panel, burlap still fits. Usually burlap is used as a background, the basis of the image.

You can put a certain image on it, for example:
- coffee beans;
- Embroider with colored thick threads;
- shells;
- Dried citrus fruits and flowers;
- Straws;
- Dried flowers.
One of the most popular themes today is a panel on burlap using dried citrus fruits and cinnamon sticks.
Delicate panel of cotton pads with your own hands
This is the case when a simple decoration can be done in a couple of hours. For example, take an ordinary disposable plastic plate, paint it in the desired color. Let's say light purple. This will be your base under the panel. And then lay out an impromptu flower arrangement from cotton pads.

The stems for flowers can be cotton buds. Often such a snow-white bouquet is framed with a film for wrapping flowers.
Many interesting wall panels can be made on a winter theme, playing up scenes with snowdrifts, snowmen, etc. with the help of cotton pads.
Fork panel: high-tech for the kitchen
From disposable forks today you can also make an interesting panel. It will look cute in any room, but it is more logical to decorate the kitchen with it, because the main material is forks, albeit disposable ones.

What does such a panel look like, for example, a fan:
- This will be a semicircle, where forks fan out from the center decorated with flowers around the entire perimeter of the semicircle;
- The beginning of each fork is covered with this flower center, and the scalloped end is masked with lace, threads, braid.
There are many options for creating a round panel, in exactly the same way, but the idea with a fan is one of the most popular.
Bright panel of balloons for the holiday
It is not enough to have a rich imagination here, you also need gel balloons, and an automatic machine for inflating them, and some skills in forming compositions from balloons. It is unlikely that someone will be able to immediately not only technically connect them, but also build an artistic image out of this.

Festive panels are interesting, in which the date is written (how much hit the birthday man). Often in such panels images of flowers from balls are used.
Panel of seeds on the wall
Seed panels were very popular in the 90s. Then, flower arrangements and various ornaments were laid out on some canvas with watermelon and pumpkin seeds, the plots were repeated.

Today, an interesting panel of seeds can be made on the topic:
- Japanese sakura (seeds will have to be painted);
- Birds flying south
- Eastern motifs and symbols;
- Silhouette of a cat;
- exotic birds, etc.
And, of course, various complex abstractions turn out to be very interesting in such a mosaic of seeds.
Soft foamiran panel: elegant and subtle
Foamiran is a soft, plastic material resembling suede. In fact, this is foam rubber, which, when heated, is able to change shape. Due to this, various three-dimensional figures can be made from foamiran. The most common thing that is made from this material is flowers.

And it is the flowers from foamiran that become the main panel. For the background, you can choose the same burlap, find a nice frame, you get a classic panel. Flowers are obtained as real ones: red poppies, yellow roses, greenish-white peonies - in this plausibility is the beauty of foamiran.
Painted panel of stones: is it difficult
Painted stones make wonderful abstract panels. The main thing is to choose a good glue, base, and have an accurate sketch.

But the most fashionable use of stones today is their painting. Smooth pebbles are literally dotted with very bright colors. For example, each pebble is a colored fish. And then on the panel of such fish you get a magical, fabulous seabed.
Decorative panel from satin ribbon: ribbon embroidery
Ribbon embroidery on canvas is not a new type of needlework, but very popular. From different thicknesses of ribbons, you can create any composition on canvas - from simple flower plots to complex landscapes.
The floral theme is played up more than others, beads, beads, sequins, felt are used as additional materials.

For example, ribbons can be used to embroider a basket with bunches of mountain ash, where instead of berries there are large red beads.
Tape panel (video)
Mosaic panel from plasticine autumn: old technique
Plasticine paintings reappear in interiors, which is not surprising: the materials are getting better, better, more diverse, and finding a master class is no longer a problem.

One of the interesting techniques is plasticine mosaic. You sculpt a lot of small colored circles from plasticine, from which you then build a composition in a mosaic way. The sample picture should be in front of your eyes. On such a panel there should be no voids.
Fashionable panels from other improvised materials
And briefly, a few more interesting ideas that can become the basis of a wall panel in your interior.
What other materials can be used:
- Moss. Entire installations are created from moss, and quite large ones at that. You can decorate such a panel with ferns and other plants growing in swampy areas.
- Cones. What is not made of cones. Compositions of white cones are especially fashionable now, and natural material can be bleached with simple whiteness for washing.
- Matches. Complicated mosaic panels are made from matches, this is painstaking work. Although, if the technique is combined, even a child can handle it.
- Metal. If you want to make something from metal at home, then move towards industrial art, building interesting compositions from old nuts, bolts, keys.
- Pasta. You can make any panel from pasta using interesting shapes of pasta. Then spray paint them, and this pasta mosaic will be a cute kitchen wall decoration.
- Polymer clay. Again, flower arrangements are most often made from polymer clay, as well as from foamiran. But no less interesting are plot panels that play with folk life, old rites, etc.
- Plastic bottles. And flowers are made from plastic bottles, as well as an interesting mosaic. But for the mosaic, multi-colored caps are used, which are glued to the base with strong glue.
- artificial fruits. From artificial fruits, you can make a beautiful wall still life. Again, we found a good sketch, strong glue, a beautiful background, and you can quickly create a three-dimensional still life.
And how many other interesting ideas lie literally under your feet? These are decorative napkins, and cereals, and broken porcelain, and crepe paper, and colored buttons, etc.
How to make a panel of matches (video)
Very beautiful panels can be made from the cheapest and most inconspicuous material, the main thing is the idea and technique. Create, impress, complicate and then enjoy the result, which will become a beautiful accent in your interior.
Examples of do-it-yourself panels from improvised materials (photo)


Each of us wants to live in a comfortable, cozy home that would not strain or overload with its appearance. Often, a new worthy repair is already bored, it is not possible to make updates, but you want to breathe a new breath of air into your home.
It is in these cases that a decorative panel placed on the wall surface can decorate and refresh the interior without much hassle and alterations.

The panel can be placed in any room from the hallway to the bathroom. Each specific room has its own selection criteria and features of such wall decorations.

There are several characteristics that distinguish wall products from each other:
- the material from which the thing is made. It can be a product made of wood, plastic, mirror surface, cardboard and others. Such paintings are decorated with buttons, and dry plants, and small mosaics, etc.;
- manufacturing technique - it can be in the form of knitting, weaving, embroidery, carving, inlay, etc .;
- form - here production is not limited by any framework. Products can have completely different sizes and shapes. These are ovals and polygons, and models consisting of several elements stand out;
- 3D effects, which are at the peak of popularity today. The effect of volume is then created by voluminous paper applications, ledges. Similar products imitate carved and bas-relief surfaces.


Wall products have two functions. The first and most important is the decorative effect of use. The panel is a full-fledged independent element of room decoration.

The second equally important function is to hide existing flaws in the form of bumps or cracks. It is also possible to hide the safe under the panel.

Varieties of wall panels
There are several types of panels that can be made from a variety of materials and in various techniques.

Textile products - this type is made of fabric using the embroidery technique. Most often, a wooden canvas is taken as the basis. Embroidery can take the form of picture compositions, ornaments, appliqués. As a rule, such panels are made on an industrial scale, however, there are also manual copies, the cost of which is much higher.


Wooden products (carving, burning), the cost of which is high, and the appearance is quite premium.

Panels made from wallpaper fragments look very original. In addition, it is possible to make such a panel with your own hands.

Freesize type, the main difference of which is their free size and the ability to add other elements to the composition. An example is modular compositions with different images.

Mirror panels, for the creation of which they use both standard mirror surfaces and elements of unusual shapes, wavy and uneven mirrors.


Panel placements
In any living space there are many wall surfaces on which it is possible to place decor panels. The main condition is that the product is in harmony with the functionality of the room and its style.

Hallway
It is from the hallway that any apartment begins. Therefore, it is advisable to place a pleasant wall composition here that will meet all those who come. When choosing a suitable product, you should consider the size of the room.

For small spaces, it is better to choose small panels with a non-aggressive image in soothing colors. The best options would be images of flowers, natural paintings.

corridor passage
If the corridor is not equipped with light sources, then the panel can be chosen brighter by supplementing it with a wall lamp. If the corridor is small, then a few compositions on the wall will be enough.

But a spacious room should be equipped with a number of panels. An excellent option would be a composition related to one theme, for example, four products that reflect the change of seasons.


kitchen area
The kitchen is often decorated in light warm colors, but the panel should be bright, gathering all the attention. A composition with a still life or coffee bean products that fit the theme will perfectly fit into the atmosphere.


Living room
The main purpose of the living room is rest and relaxation. Based on this, decorative panels on the walls also have a peaceful look. The color palette of products is calm, images in the form of landscapes.

In spacious living rooms, the composition is recommended to be placed along the entire length of the wall surface; it can consist of several elements interconnected by a single plot. An excellent option would be a large ship plowing the sea surface, which is embroidered on a fabric.

Another composition is a world map applied on a wooden base consisting of several blocks. Lighting should be added to such a composition, and then the backlit wood panel will become the main focus of the entire interior.

sleeping area
The bedroom is the room where you fall asleep and wake up. Decorative panels here should serve as a means of appeasement in the evening and a source of awakening in the morning.


It is better to place images of nature in front of the bed, as in the photo panel in the bedroom on the wall. Pictures with space views look quite original.

In the children's bedroom, you can create a wall decor composition on your own, involving the kids themselves in the joint creativity.


bathroom
Making a panel in the bathroom, you should pay attention not only to the external characteristics of the composition, but also to its performance. Wood products immediately fall off, because due to high humidity they will quickly become unusable.

The most suitable option is products from marble elements. Attached to a special solution, such compositions are not afraid of moisture and temperature changes. Thanks to a large selection of wall decor compositions, it is possible to choose the right option for any room and style direction.

Photo panel on the wall


Fabric panels for many unremarkable decor. But often a simple craft in the hands of a talented craftsman can turn into a work of art. It is impossible to give certain patterns here, since everything is built on one's own imagination and imagination. The main factor is the development of technology, various master classes will help with this. In the future, everything depends only on the flight of fancy.
Choosing a theme for creating a panel
Before you start work, you should understand that the panel must be designed in a certain style. It should be in line with the decor of the room in which it will be located. Otherwise, the product can stand out from the general theme and amaze everyone present with its bad taste.
Many ideas and stylistic solutions can be found in various articles, which are accompanied by a large number of photos. It remains to choose the idea that you liked the most and fits the existing interior.
Classic, country, provence
The ideal panel theme for rooms decorated in the style of classics, country, Provence are various still lifes or floral motifs. The compositions in the form of landscapes also look good. Try to get away from pretentiousness, it is better to give the appearance of the product maximum simplicity and cheerfulness. The composition should bring an atmosphere of relaxation into the interior and evoke only positive emotions.
Appropriate in the interior of the corresponding style and abstraction. It can be noted that it is a universal option, as it suits, in principle, any style.

Modern
Art Nouveau is distinguished by the presence of strict geometric lines. That is why the Art Nouveau panels should contain compositions with different clear patterns. The design of the product should also be moderate. Frames for framing panels are used quite simple, almost invisible.

Scandinavian style
One of the rare themes in the Slavic expanses is the Scandinavian style. It implies brightness and practicality, is distinguished by the presence of appropriate ornaments and motifs. Even a novice master can create such a fabric panel on the wall using various materials at hand, such as beads, shells, ribbons.

Also on the fabric panel there can be images of deer, Christmas trees, letters, lines, cells and other things.

loft style
In the design of a modern interior, design solutions in the loft style are quite popular. There are also certain requirements here. The theme is quite diverse, but the panel should be made only in two or three tones.
Despite the strict and concise lines, the loft-style panel attracts the eye and looks perfect in the interior.

Fabric on fabric (work basics)
Paintings on fabric began to come into fashion relatively recently. But, recently, the panel is increasingly beginning to occupy a leading niche in the interior of the room. There are many admirers of this art. Some needlewomen try to make compositions with their own hands.
Often you can find variants of paintings that are obtained by painting on a fabric enclosed in a frame. But such compositions cannot be called panels. It is a completely different matter when a pattern is created on a fabric using another fabric. This is the real panel. The composition looks gorgeous if a volumetric effect is given with the help of fabric.

Main Rules
Full compliance of the panel with the style of the room design is the main requirement. But there are no rules without exceptions. If the product is made in a different theme, but the color accents are observed and do not violate the overall impression, then you should not deny yourself the pleasure of placing the composition on the wall.
When working on the creation of a decorative panel, it should be:
- knowing of limits;
- compliance with the design of the room;
- full interaction of components with each other.

Techniques for creating a fabric panel
Composition can be done using different techniques:
- applications;
- kanzashi;
- patchwork;
- ZD simulation.


Base manufacturing options
When starting work for the first time, it should be understood that the first time you are unlikely to get a work of art. To do this, you need at least a little bit to fill your hand. Constant training, perseverance and following the advice of experienced craftsmen will give their results.
For the first time, it is better to make panels from materials that are not a pity to spoil. And the second and further, having acquired skills, you can swipe at expensive blanks.

There are several options for preparing the basis for creation:
- A base is prepared from very dense cardboard, fiberboard or plywood. A fabric is stretched over the front of the workpiece, the edges of which are wrapped on the wrong side. To prevent the canvas from moving, its edges are fixed with glue. In this way, a base is obtained, on which the application elements begin to be attached.

- They take wooden slats and form a frame out of them, then it is covered with fabric. To do this, cut out a rectangular canvas according to the dimensions of the frame, adding 2-3 cm so that it can be wrapped on the wrong side. After the fabric is stretched, the edges are fixed to the frame with a stapler or small nails.

- Styrofoam is also perfect as a base. On such a blank, a drawing or diagram is drawn with a pencil, then scraps of fabric of different colors and textures are selected. Along the marked lines, deepen the edges of the shreds into the foam using a sharp tool.

After the base is ready, they begin to select the elements from which the drawing will be created. To do this, you can use both multi-colored textiles and any other accessories that are appropriate in the composition and combined with the main elements. Complement the appliqué with all sorts of beads, buttons, rhinestones and more.
Fabric panel in the New Year theme
Even adults are waiting for a miracle from the New Year holidays. And for kids, the New Year is the most long-awaited holiday. Therefore, they try to decorate the room in an original and truly festive way in order to create New Year's comfort. One of the successful decor elements is a New Year's-style panel, with which you can easily achieve your goal.

To perform the composition with your own hands, you need to prepare:
- a frame for framing a panel;
- fabric in a blue tint for the background;
- patches of felt, fabric cuts of different colors;
- thick cardboard as a base.
To begin with, the cardboard is covered with a blue cloth, firmly securing the edges of the textile on the reverse side. Then the elements of Santa Claus are cut out of cardboard to form his three-dimensional figure. An outfit is prepared: clothes and a hat are cut out of red material, mustaches, a beard, a hat lapel are prepared from white fabric or a piece of fur. For the sleigh, silver or gold-colored fabric is used.
Having prepared all the blanks, they begin the general assembly of the composition on cardboard. Parts can be glued using silicone glue, which is heated and applied with a special gun. You can see options for the execution of panels on the New Year theme in the photo below.


Composition with fabric flowers
Before you start making a more complex picture on a panel, you need to be well acquainted with the technology of its creation. First you need to prepare all the necessary materials and select or draw the appropriate diagram. This will take you no more than an hour, but then it will greatly help in your work.

Let's present a step-by-step instruction on how to make a flower panel from fabric with your own hands:
1. First, select pieces of fabric with which you can create flowers. They cut out circles of different diameters.

2. If you want to give the flower petals a beautiful wavy shape, then you must first burn the edges of the circles above the candle.


3. Collect each flower in this way: fold the circles in descending order of diameter.

4. So that future flowers do not fall apart, they are stitched with a thread in the center.

5. As a finishing touch, a bead is sewn in the middle.

6. After all the elements are ready, it remains to properly attach them to the base. For attaching very small items, silicone glue is used. Larger parts should be sewn on.

Flowers do not have to be round. Turn on fantasy, creativity and experiment. Panels of different fabrics, photos of which are presented below, can help with this.


On the video: do-it-yourself panel with roses from ribbons.
Creative patchwork panel
Any hostess in the house will find multi-colored scraps of fabric that do not have to be thrown away. You can create a chic panel of multi-colored textiles, especially when it comes to admirers of abstraction. Having a little conjured over the flaps, you can get an original composition, which will later become the pride of the hostess of the house.

For the process of making a patchwork panel you will need:
- several patches of fabric in contrasting shades;
- thick cardboard for the base;
- wooden frame (you can make it yourself from slats);
- thread and sewing machine;
- fabric glue.
All work will not take you much time and consists of the following steps:
1. Initially, a schematic picture is formed, then blanks are selected. To avoid confusion, it is better to number them according to the scheme. The resulting composition can be transferred immediately to cardboard.

2. Blanks are cut out of shreds and begin to arrange them according to the scheme. To do this, each piece of fabric must be folded in half so that the cut off part is not visible on the other side of the future picture, and is laid on top of the previous ones.

3. In order to achieve the necessary brightness and implement an interesting solution, it is necessary to take a responsible approach to the selection of colors. The shade of the base should be in full accordance with the theme and style of the interior.

4. To fix the shreds, you can use both the standard method - sew on a typewriter, and use glue designed to work with textiles.

5. The finished composition remains only to be inserted into the frame. You can make several such decorations from patches, then you get a modular panel on the wall.


As you can see, making a panel with your own hands is quite simple. This entertainment can be done with the family. This is especially true for children. When working with kids, do not forget to control their actions, since scissors are used in the process, and the child may get hurt.
Different techniques for creating paintings from patches (3 videos)
Our country is washed by a large number of seas and oceans, has hundreds of lakes and rivers, and our fishing industry is developed everywhere. Therefore, we have the opportunity to use fish waste - its bones and scales for interesting work.
Fish scales are horny or bony formations. The largest scales are in carp, cyprinids, perch, whitefish, etc. When cleaning fish for cooking, collect the scales, rinse it in warm water and several times in cold water and spread it on a board or newspaper.
Large, soft scales will curl up and have a rather unsightly appearance. Only the scales of perch and zander will remain dense and even. Therefore, it is especially good for work. Possessing strength and teeth on one side, like a scallop, these scales are suitable for volumetric layout of patterns.
Large scales of cyprinid fish are used for flat inlay and mosaic gluing, for laying out decorative flowers, for pasting a snowy landscape in mock-ups.
The layout of patterns from hard scales is performed according to a previously created pattern on plastic mass or mastic. The product is either covered with mastic, or entirely made of plastic. There are many recipes for making plastic. The next one is the most accessible.
The carpenter's glue boiled in an oilcloth is mixed with sawdust to a very thick mass and mixed thoroughly. Then 20 grams of paraffin or 15 grams of wax are added to this mass per 0.5 kg. A warm, not yet cooled mass is rolled out with a bottle and any shapes and planes are molded from it. Dry the plastic for two days. After drying the product for only a day, proceed to gluing a pattern of fish scales over it.
Transparent fish scales are cast in mother-of-pearl and look good on a white or black background.
The second recipe is as follows: in 0.3 liters of water, soak and boil 100 grams of tile wood glue and the pulp of one Russian bun. Then add 25 grams of processed cheese and egg white to it. Mix this mass well with your hands, like dough, and roll it into a cake - at least 3-4 millimeters thick. The figured product is cut out of plastic with a wet mold. If you want to make a rolled-out cake box, cut out rectangular or square shapes for the sides, bottom, and lid. Put all the cut out forms on oiled paper, cover with oiled paper too and lay between the boards with a small load. After letting the form stand for four to five hours, proceed to laying out the pattern. Separate parts of the box are connected to each other, gluing with egg white and drying it out without a load.
Do not dry plastic products near an oven or in a place where it is very warm.
In the drawings, we give options for laying out patterns of both hard scales and a combination of hard and soft scales, interspersed with fish bones.
On the box, casket, lay out the pattern from the scales only on the lids. The sides should remain smooth.
When this or that product dries, cover it with a colorless zapon varnish.

Pattern laying out technique
The pattern drawing is applied to the plastic surface through carbon paper with a light pencil pressure. Those who know how to draw perform the drawing, looking at the drawing they previously made on paper. Let's take a closer look at one of the drawings proposed here. Rosettes (A) are made by pressing hard scales placed on edge and upwards with teeth.

Leaves (B) are made from two unfolded and slightly inclined halves of scales. Bells (D) are formed from scales selected in size from large to small, with a strong inclination of the rib to the right side.
Bindweeds (B) consist of ribbed scales-circles and a flatly depressed base. Grapes are made either flat, or a small soft flake is twisted over the steam into a ball.
Stems, twigs are laid out from scales placed on the edge, strongly pressing and thereby forming a continuous line.
This work is small, painstaking, similar to jewelry. It requires taste and patience. But the results are so good that we highly recommend doing it.
The pressing of the flakes into the plastic is done by finger pressure, and the transfer of the flakes, tilting and selecting them with the help of small tweezers.
The following can be said about working with fish bones: well-washed bones from fish heads, ridges and fins of various fish have very diverse shapes. Particularly interesting are the bones from the head of zander and navaga. The upper fins of perches, pikes and many other fish also have interesting varieties of needle-like shape. Spinal, saffron cod bones, for example, are good for laying out leaves, butterfly wings. In the head of the navaga, at the crown, there are two oval white bones, shaped like chamomile petals.
From the large scales of carp, mirror carp and colored scales of the Black Sea greenfish, you can cut out squares and glue the planes in cardboard and plywood products with them. A writing set made of cardboard pasted over with checkered scales turns out to be very beautiful. You can glue the scales on the BF-2 glue and celluloid adhesives, firmly pressing each cut-out square of the scale. Then they must be dried under pressure.
For better preservation, the finished product is covered instead of varnish with a thin layer of BF-2 glue or filled with casein treated with boric acid.
In addition to the plastic masses described earlier, a product cut from unusable gramophone records can serve as the basis for laying out various patterns from scales and bones. The property of gramophone records to soften in hot water and to be easily cut with scissors has long been known. Having cut out the desired shape from the plate, the plate is taken out of the water and, put on a board, the drawing is transferred to it with a needle. Then, with a small electric soldering iron, the plastic is slightly melted in the place of the picture where it is needed, with the left hand, using tweezers, the scales are inserted into the melted plastic.
So interspersed with scales throughout the pattern. The box can be made from pieces of a gramophone record. The parts of the box are also welded together with a soldering iron.
This work should be done by older children who know how to handle a soldering iron.
Fish bone necklace

An original and beautiful necklace can be made from fish bones. Along the ridge of sturgeon, beluga and any other so-called "red" fish are hard, pointed, star-like bones. When you have red fish for dinner, don't throw away the bones. Rinse them in hot water, boil them so that they do not smell like fish, and dry them. The bones will become clean, white and very beautiful. Cut white linen into small circles smaller than the bones and take a harsh thread. Start gluing the bones to the thread in the following order: take the first bone, spread it on the reverse side with BF-2 glue, also glue a circle of material with glue. When the glue dries slightly (does not stick to your hands), spread the bone and circle again with glue, wait a bit, put the thread on the bone, put a circle of material on top of it, firmly hold the bone and circle between your fingers and hold for several minutes. Then glue the second bone in the same way, and so on, until a necklace of the required size is formed.