What can be made from corks from plastic bottles. Crafts from corks from plastic bottles. What can be made from plastic bottle caps? How to make a rug out of plastic bottle caps
on 28.05.2017 147,848 Views
From plastic bottles you can make a lot of useful things for the garden and garden
Lovingly equipping the city dwelling, we are no less touching about our summer cottages. We try to ennoble them, create comfortable conditions for ourselves and add special notes of attractiveness to even rows of beds and berry bushes. Many summer residents have chosen the most affordable and flexible material for their creative experiments - ordinary plastic bottles. About what products can be made for the garden and cottages, we will talk further!
- house made of plastic bottles
- Country crafts from plastic bottles step by step: palm tree from plastic bottles
- Plastic crafts: some tips
- Master class from plastic bottles step by step

Wonderful hanging pots for cacti from plastic bottles

Resourcefulness in ways to place many plants in the garden

Plastic bottles in skillful hands will be a wonderful decoration for your landscape.

Beautiful plastic flower
Crafts from plastic bottles step by step: from a flower pot to a fabulous tower
The idea of making useful tools and decorative items from plastic containers is not new. The first attempts led our grandparents to build low fences for paths. Assessing the plasticity and cheapness of the material, craftsmen from the people went further. And now summer cottages are decorated with full-fledged fences, funny figures and unusual devices made of plastic bottles.

A lovely ostrich from a pet container cannot fail to please your children!

Thanks to imagination and such excellent material as plastic bottles, we have almost limitless possibilities for creating crafts for every taste, any complexity and direction.

Pictures from caps of plastic bottles and other containers have grown into a whole art direction

Plastic bottles have long been in great demand among gardeners.

Gorgeous orange flowers from pet containers
Crafts and decorations for summer cottages and gardens from plastic bottles do not require the use of complex tools and specialized skills. The main thing is that there is time and desire, as well as enough material. Those who had both, convincingly proved the limitless possibilities of such needlework, and we have prepared a review of the best examples of crafts.
Do-it-yourself furniture, flowerpots and a vase from a plastic bottle

Comfortable and very stylish chair made of plastic bottles
A sheet of plywood, sixteen one and a half liter bottles, adhesive tape - and a comfortable and durable coffee table will appear on your site. Plywood can be replaced with plastic or hardboard, old countertops or plexiglass. From the same materials, slightly changing the design, you can make a garden bench. Some diligent and patient craftsmen manage to assemble full-fledged sofas and armchairs from bottles.

From plastic bottles, you can even make the basis for a full-fledged sofa, if you fasten them firmly and neatly.

Hanging flowerpot or base for planters
Do-it-yourself ottoman from plastic bottles

How to make a pouffe from a pet container
house made of plastic bottles
There are real builders among the summer residents who know that it is possible to build whatever your heart desires from plastic bottles. They collect gazebos, toilets, sheds and even from plastic bottles. The only difficulty of such structures is not in their assembly, but in collecting the required number of bottles.

House with a roof of 7,000 bottles

Plastic bottles are a good base material for building walls of a summer house, a greenhouse, a shower, a toilet or other partitions.

The walls of the greenhouse from containers on a wooden frame

The bottoms of plastic bottles will help to arrange garlands for the garden
Playground: flowers from plastic bottles and toys from plastic bottles

Crafts from plastic bottles will help decorate the playground
All kinds of crafts from plastic bottles are especially attractive for decorating a playground. Absolutely safe, they can become the basis for toys, and for fun decorations, and for creating plot compositions. Funny elephants, bees, hares and hedgehogs, bright flowers, cheerful lanterns will turn the countryside island of childhood into a fairy-tale kingdom.

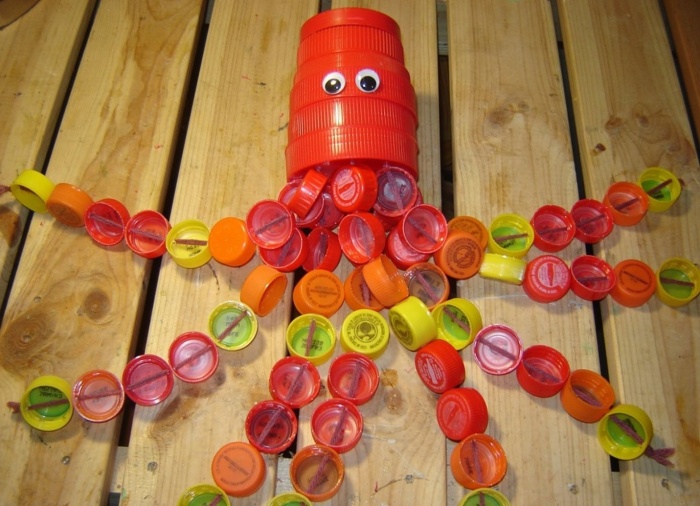
A whole plot for a playground from caps of plastic bottles and canisters

From the caps of plastic bottles, together with children, you can make small crafts and large plot mosaics
plastic bottle doll

Examples of a variety of crafts that will help the gardener with placement, easy transportation and plant care

Piglets from large plastic bottles - stable stands for germinating seedlings or small plants

Craft for garden or lawn decor: pet container parrot
Crafts for the garden and useful little things

Multi-colored turtles will be a great decor element for your garden.
With what ease the "crazy" hands of summer residents turn used plastic containers into useful summer cottages, you can see by walking through the countryside. Here, on the trunk of a tree, a washstand was comfortably attached, and in the next courtyard, a gazebo was decorated with multi-colored geraniums with fragrant and ampelous ones. We have also prepared for you several descriptions of crafts from plastic bottles for the garden.
Do-it-yourself bird from plastic bottles

DIY painted garden owl lanterns
Birdhouse from a plastic bottle

It is very easy to make a birdhouse from a plastic bottle

Cut in half plastic bottles will become pretty flower pots, it is important to paint them carefully. It is also advisable to take opaque bottles for this.
The ever-tangled and stuck twine for tying seedlings will stop tormenting you if you hide the ball in a plastic bottle. Just cut the bottle in the middle, put a ball in the top, pass the end of the twine through the neck, connect the parts, secure the cut with tape - and a comfortable storage is ready.
Drip irrigation from plastic bottles
Your seedlings will not wither, even if you are away for a few days: install semi-automatic watering. Once again, plastic bottles come into play. We cut off the bottom of the bottle, about 2/3, drill 4-8 holes in the cork, close the neck, bury the bottle upside down, pour water - and the seedlings are provided with moisture during your absence. A similar garden made of plastic bottles (photo confirms this) will significantly save your time and money.

Automatic watering "Aquasolo" - these are conical nozzles for a threaded bottle that do not require time-consuming drilling of slots, digging into the ground, and so on

Anthurium with a convenient system of automatic watering "Aquasolo"

Maximum and space saving: plastic bottles suspended one above the other with a notched tube of water passing through them
- For the same seedlings, plastic bottles make excellent containers. After cutting the bottle in half and taking the bottom, pour the prepared substrate into it, plant the plants and place them on a bookcase made of wooden planks. This design is also suitable for decorating a house with flowers.

Beautiful hanging pots made of plastic bottles will not only decorate the interior, but also make it unique.

Great flowerpot from a shampoo bottle with your own hands

Arrangement in the country of compact placement of seedlings or small plants
Bird feeder from a plastic bottle
Some crafts from plastic bottles for the garden amaze with the ingenuity of the owners. By putting a bottle on a hose and making many holes in the bottom, you will get a wonderful diffuser for watering the garden. From a five-liter container, you can build an elegant lamp on the veranda, and a mineral water container is suitable as a bird feeder.

Plastic bird feeder

Simple and handy hose spreader for garden watering
- Plastic bottles will help you save trees from pests. Cut the bottle lengthwise into two halves, fill it with a mixture of insecticides that is attractive to pests and dig at the base of the trunk.
- From bottles you can make a magnificent decorative all-weather and all-season flower bed. Just paint the bottoms of the bottles in different colors and assemble a wonderful carpet out of them by sticking them with the open side into the ground. The carpet pattern can be pre-reproduced on paper.

Making flower beds with pet containers has become very popular
- One Brazilian engineer made calculations and built a solar collector from plastic bottles. The design can be placed in a summer cottage, connected to a storage tank, and you will always have a warm shower.

Solar collector made from plastic bottles

Automatic watering of seedlings and ornamental plants in your absence with the help of a plastic bottle dug near the roots with small holes drilled in the neck or lid

Cut plastic containers suspended one above the other are the fastest and most economical way out of a situation where you need to germinate a lot of seedlings in a limited space

Making an owl from a plastic bottle with your own hands

Bottles for sprouting and overwintering plants - an opportunity to save space and provide good irrigation and drainage
Products from plastic bottles: artistic masterpieces

Gorgeous dandelions from pet containers will never cease to delight you and your guests
The fantasy of folk craftsmen is so diverse that it leads to the appearance of outlandish animals, and characters from fairy tales and cartoons, and exotic plants, and original thematic compositions in summer cottages.

We paste over the bottom of a plastic bottle or cup with dry twigs and get an unusual candlestick, protected from wind blows

Rainbow decor of the garden, workshop, garage: a fountain of spirals cut from multi-colored plastic bottles

Plastic bottles are used not only to decorate the garden, but also to decorate the home.
Country crafts from plastic bottles:
If you have a small pond on your site, you can decorate it with a plastic palm tree. It's not at all difficult to make it. You will need:
- 10-15 brown plastic bottles (for a palm tree trunk);
- 5-6 green bottles (it is desirable that they are long);
- iron or willow rod;
- an awl or drill for making holes;
- sharp knife or scissors for cutting bottles.

A palm tree made of plastic bottles looks very beautiful
Now let's start making jewelry.
- Cut all brown bottles in half. We take the lower parts and make holes in the bottom of each of them with an awl, equal in size to the diameter of the rod.
Advice! You can take the tops of the bottles, then you do not have to make additional holes.
- We cut off the bottom of the green bottles by about 1 cm. We leave one of the blanks with a neck, cut it off for the rest to make a loop.
- Carefully cut the green bottles lengthwise into three equal parts to the very loop.

Making palm leaves
- We cut the edges of the brown parts with cloves to create an imitation of a rough palm tree trunk.
- We securely fix the rod in the soil. We calculate the length of the rod by laying out the brown details on the ground in one row, plus 2-3 cm on the leaves.
We put brown bottles on it. 
Making a trunk for a palm tree
- We string our leaves on the free top of the rod, completing the work with a blank with a neck. We make a hole in the lid and screw it onto the last sheet, securely fixing the entire crown.

Combination of stem and leaves

Assembling a palm tree from plastic bottles
Using several rods of different lengths, you can create a real oasis. As you can see, it’s not so difficult to make crafts for a garden from plastic bottles with your own hands, the main thing is to find enough material and take one of the proposed ideas as a basis.

Step-by-step guide: make fabric pots on the basis of plastic bottles.


Hedgehog from a plastic bottle and a twine rope: we grow seedlings and small creeping plants
Crafts for giving from caps from plastic bottles

From plastic covers you can create real masterpieces
Don't throw away bottle caps. Decorative crafts from caps from plastic bottles for summer cottages and gardens can also fit beautifully into its landscape. They will serve as an excellent mosaic material for decorating fences and walls of a country house.

Bright compositions made of plastic covers will help make your landscape design more fun.
Master class video (from plastic bottles of standard capacity):

A walkway made of plastic covers is not only economical, but also very beautiful.

Large-scale red and blue mosaic of caps of different sizes
Having conjured a little with the pattern, painted and drilled holes in the sides of the covers, you can use them to assemble a curtain on the door. The perfect insect repellant!
The lids can be turned into a beautiful tabletop or a practical doormat. Use them for decorative interior decoration.

Gorgeous door curtains made from plastic covers

Carport that diffuses sunlight

Beautiful Hawaiian style lanterns
Before starting work, remove the labels from the bottles and wash the container thoroughly.
For the stability of vertical structures, fill the bottles with sand or small pebbles.

Dragonflies from corrugated plastic bottles

Ingenious device for collecting fruits from trees

Hanging pots from pet containers with the image of animals will perfectly fit into the interior of a children's room
Choose bottles of different softness for crafts. For example, for the body of a dog or elephant, take a strong base, and for the ears it is better to use softer plastic.
Master class from plastic bottles (step by step):


Crafts from plastic corks have recently gained recognition among lovers of original things due to their ease of execution. After all, plastic bottles are in every home. Therefore, do not rush to part with them, but turn on your imagination and start ennobling your home or garden plot.
As you know, children have a very well developed imagination. They can create anything from any materials that are at hand. The thing is that from early childhood, parents and kindergarten teachers develop their interest in crafts.
For children's creativity, material such as plastic corks is perfect. They are good because they stick to any surface, which means that you can create all kinds of pictures, shapes. Crafts from plastic corks are very popular with children, and they are happy to make voluminous and interesting products.
Usually from d With this material, they perform 3 types of crafts: applications, toys and figures.

The simplest application to perform is a caterpillar. It can be any size and color. You can complement it with a beautiful background and various small details. For example, make a sun and a flower as a background by gluing corks together according to the pattern.
Another interesting application is birds. To do this, you will need 2 covers for the head and body, as well as cardboard, fabric or real feathers for the wings.
You can make crafts from corks from plastic bottles in a wide variety of ways, trusting your imagination or displaying them in stages in the pictures.
So, you can make an application, for example, in the form of a rabbit. It is made in the same way as a bird, with two covers of different diameters, cardboard for the ears and a small pom-pom for the tail. In this way, you can create any animals that your child likes.
Volumetric crafts that look more interesting than applications are also easy to manufacture. Try to make a turtle.

To do this, you will need a large shell cover, cotton swabs for the limbs and an ice cream stick for the calf. They need to be painted green or any other, glue a cap on an ice cream stick and crossed cotton buds, draw spots on top, attach eyes - and the funny turtle is ready.
The same principle is applied in the manufacture of spiders, only instead of cotton swabs, pieces of chenille wire can be used.
A child can easily make crafts in the form of ladybugs or bees, which are done by painting the covers with the appropriate colors. The antennae can be made from black fishing line, and the wings can be made from cardboard.
With the help of fishing line and wire, by stringing corks on them, you can get a snake.

Mosaic panels made of plastic corks
Mosaic compositions made from bottle caps are also very popular. To create such paintings, many covers of different colors are required. It is absolutely easy to do the job - by gluing the corks together.
Important! The glue must have increased tenacity, as an option, you can use a glue gun.
Details are attached to the base. If fastened with the reverse side, then in this case it is advisable to screw them to the base with screws.
If you have a lot of plastic corks of the same color, say, yellow, then you can make crafts in the form of the sun out of them. It will look interesting if you take covers of different diameters and put them one into one.
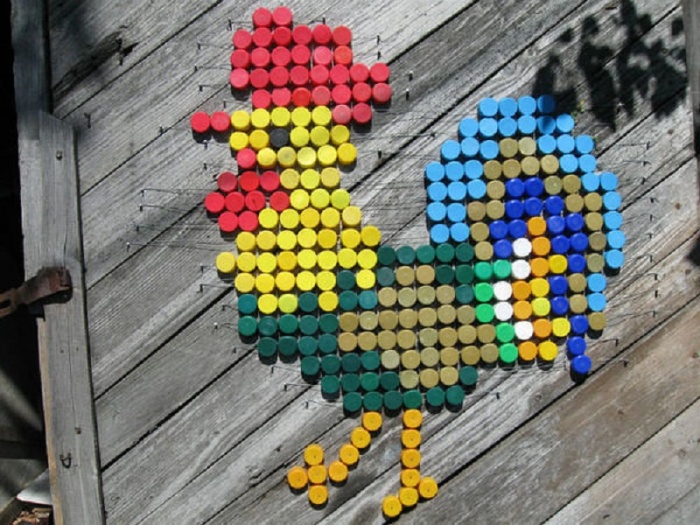
From a large number of multi-colored corks from plastic bottles, you can make a cockerel craft. True, some skills will be needed here, and such work will take much more time, but you will get an original picture that will delight you for a long time.

A piece of plywood is suitable as a base, which must first be opened with a primer, then apply a contour and glue the corks themselves according to the pattern of the picture.
Plastic bottle cap magnets
If you just decided to try your hand at this exciting activity, then the simplest crafts made from plastic bottle caps look like ordinary magnets that can be found on the refrigerator of every housewife. After all, we need them not only for beauty or for fixing lists, but also for masking possible defects formed on the surface of equipment. To make them, you do not need too much time.
Materials that will be required in the manufacture of magnets:
- multi-colored corks;
- magnets (can be bought at a craft store);
- glue;
- alcohol;
- paints and colored paper;
- colored markers or pencils.

First of all, it is necessary to completely degrease the cork with alcohol. Then put a magnet on the glue inside. From colored paper, cut out circles of exactly the same diameter as the cork itself. On the resulting blanks, write letters and fix them at the bottom of the cork. You can additionally decorate the magnet with a small bow. The result is a bright and fun alphabet. Using this method, you can also assemble a picture by cutting out circles of the required diameter and various shades. The description of this craft from plastic corks can be found in more detail from the master class on specialized sites on the Internet.
Cork mat as a foot massage
One of the most popular DIY plastic cork crafts is a massage mat. For its manufacture, you do not need to make special efforts, but it looks very unusual and attractive, especially from multi-colored corks. This product has some benefits. Even doctors recommend walking on such rugs daily for 15 minutes to improve health. Because massage has a relaxing effect. The principle of its action is that when walking on it, the nerve endings located on the feet, which are responsible for certain organs, are activated. Such a massage is a kind of exercise for the whole body.
To make it you will need:
- plastic stoppers;
- awl;
- strong line.
Each side of the hexagonal rug contains 10-15 corks. In order to make a correct calculation, it is necessary to multiply the number of plugs on one side by the number of sides of the product and subtract the number of repeating plugs. After you have the required amount ready, you should make 6 holes in each part with an awl. The end plugs must be collected on one fishing line. Next, firmly braid the covers with fishing line, forming a hexagon. And to make the rug pleasing to the eye, you can use covers of different shades, from which you get the whole picture. The pattern of crafts from corks from plastic bottles can be selected from a photo on the Internet, focusing on the selected image, you can lay it out in advance, and then proceed directly to the assembly itself.

Corridor mat made of plastic corks
Among the original and at the same time practical DIY crafts made from plastic bottle caps is a rug in the corridor. It is made by gluing the lids with silicone glue in a glue gun. You can make any pattern, for this you need to take only corks of various shades to make the product colorful.
Attention! The main advantage of the material taken for the rug is its ability to be easily and quickly cleaned of various kinds of contaminants.
However, in a room where linoleum lies, it can be harmful, since the edges of the covers are quite sharp and can scratch the coating. It is recommended to lay such a rug on a tile, which means it is suitable for a bathroom.
Plastic is characterized by such a property as wear resistance, so it will withstand any temperature and humidity. The only thing that can suffer is the color. However, if desired, it can also be restored by painting over with special paints, or another can be made from new covers, because, as mentioned above, this material is very cheap. Therefore, crafts from plastic corks can be made very often and are different all the time, experimenting with color and shapes.

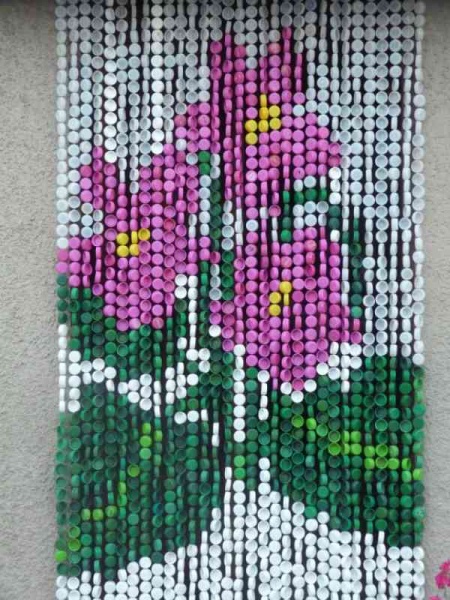
Filament curtains - decoration of a country house
Crafts from plastic corks can be very diverse. It all depends on the richness of your imagination. However, one of the most interesting and original ideas that can be found on the Internet is thread curtains made of covers, which is especially important for those who have a dacha. Such a product will save your budget, because it does not require special costs, besides, they are easy to manufacture. The result is unusual filament curtains.
All you need to make them is covers in large quantities, you can use the same color or different shades if you plan some kind of pattern. It is important to note that its scheme should be selected in an elongated shape. You also need: fishing line, hammer, nails, awl, and if necessary, also a needle.

Cork curtains are made in the following sequence:
- Make holes in the lids on both sides with an awl.
- Lay out the details according to the picture, you can keep it near you when stringing the corks.
- String 2 vertical rows on a long fishing line, starting from the bottom of the 1st, moving to the 2nd.
- Fasten with knots received on both sides, you can singe the ends of the fishing line.
- String the third-fourth row, the fifth-sixth and the seventh-eighth according to the same principle.
- To facilitate the assembly of the curtains, it is advisable to make some kind of mark when you move to the next row.
- If the door frame is wooden, then the product can be attached to it by nailing separately taken fixing plugs.
- Before attaching the corks, it is necessary to make markings, determining the same distance between them.
- Take the first thread with the first or second rows of caps. Find the middle mark, which indicates the transition from row to row.
- Nail an additional cover to the door frame, while the nail head should protrude from the wood, and the 1st thread should be hung on it in the middle. Then beat it to the end.
This design will also look good in a summer shower in the country, because of its density.
Bottle cap massage mat
bottle cap massage mat
Everyone has bought plastic bottles with mineral water or something else in stores many times ... Empty bottles are usually thrown away ... along with caps. It turns out that if you do not throw away the caps, collect enough of them - you can do a lot of interesting things. One of them is a massage mat, which can be turned in different directions as needed.
Such a rug can be placed near the chair in front of the TV and put tired legs after a hard day's work on it. You can periodically walk on it for 5-10 minutes. The projection of all organs is displayed on the feet, massaging the feet, you give a charge to the whole body.
If the rug does not fit into the interior, you can put it in a closet or put it in the bathroom.
And from such covers you can make bright and festive coasters for mugs. 
For the manufacture of such a rug, the covers themselves, an awl and a fishing line will be needed directly. Let's show the scheme of collecting covers on the example of a small stand. The base is a hexagon. If you want to make a stand, then three covers should fit along the length of one side. And for the rug you need to take about 10 - 12 covers.
As a result, for a stand on the extreme line, you need to take 12 covers (3 + 2 + 2 + 2 + 2 + 1), and for a rug with a side length of a hexagon of 10 covers - 54 (10 + 9 + 9 + 9 + 9 +8). That is, it turns out the number of caps in the side multiplied by 6 (number of sides) minus 6 repeating caps.
In the lids, 6 holes are pre-pierced with an awl. Then 12 extreme covers are assembled on one fishing line. And then we begin to twist the covers with fishing line, as shown in the figure.  We continue to weave the covers, threading the fishing line into the holes.

The fishing line is one, the process of tightening is shown in different colors, so as not to get confused when crossing the threads. If there is not enough fishing line, then you can increase it by tying several pieces.
 To make the drawing interesting and colorful, it is better to pick it up in advance by spreading the covers on the floor or on the table.
The fantasy of folk craftsmen knows no bounds, the results of needlework amaze the imagination with a variety of forms and methods. Recently, there has been a tendency to make crafts from plastic covers, since there is always enough material at hand. Consider the most popular uses and schemes for plastic bottle caps.
Children's crafts
Even children can create interesting crafts from plastic bottle caps. The easiest option is the original magnets.
For work, you need to take care of the following materials:
- multi-colored corks;
- small magnets, which can be found in needlework departments;
- double-sided tape or glue;
- colored paper;
- alcohol;
- felt-tip pens, pencils and paints.
Alphabet

Craft in the form of an alphabet set based on plastic caps will be a useful tool when teaching children the alphabet. Basic manufacturing steps:
- The bottle cap is degreased with alcohol.
- The magnet is fixed to the plastic cork with adhesive tape or glue.
- Circles with a diameter corresponding to the size of the lid are cut out of colored paper.
- Letters are written on blanks.
- Details are glued inside the lid.
Advice! The craft is very convenient to use on a magnetic board.
Similarly, create a craft in the form of an arithmetic set.

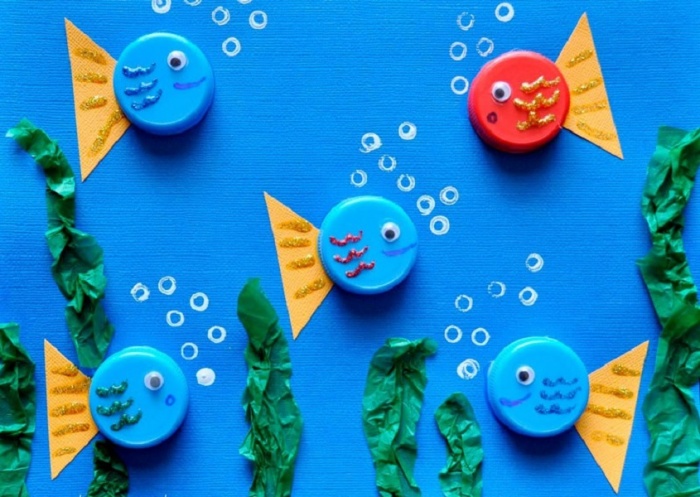
Aquarium
The fish aquarium based on plastic covers looks original. Depending on the age of the child, parental assistance may also be required. The process of creating an attractive craft includes the following steps:
- Small triangles of colored paper will serve as tails.
- In random order, they are glued to a sheet of blue cardboard.
- Tails are supplemented with plastic plugs, which are fixed with glue or double-sided tape.
- The eyes of the fish are made out in various ways: they glue plastic blanks, draw with a marker, or cut out and paste parts from colored paper.
- The basis of a variety of algae is green paper.
- The bubbles applied with a stroke will add more realism to the craft in the form of an aquarium with fish.
At the final stage, the craft can be supplemented with an application in the form of a fairy-tale castle or sea stones.
Mosaic
A mosaic of plastic bottle caps is another version of the original craft. The need for a large number of traffic jams can become an obstacle, so acquaintances and neighbors are often involved in collecting help. There are several options for making crafts in the form of a mosaic, the main difference lies in the surface on which it will be located.
independent unit
This kind of crafts made from bottle caps is rare. The design principle is quite simple. Initially, a sketch of a future craft is created on a sheet of cardboard, drawing all the multi-colored elements. Focusing on the sketch, the corks are fastened with glue for plastic.
Comment! Drawings for mosaics are chosen simple, without a lot of ornate details.

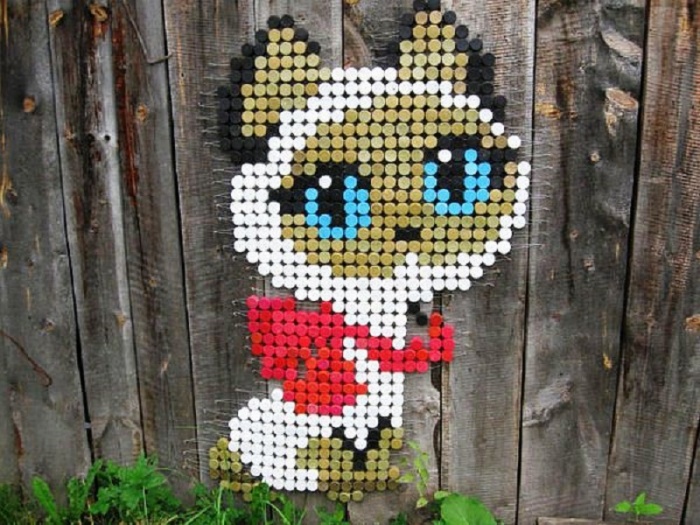
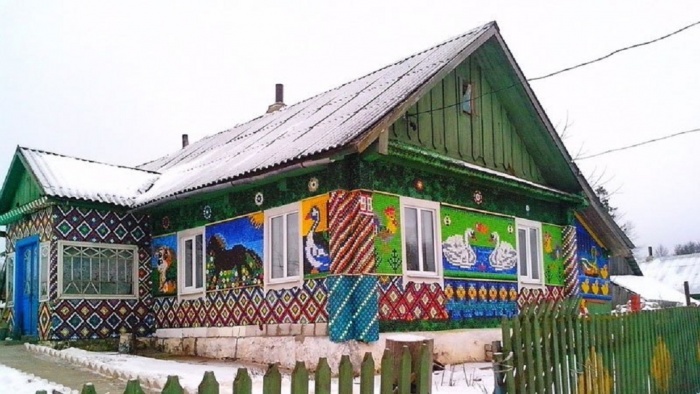
Paintings on houses and fences
Much more often, a mosaic decorated with covers is found on wooden fences. There are several creation options. As in the previous case, you should worry in advance about the presence of a sketch with traced color markings. An excellent assistant in this matter can be blanks for cross-stitching.
The first way is to stick caps from plastic bottles on plywood in accordance with the selected image. After that, the whole part is fixed on the fence or wall of a wooden house.
The second way is that holes are initially prepared on all plastic covers. This work is quite laborious, it is better to do it with a red-hot awl. Then the corks are strung in rows on the wire. When all the elements are assembled, each row is fixed on the wall or fence with carnations. Vivid examples of bottle cap paintings are shown in the photo:
Another popular way of crafting in the form of a mosaic is to attach plastic covers to a wooden surface with nails. Naturally, the presence of a pre-drawn image is necessary. Nails are selected with a small hat along the length corresponding to the thickness of the wooden base. You can nail bottle caps on the inside and outside.
Comment! The second option is preferable, since fastening from the inside causes a lot of inconvenience at the fixation stage. In the future, the covers quickly become clogged, and the craft loses its original attractive appearance.

A concrete or brick wall requires a different approach when making a craft in the form of a picture based on plastic bottle caps. Here you will need a special solution designed for laying ceramic tiles. In order to save money, you can independently prepare the cement mixture. Bottle caps are fixed gradually, treating a small section of the wall with a solution. It is important to choose the right consistency of the adhesive, otherwise the plastic covers will move down, and the craft will turn out to be sloppy.
Subsequently, the gaps between the plugs can be sealed with mortar, this will extend the life of the craft and give it greater aesthetics. Masterfully executed works from bottle caps with their own hands are presented in the photo below:

Some more original ideas
Cork is a versatile material. They even learned how to make massage mats and decorative paths for the garden from them.
massage mats
A rug made from plastic bottle caps perfectly relieves muscle tension after a hard day's work. The craft is useful both for the back and for massaging the feet. Here you need to be patient. The principle of creation is similar to the design of an independent mosaic:
- A geometric pattern is often chosen for the rug, although this is not at all necessary.
- The image is drawn on paper with the reflection of all multi-colored lines.
- Each bottle cap is pierced with an awl at four crosswise points.
- Further, the selected pattern is formed from plastic plugs.
- Details are alternately strung on a fishing line in rows.
- The rug from the covers can be assembled all at once according to the principle of a snake or strung in separate rows, and then fix them together.
- The ends of the fishing line are bitten or gently set on fire.
This method is suitable for creating various crafts from bottle caps: coasters for cold dishes, rugs in the hallway or shower.
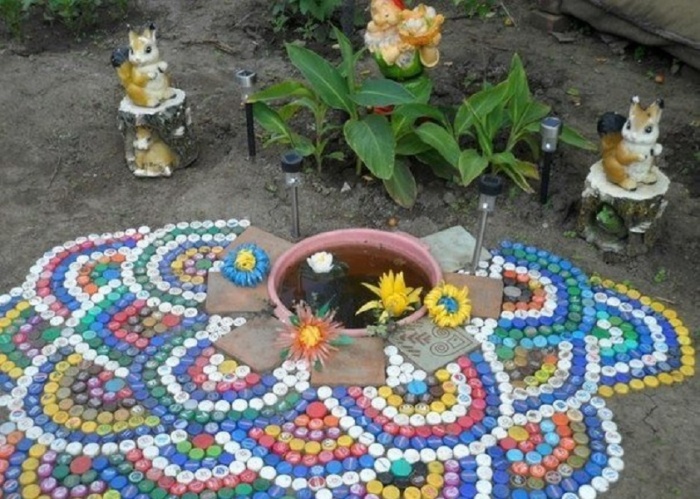
garden paths
Another area of application of free material is paths made from plastic bottle caps.
Attention! Experienced users warn about the slipping of the surface from the covers during the frosty period, so the paths are located in that part of the garden that is not used for walking in winter.
To work, you need to prepare:
- Lots of plastic bottle caps.
- Sand with cement for mortar.
- Construction adhesive.
- Wooden elements for formwork.
Registration process:
- In the back, the outlines of the future track are marked.
- In the presence of grass, the top layer of turf is removed, a trench 10 cm deep is dug.
- Formwork fastened with nails is formed from wooden elements.
- When preparing the solution, glue is added to the mixture of cement and sand.
- The composition is distributed over the surface in a small area, after which the bottle caps are gently pressed into the uncured mixture. The plugs deepen to the base.
The basic rule of time-consuming crafts is to achieve the same level of plastic covers. When the mortar dries, the remaining cement is removed with a stiff brush. At the end of the work, the formwork is being dismantled.
The following photo will help you enjoy the beauty of the paths from plastic bottles:

In addition to the proposed options for crafts, curtains for a country house are often made from covers.

The main thing is to show imagination, and a fascinating process will lead to the creation of individual masterpieces from bottle caps.
Metal caps from bottles of beer, mineral water and carbonated drinks are an excellent material for crafts and decoration of various surfaces. A number of features make them a more convenient, beautiful and versatile raw material for creativity than plastic lids. Firstly, the metal can be bent, bent and used with a soldering iron, and secondly, the corrugated edges of the cap themselves look very interesting. We offer some interesting ideas on what crafts from bottle caps can be made for the interior.
Methods for decorating surfaces with lids
If you have managed to collect dozens or even hundreds of metal caps, pay attention to this project - the inlay of any surface. You can decorate an old coffee table or nightstand, a tray or drawer for things, a dining table or kitchen countertop, the surface of a chest of drawers or a closet with caps, even lay out a wall or floor with a mosaic of caps! The result can exceed all expectations!
The appearance of the finished inlaid surface depends on the chosen method of attaching the caps, as well as on the color scheme and the laid out pattern. Let's look at the main ways to decorate surfaces with metal bottle caps.
Put on glue
The most obvious and commonly used method is to put the lids on with glue or liquid nails. With this method, the caps protrude above the main surface, creating a three-dimensional corrugated pattern. For gluing, use high-quality thick glue, liquid nails or mounting foam. Make sure that the adhesive mass does not protrude beyond the edges of the caps and at the same time securely fix each one. If desired, then the entire surface can be varnished.

In terms of the design of the surface inlaid with lids, you can completely trust your imagination. No rules or restrictions. Try using original caps with the names of drinks, spray-paint them a certain color, or hand-paint them with acrylic paints. You can also lay out any pattern, ornament or image from the caps, like a mosaic. On a large scale, such decor with metal lids will look very impressive!

The glue-on method is used for decorative tables, mirror frames, furniture walls, i.e. for surfaces that will not be used often, such as dining tables or floors. For them, it is better to choose the second method, which will be discussed below.
Put on glue and rub the seams
If you want to decorate with lids the tabletop of a dining or desktop, floor or "apron" above the working kitchen area, then it is advisable to fill the space between the lids with grout to prevent the accumulation of dust, grease and dirt. To do this, glue the caps in the same order in the chosen order, let the glue dry and then fill the space between the caps with grout or primer using a rubber spatula. It is very important to keep the lid caps clean, so clean the lids with a damp sponge at the same time as grouting.


There are options when cement mortar is used to lay the caps on the floor area. While the poured cement is still not completely dry, the caps are gently pressed into the solution. This method is quite laborious, requiring you to act quickly with a confident hand and without hesitation. After complete drying, the surface is varnished.

Fill with epoxy resin (acrylic water)
This method is suitable for surfaces with sides, such as a tray, drawer or countertop with a recess. Epoxy resin (acrylic water) can be used as a fixative and grout for caps. Since this chemical solution is liquid, we need the sides. Lay the lids on the surface, and then fill the mosaic with epoxy mortar according to the instructions for it. It is very convenient and fast, because you do not need to glue each cap, or then rub the seams between them.

By the way, almost the same effect can be achieved if a sheet of glass is laid on top of the lids, this is especially true for countertops.

to nail
Lids can simply be nailed to a wooden surface with small carnations. A nail cap will spoil the drawing a little, but in principle it can become a highlight and a unifying element of all caps. Alternatively, the covers can be pre-painted in a solid color, then the middle in the form of a nail head will look natural and harmonious. In order to bend the lid itself when driving a nail, place a nut of a suitable height under each piece of plywood and a nut.

Ways to connect caps to each other in crafts
With metal bottle caps, you can not only decorate surfaces in the interior, but also make individual crafts - jewelry, magnets, coasters and toys. How to assemble the caps into a single structure?
Holes and wire
With a thin nail or drill, make holes in the embossed sidewalls, and then connect the caps together with a wire or fishing line.

soldering iron
You can use a soldering iron and solder to securely connect the caps.

Glue and fasteners
In some crafts, for example, for jewelry, it is necessary to use special parts. They can be either soldered to the lid or glued with super glue suitable for metal surfaces.

bend, bend, straighten
Unlike plastic, metal caps can be bent in half, bent into a spherical shape, or completely straightened with a hammer blow. It is easy to make jewelry, jewelry, Christmas decorations and other decorative elements from such blanks.


Decor and crafts from bottle caps
And now let's see what original crafts and decor can be made from caps.
tables


Chairs


Floor and walls


Other bottle cap crafts


