How to make wooden chandeliers with your own hands? Designer lamps made of wood with their own hands Creative chandeliers made of wood
When planning the interior of your home, you need to pay a lot of attention to the little things, such as paintings on the walls, curtains, sconces, and so on, because it depends on them how stylish and comfortable the room will look. Not the last place in the design of the apartment is occupied by a lamp. With it, you can increase or narrow the space, as well as give a special charm to the room. Lighting fixtures in a wide variety of variations are presented in stores in a wide range - these can be floor sconces, miniature spotlights or a classic pompous design that occupies a significant part of the ceiling, but they are often quite expensive. To make the interior more unusual and exclusive, you can make carved wooden chandeliers with your own hands. They will undoubtedly become the main highlight of any space.
Advantages and disadvantages of wooden ceiling lights
Handmade wooden chandeliers will decorate absolutely any home. Such designs look especially good in apartments with a rustic and brutal style, but by decorating the natural material with dark or bright paint, you can get a lamp that is also suitable for high-tech or modern interiors. You can make your own lamps from plywood or from a single piece of wood.
Before deciding whether to hang a wooden chandelier on the ceiling, you need to familiarize yourself with all the pros and cons of such an item.

Advantages of wooden chandeliers:
- The tree is easy to process, due to which it can take completely different forms.
- Wood is the most environmentally friendly material, it not only does not emit harmful compounds, but also helps to increase immunity.
- Wooden lamps make the room more comfortable, and create the impression of unity with nature for the people in it.
- Handmade wooden chandeliers do not require large financial investments, but at the same time they look very expensive.
- A large number of wood species allow you to choose the right color for the lamp without using paint for this.
- A wooden ceiling lamp can be decorated with metal, glass or even stones.
A do-it-yourself chandelier made of wood is made quite simply and looks very dignified, but this material also has some drawbacks.
Disadvantages of wooden chandeliers:
- Wood used in tandem with heating devices (which include most light bulbs) must be treated with special means that protect this material from fire and damage by insects.
- Such exclusive species as oak and mahogany are quite expensive. Therefore, in order to decorate your home with chandeliers from them, you will have to spend an impressive amount of money.
- If you use untreated or poorly dried wood in your work, then the finished lamp may crack or change its shape after a few weeks.
Of course, wooden chandeliers have their drawbacks, but with proper processing and care, such accessories will last you for many years.
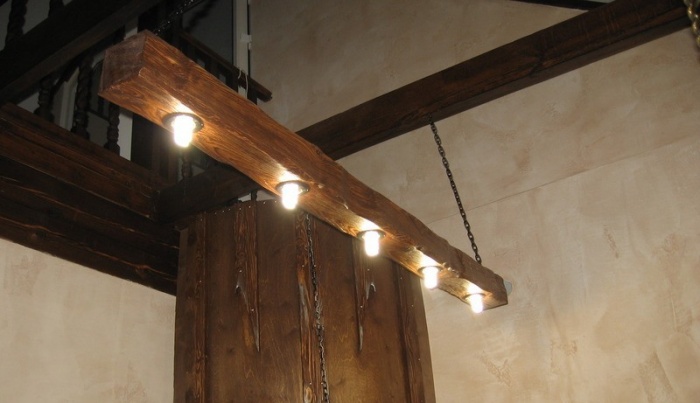
Simple wooden chandelier
Such a handmade wooden chandelier will fit perfectly into the modern high-tech or modern kitchen interior. It is a bar with several spotlights implanted in the cups.
To make a chandelier-slat you will need:
- jigsaw or hacksaw;
- pliers and wire cutters;
- screwdriver;
- a hammer;
- construction pencil;
- special protective compounds for wood;
- stain or brown paint;
- wooden board 20-25 cm wide;
- tape measure or centimeter;
- drill;
- drill for working with tiles;
- paint brush of medium width;
- cups with saucers, 3 pcs.;
- rubber pads;
- wires;
- small light bulbs with cartridges 3 pcs.
Before starting work on the manufacture of such a chandelier, the wood must be treated with special compounds and allowed to dry completely. When choosing a material, it is advisable to inspect the board for knots and traces of insects.
Manufacturing

Master class on making a simple lamp-slat for the kitchen:
- We measure 50-60 cm of the board and saw off the excess parts with an electric jigsaw.
- We drill three holes in the places where the lamps will be located. The distance between saucers should be at least 10 cm.
- We process the board with sandpaper. First you need to use coarse-grained sandpaper, and then fine-grained.
- Now you can cover the bar with stain. If oak or mahogany was used, then this step can be skipped.
- We drill a hole in the center of each saucer and each cup.
- Insert the cartridge with the wire first into the cup, and then into the saucer. Do this for the rest of the cups and saucers.
- Connect the construction of dishes and cartridges to the bar by threading the wires through the holes made in advance, and then fix it on the back side.
- Mount the resulting chandelier on the ceiling.
A chandelier-slat will look perfect in the kitchen above the work surface, it is also ideal for dividing the room into a cooking and relaxing area.
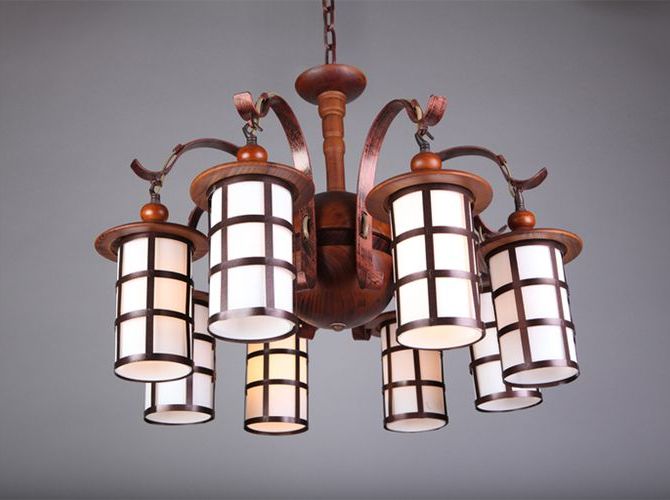
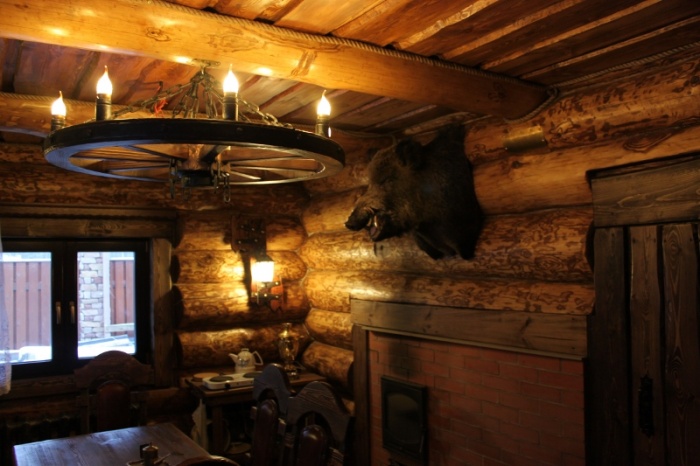
Wooden wheel chandelier
Such a chandelier is more difficult to manufacture than the previous one, but it also looks more noble and impressive. The lamp in the form of a wheel will perfectly fit into a rustic interior or a loft-style room.

For this type of chandelier, you will need the following materials and tools:
- a wooden square assembled from boards is slightly larger than the future wheel.
- protractor;
- large compass;
- metal ruler or building level;
- construction pencil;
- electric jigsaw or circular saw;
- glue;
- self-tapping screws;
- plywood sheet;
- narrow wooden boards;
- a hammer;
- nails;
- iron rim;
- stain;
- metal chain;
- drill with a round nozzle and a drill;
- wires, cartridges and light bulbs 4 pcs.;
Master class on making a chandelier-wheel:

The finished chandelier-wheel can be attached to the wall or suspended by a chain from the ceiling. It is perfect for lighting a dining room or living room.
Such a wooden chandelier will become the main decoration of the interior of a country house, and will undoubtedly attract the eye of every guest.
Wooden chandeliers are increasingly seen in the interior of country mansions. What is the reason for such popularity of such lighting devices? Of course, first of all, it is important to note the environmental safety of natural wood. This useful and high-quality material is ideal for making a wooden chandelier with your own hands.
Wooden chandeliers made of wood fill the room with pleasant and soft light, allow the owner of an apartment or house to completely relax after a busy day.
Wooden chandeliers have excellent technical and operational characteristics. Professional interior stylists note their unique wear resistance, as well as the possibility of making such lighting fixtures with their own hands.

Attention! A high-quality wooden chandelier has a fairly high cost.
It is not necessary to spend money on buying a ready-made lighting fixture, because it is quite possible to make it yourself, turning your creative ideas and original ideas into reality.
In addition, a do-it-yourself wooden chandelier is a guarantee of uniqueness and individuality.

Reasons for choosing wood for making a lamp
In our age of scientific and technological progress and innovative technologies, polymeric materials have become widespread, which have pushed natural wood into the background. Despite the variety of finishing and decorative materials offered by lighting manufacturers on the modern market, interior designers do not stop using natural wood in their work.
The original do-it-yourself wooden chandelier, step-by-step instructions, as well as photos can be found in the video:
Natural wood has certain advantages. For example, this natural material retains its original characteristics during mechanical processing.
Advice! For relaxation, professionals recommend choosing spruce or pine for the manufacture of a wooden ceiling chandelier. Doctors recommend choosing such wooden chandeliers for people with chronic respiratory diseases, as well as asthmatics.

Also among the advantages of natural wood, we highlight the ease of processing. If desired, you can make semi-antique wooden chandeliers, a modern version, and of any degree of complexity.
When choosing a tree for decorating the interior of a living space, you can make it cozy and harmonious.
Wooden ceiling chandeliers will help to bring an accent to the room, emphasize the main idea chosen for decoration.
Advice! In order to put into practice creative fantasies, you can experiment with the selection of wood species.
For example, “antique” wooden chandeliers can be made from oak or larch, and modern versions of lighting fixtures can be made from pine.
Among the advantages of choosing wood for creating ceiling chandeliers, professional stylists note the excellent combination of this decorative material with other decor options: glass, plastic, metal, fabric.
Disadvantages of wooden ceiling lights
It would seem that with such a huge number of positive characteristics, wood should be an ideal option for the manufacture of ceiling lighting fixtures. But unfortunately, even wood has some significant drawbacks that should be mentioned.
Wooden chandeliers are highly flammable as wood is not resistant to high temperatures.

Attention! It is strictly forbidden to use light bulbs in such chandeliers that will heat up during operation.
For safety reasons, professionals working with this natural material prefer to choose fluorescent or LED lamps that cannot create a fire hazard.
Among the shortcomings of ceiling wooden chandeliers used in rooms with high humidity, we highlight the instability of wood to negative environmental influences: moisture, temperature fluctuations.
Ceiling lights made of wood are exposed to insects.
Advice! In order to provide your ceiling lamp with reliable protection against these factors, it is important to coat the finished product with a special protective impregnation.
Also among the disadvantages of choosing lighting fixtures made by hand from wood, we note their high cost. As it dries, in some cases, the original appearance of the ceiling chandelier may also change.
If you take into account all these shortcomings inherent in wooden products, you can make an original and functional lighting device that will become the pride of the owner of an apartment or house.
Work materials
To assemble a ceiling wooden chandelier with your own hands, you will need tools and materials:
- roulette;
- screwdriver and hammer;
- pencil;
- electric drill;
- hammer and pliers;
- antiseptic for processing a wooden product;
- base, light bulb, electric wire;
- decorative elements
Depending on which particular model of the lighting device will be created, this list can be supplemented with other materials and tools.
There are certain rules that must be observed when starting work related to the creation of wooden ceiling chandeliers.
First of all, you need to take care of the full processing of the material with a special antiseptic composition.
In addition, due attention should be paid to the system for attaching the finished product to the ceiling surface. For example, you can pick up the original metal chain so as not to be afraid that the chandelier will fall from the ceiling.
In the process of connecting a wooden lamp, it is better to use the services of a professional electrician in order to prevent emergencies.

The chandelier can become the main element of the interior, make it special and unique. And it is not at all necessary to give huge amounts of money to purchase exclusive interior items; if desired, beauty can be created with your own hands.
Imagine how interesting the manufacturedDIY chandelier made of wood.
In contact with
What is required for this
What can you make a chandelier with your own hands. Main The advantage of a homemade lampshade is that you can use any materials at hand to create it. In this case, the new design of the room will not be associated with material costs, and space will be freed up in the pantry.
Beautiful chandelier with your own handscan be made from almost any improvised materials. For creative work, slats, boards, planks, branches, plywood, wood glue, varnish or paint, tools are useful. The exact set of materials depends on the selected product model.
Advantages
Main advantagehomemade wooden chandeliers- material. Today, when plastic has become widespread throughout the world, everything natural and environmentally friendly is especially appreciated. What advantages will it havewooden chandelier?
- guaranteed environmental friendliness - wood is a clean material that does not harm health;
- ease of execution, which is ensured by the pliability of the material;
- no restrictions regarding the appearance of the product - working with your own hands, you can create a chandelier that is ideal for the chosen design of the room;
- a positive effect on the emotional state - it has been proven that objects made of wood have a calming effect.
Important!Homemade chandeliersfrom coniferous wood not only have a beautiful appearance, but also help to get rid of respiratory diseases. Pine and spruce are especially healing.
Product design
A chandelier in the form of a wheel will certainly appeal to connoisseurs of ethnic style. Such a lampshade will become an integral part of the interior in the style of the wild West.This idea will especially appeal to those who have a wheel from a cart lying idle in their country house.If the main element is absent, andwooden chandelier wheel needed and there is a desire to needlework, then this component can be bought at any "flea market" or ordered via the Internet.
Necessary tools and materials
For work we need:
- wooden wheel;
- electric drill and a set of drills for it;
- woodcarving tools;
- mounting adhesive;
- foil;
- electrical component - lamps, cartridges, wires;
- varnish or paint to cover the finished product;
- decorative elements - optional;
- chains for fastening.
Not sure which light bulbs to choose for your homemade chandelier? Give preference to LED or fluorescent, such a lamp will have a high level of fire safety.
Manufacturing instructions
 Clean the wheel, sand it - the surface should be smooth and clean. Decide which part will be the top and which part will be the bottom. Drill holes for the cartridges in the upper part. It is most convenient to perform this procedure using a Forster drill.
Now you need to make holes for the wires with a drill of a suitable diameter, make holes from the inside of the wheel to each place where the electric chuck will be installed.
We make “moves” for the wires in the upper part of the wheel, where the ceiling mount will be located.
You can put the wires on top, then you do not have to spend time masking them, but this will make the chandelier less attractive. Through holes in the upper part are best done at an angle, from top to bottom.
Decorate DIY chandelier frame. You can simply varnish the wood or give it the effect of "old times" by covering the base with "stain" and the iron elements with black paint. As a decor, you can use any elements that are at hand.
Important!Pay attention to the central hole below: you can insert an additional lamp into it or cover it with a decorative element.
We assemble the chandelier: it is recommended to lay a layer of foil on the bottom of the recesses for cartridges - this will increase the fire safety of the lamp. Insert cartridges, connect wires. If desired, the wires that are in sight can be coated with paint to match the base.
For fastening to the ceiling, use chains - three pieces attached at equal distances from each other.
Antiques are always valuable
DIY antique wooden chandeliersusually made fromnatural materials. You can, of course, use artificial chemical compounds, but then the lampshade will no longer be environmentally friendly.
Antique wood chandeliersdiffer from their "brothers" in appearance. The tree is artificially aged using various means.
For work you will need:
- finished wooden chandelier;
- mint oil;
- beeswax;
- potassium permanganate;
- gloves;
- rags for work.
Advice!Peppermint oil is easy to prepare on your own - for this, a glass of chopped mint leaves should be poured with a liter of refined linseed oil. Can be used after 14 days.
Product processing
 Mix mint oil with beeswax in a ratio of 1:3. Heat the mixture in a water bath until a homogeneous mass is obtained.
Using a soft cloth, evenly coat all wood surfaces of the lamp with the oil and wax mixture.
Make a concentrated aqueous solution of potassium permanganate. With a cotton swab, arbitrarily make wide strokes with a solution on a tree: they will look like darkening from time to time.
Let the chandelier dry.
We use a rail
The chandelier in the hall with your own hands from the rails looks original. The slats remaining after repair or construction, through simple manipulations, turn into an exquisite lamp that will become the highlight of any interior.
To the question how to make a chandelier at homefrom wooden slats, there is a fairly simple answer.
Prepare the following set:
- wooden lath 2 m long 20x30 - 5 pcs;
- electric chucks - 3 pcs;
- wires;
- corners - 1 pc;
- hairpin m6 - 1 pc;
- linen impregnation;
- paint or varnish;
- glass;
- washers and nuts;
- woodworking tools.
Sequencing
- We cut all the slats in half, cutting the length in half.
- Apply a layer of paint or varnish.
- From all the rails we build a kind of well, on the bottom of which we install glass. We fix the structure with clamps.
- Using an electric drill, we make holes and strengthen the well with bolts and nuts.
- We choose a means for attaching the lamp to the ceiling - it can be a chain or a strong thread.
- To give the chandelier aesthetics, blind nuts should be used on the visible side. We hide the edges of the glass behind a plastic corner.
- We insert cartridges, we conduct wires.
- We mount the chandelier.
Create a frame
 What should an exquisite wooden lamp look like? It doesn't have to becarved wood chandelier.
The mold and the manufacturing process could be much easier.
You don’t even need to buy something for the base: you can use an ordinary snag found during a walk through the forest as a frame.
The advantage of such a lamp is unsurpassed natural beauty. How to create a masterpiece based on driftwood:
- Clean the workpiece from the bark, dry and sand.
- Make holes for the wires along the branches. It is almost impossible to make solid ones - choose the option when the wires will evenly wrap around the frame.
- In places where the wiring is outside, you can make recesses, and then hide the wires with putty of the desired shade.
- Cover the lampshade with several coats of varnish and let dry completely.
- Install a cartridge at the end of each branch.
- For fastening, it is best to use a metal chain.
Advice!Wood is a flammable material, it is advisable to immediately treat it with a protective compound.
original solutions
Interesting DIY chandeliersyou can make any shape, style from the most unexpected materials - snags, logs, timber or twigs. There are no restrictions and limits in this matter, any author's decision is guaranteed to find its fans, give a lot of positive emotions to the owner.
The easiest way
Making the interior of your home truly unique is not as difficult as it seems at first glance. A little imagination, artistic creativity and faith in the result - and you can achieve your goal.
For those who completely doubt their own abilities, there is an easy option for turning an ordinary wall lamp into an interesting lamp. It will look especially interesting in the bedroom, the interior of which includes elements of wood. To implement the idea, process and varnish a flat wooden board. Attach it to the wall vertically, and fix the sconce on it - the lamp will look completely different.
Advice!If you use PVA glue when making a wooden chandelier, carefully wipe it off all visible areas. Over time, it turns yellow, which spoils the appearance of the product.
As you can see, the questionhow to make a wooden chandelier with your own handsthere are a lot of answers. Having certain talents and skills, showing a little imagination, you can create a chandelier worthy of admiration. The options described above are just a small fraction of what you can think of.
Since ancient times, people have valued what was created by nature. In the old days, almost all household items were made from wood. And this is no coincidence. More environmentally friendly and safe material is hard to find. And the natural beauty of the unique texture impresses with its exquisite outlines. That is why modern interior design is not complete without this valuable material. Wood can be used not only for interior decoration or for the manufacture of furniture. Wooden lighting fixtures look unique, original and inimitable, especially if they are homemade wooden lamps. Often such an element in the interior is used to emphasize a certain style. Therefore, configurations can be very diverse.
Simplicity and sophistication. Driftwood chandelier
Making a lamp out of wood with your own hands is not so difficult. Moreover, some products do not even require a special type of wood. You can even use driftwood found in the forest. Moreover, each of them has a unique shape, each of its bends is perfect, since this is a creation of nature itself. Now the main thing is not to spoil its natural beauty during processing. A lamp made of wood (snag) will become not only a source of light, but also a wonderful ceiling decoration.
Manufacturing technology
Preparatory work consists in cleaning the driftwood from bark and unusable wood, as well as in thorough drying. Then the snag is carefully polished with sandpaper. Based on the type of lamp, the necessary components are purchased. It should be remembered that wood is flammable, so a wood lamp requires the use of energy-saving lamps. Also suitable for LEDs.
In special places, holes should be drilled for wiring. On the side of the branches that will be located closer to the ceiling, you can make grooves for the wire with a narrow blade. After laying the wire, all holes must be puttied. At the ends of the driftwood, cartridges are installed on which lamps and shades are attached. The snag is attached with chains to the ceiling. All wooden elements must be varnished. Ceiling lamp made of wood is ready.
Japanese style. Table lamp
Table lamps can be an excellent decoration of the interior. The tree is the best suited for making such a miracle. So that the work does not cause unnecessary trouble, you should prepare all the materials and tools in advance. For manufacturing, you will need a processed piece of board, square (it is desirable that the wood is the same), light veneer, wooden spikes, PVA glue, a drill with a disk nozzle. For such a lamp, a lamp with a small base is used. From electricians, a cartridge and wire are also needed.
Manufacturing process
A do-it-yourself wooden table lamp is very easy to make, especially if you have the appropriate skills.
First you need to drill holes in the corners of the wooden plank. To do this, measure one and a half centimeters from each edge and outline the squares on which the vertical bars will be installed. Holes are marked in the center of each square. If the spikes are made by hand, then their size should be adjusted to the diameter of the drill. Otherwise, the drill should be selected according to the size of the dowels. No need to drill holes through. Up to half the thickness will be enough. It is also necessary to drill holes in the bars and glue spikes there. In the center of the base board, you need to make a large hole for the cartridge. If there are difficulties, then you can simply drill a hole for the wire. Between the holes in the base, make shallow cuts for the veneer. You also need a deep enough channel for the wire. The wire cord must be fixed in the cut. A do-it-yourself wooden table lamp is almost ready. The last step is assembly. The bars are glued to the stand, the cut veneer plates are inserted into the cuts. The original wooden lamp is ready.
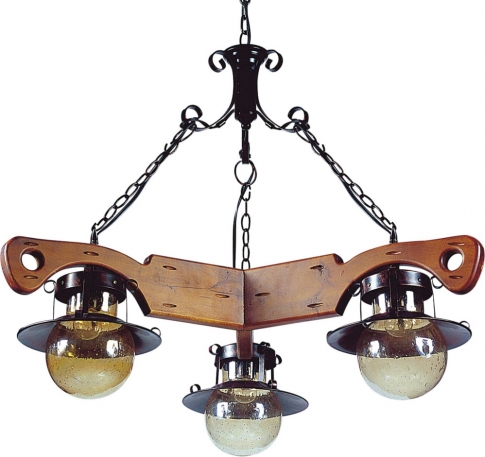
Lamp made of wood and coffee service

Making such an original lamp is quite simple. To do this, you need to take a suitable size board made of precious wood, pre-treated with stain and varnished. You will also need three coffee cups with saucers with holes in the bottoms (you can drill it. To enhance the decorative effect, it is best to use cups made of thin glass. The wires connected to the cartridges are passed through the holes in the shades (saucers and cups) and attached to the board. All wires are output on the part of the board that will be hidden, connected to each other and to the main wire.Such a design can be mounted on the wall or hung on the ceiling with chains or a twisted cord.The variant with a more modern one.But with the help of such a lamp you can also create an antique effect.For this instead of cups and saucers, you can use clay pots, and wipe the board itself with sandpaper.Such a wooden lamp will fit perfectly into the design of a country house kitchen.
Original lamp-arrow

Dimensions are selected individually based on the characteristics of the interior. It looks quite impressive when the arrow lamp occupies the entire wall vertically. One such device is enough to completely illuminate the entire room.
When making such a miracle, fantasy is required. The easiest solution is to take a long board for the base of the arrow and a few small planks for the point and fletching. All parts must first be fastened together with glue. For reliability, you can additionally connect with wooden plates and screws. As a lighting element, it is best to use a street garland. Based on its size, holes should be drilled in the wooden structure and light bulbs should be inserted there. On the reverse side, it is necessary to secure the wires well with adhesive tape and glue. It will not look very neat, but all this will be hidden when installing the lamp.
A little imagination, and you can make such original lamps from wood. Photos may give some ideas.
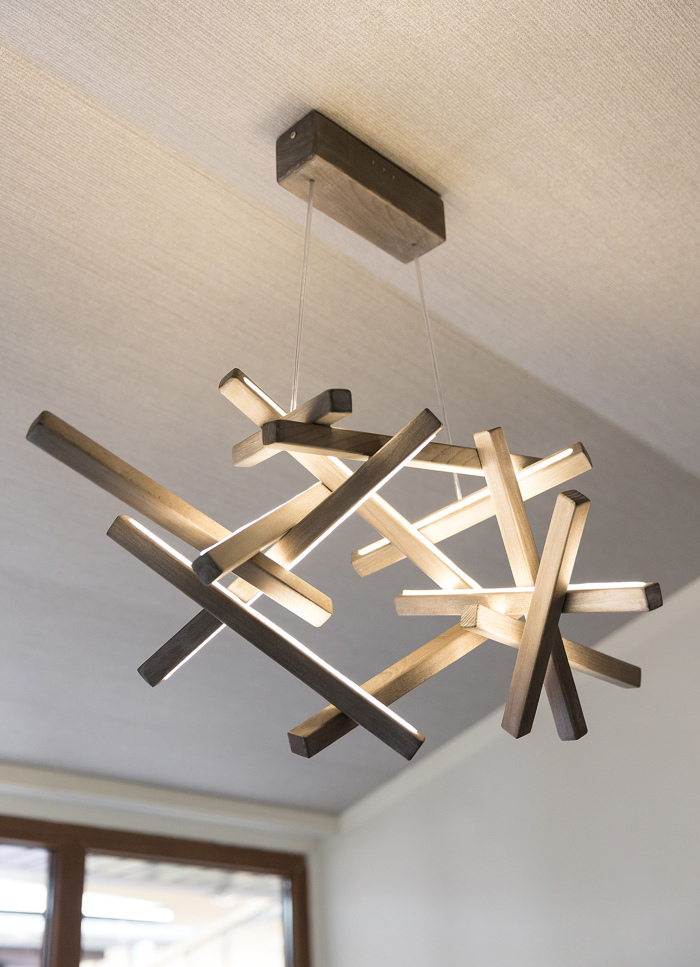
Plank lamp

Every carpenter has a lot of valuable wood scraps, which, as a rule, are difficult to find a use for, but you should not rush to throw them away either. You can make an unusual one from them. Moreover, you won’t need nails for this design, but such a lamp made of wood will come out. The photo cannot even convey all its beauty and spectacularity.
For the manufacture will need seventeen identical-sized boards. Multi-colored and different texture boards look spectacular. Each plank must be given a wedge shape. To attach the blades to the base, you will need wooden pins. A hole is made in the base, in which a cartridge with a wire is placed. The design is extremely simple to manufacture, but looks amazing in any interior.
Log floor lamp

A real masterpiece of LED lighting technology is quite simple to do with your own hands. You can create an original LED lamp using an ordinary log, the dimensions of which depend solely on the idea.
To make a lamp, you will need wood glue, a transparent tube, wood varnish, LED strip, a brush, a hammer, a saw and a drill.
Manufacturing sequence
A well-cleaned and dried log must be cut into uniform rings of approximately 5 cm. A hole should be made in the center of each ring, corresponding in diameter to the tube with LEDs. She needs to be in there tight. In the lower and upper rings, holes are made at half the thickness of the log. A small hole is made in the base for the wire. Each ring is varnished. Then a tube with diodes is inserted into the holes of each of the rings.
In order to make the interior of a modern apartment or country house original, interesting and spectacular, you can make wooden lamps with your own hands. Photos of the most unusual specimens of branches, clothespins and other wooden elements are given below. There are just a huge number of options.

In order to create lamps made of wood with your own hands, you need to connect your imagination. Clothespin floor lamps are simple, cheap and original. For such a lamp, a frame made of metal rods and wooden clothespins is required. Its external outlines depend on the bending of the frame.

A chic chandelier made of branches will transform any room. Its very easy to do it yourself. Thin branches of some trees can not even be processed. The wire is drawn from the main source, winding each branch, approaches the lighting cartridge.

Having imagination and certain skills, you can independently make lamps from wood with your own hands. The photos shown in the article are only a small part of what you can think of. Moreover, wood is the most environmentally friendly material.
Such a product will look great in a country or country house, in the hallway of a bathhouse, and even in an apartment furnished in a rustic style. But finding it in stores is far from easy, and at an affordable price it is not at all possible. You should not rush to search for online stores, because you can easily do it yourself. Consider two variants of the product, which differ from each other in the degree of severity of manufacture.
Self-assembly of a product of a simple design
To make a wooden chandelier of a similar plan with your own hands you will need the following:
- Wooden beam of square section 10x15 cm.
- Battery powered LED lamps.
- Chisel.
- A hammer.
- Needle file.
- Drill.
- Antiseptic.
- Sander (sandpaper fine and coarse grain).
- Stain.
- Hanging hooks.
- Chain.
- Linen rope.
 DIY wooden chandelier
  Chandelier made of wood and bottles
The main energy-saving lamps and their features.
A wooden chandelier is assembled with your own hands as follows:
1. We mark on the beam the places of the future location of the lamps. We draw the contours of the appropriate sizes.
2. With a drill, we make many holes inside the contour, splitting the wood as finely as possible.
3. With a chisel and a hammer, we knock out excess wood. Holes are preferably made through.
4. Using a needle file, we align and grind the inner sides of the squares.
5. We skin the entire surface of the timber by hand or with a grinder.
6. We treat it with an antiseptic in several layers.
7. We protect the surface with sandpaper of the finest grain, clean it from dust.
8. We cover the beam with a stain of the desired color.
9. On the back of the product and on the ceiling, we make holes for hanging hooks.
10. We cut off segments of the required length from the chain, attach them to the hooks on the beam.
11. To enhance the decorative effect, we wrap a linen rope around the edges and in the middle in several rows around the timber. The ends of the segments are fixed with liquid nails.
12. We insert light bulbs into the holes, which will be fixed in the sockets with liquid nails.
13. Instead of LED lamps, you can insert cartridges into which energy-saving light bulbs will be screwed. The wiring will be hidden from the top of the product and in the attachment chain.
 DIY veneer chandelier
  DIY chandelier from branches
Do-it-yourself options for a step-by-step master class from various materials.
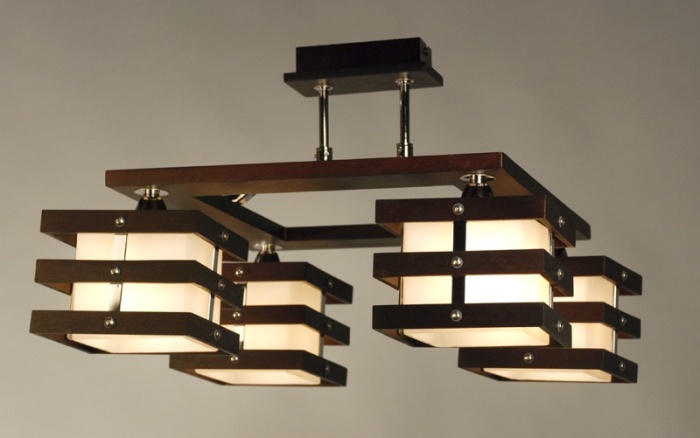
Do-it-yourself assembly of a wooden chandelier of a more complex design
To make a wooden chandelier with your own hands of a more complex plan, you will need the following tools and materials:
- Raw or debarked logs.
- Shingles (wooden slats) 2.5 cm wide and 0.5 cm thick.
- Linen rope.
- Ammo.
- Sandpaper coarse and fine grain.
- Stain.
- Chainsaw or manual.
- Drill and cutter.
- Screws with bolts.
- Solvent (turpentine, acetone or gasoline).


The production of the product is carried out as follows:
1. A third of its thickness is sawn along the log (a fourth part is possible). You will need three of these blanks.
2. Their length is determined individually depending on the desired dimensions of the product.
3. The bark is removed from the raw logs.
4. The surface of the blanks is wiped with a solvent from the resin that has come out.
6. Then they are folded into a triangle so that one edge of the workpiece overlaps the edge of the other, and the second lies on top of the edge of the third.
7. At the docking point, marks are made for drilling. In the center is a large hole for the cartridge, on the sides of it are smaller ones for screws.
8. The cutter cuts large through holes with a diameter that allows you to insert a cartridge into them. A drill drills through holes of smaller diameter for screws.
9. Closer to the vertices of the triangle, three more holes are drilled from the cuts of the logs for threading the ends of the rope into them, on which the product will be hung.
10. The surface is skinned with fine sandpaper.
11. The shingles are sawn into small parts of the same length.
12. Plafonds are assembled from chopped shingles, which was previously covered with an antiseptic and stain. Two parts are placed parallel to each other, two more elements are placed on their edges, which form a square. One plafond consists of 24 elements.
13. Fastening parts in the ceiling is carried out with liquid nails.
14. The blanks are covered with an antiseptic and stain, assembled together and fixed with screws and bolts.
15. Plafonds are glued to the blanks with liquid nails or wood glue.
16. The assembled product is varnished.
17. The edges of the ropes are threaded into the holes, which can be hung, for example, on a hook.
You can make a completely elementary version of the product, which is presented in the form of tightly interconnected branches. They can be painted or varnished, and cartridges with lamps are hung on top of long cords. This option is suitable for a home in a minimalist or eco-style.