Do-it-yourself jigsaw machine - drawings and video details. How to make a homemade jigsaw with your own hands from a conventional electric jigsaw Desktop jigsaw for artistic sawing with your own hands
Using a desktop jigsaw at home, you can make furniture, beautiful patterned shelves and much more. The mechanism allows you to cut smooth and sinuous parts from wood, plastic and dense foam materials. In order for a home-made device to fully meet the requirements, it is necessary to carefully select the appropriate design.
Design and specifications
The device of any model of an electric jigsaw machine must contain:
- saw;
- crank assembly;
- drive unit;
- saw tension device;
- Desktop;
- auxiliary mechanisms.
The processed material keeps within on a desktop. Some models are equipped with a rotary device that changes the slope of the surface. To make it easier to mark the material with your own hands, graduation is applied to the surface.
The larger the table, the longer the cut can be made. On average, this figure is 30 - 40 cm.
The drive power for a homemade desktop machine is about 150 watts.
The crank assembly converts the rotational movement of the drive into reciprocating and transfers it to the saw. On average, the oscillation frequency of the file per minute is 800 - 1000. The vertical movement amplitude is not more than 5 cm. Some models allow you to select the movement speed depending on the properties of the material.
A manual jigsaw file can work with wood, plastic with a thickness of not more than 10 cm, having a length of up to 35 cm. For different types of materials and work, the files change, their width is 2 - 10 mm.
The manual tension device secures the saw blade for uniform sawing, it is a helical or leaf spring.
Types of machines
Structurally, all jigsaw devices can be divided:
- with bottom caliper;
- with double support;
- on suspension;
- with degree scale and stops;
- universal.
The most common are models with a lower caliper. Their bed is divided into two halves: lower and upper. At the top there is a cutting and cleaning module. At the bottom there is a control module, an electric motor, a transmission mechanism and a toggle switch. Allows you to process sheets of material of any size.
Double caliper models differ in that there is an additional rail on the upper half of the bed. Such devices are good for creating oversized parts. They are easier to install than the previous version. Both models allow you to process material no thicker than 8 cm. A working table with angle and height adjustment is attached to the machine.
Suspension machines are not equipped with a monolithic bed, they are very mobile. During processing, the cutting module moves, not the material. The working module is usually attached to the ceiling with its own hands, so the size of the material is unlimited. The cutting tool moves manually independently of the bed, creating very complex patterns.
Machines with a degree scale and stops are good for precise work on drawings. The design allows you to avoid errors. Universal jigsaws can perform several operations associated with cutting: drilling, polishing, grinding.
Making a machine with your own hands

Drawing of a homemade desktop jigsaw: 1 - rocking chair insert (2 pcs.), 2 - earring (2 pcs.), 3 - table, 4.6 - screws, 5 - thrust, 7 - eccentric, 8 - base, 9 - axes of earrings, 10 - upper rocker, 11 - axis of the rocker, 12 - lamb, 13 - tension screw cross member (2 pcs), 14 - tension screw, 15 - rocking stand, 16 - bottom rocker, 17 - box, 18 - two-stranded pulley, 19 - intermediate shaft, 20 - rack bushing, 21 - table plate, 22 - bearing with cover (2 pcs.), 23 - electric motor pulley.
In the drawing of a do-it-yourself desktop machine, the number of nodes must be minimized, these are: a rocking chair with a fixed saw, a frame and an electric motor. You can take the engine from an old electric machine.
Owners of a manual jigsaw were more fortunate. From a sheet of plywood, you can make a stand and attach a jigsaw to it. To fix the jigsaw with your own hands, you will have to make holes in the base of the tool. The simplest model is ready.
Now about more complex and functional ones. The do-it-yourself bed is made of 12 mm plywood, thick plastic or textolite. It is a base, a box for placing the engine and mechanisms, and a work table. On the other hand, we have a rocking chair with an eccentric. They are interconnected by a metal plate with bushing bearings. The whole structure is fixed with screws. To mount the intermediate shaft, prepare a pair of bearings. The two-strand metal pulley is mounted on the shaft as tightly as possible, the screw connection is fixed. In the same way, you can make an eccentric.
To change the amplitude of the movement of the rocking chair, four round through holes with threads are made on the eccentric flange, remote from the axis at different distances. By changing the installation location of the screw, the swing of the rocking chair is adjusted. It is a pair of wooden yokes hinged to a rack. The rear ends of the rocker arms contain through cuts, tension screws are inserted into them. A file is fixed to the ends in front, movable due to metal hinges. Before fastening, the file is inserted into the groove of the working surface of the table.
The saw blade attachment mechanism is very important. When making a homemade device with your own hands, special attention should be paid to it. The insert plates of the rocker arms carry constant loads during movement, therefore they are rigidly fixed and tightened with screws and Grover washers. The fastening earrings should not be strongly compressed by the screws, allowing the hinge axis of the plate to move.
Since childhood, we have been familiar with the technology of sawing with a jigsaw. The principle is simple - a fixed part is placed on a stand with a technological cutout, the cut is made by moving the file. The quality of work depends on the firmness of the hands and the skill of the worker.
In this way, you can literally cut lace from thin wooden or plastic blanks. However, the process is laborious and slow. Therefore, many masters thought about small-scale mechanization.
A simple design from the last century
Even in the magazine "Young Technician" drawings were offered on how to make a jigsaw machine with your own hands. Moreover, the design does not imply an electric drive, the drive works from muscular strength, like knife grinders.
The machine consists of the main parts:
- bed (A)
- desktop (B) with a slot for the canvas
- lever system (B) for holding the saw blade
- flywheel (D), which is the primary drive pulley
- crank mechanism (D), combined with the secondary drive pulley, and driving the levers (B)
- pedal assembly (E) with a crank mechanism that drives the flywheel (D)
- saw blade tensioner (W)
With the foot of the foot, the master sets the flywheel (D) in motion. With the help of a belt drive, the crank mechanism (D), connected to the lower lever (B), rotates. A file is stretched between the levers, the degree of tension is regulated by a lanyard (G).
With a well-balanced flywheel, a sufficient smoothness of the saw blade is ensured, and such a home-made jigsaw machine allows you to massively cut out the same type of workpiece, saving time and effort. In those days, jigsaw saw blades were produced in the form of a flat tape with unidirectional action.

Therefore, to obtain patterns of complex shape, it was necessary to rotate the workpiece around the canvas. The dimensions of the workpiece are limited by the length of the levers (B).
From mechanical jigsaw to electric one step
The foot drive cannot give real freedom of action and uniformity of the sawing stroke. It is more reasonable to adapt an electric motor for a crank mechanism. However, if you use a desktop jigsaw from time to time, it makes no sense to make a stationary structure with its own motor.
You can use household power tools. For example - a screwdriver with a speed controller.
Materials are used, literally from wooden scraps and old trash. The only critical part is the frame. It is better to make it from durable plywood with a thickness of at least 18 mm.

We make all connections on wood screws, the joints can be smeared with PVA glue. We assemble a support pedestal for the lever rod from the same material. The design of the support should not have backlashes; the subsequent accuracy of the operation of the entire machine depends on its strength.
This article will focus on the design of a home-made machine from a household electric jigsaw. Below are step-by-step instructions, photos, videos, as well as drawings and diagrams.
Introduction
There are a lot of design options - from the simplest, where it just sticks out of the countertop, to rather complex structures with guides, the possibility of sawing at an angle, when it is possible to set not only 90 degrees to the base, but change the angle (well, within reason, of course) . There are devices (machines) for, that is, making a straight and even cut.
Such devices are increasingly being used because of their versatility and functionality. In fact, they are similar in parameters and purpose to stationary machines and have a strictly defined practical application in every workshop.
Purpose
| Plywood thickness, mm | Layers of plywood, not less than | Sanded plywood | Rough plywood | ||
| Maximum deviation, mm | Different-thickness | Deviation, mm | Different-thickness | ||
| 3 mm | 3 | +0,3/-0,4 | 0,6 | +0,4/-0,3 | 0,6 |
| 4 mm | 3 | +0,3/-0,5 | +0,8/-0,4 | 1,0 | |
| 6 mm | 5 | +0,4/-0,5 | +0,9/-0,4 | ||
| 9 mm | 7 | +0,4/-0,6 | +1,0/-0,5 | ||
| 12 mm | 9 | +0,5/-0,7 | +1,1/-0,6 | ||
| 15 mm | 11 | +0,6/-0,8 | +1,2/-0,7 | 1,5 | |
| 18 mm | 13 | +0,7/-0,9 | +1,3/-0,8 | ||
| 21 mm | 15 | +0,8/-1,0 | +1,4/-0,9 | ||
| 24 mm | 17 | +0,9/-1,1 | +1,5/-1,0 | ||
| 27 mm | 19 | +1,0/-1,2 | 1,0 | +1,6/-1,1 | 2,0 |
| 30 mm | 21 | +1,1/-1,3 | +1,7/-1,2 | ||
Preparatory stage
- draw up sketches and make a drawing of the future product,
- make paper patterns of future elements and details
- stick templates on the blanks of future parts.
There are two ways to make templates - take a tracing paper and draw on it the kennels of the future workpiece. This has been done since ancient times, since nothing is needed for this, except for a ruler and a pencil. However, if you have a computer and a printer, it would be nice, of course, in A3 format, but A4 is also suitable (you just have to print several sheets and then glue them together), then the process of drawing with a pencil and a ruler can be replaced by drawing the outlines of blanks on a computer.

Then cut out with a clerical blade or just a sharp knife.

After that Once the template is ready, it must be glued to the workpiece.
Tip: You don’t need to glue it tightly, since in the future you will have to remove the template, and this will be difficult if you glue it “tightly”. Accordingly, you can stick, for example, on stationery glue, use glue stick or, as in our example, glue in the form of a spray.

Create blanks
At this stage, you need to do:
- Cut blanks exactly according to the template,
- Process workpieces - align the ends, remove burrs
- Drill the necessary holes;
- Make grooves with a file;
- Drill seats for bearings;
- Select grooves with a milling cutter for the cover and seat;


We install the bracket. It should be noted that the mounting of the bracket must be done without excessive tightening of the nut - there must be free play. To do this, use a self-locking nut and only slightly tighten it.

Installing the spring shouldn't be difficult. You need to do as shown in the photo below.

For the future fastening of the file, you need to make a simple clip in the form of a plate with two holes. It must also be installed on the bracket using a self-locking nut. Moreover, the backlash of the plate in the seat is very important because the bracket moves, and the clamped plate will hamper its movement.

Below is a sketch of the design of the upper attachment of the file.

Then it is necessary to make technological holes for the controls of the jigsaw, so that it is convenient to change the engine speed, you can access the start button and its lock. There is another solution that allows you to make it more convenient to turn on the tool - this is to place an outlet and a switch in an easily accessible place on the machine body, which would turn the power on and off in the outlet. We turn on the plug of the jigsaw cord into the outlet, and it turns out that we will turn it on and off using a switch installed in a place convenient for us. However, this is a matter of taste.
So, below is the manufacture of technological holes on the body.

Here are the controls that are now available.

Now you need to make clips for the file itself. The principle is simple - we take a bolt and make a cut at the base of the cap, but not completely. In the future, the file itself will be inserted into this cut. The principle is shown in the photo below.

This is how the upper assembly of the saw blade is mounted and assembled.

The lower node is almost similar to the upper one, except that it is not a plate that is used, but a standard file is taken (you can use “BU”), almost the entire cutting part is sawn off with a grinder (angle grinder) and the shank is left. In the remaining cutting part, a hole is made with a similar bolt with a slot at the base of the cap, which will also include a file. The principle is shown below.

After the file is fixed, we install the jigsaw itself. We fasten it with the help of bolts with countersunk hats so that they do not stick out on the tabletop of the machine.


Now you need to adjust the perpendicularity of the file, relative to the table of our machine. To do this, you can use a square, or, as in our case, just a bar that is exactly trimmed. We make the adjustment as follows. To adjust the file to the left / right, the adjustment of the upper plate is used - its displacement on the axis - respectively in the desired direction.

And to adjust the file position forward / backward, the displacement of the file attachment itself forward or backward is used.

The machine is almost ready, it remains to make and install a plate that surrounds the jigsaw file. It can be made from textolite or any piece of sheet plastic.

This completes the manufacture of the jigsaw machine.
We hope that the presented material was useful to you.
Conclusion
dimensions
Here is a table with overall dimensions:
General assembly scheme
Let's attach a complete assembly scheme, which in a sense can be a 3B drawing for making a do-it-yourself jigsaw machine.

Video
The video on which this material was made.
A desktop jigsaw is useful for every craftsman who cuts out thin details. However, it is far from always possible and meaningful to acquire a full-fledged machine. In this case, get down to business and do it yourself!
The device of the jigsaw machine - what lies inside?
Jigsaws are more about special tools than devices that are needed by both an experienced craftsman and an amateur who runs a garage. Their purpose is reduced to a special task, namely cutting out complex curvilinear contours from sheet materials. A special “chip” of such machines can also be attributed to the execution of the cut without violating the integrity of the external contour. Most often, sawing occurs on wood and derived materials (plywood, chipboard, fiberboard), although modern machines equipped with appropriate nail files are able to work with other materials, such as plastic or drywall.
Such equipment has found application in the music industry (manufacturing of musical instruments) and, of course, in the furniture industry. They buy such units and lovers of tinkering in their own workshop. The device of a traditional jigsaw machine, designed in accordance with all the rules, is as follows: the working surface on which the saw is placed hides the drive (electric motor) and the crank structure underneath. The tension mechanism can be located both below and above the machine.
To process a part, it must be placed on the desktop. Many models have the ability to rotate it at different angles to make bevel cuts. The stops and guides on the surface, as well as the swivel mechanism, can be marked, which greatly simplifies and speeds up the work. It is on the length of the desktop that the length of the cut depends - most models are limited to 30-40 cm. The power of the electric motor is an important, but still far from the most fundamental factor, since the machine has a huge margin of unclaimed power. For example, for a home workshop or even a small production, a “engine” of only 150 watts is enough.
The crank mechanism is a much more important detail, because in this case it is on it that the quality of the transmission of the drive torque into the reciprocating motion directed in the vertical plane by means of a file depends.
Standard jigsaw machines are considered devices with a range of motion in the region of 3-5 cm at an oscillation frequency of up to 1000 per minute. In many models, a change in speed mode is provided for different materials. The jigsaw itself is usually made up to 35 cm long and is able to cut material up to 10 cm thick. The width of the files can vary in a fairly wide range - from very thin two-millimeter to coarser ten-millimeter, with a thickness of 0.6 mm to 1.25 mm.
Even the thickest and widest nail file will easily break if you do not provide sufficient tension along the entire length of the nail file. For this, spring and helical springs are used. Quite often, such machines are equipped with an air pump, which cleans the cut from sawdust by blowing, as well as a drilling unit. The latter device is especially useful, because in this case the master does not need to be distracted by connecting an electric drill and drilling a hole - everything happens on the working plane of the machine. Of course, you have to pay for convenience!
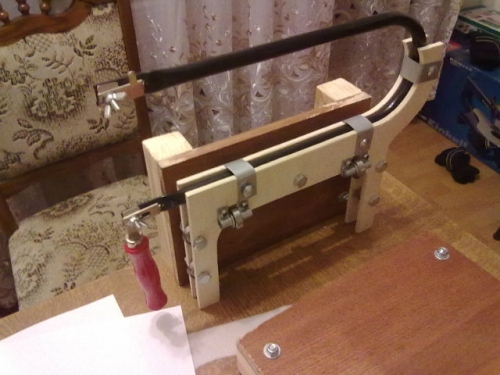
How to make a jigsaw machine with your own hands from a manual jigsaw?
On the net you will find many different designs of homemade machines, but most of them come down to reprofiling into this machine. Using your ingenuity and watching the video, you can easily make a homemade jigsaw machine from this tool. You only need to modify the jigsaw a little. In fact, it plays the role of a machine tool drive and a crank mechanism, the rest needs to be thought out and implemented.
Of course, manufacturers are trying to please consumers in this area as well, offering their own platform options for quick and convenient rework, however, in reality, only you can make an apparatus that meets your needs. So, the first step is to make a support table, for which sheet metal is most often used. In it you need to make a slanted oblong hole for the saw blade and holes for fasteners (countersunk screws are recommended), and attach the jigsaw to the bottom of the support table.
This design can only be strengthened on a wooden table. You can go beyond this and install guide rails. The convenience of such a device lies in the fact that in addition to performing functions that are not entirely inherent in it, you can always disconnect the drive and turn it back into a manual electric jigsaw with a flick of the wrist! If you constantly need this tool for work, it makes sense specifically for the machine - it will be cheaper than spending money on a real machine.
Advantages and disadvantages - we continue to modify!
But such an assembly inherits not only the advantages of the tool, but also its disadvantages, in particular, a nail file that is too wide for filigree work, which significantly limits the curvature of the lines. If there is a need for this, there is a way out. So far, our machine differs from the classic jigsaw unit by the absence of springs that would provide sufficient tension for the nail file. But to build a simple rocker, which on the one hand will be under the tension of the springs, and on the other hand fixed on a nail file, is quite easy.
There is another option - to clamp the nail file between two guide rollers, but the first option is still more reliable. Do not forget to turn off the pendulum stroke on the jigsaw before you start using a homemade machine. There is another design - if your tool is powerful enough, then it can only serve as a drive in a design of two rocker arms, between which a nail file is stretched. The movement is transmitted by means of a nail file fixed on the lower rocker arm.
Machine from a sewing machine - we give a second life to old tools!
If you inherited a foot or hand sewing machine from your grandmother or mother, consider yourself the owner of an excellent jigsaw! Of course, for this you need to “conjure” a little over the machine. First, remove the thread weaving device, which is usually located at the bottom of the machine. There is nothing complicated in this, it is enough to unscrew the two bolts. Then we knock out the cotter pin and remove the drive shaft leading to the thread weaving mechanism.
Having unscrewed the top panel that protects the mechanisms, it is necessary to expand the slot in which the needle went. Focus on the needs and width of the nail file that you will use in your work. Jigsaw blades of this kind also need to be slightly modified, namely cut to the maximum length of the needle that could be used on this machine. After grinding off the upper teeth and sharpening the lower part on the point, you just have to insert the nail file into the needle holder and test your machine in action!
A desktop jigsaw is an indispensable thing for any owner who is used to doing housework on his own. Especially electric jigsaws are good for residents of the private sector, lovers of manual labor and summer holidays. From its prototype, an ordinary manual jigsaw, the desktop electric model has gone far enough. A desktop jigsaw makes it easier and faster to cut, not to mention improving quality.
The concept of desktop jigsaw
The jigsaw is a saw, which is characterized by reciprocating movements of the saw blade, which acts as a working body. It has a ski designed to guide the saw blade when moving over the surface that is being processed, and making movements at a frequency of up to 3000 vibrations per minute.
This tool was invented in 1946. Its creator is Albert Kaufman, who replaced the needle in a sewing machine with a blade. The tool appeared on sale in 1947. The manual electric jigsaw has a body with a flat platform and a handle. The main difference between an electric jigsaw and a manual jigsaw is its greater functionality and cutting quality.

Inside is an electric motor and a special mechanism that drives the blade. In stationary jigsaws, there is no handle, and the platform is located on top. In front of the mechanism there is a guide, in the lower part there is a retractable blade that moves and makes cuts.
The tool works as follows: a table jigsaw file is securely fastened with clips in the slider. Reciprocating movements have a frequency of up to 3000 strokes and can be adjusted. The support platform allows the jigsaw to focus on the part being cut, so the work is carried out very accurately.
The purpose of the desktop jigsaw
The jigsaw is an essential accessory for every workshop and every hobbyist. His thin file can successfully cut plywood, copper, iron, thick boards, brass, steel. Tools can be motorized, foot or hand-operated and are more productive. An electric jigsaw is simply indispensable for carpenters, woodworkers, furniture designers, drywall workers who make complex parts.
An electric jigsaw can perform straight and curved cuts on workpieces with complex shapes and various sheet materials without disturbing the external contour. Most often, desktop jigsaws are used for cutting wood and wooden plates, figures with a complex outline from laminate and drywall, plastic blanks, and also for cutting sheet metal.

Desktop electric jigsaw makes clean cuts of complex shapes and works with small
details. Due to the stable and fixed position during operation, high cutting accuracy is achieved. The file has a stable course thanks to the tension system and guides, which manual jigsaws lack. The large size of the table makes it stable, so that a precisely defined sawing direction is observed.
Types of jigsaws
Today, a wide variety of electric jigsaws are presented on the power tool market, which differ in the nature of the application, technical characteristics, type of power supply and design features. In hardware stores you can buy a desktop jigsaw for every taste and budget.
By design features, it is difficult to classify, because each manufacturer seeks to provide its products with features that are designed to facilitate and improve the operation of the tool. In this regard, the shape of the handle is an important parameter.
Two types of handles have settled - mushroom-shaped and D-shaped. A jigsaw with a staple-like handle requires one-handed operation. This increases the possibility of using a jigsaw, but somewhat negatively affects the quality of the material cut.

Mushroom handles allow for more accurate cuts when holding the jigsaw with both hands, after fixing the workpiece to be cut. The choice of a jigsaw with a certain shape of the handle depends on the financial capabilities and personal preferences of the buyer. It is worth choosing the jigsaw with which it will be more convenient to work.
Household jigsaws are not designed for intensive use, but the low price of a desktop jigsaw and the power that is enough for domestic needs make them indispensable in the household.
Professional jigsaws are characterized by high wear resistance and the possibility of many hours of daily use (up to 8 hours). The significant power of such jigsaws allows you to process materials of great thickness. Extended equipment and improved features are reflected in the price.

Among professional jigsaws, industrial ones also stand out, which are characterized by greater adaptability to complex operations and drive features - for example, increased power supply voltage. Industrial models are machines that are designed for the woodworking industry.
By type of power supply, there are network and battery electric jigsaws. Network models are powered by a standard voltage power supply. If performance is important to you, then you should choose a corded power tool.
Cordless jigsaws provide independence from the presence of sockets and greater mobility during work. When buying a battery model, you should pay attention to the type of battery. Increased performance is inherent in lithium-ion batteries. Battery capacity is responsible for the duration of work without recharging.
Advantages of desktop jigsaws
The desktop electric jigsaw is a stationary design, so this type of cutting tool has many advantages. Modern models can work with wooden materials with a thickness of 40-50 millimeters. A narrow saw acts as a working body, which performs vertical reciprocating movements. Due to the peculiarities of the notching of the teeth and the mechanics of the movements of the file, the material is cut out by moving upwards.
The desktop electric jigsaw allows you to cut out complex decorative details, to make longitudinal, straight, oblique and transverse cuts. The wide tabletop allows you to process large parts and make cuts inside wide workpieces. Reliable fastening protects the body from unnecessary vibrations and allows you to well position the material, so the motor can work without overloading.
The advantages of desktop jigsaws include good accuracy and clarity of cuts, high safety and ease of use, wide customization options for the material and the required detail of the cut workpieces.

If you need to cut small parts, a manual jigsaw will not be very convenient. It is quite heavy, so you have to hold it with one hand and guide the workpiece with the other. And the desktop jigsaw is devoid of this drawback. Perhaps the inconveniences are too large sizes and the difficulty of working with large details.
The desktop jigsaw is a kind of mini-machine for cutting workpieces. If you buy a jigsaw in a store, most likely there will be an opportunity to select the power and adjust the frequency of the saw strokes. However, you can make the simplest homemade desktop jigsaw, and very quickly. You will need a manual jigsaw, a few screws, a small piece of plywood and just an hour of work.
Making a desktop jigsaw
A carefully made jigsaw will not be inferior to a factory-made one, and in some respects even surpasses it. It is not difficult to assemble such an electric jigsaw if you have the necessary materials. Next, we describe a simple scheme of such manipulations.
The design of the jigsaw includes the following components: a handle, a switch button, an insulating washer, a power cord, a frame, a heating thread, a screw clamp and an earring. First you need to make a frame. You will need a duralumin pipe with an outer diameter of up to twelve millimeters.
You can also use textolite with a thickness of at least ten millimeters or thick plywood for the base. But keep in mind, the lighter the frame, the more convenient the jigsaw will be to use. Be sure to provide a channel so that you can later lay the power cord. The best shape of the frame is the one with one of the sides deviated by 45 degrees.

Next, you need to make an earring. It is made of copper sheet with a thickness of one millimeter. After that, it is fastened with screws to the frame, where it connects to the handle. Thus, the screw, wing nut and earring will form a clamp in which the heating thread can be fixed. The thickness of the duralumin sheet should be up to 0.8 millimeters. It is necessary to make clamping cheeks from it, between which there is a button-switch.
After that, you need to cut a gap in the plywood through which the file can pass. It can be done with a drill. To do this, it is necessary to drill holes along the marking line, and smooth the transitions. Instead of plywood, you can use plastic, metal, plexiglass and others. Next, you place and drill mounting holes on the plywood and the base plate of the jigsaw.
Then you need to fix the jigsaw with screws on the plywood base so that the file can pass through the gap. You attach the structure to the table with a clamp so that the file is pointing up. You can also secure the platform in any way you can.
The jigsaw file remains conventional, but the possibilities for good sawing are expanded by freeing up the hands.
You can use a nichrome coil from any household heating device (for example, an iron) as a heating filament. It must be secured with tension between the ends of the frame bends. To heat up the thread, you need to apply a tension of about 14 V. To control the operating mode, you can use a rheostat.
The current is determined by the thickness and length of the nichrome filament. With the help of a rheostat, it will be possible to set the optimal current strength (no more than 3-5 A), which will affect the temperature to which the thread is heated. Before starting work, it is necessary to determine the current strength. But keep in mind that if the force is too high, the material being cut out can be caught in flames, and if it is not enough, it will not be taken. A do-it-yourself desktop jigsaw will allow you to cut out figures with complex contours from various types of materials.
Rules for using a desktop jigsaw
When working with a desktop jigsaw, you must adhere to some rules:
- While cutting, do not press hard on the tool, otherwise, at best, the needle will break, at worst, you will spoil the work.
- Change blades from time to time. An old saw can spoil and destroy the surface of the material.
- If you work with organic glass and non-ferrous alloys, the surface of the product must be moistened with water. Such an operation will speed up the process and extend the life of the saw.
- If you are cutting a surface with a thickness of less than one millimeter, place a sheet of wood or plywood under the material being processed.
- Before cutting, it is necessary to fix the material. It is better not to make long cuts by hand, the line may turn out to be crooked.
- To cut different materials, appropriate blades are needed, with a special pitch and length.
- Rotate the tool by turning only the back of the tool.
- When cutting the laminate, an adhesive tape is glued to the cut line, which protects the material from chipping.
- If the need arises for curved cuts, set the jigsaw pendulum to a minimum.
If you have not yet fully understood how to make a desktop electric jigsaw, watch a video about this procedure. This tool allows you to cut complex parts from wood and other materials, to make longitudinal, oblique, straight and transverse cuts. With the help of an electric jigsaw, you can process large parts, wide workpieces and small products, which is not superfluous at home.