Wicker furniture from plastic bottles. What can be done from plastic bottles. Plastic products for outdoor games
Masters and beginners use crafts from plastic bottles for the interior, as garden decor and in the form of practical furniture. Colored plastic bottle caps are an excellent material for mosaic panels on walls and fences. The best ideas with detailed instructions and photos are easy to implement in the country, turning a bare area into a "glade of fairy tales", and filling the house with useful little things.
One of the craziest pens in Runet, Roman Ursu, presented a crazy video in which he showed 70 ways to use plastic bottles.
Advantages of crafts from plastic containers
A well-made souvenir or trinket will eventually develop into a hobby if there are no limits to fantasy. Do not cease to amaze summer residents who have moved from simple hedges on a wire to buildings that delight in scope.
From the available material, which many people throw away, someone constructs:
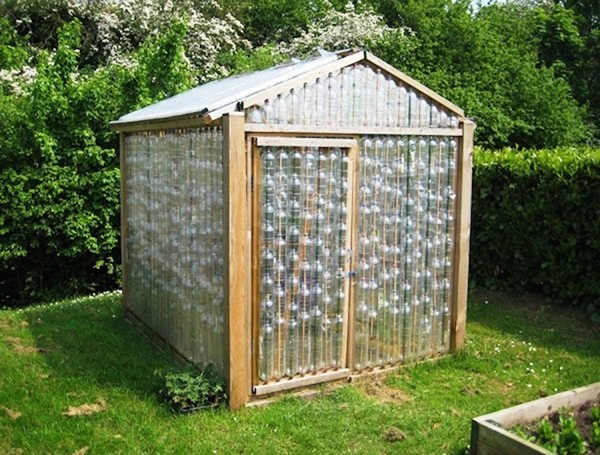
- greenhouse;
- carport;
- summer shower or bath;
- country toilet or shed;
- summer gazebo or sun visor;
- a teremok for children or a playground;
- sandbox with decorative borders;
- various temporary structures on the site.
Plastic eventually becomes a real environmental disaster - it is difficult to recycle. But it is enough to involve all those who are not indifferent to the cleaning of the territory, and there will be a whole mountain of empty PET bottles for the construction of a greenhouse, a cascading flower bed or vertical gardening. The only drawback is the long collection of the same container, since the containers are produced in different colors and volumes.
To create an original decoration you need:
- interesting idea;
- ready-made role model (illustration);
- craft material with tools;
- step by step guide to the training plan.
In the hands of a real master, plastic bottles take on a second life, becoming functional objects. Souvenirs are best done on a seasonal basis. For example, New Year's toys are made in winter, practical country houses - in summer, and in spring and autumn it remains to build a "glade of fairy tales" near the house for children.

Furniture and interior items from plastic bottles
Furniture made from plastic bottles looks like a masterpiece that not everyone can afford. They will need a lot of plastic containers of the same sample. Sofas and pouffes impress with their design and comfort, not inferior to real furniture. There is nothing complicated if the sofa is made in blocks - seat, back, sidewalls. If there are not enough containers, sofa blocks can be made alternately. It is better when they collect bottles from one drink, for example, two-liter kvass or lemonade.

The principle of "assembling" furniture from bottles is simple - they are exposed in layers and tightly wrapped with tape. To make the furniture softer and springier, a little air is released from each bottle and twisted tightly. In the place where the cap is, cut out the cap from another bottle and wrap it with tape. It turns out a block, which has a bottom on both sides - this is the basis of the furniture.
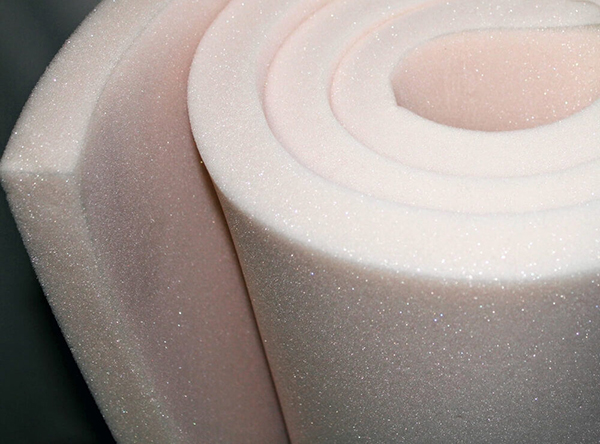
Then it all depends on the imagination, the type of furniture and the number of bottles available. We wrapped 7 containers of the same volume with tape, we get the basis for an ottoman. What will be its appearance and style depends on the master. For a soft seat, you will need a round pillow or a block of foam rubber according to the size of the top. The cover is cut out according to the size of the ottoman in the form of a cylinder, and it is convenient to insert a zipper along the side seams, but it is easier to sew up the upholstery tightly.

To build a coffee table, you will need 4 racks of plastic bottles and a plywood shield as a tabletop, which can be hidden with a long tablecloth. In a similar way, they make a convenient stand for a laptop or a remote table for giving. For large furniture (sofa, chaise lounge or chair) from plastic bottles, you will need a lot of patience and source material.

Useful little things for the house from plastic bottles
Flowers and vases
It will not be difficult to decorate a schoolchild's bedroom or a children's room with crafts from plastic containers. You can build a whole bunch of artificial flowers. Put the resulting chrysanthemums, daisies or roses in a vase of the same material, adding the middle with diode bulbs on an insulated wire. This is how a night lamp of extraordinary beauty will look like, where a weak light shimmers in plastic petals.
Advice: To give the leaves a special shape, use the heating of the blanks and folding the corners with tongs!
To place a homemade bouquet, you will need a suitable vessel, just cutting off part of the bottle is not aesthetically pleasing. The edges of the cut are marked with a ruler to make a cut, fixing the result by heating the bends. A small transparent bottle is cut off to the very top, about a half is cut off from a large container. We choose a material with a corrugation or a “waist” in the middle so that there is an interesting base.
Then we do as fantasy allows, but we bend the edges beautifully. The fringed cut is obtained from vertical or diagonal notches of the plastic base. The resulting strips are evenly bent to the outside.
Note! It is important that all the notches and the depth of the slot are exactly the same, then the whole product will come out neat.
Depending on which edge is desired, the strips of the vase (the edges of any other product) are fixed in different ways:
- curly bend;
- stapler staples;
- fusing;
- bonding with transparent polymers.


Planters, flower pots and containers for seedlings
Colored plastic containers in the form of bottles and bottles of various sizes are suitable as containers for growing live plants. It is very easy to make a fragrant balcony from 3-liter tanks - a cascade of ampelous petunias. Fragrant flowers hanging from cut containers will help make the dream of a beautiful piece of paradise come true.
Large bottles and tanks cut in half are hung upside down and with a lid. At the bottom it is recommended to lay large pebbles for drainage. Excess water after watering will go to the plants in the lower rows. In the same containers, plants are grown without soil - in a hydroponic way with the addition of fertilizers. Fresh herbs and seedlings (in urban and country conditions) are also germinated in prepared plastic bottles.
Advice: Use the compact shape and the ability to hang containers for vertical gardening with automatic watering. In the absence of the owners, watering cans with water immersed in the ground will cope with moistening the plants.


Traps and feeders
Using plastic bottles, you can scare away pests or attract birds to the site. To do this, the tank is used as a feeder, and traps from bottles of chemicals are placed at the roots of fruit trees. From a double plastic container, craftsmen build traps for wasps, where they fly into sweet water and cannot get back.


Equipment of the suburban area
At the dacha "in haste" it is easy to build crafts from plastic bottles in the form of an impromptu washbasin by hanging a full bottle upside down. It is worth unscrewing the lid a little, and a small stream of water will help to wash and wash your hands. It is also worth making a bench and organizing lighting with beautiful owls or gnomes of their plastic. Any garden decor for inspiration - on interesting illustrations.


Multifunctional items for the home
Make an original cosmetic bag from 2 bottoms of plastic bottles, sewing the edges with a zipper. This box can be used as a multifunctional item - a piggy bank, a case for large beads, hairpins or jewelry.
From a similar ball, suspended somewhere nearby, it is convenient to knit, pulling the thread from the ball inserted inside. Nail polish or a lipstick collection is easier to find in a makeshift zipper box.

New Year's decor


Original all seasonal flower beds
The summer season is over, and home-made plastic flowers are replacing the living flower beds, which are not inferior in beauty to real ones. Their advantage is the ability to decorate the territory at any time. These flower gardens pale against the backdrop of living plants, but in early spring and late autumn they are the only ones that attract admiring glances.

For daisies, you will need small plastic containers of white (petals), yellow (middle) and green (leaves). You will also need an awl and a candle (for heating), “liquid nails”, scissors and hard wire in green insulation.
We cut the base of the white bottle to the center, marking 16 segments - these are the petals. We bend the neat edges over the candle flame, we also make 2-3 chamomile corollas, which we connect in the center with an awl. Here the stem with leaves is fixed on the green wire, closing with the middle. We fill the center of the flower with a yellow basket with small cuts from 2 finely dissected circles with a fringe bent over the candle. We supplement the flower with green sepals from the bottom, collect all the parts and fix them together.

From the remaining pieces of green plastic, cut out leaves with a hole at the base (for stringing) and give the desired shape by heating over a candle flame. We fasten leaves on a wire handle, they should slightly bend around it. It remains for chamomile to make a few "companions" and find a decent place for the bouquet.
All seasonal flower beds include mosaic compositions from containers filled with earth. Wall panels are made from covers. "Butterfly" or "ladybug" - in different versions.

Crafts from plastic bottles for the playground
The incredible beauty of a bird with plastic plumage is a whole “field of fairy tales”. This is a peacock or firebird, swans, doves, bullfinches and parrots. All of them are made from empty PET bottles according to the general principle:
- Design an aesthetic bird head with eyes and a beak;
- Build the torso and neck;
- String plastic plumage;
- Provide wings and tail;
- Plant on paws or fix on the selected surface.
Plastic swans can be fenced off with a blue "lake" of inverted plastic bottles. Outlandish birds will decorate the trees in the corner of the garden, which is reserved for children's games. You can choose a themed decor, such as a desert island with palm trees and parrots.


The material is collected for a whole year, but it is easier to involve neighbors and acquaintances in the idea of \u200b\u200b"ecological" cleaning. In the yards there are special containers for plastic - it is much easier to collect.
Preparation for work - removal of labels and glue residues from plastic bottles, it is important to rinse well and discard the deformed material.
If vertical fences are being built, they need to be filled. Depending on the idea, sand, stone chips or dry soil are poured into PET bottles, burying 1/3 with the neck down.
For selected purposes, plastics of different elasticity are used. Heat treatment is required for filigree work (flowers). It is important not to overheat the fragments cut into strips.
Fairy tale characters sometimes require additional painting. For example, pink piglets for a playground are best covered with an aerosol spray, fixed with transparent acrylic paint.
Plastic bottles are an excellent material in capable hands. Using them as a basis, it is easy to teach children a lesson in environmental education and fill the house or yard with practical things. With a creative approach, the color, volume and shape of plastic bottles themselves will prompt new ideas for an exciting creative process.
Tags: ,Interior and exterior items are expensive structures that require people to invest quite a significant amount of money. Therefore, there is often a desire to save money, for which numerous products are made independently. Do-it-yourself furniture made of plastic bottles is considered an excellent solution for giving, which does not require significant investment of money or effort, and at the same time various unique ideas can be realized. With a careful and careful approach, it is guaranteed to get really beautiful designs that fit well into any territory or room.
If you plan to make furniture from plastic bottles with your own hands, a master class of this process is very useful. For this, materials and tools for work are certainly prepared in advance. These include the following items:
- the plastic bottles themselves;
- high density cardboard;
- foam rubber, if you plan to make a soft object;
- fabric for covering the product, and it should be specially designed for the formation of high-quality upholstery of various items;
- scissors and tape.
The number of plastic bottles depends entirely on the size, purpose and other parameters of the future design. Additionally, other tools and materials may be needed during work, as it depends on what exactly is created from the bottles, as well as how the product will be decorated.


Shears and cattle

Plastic bottles


Manufacturing instructions
Crafts from plastic bottles are numerous. To create each design, its own instructions are used, which involve the performance of certain actions. Photos of different products are presented below.
If you carefully understand the features of working with the material, then even do-it-yourself furniture for dolls can be made, which has unsurpassed attractiveness and originality.
pouf
How to make furniture from plastic bottles? This process seems to be quite simple. The following is a step-by-step instruction explaining how to get a full-fledged soft ottoman from bottles:
- an incision is made in the widest part of the bottle;
- the neck of another bottle is inserted into it;
- this process will be carried out until the construction of the optimal height is obtained, suitable for the planned ottoman;
- the resulting sufficiently long workpiece must be well fixed, for which it is tightly and securely wrapped on all sides with adhesive tape;
- several such blanks are made with the same height;
- they are tightly connected to each other with adhesive tape, resulting in a round design that resembles a standard ottoman in appearance;
- further, such a product is sheathed on all sides with foam rubber to get a really soft ottoman, which is comfortable for constant use;
- the made structure is sheathed with any upholstery fabric so that it is attractive and fits well into a certain interior.
Thus, a comfortable ottoman with optimal dimensions is obtained from plastic bottles. It can be sheathed with different types of fabric, so a material is selected that is perfectly suited to the tastes of future users. Photos of different types of ottomans are presented below. If doll furniture is being made, then it is advisable to purchase small bottles, and you will also have to act more painstakingly, since many small elements will have to be cut out of the elements.

We cut the bottle

We connect with adhesive tape

We sheathe with foam rubber

Creating upholstery
A shelf
For beginner craftsmen who do not have experience with bottles, creating a simple shelf is a great solution. You can arrange such shelves not only in the country in the open air, but even in residential premises. They are considered relevant for use in the pantry or even in the children's room. The resulting shelves are fixed to the wall of the room, so they do not take up much space in the room, but at the same time they can be used to store various items.
The whole process of creating a shelf is divided into stages:
- the optimal shape and size for the future shelf is determined;
- bottles are cut off in the part where there is a neck, and these elements are not needed for subsequent work;
- the elements are covered with acrylic paints so that the resulting design has an attractive appearance;
- after they dry, they are connected to each other, after which they are covered with various decorative elements;
- correctly made shelves are fixed to the wall with self-tapping screws or other suitable fasteners.
Shelves can be made using plywood, to which blanks are fixed, and this design will be the most reliable.

We cut the bottles

We cover with paint

We connect the bottles

Attach it to the wall
Sofa
An interesting solution for any garden plot or cottage would be a sofa made from plastic bottles. For this, the following steps are performed:
- two-liter bottles are purchased, and their number cannot be less than 500, since a smaller number is not enough to get the sofa that is optimal in size;
- standard tape is used as fasteners, but it must be wide enough;
- bottles are not very strong elements, therefore, under the influence of a significant load, they are easily crushed, so you definitely need to make a strong and rigid base for furniture;
- the upper part is cut off from each bottle, after which it is inserted with the neck down into the lower element;
- the next bottle is inserted into the resulting base, hiding behind the previously cut off bottom;
- then bottles of 2 elements are connected in the same way, after which they are securely and firmly wrapped with tape;
- from the made modules, a direct structure is formed, and about 17 modules are usually needed for sitting;
- the seat is assembled from these elements, then the back, and then the armrests;
- all received parts of the future sofa are connected to each other with adhesive tape.
In the process, you will need a large amount of adhesive tape, so it is recommended to purchase a lot of this material in advance.

We cut the bottles


Connecting all elements
Stool
The easiest to create is considered a small stool. It can have different unusual forms, therefore it is often intended for children. The process of its creation is divided into stages:
- approximately 10 two-liter bottles are prepared;
- they are tightly rewound with adhesive tape;
- separate sections are made of 3 or 4 bottles, which are tied to the main structure in different ways and from different sides;
- it is important to use a large amount of adhesive tape in order to obtain a reliable and deformation-resistant structure;
- to increase stability, it is allowed to fill the bottles with water or sand;
- the seat is cut out of plywood, screwed or nailed to bottle caps.
decoration
You can decorate finished designs in different ways, but the most popular are:
- fastening soft elements to ottomans, sofas or stools, for which foam rubber, synthetic winterizer or other stuffing materials are used;
- different types of fabrics and even leather can be used for sheathing, and a ready-made cover can also be purchased;
- the design can be pasted over with photographs, various decorative films or other attractive materials.
Thus, furniture made from plastic bottles is quite interesting and unusual designs. They can be presented in different forms, and at the same time they are easily created by hand. With proper decoration, they have an attractive appearance. They are considered optimal for outdoor use in a summer cottage.
Plastic bottles are an excellent material for creativity and a handy tool for solving many problems. Whatever they do. And a variety of boxes, scoops, buckets, and brooches, and curtains. They are laid instead of pipes in dachas, flower beds are decorated with them, etc. My son and I decided to make an armchair, since, as it seemed to us, there was clearly not enough such furniture in the setting of our apartment. We now understand that we got a little excited, not taking into account the modest dimensions of our room, but five months ago we began to collect plastic bottles with enthusiasm.
As we accumulated, we cut them accordingly and put them into “blocks” of two. It looked like this: they cut off the neck of one bottle and, turning it over, installed it in the lower part. Then the second bottle was sent neck to neck.
As a result, such blanks of the future chair were obtained, which are much more compact and more convenient to store than the bottles themselves.

In total, our chair took something like ninety two-liter plastic bottles. Along the way, we stocked up on tape and stretch film.

When there were enough blocks, we started assembling. It will not be possible to visually demonstrate this process, since at the time of writing the material the chair was already assembled, but I will try to simply tell. Moreover, there is nothing complicated about this, and your imagination can tell you completely different, more interesting forms.
For the harness, we first prepared larger blocks based on the existing ones, tightly wrapping each four of the sixteen “bottles” with tape. Then, with the same adhesive tape, the resulting four enlarged blocks were combined into one.
Next came the turn of the "sidewalls" and the back. They are made of the same individual modules, only higher - not from two, but from three and five bottles. The extension scheme is quite simple. We cut off the bottom from the top bottle, set it inside, as we did with the neck before. After that, again, put the next bottle down with the neck. Etc…
By the way, testing the seat for strength, we found that the blocks inside diverge. It was this moment that gave us the idea of stretch film. However, I think that in this case it was possible to get by with adhesive tape. But we had a film, and therefore we swaddled the base blocks with it.
We carefully taped the finished sidewalls and the back with tape to the seat and, not resisting the temptation, completely tightened the resulting structure with a stretch film. And here's what we got in the end.

This is, so to speak, the basis. The chair, of course, is harsh and needs to be improved. It can be "beaten" and sew a cover on it. My chair is still covered with a blanket and is waiting to move to the country, but my son and I are thinking about a bar counter made of plastic bottles in the kitchen. And what? It might very well be ;)

Sulatskaya Irina
In a big cheerful company there are never extra chairs. Therefore, hospitable hosts often think about how to make new inexpensive sofas, poufs, stools or chairs.
The idea of recycling plastic bottles is useful from every point of view. First, plastic is a durable material that decomposes over several hundred years, and therefore pollutes the environment. And secondly, it is lightweight and durable, ideal for creating furniture frames of almost any size and shape. For furniture made of plastic raw materials, there is a place in the country house and on a large loggia, on the beach or on the playground.
To learn how to create such products, you only need to understand the main idea - how to turn a container with a lid into a solid and elastic material. Each craftsman offers his own original way:
- For example, you can leave open bottles in the cold overnight, and in the morning close the containers with lids and place in a warm place. After such thermal hardening, the material becomes more durable; products made from it retain this property for a long time.
- In another case, it is recommended to use entire blocks in the work. To do this, one bottle is tightly closed with a lid. At the other, they cut off about a third or a quarter in the upper part. The remaining bottom is put on the first container from the side of the lid. The location of the cut is wrapped with tape. Thus, the material will not only be strong, but will acquire good cushioning properties.
Comfortable plastic seat
Do not throw away plastic containers from sweet water, beer, and other drinks. Rinse them gently and store them in a closet or garage. We advise you to make a chair from plastic bottles with your own hands.

For its manufacture you will need
- from 200 to 250 empty two-liter containers, preferably one shape;
- wide tape;
- stationery knife or scissors.
Description of work
- In the design, we will use both whole bottles (A) and cut ones (B, C, D, E). We will need the cut parts to make strong building blocks. Take a look at the image below.
- Now you should place part C in bowl B.
- Insert the closed whole bottle A with the bottom part into the part from B and C
- Now put the bottom of the bottle D on the structure from the side of the cap. We have received a sample block, copies of which will be used to make the seat of our chair. In total, 16 such elements should be made.

- Connect, tightly wrapped with tape, 2 such parts.
Attention! When forming large and small blocks, place the elements on a hard, flat surface. Fasten the parts tightly. Then your design will be stable and strong.
- Next, connect two by two.
- Then four and four.
- The entire seat is a block of 16 bottles.
- Proceed to the formation of the back of the remaining material. Place the three parts C + B inside each other on a block similar to those used for the seat. You will get a high tubular part. You will need two in total.
- Now make 2 taller parts. They will become the extreme elements of the back of the chair.
- Install in the same plane: two low parts in the middle, high ones on the sides. To ensure the backrest is secure, fasten the block with tape at three levels.
- Connect the back and seat together. Fasten the parts with three strips of adhesive tape.
The chair is ready. You can use the product in this form or sew a soft fabric cover with a plywood base and dense foam rubber on the seat. And then no one will guess that you made this soft and beautiful chair yourself.
Pouffe from plastic bottles
A pouffe is the simplest piece of furniture that can be quickly made from plastic containers. It can be large and small, square or round - it all depends on how to connect the containers, how many of them to use. A good stable pouffe is easy to turn into a table, footrest. And a little imagination and creativity will make your pouffe a unique eye-catching touch in the interior.

Materials and tools
For a medium size pouf you will need
- 16 two-liter plastic containers.
- Scissors or utility knife.
- A skein of wide tape.
- Some double sided tape.
- Thick cardboard or a piece of thin plywood.
- Jigsaw (if you use plywood).
- Decorative textiles for the cover.
- Joiner's glue or PVA.
- Technical textiles.
- Thick foam.
- Needle, thread.
- Roulette.
- Sewing machine.
detailed instructions
- Prepare the bottles for work: rinse them, dry them, close the caps tightly.
- Form a circle from the containers. Start with the first, then add one at a time, tightly fixing everything in turn with tape. Perform assembly on a level surface (table or floor).
- Measure the diameter of the resulting structure with a tape measure. Cut out 2 circles of foam rubber and 2 of plywood of the same size.
- Attach plywood circles to the top and bottom of the structure using double-sided tape.
- Glue the foam circles on top of the plywood, applying glue to them in strips.
- Measure the height of the bottles. Add another 2-3 cm and cut a strip of foam rubber. Wrap the design with this piece. Sew the ends by hand.
Furniture made from plastic bottles is increasingly being installed in garden houses and cottages. Many people are happy to place non-standard models in city apartments: in children's rooms, on loggias and even in living rooms made in the style of extravagant Art Nouveau. The demand for such furniture is determined by the low cost and ease of manufacture, for example, an armchair from plastic bottles with your own hands can be built in one evening. The functionality of the product will not differ from that purchased in the store. And if its appearance seems too unsightly, you can always cover the chair with a beautiful cover or upholstery.
The manufacture of furniture from bottles should begin with the definition of a suitable design. The chair can be built similar to the classic model with armrests and backrest, in the form of a rocking chair, or you can choose an original shape for it. The first option is the most popular, since it is easiest to make such furniture. Depending on the desired dimensions, you may need from 90 to 250 empty bottles to work.
At the initial stage, it is useful to draw up a small project, sketch out a schematic drawing, it should take into account the amount of free space that can be used for furniture, as well as the types of structures that will be conveniently placed here.
Enterprising craftsmen have come up with several ways to make chairs from plastic bottles. You can build a product from vertically installed elements - with proper execution, such a model looks quite respectable. You can also combine plastic containers with wood or wire, upholstered with foam rubber and covered with fabric. Combined options are well suited for high-tech interiors. Soft types of furniture will appeal to lovers of comfort and coziness.


Materials and tools
Making an ordinary chair is a long and laborious process, in addition, it is costly in finance. You need to cut parts out of wood or plywood and assemble them, which requires at least a jigsaw, wood glue, nails, a hammer, self-tapping screws, screws. To make a simple chair out of plastic containers on your own, you will need to stock up on a minimum amount of necessary materials, most of which are literally at hand:
- directly bottles of the same color, design and size (from 90 to 200 pieces, depending on the desired dimensions of the finished product);
- strong adhesive tape, food or stretch film;
- knife and scissors;
- fabric for creating covers;
- foam rubber for softness;
- sheets of cardboard and wire for the frame (if necessary).
All of the above materials and tools are designed to make a simple chair. Depending on the design of the intended product, a variety of additional elements may be required. For example, to make the body of a rocking chair, you will need parts cut from chipboard or fiberboard.


Manufacturing steps
Having decided on the desired type of furniture, you can proceed to its manufacture. It is necessary to calculate in advance the required number of bottles and prepare them. Some fans of the secondary use of things collect the main material gradually. After waiting for a certain amount of empty containers to be collected, they combine the bottles into a block. The resulting modules are stored in a suitable place - a garage, a closet, a basement. After a sufficient number of plastic bottles have been collected, they proceed to the formation of the furniture itself.
Creation of a drawing and preparatory work
When preparing a drawing, it is desirable to estimate as accurately as possible the place that the manufactured piece of furniture will occupy. So it will be possible to correctly determine the height of the chair and its width, the depth of the seat, the dimensions of the armrests. Then compare the obtained dimensions with the dimensions of the materials available. In this case, it is necessary to take into account the thickness of the auxiliary elements - adhesive tape, film, covers. After creating a plastic frame, the structure is supplemented with soft foam rubber, the seat is stiffened by using plywood or chipboard, the furniture is decorated with fabric, although this does not significantly affect the occupied area.
To make a chair, you will need to create several sketches that depict the desired piece of furniture in scale from different angles. The drawing can be done schematically. Having previously indicated the length, width, height of all elements and applying these parameters to the drawings, you can calculate how much material is needed to bring the idea to life. In the manufacture of the chair, you need to periodically (after creating each individual element) check with the drawing.
In preparation for work, all plastic must be washed, cleaned of stickers and dried naturally.

Making blocks from bottles
Once all the necessary materials for the manufacture of the chair have been collected, the preparatory work has been completed, you can proceed to the first stage. To make blocks, from which the frame is then made, you will need several bottles and scotch tape. Step by step, the whole procedure looks like this:
- Two-thirds of all plastic bottles need to be cut in half. The part on which there is a neck is directed with the lid down and inserted into the other half with a bottom. Then a whole bottle is installed in the resulting design, on the top of which it is necessary to put on the lower part of another cut container. The neck of the second bottle goes to waste. The result is a rather rigid plastic element resembling a loaf.
- Having made a sufficient (according to calculations) number of such blanks, they should be connected into a single module using adhesive tape. For better stability, all bottles should be placed neck down.
- It is necessary to wrap the structure with an adhesive film as tightly as possible. So it will be possible to obtain an element that is not deformed during subsequent operation.
At the end of the work, several finished blocks should be obtained: a base, two armrests, a backrest. At this stage, it is necessary to measure all parts of the future chair and check with the parameters reflected in the drawing. In the event that some parts are smaller or larger in size, the block structure is unwound, adjustments are made, and everything is assembled again.

Cut off the neck of the bottle

Connect the whole bottle and the cut off part, fasten with tape

Connect the prepared elements with tape

For the base you need 4 blocks of 6 elements
Assembly
You need to start assembling a chair from bottles by installing blocks in the form of a rectangle or square on the floor. Referring to the diagram, it is necessary to fasten them with a wire. Thus, the foundation of the future product will be obtained. On top of it, the same blocks should be laid, but they must be placed across. If you need to assemble in several rows, you can fold the elements in a checkerboard pattern. Next, you need to raise the rows to the height at which the seat is supposed to be made.
At the corners of the base, it is recommended to install “risers” one or two bottles high to give the structure strength. They are formed from rounded blocks with a thickness of 10–12 elements. To fasten all modules, adhesive tape or cling film is used. The same round blocks are used to decorate the armrests. The back is created last - it can be made round or square, as desired.

Glue blocks with two elements to the base

Starting from level 4-5, add only backrest and armrest blocks

Ready product
Upholstery and soft seat
For upholstery of a chair made of plastic bottles, foam rubber is required, which, if necessary, can be folded into several layers. On the seat, you can make an additional pillow like those chairs that are sold in stores. The same can be done for the back of the product.
On top of the foam pads, the chair is covered with a suitable fabric. If there is no time to create a full-fledged cover, you can simply throw a blanket over the product. If you have the opportunity and desire, furniture can be decorated with flock, nubuck, chintz, artificial leather, jacquard. If the product is intended for a summer house or a garage, you should not use expensive materials - the cover can be sewn, for example, from old blankets. But at this stage, every master who assembles a chair from plastic bottles with his own hands is free to give a flight of fancy.

Make a cover and put foam
What else can be made from bottles
From plastic containers you can design a lot of useful and interesting things. They are great not only for the manufacture of various furniture. New master classes and technologies for creating handicrafts, interior elements (vases, curtains, coasters, caskets) and products for summer cottages and country houses are constantly appearing: bird feeders, drains, flower beds, garden figurines, lampshades, watering devices, washbasins.
In the household, plastic bottles are also used to create greenhouses and country greenhouses. Small-sized summer buildings can be built by first collecting the right amount of material. Experienced craftsmen can even make a boat that will be no worse than an inflatable rubber or wooden one.
Furniture made from plastic containers is cheap, convenient and lightweight, it can be moved from one place to another without any problems. She is not afraid of heat, cold, or rain. That is why there are more and more new product options: shelves, cabinets, cabinets, pouffes, chairs, stools, tables, sofas, beds.


original stool
You can make a comfortable stool from bottles that will appeal to both adults and children. The creation process is understandable for beginners. To work, you need the same plastic bottles with a volume of 2 liters (they will need 5-7 pieces), adhesive tape or film, plywood or thick cardboard, universal glue. If you want to make the stool more stable, you must first pour water into the containers or pour sand into them. The creation of the original product is carried out according to a step-by-step algorithm:
- The prepared elements are placed on the floor with their neck up so that the result is a round block.
- The entire bundle is fixed with tape or film.
- A round or square seat is cut out of plywood or a piece of thick cardboard along the width of the resulting stool leg and attached to the bottles with glue.
If the seat turned out to be hard, it can be covered with foam rubber. The finished design is decorated with fabric, self-adhesive wallpaper, plain white paper. When using the latter option, it is worth allowing the child to paint the stool with funny faces or some other figures.

Connect plastic bottles with tape

Cut two circles out of plywood

Fasten with screws to the bottles

Wrap the structure with synthetic winterizer

Add soft filler for the seat

Cut out the details for the cover

stitch

Fix on a stool
Comfortable chair with back
To make a chair out of plastic bottles, you need to act in much the same way as in the manufacture of a chair. From three containers - a whole and two cut ones - you need to collect 16 blanks. Then connect them into blocks, fastening together first 2 bottles, then 4 each. So until all 16 elements form a single module.
Then the back is formed. It is better to make it two bottles thick, the length is at the discretion of the master. Each row is fastened with adhesive tape, the latter for beauty can be lined up in one container. The plastic back is attached to the seat.
You should not save adhesive tape: the more it is, the more reliable the design.

Table made of plastic bottles
If you want to furnish the entire cottage with plastic furniture, the next product after the armchair, stool and chair can be a table. For him, you will need bottles of 1.5 liters, the same in shape and color. For the countertop, you need to prepare a piece of plywood or use a ready-made version left over from old furniture. From the prepared plastic elements, you need to assemble a block of the required thickness, give it the shape of a circle, rectangle or square.
Next, the cover must be turned over and mark the points at which it will be attached to the screws. It is better to arrange them in a circle - the countertop will be located, as it were, on a plastic palisade. Fasteners along the length should be selected so that their sharp ends do not peek out from under the table top. Or screw them on the front side, and then close the hats with putty. Paint or decorate the work surface with wallpaper.
Bottles are glued in pairs with bottoms. The top part in a pair will be without a cover, the bottom part will be closed. Then each of the legs is screwed into a lid fixed to the tabletop. To strengthen the structure, you can tie the necks of the upper and lower elements with wire. The plastic table is ready.

Prepare a wooden tabletop, glue corks, screw in bottles
Video