How to stick non-woven wallpaper. How to glue wide non-woven wallpaper: meter-long canvases. The gluing process

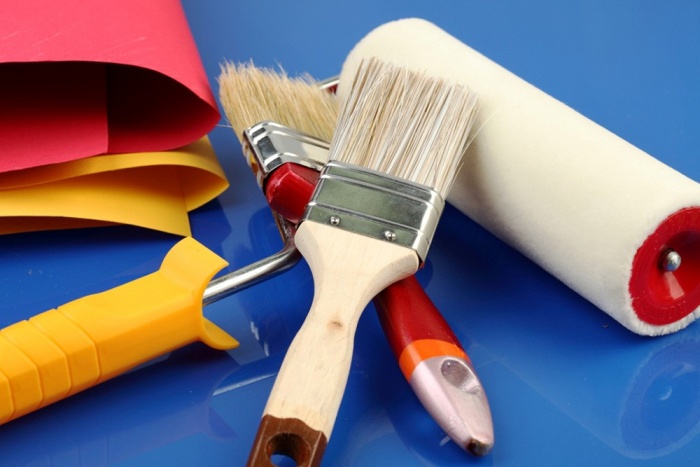
Sticking tools:
- Roller with long pile;
- Roulette in 5 m;
- Pencil;
- Foam sponge;


- Wallpaper is light and papery.


- Tuck sleeves into gloves;
- Protect the floor from water.


Happy repair!

Non-woven wallpaper consists of cellulose fibers and a polymeric binder. Non-woven wallpaper is considered a universal coating, both externally and qualitatively, they will appeal to the average buyer. True, he may immediately have questions, but will it not be difficult to stick non-woven wallpaper, can you do it yourself, is it easier to glue meter or standard wallpapers? And how to prepare the surface of the walls for gluing?
How to glue non-woven wallpaper: important points
A big plus is that the interlining for the walls does not need special care. If it is for painting, then dispersion and acrylic dyes will look great on it. Most of these wallpapers are not afraid of moisture, so you can wash with soapy water.
As for the preparation of the walls before work, it is very important that the entire surface is of uniform color and, if possible, that its color does not contrast with the color of the wallpaper.

If you glue non-woven wallpaper correctly, they will look like a continuous coating and the seams will be invisible
Some important points in gluing non-woven wallpaper:
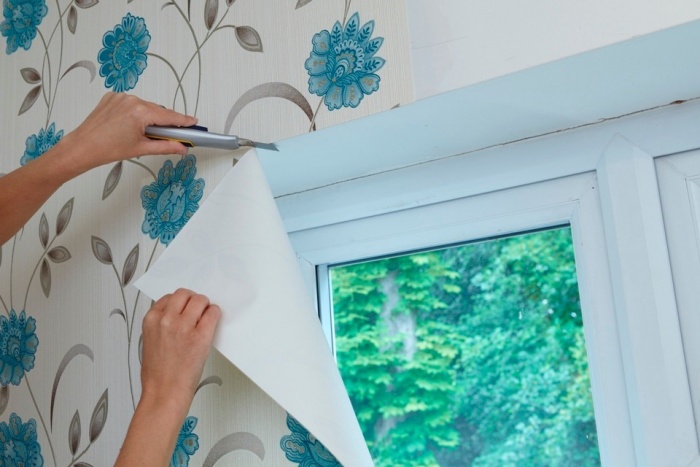
- Good non-woven wallpaper has a high-quality edge, which allows you to glue these wallpapers end-to-end. And the neighboring canvases will look like a continuous coating, and the seam, one might say, will not be visible.
- Wallpaper is prepared only after checking them for marriage. Follow this rule at all times: first inspect the entire unfolded roll, and only then cut.
After that, prepare the tools for gluing.
Non-woven wallpaper: how to choose (video)
Tools for sticking non-woven wallpaper
Everyone who glues wallpaper himself, with his own hands, has his own list of necessary tools. But if you are doing this for the first time, or are unhappy with past experience, you can use the following universal list.
Sticking tools:
- Building level (if there is a laser - ideal);
- Roller with long pile;
- Roulette in 5 m;
- Plastic spatula for rolling wallpaper;
- Sharp knife for cutting wallpaper
- Narrow spatula (metal);
- Pencil;
- Foam sponge;
- A bucket for glue and a bucket for water.

Basic tools for comfortable gluing non-woven wallpaper
Perhaps some additional tools may be needed to prepare the walls. Wide wallpapers are glued using the same tools.
How to glue non-woven wallpaper
Non-woven wallpaper is remarkable in that it can be glued to virtually any surface - plaster, wood, drywall, chipboard, paper, concrete. Be sure to clean the surface of the walls from the previous coating, if the wall is painted - the paint must also be removed. If there are good reasons not to remove the paint, at least sand the painted wall so that the wallpaper adheres to the surface more easily.
Is it possible to glue non-woven wallpaper on old wallpaper
Theoretically, this is possible, but there are some nuances.
How to glue non-woven wallpaper on the past wallpaper:
- The former coating should be papery and thin;
- Old wallpaper should be firmly attached to the surface of the walls;
- Old wallpaper cannot be significantly darker than new.

It is worth warning that the risks of defects in this case are high. For example, bubbles may appear under the wallpaper, or the wallpaper may begin to delaminate. It is believed that the period of use of a new coating from such gluing is reduced.
Do I need to glue non-woven wallpaper with glue
It happens that during the repair a person is overcome by doubts, and he still smears both the strip and the wall. If, as it happens, you have already smeared the strip, then you do not need to apply glue to the wall. Just wipe it with a cloth at the joints.

It is not necessary to apply glue directly to the wallpaper, this is written both on the label and on the wallpaper paste. Glue is applied only to the wall
But it is easier to apply on the wall, and then glue the prepared strip. Mistakenly, many smear the entire surface of the walls, but you only need the area of \u200b\u200bthe nearest work. If the wallpaper is meter long, this zone increases.
Is it possible to glue non-woven wallpaper on non-woven wallpaper

Gluing non-woven wallpaper over other non-woven wallpaper is highly discouraged. The risk that the wallpaper will fall off is great
With a spiked roller, go over the surface so that as many holes as possible form on the old wallpaper, then the hitch with the new ones will be better.
Do I need to prime the walls before sticking non-woven wallpaper
Priming, of course, is always worth it, no matter what wallpaper you glue. And already non-woven wallpaper definitely needs to be glued to a primed wall.
A primer is not needed only if:
- If the repair is temporary, and the wallpaper, in principle, is not intended for a long service;
- Wallpaper is light and papery.

If the surface on which the wallpaper will be glued has a defect, then it must be primed
What is wall primer for? It's simple - it increases the adhesion (that is, adhesion) of materials, they will better stick to the base.
Is it possible to glue non-woven wallpaper on a concrete wall
Just like that, glue on concrete, of course, is not necessary. First, level the surface with your own hands, putty and primer.
How to prime a concrete wall:
- Take a liquid adhesive solution. In the first layer, apply the adhesive evenly, and in the second layer, the adhesive solution should be thicker.
- Double coating will increase adhesion, which guarantees successful wallpapering.

Without a primer, you can still relatively successfully cope with paper wallpaper, but you need to glue heavy non-woven wallpaper with a preliminary primer.
Is it possible to glue non-woven wallpaper with an overlap
If with your own hands you have not previously glued in this way, you can use the technique of the masters. They glue the non-woven wallpaper with an overlap, and then, as the glue is absorbed, they cut the line with a clerical knife along the level so that the excess tape is removed from the adjacent wallpaper.

The technology of pasting "overlap" is a method of pasting wallpaper, when the uncut edge of the canvas is covered with the next piece of wallpaper
It turns out that the joint will come out perfect, exactly in the middle of the "overlap". But, nevertheless, it’s quite difficult to glue like that, so the best way is end-to-end.
How to glue non-woven wallpaper on drywall
Somehow this sticker will not be radically different. But there are features that are worth considering.
How to glue non-woven wallpaper on a plasterboard wall:
- On one wall, draw a vertical marking, and glue from there;
- When gluing the first canvas on drywall, adjust the height;
- Turn the second side of the non-woven wallpaper at an angle;
- If the wallpaper protrudes slightly above the plasterboard wall, they can then be trimmed.

You need to smooth the wallpaper on drywall without delay, completely expelling air bubbles from under them.
Cut off excess wallpaper with a sharp knife, and a flat spatula applied to the wall will be a guide for cutting.
The technology of pasting walls with non-woven wallpaper
After the wall is primed, the vertical markings are done, you can start gluing with your own hands.
Pasting non-woven wallpaper in steps:
- Mix the wallpaper paste and apply it with a roller to the wall section;
- Bring the cut canvas to the wall, you need to start pasting either from the window or from the corner;
- You can smooth the canvas with a plastic spatula;
- If vertical lines are drawn on the wall, the work will go faster;
- Cut off the excess at the floor with a sharp knife.

When pasting walls with non-woven wallpaper, the canvas must be smoothed with a special plastic roller or spatula
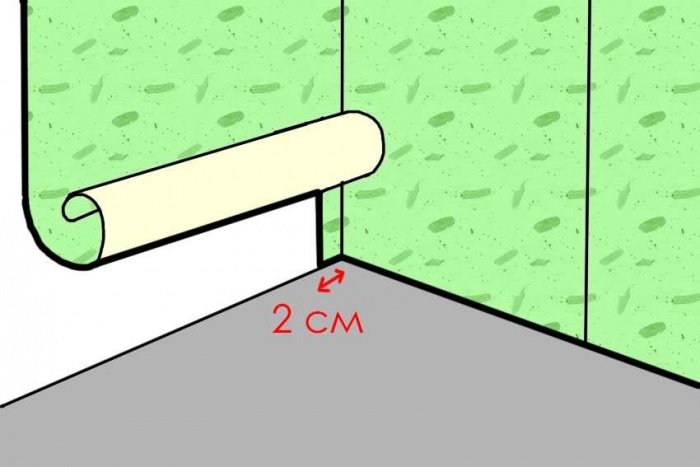
It’s good if the wallpaper goes 1 or 2 cm onto the plinth, which is first removed, and put in place after pasting.
In order for the surface of the corners to be even, even in the process of puttying, you need to decorate the corners with plastic corners. If the surface of the corners is uneven, it is there that the wallpaper will begin to flake off first.
How to glue non-woven wallpaper (video)
Features of gluing non-woven wallpaper
Even if in each instruction it is clearly written several times how to glue, with what glue, and in what sequence, people often decide to “amateur”.
However: always level and prime the wall. Always mark up and cut the canvases in advance. Always use special glue without experimenting with composing it.
Is it possible to glue paper wallpaper with non-woven glue
If there is glue from a previous repair, or for some reason you decided to glue not non-woven, but paper wallpaper, then you can use non-woven glue.

Glue for non-woven wallpaper can also be used when gluing other types of wallpaper, but you need to dilute such glue with plenty of water
The only thing is that paper wallpapers are thinner in structure, so the glue for them should be lighter. In this case, when mixing non-woven adhesive, more water must be poured so that it is not so heavy.
Is it possible to stick wallpaper on non-woven wallpaper
You will need to remove old non-woven wallpaper, whether it be standard or wide meter. And you can remove them if you go through the wallpaper with a spiked roller, and then moisten.

Non-woven wallpaper is well removed by a steam generator, if you have one, this method will be the fastest
If you decide to use a steam generator, be sure to:
- Put on gloves (rubber);
- Tuck sleeves into gloves;
- Protect the floor from water.
If the old wallpaper is not removed, then fresh glue will begin to soak into the pores of the old wallpaper, softening the old layer of glue, which may cause bubbles.
Why do non-woven wallpaper peel off
There are several reasons that affect poor-quality wallpapering.
Why does non-woven wallpaper peel off:
- Poor wall preparation. Even if there are small holes in the wall, the wallpaper may peel off. All defects must be removed, the wall leveled and primed.
- Use of unsuitable materials. Wrong glue - and already all the work can stand up.
- Wrong sticker. Glue only the wall, and only that part of the wall that will have to be glued in the near future. Glue butt.

Non-woven wallpaper can peel off if the surface on which they are pasted was poorly prepared
Also, do not resort to forced drying, then the wallpaper will definitely peel off. Sometimes this method is used if wide meter-long wallpapers are glued. But even such meter-long wallpapers are glued according to the same principle, and they are also afraid of forced drying.
Bubbles on non-woven wallpaper after gluing
How to glue non-woven wallpaper to prevent bubbles? They appear, as mentioned above, due to insufficient preparation of the wall.

You can carefully correct the deformation after gluing non-woven wallpaper with glue and a clerical knife
To eliminate bubbles, you need:
- Make an incision on the bubble with a sharp clerical knife;
- After that, try to gently straighten the wallpaper, draw glue into the syringe and squeeze it through the incision into the wallpaper;
- Spread the wallpaper fragment well, and press it against the wall with a clean cloth.
Wide meter wallpapers can also be with bubbles after gluing, do not undertake to glue them alone, the risk of bubbles and peeling will be high.
How to glue non-woven wallpaper (video)
If you understand how to properly glue non-woven wallpaper, the process itself will not be difficult. After a good primer and proper marking, the strips will stick easily, and the process will not be delayed. Quality materials and good wall preparation will ensure a good result.
Happy repair!
Wall decoration is the main stage in cosmetic repairs. Walls can be finished in different ways: whitewashing, painting, gluing. The most popular in our time is wallpapering. Many are faced with such a problem, which wallpaper to choose and how to glue them correctly.
We will talk about the most popular type - non-woven wallpaper. They have a thickened structure and perfectly mask small wall defects. That is why under this type of wallpaper you do not need to carefully prepare the walls. Enough light preparatory work. How to do this and how to glue non-woven wallpaper, we will tell below.
Wall preparation
 This type of wallpaper is ideally glued to:
- paper.
- Drywall.
- Plaster.
- Wood.
- Concrete.
It is worth noting: the color of the walls for gluing paintings should be uniform. It should be combined with the color of the painted wallpaper. This is necessary so that a different color does not show through the sheets.
The first step is to clean the walls of the old surface: paint, whitewash, wallpaper. The old surface can be removed with help. After that, the surface must be treated with a primer.
Wallpapers of this type have smooth and high-quality edges. This is what allows you to glue the sheets end-to-end. In this case, the canvas looks like one piece, no seams are visible.
It is best to glue wallpaper from the corner. In order to properly stick the canvas, it is necessary to mark the wall. You will need a level and a pencil. It is necessary to draw a vertical line from the corner of the room at a distance of 1 meter.
When gluing sheets, you need h strictly follow this line.
How to glue
 After the walls are prepared and the wall markings are made, you can start gluing. It is best to start work during the day. At this time, you will not need light. Therefore, you can turn off all the lights and calmly do the work. This will prevent the possibility of electric shock.
Close all windows before starting work. The room should be warm and dry, without drafts. The acceptable temperature for work is + 20-22 degrees. Non-woven wallpaper gluing technology:
- First of all, evenly apply glue to the wall. You can use a roller for this. Try to make the strip wider than the canvas itself. You don't need to make leaks. Sheets can collect in this place, and straightening them is a big problem.
- After applying the adhesive to the wall, leave it for a few minutes. This will evaporate excess moisture. Large relief on the sheet must be smoothed out with a roller, while not pressing it strongly against the wall.
- Gluing the canvas should start either from the corner of the room, or from the window. The first sheet is placed clearly vertically. If the first sheet is glued unevenly, then subsequent sheets will be very difficult to fit. That is why it is necessary make a preliminary markup.
- For a quick setting of the canvas with the wall, it is necessary to smooth the sheet with a spatula. Try to smooth the canvas towards the non-pasted part of the wall. In this case, excess glue will flow to this side.
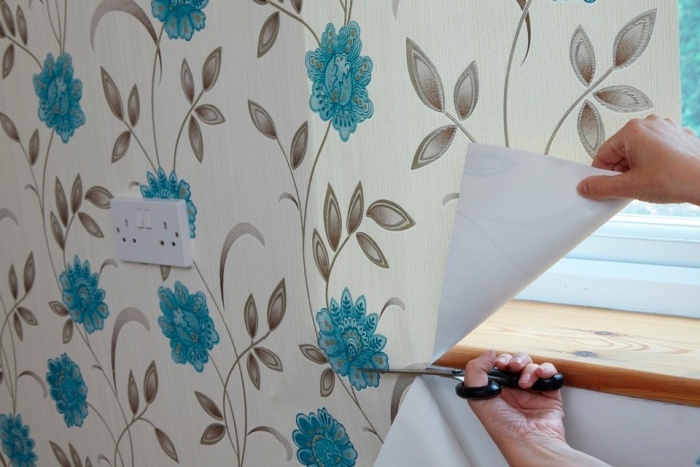
- The excess is cut off. First cut off the bottom of the sheet, and then the top. To get an idea of how much to trim, consider how far the skirting board can cover.
- After that, you can glue the second sheet. Make sure that the drawings on the canvases match. It is not necessary to glue this type of wallpaper with an overlap. It will look ugly. If the walls are not even and you are unable to stick the canvas evenly, then it is best to leave a small gap between the sheets. The joints of the wallpaper must be wiped from the remnants of glue. Otherwise, after drying, an unwanted shine will remain.
- The most difficult step in gluing is gluing the corners. It is in this part of the room that the canvases are most often peeled off. That is why before gluing it is necessary to grease the corner well with glue.
- You do not need to immediately glue the whole sheet. To begin with, we cut it so that its edge goes out to another wall by 2–3 cm.
- The second strip is glued close to the corner. In this case, a slight overlap is obtained.
 The procedure for gluing canvas on the ceiling is no different from gluing wallpaper on the walls. But there are some nuances:
- Meter canvases are best glued parallel to a short wall.
- The first sheet is glued on that side of the ceiling, which is opposite the exit.
- You need to glue the canvases parallel to the rays that come from the window.
- The wallpaper must be cut in advance, and then completely raised to the ceiling.
- It is impossible to glue the ceiling with meter-long canvases on your own.
- If you work with two or three people, you can paste over the room in a day.
To cope with such repairs is really do-it-yourself. The main thing is to properly prepare the ceiling and glue the sheets.
 The procedure for gluing wide is not fundamentally different. The walls are also being prepared. For gluing walls with such canvases, you must:
- Choose any corner of the room. Step back from it in both directions 100 cm, draw vertical lines.
- Now you need to dilute the glue. How to do it will indicated on the packaging. You need to put the required amount of glue in the dishes and dilute with water. After that, you need to stir the mixture.
- Lubricate the walls with glue. That is, the place on which the first canvas will be glued. You can go beyond the markup. Glue is applied only to the walls, glue is not applied to the wallpaper.
- We take the first roll and apply it closer to the ceiling, apply the side side exactly according to the markup. Smooth out the fabric carefully. When wrinkles appear smooth them out with a spatula At once.
- Cut off the excess with a knife.
- Glue the second sheet in the same way.
- Now you need to form a corner. Place the spatula vertically in the upper part of the corner. Now you need to make a cut a few centimeters from the top edge. Now you need to make a cut along the entire length of the wallpaper to the floor. The top of the sheet will fall off on its own. But the lower cut off part will have to be pulled out independently.
- The edges of the wallpaper need push hard into the corner. If a gap appears, you need to stretch the wallpaper with a spatula.
- Excess adhesive should be wiped off with a clean cloth.
- After the corner is formed, you can start wallpapering the rest of the room. You can choose any direction for further pasting. Lubricate the wall, apply the sheet, smooth it. It is allowed to leave a small gap of 1 mm. Surplus sheet needed cut.
- If the walls are crooked, then you can glue the wallpaper overlap. After the glue has dried, it is necessary to make a cut along the entire length. To do this, use a spatula, a sharp knife, a level. In this case, the bottom panel should not fall under the knife. Such work requires great skill.
- After that, you can paste over all the walls in the same way.
If excess glue appears, they must be removed. No need to be afraid to wipe the wallpaper with a damp cloth. This type of wallpaper allows you to do just that.
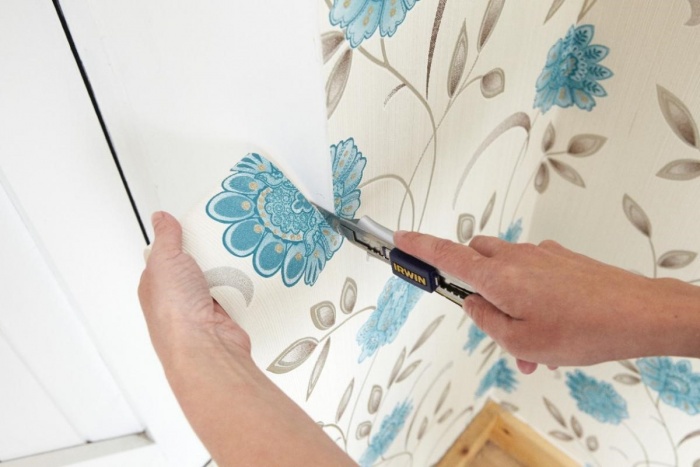
Sticking wallpaper with your own hands in the window and doorway
Often occur fabric adhesive problems if there is a window or door. Consider the work procedure in this case:
- We glue the sheet in the usual way and make a joint.
- You need to find the opening angle. After that, you can have two options: cut off the excess along the edge of the opening or bend it at an angle. If you choose the second option, then you need to stretch the sheet at the corner. There should be no wrinkles. In the first option, you need to cut off the excess. To do this, use a level to cut straight. This job is best done after the glue has dried.
- This is where the work ends. You can leave everything as it is or paint the wallpaper.
How to glue non-woven wallpaper video.
Another original solution for cosmetic repairs is photo wallpaper. In order to glue them you need to buy a special glue. The wall also needs to be marked. The markup starts from the window. How to paste photo wallpaper:
- There are white stripes along the edges of the photo wallpaper. They need to be coated with glue.
- Now we apply the canvas to the wall and smooth it with a rag.
In this case, you must work very carefully so as not to damage the canvas. When wet, the canvas is very fragile and can tear.
So, we looked at how to glue non-woven wallpaper. They can be wide or narrow. Mostly they are long. This type of canvas does not need to be lubricated with glue. It is enough to apply glue to the walls, and then attach the canvas. Wallpaper can be either an independent finishing option, or an additional one - for subsequent painting. Such wallpaper can be glued to the ceiling. But, sticking tightly to the ceiling on your own is very problematic. Therefore, you need to work in a team, well, or with a partner. The first step is to prepare the surface. Then the sheets are glued. You can make such repairs with your own hands.
Non-woven photo wallpapers are recognized as the best in comparison with analogues and the most convenient in gluing. They do not get wet and do not tear under the weight of glue, like paper ones, and do not accumulate dust, like textile ones.
Tips and instructions, as well as videos on the topic, will help you learn how to glue non-woven wallpaper. There are 2 photo options…
How to glue non-woven wallpaper on the wall
Non-woven photo wallpapers are recognized as the best in comparison with analogues and the most convenient in gluing. They do not get wet and do not tear under the weight of glue, like paper ones, and do not accumulate dust, like textile ones. Tips and instructions, as well as videos on the topic, will help you learn how to glue non-woven wallpaper.
Types of non-woven photo wallpapers
There are 2 options for photo wallpapers made of non-woven fabric:
- consisting of two layers of this material - external with a printed image and a substrate;

- two-layer fabrics on a non-woven basis with a vinyl surface.

Photowall-paper of both types differ in excellent operational characteristics.
Tools and materials
Devices and materials that will be needed for work:
- ladder;
- sandpaper;
- putty;
- primer;
- plumb;
- roulette;
- a simple pencil for marking;
- scissors;
- wallpaper knife with replaceable blades;
- ruler;
- masking tape to protect walls, floors, ceilings;
- rollers - with a long pile, rubber, for joints;
- paint brushes for applying glue - flat wide and round narrow;
- wide and narrow spatulas;
- brush with short pile;
- containers for water and glue;
- plastic spatula with soft edges for smoothing glued fragments;
- sponge or piece of cloth;
- screwdriver for dismantling sockets and switches.

Foundation preparation
The preparatory stage consists of the following steps:
- It is necessary to completely remove the old coating, peel off and wash off the wallpaper and the adhesive layer. If there was a tile on the wall, beat off the fragments with a hammer, scrape off the remnants of the adhesive.
- If it is necessary to level the surface, it is necessary to fill the gaps and cracks with putty, carefully level it.
- When the puttied places are dry, you should treat the wall with sandpaper, and then clean it from the resulting dust.
Note! If non-woven wallpaper without vinyl coating, which can be translucent, will be glued, the surface must be uniform and uniform. So, you need to putty a continuous layer. Detailed instructions are here.

markup
It will not be possible to glue photo wallpapers with high quality without careful marking, for which you will need a long ruler, a protractor or a square, a plumb line, a pencil.
- It is advisable to start from the window - from the upper corner opposite the entrance.
- If you plan to paste over part of the wall, you must first draw the upper horizontal line at the desired point. Then, using a plumb line, mark the vertical lines in the places where the joints of the photo wallpaper fragments will pass.
- Untreated surfaces are best pasted over with masking tape so as not to stain them with glue.
- If the entire wall is pasted over, it is necessary to mark vertical stripes in increments of about a meter.

The nuances of cropping and combining the pattern
Rules that will help you cut and combine parts of the image correctly:
- If the canvas is long and wide enough, it is advisable to cut it into smaller pieces for convenience.
- When the wallpaper is wider than the marked part of the wall, cut the canvas with a wallpaper knife or scissors at the edges or in places where minimal damage will be caused to the image.
- If the wallpaper is longer than necessary, you need to carefully study which part of the picture - the top or bottom - can be painlessly removed.
- A large wide image - a landscape, a detailed flower or plant, a group photo of people, animals - should be cut and combined especially carefully. No detail should be omitted so that integrity is not compromised.
- When murals are planned to be pasted in the form of a modular picture - a diptych, a triptych, a polyptych - you need to think over and carefully mark each part of the image.

Advice. Marking and matching the drawing can be too difficult for one person, so it's best to do this part of the work with an assistant.
The process of gluing photo wallpaper
Having marked the wall, cutting and aligning the canvases of the photo wallpaper, you need to lay them out in the desired sequence on the table or on the floor. You can put the cut sheets on top of each other in a stack.
Let's start gluing:
- With a wide brush, apply a thick layer of glue to the wall, starting from the top horizontal line and ending with the vertical one. We try not to stain the places beyond the line with glue, even if they are protected with adhesive tape.
Important! You can not glue the entire surface of the wall at once. You should work strictly with one fragment. There is no need to apply adhesive to the wallpaper.
- Carefully apply the dry sheet to the top of the surface treated with glue. Aligning with the upper horizontal and vertical lines, smooth with a rubber roller in the direction from top to bottom and from left to right, expelling air.
If during operation the front side of the canvas becomes stained with glue, you must immediately remove the dirt with a damp cloth or sponge.

Non-woven photo wallpapers are plastic, and if necessary, they can be carefully stretched, trying not to disturb the proportions of the image.
- We consistently transfer all parts of the picture to the wall. Wallpaper must be glued end-to-end, so that the edges do not crawl on top of each other, distorting the image.

The wall pasted over with non-woven photo wallpaper dries for several days, depending on the temperature and humidity of the air. All this time, you can not open windows and doors, sharply raise or lower the air temperature in the room, use improvised household appliances for drying - a hairdryer, an iron - or perform any actions that can damage the image.
Corner gluing
If a fragment of the picture on the photo wallpaper falls at an angle, it is necessary to smear the surface with glue with a narrow brush. Next, the wallpaper is glued in one of two ways:
- The canvas is cut into two parts. First, the wall is glued on one side of the corner, then the adjoining one is processed and glued.
- One fragment is glued to both adjacent walls, the sheet is carefully ironed at the corner joint. This method is quite complicated and is not suitable for uneven corners.

How to mark and paste over difficult places (sockets, switches)
If there is a socket or switch on the wall fragment being processed, they must be carefully removed, after de-energizing the apartment. Next you need to do the following:
- On the wallpaper cut and ready for sticking, mark with a pencil in the places of sources of electric current, attaching the sheet to a dry wall.
- Close the exposed sockets with special plugs or glue them with small pieces of paper.
- Apply a layer of glue to the base.
- Attach a sheet of wallpaper to the wall, first aligned with the top horizontal and vertical lines. Press the fabric down and smooth with a rubber or fluffy roller for better grip from top to bottom.
- When the photo wallpaper is dry, use a wallpaper knife to cut out round or shaped holes for mounting sockets, switches in the places marked with a pencil.
A video will help to visualize the process of wallpapering with a photo image.
Interior "with character", or how to glue wallpaper on the wall

The process of installing photo wallpaper is a simple procedure, but it requires attention and accuracy. Today we’ll talk about how to avoid typical mistakes in the process of work, consider the technology and features of this procedure.
Necessary tools for gluing photo wallpapers
Before you figure out how to glue photo wallpapers on a wall, you should find out what tools and materials you need to prepare. To save time and effort, prepare in advance everything that may be useful to you in your work:
- Directly panels with a pattern. When buying, you must immediately decide on the future place of gluing and size.
- adhesive agent. To choose it, it is better to consult with a sales assistant in the store.
- Wallpaper or clerical knife. With it, you can easily trim the protruding parts of the paintings or adjust their ends.
- Brushes. The size of the brushes should be large, since with their help it will be necessary to apply glue to the inside of the panel as quickly as possible. And for the joints, prepare a smaller brush.

- Roulette, level, straight line. These tools are needed to maintain the correct proportions, check vertical and horizontal lines, and prevent the canvas from “blocking” to the side.
- A bar or other flat surface, with the help of which it will be possible to evenly draw the boundaries of the elements of the picture on the wall.
- Rubber roller. Using it, you can evenly and correctly smooth the components to the surface.
- A simple pencil, a rag.
- If you are working at height, have a stable chair or stepladder ready.

How to choose glue for photo wallpaper
The adhesive composition plays an important role in the issue of durability of wall design.
- As experts recommend, it is better that the adhesive for photo wallpaper matches their brand.
- Trademarks such as Contact Vinyl, Metilan and Quelyd have proven themselves well for these purposes. These models are affordable and do the job perfectly.

- Sometimes glue can be sold complete with photo wallpaper, but the suggested amount is often not enough for the entire area of the canvas. Moreover, for reliability, the adhesive composition is applied not only to the inside of the photocells, but also to the surface of the wall. Each package with glue is equipped with information about the proportions in which the mixture should be diluted.
Important! For high-density materials, you need to use a thick adhesive mixture so that after the installation is completed, the wallpaper does not move out and adheres well to the wall.

To choose the right adhesive option, pay attention to the following properties:
- the color should not lie in spots;
- moisture resistance will prevent the appearance of fungus;
- no unpleasant pungent odor;
- the faster the drying time, the better the glue.
Note that a quality product is provided to the consumer not only by foreign manufacturers, but also by domestic ones. In the latter case, the price of the product will be much less.

Preparing walls for wallpapering
- Do not glue photo wallpapers on the remnants of old wallpaper, there is a risk that both coatings will rise over time.
- If the wall is painted with paint, then you need to remove it if it is prone to peeling and shedding. If not, simply coat the surface with an acrylic primer.

- Too bright paint can show through, so it makes sense to cover the wall with another layer of white paint.
- It is better to trim any tubercles, this is especially true if you have chosen paper-based wallpaper.
- Under the non-woven vinyl coating, level only obvious flaws.
- Ideally, sand the surface with a finishing putty, "scratch" it with sandpaper after drying, brush off the dust and cover with an acrylic primer.

Pattern selection and dimensions
- Ideally, the area of the canvas should match the area of \u200b\u200bthe wall.
- Wall-paper photowall-paper by the individual order does not demand adjustment.
- If the surface of the wall is larger than the area of the selected picture, then place the picture in the center, retreating from the corners an equal distance.

- If the canvas is larger, then it is better to cut it in the most inconspicuous place, or from the side that spoils the overall composition the least.
- On sale there are photo wallpapers from 8 parts and from 12 parts. The more elements, the more carefully you need to take the assembly. Lay out the pieces of the drawing on the floor, so you get an idea of the final result.

- Take care of the markings on the wall by plumbing out the lines beyond which the first row of elements will not protrude. Then glue the next rows exactly along the line, fitting the first one to the reference.

Working with non-woven base
Let's figure out how to glue non-woven photo wallpapers, since this coating option is the most practical and convenient for sticking with your own hands.

In this case, there is no need to lubricate the canvas with glue, so the speed of work increases.

The technology is like this:
- Lay out the items on the floor.
- With a wide brush, generously coat a section of the wall slightly larger than the area of \u200b\u200bthe piece.
- Press the dry canvas against the wall, aligning it with a pre-lined right angle. With a rubber roller, stretch from top to bottom, and then fan-shaped from the middle to the edges.
- After the roller is glued, gently blot the edges with a clean rag, pressing them against the wall. Do not rub, so as not to spoil the drawing.
- Non-woven fabric is quite plastic, so if necessary, you can pull the canvas, if suddenly any irregularities or wrinkling appear on the surface.
- Glue the next sector in the same way, paying special attention to the joints. The edges should not overlap one another, but there can be no gaps between them.
- In the process, remove excess glue. At the end, all joints are rolled with a roller.
- At the end, do not allow sudden changes in humidity and temperature so that the segments do not come off.

Interesting! Recently, Komar photo wallpapers have gained particular popularity. If you look at the photo of the result of their installation, you will understand the reason for the popularity of "Mosquito". These wall murals look amazing in the interior: 3d effects, a variety of coating themes and bright colors, add to this the dimensions prescribed on the tubes, gluing instructions and glue in the kit and you will get a decent material ready for gluing. See the video below for more details.

Working with paper bases
Many are interested in how to properly glue paper photo wallpapers on the wall so as not to spoil the material. Note that paper wallpaper is a rather capricious material, especially if thin single-layer options are chosen.

They literally spread on contact with glue. The pasting technology is as follows:
- Lay the segments on the floor, cutting off the edges on the left side of the segments, and leave on the right side so that you can later glue the overlap.
- The wall should be flat and white, and the glue should be as thin as possible.
- With a wide brush, coat the wall, and then the first canvas in turn. Wait 2 minutes and apply to the surface.
Important! If the density of the paper is very low, and they are translucent, then it is better not to smear the segment, but to glue it dry.

- Align the first segment along the vertical markings, roll the middle with a roller, removing air bubbles. Be careful not to damage the pattern. The direction of movement is from the center - to the sides and to the bottom.

- Glue the next segment overlapping the edge of the previous one. Make sure that the rest of the edge does not show through.
Important! Don't be alarmed if the surface is wrinkled, this is normal. If pasting was correct, then after drying the canvases will align again.
A few words about stickers
Many see this as a panacea, but in fact, decorating a room with self-adhesive is more difficult. If pieces of ordinary material can be glued even alone, then even two people can ruin the self-watering can without reaching the wall. Such wallpapers have a paper layer of protection, removing which you need to accurately and quickly smooth out the segment on the wall, since the glue quickly collapses and dries. And the main problem is that the canvas strives to stick together with itself. Wrinkles form on the surface, which are almost impossible to smooth out.

Properly mounted segments will delight the owners for a long time, and will become a source of pride and a demonstration of the result of repair and finishing efforts.
Video: The process of pasting the wall with Komar photo wallpapers
How to glue paper-based photo wallpapers: step-by-step instructions and features of gluing paper-based photo wallpapers
How to glue paper-based photo wallpapers and are there any differences in pasting ordinary and paper photo wallpapers, how does the process differ from working with ordinary rolled paper wallpapers? The purpose of this article is to answer questions and help to glue paper wallpapers perfectly. 
How to glue paper-based wallpaper: preparation
When choosing paper-based photo wallpapers to create a room design, you need to take into account the main feature - they are thin and delicate. Work with paper photo wallpaper should be carefully and carefully, slowly. These are the most basic requirements.
We prepare the necessary tools and materials for work:

The next step is the selection and preparation of the surface. Paper photo wallpapers do not hide defects and various wall irregularities, so surface preparation must be carried out with high quality.
How to glue photo wallpaper on a paper basis: working together step by step
After preparing the surface and the tool, we proceed to the answer to the question "how exactly to glue paper-based wallpaper?":

If you do not neglect the basic rules for sticking paper-based photo wallpapers, you will get not only budget savings, but also a special decorative effect for a long time.
You can learn more interesting and useful information on the topic from the materials:
Instructions on how to glue wallpaper on the wall

Recently, the best designers are increasingly resorting to the use of photo wallpaper in the interior. And not in vain, because a properly selected drawing can radically transform the entire space. However, very often, a rash choice of photo wallpaper can greatly spoil the whole appearance of the room, make it uncomfortable.
Choosing the right wallpaper
A suitable picture on the photo wallpaper should be chosen based on the interior of the room. If the room has a lot of colorful items: upholstered furniture. Carpets, curtains, then you should choose plain calm patterns. In this case, it is better to refuse the image of a night city, a herd of grazing animals, a lush jungle or a flower meadow, otherwise it will be difficult to be in the room.

Photo wallpaper color scheme
The color scheme of photo wallpapers also needs to be selected carefully. It should be in harmony with the color scheme of the room, otherwise the wallpaper will look like a tasteless spot in the overall interior of the room. The creators of photo wallpapers usually make them in such a way that one color dominates the entire image, which sets off another, contrasting with the first.
In order for the photo wallpaper to blend perfectly with the overall interior, it is advisable to choose a pattern in such a way that this second color is the same as the main part of the other elements of the interior of the room. For example, if a sea breeze is depicted on the photo wallpaper, with a dominant turquoise color, then the sandy color of the coast and shells sets it off. This pattern is best suited in rooms with a predominance of sand and light brown colors in furniture and other interior elements. In rooms with very dark, or vice versa, very light colors, almost any pattern will do.

The most fashionable design solution can be the choice of three-dimensional photo wallpaper. Most often they are made only to order, so they are considered good form in expensive apartments. However, you need to be especially careful with their choice, as well as consider the level of lighting and the necessary backlighting.
Visually 3D photo wallpaper will help to significantly expand the space, so it is very successful to glue them in small rooms.

With the right approach, photo wallpaper doors can turn into a stunning design solution. They can look like a window, an archway, or even an entrance to a fairy tale world. If the appearance of the door in this place interferes with the overall interior, then with the help of photo wallpaper it can be visually converted into a bookcase or fireplace.
Today, photo wallpapers for doors are practically not available in hardware stores, so most often people turn for individual projects "to order".
Since doors are more prone to dirt and abrasion than walls, it is worth protecting the design with a protective film or laminate. Then such photo wallpapers can be easily washed and the pattern will not be erased near the handle.
If the wallpaper has already been selected and purchased, you should think about how to properly glue the photo wallpaper. First, you need to prepare all the necessary equipment for this, namely:

Instructions for gluing photo wallpapers
If the photo wallpaper is made on a paper basis, then, as a rule, they are very thin and any unevenness or roughness will immediately affect their relief. For this case, the wall is best to putty well beforehand, trying to level it as much as possible.
When gluing, it is important that the remnants of old wallpaper fly off the wall and plaster does not crumble, since on thin wallpaper any grain of sand can become noticeable and spoil the appearance.

Vinyl photo wallpaper
Vinyl wall murals have a very dense structure. They can easily hide minor surface imperfections.
In order for the wallpaper to hold firmly, and also to reduce the cost of glue, the wall must be primed with a primer suitable for this case. Only after preparing the wall, you can proceed to the gluing itself.
To simplify the whole procedure as much as possible and at the same time achieve an excellent result, you should adhere to the following order of actions:

How to glue paper-based wallpaper with your own hands
Wall mural
In recent years, photo wallpapers have become increasingly popular for decorating apartments. The fact is that they can be glued to absolutely any room and thereby bring something unusual and very interesting to it. However, in order for the result to please the eye, you should know how to glue paper-based photo wallpapers correctly.
How to choose paper-based wallpaper
Of course, the initial stage of this type of finishing work will be the choice of material, or rather, photo wallpaper. This process must be approached quite responsibly. Here are some factors that you should definitely pay attention to:
- Image. This is a matter of taste for each person, the main thing is that the main colors are in harmony with other shades of the interior.
- The size. Here, too, there may be several options. Wall murals can cover the surface of the wall either completely or partially. Do not take material larger than the area of \u200b\u200bthe wall.
- Quality. Be sure to check whether the finishing material is of high quality in front of you. It should be quite dense, and the pattern should be clear and bright. It is better not to save on this type of wallpaper, so as not to make repairs again in a year or two.
- Number of details. It is better to check the number of parts and their compliance with the drawing while still in the store.
Features of choosing a pattern on photo wallpaper
Of course, the choice of patterns on this type of wallpaper is simply amazing. And therefore, when choosing this finishing material, some difficulties arise. In this regard, for starters, it is worth deciding which color in the picture should be the main one. It, as a rule, should be in harmony with other colors prevailing in the room.
After that, you can proceed to the choice of the plot of the picture. For the bedroom, it is best to choose something soothing. For a living room or a children's room, you can choose brighter and more cheerful patterns, but it is worth considering that it is better to avoid aggressive colors.
For a small room, it is better to choose wallpaper where cold colors predominate, thereby visually expanding it. And for a more spacious one, you can choose both cold and warm color shades.
What kind of glue do you need
Photowall-paper on a paper basis practically does not differ in any way from simple paper wall-paper. And because the glue can be used the same. However, this question is best to clarify with the seller in the store. He will be able to advise you on the brand of adhesive that is ideal for working with this particular finishing material. It is worth considering that you should not save on glue.
It is necessary to dilute the adhesive substance according to the instructions attached to it. At the same time, choose a convenient dish and immediately take care of a stick or spoon, which can be used to easily mix the glue during work.
What needs to be prepared
Before proceeding with the direct finishing of the wall, it is necessary to prepare the following tools:
- finishing material (wallpaper);
- adhesive diluted in a convenient container;
- brush to apply glue;
- roulette or ruler;
- pencil;
- sandpaper;
- a special roller made of rubber designed to remove air bubbles;
- stationery knife;
- level;
- putty knife.
Preparatory work: wall
The first step is to prepare the wall surface on which the finishing material will be directly glued. And it must be prepared as carefully as before painting.
The first step is to remove the old wallpaper (if any). How to clean the wall from glue, paint, etc. If there are cracks, then they must be puttied. Then it is necessary to level the entire surface of the wall with putty and prime it. However, keep in mind that it will be possible to start pasting the wall no earlier than it is completely dry.
It is very important not to forget that if the pattern on your wallpaper is made in light colors, then the wall should be white without dark spots. This is very important, because such defects can then be highlighted through the photo wallpaper. And this, no doubt, will spoil the whole impression of the result.
If you are going to glue photo wallpapers on a painted or smooth surface, then it will first need to be processed with sandpaper. As a result, you should get a rough surface on which you can easily stick the wallpaper.
Preparatory work: photo wallpaper
The next step will be the preparation of the photo wallpapers themselves. What do you need to do? Release them from the packaging and lay them on the floor surface, making up the future pattern. At this stage of work, you should pay attention to the following:
- The drawing should not only match the lines, but also the color shades. Unfortunately, there are times when the color is slightly lighter on one fragment, and darker on the other. If you find any kind of defect, it is best to go to the store and exchange these wallpapers for others. And it is worth choosing a different drawing, since the entire batch may be of poor quality. Of course, you can stick wallpaper with a defect. But it may turn out that this place, which has a defect, will constantly catch your eye and, in the end, you still decide to change them.
- After that, you need to check all the joints. They must all match without exception. This condition is very important, because otherwise the drawing may lead. It should be noted that most manufacturers, when making photo wallpapers, do not imply the presence of joints. Most often, the fragments are glued with an overlap equal to a couple of millimeters. How to stick the elements of photo wallpaper correctly can be found in the instructions that are necessarily attached to them.
Preparatory work: markup
Now you will need to measure the length and width of each individual fragment, and make markings on the wall with a pencil, ruler and level. Thus, you must mark all the places where you will need to glue the elements of the finishing material.
The most important thing at this stage is to place the upper left corner or the right one, with an accuracy of up to a millimeter, as it suits you. You can use a ruler, a plumb line, and a level for this. As a result, you should get an angle equal to 90⁰. And already from it it will be possible to draw straight lines on the sides.
How to apply glue correctly
There is nothing complicated in applying glue. As a rule, they first need to prime the surface of the wall. However, this may not be the case. On the floor, it is best to spread an old, but always clean rag, and on it already spread the individual elements of the wallpaper with glue.
Then the already prepared adhesive is applied directly to the surface of the wallpaper. It should be noted that the fragment should not be folded in half. And it will be necessary to glue it to the wall no later than in a couple of minutes. You should not linger longer, as paper-based photo wallpapers will swell quite quickly, and then it will be much harder to work with them.
Optimum room temperature during wallpapering
It is very important to consider that during the gluing of photo wallpapers in the room where the work is carried out, there must be a certain temperature. Namely, from 20–25⁰ C.
In the event that the temperature in the room is higher than recommended, there is a possibility that the finishing material will crack. And if the room is too cold, the fragments may peel off the wall.
It is also very important to take into account the fact that in the room and during the finishing work and until the wallpaper is completely dry, there should not be even the slightest draft. Vents and doors should be tightly closed.
Sticking photo wallpaper on a paper base to the wall
Start sticking fragments of photo wallpapers from the left corner located on top. After you stick it to the wall, take a rubber roller (clean, dry rag, sponge, etc.) and smooth the wallpaper well. This must be done carefully so that they do not tear. Try to remove any air bubbles that have formed. At the same time, make sure that the wallpaper fragment does not crawl out of the markup.
After the first element is glued, you can move on to the next one. And it should be the fragment that is located below the first. It is best to stick vertical stripes one after another, moving from top to bottom. Moreover, the upper element of the second and subsequent rows should be glued in such a way that their top line is perfectly straight, and the side line exactly matches the pattern.
Make sure that all elements are glued exactly according to the markup. Avoid overlaps (if they are not provided) and displacement of the pattern. If suddenly droplets of glue fall on the front side of the wallpaper, then in no case do not rub them with a rag. Take a clean, dry sponge and gently blot them.
Elimination of defects
Having finished sticking wallpaper, you should evaluate the final result. Particular attention should be paid to air bubbles and fragments lagging behind the wall. How to fix such defects:
- Try to carefully remove the resulting bubbles while gluing the fragments. To do this, the rubber roller should, without pressing hard, move from the center to the edges. But it may turn out that the bubbles will still remain. Then they must be carefully pierced with a needle, let out the air and press this place, for example, with a clean sponge. If the wallpaper does not stick in this place, then take a syringe and, having pierced the photo wallpaper, inject a little adhesive into this place, and then press it again.
- If the edges of the fragments begin to peel off, then you need to do the following. Bend the edge a little and coat with a small amount of glue. This should be done very carefully, so that the adhesive does not get on other elements of the photo wallpaper. Then glue the edge and immediately remove the excess glue that has come out.
- It may turn out that you glued a separate fragment crookedly. Then it should be carefully torn off and glued again. This should be done with extreme caution, since this kind of wallpaper, impregnated with glue, is very easily torn.
Advantages of photo wallpaper
Of course, like all other finishing materials, photo wallpapers have their advantages. So, what are the advantages:
- They are relatively easy to work with. So, unlike many simple wallpapers, photo wallpapers, as a rule, consist of several small fragments. They are very convenient to glue on the wall and you can easily cope with such work alone.
- Huge selection. You can easily choose not only the desired size of the photo wallpaper, but also the pattern. The choice here is more than rich. And if it suddenly happens that you cannot find the right picture, then you can always order it from specialists. They will be able to depict on the photo wallpaper, for example, you and your loved ones or your pet. In general, whatever your heart desires.
- Small cost. As a rule, paper-based photo wallpapers are relatively inexpensive, which, of course, is a huge plus.
- If you get bored with old photo wallpapers, then they can be easily and simply replaced with new ones.
Disadvantages of paper wallpaper
Paper photo wallpapers, of course, have their drawbacks. And they should definitely be known and taken into account during finishing work:
- If you ruin at least one fragment during gluing, then you will most likely have to buy a new finishing material. Therefore, it is necessary to carry out finishing work very carefully.
- Most of this kind of wallpaper has a small thickness. As a result, they can easily break. This problem is especially relevant after glue is applied to the fragment, because the paper base swells quickly.
- Wall mural is quite difficult to stick on a wall where the floor and ceiling are uneven. The fact is that the edges of such a finishing material must be perfectly even. As a result, the existing defects in the room begin to catch the eye. You can glue them at an angle, but here, most likely, you will have to resort to the help of specialists.
- fragility. Paper wallpapers will not last very long. The fact is that after only 2 or 3 years they may lose their original attractive appearance, and then you will again have to think about repair.
Wall murals can dramatically change the look of your room. Hide some defects and make the design unique. But this is only if this type of wallpaper is selected and pasted correctly.
Non-woven wallpaper is a popular material used for decoration. The main feature is a thickened structure that masks small defects well. Thanks to this, it is not necessary to achieve the smoothest possible surface.
Non-woven coating is not demanding to care for. One wet cleaning and it looks like new. The material is resistant to deformation, stretching and shrinkage. You can always paint it if you wish. The relief of the wallpaper gives the walls an unusual and beautiful look.
Non-woven wallpaper can be used to finish any surface, but it should be remembered that their base is thin, as a result of which, after pasting, the color of the walls is visible through it. Therefore, it is advisable to paint the surface with water-based paint before starting work.
Overview of glue for non-woven wallpaper
Properly selected adhesive for non-woven wallpaper will significantly extend their service life and facilitate the gluing process.
The stores offer a large selection of adhesives, but conditionally they can be divided into two groups - universal and special.
- Universal adhesives are designed to work with different types of wallpaper, and special ones are designed specifically for gluing a certain type. When choosing an adhesive, pay attention to the possibility of using it with non-woven wallpaper on the packaging.
1.Methylane. This German-made adhesive is very convenient to use, as it is applied directly to the wall. Good adhesion allows it to be combined with lime and cement. The glue is not afraid of moisture, contains special antifungal components. Due to the safe composition, Metilan can be used in children's and medical institutions.
It is quite affordable - the cost of packaging is about 250 rubles.
2.Quelyt. French glue designed exclusively for interior work and for gluing non-woven wallpaper and wallpaper for painting. They appreciate it for its excellent sliding ability, ease of application. The adhesive does not contain hazardous components, prevents the formation of stains and mold on the wallpaper.
The price of the package is about 190 rubles.
3.Kleo is a good adhesive with antifungal additives, safe and easy to use. Seizes in just 5 minutes, and the finished solution can be stored for about 10 days. With the glue of this brand, ease of installation of wallpaper is ensured, it hides minor wall defects.
You can buy a package of glue for 200-220 rubles.
How not to make a mistake with the choice of non-woven wallpaper
All non-woven wallpaper can be divided into two types:
- Wallpaper, where interlining acts as an independent material. They usually have several layers of interlining. Such wallpaper can be painted several times.
- Non-woven base. They have other materials applied on top of the non-woven layer, such as textiles, paper or vinyl. Vinyl options are especially popular among buyers, they easily hide wall irregularities, are environmentally friendly, and allow air to pass through. In addition, the choice of textures and colors is diverse.
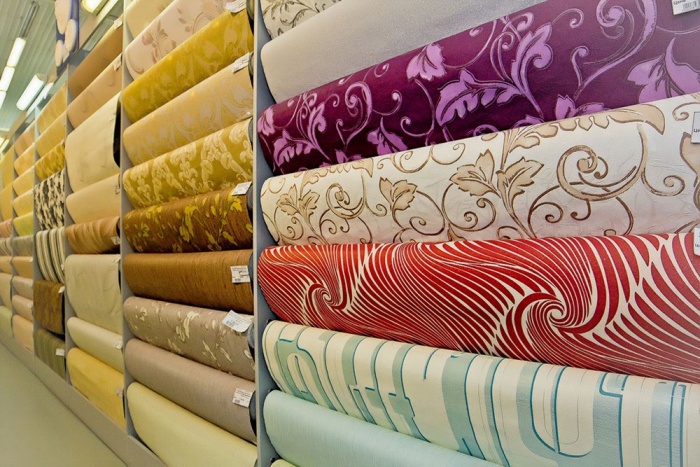
 Wide non-woven wallpaper
 Wallpaper color
As for color, everything is simple here - non-woven wallpaper can be white and colored.
Unpainted ones are subject to further decoration, but colored ones can also be painted. Paintable wallpapers are good for hallways, bedrooms and rooms that are subject to constant stress. Coloring allows you to hide even significant defects.
Surface type
According to this indicator, non-woven wallpaper can be classified into:
- Monotonous, they are painted with acrylic or latex paints.
- With silkscreen.
- Smooth with a pattern.
- Embossed.
The texture should be selected taking into account the interior of the room and your wishes for the design. Large patterns will hide the imperfections of the walls best of all, and for an interior in warm colors, you should prefer a small pattern. It is also important to consider that the more embossed the pattern, the more “tolerant” the wallpaper is for repainting.
Web width
On sale are wallpapers with a width of ½ meter and 1 m. If the room is large, you should choose a wider canvas to simplify gluing and reduce the number of joints. In small rooms, use narrow ones, gluing will be less troublesome and there will be less waste.
Well, it is important to purchase wallpapers of the same batch with the same color and pattern. The choice should be made in favor of well-known manufacturers.
Instructions on how to glue non-woven wallpaper
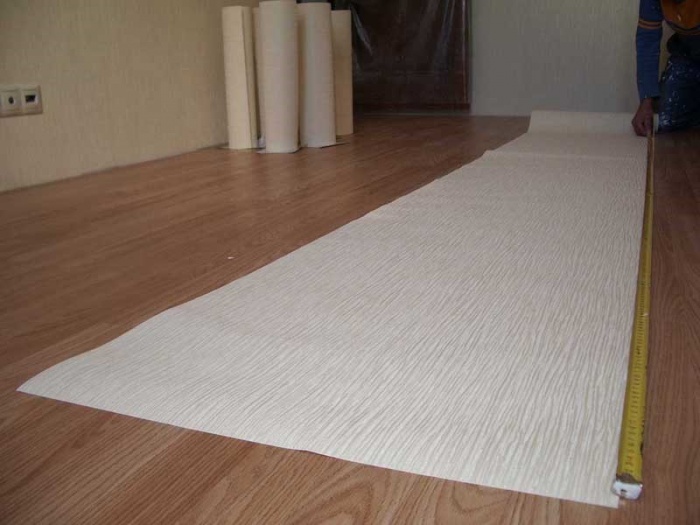
- We measure the height from the ceiling to the floor with a tape measure. We measure the same distance on the canvas, do not cut it off, but fold the wallpaper in half for about another meter. We smooth the fold with a spatula and cut off the first piece with it to get a perfectly even cut.
- We roll out a roll of wallpaper next to the first segment and select a pattern. We do the same with the rest of the segments on all the walls.
- We measure with a tape measure from the corner a distance equal to the width of our segments, and put a mark on the wall. With the help of the level, we draw a vertical, even line, taking into account this mark.
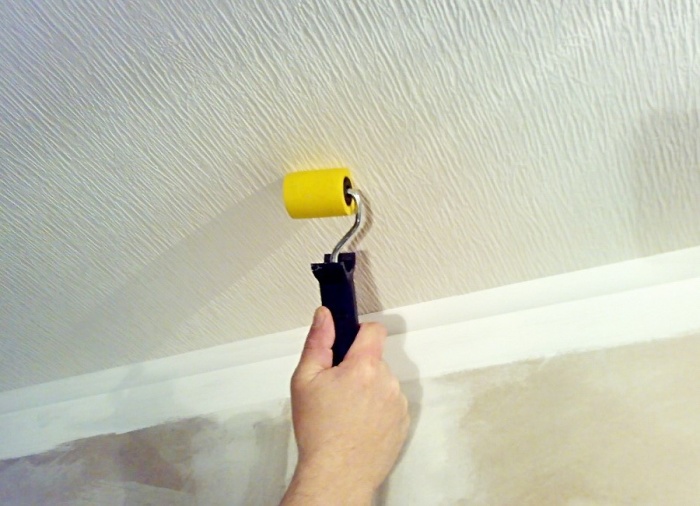
- We apply glue to the walls with a roller, and coat the junction with the ceiling plinth and in the corner with a brush.
- We apply the first segment to the wall, but we focus not on the angle, but on the vertical mark, which was made using the level. We do not lean the wallpaper completely, but first glue only the edge along the mark. Then we align along the upper edge and carefully expel excess air from under the wallpaper.
- If the canvas has crawled out a little around the corner, apply a spatula to the wallpaper and cut off the excess.
- We apply glue to the next section of the wall, and the canvas is applied butt-to-butt to the previous one. We smooth along the joint, as far as the hand reaches, we do the same along the upper edge of the canvas. Then with the palm of our hand we smooth the canvas along the wall, expelling the air. The remaining air bubbles are removed with a spatula, moving it in different directions. Additionally, once again we go along the seam between the canvases, smoothing it with a spatula angle.
 We glue and smooth non-woven wallpaper
 We glue joints and corners
Gluing in corners and joints causes particular difficulties. Let's analyze the procedure for pasting different types of corners.
Angles top and bottom
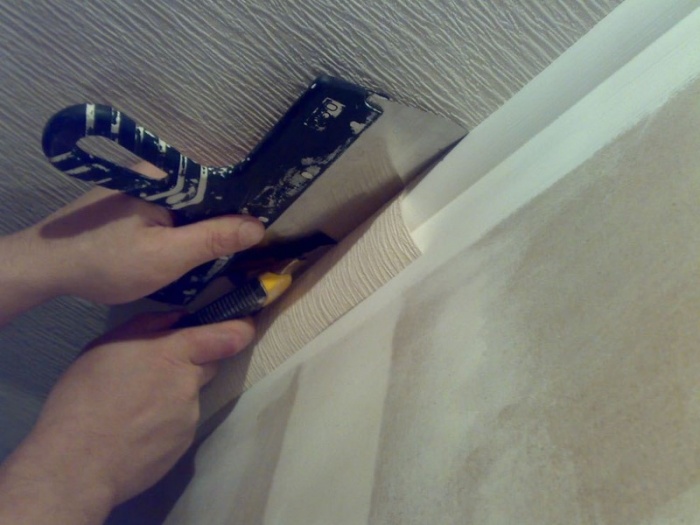
- We cut off the wallpaper with a margin of 6-8 cm below or above the plinth.
- We glue the canvas, make a bend of the allowance along the plinth with a wide spatula.
- Cut off the allowance, using a spatula as a guide base.
You need to work until the glue has time to grab. This will make it possible to make a remainder of 1-2 mm gently with a knife behind the plinth.
 We fix the joints and cut the edge
 Inner corner
In the case of an internal angle, we act like this:
- We glue the canvas so that at least 2 cm goes to the adjacent wall. We are waiting for the glue to dry.
- On the adjacent wall, glue the canvas close to the corner and smooth it with a roller.
Many people try to fold the canvas in half in width to get a beautiful corner from one piece, but in practice this is rarely possible, since in the future the material begins to “run in”, and the corner completely departs.
Angle outside
Gluing the outer corners is the most difficult. The algorithm of actions is as follows:
- We glue on one side a roll with a bend of 6-8 cm on the wall to be joined.
- We glue the roll "around the corner", not reaching a couple of centimeters to the corner.
- We put a vertical mark along the edge of the bottom roll.
- In the center between the edges of the two rolls, cut off both pieces. Everything that remains from the top will no longer be needed.
- The cut section will remain on the wall and create a smooth joint.
High-quality and neatly glued non-woven wallpaper will help create a cozy atmosphere in your home.
Where to start gluing non-woven wallpaper
- Experienced craftsmen advise doing this from the corner.
- A distance equal to the width of the strip is measured on the surface of the walls and a vertical line is drawn - it will help to achieve a perfect joint.
RELATED VIDEO
Glue consumption for non-woven wallpaper
An important quality is economy. Usually, ten liters of solution are obtained from eight hundred grams of high-quality glue. At the same time, the process of its preparation does not cause difficulties.
- Pour a certain amount of water into the container and pour the powder into it with constant stirring. The result should be a sticky and thick mass.
- After ten to fifteen minutes, it needs to be stirred again.
The exact amount of the resulting solution depends on the manufacturer and the specific type of wallpaper: for painting, non-woven vinyl and others. For example, packages of Quelyd glue, according to the manufacturer, should be enough for a room of about 35 m2.
Which glue is right for you, you have to decide for yourself. Remember, it cannot be used for other coatings, so calculate the right amount in advance, adding ten percent for unexpected situations.
 Non-woven wallpaper
 Important Rules
- Prepare the walls before pasting, peel off all the old wallpaper and glue from the walls, do not forget to treat the walls with a primer to better bond the glue to the walls.
- If the decoration of the room is supposed to be stucco, it should be glued before the wallpaper. Firstly, the adhesion to clean walls at the ceiling plinth is much better than with wallpaper. Secondly, this will save on wallpaper, and in our version with wide ones, this is just the way, given that the disadvantage of wide wallpapers is the frequent lack of length of the last canvas. Specialists also in carrying out repairs
- Do not forget to read the instructions from the wallpaper, they are all different and have their own characteristics. When making pieces of wallpaper, leave a small margin for adjustment in height, if you are generally confident in the evenness of your ceilings, then two centimeters is enough, otherwise it is better to leave about ten centimeters.
- In a square or rectangular room, start gluing wallpaper with a pattern close to the corner, but do not go from the very corner, holding it by the true guide. Step back a little and draw the correct line along the wall - a guideline, but the angle may turn out to be crooked and ruin your drawing on the wall.
- When pasted, wide wallpapers do not differ in any way from ordinary ones, the glue for the non-woven base is applied to the wall, then a piece of the canvas is applied to the mark on the wall, this should be done from the ceiling. Having adjusted the wallpaper to the line, we begin to smooth it - first the center, then the herringbone to the edges.
- We apply the second sheet of wallpaper from the ceiling to the edge, aligning the seam and then glue it, like the first one. Actions with the remaining parts are repeated. The corners are glued in the same way as ordinary narrow wallpapers (this is written a little higher in the article).
- To make the process easier, it is better to carry it out together.
Wallpaper on a non-woven base is not uncommon today, you will not surprise anyone with them. But wide canvases for Russians are still a curiosity. Meter wallpaper made of non-woven or based on it is produced by European manufacturers, in Russia they are limited to a standard roll size - 53 cm. By the way, meter wallpapers are called conditionally, their real width can be different - from 90 to 140 cm. pros and cons. You need to familiarize yourself with the features before buying wide wallpapers.
Advantages and disadvantages of wide canvases
Here we will consider the characteristics of not only those coatings that consist entirely of non-woven fabric, but also non-woven vinyl. These materials are very similar in performance, they are also mounted in the same ways.
So, wide wallpapers are convenient because:
- they form fewer joints - due to their large size, more voluminous patterns are placed on the canvases, it becomes easier to pick up and combine pattern fragments, the canvases after installation are one whole - the seams between the stripes are almost invisible.
- Installation is faster - instead of two standard strips, you need to cut, apply, level and cut only one.
- Material costs are lower - the price of a meter roll is less than the cost of two standard ones from the same manufacturer.
All the shortcomings of meter-long canvases are associated with the features of their installation:
- they are difficult to glue alone, especially on the ceiling. But, if you couldn’t find a partner, you can still stick meter-long wallpapers on your own, you just need to be patient.
- It is more difficult to buy the optimal amount of material - there is a risk that a few centimeters of coverage will not be enough, or, conversely, almost a whole roll will remain. In this regard, it is easier with narrow canvases - if there are surpluses, there will be few of them.
- It is very problematic to paste over a small room with wide stripes, they often have to be cut and cut (in the corners, on the slopes).
- It is permissible to use a non-standard width in rooms with slight deviations in dimensions - if the ceiling, walls or corners are very curved, it will not be easy to join meter-long canvases without distortions.
Summing up the above, we can conclude: it is optimal to glue wide wallpapers in large rooms with a minimum of additional elements (such as radiators, windows, doors, niches and arches) and with even walls. Drywalled rooms are ideal - all the corners are right there, and the surfaces are even.
Video on how to glue meter-long wallpaper together:
Installation of non-woven wallpaper on the ceiling
With the advent of non-woven finishes, the fashion for wallpapering ceilings has returned. This happened due to the versatility of the material:
- it has a different surface (corrugated, smooth, plain or patterned);
- durable;
- easy to clean with a vacuum cleaner and a damp cloth;
- suitable for dyeing.
It is necessary to glue wide wallpaper on a non-woven base on the ceiling in the following sequence:
- Prepare the surface - remove the lighting fixtures, insulate the wires, clean the ceiling of the remnants of the old coating, putty and prime it.
- If it is provided for by the repair plan, stick sockets, skirting boards and borders on the ceiling.
- From a wall with a window at several points, measure a distance equal to the width of the roll. Connect the dots with a line.
- Lubricate the resulting strip with glue.
- From the roll, cut the canvas a little longer than the width of the room.
- Attach the strip to the ceiling, aligning the edge with the corner or border, while you also need to focus on the drawn strip.
- Press the meter-long wallpaper with a roller, expelling air and excess glue in the direction from the center of the strip to the edges.
- Butt-glue the following strips.
It is quite difficult to stick heavy non-woven wallpaper on the ceiling. To make them more firmly fixed, the glue must be made thicker than indicated in the instructions. A thick composition is also easier to apply to the ceiling, it will not drain and drip.
The ceiling is often painted, it is important to remember that this can only be done on a dry surface. After wallpapering, at least 3 days must pass before painting.
The trick with which wide wallpapers can be glued to the ceiling alone is shown in the video:
Instructions for installing meter wallpaper on the walls
In principle, working with wide canvases is no different from gluing standard wallpaper.
All actions are performed in the same sequence:
- Sockets and switches are removed from the walls, the ends of the wires are insulated.
- Remove various fasteners (nails, brackets, self-tapping screws, dowels).
- They clean the walls of the old coating (the paint is washed off, the wallpaper is moistened with water and cleaned with a spatula).
- Irregularities are puttied and the dried putty is rubbed with fine-grained sandpaper. How to properly prepare a room for pasting, you can additionally look at the video:
- Cover the walls with one or two layers of deep penetration soil. This must be done, especially on moisture-intensive materials (concrete, drywall, wood). The primer clogs the pores of the base, thereby preventing the penetration of glue into them. The adhesion of wallpaper and walls becomes an order of magnitude higher.
- After the walls are completely dry, they move on to wallpapering. Glue for non-woven fabrics is dissolved in water, do it according to the instructions on the packaging of the glue.
- Determine the starting point from which meter-long non-woven wallpaper will be glued. Experts recommend starting from the corner - you need to retreat 104-105 cm from it (with a roll width of 106 cm) and draw a straight vertical line.
- Lubricate the wall with glue.
- Cut off the first strip 5-10 cm longer than the height of the walls.
- Align the top edge of the wallpaper with the line of intersection of the ceiling and the wall, while aligning the vertical edge of the canvas with the line drawn on the wall.
- Press the canvas in the center and level it with movements in the form of a “herringbone” - from the center to the sides.
- Use a roller or spatula to expel excess air from under the wallpaper.
- Trim excess wallpaper from top and bottom with a sharp knife.
- Continue gluing solid wide strips to the next corner.
- You can’t glue a whole strip into a corner - it can lead and wrinkle. From the extreme strip, the tape measure is turned around the corner by 1.5-2 cm, this size is fixed.
- A piece is cut from the new strip to the width of the resulting size.
- A cut off strip is applied to the wall smeared with glue, aligning it with the edge of the previous strip.
- If the second segment of the same strip has a width of more than 20-30 cm, it is used for gluing an adjacent wall. If too narrow a strip remains, it is better to cut off a new one from the roll.
- On the adjacent wall, a vertical is drawn, stepping back from the corner the width of the next strip of wallpaper.
- Wallpaper is applied to the wall smeared with glue, combining their edge with the outlined strip.
- In the middle of the resulting overlap in the corner, a vertical incision is made. Excess wallpaper is removed, and the strips are glued end-to-end. The seam should be invisible.
- Continue to work in the same sequence.
Important ! If the wide wallpaper is not too thick and the owner will not paint it, overlapping corners are allowed.
In this case, it will not be necessary to cut through the thickening, it is enough to roll the overlap with a roller well enough.
As you can see, there is nothing complicated in the process. More information can be found in the video:
Still, it is better to work together - one person stands on a stepladder and combines the canvas with the ceiling line, and the second equalizes the wallpaper vertically.

Pasting difficult areas
Gluing wallpaper on even walls is quite simple, it is a little more difficult to glue the corners with high quality. But the most tricky places are the areas behind the batteries, external corners and various decorative elements.
- heating pipes are different, depending on this, they decide on the method of gluing the walls behind them. In any case, this work is not easy to do, and with a meter-wide wallpaper it is doubly difficult. You can cut the canvas into small fragments and stick them individually. But this method is only suitable for plain wallpaper, it will not work to fold the pattern in this way. An easier way, accessible even to a beginner, is to paint the space behind the battery to match the wallpaper. They do this with a brush on a long curved handle, it is better to take acrylic paint.
- Wallpaper can be glued to external corners in several ways, they do not differ from the options for processing internal corners. This is the overlap method and the undercut method. In any case, you need to overlap not in the center of the corner, but 3-4 cm from it.
- If ceiling cornices or borders are provided, it is better to fix them before gluing the wallpaper. So the material consumption will decrease (no need to leave an upper allowance), and it will be easier to trim the wallpaper.
- Floor plinths, on the contrary, are best removed. They will subsequently hide unevenly cut or too short edges.
Professional tips for pasting difficult areas are shown in the video:
The installation process of wide non-woven wallpaper is not much different from working with standard width material. And small nuances and tips from experienced craftsmen are easy to find in a photo or video.