How to replace one color with another in photoshop. How to replace the color of an object with another in Photoshop in a separate area and in the whole picture
How to Recolor Anything and Everything in Photoshop
Sofya Skrylina, teacher of information technologies, St. Petersburg
The Photoshop graphics editor has a huge number of tools that you can use to recolor various objects. Some of them require preliminary selection of fragments, others do not require the use of selection tools, affecting only certain colors of the image. In this article, we will work only with the background or normal layer, without using any fill layers or layer blending modes.
Color Replacement Tool
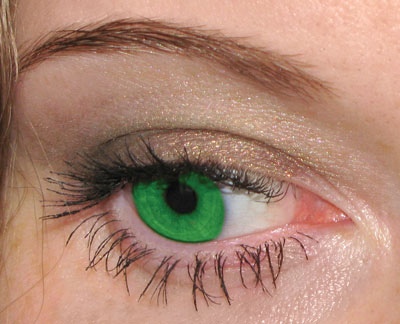
Tool Color replacement(Color Replacement) is in the same group as tools Brush(Brush) Pencil(Pencil) and Mix brush(Mixer Brush) and is intended for repainting image fragments. This tool has a total of four blend modes: Color tone(hue) Saturation(Saturation), Chroma(Color) and Brightness(Luminosity). Modes are used to recolor fragments. Chroma(Color) and Color tone(hue). The first mode provides a brighter shade, so when using it, you should choose shades of the color applied to the object that are much darker than in the second mode. So, in fig. 1 shows an example of repainting the iris in green of one shade: R=7, G=95, B=17. The first result is obtained in blend mode Chroma(Color), the second - in the mode Color tone(hue).
 a
a
 b
b
 c
c
Rice. Fig. 1. Results of repainting the iris with the Color Replacement tool: a — original image; b — Chromaticity mode; c - Color tone mode

The tool properties panel has a number of other options (Fig. 2):
- All pixels(Discontiguous) - the color is replaced wherever it meets on the path of the pointer,
- Adjacent. pix(Contiguous) - colors are replaced that are close in color to the one under the mouse pointer,
- Edge selection(Find Edges) - when replacing colors, sharp edges of objects are simultaneously preserved;
- parameter Tolerance(Tolerance) sets the sensitivity of the instrument;
- checkbox Smoothing(Anti-alias) sets smooth borders when replacing colors, set by default.
In the example considered, the preliminary selection of the object was not carried out, but if you are working with a more complex object that requires processing with a brush in several stages using several blending modes, then, of course, you must first select the object.
Note. Basically, instead of a tool Color replacement (Color Replacement) can be used Brush (Brush) which has the same blending modes: Chroma (Color) and Color tone (hue).
Beyond Tools Color replacement(Color Replacement) and Brush(Brush) color correction tools are used to repaint fragments. To call them use the menu Image(Image) -> Correction(Adjustments). Let's take a closer look at these tools.
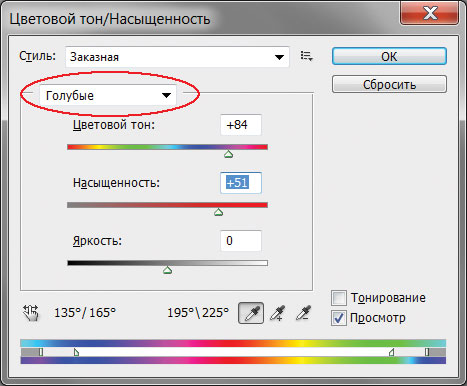
Dialog window « Hue/Saturation »
For changing the color of an object in a dialog box Hue/Saturation(Hue/Saturation) Responsible slider Color tone(hue). When choosing an item All(Master) replaces all colors that fall into the selected area. At the same time, you can specify one of the base colors of the RGB and CMYK models, which will be affected by the tool (Fig. 3). In this case, if the object is the only one in the image consisting of one group of colors, there is no need to pre-select it.


Rice. 4. The original image of the girl (a) and the result of recoloring and applying a tan (b)
So, in fig. 4 to change the color of the jacket from blue to lilac, it was not necessary to select it, it was enough to select the blue color to be replaced (see Fig. 3). But for coloring the rest of the objects, their preliminary selection was carried out.
Note. In the above example, a tool was used to recolor hair and sweaters Hue/Saturation (Hue / Saturation), and for applying a tan - tools Replace color (Replace Color) to darken the skin tone a little, and Color replacement (Color Replacement) to repaint the leather brown.
Don't forget to use the remaining two sliders when replacing the color: Saturation(Saturation), which allows you to increase or decrease the saturation of the selected color, and Brightness(Lightness), darkening or brightening the selected color.
Replace Color Dialog Box
Team Replace color(Replace Color) replaces the color in the image, which is selected using pipettes. The first click with the pipette selects the color to be replaced, subsequent clicks with the pipettes with the “+” or “-” sign refine the range of colors (Fig. 5). Parts of the image corresponding to the selected colors appear in white in the preview area. In addition to pipettes, a slider is used to expand or narrow the selected shades scatter(Fuzziness).
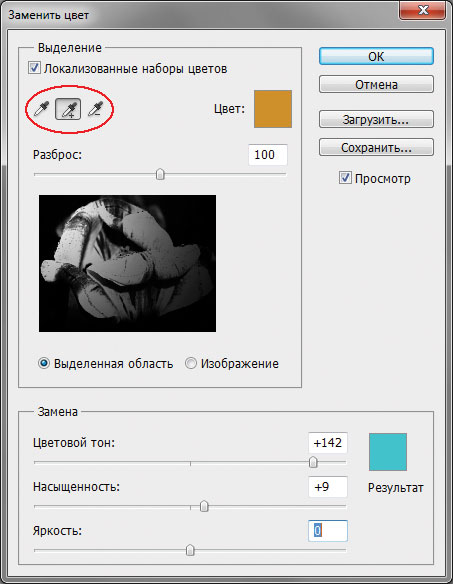
With sliders Color tone(hue) Saturation(Saturation) and Brightness(Lightness) determines the replacement color. In addition, replacement and replacement colors can be selected from the color palette, which is called up by clicking on the color swatch. In most cases, preliminary selection of fragments is not required.
Note. Please note that the dialog box Replace color (Replace Color) very similar to the selection tool Color Range (Color Range), which selects a fragment by a group of colors. It turns out that the dialog box Replace color (Replace Color) combines the functions of two tools: the selection tool Color Range (Color Range) and Color Replacement Tool Hue/Saturation (Hue/Saturation).
Best result when using a dialog box Replace color(Replace Color) is achieved if the replaced color is close to uniform. Otherwise, noise appears on the image, which you have to get rid of with the help of additional tools. An example of using this tool for recoloring tulip petals is shown in fig. 6.
 a
a
 b
b
Rice. 6. The original image of the tulip (a) and the result of its recoloring in the Replace Color dialog box (b)
Selective Color Correction
Selective color correction is carried out in the dialog box Selective color correction(Selective Color) (Fig. 7), which allows you to selectively change the amount of a compound color in any of the primary colors without changing other primary colors.

This tool can be used to recolor image fragments while maintaining the base color. For example, red can be changed to any other color that includes red: from yellow (a mixture of red and green) to lilac (a mixture of red and blue). But, for example, turning red into blue will not work. This tool is also indispensable in situations where you want to remove the color cast created by a light source, such as a conventional table lamp (Fig. 8).
 a
a
 b
b
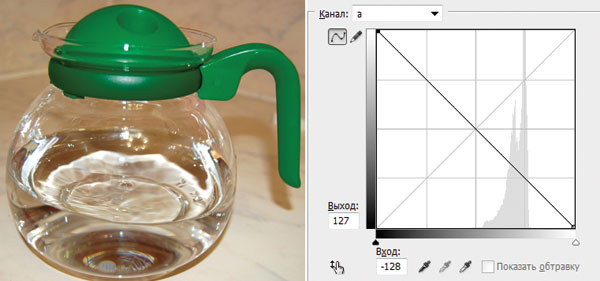
Using Lab mode
The Lab color model is based on three parameters: L- brightness (Lightness) and two chromatic components - a and b. Parameter a changes from dark green through gray to purple. Parameter b contains colors from blue through gray to yellow. This circumstance can be used to quickly recolor image fragments by inverting a straight line in each channel (provided that this object is easy to select or all other colors in the image are close to neutral). To invert a line, just drag the top right point of the line down and the bottom left point up.
a you can get the following results:
- red and burgundy colors are repainted in green;
- green becomes light brown.
When inverting a straight line in a channel b you can get other results:
- red becomes purple or lilac depending on the original hue, and magenta and lilac become red;
- yellow turns to blue.
When the straight line is inverted in both channels, the following results are obtained simultaneously:
- red is repainted in blue, the shade of which depends on the original shade of red;
- blue and magenta become green.
Note. Since the Lab color model can display more colors than the RGB model, converting an image from Lab to RGB and vice versa does not affect its quality. Therefore, the transfer can be carried out as many times as you need.
Now let's look at a few examples. On fig. 9 shows the original image of a jug with a lid and a red handle.
First you need to put the image in Lab mode by running the command Image(Image) -> Mode(Mode) -> Lab. In this case, the tool will fit perfectly to select the lid and handle. Quick Selection(Quick Selection).

 a
a
 b
b
 c
c
Rice. Fig. 10. The result of recoloring the fragments: a — in green color by inverting the straight line in channel a; b - to lilac color by inverting the straight line in channel b; c - to blue color by inverting the straight line in channels a and b
In the dialog box Curves(Curves) (it is called by the key combination Ctrl + M) from the list Channel(Channel) select a channel a and invert the straight line (Fig. 10 a).
If we invert the straight line in the channel b without changing the position of the line in the channel a, we get a lilac color (Fig. 10 b). Inversion of the straight line in both channels will give a blue color (Fig. 10 in).
During repainting, the colors of the images may fade. You can also increase their saturation in Lab mode without resorting to the dialog box Hue/Saturation(Hue/Saturation). To do this, it is necessary to increase the angle of inclination of the straight line in both color channels. On fig. 11 shows the original image of green leaves. When inverting a straight line in a channel a we get a faded brown color (Fig. 12).

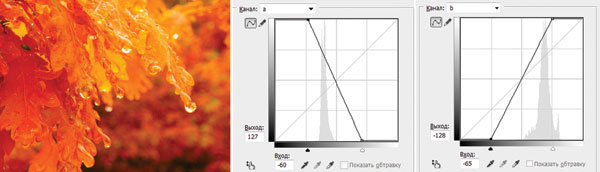
To increase the saturation of colors and turn the summer landscape into autumn, we will change in the channels a and b the angle of inclination of the straight line (Fig. 13).
As you can see, Photoshop offers a really huge selection of tools for recoloring image fragments. Which of the available tools to use is up to you.
Are you unhappy with the color of your shirt or hair? Want to experiment and maybe change something? All in your hands!
In this tutorial, I'll show you how to quickly and easily change the color of any element in your photo.
So, we open the image we need.
Personally, I chose this photo:
Now you need to select the area of the image whose color you want to change. In this case, it will be a T-shirt.
Use the tool Lasso and other selection tools ( Rectilinear lasso, magnetic lasso, as well as the tool Quick Selection and Magic wand):

In order to highlight the contours as carefully as possible, I recommend zooming in as much as possible.
Do not forget to pay attention to the fact that the outline of the selected area must be closed:

If the areas you want to select are not adjacent to each other, hold down the key while selecting SHIFT. This will add the selection to the previous one.
Do not worry if you accidentally got out a little beyond the contour, or selected an unwanted area. We'll sort this out a bit later.
So when you're done with the selection, go back to 100% of your image.
Now click on the icon Editing in Quick Mask Mode, which is in the toolbar right below the colors:

You will see something similar to my result - the selected area has retained its previous color, while the rest is filled with a translucent red color. This is the quick mask mode:

Then, making sure that the colors White and Black are selected, take the tool Brush, 13 pixels in size, with hard edges:. If you start "drawing" on your image black, this means that the sketched areas will be added to the selected area, if white- they will be deleted. This way we can adjust the boundaries of our selection.
To quickly change between white and black, you can use the key X on keyboard.
If the brush size is too large, silt, on the contrary, is small, adjust it to your liking.
But do not forget that you need to use only hard brushes, as soft ones will make the selection sloppy.
Once you're done, turn off mask mode using the same icon you used to activate it.
You now have a neat, carefully defined area. If you suddenly notice that you missed some speck or detail - go back to the quick mask to fix everything.
Now it's time to play with colors.
Create a new layer for the Hue/Saturation mode using the commands:
Layer - New - Layer.
Next: Image - Correction - Hue / Saturation.
and you can start your experiments!
The main thing is not to overdo it, as in some cases shadows and textural features may be lost, and the image will look unnatural.


Consider a dialog box
At the top " Selection» (Highlight) is a tab from « color range».

Using an eyedropper, a color sample is marked on the image sample that needs to be changed.
An eyedropper with a plus adds an area, an eyedropper with a minus subtracts.
Fuzziness setting
The slider defines the boundaries within which the color shades will change. With the maximum spread, almost all shades of the selected color that are available in the image will fall under the replacement. With a minimum spread, only those pixels that exactly match the sample will fall under the replacement.
Starting from version Photoshop CS4 there is an additional option Localized Color Clusters» (Localized color sets), designed to define areas of the same color. Its use allows you to more accurately highlight the color in the image.
In the lower part " Replacement» (Replace) dialog box « Replace color» (Replace color) is a tab from « Hue/Saturation» (Hue/Saturation) which, based on the name, selects the color and hue to replace.

Let's consider color replacement on a specific example.
Step 1
Opening the image in photoshop. Create a duplicate of the main layer at once (Ctrl + J).

Step 2
Go through the menu Image - Adjustments - Replace Color» ().
Let's say I want to change the color of a T-shirt.
Step 3
If you have a version from Photoshop CS4 and above, then immediately put a tick in front of " Localized Color Clusters» (Localized color sets).
We increase " Fuzziness» (Scatter) to the maximum value.
With the help of an eyedropper, mark the area on the image. Next, choose the color you want to change to. We click on the colored square with the signature " result» (Result) and select the desired shade.

It can be seen that in the area of shadows, the color is not sufficiently highlighted. Choose pipette « + » and click on the image in the crease area on the T-shirt.

The T-shirt was completely dyed, but at the same time, unnecessary areas were dyed, for example, the face. Choose pipette « - » and click on her face.

As you can see in the image itself, lips and ears remained painted, this defect can be corrected using eraser.

This method of color change works most successfully on contrasting images.
Also on images where there are few related shades to the color being changed.

And finally, one more piece of advice. If the image still contains several areas of the same color, and among them you need to change, for example, only one, then before using the command " Replace color» (Replace Color), highlight the area that needs to be replaced. Any selection tool can help you with this.
It often seems to beginners that Photoshop's "smart" tools are designed to simplify their lives by eliminating tedious manual work. This is partly true, but only partly.
Most of these tools "Magic wand", "Quick Selection", various correction tools, e.g. tool "Replace Color") require a professional approach and are categorically not suitable for beginners. It is necessary to understand in what situation such a tool can be used, and how to properly configure it, and this comes with experience.
Let's talk about tools today. "Replace Color" from the menu "Image - Correction".

This tool allows you to manually replace a certain shade of the image with any other. Its action is similar to that of an adjustment layer. "Hue/Saturation".
The tool window looks like this:

This window consists of two blocks: "Isolation" and "Replacement".
Selection
1. Shade sampling tools. They look like pipette buttons and have the following functions (from left to right): main sample, adding a shade to the replacement set, removing a shade from the set.

2. Slider "Scatter" determines how many levels (adjacent shades) are to be replaced.

Replacement
This block includes sliders "Hue", "Saturation" and "Luminance". Actually, the purpose of each slider is determined by its name.

Practice
Let's replace one of the shades of the gradient fill with this circle:

1. Activate the tool and click with an eyedropper on any part of the circle. A white area will immediately appear in the preview window. It is the white areas that need to be replaced. At the top of the window we will see the selected shade.

2. Go to the block "Replacement", click on the color box and set the color to which we want to replace the sample.

3. Slider "Scatter" adjust the range of shades to replace.

4. Sliders from the block "Replacement" Fine tune the tint.

This completes the manipulation of the tool.
Nuances
As mentioned at the beginning of the article, the tool does not always work correctly. As part of the preparation of materials for the lesson, several experiments were carried out to replace colors in various images - from complex ones (clothes, cars, flowers) to simple ones (one-color logos, etc.).
The results were very contradictory. On complex objects (as well as on simple ones), you can fine-tune the hue and the area of application of the tool, but after selection and replacement, you have to manually refine the image (eliminate halos of the original hue, remove the effect on unwanted areas). This moment negates all the advantages that a “smart” tool provides, such as speed and simplicity. In this case, it is easier to do all the work manually than to redo it behind the program.
With simple objects, things are better. Halos and unwanted areas, of course, remain, but are eliminated easier and faster.
The ideal use of the tool is to replace the color of an area surrounded by a different shade.
Based on the foregoing, one conclusion can be drawn: it is up to you to decide whether to use this tool or not. Worked well on some flowers...
,When editing images in Photoshop, it often becomes necessary to change the color of an object or part of it, and do it in such a way that it retains its texture, shadow, transition effects, and other attributes exactly. For obvious reasons, simple repainting with a brush is not applicable here, this method is only valid when working with solid objects.
When replacing the color of textured or non-uniform color objects, you cannot do without the use of additional tools. So, how to replace the color of an object in Photoshop.
Replacing color with changing layer blend mode
The easiest way to replace a color in Photoshop is to use the Blend Mode. Now we will not analyze exactly how the interaction of colors works when using different modes, it is better to get down to business right away. In our example, we will change the color of the inner circle of the hand-drawn gear. Right now it is blue, but we want it to be red and still retain all of its gradients and effects.
Open the images in Photoshop, create a new layer and change its blend mode to .

Select the desired color in the palette and start painting with a regular brush directly on top of the object. Isn't it too easy?

Yes, if the areas adjacent to the object being edited are black, white or gray (of any gradation). In all other cases, the area to be repainted must first be selected with a lasso, magic wand, or mask.
Color replacement by color correction
This method is more suitable for replacing the color of objects that have a more or less uniform tone, such as clothing, a flower, a car body, and the like. Open the image in Photoshop and choose from the menu Image -> Correction -> .

In the window that opens, take the eyedropper and click on the color you want to replace, after which it will immediately appear at the top of the window.

Then click on the square with the color (Result) at the bottom of the dialog box and select the desired color in the palette that opens.

Changes can be viewed in real time. To more accurately determine the object to be repainted, you can use the scatter and pipette option «+» and «-» , allowing you to add and remove adjacent areas.
Replacing color with a special brush
The latest versions of Photoshop have a special brush that allows you to replace the selected color, including neutral, with any other. It is located in the same tool group as the regular brush. The essence of its work is to replace the color of adjacent pixels, the error of which is determined by the user himself. Yes, with permission 1 percent only one specific color that is in focus of the brush will be replaced.

With admission 30 percent The brush will replace the color of not only those pixels that will be in its focus, but also adjacent pixels that have a similar color tint. At 100 percent tolerance, all colors will be replaced. The main difficulty when working with a brush "Color Swap" in that the user has to select the tolerance empirically. As in our opinion 14-17 percent for a start it is quite enough, if necessary, this threshold can always be raised.
Also, when working with this tool, you should make sure that the drawing mode is set to "Chroma", but not "Color tone", otherwise the color overlay will be uneven. When repainting, you should be careful not to accidentally climb onto an adjacent area, you need to drive the brush gently without breaking away.

If possible, it is better to select the area to be repainted with a lasso or other tool.