How to fasten wooden parts without nails, glue and screws. Methods and ways of connecting wooden parts How can wood parts be connected
All photos from the article
In this article, we will review what options are available for joining wood products. And there are a great many such methods, from a simple butt joint to the most complex dovetail joint. It is important to remember that not all of them can be done on your own, but the information below will definitely not be superfluous.

Reliable hitch - a guarantee of strength and reliability for any design
Listing the available options
All of them are distinguished by their strength and complexity, for example, the cabinet body is assembled with a seam or butt joint, less often they use a “groove” or “moustache” combination. But for the manufacture of a door frame or panel, the skill of a spike connection is useful.
The following are ways to connect wooden parts.
Joining parts "butt"
Butt alignment is called fixing the edges. For this, fasteners and glue are usually used. But the butt joint is not very reliable, so it should be strengthened, which is not so difficult to do.

It is desirable to strengthen the butt fastener with a metal fastener: corners and self-tapping screws
This method is usually used when assembling the front frame of a cabinet, where strength is not important, since the frame parts are securely attached to the cabinet itself. Butt jointing of wooden structures is usually reinforced with lamellas or dowels, which are able to combine individual parts during gluing.
Fastening parts "in the mustache"
This combination has some differences from the previous one. When gluing the surface, the parts are beveled at an angle of 45 ° with respect to the axis. The connection of wooden parts "with a mustache" must also be strengthened with the help of additional fasteners.
Note! Typically, this method of combining is used when it is necessary to connect two pieces of molding in the corner.
Strengthening the connection of wood parts
As mentioned above, you can strengthen with the help of ordinary wooden dowels. Nagel fortifications are usually made with the help of two dowels, glued into one and the other end of the crossbar, into vertical posts, into their corresponding sockets. There is a specific instruction for making such connections:
We mark nests for dowels:
- For a clear markup, it is necessary to attach the parts to be fastened to each other.
- Draw a line with a pencil, marking the places for the dowels.

- Continue the line to the edge of each of the blanks, using a square.
- Drilling sockets for dowels:
- In order for the nest to be located exactly in the middle of the wooden part, it is necessary to use a drilling jig.
- In order for the nest to be of the required depth, it is necessary to use a sleeve for the stopper.
Advice! If you do not have a stop collar, you can replace it by putting a small piece of tape on the drill bit.
- Gathering details:
- It is necessary to apply glue to the dowel and insert it into the corresponding socket of the first part.
- We connect the parts together.
- We clamp.
- Leave for a while to let the glue dry.
Strengthening the connection with lamellas
If we compare the types of connections of wooden structures, of course, the lamellar combination wins. Let the price of such connections be a little higher, but it is very easy and convenient to work with them.
Lamels are compressed wood in the form of flattened balls. Nests for such balls are cut out using a special lamellar machine. In this case, the hole is obtained in an ideal shape. And due to the fact that the lamellae are slightly shorter than the socket, the alignment of parts during gluing is more accurate. It is very uncomfortable.
It will be useful for beginner home craftsmen to learn about the methods of joining wooden parts. We devote a brief educational program to this topic, which will describe the main types of carpentry joints and rallying using glue, nails, screws or dowels, or without them at all.
Connection selection rules depending on the type of load
End connections are the simplest; they are used if necessary to build up a part. These joints are best able to withstand compressive loads, however, when punching specially shaped locks, good resistance to twisting, stretching and bending can be achieved. The standard version of the end connection is with trimming to half the thickness of both parts. The cut can be straight or oblique, if necessary, to prevent bending, stretching or twisting, a spike or an obtuse angle is cut at the end of each cut, or the cut is made stepped, forming a kind of “castle”.
 1 - direct overlay half a tree; 2 - oblique pad; 3 - straight overlay with a stepped joint; 4 - overlay half a tree with an oblique joint; 5 - oblique overhead lock; 6 - half-tree connection with an oblique spike
Corner and side connections are used to connect straight parts into a truss or frame. Usually this part of the structure is supporting, so the main loads fall on displacement and compression. If the structure experiences the static load provided, a rectangular spike is cut on one of the parts, and a groove or eyelet of the appropriate size is cut on the other. If it is possible to act on the break of the structure, the spike and groove are cut in the shape of a trapezoid.
 Corner joints: 1 - with an open through spike; 2 - with a deaf closed spike; 3 - with a through oblique spike
Overhead cross and T-shaped connections are used, as a rule, for additional connections between critical structural details. The main load in them is compression, displacement and rupture. The first two types of load are eliminated by cutting half a tree or less, followed by matching the parts. The shoulders of the notches take the main load on themselves, it remains only to fix the connection with screws or overhead brackets. In some cases, a dowel is used to strengthen the connection or a spike with a wedge is cut down.
 1 - cross connection with an overlay in half a tree; 2 - cross connection with landing in one socket; 3 - T-shaped connection with a hidden oblique spike; 4 - T-shaped connection with a straight stepped overlay
A separate type of connections - box. They are designed to connect boards at right angles. Usually, for a box joint, teeth are cut on each board, the width of which is equal to the distance between them. On different boards, the teeth are cut with an offset, so when connected, the corner of the boards looks like one piece. The teeth can also be wedge-shaped, preventing the corner from breaking in one direction, or additionally fastened with glue or nails.
 Box corner joints: 1 - with straight through spikes; 2 - with oblique through spikes
How to make a spike connection
To make a spiked joint, you need to circle both parts with a marking line along all faces at a distance from the end equal to the width of the joint. On two opposite sides and the end, the body of the spike is marked with lines, the markings on both parts are completely identical.
The spike is cut from the sides with a hacksaw for a transverse cut and the wood is chipped with a chisel. The width of the spike is made 2-3 mm larger for subsequent precise processing with a knife or chisel. The groove is cut with a hacksaw for a longitudinal cut and chipped off with a chisel, also leaving a small allowance for processing. This is followed by an adjustment, during which the parts are combined and achieve the most snug fit.

With a T-shaped spike connection, a central spike or groove is cut on one of the parts, and an eye is hollowed out on the other or two side cuts are made, depending on the type of the first part. To make an eye, a chisel is used, turning the inclined part of the blade into the hole. If the eye is not solid, I make the spike 8-10 mm more depth and cut off its end in the form of a developed wedge. So when driving, the spike will open itself, and the part will be firmly planted.
To connect wide parts, you can use a box connection by cutting several spikes and grooves. The easiest way to fasten a stud joint is to drill it through and across the studs and drive a wooden dowel (window gusset) into the hole.

How to glue boards together
A very popular method of joining boards and bars is longitudinal and transverse gluing. When connecting boards with a wide side, the end can be even, although in most cases a tongue-and-groove profile is used. It is very important to fit the parts tightly so that the adhesive layer is as thin as possible, only in this way can maximum strength be achieved. Sometimes a small amount of cotton fiber is applied to the end smeared with glue, this improves the quality of the hitch.

The boards can also be connected in profile, but for this it will be necessary to perform a wedge-shaped gear cutting of both ends with a tooth offset to the floor for different parts. At home, such an operation can be performed using a manual milling cutter.

For gluing parts, casein glue or high concentration PVA is used; sifted wood flour is added to the adhesive to give strength. The surfaces are covered with glue and kept in air for 3-5 minutes, after which they are placed under oppression or squeezed with clamps. Such a connection is stronger than the tree itself and never breaks at the junction.
How to assemble elements of load-bearing structures
For load-bearing structures, two types of connections are used - extension and articulation. The easiest way to splice two parts is to make a cut with a hacksaw half the thickness at the same distance from the ends, and then chop off excess wood with an ax. After matching the two parts, the connection is usually fastened with two overhead strips nailed to the side of the cut. Bonding is also possible, but only if the parts are tightly fitted.

Half-cut ends can be brought together at almost any angle, this is the main method of connecting roof trusses. To fasten the parts, an additional tightening bond is required: the beam is applied to the connected parts on the side at a distance of 30-50 cm from the corner and cut to half the thickness at the points of contact, and then the structure is fastened with nails.

Often vertical and inclined structures need support, for example when connecting the truss system to floor beams. In this case, the landing slots on the horizontal beam are notched, into which the racks will be inserted. It is very important to observe the angle of inclination and make a hemming no more than a third of the thickness of the timber.

Connections with Special Links
Almost all carpentry connections are made with additional reinforcing ties. In the simplest example, the role of such is played by nails or self-tapping screws.
When building up parts, the assembly can be strengthened with a through bolted connection, clamps, staples and wood grouses, or it is simply wrapped with cold-rolled wire. It is enough to fasten the spliced vertical supports with two overhead strips - wooden or metal.

Corner joints are most often fastened with staples, patch plates or corners. In cases where it is necessary to maintain a slight mobility of the connection, one through bolt is used, which either flashes across the place of the lining of the parts, or tightens them in the longitudinal direction with a minimum indent from the lining.

The place of fastening of the special connection must be removed from the edge by at least 10 diameters of the fastener and must not have defects. It is important to remember that often the bonds do not provide the overall strength of the connection, but only compensate for the unaccounted for load.
Due to the limited size of the tree, the creation of building structures of large spans or heights from it is impossible without connecting individual elements. Connections of wooden elements to increase the cross section of the structure are called rallying, and to increase their longitudinal length - splicing, at an angle and attaching to the supports - anchoring.
Increasing the workpieces in length is called splicing. The increase in blanks along the section is called rallying. Connections of wooden structures are classified according to various criteria. For example, by the type of work of the element and the work of the connection itself (connections on stretched bonds, connections on pliable bonds).
By the nature of the work, all the main connections are divided into:
- without special connections (frontal stops, cuts);
- with compressive bonds (shoe keys);
- with bonds working in bending (bolts, rods, nails, screws, plates);
- with ties working in tension (bolts, screws, clamps);
- with shear-shear bonds (adhesive joints).
According to the nature of the work of the joints of wooden structures, they are divided into pliable and rigid. Compliant are made without the use of adhesives. Deformations in them are formed as a result of leaks.
It is customary to distinguish between three groups of joints of wooden structures:
- Contact connections (without the use of working mechanical connections: notches and other "end-to-end" connections)
- Connections using mechanical connections (dowel: bolted, nailed; keyed, connections on washers, dowel plates, etc.)
- Adhesive and combined type joints
Connection Requirements
 1. Reliability. In particular, it is recommended to minimize unfavorable (unreliable) types of work of wood in joints (work of wood for chipping, crushing across the fibers, stretching across the fibers). The so-called principle of fragmentation is closely related to the concept of reliability: "the smaller the connections and the more of them, the higher the reliability of the connection." In other words, ten small-diameter bolts are preferable to one bolt at the same metal costs, since in the first case, the wood works mainly for crushing (“reliable” type of wood work), and in the second case, for shear (“unreliable” type of wood work)
2. Strength. In particular, the desire for equal strength with the main part of the structure, the absence of weakening (holes) in the section.
3. Reduced labor intensity in the manufacture and installation of structures (manufacturability)
4. Deformability. For example, in contact joints, the value of the ultimate deformation of the collapse is limited
The work of wood in joints. Types of wood work for crushing across and at an angle to the fibers, as well as for chipping, are unfavorable. It is these types of wood work that accompany the work of joints, and it is they that are most often a direct or indirect cause of structural failure.
Collapse. The work of wood on crushing across and at an angle to the fibers is characterized by increased deformability and low strength. The “force-strain” diagram during the collapse of wood across the fibers reflects the effect of flattening of tubular wood cells. There are three types of crush:
- n collapse over the entire surface (R cm = 1.8 MPa, the most unfavorable type of collapse)
- n collapse into parts of length
- n collapse on part of the surface (under the washers) (R cm = 4 MPa)
The increase in strength in the latter case is explained by the reinforcing effect of the wood fibers surrounding the crushing area.
Main empirical dependences at crushing.
Dependence of resistance on the angle between the direction of the force and the direction of the wood fibers
R cm, a \u003d R cm, 0 / (1 + (R cm, 0 / R cm, 90 - 1) sin 3 a
Dependence of resistance on the length of the crush area
R cm, L = R cm (1 + 8 / (L cm + 1.2);[cm]
chipping. The work of wood for shearing (shear) is characterized by low strength and brittle fracture. In a "pure" form, chipping practically does not occur. Usually this type of stress state is combined with others (tension and compression across the fibers).
There are two types of chipping: one-sided chipping and two-sided chipping. In the first case, the strength is less, since the degree of uneven distribution of stresses is higher. In the calculations, a uniform distribution of stresses along the length of the shear area is conditionally assumed. Therefore, the concept of "average shear resistance" is introduced.
R sk,av = R sk,av / (1+ bL/e)
The formula reflects the physical essence of the shearing phenomenon: coefficient b takes into account the type of shearing, and the L/e ratio takes into account the effect of normal stresses accompanying shearing. R sk, sr- resistance to chipping with a uniform distribution of shear stresses.
The dependence of chipping resistance on the angle between the direction of the force and the direction of the wood fibers has the form:
R sc, a = R sc, 0 / (1 + (R sc, 0 / R sc, 90 - 1) sin 3 a
| Purpose of connections |
In designs manufactured in the factory |
In structures manufactured using lightweight means of mechanization. |
|
|
dried lumber |
from beams and boards |
from local roundwood |
|
| Rallying | With waterproof adhesive | On oak or birch Derevyagin plates; on nails and dowel pins made of round steel, of plastics | On pads, bolts, brackets |
| Building | |||
| In a tight joint |
frontal stop |
||
| In a stretched joint | Serrated joint on waterproof glue | Wooden slips and spacers on dowels made of round steel, on bolts, nails | Wooden plates on round steel dowels, bolted |
| Overlays with glued washers | Overlays with washers on deaf dowels and screws | Steel overlays with washers on deaf dowels and capercaillie | |
| Nodal adjunctions | |||
| Compressed rods | Frontal and three-frontal emphasis | Frontal notch; frontal and three-frontal emphasis | |
| tension rods | Steel bands or clamps through linings and gaskets on glue or dowels and bolts | Steel bands or clamps through linings and gaskets on nails or dowels and bolts | Steel strands or clamps through the lining on the dowels and bolts; cross profile brackets |
| Rods that perceive alternating forces | Center bolt through glue washers | Pins, cross profile pins, nails | Nagels, pins of a cross profile |
| Center bolt, through claw washers, washers on blind dowels, screws, cross pins or nails | Center bolt through washers on deaf dowels, capercaillie or cross profile pins | ||
The main types of connections (when rallying)
1. Connections on cuts working without special working connections. Connections are thrustless; only auxiliary cross ties are required (obsolete type of rallying)
 |
 |
| Connection diagram on cuts | |
| The main area of application of cuts is the nodal connections in block and log trusses, including in the support nodes of the junction of the compressed upper chord to the stretched lower chord.
The elements of wooden structures (d.c.) connected by a notch must be fastened with auxiliary connections - bolts, clamps, brackets, etc., which should be calculated mainly for mounting loads |
|
|
|

2. Connections doweled working mainly for compression(c), similar to the compressed braces of the truss (c). Spacer Q w is perceived by working cross-links (p) - bolts, clamps, etc., working on stretching similar to stretched truss posts (p)

|
 |
|
Dowel connection diagram |
3. Connections on dowels working mainly for bend(and), similarly to the racks (and) of a diagonal truss. Connections are non-expansion, only auxiliary cross braces are required
4. Connections on glue working mainly on shift(τ), similar to a weld in metal beams. Cross-linking is usually provided by the adhesive line itself.
Width Connections
When joining narrow boards, shields of the required dimensions are obtained.
There are several ways to connect.
1)Connection on a smooth fugue;
With this connection method, each rail or board is called a plot, and the seam that is formed as a result of the connection is called a fugue. The quality of the jointing is indicated by the absence of gaps between the joints of the edges of adjacent plots.
2)Rail connection;
Along the edges of the plots, grooves are selected and inserted into their rails, fastening the plots together. The thickness of the lath and the width of the groove should not exceed 1/3 of the thickness of the board.
3) Connection in a quarter;
In fastened plots, quarters are selected along the entire length. In this case, the dimensions of the quarter, as a rule, do not exceed half the thickness of the plot.
3) Tongue and groove connection (rectangular and triangular);
This type of connection provides the plot with a groove on one side and a ridge on the other. The comb can be either rectangular or triangular, but the latter is rarely used because its strength is slightly worse. The tongue and groove connection is quite popular and is often used by parquet manufacturers. The disadvantage of such a connection is considered to be less economical, since more boards are used.
4) Dovetail connection;
This type of fastening is a bit similar to the previous one, only the comb has a trapezoidal shape. Well, hence the name.
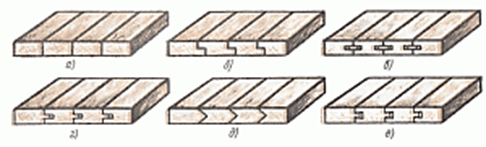
Connection of boards into shields: a - on a smooth fugue, b - in a quarter, c - on a rail, d - in a groove and a rectangular comb, e - in a groove and a triangular comb, e - in a dovetail
Also, when assembling the shields, dowels, tips in the groove and a comb with the rail pasted into the end are used. Among the glued rails, there are triangular, rectangular and glued ones, and when using the dowel, the dovetail groove is mainly chosen. All this is necessary for reliable fastening of the shield.

Shields: a - with dowels, 6 - with a tip in the groove and comb, c - with a glued rail in the end, d - with a glued triangular rail, e - with a glued triangular rail.
Length connection
Among the popular types of connections along the length can be distinguished: end-to-end, on the "mustache", in the groove and comb, on the toothed adhesive connection, in a quarter and on the rail. The most popular gear connection, because it has the best strength.

The connection of the bars along the length: a - end-to-end, b - in the groove and ridge, c - on the mustache, d, d - on the toothed adhesive connection, e - in a quarter, g - on the rail
There is also splicing, when longer segments are joined together. This can happen in several ways. For example, half a tree, oblique cut, oblique and straight overhead lock, oblique and straight tension lock and end-to-end. When choosing half-wood splicing, the required joint length should be 2 or 2.5 times the thickness of the timber. For greater reliability, dowels are used, for example, this can be found in the construction of cobbled houses.
When using an oblique cut with end trimming, the dimensions are 2.5 - 3 of the thickness of the beam and are also fastened with dowels.
The connection with a straight or oblique overhead lock is used in structures in which tensile forces are present. A straight overhead lock is located on a support, and an oblique one can be placed at the supports.
If you decide to use a bevel cut with end trimming, then the connection should have 2.5 or 3 bar thicknesses. In this case, the same dowels are used.
When docking with a straight or oblique tension lock, you don’t have to worry about strength, but such a connection is difficult to manufacture, and when the wood dries out, the wedges are weakened, so this connection method is not suitable for serious structures.
Butt splicing is when the two ends of the beam are placed on a support and securely connected with staples.

Splicing: a - half a tree, b - oblique cut, c - straight overhead lock, d - oblique overhead lock, d - straight tension lock, e - oblique tension lock, g - end-to-end
The connection of beams or logs can be found in the construction of walls or in the upper or lower trim in frame houses. The main types of compounds are half a tree, half-paw, spiked and corner frying pan.
A half-tree cut is considered to be a cutting or cutting of half the thickness at the ends of the bars, after which they are connected at an angle of 90 degrees.
The half-lap connection is formed when cutting at the ends of the bars of inclined planes, due to which the bars are tightly connected. The slope size is determined by the formula.
Cutting with a corner frying pan is very similar to cutting in half a tree, but the distinguishing feature is that with such a connection one of the bars loses a small part in width.
Building
The extension of beams and logs is the connection of elements in height, which is often used in the construction of poles or a match.
There are several types of extensions:
1) butt with a hidden spike;
2) end-to-end with a through comb;
3) half-wood with bolting;
4)half a tree with fastening with clamps;
5) half-tree with fastening with strip steel;
6) oblique cut with fastening with clamps;
7) butt with overlays;
8) bolting;
The length of the joints is usually 2-3 of the thickness of the joined beams or 2-3 of the diameter of the logs.

Connection of logs during extension: a - end-to-end with a hidden spike, b - end-to-end with a through ridge, c - half-tree with fastening with bolts, d - half-tree with fastening with strip steel, e - half-tree with fastening with clamps, e - oblique cut with fastening with clamps, g - end-to-end with overlays and fastening by bolts
spike connection
When spike knitting bars, a spike is cut on one, and an eye or nest is made on the other. Spike knitting of bars is often used to create joinery, doors, windows or transoms. All connections are made with glue. You can use not only one, but two or more spikes. The more spikes, the larger the bonding area. This type of connection can be divided into corner end, corner middle and corner box.
At the corner end connection, an open through spike is used (one, two or three), a spike with a dark through and blind, plug-in dowels. Angular middle connections can be found on the doors. Angled middle and end can additionally use nails, screws, dowels or bolts.

Corner spike connections: a - open through single spike UK-1, b - open through double spike UK-2, c - open through triple spike UK-3, d - blind spike with semi-darkness UK-4, e - through spike with semi-darkness UK-5; blind on the mustache with a plug-in flat stud UK-10, l - through on the mustache with a plug-in flat stud UK-11

Angled middle joints on the spike: a - blind type US-1, b through US-2, c - double through US-3, d - blind into the groove and crest US-4, e - blind into the groove US-5, e - blind on round dowels US-6
Wooden parts are used in many products. And their connection is an important process on which the strength of the entire structure depends.
Dozens of different compounds are used to make furniture and other wood products. The choice of how to connect wood parts depends on what the product should be in the end and what load it should carry.
Connection types
When connecting wooden parts, you need to remember an important point - always a thin part is attached to a thick one, but not vice versa.
According to the relative position of the elements, the following methods of connecting wood parts are distinguished:
- extension - increasing the height of the part;
- splicing - elongation of the workpiece;
- rallying - increasing the width of the element;
- knitting - connection at an angle.
The methods of joining wooden parts in the manufacture of furniture are most often used as follows:
- gluing;
- "dovetail";
- butt;
- grooved;
- overlap;
- deaf on thorns;
- through spike.
Let us consider the technologies of some compounds in more detail.
Splicing to length
Such wooden parts have some nuances. At its core, this is the elongation of elements in the horizontal direction. Splicing can be:
- End-to-end - cuts of the ends are made at a right angle and are combined with each other. A bracket is hammered into both beams (logs).
- Oblique butt - the cuts are made at an angle, and the ends are fastened with a pin or nail.
- End butt with a comb.
- Direct overlay - the length of the cutting is 1.5-2 times greater than the thickness of the beam (log).
- Oblique overlay - the ends are cut at an angle and fixed with bolts.
- Overlay with an oblique cut - end ridges are made at the ends of the parts, having a width and length of one third of the thickness of the timber.
Height extension
From the name it is clear that the essence is to lengthen the bars or logs in the vertical direction. The axes of the elements are on the same vertical straight line. Extension types are:
- End-to-end extension. To perceive random loads, a spiked pin is inserted on the sides.
- Extension with one or two spikes. The width and height of one spike must be at least one third of the timber thickness. The depth of the nest is slightly more than the height of the spike.
- Growing in half a tree. The ends of both logs must be cut to half their thickness by 3-3.5 diameters in length.
- Tongue extension. In one beam, you need to cut a fork into which you need to insert the correspondingly cut end of the other workpiece. The connection itself must be wrapped with tin.
Width payment
Used to increase the product in width. When using rallying methods, it is important to pay attention to the location of the annual rings of the tree. It is important to alternate boards depending on their direction. The payment options are:
- Butt - the details need to be trimmed and milled on a square.
- In tongue and groove - the height and width of the ridge is equal to 1/3 of the thickness of the board.
- In a hacksaw - the edges must be trimmed at an acute angle to the wide plane of the board.
- Comb with a height of 1/3 to half the board.
- A quarter with a ledge equal to half the thickness of the board.
- In the tongue with rails - in each board, select the grooves into which you need to insert the rail, which has a width twice the depth of the groove.
knitting
Knitting is used when it becomes necessary to connect parts at an angle. The types of knitting are:
- knitting in half a tree using a hidden spike;
- knitting in a semi-paw;
- single and double slotted spikes;
- slotted paw.

butt
The easiest way to join two pieces together. Joining wooden parts at right angles is done using this method. The surfaces of the two parts are carefully adjusted to each other and pressed tightly. There is a connection of wooden parts with nails or screws. Their length should be such that they pass through the first part and go deep into the second one by about 1/3 of the length.
For the fastening to be reliable, it is necessary to drive in at least two nails. You need to place them on the sides of the center line. The thickness of the nail should not cause cracking of the wood. Therefore, it is recommended to pre-make holes with a diameter of 0.7 of the thickness of the nail used.

To enhance fixation, lubricate the surfaces that are connected with glue. For rooms that will not be under the influence of moisture, you can use carpentry, casein or skin glue. In the case of using the product in high humidity conditions, it is better to use a moisture-resistant adhesive, for example, epoxy.
Overlay T-connection
To perform such a connection of wooden parts, you need to lay one workpiece on top of another and fasten them to each other using bolts, screws or nails. You can arrange wooden blanks both at a certain angle to each other, and along one line.
So that the details do not change, use at least 4 nails. If there are only two nails, then they are driven in diagonally. To make the fixation stronger, the nails must pass through both parts, and the protruding ends must be bent and deepened into the wood.
Half tree connection
To perform such a connection of two wooden parts, certain skills and experience are required. It is performed as follows. In both workpieces, samples are made with a depth that corresponds to half of their thickness. The width of the sample must be equal to the width of the part.
The method of joining wooden parts in half a tree can be performed at different angles. In this case, it is important to ensure that the angle is the same on both wooden blanks, and the width corresponds to the width of the part. Due to this, the parts are tightly pressed against each other, and their edges are located in the same plane.

In addition, such a connection may be complete or partial. In the case of a partial connection, the end of one workpiece is cut at a certain angle, and an appropriate sample is made at the end of the other. Such connections include angular in the mustache of a half-tree. The bottom line is to trim both spikes at an angle of 45 o, as a result of which the seam between them is located diagonally. When using this method, you need to be especially careful, and make corner cuts with a special tool - a miter box.
Cleat
Such wooden parts are used for fastening planks or when laying the floor. The edge of one board has a spike, and the edge of the other has a groove. Accordingly, fastening occurs when the spike enters the groove. Such a connection looks very neat, since there are no gaps between the boards.
Doing tenons and grooves requires some experience. And besides, for the manufacture will require a special machine. Therefore, it is easier to purchase ready-made parts.
Connector "socket-thorn"
The most commonly used method of joining wooden parts. Such a joint is strong, rigid and looks as neat as possible. To make such a connection, you need to have some skills and experience, as well as be careful. An incorrectly made socket-thorn connection is fragile and looks ugly.
Its essence is the following. At the end of one workpiece, a groove is drilled or hollowed out, and at the end of the other, a spike. It's better when the elements have the same width. If the thickness is different, then the spike is made in a thin part, and the groove, respectively, in a thick one.

Spike connection sequence:
- Using a thickness gauge, draw two risks parallel to each other on the side of one workpiece. The distance should be the width of the future spike. For its evenness, markings should be made on both sides.
- The most optimal tool for making spikes is a hacksaw with a narrow blade and fine teeth, or a bow saw. During operation, the teeth of the tool should pass along the inner edge of the marking line. For convenience, it is better to clamp the part in a vice. It is best to make the spike a little larger than the required size. Then, if necessary, you can remove the excess. But if the spike is shorter, then the whole process will need to be repeated again.
- Using a chisel or chisel, a nest (groove) is made in the second part. Naturally, the dimensions of the groove must correspond to the dimensions of the spike. It is best to drill holes around the entire perimeter of the groove before proceeding with chiselling. The edges are carefully processed with a chisel.
If the connection of wooden parts is done correctly, then the surfaces of the edges of the spikes fit snugly against the walls of the nest. This gives good adhesion when gluing. In order for the spikes to be tighter, their dimensions should be 0.2-0.3 mm larger than the dimensions of the socket. If this value is exceeded, the bowstring may split; if the tolerance is less, the fastening will lose its strength during operation.
In addition, such a connection also involves gluing and fastening with screws, nails or wooden dowels. To simplify the work, holes should be drilled before screwing in the screws. The heads of the screws are hidden in a secret (made using a countersink). The pilot hole should be equal to 2/3 of the screw diameter and less than 6 mm (approximately) of its length.
Gluing
Bonding wooden parts is carried out as follows:
- The surfaces to be glued are cleaned with a lint-free cloth, and the roughness is cleaned with fine emery.
- Using a cardboard stick, apply wood glue in an even thin layer on all necessary surfaces.
- The surfaces smeared with glue must be rubbed against each other. This will ensure smooth contact and strong bonding.
- The parts must be pulled together so that the retention at the joints is reliable. Measuring the diagonals will make sure that the corners are straight. They must be equal. If this is not the case, the position of the elements needs to be corrected.
- The connection is strengthened by drilling pilot holes into which finishing nails are driven in or screws are screwed in. The heads of the screws must be recessed, for this the holes must be bored. The nails are deepened using a punch.
- Holes with nails are covered with putty for wood. Holes bored for screws are closed with hardwood plugs lubricated with glue. When the glue or putty is dry, the surface is sanded so that it is smooth, and then varnished.

Necessary tools and fixtures
Implementation tools are very diverse. They are selected depending on the type of work performed. Since in carpentry the processed elements are larger than in carpentry, respectively, the tool must be suitable.

To connect wooden parts, use the following:
- axe;
- planer, straight and curved plows, bear, sherhebel - more thorough surface treatment;
- chisel - chiseling holes and nests;
- chisel - for cleaning cuts;
- drills with various tips - for through holes;
- various saws - for sawing up and down;
- hammer, hammer, sledgehammer, mallet;
- square, compasses, level and other auxiliary tools;
- nails, metal staples, bolts with nuts, screws and other fastening products.
Conclusion
In fact, there are many more ways to connect wooden parts of furniture or other structures. The article describes the most popular methods and implementation technologies. It is important to remember that the connection of wooden parts for painting or varnishing must be carefully prepared, and all fasteners must be strong and made to last.
At the heart of all connections is the knot - the place of attachment. Depending on what shape the connected parts resemble and how the node is located, there are several types of connections. Among them are end, side, corner, T‑shaped and cruciform.
The main types of connections and their requirements
The emergence of new types and methods of manufacturing joints of wooden elements has led to significant progress in the development of wooden structures in recent decades. In modern wooden structures, along with traditional, hand-made connections, new connections of an improved type are used.
The timber used for construction needs in the form of logs and lumber has a maximum cross-sectional dimension of 25-28 cm and a maximum length of 6.5 m. Due to the limited size of the tree, the creation of building structures of large spans or heights from it is impossible without connecting individual elements.
Connections of wooden elements to increase the cross section of the structure are called rallying, and to increase their longitudinal length - splicing. Along with rallying and splicing, wooden elements can be connected at structural nodes at various angles.
The need for the correct solution of the connections of individual wooden elements for the operation of the structure as a whole is also explained by the fact that the anisotropic structure manifests its negative qualities to a greater extent at the joints.
The development of connections of wooden structures traces its history back to ancient wooden structures. One of the first to be used were joints in which forces were transferred from one element to another directly through the contact surfaces and caused mainly crushing stresses (front cuts, stop, etc.). The use of such compounds led to a large waste of wood. Later, thanks to the use of working connections in the joints, it was possible to transfer large tensile forces. Finally, an important step in the development of individual elements and wooden structures as a whole was the emergence of adhesive joints. This was facilitated by the creation of new branches of the chemical industry for the production of synthetic polymeric materials and building adhesives based on them.
The use of one or another type of connection is determined by the type of the entire structure, in some cases it is possible to use different types of connections in one structure.
The advantage of solid wood in terms of cost compared to glued wood makes it advisable to use it in almost all cases where natural wood reserves allow or its use on conventional (non-glued) joints is possible. The use of glued board structures is rational in cases where a large cross-section of elements is required, when it is necessary to minimize the number of metal inserts, to increase fire resistance, reduce the impact of chemically aggressive environments, or when special requirements are placed on the architectural expressiveness of the structure. Plywood, chipboard and fiberboard and other sheet materials are used as sheathing and attached to the wooden frame with glue or various working bonds.
Wood fastening methods
Fastening wood with nails, screws and dowels. ![]()
In order for wood to hold nails, screws and dowels well, you need to learn the basic rules for their fastening.
A nail hammered along the grain holds less well than a nail hammered across the grain. Nails should be hammered in with some slope, but not parallel to each other.
On nails, you can put together a box for a parcel, a stretcher, but you should never fasten shelves, chairs, tables, etc. with nails. In addition to gluing, you need to use screws or dowels here.
Screws hold wood much stronger than nails. The heads of the screws are countersunk, semi-secret and semicircular. Before screwing a screw, a hole is drilled in the wood, equal to about a third, half of its length and less than the diameter of the unthreaded part of the screw. Under the countersunk head, the hole must be countersunk, after which the screw is screwed into the wood.
Nails are called wooden nails - planed, rectangular and round, turned on a lathe. Round dowels are usually machined from durable wood, while rectangular dowels are made from the same wood as the product. Examples of the use of dowels to secure knitting with and without spikes are shown in Figure 33.
Rice. 1. Fastening wood with nails: A - correct; B - wrong
Rice. 2. Knitting wood with round dowels: A and B - when knitting on spikes; C and G - with angular knitting without spikes
Wood connections. To obtain large surfaces, wood is made up of separate parts. The strength of the product often depends on the correctness and thoroughness of the joining of wood. Wood compounds are usually divided into three types. Splicing is used to lengthen pieces of wood. Examples of splicing are well-known butt and lap joints, as well as splicing wood on spikes. Increasing the width of wood (by layers) is called rallying. The connection of boards at an angle is called viscous.
Examples of rallying, splicing and knitting wood are shown in the figures.
There are other ways to join wood. We talked about the most accessible ones that young masters can easily learn.
Gluing wood. When gluing boards or bars, it is necessary to take into account the location of the annual layers. The annual layers of adjacent boards should be facing in different directions. This greatly reduces wood warping.
The location of the annual layers should not be mutually perpendicular, because this also contributes to damage to the gluing, since the degree of drying and moistening along and across the fibers is so different that it can lead to the destruction of the gluing.
For gluing wood products, carpentry or casein glue is used.
Joiner's glue is prepared from the waste of tanneries and slaughterhouses, which, as a result of industrial processing, give a glue with a strong gluing ability. The more transparent and lighter the glue, the better it is in quality.
Wood glue works when it is in a hot, liquid state. To do this, having crushed the glue tiles into pieces, they are placed in a bowl and poured with water in a proportion by weight approximately: three to four parts of water are taken for one part of the glue. After 10-12 hours, when the glue swells, it is heated, stirring, but not boiling.
Compound
There are the following main types of interfaces of wood parts: rallying, splicing and building up elements: length, adjoining elements at an angle, intersection of elements. Figures 16, 17, 18 and 19 show the main types of carpentry joints most often found in the designs of young technicians.
The parts are usually connected with glue, nails and screws, less often with bolts.
Bonding parts. For gluing wood, carpentry or casein glue is used. With proper gluing, the strength of the seam is not inferior to the strength of the wood itself.
You can glue only those parts that are made of dry wood, since its high humidity significantly reduces the strength of the joint. The surfaces to be glued must be carefully adjusted to each other so that the seam is thin and uniform in thickness throughout. The strength of the joint increases if the surfaces to be bonded are made rough (for example, using a rasp).
For the strength of gluing, the cleanliness of the surfaces to be glued is of great importance, "the absence of dust, dirt, grease, and remnants of old glue on them. For the same reasons, do not touch the surfaces prepared for gluing with your hands.
Joiner's glue on the surfaces to be glued must be applied in a heated state (at a temperature of 40-70 °), quickly and in a thin layer. The strength of the bond is increased if the surfaces to be bonded are slightly warmed up before the adhesive is applied to them. Such heating is especially recommended when gluing large surfaces.
After applying the adhesive solution, the parts to be glued are immediately connected and pressed tightly against each other in the clamps of the workbench or with the help of special devices (Fig. 20) - clamps, vim, sulag, screw presses, wedge clamps. Small parts can be tied with strong threads or compressed with spring-loaded laundry clips (pins). In many cases, some kind of weight is used to compress the glued parts. Under the press, the glued parts must remain in a dry and warm room for 12 to 24 hours, but not less than 6-8 hours. It is possible to process glued parts only after they are completely dry. 
The density of the glue depends on the material from which the parts to be glued are made, and on the "mutual arrangement of the wood fibers. So, when gluing dense - oak, beech, maple - the glue must be diluted thinner than when gluing less dense species - linden, pine, spruce, To increase the strength of gluing parts in which the planes of the seams are located across the fibers of the wood, dry and heated ends should be glued with a liquid glue solution (the so-called gluing).Only after this layer of glue has dried, the parts are glued in the usual way.
In the manufacture of various models and devices, young technicians use casein glue to glue wood. Unlike wood glue, casein glue is not heated. Otherwise, all the basic rules - surface preparation, gluing procedure - when using casein glue are the same as for carpentry.
When assembling their models on glue, young aircraft modelers and ship modellers use special AK-20 glue and nitrocellulose glue - enamel. The latter is a light (i.e., unpainted) nitro lacquer used in production for applying the first lacquer coating to the product. The order of gluing remains the same.
Connection on nails and screws is the simplest and most affordable way to connect individual parts made of wood (Fig. 21). Nails and screws are also widely used for attaching various metal parts to wooden bases.
In order for the connections on the nails to be strong, you need to choose the right size of nails, their number and direction of driving. Nails hammered into the end of the part, that is, along the wood fibers, hold weaker than those hammered perpendicular to the wood fibers.
The leader of the circle should warn young technicians against driving several nails along one layer of wood, as this may cause splitting of the wood. A too thick nail or a nail hammered too close to the end edge of the board, bar or lath can also split the wood.
A thinner part is always nailed to a thicker one: a board or a board to a bar, plywood to a board or a bar, etc. Nails are selected so that their length is 2.5-4 times the thickness of the nailed part (the thicker the nailed part , the smaller the relative length of the nails used for nailing it) .
The strength of the connection of parts increases if the nails are hammered in with a dovetail, that is, in different planes.
To increase the strength of the connection, nailing parts with nails is often combined with gluing.
If the length of the nails exceeds the total length of the parts to be joined and the nails pass through, the end of each nail is bent with a hook and hammered into the surface of the part (Fig. 21, c).
Nail head caps. usually spoil the appearance of the product. Therefore, they try to “drown” them a few millimeters under the surface of the part, and putty the resulting recesses. To do this, each nail, before driving it, “is laid flat on some massive metal object - an anvil, a slab or an ax butt - and its head is flattened with a hammer. Then the nail is hammered so that the plane of its flattened head coincides with the direction of the wood fibers. A hammered nail is driven a few more millimeters. To do this, the head of another nail is laid sideways on its head and the clogged nail is deepened with a hammer blow on the latter.
When it is necessary to nail thin laths, glazing beads and other details, or when these details are pre-glued, the nail heads are bitten off with wire cutters.
To extract hammered nails, they use tongs or a special hammer that has a grip for this purpose - a nail puller. To protect the surface of the product from damage, under the pincers and the hammer, when removing the nails, plywood trimmings or wooden blocks are placed.
The assembly of wooden structures of various models and devices, especially when individual parts of the structures must be removable, is often carried out using screws.
When assembling structures on screws (Fig. 22), they first make markings, that is, they establish the location of the screws. Then, in the upper part for each screw, a hole is drilled with an awl, gimlet or drill, the diameter of which should be equal to or slightly less than the diameter of the upper cylindrical part of the screw. Holes of half the diameter are drilled in the lower part for the screws. When screwing into wood, the screws cut a thread in it, thanks to which they tightly tighten the parts to be joined and hold well in them.
Sometimes, in order to achieve special structural strength, parts are assembled on glue and screws at the same time.
Adhesive wood joints
From boards of limited sizes, structures of any size and shape can be glued together. For gluing, small-sized wood and low-quality wood are used with the removal of knots and defects. Adhesive structures can be straight, curved, constant, variable, profile sections, up to tens of meters long and with a cross-sectional height measured in meters. Adhesive joints are strong and monolithic, their compliance is so small that it is not taken into account, therefore, glued elements are calculated as elements of a solid section (Fig. 18). These joints are waterproof, resistant to decay and chemically aggressive environments, which ensures their reliability and durability. For gluing, boards with a thickness of not more than 50 mm and a width of not more than 180 mm are used. Boards with large dimensions warp during shrinkage and swelling. In this case, tensile stresses occur across the fibers, which destroy the adhesive seams. Boards must have a moisture content of not more than 10±2%. Boards are sharpened before gluing. Moreover, the depth of the sharpening should be at least 3 mm so that the glue line is as thin as possible (no more than 0.1 mm).
When gluing joints, in order to avoid warping of the structure, the direction of the fibers and annual layers of wood of the parts to be glued is taken into account. By gluing blanks, edge to edge, the annual layers of adjacent bars and planks are arranged so that the core and sapwood of one plank adjoin the core and sapwood of another. When gluing with layers, the direction of annual layers in the edges of adjacent planks should be opposite. To make the glued seam less noticeable, mineral pigments of the corresponding one are added to the glue - from 8 to 10% (by volume).
For gluing boards, glues based on thermosetting resins are used. Epoxy glue EPTs-1 is used for gluing wood with metal.
 Bonding technology consists of several processes. First, solid wood boards are sawn into bars, these bars are jointed so that the side edges adjoin each other without a gap. Then they are cut out from the bars with cross cuts. Next, the bars are collected in a package with the orientation of the annual layers. The package is disassembled, a jagged joint (comb) is made at the ends of the bars, the surfaces to be glued are smeared with glue, the package is reassembled and pressed with clamps.
Glue is applied evenly on both surfaces to be glued. Applying glue only on one side of the glue line does not ensure uniform wetting of the other side, which leads to non-glued spots and a decrease in the strength of the entire product. It is also not recommended, and through the chur, abundant application of glue. This leads to its extrusion during pressing and the time spent on its removal. After applying the adhesive, the items to be bonded are allowed to stand for some time, determined by the adhesive manufacturer. During this time, excess moisture evaporates from the adhesive, and the concentration of the adhesive increases. Especially exposure is necessary for liquid adhesives or at high temperatures of the adhesive and the room air. Rushed bonding will cause the adhesive to extrude excessively and form a "hungry" bond. Conversely, in a cold room or thick adhesive, the exposure time should be reduced, up to immediate gluing. In a cold room, it is recommended to heat the parts to be glued, but not more than 45 ° C, because the glue can dry quickly on overheated wood, forming dry spots. For the same reason, drafts and dust are not allowed in the room.
After applying the glue, the parts are connected, tightly pressed against each other and pulled together with clamps, a vice or placed under a press. The most primitive clamp is obtained from two boards with drilled holes and bolts inserted into them. For bone adhesives, it is recommended to maintain a pressure of 0.1 to 0.4 MPa, when gluing with skin glue, the pressure can be from 0.1 to 1.2 MPa. The amount of pressure largely depends on the density of the adhesive. A pressure of more than 1.2 MPa is not recommended, as it leads to wood shrinkage and requires sophisticated equipment.
![]() After gluing the boards, sags are formed on the side surfaces of the elements, which are removed by milling. The tensile strength of adhesive joints is low, it approximately corresponds to the tensile strength of wood across the fibers. Gluing technology must be carefully observed. In this case, adhesion (adhesion of glue to wood) will be sufficient and possible damage will occur not through the glue, but through the wood.
After gluing the boards, sags are formed on the side surfaces of the elements, which are removed by milling. The tensile strength of adhesive joints is low, it approximately corresponds to the tensile strength of wood across the fibers. Gluing technology must be carefully observed. In this case, adhesion (adhesion of glue to wood) will be sufficient and possible damage will occur not through the glue, but through the wood.
Types of adhesive wood joints
Among wood compounds, glue is the most widely used. This is due to the fact that with the help of glue it is possible to obtain products of almost any shape, large size, high quality, economical profile from small-sized and low-quality wood.
Glued wooden structures are less susceptible to warping than those made from a whole piece of wood, and their strength, as a rule, is higher due to the redistribution of defects and the presence of adhesive layers. The parts are connected along the length, width, thickness and angle.
Length connection 
The gluing of wood at the end is very fragile, therefore, when joining segments along the length, it is necessary to replace it with gluing of a different type. For this purpose, the connection of parts on a mustache and on a toothed spike is used.
Connection on the mustache.
The strength of the connection depends on the length of the mustache: the longer the mustache, the more the connection approaches the formation type of bonding and the higher its strength. However, this increases. For products of increased strength, the length of the mustache is taken equal to 10 ... 12 thicknesses of the parts, in other cases, eight thicknesses. Tension or compression of the mustache joint induces normal and shear stresses.
Normal stresses, MPa: a = P sin α 102/F. Shear stresses, MPa: τ = P sin 2 α 102/2F, where P - tensile or compressive force, N; α - mustache bevel angle, deg; F - cross-sectional area of glued elements, cm2. These equations can be used for calculation, provided that the thickness of the adhesive layer is not more than 0.01 of the thickness of the elements to be glued. If the thickness of the adhesive layer is 0.1 of the thickness of the element, the stress concentration in the adhesive layer reaches 1.5.
Toothed connection.
The consumption of material in the connection to the toothed spike is less than in the connection to the mustache, with the same strength. Shear stresses in the adhesive seams of serrated spikes in tension are determined in the same way as for the mustache joint. Due to the symmetry of the bevels, the stress concentration and the uneven thickness of the adhesive layer have little effect on the strength of the gear joint.
All connections, whether carpentry or joinery, are called landings, because they are based on the principle of fitting a part with a tenon onto a part with a groove. Depending on how tightly the parts in the mount are in contact ( connection types), all landings are divided into tense, tight, sliding, loose and very loose.
At the heart of all connections is the knot - the place of attachment. Depending on what shape and how the node is located, there are several types of connections. Among them are end, side, corner, T‑shaped and cruciform.
End connections
There is another definition of such a connection - extension. It is characterized by the fact that all parts are fastened together in the end part, while the length of the whole part increases. Depending on the type of fastening, these end connections withstand high loads in compression, tension and bending. An ordinary whole board is in many ways inferior to that obtained by building.
T  the end connection of parts that resist compression can have a different design. The main feature of this connection is that each has both an overlay and a groove, which are most often made equal in both thickness and length. If there is no confidence in the strength of the future connection, you can further complicate it with spikes or various joints, for example, a joint in an obtuse corner. But this connection will require additional adhesive fastening or fastening with nails and screws.
The end connection of the parts, which resists stretching, at the heart of its design contains an overlay in the lock. First, an overlay is drawn, then a groove is made on one part, and a ledge on the other. It is this lock that allows both halves not to be separated. As well as a compression-resistant connection, this type of connection can be provided with a straight overlay. Lateral connections
![]() Lateral connections are also called rallying. Most often, such a connection is used when constructing floors, doors or gates. This is a fairly strong connection. Large arrays that are obtained as a result of such a connection are additionally fastened with transverse boards or shields Corner joints
Lateral connections are also called rallying. Most often, such a connection is used when constructing floors, doors or gates. This is a fairly strong connection. Large arrays that are obtained as a result of such a connection are additionally fastened with transverse boards or shields Corner joints
This type of fastening is most often used in fastening window, door blocks, greenhouse frames, elements of benches and swings. The corner connection differs from others in that the parts to be joined are placed at an angle of 90 ° to each other. Depending on the fasteners used, all corner joints are divided into tenon and mustache joints.
Corner joints can be T‑shaped and L‑shaped.
L-shaped corner joints (they are also called end) have many options: from a simple one - half a tree, to the most durable - a triple tenon T-shaped connection is named so because of its appearance. After fixing the parts, the inserted part, as it were, grows out of the array of the other. Most often, this type of connection is used when pairing a log of ceilings and partitions with a house harness. 
The angle at which the parts are connected must be 90 °. At other angles, the connection is fragile and very quickly becomes unusable.
Among the many varieties of T-connection, two types are most common