Window sill on the balcony: types, installation and tips. How to make a wide window sill. Personal experience Window sills are narrow what to do
So, are you a happy owner of your own square meters, but a very small kitchen? If the builders have made the window sill so narrow that it barely holds a glass with a tulip or a small cactus in a box, such a window sill should be urgently enlarged so that it looks more aesthetically pleasing and more functional. But first get advice from those who have already done it. Within the framework of this article, we offer a story from the personal experience of the designer Maria and useful tips for arranging a large window sill.
“Moving to a new panel building, we were so happy about the increase in living meters! But there was much less space for flowers. The window sills turned out to be so narrow that even a saucer could not hold on them, not to mention flower pots.
The problem needed to be solved urgently, until we lost half of the flowers - there was absolutely no place to store them, and the balcony was not yet glazed. It was especially important to solve the problem of a narrow window sill in the kitchen."
The first option that came to mind was a plastic window with a PVC window sill. True, the window sill at the same time increases by only 10-12 centimeters. Not as big a win as I would like. In addition, if the kitchen is small, the desktop (wherever it stands) makes it cramped, and the solution comes by itself - you need to make a full-fledged working area from the window sill - from wall to wall. In this case, the window sill will be about 2 meters long (it all depends on the kitchen area), 50 cm wide (near the wall) and 60 cm (in the window opening) - and the space will be saved and it will look European.
This option assumes that the window sill will simply become a continuation of the countertop. In this case, the cost of money and time is not so great, and there are a lot of benefits from an additional working area.
For the manufacture of a wide window sill, we used 2 simple narrow kitchen cabinets without a "top" and facades. These cabinets are easy to purchase at a home improvement store or ordered from a kitchen furniture company.
The bedside tables were placed sideways against the outer wall, opposite each other. Thus, they have become a reliable support for the future countertop. Adjustable legs made it possible to adjust the height of the bedside tables and the level of the window sill.
For the countertop, we took a large sheet of plywood (12 mm thick). According to the plan, the tabletop is slightly wider than the bedside tables standing sideways, and goes into the window opening. Taking into account the uneven geometry of the walls, the base for the countertop had to be cut out according to a pre-made pattern. For curly carving, an electric jigsaw was needed.
The next stage is facing the countertop with ceramic tiles. We used medium-sized tiles: with a small kitchen, large tiles visually reduce the free space, and laying very small tiles is a very tedious task, similar to putting together a large puzzle. As a result, the choice fell on the tile, which was used to decorate the wall. The total size is 20x20 cm, each consisting of four small squares (10x10 cm).
The tiles were attached to the plywood with liquid nails.
The seams were covered with white grout - in our case, it harmonized well with the bright kitchen. The butt was closed with an aluminum threshold. By the way, window slopes were made last, when the wide window sill was already completely ready. Now it has a place to place flowers and vases, and you can also cook and dine with a view of the street
Impressions from using a functional window sill (after a couple of years)
Minuses:
Making wide seams between tiles was purely a design decision. The desire to keep the size of the cells and lines, as on the wall, played, unfortunately, a cruel joke - rough white seams 5 mm wide turned out to be "hotbeds of dirt". At first, they were intensively cleaned and washed, but the grout cracked from constant cleaning. Hence the conclusion: on a plywood worktop, lay the tiles close, and minimize the gaps.
Use embossed tiles, even if one has already been used for walls. From an aesthetic point of view, maybe it’s beautiful, but from a household one ... On such a “bumpy” surface, you can’t really cut anything, roll out dough, etc. Relief tiles have to be cleaned regularly with a brush (a rag is enough for a smooth surface) and each little thing has its own smooth place.
In order not to block the gas valve, a small hatch (15x15 cm) is made in plywood, one whole tile corresponding to the size serves as a cover for it. If necessary, the tile can be easily removed onto it, even a furniture handle can be installed. True, experience shows that even without a handle, such a hatch is quite convenient to use.
There is no doubt that a window sill can become not just a beautiful element of an apartment, but also a functional part of a window. However, in order to turn it into a beautiful countertop, a full-fledged table, you should think over each stage of work in advance, foresee all possible problems and make the window sill as safe as possible.
| Subscribe | |||
The standard method of attaching the window sill is glue. Products made of PVC, wood or chipboard are “planted” on “liquid nails” for these materials, and stone products are placed on silicone sealant or cement glue. If the support platform has defects or a pronounced slope towards the room, it is leveled with a reinforced layer of plaster or the board is installed on leveling dies and the space under it is filled with polyurethane foam. However, with a window sill width of more than 200 mm, alternative mounting is often required.
In houses with thin walls (panel buildings of the 1980s and later), the support area is small - 100–120 mm, and the adhesive fastening of the window sill with a width of more than 150–170 mm turns out to be insufficiently reliable (we do not consider cases where the structure has additional props - legs, cabinets). You have to jam the board with a window frame. The essence of the method is that the window sill is not pressed against the window, but is led under it to a depth of 10–40 mm, then it is leveled with linings and fixed with foam. This way you can fix a product made of plastic, wood-polymer composite and wood, providing high strength with a small area of contact with the wall (½ and even ⅓ of the width of the board). However, the insulation (foam) will have to be partially removed from under the lower bar of the window frame, which will increase, so the method is unsuitable for stone window sills with high thermal conductivity.
In houses with thick walls (single-layer brick and block), glue is enough to securely fasten the window sill, however, a wide “step” prevents the glass from blowing air from the radiator, and the window often fogs up. To avoid this, it is advisable to provide a ventilation gap: install the window sill on narrow dies (made of plastic, DSP, antiseptic wood) 20–30 mm high, directed perpendicular to the window, and leave a gap between it and the window (again, 20–30 mm), covering it with a narrow grate. Glue or mounting foam should be applied locally so as not to block the air channels, and the battery should be decorated with a convection screen that directs the flow of warm air into the ventilation gap.
In a bay window, one continuous window sill is often appropriate, and not several - under each window. The complexity of installation lies in the need for precise fitting of parts that are joined at oblique angles. When using standard wood and plastic products, you can not do without a miter saw or miter box. A more expensive option is to order a prefabricated structure made of wood or artificial stone. In this case, the masters from a specialized company will take accurate measurements and mount the window sill so that the joints of the elements will be almost invisible to the eye.
In a glazed loggia, where windows are installed on a thin parapet, there is practically no support platform. You have to use metal consoles. They are suitable for any light window sills and are quickly mounted with screws and dowels.
WINDOW SILL INSTALLATION METHODS
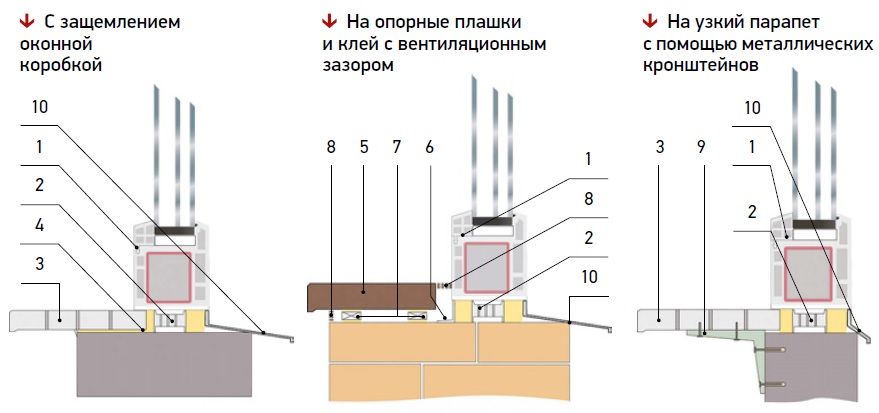
Elements of window construction: 1 - window; 2 - stand profile; 3 - PVC window sill; 4 - mounting foam or glue; 5 - window sill made of wood or chipboard; 6 - plastic flashing; 7 - support dies; 8 - ventilation grilles; 9 - bracket; 10 - low tide. Visualization: Vladimir Grigoriev/Burda Media
- The window sill should be installed before finishing the slopes, regardless of whether you plan to plaster or panel them.
- Although condensation rarely forms on modern windows, it is advisable to install a window sill with a slope of 1-3% towards the room in order to divert water from the frame and the installation seam, for example, accidentally spilled when watering flowers.
- Before applying the adhesive, the brick or concrete surface should be cleaned of dust. When attaching to a cement composition, the base must be primed, and in the case of using polyurethane foam, it must be moistened to ensure complete polymerization of the material.
- If the edges of the old window sill were embedded in the wall, it makes sense to install the new one in the same way, providing the most durable fastening.
- The gap between the window sill and the window frame should be closed with a special self-adhesive petal seal or filled with silicone plumbing sealant.
Do you need a wide window sill? You will get the answer to this question only by installing it at home. But as practice shows, even those who previously rejoiced only in a narrow window sill, faced with new sizes, will certainly give preference to a novelty with a wide profile.
A wide window sill is convenient in the kitchen, in the bedroom, and even in the bathroom!
Anyone can appreciate the convenience, but not everyone can install such a window sill at home. We are talking about technical indicators and, above all, the width of the wall. With the replacement of windows, many of us think about changing the window sill. In some cases, it is installed on the old (often wooden) base, but most often the installation and installation takes place on a new “original soil”.
Window sills are available in different colors - plain, marble or wood. And it is difficult to refuse such beauty. The convenience is that dust is not particularly visible (especially if you have chosen multi-colored tones), and if it does appear, it can be easily removed in just a couple of minutes using ordinary detergents.
Do you want to install a novelty in the bedroom or in the kitchen? Amazing! And there, and there he will find a use. In the first case, for photographs, boxes, cosmetics or perfumes, in the second - for cups, saucers and vases for sweets or fruits. And fragrant flowers have not been canceled. And this is probably one of the main advantages - both small violets and a large Chinese rose that has grown in a pot look great on such window sills.
Of the minuses - you still have to clean up this territory, which has increased in size. Dust will accumulate on your windowsill whether you like it or not. So don't clutter up these spaces with a lot of knick-knacks, or you'll get bogged down in repeated cleaning every day.
How to make a wide window sill? According to experts, it is very simple, you just need to take into account all the details. Do you mind installing it in the bathroom? Why not! Just decide on a place for such a window and at what level the new window profile will be located. It does not make sense to install a window sill at a height of one and a half to two meters. There are too few amenities. But what to fill in the bathroom with such an important element of your “decor”, I think this question will not arise. From shampoos to hairspray, from soaps to gels. Well, and so on.
Wide window sill in the interior - features of use
Desire is desire, and it is not always possible to install such a large window sill in a home interior. There are rather thin walls on which it is better not to risk mounting such a structural element. In this case, you must come to terms with the fact that the flowers, as before, will only stand in one row.
If the experts gave you the go-ahead, decide not only what the window sill will be, but also what window profile, what type of double-glazed window and how it will open, as well as with accessories. It is better to do everything together and at once. And considering that dust from repair work will inevitably appear anyway, it is better to immediately install windows and all structural elements in all rooms. In this way, you will avoid stretching the repair for months or even years.
If you have a “cold side”, it is better to order an energy-saving double-glazed window and a five-chamber profile. But you can limit yourself to a cheaper, budget option. Properly installed windows with window sills provide warmth and comfort and guarantee the absence of drafts and large gaps.
Taking into account the interior, you can order window sills that will harmonize, for example, with your living room in terms of color. In the kitchen, you can choose a color that will suit the tile installed here earlier. And believe me, your child will be happy to explore the world "outside the window", climbing into such a cozy place with his toys. Well, the height of bliss will be for you when you yourself can take this comfortable niche in the winter cold and wrap yourself in a warm blanket (if the parameters of your window sill in the room allow it). It would be nice to take a mug of hot tea with you.
So, there is no noise from cars under the house, it is warm in the house, even if it is minus outside, the window sills are easily removed, and the flowers feel great and grow on them, the ventilation system is convenient - these are big pluses of installing new window structures. Like new window profiles, plastic window sills are durable and once installed, you definitely won’t have to change them every couple of years. Of course, you can use shutters, curtains and blinds, but having a beautiful wide window sill, it is better to open access to light in order to emphasize both the beauty of the new design and the variety of flowers in pots.
But what to do with the condensate is an open question. It is most likely impossible to avoid it, for example, in the bathroom. It is possible to think over the ventilation system (according to the type of use in cars), but this can lead to a decrease in thermal insulation properties. The disadvantages include the formation of ice. When it is cold outside, the condensate freezes and turns into an ice crust.
If there are a large number of flower pots on a wide windowsill, the convection jet of hot air from the battery is quite strongly blocked.
This leads to increased moisture and condensation, as well as freezing windows. A constant increased amount of water on the slopes can lead to the appearance of unnecessary fungus in the future.
But if you decide to use such a miracle window sill on a closed balcony, then in order for it to also be warm, you will need to make a sheathing. Thus, using a similar insulation scheme, you retain both the appearance and the main qualities. At the same time, from the street, your balcony structure can be sheathed with plastic clapboard or covered with special sheets and then treated with polymer paint. In this area, you can also successfully demonstrate your skills as an amateur florist or even a gardener. On the windowsill, a greenhouse of plants will be perfectly located, which will delight both you and your guests.
Just pay attention to the correct installation of window sills. Properly calculated window sill sizes are also important.
- In order to get rid of the condensate, you can buy aerosols at car dealerships that are used to prevent fogging of windows.
- Window sills choose well-known companies.
- It is better to install the window sill by the same craftsmen who were responsible for the installation of window frames.
- You need to take measurements not by yourself, but by specialists (so as not to use 2 times more
Very often in life there is a need to increase the window sill. The reason for the need to increase the window sill very often becomes an increase in the width of the bearing walls.
In order to save money, you can perform this action yourself.
How wide should the window sill be??
When installing a plastic window sill, it must be remembered that it should not interfere with the rise of warm air. That is why it is necessary to correctly calculate its width.
The permissible protrusion of the window sill should not exceed 50-70 millimeters. If the protrusion of the window sill is larger, then it will overlap the window sill, which will negatively affect air circulation.
Under the window itself, it is necessary to bring approximately 20 millimeters of the window sill. This fact must also be taken into account when calculating its length.
The width of the window sill directly depends on the width of the load-bearing wall. For example, if the width of the load-bearing wall is 50 centimeters, then it is necessary to add its plant under the window and ledge to the width of the window sill.
That is, with a bearing wall width of 50 centimeters, the width of the plastic window sill will be 57-59 centimeters.

Flowers are an original design solution for any room. Most often they are placed on the windowsills.
If the window sill is narrow and it is impossible to place flowers on it, then it is necessary to expand it. It is quite simple to do this, which allows the user to perform this action independently.
To expand the window sill, it is necessary to make a wooden beam, the width of which will be equal to 100 millimeters.
Four holes must be drilled in the front edge of the window sill, the diameter of which will be 12 millimeters. It is also necessary to drill appropriate holes in the beam at the same distance.
This requires pre-drilling 2mm holes. At the same time, the nail heads should be hidden under the window sill so as not to spoil the aesthetic appearance of the window.
In order to simplify the task of mounting the beam on metal rods, it is necessary to clean the holes from dust. For this purpose, a special brush is used.

In order to save space in the room, you can make a countertop from the windowsill. This countertop can be widely used in the kitchen, bedroom or office.
Initially, it is necessary to make measurements of the window sill, which will be used to make the countertop. In this case, the height of the countertop must fully correspond to the height of the window sill.
The far edge of the tabletop must be attached to the support profile, and the near one will rest against two specially made cabinets.
When installing the cabinet, it is imperative to align it vertically. It must completely coincide with the plane of the window sill. It is best to order cabinets for this, which will have adjustable legs.
After installing the cabinets, it is necessary to make a base for the countertop. For this purpose, you can use plywood, the thickness of which is at least 12 millimeters.
To protect the countertop from swelling, it is necessary to choose moisture-resistant plywood. The base for the future countertop is cut out in accordance with its configuration. For this purpose, a jigsaw.
The final step in installing the countertop is placing the plywood on the cabinets. Other materials can be used as countertops, but they will be much more difficult to process to the shape of the countertop.
At the same time, they are much stronger and more reliable than plywood.
And also watch a video on how to make a countertop from a window sill:
Moving to a new apartment, we were glad to increase our residential meters. But there is much less space for flowers. The window sills were so narrow that even a saucer could not hold on them, not to mention flower pots. The problem had to be solved urgently before we lost half of the collection. It was especially important to solve the problem of a narrow window sill in the kitchen.
Options
The first option that comes to mind is a plastic window with a plastic window sill. True, the window sill increases by only 10 centimeters. Not as big a gain as we would like. In addition, if the kitchen is small, the desktop (wherever it stands) makes the kitchen cramped and uncomfortable.
The decision came by itself. It is necessary to make a full-fledged work surface from the window sill - from wall to wall. In this case, the window sill will have a length of 2 m, a width of 45 cm (near the wall) and 60 cm (in the window opening).
Window sill installation
For the manufacture of a wide window sill, we used 2 simple narrow kitchen cabinets without a "top" and facades. These cabinets are easy to purchase at a home improvement store or ordered from a kitchen furniture company.
The bedside tables were placed sideways against the outer wall, opposite each other. Thus, they have become a reliable support for the countertop. Adjustable legs made it possible to adjust the height of the bedside tables and the level of the window sill.
For the countertop, we took a large sheet of plywood (12 mm). According to the plan, the tabletop is slightly wider than the bedside tables standing sideways, and goes into the window opening. Given the uneven geometry of the walls, the base for the countertop had to be cut out according to a pre-made pattern. For curly carving, an electric jigsaw was needed.
The next stage is facing the countertop with ceramic tiles. We used medium-sized tiles: with a small kitchen, large tiles visually reduce the free space, and laying very small tiles is a rather tedious task. As a result, the choice fell on the tile with which the wall was finished. The total size is 20x20 cm, while each one consists of four small "tiles" (10x10 cm).
To avoid wet processes, tiles were attached to plywood with glue, which is popularly called "liquid nails".
The seams were covered with white grout. The end was closed with an aluminum threshold. By the way, window slopes were made last, when the wide window sill was already completely ready.
Impressions from the operation of the window sill(after five years)
Not necessary:
Making wide seams between tiles - the designer's desire to keep the size of the cells and lines, as on the wall, played a cruel joke. Rough seams 5 mm wide turned out to be "dirt accumulators". At first they were intensively cleaned and washed. However, from constant cleaning, the grout began to crack. Hence the moral: on the countertop (window sill), lay the tiles close, with minimal gaps.

Use embossed tiles, even if one has already been used for walls. From an aesthetic point of view, it is beautiful, but from a household one ... Embossed tiles have to be cleaned regularly with a brush (a rag is enough for a smooth surface).

In order not to block the gas valve, a large hatch (15x15 cm) is made in plywood, one whole tile serves as a cover for it. If necessary, the tiles are easy to remove. You can install a furniture handle on it. True, experience shows that even without a handle, such a hatch is quite convenient to use.