Electric guitar from the usual. Materials for magnets How to make an active pickup with your own hands
A pickup is needed to amplify the sounds played by the guitar. It is often used for acoustics. Also, this element transforms the sound, makes it louder. Sometimes pickup placement becomes very important, such as when you need to prepare your guitar for stage performance.
If a pickup is built into an acoustic guitar, it becomes an electro-acoustic guitar. They are divided into several types, but the task of each of them is to convey the sound of any string as realistically as possible.
What are sound amplifiers
Pickups are divided into magnetoelectric and piezoelectric. The first type is removable and is installed in the body of the guitar, while no rough changes to the body are made. But such a pickup picks up sounds at slightly different frequencies and can distort the correct acoustic sound. Due to the fact that the element is removable, you can remove it at any time.
The magnetic pickup is placed on guitars with metal strings only, since it does not pick up the sounds of nylon ones.
But the second pickup option is more suitable. It picks up and amplifies any sounds emitted by the guitar: the sounds of the strings, the sounds of the guitarist's hands and the vibrations of the body. The conversion of acoustics into electrical signals occurs with the help of a piezoelectric crystal. It can be removable and stationary. This pickup gives the guitar a deep and interesting sound.
How to make a guitar pickup
Both types of pickups can be made at home. More interesting in terms of experiments is the transformation of acoustics into an electric guitar. To do this, you need to make a magnetic pickup.
First of all, two plates are cut out, which are attached to the base with six holes. They are attached from above and below to form a shuttle for winding the inductor. The material for the manufacture of sheets of foil fiberglass.


The frame can be carved from hardwood or plastic. It is placed between thin plates of fiberglass.
To make the drilling process convenient and safe, the base is wrapped in thin cardboard and clamped in a vise. Holes are drilled with a sharp drill at high speeds. It is difficult to make such even holes with a home drill, therefore, as a base, you can take a harder and more durable material without magnetic properties. In this case, plexiglass is taken.


Next, you need powerful magnets of small height. For winding, a thin copper wire is taken. To create an inductor, it is necessary to wind a wire of 3000 turns. Also for winding, you can take a thin wire with a diameter of 0.1 mm.


Next, the end of the wire is cleaned of enamel, an insulated conductor is taken, which is soldered to the wire. The place of soldering is closed with electrical tape. After the wire fits into the coil and is fixed with several turns of winding.

Hello! Recently I found a rather interesting solution on a site on electronics and circuitry - a homemade pickup for an acoustic guitar. I think that many guitar radio amateurs and those who are at least friends with a soldering iron will be interested in this article. Of course, many will say why bother, because you can buy a special one for acoustics in any guitar store. Yes, I agree! But there are many experimenters, like me, who want to tinker with this.
Diagram of a homemade pickup
A rather funny and interesting solution was found by master A. Melnikov from the city of Mstislavl, who offers only two fairly simple ways to make a homemade pickup for an acoustic guitar. Let's take a look at them now.
Method number 1
For the first method, you will need 5 magnets from furniture fittings (a kit for assembling cabinet doors). All these magnets must be freed from all unnecessary parts and glued into one continuous strip using superglue, as shown in Figure 1.

After that, we glue a strip of adhesive tape on both sides, and thus we should get a magnetic core for the future pickup. Now you need to wind the coils, 50 turns each, using wire with a diameter of 0.1 mm or less, but with such a distance from each other that when directly under the strings, each coil is under its own string. In total, 6 coils should be obtained, as shown in Figure 2.
On this, we can say, the acoustic guitar pickup is almost ready. But it remains to decorate it beautifully so that it visually matches the appearance of our instrument. For this purpose, you can take a rubber tube from under the water heater and place the finished pickup there, after making a longitudinal slot in it. To connect to an amplifier, it is necessary to solder the pickup leads to the connector - a 3.5 mm mini-jack socket. A general view of the finished pickup is shown in Figure 3.
Important point: before putting on the rubber tube, it is necessary to protect the coils, for this, stick a strip of adhesive tape along the core on one side and on the other. You can attach the pickup with superglue, but in no case to the tree itself. To do this, stick adhesive tape, and then stick it on it. In the future, you will not have problems with dismantling.
It is also worth noting that when the pickup is located closer to the saddle, the sound will be more ringing with a metallic character, and when moving away from it, it will be more bassy and melodic with a large output amplitude. But the signal level of a homemade pickup will correspond to the level of a dynamic microphone. As a result, you should get something like this.

Method number 2
This option is the easiest in my opinion. For the second method, you need to get 6 heads from old cassette recorders, and all heads must be of the same type, i.e. the same. If you are lucky enough to find such heads, then first of all you need to remove the petals from them, which are designed to accurately stretch the film, as shown in Figure 4.

Next, you need to twist all the heads together into the pickup using long thin screws, as in Figure 5. Over these screws, you need to put PVC tubes of the desired length. At the bottom of the resulting pickup, we solder a printed circuit board to the head terminals, the tracks on which connect all the heads to each other into a single coil, and here we also solder the jack socket. The heads must be positioned so that the distance from each other corresponds to the distance between the strings. The pickup is ready!
As you can see, these two ways to make a homemade acoustic guitar pickup are quite simple and not complicated in principle. If you do not have extra money to buy a branded sensor, then this option will be just right for you. I hope you enjoyed it, keep it up!
Many people, in particular the representatives of the stronger sex, dream of learning to play the guitar or are fond of this art. So you want to pick up a brand new instrument and play some kind of cheerful motive. Strumming cold, metal strings, and imagine yourself on stage with some famous singer, or singer, singing to the music pouring from the guitar.
In this article, we will discuss how to make a guitar pickup. Consider the process of converting an acoustic guitar into an electric one (which we can connect to a computer). And you will learn a lot of new things about your guitar.
Creating a Guitar Pickup
With the help of a pickup, you will be able to improve the sound of your electric guitar, and learn how to play along with some musical compositions. It is very interesting, fun and exciting. Perhaps, after the experience of communicating with such a guitar, you will have a desire to purchase a professional electric guitar.
We will analyze in detail how to make a sound pickup. Cores with magnets, which are placed inside the inductor and are a pickup. The strings, by their vibrations over the cores, produce magnetic vibrations, and they, with the help of a coil, turn into electronic signals. These signals go to the microphone input. After all, the signals are of very low strength, and they initially need to be amplified. What does the microphone input do?
So, to create a pickup with our own hands, we need a bobbin, make it by winding the wire. Although you can go the easy way. Cut flat records from an old CD. Then glue "Super Glue" 2 outer and 4 inner together. Let dry for about five hours.
The preparation is ready. Now drill six holes in the bobbin and take six bolts to fit your strings. Leave the tip of the wire to tap the contact, and then wind the wire onto the spool. You can wind both with the help of tools and manually. The wire should be 0.2 mm in diameter. The thinner the wire, the better. It is necessary to wind to the end. The wire must be intact.
Wrap a strip of brass around the coil to reduce hum and noise. Wrap the coil with electrical tape (a couple of layers), and solder the wires to the wire. At the bottom of the coil, a magnet is glued to amplify the sound.
Here is your homemade pickup and ready. Now you know how to make it and that it is not difficult at all. If the dimensions of the original were respected, then you can put it in an electric guitar. Get a completely new sound. You can connect the guitar to a computer or to an amplifier. You will succeed. Don't be afraid to experiment! Great musicians also did not immediately become such. Everyone starts by simply playing a regular guitar.
Prologue
The story begins with my INVASION ST300 guitar, or rather when I compared its sound to a more serious instrument. They say you quickly get used to good things, which is probably why it became unbearable for me to play the same instrument. After a week of dreary despondency, I started a coup, or rather a "rewind" :D
Making a homemade pickup
Having removed and disassembled the pickups, I saw the following design: a coil on a plastic case filled with paraffin, 6 metal cores and a ferrite magnet.
I was somewhat surprised that the metal cores turned out to be separate (before that I thought it was a solid part). I did not disassemble the old coil further, so that in case of failure I could make a "backup" =) Therefore, I had to make the case myself. To do this, I sawed out 8 plastic plates (~2mm thick), 6 of which formed the core of the coil, and the remaining 2 restrictive covers. All these plates were brought to the required dimensions and glued together. The difficulty here arises with the holes for the cores, they need to be drilled in the right place and exactly along the axis. In order not to ruin the workpiece, I drilled holes of a smaller diameter, and then finished it with a round needle file, and checked the diameter by inserting the core.

In the central part there is a hole for installation on the axis for winding, do not wind it with your hands =) Well, here is the most important part of the work. In order to make my life easier, I wound 6 threads at once (which ultimately affected the result, but more on that later). 450 turns fit, and that's 2700 turns (wire diameter 0.08 mm). The sensor resistance turned out to be about 1.5 kOhm, which is several times less than usual (but more on that later). With straight hands and good handling of the wire, this procedure takes only a couple of hours. After winding, you need to connect all the windings in series into one (the most important thing here is to connect them in the right direction). Soldering points must be isolated from each other.

Since the number of turns is small, and therefore the signal from the coil will not be so strong, it will not be superfluous to shield the coil from pickups. According to the size of the coil, I cut a copper strip that is worn over the insulated winding. The ends of the strip are sealed with adhesive tape to avoid shorting the screen loop, otherwise this will lead to power loss on this loop and a bad signal at the output. Also, all metal cores are connected with a thin wire and connected to the screen

The screening is wrapped with insulating tape or adhesive tape. The cores are inserted into the coil, the magnet is glued into place.

The sensor can be installed and connected. Regarding the topic of guitar shielding, I note that it is recommended to connect the ground with a star everywhere, put on shield protection on the signal conductors, and connect the negative leads from the sensors to the ground at the farthest (along the chain) point, for example, at the output jack, or if you purchase a two-wire microphone cord and a stereo -a connector with a socket (as I did), then at the other end of the cord. In such a scheme, the noise induced on the cord is compensated. Also, the advantage of this circuit is the ability to use an ordinary single-wire cord, then the signal ground is closed at the output of the guitar through the jack.

Here the color is marked: red - signal wires and elements, blue - signal ground, black - ground and screens.
Install the sensor in place and try the sound!

After playing on the sensor, I noted the appearance of a "voice" on the guitar. The sound became more distinct and melodious. On overdrive, the strikes of the pick against the strings became clearly audible and, most importantly, harmonic overtones appeared between the notes. Artificial harmonics are easily and naturally removed. A bunch of new sensations =) However, due to the low output voltage, the signal-to-noise ratio has become worse.
Measuring the frequency response of a pickup
The measurement technique was based on the scheme from the article GUITAR STUDIO: Pickup Secrets. It proposes to use an external coil with low resistance, capacitance and inductance. The frequency response of which will be obviously wider, and therefore uniform in the measurement area of the frequency response of the measured sensor. However, I found it better to use a large power coil with high resistance to create an external magnetic field in order to increase the accuracy of the measurement and reduce the currents required for the measurement. However, in this case it is necessary to take into account the frequency response of the power coil.
Theoretical part
So, the electrical circuit for measuring the frequency response of the pickup:

The alternating voltage generator G supplies voltage to the power coil, which induces an EMF in the cartridge being measured. By measuring the ratio of the voltage on the measured coil to the voltage on the power coil, we get the transfer coefficient of the circuit, which is equal to the product of the transfer coefficients of the two coils. By changing the frequency of the generator and recording the voltage readings, you can build the frequency response of the circuit:
U out (f) / U in (f) = A o (f) = A coil (f) * A x (f)
And to measure the transfer characteristic of a power coil, you just need to use a reference low-resistance coil with low inductance and capacitance, the characteristic of which does not change in the measured frequency range. In this case, the power coil remains in place, and a reference coil is placed instead of the measured pickup. By measuring the frequency response of the power coil A coil (f), you can calculate the frequency response of the measured pickup A x (f) up to a factor. (In the case of sensors of identical dimensions and the same location of the power coil, this coefficient will coincide, and these sensors can be compared in terms of the output signal level).
Usually, the frequency response is measured in decibels, and not in "times", so we translate the obtained transfer characteristics using the formula:
frequency response o (f) = 20 * log [ U out (f) / U in (f) ] = frequency response coil (f) + frequency response x (f)
And in order to get a clean characteristic of the measured frequency response x (f) sensor, it remains only to subtract from the measured frequency response o (f) the characteristic of the power coil frequency response coil (f).
Practical part
The generator that I used was made by my father :) It generates a sinusoidal signal of a given frequency (selected by a switch) with an amplitude of up to 10V and has a current limit of 10mA maximum. As a measuring voltmeter, I used a multimeter from the M-890 series, it has a wonderful ability to measure AC voltage starting from 10mV. To connect all devices and coils, I cut out a plate with three contacts from textolite (see photo). An archival thing, without it the whole structure will be flimsy and will fall apart, and the power coil strives to move or fall, which is unacceptable during the measurement process!


As a reference low-resistance coil for changing the frequency response of the power coil, I wound about 1000 turns of enameled wire with a diameter of 0.08 mm on a ferrite blank, which I once took out of a broken imported TV.

You can measure without removing the strings and pickup!

results
First, we measure the frequency response of the power coil using the reference and the frequency response of the complete "power coil + sensor" circuit:

The difference in frequency response will give us the pure frequency response of the measured sensor (#3) accurate to an additive constant:
The resulting curve quite accurately repeats the theoretical curve, which confirms the correctness of the measurement and methodology. The slight deviation of the line to the left of the resonance indicates a good accuracy of the obtained data.
Thus, I took the characteristics of all three single-coil sensors:

#1 - neck (at the neck), #2 - middle, #3 - bridge (at the typewriter). As you can see, the resonant frequency of all sensors is in the region of 6-8 kHz. Chinese brother's attempt to make broadband sensors?
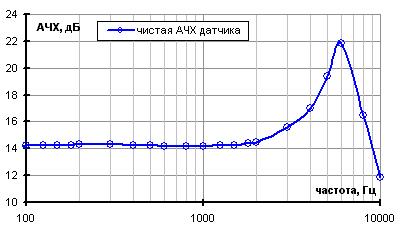
And now let's measure the frequency response of the self-made pickup in comparison with the frequency response of the bridge pickup (#3), it was in its dimensions that I made my own.

The resonant frequency is at 3kHz, which is just in the zone of maximum auditory perception and gives sonority to the "voice" of the sensor. The quality factor of the resonance is approximately 2.5. However, the output voltage is 2.5 times less.
The discussion of the results
Now I would like to discuss a little what worked for me and what did not work. I deliberately conceived to make the resistance of the sensor low. As the number of turns decreases, the inductance and capacitance decrease, and this usually results in a shift of the resonant frequency to the right. However, in my case, I wound the wire in 6 windings, and as a result, the capacitance between the windings was added to the interturn capacitance, which led to a shift in the resonant frequency to the left. I thought about the winding parameters for a long time, and in the process the total number of turns had to be reduced from 3000 to 2700 due to the fact that it just didn’t fit anymore :) but nevertheless everything turned out quite well.
The low impedance of the sensor made it possible to make a sufficient resonance height, however, the low output voltage does not give a good output voltage and signal-to-noise ratio, even with the shielding of the sensor. Therefore, in the future, I plan to "activate" the sensor and increase the output voltage to an acceptable level. Well, by itself, the finished sensor will need to be filled with paraffin. And I also plan to record audio samples.
In this article, you will learn how make a homemade guitar pickup with the help of improvised materials, which will work, perhaps no worse than the purchased one. In terms of quality, noise suppression and appearance, such pickup, of course, will be significantly inferior to the factory one, but still, making the pickup yourself at home is quite interesting. We take as a basis the model of a conventional electromagnetic pickup Single. Its device is quite simple: it is an ordinary induction coil with a magnet.
Now the blank for the pickup bobbin is ready. You need to find 6 suitable bolts for each string and drill 6 holes for them in the bobbin with a drill.
When winding the wire on the coil, do not forget to first leave the end of the wire to tap one of the contacts. You can wind it manually, but it's long and tedious. If you attach the coil to a drill driver, and turn it on at low speed, it will be much faster.
For winding, varnished wire with a cross-sectional diameter of 0.1-0.2 mm is required. Such a wire can be taken from the coil of any old tape recorder, the thinner it is, the better. In branded pickups, 6000-8000 turns, but at home this is not possible, so wind until the coil runs out, about 2000 turns will come out. Naturally, the wire should not break during winding, if this happens, you will have to rewind.
For additional shielding from external interference, you can wrap the coil with a brass strip (see figure), which will significantly reduce the amount of background and noise.
Wrap the resulting coil with one or two layers of electrical tape so as not to damage the coil during use, solder the wiring to the ends of the wire.
A magnet must be installed at the bottom of the coil, otherwise the sound will be very weak, almost imperceptible. If you don’t have a magnet of a suitable shape at hand, then you can buy “door magnets” in a hardware store that hold cabinet doors, etc., inside such locks, you may find a magnet of the desired shape and size. It can also be glued to the underside of the coil using Moment glue.