How to make curbs for tracks. How to make a beautiful border for paths in the garden. Creation of a monolithic concrete curb
The design of a personal plot in a country house cannot be imagined without beautifully designed paths. Garden paths not only perform a functional role, visually delimiting zones (lawns for games, flower beds, ornamental plantings, etc.), but also serve as a decor element themselves. To increase the service life of the coating and to accentuate the tracks, borders are used, which can be presented from various materials. The type of border is determined by the overall design of the garden and the shape of the paths. Some curbs can protrude significantly, while others are barely noticeable. In any case, their presence is mandatory. The article will focus on curbs for garden paths.
Types and features of curbs for tracks
For the design of garden paths, the following borders are used: plastic, metal, concrete and brick, wooden, wicker, stone, living plants. Each type has its own characteristics and difficulties in application. To choose a specific material, it is necessary to focus on the style of the paths (natural stone, paving slabs, cement coating, crushed stone, wooden flooring) and the intended laying technique.

- plastic borders the most versatile, harmonize well with different styles. A large selection of colors allows you to create an original design. They are indispensable when edging curved paths with flexible smooth lines. The advantages of plastic are high durability and resistance to corrosion, as well as the relatively affordable cost of the material. For self-assembly, plastic borders are best suited, as they are very easy to install.
- metal borders made of stainless steel or, as a more expensive option, of copper and aluminum. Suitable for making smooth paths with straight turns. They go well with their gravel paths.
- concrete curbs look good only with straight tracks. During installation, they require certain skills, and the process itself will take a little longer than in other cases.
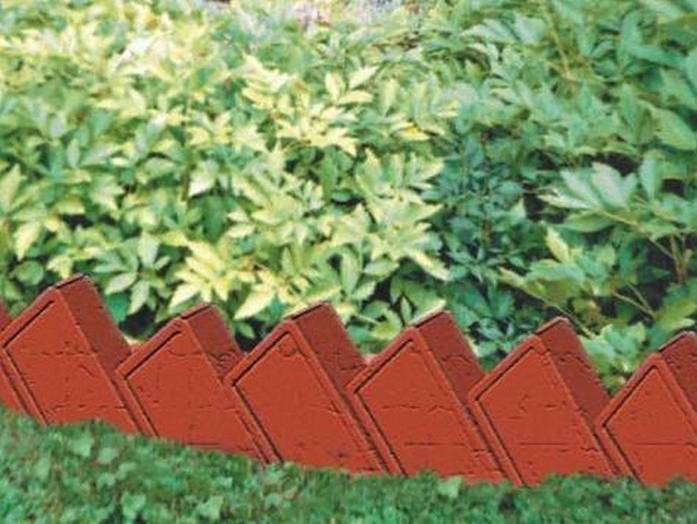
- Brick borders quite common and easy to install. Apply both a horizontal arrangement of facing bricks, and laying with an inclination (in the form of teeth). This type of edging can hardly be called practical and durable. In areas with heavy and frequent rainfall, brick quickly collapses and crumbles. However, this material is ideally combined with paving stones and looks especially advantageous in the design, made in the English style.
border photo

- wooden borders are considered the least durable. They require annual maintenance, which consists of priming and painting. Raw boards or old slats should not be used for this purpose. Such savings will quickly remind you of yourself. The average service life of wooden curbs does not exceed 10 years. However, this is the cheapest and easiest design option. Such borders are used, as a rule, in a rustic style or if you want to create an emphasized simple design.
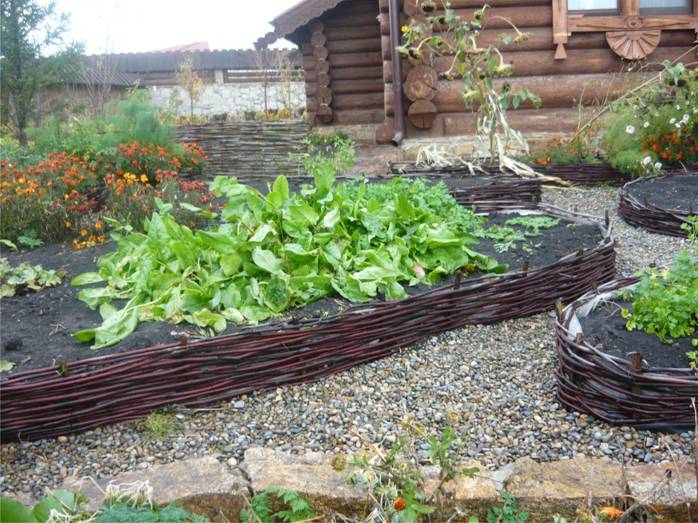
- Wicker borders are made of willow branches and perform rather a decorative function. They will not be able to become an obstacle to lawn grass or hold back the flow of rainwater. Such a romantic design is more suitable for flower beds or simple garden paths.
- A natural stone is a leader in design. It is both practical and decorative at the same time. Only its price can repel many connoisseurs of natural naturalness. For the manufacture of curbs, shell rock (cheaper), sandstone, granite and marble are used. An alternative can be various artificial imitations of natural stone.

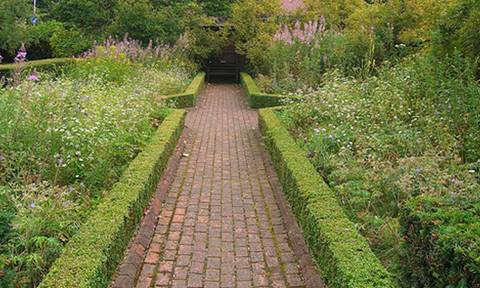
- Hedges will always remain favorites in landscape design. There is a list of special border flowering or ornamental plants. These include perennial undersized and flowering bergenia, bellflower, eland, primrose, gaillardia, hellebore, hosta, knifofiya and many others. Creating live borders is quite interesting. It is important to take into account the color contrast and architectonics of plants.
Installation of plastic curbs for tracks
- Laying plastic curbs does not require significant preparatory work associated with digging a trench, concreting the base or spreading non-woven material.
- Start by determining the contours of the track and the desired curb height. Manufacturers provide a hole for mounting pegs or anchors on the outside of the element. Such a mount securely fixes the curb and does not require special devices, except for a hammer for driving in metal stakes.

- Plastic easily joins and bends, repeating the most virtuoso bends. When the curbs are fixed, the tracks are laid. If gravel, paving slabs or stone are used, you can hide the border completely to create a contrasting line with greenery and flowers. In this case, the design will reliably perform its functions of protecting the coating.
Installation of concrete curbs
- Concrete curbs are designed for high loads, so their installation implies a strong fixation.
- First, a trench is dug along the contour of the path (its depth will depend on the level of penetration of concrete stones). Further, the trenches are poured with a solution (one part of cement and 3 parts of sand), leveled and the stones are immersed in it tightly to the edge of the path. The solution should not be too liquid, as the stone will float and it will be impossible to fix it.

- After installing several stones, you will need to return to the first and proceed with fixing with an additional layer of cement at several points. Ideally, the border should protrude 5 cm. After the mortar has hardened, the trench is covered with earth or sand from the outside. This design will last a long time, retaining its original appearance.
- For the border, you can use self-made stones, but it is better to purchase ready-made elements with a guarantee of quality compliance from the manufacturer.
Natural stone curbing
- This type of edging does not require a trench, but a thin layer of soil will need to be removed to lay down the nonwoven.
- Large stones are tightly laid directly on the "litter". Large gaps between them are filled with smaller pebbles. Finally, all voids are covered with dry cement.

- At first glance, this work seems simple and uncomplicated. However, it requires certain skills and patience.
General rules for installing curbs
- In order for the track to retain its shape and aesthetic appearance for a long time, it is necessary to prevent gross errors when installing curbs. So where do they start work, and what stages can be distinguished?
- When marking the contours of the track, stakes are driven in, along which a construction cord is pulled, it will indicate the upper border of the curb element. When installing each subsequent element of the curb, you should check its correct position in terms of level.
- It is undesirable to clog gaps in structures with cement, as this can lead to expansion and violation of the integrity of the curb under the influence of water and frost. It is safer if water does not linger in small gaps.
Original do-it-yourself borders
- For self-casting of concrete curb elements, special polymer molds are purchased. The length of garden forms does not exceed 50 cm, which is very convenient for subsequent installation. Garden forms of various configurations and sizes are sold on the market. They are reusable if washed with a 3% hydrochloric acid solution. Mechanical cleaning from concrete residues in case of sticking is not allowed.

- By purchasing molds for casting, you can significantly save on the arrangement of a personal plot, since finished border elements are much more expensive. However, self-production will take a lot of time and will require knowledge of the correct preparation of the solution.
- High-grade cement (preferably 500) is used for concrete mix, while four parts of sand are taken for one part of cement. Water is added to the consistency of rustic sour cream. For uniform and fast mixing, it is better to use a concrete mixer. If you want to get a painted border, you can add a special dye to the solution. The result is a truly original design.
- When pouring the solution into molds, it is necessary to monitor the removal of air bubbles, which reduce the strength of the product. The casting site must be perfectly flat (checked by level) and free from foreign objects. After a few hours, the solution will harden and you can carefully release the molds for a new batch. A day after additional drying, the curbs are ready for laying.

- The clear contours of the paths should be combined with the design of flower beds and play areas. Forms for pouring allow you to come up with different color schemes, delimiting zones while maintaining style.
- The design and installation of borders needs a creative approach. Even inexpensive material and simple design can look very attractive if everything is chosen and tastefully done. If time permits, all work can be done independently. By hiring specialists, the owner of a country house expands the styling options and the flight of his fantasies, but this will require additional funds.
There are many options for edging garden paths, it is enough to show a little creativity to create a unique harmonious fairy garden design. Well-groomed clean paths without land from the site will please both the owner and anyone who decides to walk along them.
Beautifully tiled or made of concrete garden paths are not able to withstand the "green army" that comes from all sides for a long time. Grass and shrubs, growing, can significantly reduce the usable area of sidewalks. To solve this problem, it is enough to install a curb on both sides of the track. The border can be purchased ready-made, or you can make a decent fence for the garden path from the available materials on your own.
How to make a concrete border for a garden
The border for the garden can be made from concrete. Concrete design elements of garden paths have the following positive qualities:
- you can easily make products of any shape;
- service life of more than 50 years;
- undemanding to care and maintenance;
- low cost.
Concrete products are cast in special molds, which can be made from the following materials:
- metal;
- wood;
- plastic.
For the manufacture of borders, you can buy ready-made forms for pouring concrete, but given the simple design of such products, it will not be difficult to make them yourself.
 When the form is purchased or made independently, it is installed in an upright position and a concrete solution is poured into it. The mortar for concrete products is prepared from the following materials:
- cement brand 500;
- sifted sand;
- crushed stone fraction 5-10 mm;
- mineral additives to improve the plasticity and strength of concrete;
- dye (used only in the case of the manufacture of colored products).
A few days after pouring, the mold is carefully removed from the workpiece, which must be dried in the open air for at least 2 weeks. When the concrete solution gains brand strength, curbs are installed along the tracks on both sides.
Brick is a popular garden design material.
Ceramic brick can also be used as a border for garden paths. This building material is used in finished form, because. installing a clay kiln on your own will be a very costly and burdensome undertaking.
A brick border can be made in various ways, but such a fence has the greatest aesthetic effect when the material is installed on the edge at a certain angle.
The process of manufacturing a brick fence is carried out in the following sequence:
- On both sides of the track, trenches are made 15 cm deep and 25 cm wide.
- A thick concrete solution is poured into the trench, consisting only of sand and cement.
- The first brick is installed in the mortar at an angle of 45 degrees. In this case, about 1/3 of the product should be in the solution.
- The next brick is installed on the previous one at the same angle and depth.
Thus, the curb is installed along the entire length of the garden path. When the solution hardens, it must be sprinkled with earth from the outside of the curb. A brick border can also be made with a horizontal arrangement of bricks, but the aesthetic effect of such paths will be much lower.
Natural stone garden fences
Borders made of natural stone have very high aesthetic characteristics. The following breeds can be used to make a curb made of natural stone:
- granite;
- basalt;
- quartz;
- slate;
- limestone;
- sandstone.

Natural stone will ensure the longevity of the structure.
Limestone and sandstone are the least durable rocks, but with proper installation and careful use, they can last more than 20 years.
Granite and basalt are the most resistant to mechanical and natural influences, therefore, the use of these materials is recommended when additional impact of people or animals can be carried out on the fence of the path.
The process of installing a natural stone fence is carried out in the following sequence:
- Marking along the edges of the garden path.
- Foundation pouring.
- Laying a stone curb on a sand-cement mixture.
Thus, the material is laid on both sides of the garden path. Also, a natural stone border can be made without the use of cement mortar and foundation. It is enough to press large stones into the ground with force to make an excellent border for a garden path.
Finished borders made of metal and plastic
One of the fastest ways to install a garden path curb is to install plastic or metal products. Sections made of metal or durable plastic are sold ready-made; to install them, it is enough to deepen the tape or individual elements of such a fence into the ground.
The order of work is as follows:
- Along the entire length of the track, make a recess in the side part.
- Set the tape horizontally and tamp the ground around.
In this way, a plastic fence is installed. Installation of metal sections does not require additional preparation of the site. To install metal curbs, it is enough to drive the tape into the ground to about half its height.
Wooden paths - beautiful and original
 If the path was made of wood, then it is desirable to install curbs from this material. An ordinary edged board, sawn into small pieces and installed in a horizontal position along the entire length of the tracks, can be an excellent solution for landscaping the backyard. The installation process is very simple.
For this purpose, a board 100 mm wide is suitable, which, when sawn into pieces of 400 mm, is hammered into the ground along the edge of the tracks. Before proceeding with the manufacture of this type of fence for a garden path, you need to carefully treat the wood with special antiseptic compounds. In addition to edged boards, for the manufacture of a border, you can use timber or natural logs of small diameter, from which bark and branches are removed without fail.
The sequence of actions in working with such materials is practically the same as the method of installing a wooden border from a cut board, but so that the wood is not damaged when driving into the ground, this operation must be performed through a thick wooden gasket.
Solutions from cheap improvised means
The budget option for installing curbs for garden paths can be made of various materials, but the products listed below are most often used to install such a fence.
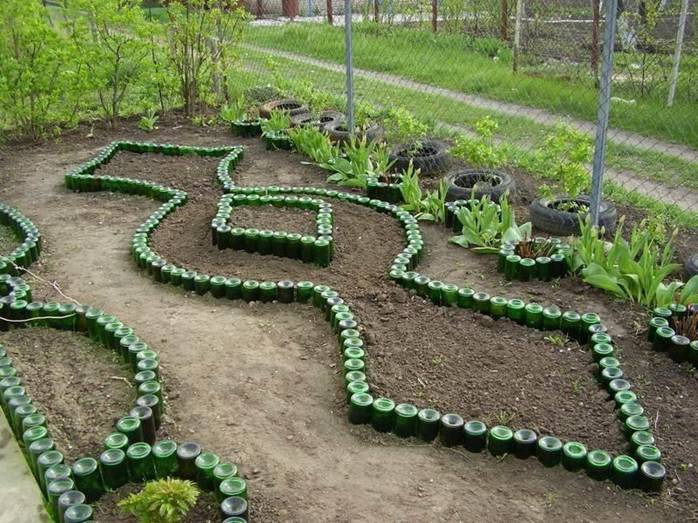
bottles
For the manufacture of the border, glass or plastic products can be used. You can make a solid border or alternate bottles of different colors. The process of making a curb from bottles is carried out in several stages:
- The bottle is half-filled with earth or sand and securely plugged with any hard rounded object.
- A trench is dug along the edge of the tracks, the depth of which should be equal to half the height of the bottle.
- A nylon cord is pulled over the trench to evenly place the bottles.
- The trench is filled with concrete.
- Bottles are installed in a concrete solution with a neck down.
This installation method is more suitable for making a glass bottle border. Plastic products are enough to be cut in half and pressed into the ground. Installing a border made of plastic bottles is the fastest, but, unfortunately, such structures will not differ in strength. Glass products are also unstable to severe mechanical damage, therefore, if there is a risk of damage to the curbs during operation, it is better to use other available materials for these purposes.

old tires
Excellent material not only for making a curb for the track, but also for various crafts. You can make a fence from whole tires. For this purpose, rubber is dug halfway into the ground, followed by compaction of the soil. If there are few tires, then they can be cut by fixing them with nails on a beam, then burying the lumber in a trench along the edge of the garden path.
Vine
Free natural material from which you can make decorative items for the garden, including borders for the path. The process of creating a fence from a vine is carried out in the following sequence:
- Wooden pegs are placed along the edge of the tracks at an equal distance.
- Several thin rods are braided around the pegs at ground level along the entire length of the track.
- The installation of the second row is carried out on the opposite side.
Thus, the fence is increased to the desired height. Vine borders have a very suitable look for the garden, and vertical pegs with sufficient soil moisture can sprout, then the fence will “come to life”.
Green and flowering plant borders
Not only various building materials, but also living plantings can be used to frame garden paths. Often for this purpose, plants such as:
- barberry;
- lavender;
- boxwood;
- marigold;
- cotoneaster.
The process of "installation" of such a fence is very simple, it is enough to plant the listed plants along the path, and after a while you will get an excellent decorative fence.
A path without a curb not only has an unfinished look, but with significant precipitation it is constantly washed away with water. Water contaminates the coating, and with prolonged exposure contributes to the destruction of the material. The methods of independent production of borders listed in this article are suitable for any personal plot, and most of the proposed options have not only a decorative function, but also reliably protect the track from destruction.
In contact with
Garden paths, in the creation of which each owner of a suburban area invests a lot of time and money, will be short-lived and unfinished without a curb. A garden border is necessary to protect paths from pollution, to prevent them from sprawling and overgrowing with grass, to prevent soil erosion and maintain a given path geometry. In addition, the border often performs a purely decorative function, and sometimes the fences of garden paths are made the same, maintaining the overall style of the site. A border for garden paths can be made using ready-made purchased materials, or it can be created from improvised items. There are plenty to choose from.
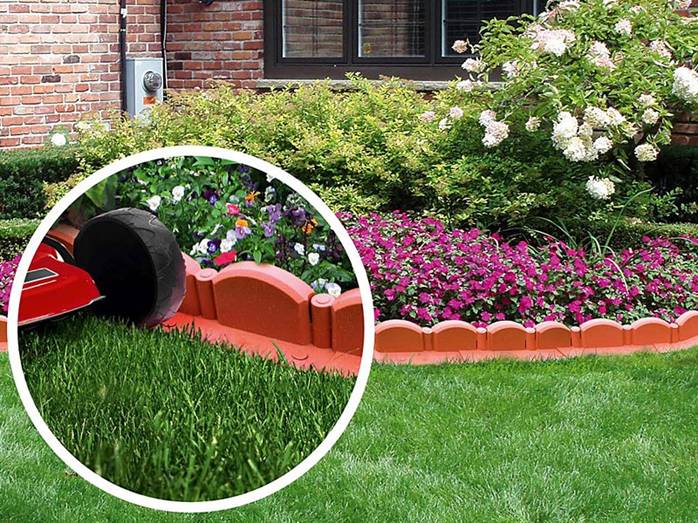
No. 1. plastic border
A plastic border can be called a universal solution for any site, since it can be either completely discreet and inconspicuous, or decorative. Main advantages plastic border for:
Flaw only one is a synthetic material, but there will be no harm to humans and grown plants. In terms of strength and durability, plastic, of course, is inferior to stone.
Plastic curbs currently presented in construction stores can be divided into such kinds:
- solid flexible roll tape, most of which will be in the ground. Such a border will be almost invisible, which means it can become a frame for a path on a site made in any style. He copes with his direct tasks: he does not allow the path to creep and prevents the germination of lawn grass. With such a ribbon, you can frame the paths of the most winding forms, but the border will not perform a decorative function;

- section borders. Each section has special elements that facilitate installation. Of these, you can eventually assemble a nice decorative border;

- finished fencing of a certain shape can imitate tiles or other materials.

Installation of plastic curbs is a simple process and usually involves the use of special anchor pins. The latter should be different for different types of soil: wooden ones are suitable for soft soil, metal ones for stony soil. It is better not to use a plastic border for framing stone paths.
No. 2. concrete curb
In most areas, garden paths are framed with a concrete curb. He owes such popularity to the strength characteristics and relative cheapness, as well as the possibility of making it yourself. A concrete curb is an excellent option for framing, stone, pavers and asphalt.
Main advantages:

Among shortcomings a large weight and a poor selection of ready-made curbs, as well as relatively time-consuming work on preparing the soil for the installation of such a curb. are sold in several sizes, they can be stacked on the edge or on the wide side. If the dimensions, shape or appearance of the finished concrete blocks are not to your liking, you can make your own border using ready-made or. You will need to prepare the solution and pour it into the blanks, and after waiting for complete hardening, use the resulting product for its intended purpose. can be dyed in the mass in the desired color or decorated with pebbles, shells, small stones, glass, prints to give a boring material a unique look. 
A concrete curb, bought or made by hand, is heavy, so preparatory work due attention should be paid - the durability of the structure depends on them. You will need to dig a trench about 20 cm deep, fill it up, tamp it down and fill it up. The latter is poured with water and also carefully rammed, after which a cement mortar is poured into which the elements of the curb are immersed. Using a rubber mallet, they are leveled to the required level, the remains can be poured into the joints. A concrete curb can also be installed in parallel with the creation of a garden path. 
Another option for arranging a concrete curb - pouring concrete with formwork. The process resembles the preparation of a tape one, it saves time, but the border obtained in this way will have low decorative qualities. Work begins with digging a trench of the desired depth and width, then formwork is installed. A sanded board will do for its manufacture, but if you plan to create a path with bends, then it is better to use plastic, MDF or steel. The formwork is fixed with pegs, and then filled with cement mortar prepared in or independently using any suitable container. Now it remains to level the surface, and after the concrete has hardened, you can remove the formwork and cut expansion joints in increments of 100-150 cm to prevent cracking. While curing, the concrete can be decorated with pebbles, pieces or mosaics. Such curbs can be used for bulk, asphalt or paths made from improvised materials.
No. 3. metal border
One of the strongest and most durable borders is metal. It can be made from stainless steel, aluminum or copper, and be in the form of ribbons or rods. Ribbons, like a plastic counterpart, serve as an invisible fence of the track. They are buried in the ground at least 10 cm, from above they can rise above the surface level by no more than 2 cm. Metal tapes retain the shape of the track, prevent grass from growing, while remaining invisible. fencing from metal rods has a more decorative function: forged elements, for example, may have common features with forged curbs of paths, allowing you to perceive the site as something harmonious and made in one. 
Main advantages:
- high strength and durability;
- resistance to a wide range of temperatures;
- excellent preservation of the shape of the track;
- simple installation;
- the ability to use for the design of paths of a sinuous shape.
Among cons only the price, therefore, if necessary, to equip borders invisible to the eye, the choice often falls on plastic.
No. 4. wooden border
Wood can be used to build walkways in one of a variety of ways: boards, bars, pegs or saw cuts. Ready-made borders can be found in the store, they are easy to make on your own, and you can even use the remnants of lumber. Wood curbing is best for fencing wood paths or tree bark pavements. 
Main advantages:

A wooden curb will do an excellent job with its direct functions, but its the main disadvantage is low durability. The tree must be treated with protective compounds before installation, and then regularly during the operation of the curb, but it is still unlikely to last more than 10 years. Mounting will require minimal effort: make a trench, organize a drainage cushion and lay it.
It is worth noting separately wicker borders, which are made from a vine, but they play a predominantly decorative role, so it is better to combine them with a plastic or metal tape in order to maintain the shape of the track. 
No. 5. brick border
For arranging a border, you can use inexpensive sandstone, limestone or shell rock or more expensive marble or granite. In any case, the stone border will be a beautiful decoration of the path made of tiles, stone and even concrete. Among the disadvantages of this type of curb heavy weight and high price. To make such a stylish design of garden paths available to a wider circle of people, some manufacturers offer an artificial stone designed specifically for arranging paths. 
Installing a stone curb is a simple and quick process. In addition to digging a pit, creating a drainage layer and ramming it, it is necessary to use agrofibre so that grass does not subsequently grow through the stones. The stones are set close to each other, and a finer fraction can be used in the gaps.
No. 7. "Green" border
The border of the path can be decorated with plants. It will look very nice, but when deciding on such an option, it is worth remembering that great efforts will need to be made both at the stage of creating the border and in the process of maintaining it to maintain the proper appearance. "Green" border can serve decorating stone or gravel paths. It is planted according to the same principle as a hedge, but it is better to select plants of a small height.
Plants such as boxwood and cotoneaster are usually used, lavender, bergenia, sage, cloves and some others are also suitable. The height of such a border should not be more than 30 cm, and the width is made in the region of 25-30 cm. Care for the "live" border should be constant, like all plants in the garden. It will have to be regularly watered, fertilized and trimmed.  - there are a lot of options, but the main thing is not to forget that the curb must cope with its main functions and be more or less durable.
It is better to decide what the curbs for garden paths on the site will be made of, even before the construction of the paths themselves, at the planning stage. Some types of curb will be much easier to install in parallel with the arrangement of the track itself.
An almost obligatory element of landscape gardening design is the original curbs for garden paths. Made from a wide variety of materials, they can be a real decoration. In addition, borders have a purely practical function. A path without a curb looks somewhat "disheveled" and, as it were, unfinished. And the practicality of using such a coating can be questioned.
How to make this decorative garden element and what is needed for this? We'll talk about this.
Why borders are needed
In different sources, this element is called differently. A curb, a curb or side stone, a curb - all these are different names for the same functionality. Simply put, this is an element of the road surface, which is placed on the border of the pedestrian and landscape gardening areas or the roadway.
As already mentioned, in addition to a purely decorative function, curbs for tracks also have a practical purpose.
- First, it separates the roadbed from other sections. In the garden, this is a flower bed or lawn, on the street - a roadway.
- Secondly, garden path borders provide an aesthetic element. Beautiful curbs decorate flower beds, ponds and other elements.
- Thirdly, the side stone is a kind of limiter for covering the track. Permanently installed elements do not allow the "body" of the track to creep under load. This is especially noticeable in the case of paths lined with tiles, paving stones or bricks.
Despite the seeming insignificance, this element is quite important. That is why the choice and installation of the curb must be approached with all responsibility. A high-quality and properly installed curb will not only decorate the garden path, but also ensure the durability of its use.
plastic fencing
Plastic curbs for tracks are an almost universal solution for any occasion. This is explained by the fact that, depending on your desire, they can be both decorative and completely invisible. Ready-made plastic borders have a lot of advantages:
- low cost;
- light weight, which greatly simplifies transportation and installation;
- the ability to arrange a garden path of any geometric shape;
- high resistance to temperature extremes, chemicals, high humidity;
- relative strength and durability;
- mobility and ease of installation;
- no need for special care;
- a wide range of shapes, sizes and colors.
The only drawback is that the plastic curbs are made of synthetic material. However, they do not bring any harm to people or plants. And, of course, they are still less durable than concrete or stone.
Plastic curb fences, presented today in the distribution network, can be divided into 3 large groups:
- Long continuous ribbon rolled up. Most of such a curb is dug into the ground, which means that the fence will be as inconspicuous as possible and will not interfere with your research in decor.
- separate sections. They come in a wide variety of shapes and sizes. Without much effort, they can be assembled into a single structure as a designer.
- Finished borders. Products of a certain shape that can imitate wood, tiles, boards and other textures. Such curbs are mounted on the basis of special anchor pins, which must be selected depending on the type of soil.
wooden border
Do-it-yourself wooden borders for the walkway look no less nice. To install such a fence, you can use different options. Saw cuts, pegs, boards or bars of different sizes are suitable. It is not necessary to purchase all this on purpose. To install a border, the remnants of lumber or thick branches left over from pruning the garden will do just fine.
The advantages of such a border are obvious:
- excellent appearance;
- environmental friendliness;
- the ability to use improvised materials;
- strength and durability with proper care;
- easy installation;
- installation speed.
A wooden curb will perform its main functions remarkably, but its durability can be questioned. In order for this indicator to be as high as possible, the tree must first be treated with anti-fungal and decay agents, and then this should be done annually throughout the entire period of operation. But even with such care, a wooden fence is unlikely to last more than 10 years.
Installing a wooden curb is a simple matter. It is enough to dig a trench, pour a drainage cushion of sand and gravel, lay a waterproofing layer. Now cut the bars or even thick branches into pegs of the desired length. Set the stakes firmly into the prepared trench, and fill the remaining gaps with earth and tamp. That's all. A do-it-yourself wooden border for a path or flower bed is made.
In the same section, one more type of wooden borders can be distinguished - wicker. They are made of pegs and flexible rods and are similar to the Ukrainian "tyn". Such curbs have an exclusively decorative function and cannot be used to strengthen the edges of the track.

brick border
An excellent option for a curb for paths made of savage stone, tiles or paving stones will be an ordinary brick. For these purposes, you can use both the usual version and the facing one. Like the rest, a brick curb has its advantages:
- resistant to seasonal temperature changes;
- not afraid of moisture;
- is a fairly environmentally friendly material;
- practically not susceptible to fungus, mold and other troubles;
- strong and relatively durable.
The most common option for installing a brick curb is “on edge”, that is, at an angle of 45˚ to each other. In order for the curb to stand for a long time and not fall over, they lay it on cement, and under the first brick I lay a hill of mortar so as to fix it in a certain position.
However, it is possible to lay a brick for a curb not only at an angle. If desired, it can be installed flat or on the end. It all depends on your design decision.
stone border
These walkway borders are the perfect solution for those who would like to spice up their landscape design. To create such a curb, granite, marble, shell rock, limestone or sandstone are most often used.

Masonry is performed on cement mortar or directly on the ground, without a substrate. If you decide not to use the solution, it is preferable to lay the stones on a sand cushion. This makes it possible to align them as much as possible with respect to each other. However, installation on cement mortar allows for a more durable frame. And weeds will grow less.
Before you install curbs for tracks, decide on the shape of the future track. Now, in place of the future curb, a shallow trench should be dug. In the process of laying the curb, gradually fill the trench with cement mortar, and set the stones to the desired shape. Make sure that the stones are as close to each other as possible. Fill the gaps with mortar or fill with fine gravel. The work, of course, is not too simple, but the final result is worth trying.
"Green" border
The easiest option to do without construction at all is the so-called green border. This is a kind of hedge of living plants. It is best to select plants that are undersized, but with a dense weave of branches. Cotoneaster or boxwood is well suited for these purposes. You can also use garden cloves, lavender, geyhera, sage, marigold, barberry and some other plants.
It may seem to an inexperienced gardener that the construction of such a curb is much easier than a wooden or stone one. But actually it is not. A "green" border will require a lot more effort from you. After all, you will not only have to tinker at the stage of its creation, but also maintain proper condition throughout the year. A border of plants will have to be regularly fertilized, cut and watered. But if everything is done correctly, the result will be amazingly beautiful.

metal border
This is one of the most practical and durable types of fencing. Most often, stainless steel, aluminum, copper or brass are used to make a metal curb. According to their functional purpose, all metal borders can be divided into two large categories:
- sectional;
- tape.
The former perform, rather, a decorative function and, for example, can be made in the same style with forged fence elements. Most often they are made of rods, forged or cast elements and are simply stuck along the edge of the track.
The latter can serve as a hidden fence and, like plastic bands, two-thirds are dug into the ground. In addition to being decorative, they also have a practical purpose. Metal tape borders perfectly keep the edges of the track from “spreading”.
Curbs made of metal have the following advantages:
- strong and durable;
- do not respond to interseasonal temperature changes;
- perfectly hold the desired shape of the track;
- if necessary, they can be used to create paths of a sinuous shape;
- fairly easy to install.
Their only drawback is that their cost is much higher compared to plastic counterparts.

Border from improvised materials
And how to make a curb for the tracks with your own hands, without spending a lot of money? If the cost of the future fence is important to you, then with a little imagination, it can be built from what is at hand. Anything can be used:
- old tiles;
- stacks of unnecessary plates;
- remnants of slate;
- tires;
- glass or plastic bottles;
- records;
- plastic pipes cut into pieces of the desired length;
- other interesting things.
It is best to choose the material for the future border at the planning stage. After all, sometimes the curb is easier to install along with the track or before it.

concrete curb
So we come to the most popular material, from which fences for garden paths are most often made. Concrete curbs for paths are preferred by the largest number of designers. Most likely, this is due to the strength and durability of this material, as well as the ability to give it the shape that is needed. All this is achievable when do-it-yourself curbs for concrete paths are made in compliance with all the subtleties of the process. To do this is not so difficult as it might seem at first glance.
Like other types of curbs, concrete has both its advantages and disadvantages. Among the first are:
- attractive appearance;
- strength and high durability;
- the ability to withstand high and fairly low temperatures;
- lack of response to high humidity;
- ease of care;
- relatively low cost;
- the possibility of self-production.
The second includes the large weight of products, the scarcity of choice among industrial production models and the laborious installation process.
Materials and tools
In order to make a concrete curb yourself, you will have to stock up on materials and tools for work.
You will need:
- wheelbarrow;
- bucket and shovel;
- concrete mixer (if you do not want to mix the mortar manually for a long time);
- container for kneading (if there is no concrete mixer);
- Master OK;
- wooden trowel for leveling the surface;
- screwdriver or furniture stapler;
- a hammer;
- electric jigsaw or hacksaw;
- a skein of twine for marking;
- roulette;
From the materials should be prepared:
- cement grade not lower than M300;
- sand, river or quarry, sifted (do not use sea!);
- small crushed stone fraction 10-15 mm;
- reinforcement bars, not less than 4 mm thick;
- screws, nails or furniture staples;
- clean water for the preparation of the solution;
- special pigments for concrete (if the border is colored);
- dishwashing liquid (used to give elasticity to the concrete mass);
- wooden boards and slats for the manufacture of formwork;
- pegs for formwork and marking.
Forms for concrete curbs
In addition, for the manufacture of smooth and beautiful curbs, you will need molds. You can buy them at the store or make your own. Each of these options has its own characteristics:
The factory form allows you to get products of a strictly defined size and with a perfectly smooth surface. The downside is that, firstly, you need to spend money on it. And secondly, getting the finished product out of this form can be very problematic. For this purpose, enterprises use special lubricants that facilitate excavation. At home, you can use, for example, used engine oil.
Home-made forms for curbs for paths are made from smooth sanded bars, which are mounted on a plywood or textolite base. Such forms are assembled with the help of self-tapping screws, which are simply unscrewed when demoulding. After removing the finished curb, the formwork is reassembled.

Manufacturing process
- First of all, you need to fill the prepared gravel with water. So it will better connect with the cement.
- We prepare a solution of sand and cement in a ratio of 4:1 or 3:1. The lower the brand of cement, the less sand.
- The mixture is poured into a construction mixer or concrete mixer and kneaded until a homogeneous mass.
- Now we add crushed stone at the rate of 2: 1, two parts of crushed stone per one cement-sand mixture. Add pigment if desired.
- We set the curb form on a flat, stable surface. We generously lubricate the inside with working off or other slippery substance.
- Pour the mixture into the middle of the mold.
- Gently tap the edges and sides of the mold with a rubber mallet to remove excess air bubbles.
- Now we lay the reinforcement, welded or wired into a rigid frame.
- Pour the rest of the solution and gently tap the mold again.
- We put the filled forms in the shade and pour them with water every day for a week. This is necessary so that the concrete does not harden too quickly and the curbs are strong.
- After removing the blocks from the mold, we leave them in the shade for about 3-4 more weeks, pouring water daily. During this time, the concrete will finally “ripen”, and it will be possible to start laying.
Monolithic curb
This is another option for concrete fencing. This design is carried out right at the installation site and is somewhat reminiscent of pouring the foundation.
- A shallow trench is dug and a wooden formwork is installed.
- Now you need to prepare the sand-cement mixture as described above.
- Pour the mixture into the formwork and leave to dry.
- After 1-2 days, when the concrete has already set, but has not yet completely solidified, the formwork can be removed, and the curb can be given the necessary shape using curly trowels.
- Moisten the curb daily with water until it is completely dry so that it does not crack.
It is impossible to imagine without beautiful borders, today they are presented in a wide range of choices, both in form and materials of their execution vary, there are plastic, metal, concrete, wood and stone sidewalk framing. But not all of them can be done from start to finish with your own hands, in this article we will consider several options for how you can build borders for tracks exclusively with your own hands.
Curbs of garden paths of various shapes are designed to protect tiles or other elements of the path from dirt getting on it after rain or watering. They also allow you to give a finished look to the shape of the path; without this element, the sidewalk will look like an unfinished structure.
Here are some of the functions that borders perform:
- Protection of the passage from growing greenery
- Prevention of melt water and dirt from getting on the sidewalk after watering.
- Strengthening the edges of the track
- Completed appearance of the entire decorative element
Brick variant
The easiest way to make a do-it-yourself border around the perimeter of the track is to use a brick as a building form, you can do this as follows. Dig with your own hands using improvised means a small trench along the line of the edge of the passage, half a brick deep and lay it at an angle of 45 degrees on top of each other. It is important to rake up a little earth under the first brick so that the shape of the border is uniform and does not collapse. After laying out, sprinkle the brick around the edges with earth with your own hands and tamp it down. This can be done with something flat and heavy, if nothing suitable was found at hand, then you can press the soil with a garden shovel by stepping on it with your foot.
wood border
Another fairly simple way is to use wooden elements of various shapes in the manufacture of garden borders with your own hands. This can be done in such a way that it will look natural and tasteful, but it is worth remembering that it is not difficult to make such a fence, but it is short-lived, and a year later, after wintering, the color of the board will fade and be more gray. But if you decide to do just that, then here are some simple tips. To begin with, it is worth digging a trench half the width of the board you have, inserting it inside and tamping it down as in the case of bricks, but rain and watering in this case will warp your wooden border over time. To avoid this, find long metal pins, rebar or thick wire, at least 8 mm in diameter, insert it at short intervals on both sides of your curb.

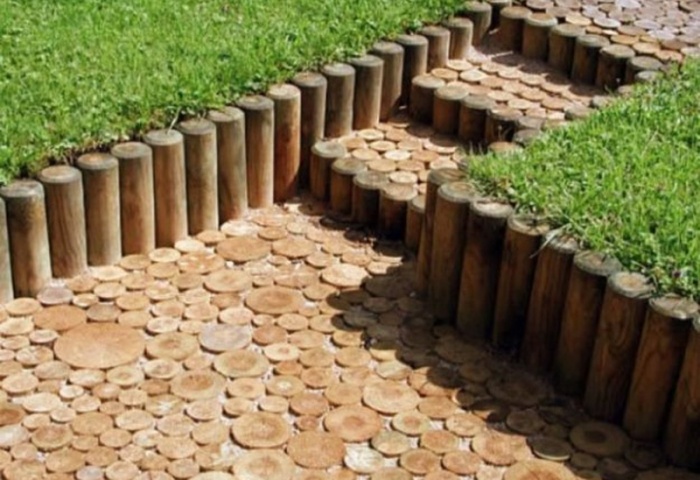
Hemp
Favorably on the garden path, another option from a tree border will look, which is also easy to do with your own hands. If you have sawn trees, then logs of approximately the same length and shape can be cut from their branches. To do this better, of course, using . Having cut them into one shape, simply put these chumps into the trench and dig in, not forgetting to tamp. This budget method will allow you to make a truly unique design with your own hands, it will fit perfectly into the design of garden plots.
Ready reinforced concrete slabs
A more thorough solution to the issue with curbs would be to make them from concrete slabs, they are already sold ready-made and their installation should be taken a little more seriously. For the garden area, they will not be some kind of universal solution, because the delivery and installation of such forms with your own hands is a very complicated process. But if you are still inclined towards this option, then we will give you some advice on this matter. First, decide on what basis they will be fixed with you, if they are simply buried in the ground, then proceed identically to the above methods of installing garden borders.

Only to go deeper into the ground in this case will have to be stronger. But if you want to make the curb more thorough, then you should install the cast molds on the cement mortar. With your own hands, dig a deep and wide trench, pour sand on the bottom of it and, using a special rammer, properly prepare the pillow for future filling. Next, install all the elements of the border along a cord stretched at the horizon level and proceed to pouring, making a solution with your own hands is quite simple, use a mixture of sand and cement in a ratio of 1 to 3 or 1 to 4, you can add granular slag to saturate the solution with a larger structure. To mix the solution, it is suitable (shovel, chopper), only after work, wash it under strong water pressure or with a rag.
Important! Concrete should be poured just below ground level, after hardening, you sprinkle it with garden soil and it will not be visible.
It is worth noting that if you decide to do everything yourself, then the sidewalk is already laid after the installation of the curb forms.

wicker fence
Wicker structures should also be attributed to the original and natural design of the fences of garden plots. There is where to roam, a lover of doing everything with his own hands, you will need:
- Thin logs from tree branches
- long willow vines
- Hard wooden sticks
We soak the willow rods in advance, for convenience in work, we set the logs of the same shape at a distance slightly less than the length of our willow vines. We stick sticks between them, their shape should also be approximately uniform. Weaving is done in sections, a bundle of two or three twigs must be carried out behind the first stick, then after the next and further in this way, they should be fastened with soft garden wire in isolation so that over time it does not rust or oxidize, this will spoil the appearance.
Plastic as an alternative
The option to use plastic curbs for garden paths has a number of advantages, firstly, it is easy to install. The forms of such structures vary, but almost any can be used as garden fences. Convenient storage in the off-season is also a plus for garden plots where no one lives in winter. In addition, the shapes that are used in the manufacture of such borders make it possible to make them indistinguishable at a glance from natural stones, tiles and other materials often used in garden solutions.
Living plantations
The most difficult thing to “manufacture” can be called a living border, it can only be done with the help of gardening skills, especially giving it the desired shape and a long time, but the reward for this will be a magically beautiful design solution. So, what do you need in order to make it with your own hands, firstly, this is the right choice of plant, most often they use boxwood or cotoneaster horizontal.
Important! The width of such a fence should not be more than 30 cm, otherwise it will not look organic.
These plants should be planted at a short distance from each other, when they grow up and take their final form, there will be no distance between them.

It is not enough just to make a living border, it requires careful care, it must be watered several times a season, but this can be included in the list of ordinary garden activities. But its shape also requires careful care, so you will have to cut the regrown leaves with your own hands.
Metal originality
The option of a metal border also has the right to life, if you correctly approach the choice of metal, then, made by yourself, it will last a very long time.
Important! Choose a metal that won't corrode or rust, aluminum, copper, bronze or brass will work just fine.
Please note that over time, each material acquires a characteristic shade only for it, this is due to the oxidation of the oxide film covering it, so copper will turn green and aluminum will become dull gray. If you are lucky enough to make the shape of the border quite large, then it makes sense to decorate it, for example, by embossing or carving patterns from soft metals. You can fix to the ground with your own hands, by analogy with the above methods (wooden border).
You can shape the garden path with glass bottles, as in the case of wooden logs, make a trench with your own hands, and insert the bottles into them, immersing about half, neck down, if left upside down, the water that enters them will leave a plaque, such bottles certainly will not decorate a garden plot.
Important! Before using in the garden, rinse the bottles thoroughly, otherwise you will encounter a problem identical to the frozen plaque.
Here are a few of the many options on how you can decorate a garden plot with your own hands, the number of shapes and colors of those materials that are described here is enough to implement the most daring garden ideas!