Weave a fence with our own hands: a horizontal design. Do-it-yourself wattle to the country: a master class. How to make a wattle fence in the country with your own hands? How to build a wattle fence in the country with your own hands
The eco-friendly woven twig hedge is an archaic exterior decoration in country style landscaping that is gaining more and more popularity. With such designs it is convenient not only to decorate flower beds and flower beds, but also to perform landscape zoning.
The main advantage of wicker fences is the ability to make them yourself from various improvised materials. How to do this is described in our article.


Peculiarities
The first wattle fences appeared in the Stone Age. In the Neolithic era, fences made of young shrubbery acted as walls for simple residential or commercial buildings, and later acquired the functions of a fence.


Nowadays, pretty wicker fences are used to decorate summer cottages and house adjoining areas.
A wicker fence is a lightweight fence, for the manufacture of which shoots or flexible branches of a shrub are used. Due to the use of natural materials after minimal processing (or even its absence), the wattle fence acquires a chaotic, handicraft structure. Therefore, such partitions look as natural as possible, becoming an organic continuation of the landscape design of a summer house or a country house, made in a "rustic" style with its inherent eco-style elements.


The main advantages of wicker fencing include:
- Application versatility. Wicker partitions decorate flower beds, form supports for climbing garden crops, designate visual boundaries between adjacent areas, barbecue patios, dining areas, pools and relaxation areas.
- External attractiveness. A variety of artistic weaving techniques (from simple to rope and chess) allows you to create original masterpieces that make the design of a garden landscape truly unique, distinguishing it from others.

- Opportunity to create optimal conditions for growth and the development of shade-loving and moisture-loving plants, if an earthen backfill is provided during the construction of the wattle fence. In this case, the installation of an openwork partition that allows air to flow well will be much more effective than a solid fence.
- Availability and cheapness of raw materials. Considering that this type of garden decor can be done by yourself, using shrubs from your own dacha, the manufacture of wattle fence can be completely free.


Minuses:
- Short period of operation which is limited to 3-6 years. This is due to the susceptibility of natural materials to the influence of natural factors.
- Poor maintainability- this is a problem inherent in all wicker products. Damage to one fragment of the fence will require disassembly of the entire section or the entire fence.
- fragile material eliminates the possibility of using a wicker fence as a reliable barrier fence.


- combustibility and flammability of dry branches.
- Wattles are appropriate only in summer cottages and adjoining areas, decorated in country design.
Openwork fences with many gaps will not be able to qualitatively limit the view of the site and maintain privacy.


materials
Another significant advantage of wooden rod wattle is environmental friendliness, since natural or harmless synthetic materials are used for modeling. The quality of the future hedge, its quality factor and wear resistance depend on the correct choice of raw materials. Let's take a closer look at the most popular options.


Willow
Willow branches, which have high longitudinal strength combined with excellent flexibility, are considered one of the best materials for artistic weaving. Nature has awarded the willow with long, even, flexible branches, which guarantees a very beautiful and hardy fence.
For the construction of a wicker fence, vines cut from any representative of a large family of these trees (willows) are suitable. Such woody plants are distributed almost everywhere in our country, which greatly simplifies the task of harvesting material.


Hazel (hazel)
The twig-shaped branches of hazel (deciduous shrub or stunted tree) are an ideal material for creating garden partitions, as they are distinguished by unsurpassed decorative qualities and durability. The picturesque vegetation of the local area, the clarity of the lines of the graceful hazel hedge form a winning contrast combination, without which it is impossible to imagine a landscape design designed in a rustic or alpine style.
As an addition to such a fence, you can use a vine to get an original fence over time, which is unlikely to leave guests indifferent. Alder, birch, cherry or apple shoots can become an alternative to hazel branches.


grape vine
Such a wattle fence is easy to manufacture, as flexible, long grape stems are wrapped at the right angle without any problems.
The vine has increased resistance to sharp temperature fluctuations and excessive humidity conditions. Therefore, a hedge of its shoots and sleeves will please with an attractive appearance for several years.


If grapes do not grow in the country, then you can get hold of a vine at a reasonable price in a nursery.
Cattail or lake reed
Both representatives of the coastal aquatic flora - reeds from the sedge family and cattail from the cattail family, which are often confused due to external similarities, are also often used for weaving garden fences. But the strength of the stems is not a strong point of these plants with an extremely fragile structure, so it is not necessary to talk about the wear resistance of these materials.
A fence made of cattail or lake reeds will become unusable in a year or two. For this reason, it is best to build mini-fences for decorating flower beds, flower beds or mixborders, and then perform landscape zoning.


Acacia
Yellow acacia is an ideal candidate for creating stunningly beautiful decorative hedges with regular geometric shapes. For this purpose, cuttings are rooted, which are cut from one-year-old shoots.
The optimal time for harvesting them is spring, until the buds and autumns begin to bloom. when the plants have finished growing. To avoid drying out, the cuttings are placed in the soil in advance.


Advantages of acacia hedges:
- Has an aesthetic appearance.
- Provides wind protection.
- Produces oxygen. Like any "living" fence, the acacia structure acts as a natural filter.
- Creates additional sound insulation.


To create living fences, various types of flowering, evergreen, deciduous and climbing horticultural crops are used.
Boards
Due to the use of a planed board as a building material for a wicker fence, protective ones are added to the decorative functions of such a fence. The capital fence is able to limit the access of outsiders to the backyard area.
Fence sections are formed from boards, and vertical supports can be concrete, wood or metal.


PVC
Although the classic wattle is made from branches or young growth of trees and shrubs, PVC has become no less popular material for its manufacture. Polymer fences come in the form of curb tapes or sectional fences.


Design advantages:
- Durable. PVC has chemical stability. It is resistant to UV radiation, corrosion and decay.
- Mobile. Sectional fences are quickly assembled and disassembled, which ensures ease of transportation.
- Trouble-free in operation.
- Inexpensive.


Care comes down to washing the fence and treating metal elements with anti-corrosion compounds.
How to do it yourself?
The easiest way to create a decorative fence involves using any wicker weaving technique. You can weave a partition by laying branches:
- Horizontally when vertical supports are braided with long blanks, which ensures the best strength and density of the weave of the fence. The distance between adjacent posts should be at least 0.3 m.
- Vertically. In this case, the basis of the future hedge is formed from horizontal veins mounted on supports. The advantage of this technique is the ability to create wattle with a different pattern.

- Inclined. This technique involves the frequent arrangement of supports, which provides a step of up to 0.3 m, followed by filling in the gaps with branches arranged diagonally when weaving.
- "Chess", which makes it possible to create a beautiful checkerboard pattern on the hedge. First, bundles are formed from several branches, and then they are arranged horizontally in a checkerboard pattern.
- Round. The supports that form a circle are braided with branches or bundles of thin growth. In this technique, flower beds are most often decorated.


Consider a master class on creating a fence of rods using simple horizontal weaving - everyone can master this technique.
Preparatory work
For the manufacture of a wicker fence, any rods that are malleable to bending are suitable. Their optimal length is 1.5 m. A favorable time for harvesting willows is spring, until sap flow begins, late summer and autumn. Preference should be given to flat vines with the same thickness and without lateral branches. The rods are cut obliquely. They are formed into bundles and left to dry or used freshly cut.


The process of preparing material for weaving includes several stages:
- soaking. The bars with a thick end down are placed in a bucket, poured with steep pitch and left for a week. The action of water activates the movement of juice, due to which the material acquires the necessary flexibility.
- Cleaning from kidneys, knots and bark. The bark is removed with a pincer in the form of a narrow conical fork with sharply sharpened edges inside.
- antiseptic treatment to increase the wear resistance of the wattle.


- Drainage device. To do this, dig a trench up to half a meter deep. A sand cushion up to 15 cm thick is formed at the bottom. Its task is to quickly remove moisture, which prevents the development of decay processes in the bearing part of the hedge.
- Procurement of supports. Stakes made of wood, thick rods, steel tubes are suitable for the role of supporting pillars.


Wattle making
Sequence of work:
- Markup execution. Bearing stakes are placed at a distance of 0.3-0.5 m.
- Deepening of supports. The installation of thick pillars is carried out at a depth of 0.3-0.5 m. The length of the supports should be 0.2-0.3 m higher than the height of the fence.
- Weaving bars between supports. They begin to interweave the thick end of the workpiece, alternately bending around the pillars from one side or the other and stretching it along the entire length of the hedge. The ends of the branches should remain from the inside of the fence.

After the formation of every 4-5 rows, they are tapped tightly with a mallet, which helps to compact the braid.
Before installing the last row of bars, the fixing bar is removed. The bearing stakes are fastened to the top row with wire.

Vertical laying is carried out in a similar way, but all the bars will need to be fixed at the upper and lower support points in order to avoid loosening the structure. The situation is more complicated with the manufacture of structures from the board.
To securely fix the pillars, use the foundation of two types in the form:
- Separate pedestals for supports.
- Monolithic strip base.


Foundation construction includes digging wells or trenches 0.7 m deep, forming a sand and gravel cushion 0.2-0.3 m high and pouring with a cement mixture.
When installing supports withstand steps up to half a meter, after which they begin to form sections, placing the blanks with the end parts down.
Border tape for decorating the garden is sold in rolls. To install it, a groove is dug, a tape is partially placed inside and covered with earth. Then the soil is well rammed, after which the fence for the flower garden is ready.


- To increase the service life of wooden poles, the supports are buried in the ground, placed in pre-clogged plastic pipes.
- For the manufacture of transverse logs and poles, metal is suitable, painted in the natural shade of a natural fence.
- To protect the lower part of the fence, it can be erected at a height of up to 10-15 cm above the ground. An alternative option is the arrangement of a sand and gravel drainage cushion.


Recently, a wicker fence made of vines has begun to appear more and more often on sites. And this is not surprising, because it is cheap, easy to manufacture and an unusual type of fence that anyone can make. Of course, a wicker fence is not very suitable for protecting the territory, but it is quite suitable for dividing within the site, as well as for decorating flower beds and playgrounds.
How to make a fence from a vine with your own hands, and will be discussed in this article.

Advantages and disadvantages of a wicker fence
Before proceeding with the construction of a vine fence, a person should weigh all the pros and cons of such a design.


- Nice appearance. Such a fence can decorate any site, bring comfort and a special atmosphere filled with rustic motifs to it.
- Environmental friendliness. Wicker fences made of vine, reed, willow, hazel are environmentally friendly, because natural materials are used in their construction.
- Cheapness. The manufacture of such a fence does not require costs, because almost all the necessary components can be prepared by yourself.
- Simplicity of design. Looking on the Internet at photos of vine fences, it may seem that they are difficult to perform. But that's not the case at all. Such a construction is able to be done by one person, without any help, since it is not necessary to pour the foundation or concrete the supports.

- Poor site protection. A wicker fence is more suitable for decorative purposes inside the site, and not to protect the territory from the visits of uninvited guests.
- Flammability. Dry materials from which the fence is made can easily catch fire when in contact with fire. This must be taken into account when choosing a place where the building will be located.
- Short service life. A wicker fence will last only about 7 years. But a polymer vine fence is more durable.
- Reconstruction problems. If any part of the fence breaks, it will be necessary to dismantle the section of the fence where the damage occurred.

What raw material to choose?
Raw materials for braiding do not have to be bought, you can find it yourself. A wicker fence is made of reeds, hazel, vines, but most often flexible branches of willow vines are used, because they are the easiest to weave.


Procurement of raw materials
Before you make a fence from the vine, you need to prepare everything you need. To create a fence, willow shoots are used, which have excellent flexibility. The best time for harvesting is late autumn or early spring, but you can also go in the summer if the fence needs to be made urgently.

We need even and smooth vines, with a diameter of 1-3 cm. Using a sharp knife, they are cut obliquely. After that, bunches are tied from twigs and sent to dry.

To create a wicker fence, you need branches with a diameter of more than 4 cm and a height of 50 cm more than the height of the wicker. This will be a support. You can also use pine branches.

It is advisable to sharpen the lower ends of these blanks so that there are no problems with driving them into the ground.

Preparing to Create a Fence
Before weaving the fence, the vine is given flexibility with the help of a “steam bath”. Also, the raw material can be left for several hours in warm water so that it gains moisture and becomes more flexible.

If the fence is constructed from shoots that have been recently cut, then the leaves do not need to be removed from them. Pine branches intended for support are cleared of bark.


It is also necessary to remove the bark from the willow vine.


Materials and tools needed to create a fence
In addition to the materials mentioned earlier, you will also need:
- Wooden perches or metal wire;
- Hammer or mallet;
- Sharpened knife;
- pliers;
- Pencil or other convenient marking device;
- Ruler or tape measure;
- brushes;
- Stain or iron vitriol.

Fence making
First you need to make a markup: the boundaries of the future fence are marked with pegs, a rope is pulled between them; the places where the supports will be driven in are indicated.

The distance between the supports should be somewhere between 30-50 cm. The greater the weight of the willow vine, the further away the supports can be installed. If during weaving the supports will bend, you can fasten them to each other with wooden perches from above.


Usually fences are woven in a vertical or horizontal way.

Horizontal weaving method
- First of all, the willow twig must be fixed. The thick edge of the vine is taken and they go around the second support, the continuation of the vine starts behind the first support.
- Thus, the vine is carried out with a figure eight, starting for each support that comes across. It will be very good if one vine covers at least three stakes.
- When the vine is over, they take another one and start weaving from the previous support. The joint is removed with a pruner and fixed with a wire.
- The vines of the next row are wrapped around the supports from the opposite side - in a mirror image.
- When a couple of rows are completed, you should do the compaction of the weave. With the help of a mallet, the vine is tapped so that the horizontal weaving is on the same level.
- The ends of the vine are transferred to the back side and removed with a sharpened knife so that they are flush with the wattle fence.


The resulting fence looks very good, but there is no limit to perfection. To make the design even better, you can walk on it with stain and apply varnish.

To increase the life of the fence, you should walk with a wood antiseptic designed for such cases. Part of the fence, which is located near the ground, it makes sense to treat with vitriol.

Vertical weaving method
- To the supports driven into the ground, it is necessary to nail or tie horizontal supports from three-dimensional bars, leaving a gap of 25 cm between them.
- To maintain a decent view of the fence, a bar is installed on top, which is removed after completion of work.
- The twig is stuck into the soil and wrapped around the transverse supports. When this is done, the twig will be at the top, it must be cut evenly or twisted with the upper transverse rod.


This type of fence is also called "live", because after the winter it can put out leaves, because the willow quickly takes root. Behind such a fence, special care is needed: it is required to cut off all the extra branches that have appeared. It is recommended to do this in early spring or late autumn. In order for the fence to grow with branches, it cannot be processed with anything.

Photo of a wicker fence made of vines


Wicker fence. How to make a wattle fence with your own hands in the country: photos, videos of making.
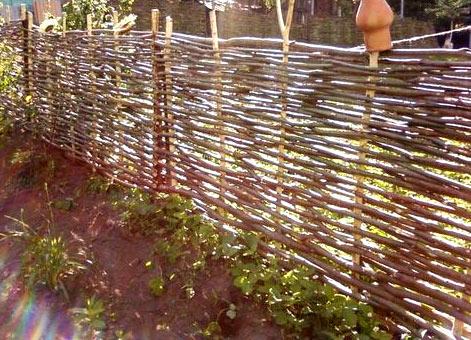
Wattle - a fence made by weaving flexible rods of branches. The method of weaving in the manufacture of hedges has been used by our ancestors since time immemorial. You can make a wicker fence yourself, it will create an original rustic flavor in your summer cottage.
Here are some photos of the wattle fence in the garden.
The design of a wicker fence consists of vertical pegs driven into the ground, and rods are alternately intertwined between the pegs.
What to make wattle stakes from?
Since ancient times, our ancestors preferred walnut stakes, walnut has a fairly strong wood structure, and when it dries, it becomes very light. But it is not at all necessary to use a walnut, stakes can be made from any wood, it is advisable to use hardwoods - mulberry, apple, pear, birch, oak, acacia.
The height of the fence can be any depending on your wishes, but usually it does not exceed 1.5 meters, the stakes must be driven into the ground to a depth of half a meter. The distance between the stakes is also half a meter.
It is important that the distance between the stakes is the same.
We measure the length of the future fence and calculate how many stakes are needed for the fence.
We make stakes from even branches, the thickness of future stakes should not exceed 5 cm, side branches should be chopped off with an ax or cut with a large knife. We make the lower part of the stakes sharp so that it is easier to hammer them into the ground.
To make the stakes last longer, the bark must be cut off from them.
If the stakes are stuck into the ground without first being treated with a protective compound, they will rot in 2-3 years. Therefore, that part of the stakes that will be in the ground must be processed, you can cover them with bitumen, resin, engine oil waste, an antiseptic, or just char a little on a fire.
Stakes need to be hammered into the ground about half a meter, the height of the stakes can be the same or different. If the fence is up to 1 meter high, then it is enough to hammer the stakes into the ground by 30 cm.
What to make wattle? For the manufacture of a wicker fence, flexible branches of vines, willows, willows, birches are suitable, you can also make wattle from hazel, mountain ash. The thickness of the branches should be no more than 3 cm, the length should be sufficient for braiding at least 3 stakes.
The branches must be freshly cut, dry branches lose their flexibility and cannot be woven. The cut must be made oblique.
Now let's start weaving the fence.
How to make a fence with your own hands photo.
We alternately weave the rods between the stakes, we begin to weave the thicker part of the rod, so that later we can hide the thin part in the braid.
There are many types of fences from a wide variety of materials. But recently, more and more often you can see a beautiful, eye-catching fence made of intertwined vines - Ukrainian tyn. Such a fence decorates areas near cafes and restaurants, separates zones on a garden plot, or simply encloses flower beds. Tyn can be made with your own hands from a variety of materials.
It looks like a classic fence tyn
Colorful and fashionable wicker fence
Vine is called elastic, long rods from any plant material. It is harvested in early spring before the juice begins to move in the stems or in autumn, from early September until frost.
Properly prepared material is the key to a beautiful and high-quality fence
Most often, long annual branches of willow, hazel or willow shrubs are used. The best time to go to harvest material is an early sunny morning. Cut the vine with a sharp knife obliquely, trying to make the cuts smooth and even. When cutting off the branches of a shrub, they tend to leave 3-4 leaves from the ground. So, the bush will recover faster. 
After clearing the branches of leaves, it is desirable to give them a neater appearance by removing the bark. This is done with a simple tool in the form of a split cone, which is better known as a pinch.
It can be made by hand by splitting a hardwood stake from one end. The unsplit end is strengthened by tying it with a strong rope or wire. The rod is inserted between two chips and stretched from edge to edge. The bark from a fresh vine is easily removed, but if it has lain down a little, then it is better to put it in water for a while.

Wicker fence tyn using logs for poles
If the branches have been stored for a long time and managed to dry out, it is best to steam them or soak them for a week in a large container of water. It is very important that the material is completely covered.
When the vine is ready for weaving, it is sorted by stem thickness.
Thicker rods are used at the base of the fence and at the very top. The thinner rods are woven closer to the middle. This trick allows you to build a stronger and more durable wicker fence.
Do I need a foundation for a wicker fence
The place where it is planned to put a tyn in the future must be prepared in advance.

An example of a tyn fence with a foundation
Typically, such a fence does not need, but more expensive options do not exclude stone or brick bases. Such fences are more often installed in public places, for example, in open areas of restaurants or cafes, enclosing their territory and creating a unique comfort. They look quite respectable, but they are much more expensive.
It is best to make a pillow of sand and gravel throughout the entire length for better drainage. This, of course, significantly slows down the construction process and increases the cost, but the wattle fence will not get wet in the water during rains. Hence, it will last longer.
The technology of such construction is very simple:
If you simplify the task of erecting a wicker fence with your own hands, you can simply level the site (in order to avoid stagnation of rain or melt water) and drive the bases into the ground to a depth of 30 cm. You must treat with drying oil, resin or any other means that protects them from decay .
Weaving a fence from a vine
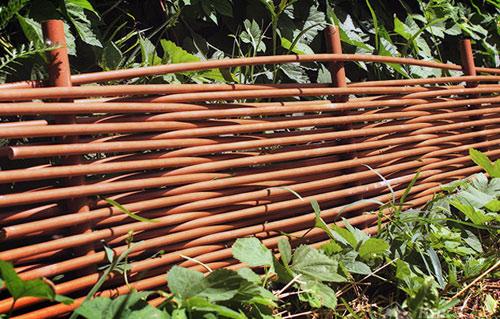
Probably, everyone has seen a finished wicker fence at least once in their life, so they have an idea of its essence.
An example of a wicker fence made of vines
Weaving begins from below, using thicker rods for this. The first rod is firmly fixed in front of the initial base with a hand from the butt side and carefully wound behind the second, and so on, in strict observance of the order.
The rod must end on the back side of the next stake. With the next rod, on the contrary, weaving behind the stake begins and the next stake is wrapped around from the front side. And in the same way - to the end of the fence.  It is not difficult to make such a decorative fence, the main thing is to have patience and know some tricks:
- Each rod must begin to be twisted from the butt, thicker side;
- You can not leave the end of the vine in the middle between the stakes, this will make the fence look untidy;
- It is necessary to regularly compact each row of weaving with a wooden mallet for greater strength and a beautiful look.
When the weave reaches the top edge, the top of the protruding stakes can be cut off or, if desired, left as is. Then you can place various decorations on them in the form of clay pots or a hanging flower pot with a climbing plant.
Interesting options for wicker fences
In order to, you can use other, alternative, material options. Some of them can stand for only a few years, while others are very durable.
Reed weaving
For such a tyne, long bundles of reeds up to five centimeters thick are used. You can make this decorative fence with your own hands using the same technique as. If the reed was dried under the influence of sunlight, the tyn will turn golden in color. Light green reeds can be obtained by drying them in the shade of a canopy.
PVC weaving
Now you can. Such fences are sold in a ready-made set, their price is quite high, but they will stand for a very long time. PVC material is not afraid of sudden changes in temperature, does not fade in the bright summer sun, and it is easy to install it yourself.
It looks like a woven PVC fence
If the tyn is made not so much for a decorative purpose as for performing protective functions, you can build it from veneer or thin boards. Such a fence belongs to opaque types.
In addition to decorative functions, it will also reliably protect the site from the prying eyes of strangers.
The bases for this type of fencing should be stronger, and it is installed at a distance of 1.5 meters or more, but not more than two meters.
Even in the recent past, wicker fences were the main way to protect a private area. The availability of consumables and its light structure made it possible to build such a structure without serious financial investments. Wicker fence has not lost its relevance today. Emphasized archaism and natural material organically fit into the countryside landscape. The advantage is the ability to make wattle with your own hands.
Wicker fence features
A traditional wattle fence is a lightweight fence made from flexible branches or shoots. A characteristic feature of such a fence is a chaotic, handicraft structure, that is, the material is used in a “natural” form, and is practically not processed. Wicker fences are decorative structures, as they rarely exceed 1.5 in height. High wattle fences are still found, but this solution does not justify its existence, since the dimensions do not compensate for the fragility of the material, and the gaps will not allow you to hide the area from prying eyes.
It is customary to enclose relatively small private properties with a wattle fence, or use them as additional fences inside and outside the site, for example, to enclose flower beds, a vegetable garden, etc. It is also ideal for delimiting a zone between neighboring plots, since a low structure will not greatly obscure the adjacent territory.
Preparatory work
To obtain a positive result, it is very important to qualitatively prepare everything for further work. Wattle making is no exception.
Material selection and calculation
Traditionally, willow (willow), hazel and willow are used to form wicker fences. These long, straight and naturally flexible branches with a minimum number of transverse processes are ideal for such fences. This material is also symmetrical, which is a definite advantage. In some cases, weaving from wild reeds is practiced. Smooth and long stems bend perfectly, but such a fence will be very fragile. Bamboo wattle will be more durable, but in this case the material will have to be purchased.
The calculation of the required amount of vines is carried out "by eye". On average, one bunch of rods is enough to form a fence with a height and length of 0.5 m. The value may deviate up or down, depending on the diameter of the rods and the density of weaving.
Note! You can weave tyn from young shoots of any trees and shrubs, but on condition that the branches are at least 1 m long. However, it should be borne in mind that when choosing this material, weaving will be chaotic, and the process itself will be more troublesome.
Large, even branches with a diameter of 4 cm or more are used as support pillars. The use of round timber, boards or metal rods is also appropriate, since this will extend the life of the structure, but they will stand out strongly against the general background, and the wattle will lose its naturalness.
On average, the step between the bearing crossbars is from 0.5 to 0.3 m, on the basis of which the required amount of material is calculated. The more often the supports are located, the denser the weaving will be, and accordingly the structure will be stronger. With vertical weaving, you will also need longitudinal crossbars, at least five for the entire height of the fence.
Photo gallery: patterns for weaving a decorative fence
Traditional is horizontal weaving  There are other options for horizontal weaving
  Decorative weaving patterns can be used if you want to decorate your site.
  The appearance of the fence depends on the method of weaving
Procurement of material
Wattle rods are harvested in early spring or autumn. During this period, the movement of sap is minimal, and the tree is not burdened with excess foliage. The most even and long shoots are selected. If the manufacture of the fence will not be carried out immediately after harvesting, the branches must be dried well. For standard weaving, rods with a diameter of about 1 cm are selected. Branches of a larger diameter strengthen the structure, but at the same time make the structure less dense.
Immediately before weaving, the shoots are soaked in a container of water to make them more flexible and remove the bark. On average, this stage lasts about a week, for freshly cut branches, the period can be reduced to several days. After the material becomes flexible, and the bark begins to be easily removed, you can start processing. Ideally, a bark is used to remove the bark - a split branch of medium thickness with a limiter. Under normal conditions, you can use wire cutters or pliers. The tip of the rod is inserted between the clamps of the wire cutters or pincers, pulled out towards itself. If the branch is well soaked, then the bark should be removed with little or no effort.
Fully cleaned rods can be coated with antiseptic and stain to increase durability or change color. This operation is only appropriate if a small fence is being erected, since each branch must be processed separately. The lower part of the supporting stakes is impregnated with antiseptics and moisture-proof compounds to protect them from decay.
Video: how to properly process a willow vine
Tools
In addition to preparing the material, you need to take care of the availability of all the necessary tools:
- secateurs;
- hacksaws for metal;
- roulettes;
- wooden hammer;
- a large hammer or sledgehammer;
- wires;
- construction thread or fishing line;
- screwdriver.
How to make a wicker wooden fence from branches with your own hands
Horizontal weaving is traditional, as it forms a dense and durable fence. The vertical arrangement of the branches will not provide the necessary density. Wattle installation is carried out in the following order:
- Marking is in progress. A thread or fishing line is pulled along the line of the future fence. According to the established landmark, marks for supports are placed. The distance between the bearing stakes with horizontal weaving can be from 0.3 to 0.5 m. Poles with a vertical arrangement of branches can be driven in every meter.
- Bearing supports for the fence are driven in to a depth of at least 0.5. With a horizontal arrangement of the vines, two racks are located at the beginning and at the end of the fence so that the rod can be wrapped between them, thereby fixing it.
- If a horizontal wattle fence is being assembled, the tops of the support posts are fixed with a rail so that they are not "led" during the creation process. With a vertical arrangement of branches, transverse crossbars are installed. To fasten them, you can use nails or screws.
- Rods are woven between the pillars. Work begins with a thicker end. Weaving is carried out according to the figure-eight principle - the first pillar is bypassed in front, the second behind, the third again in front, etc. The lower rods are attached to the supporting stakes by means of wire. This will keep the wattle fence from slipping to the ground.
- The excess is cut off. If the rod ends, for example, on the fifth pillar, then weaving continues from the fourth. This is necessary in order for the fence to be uniform. You also need to periodically direct the rods in the other direction, changing the course of weaving. The protruding tips of the branches can be fixed with wire.
- Before installing the last row of rods, the fixing bar is removed. The top row is also tied with wire to the supporting stakes.
The recessed part of the supports is the weakest point of the wattle fence, since it quickly rots and collapses due to the influence of ground moisture. Therefore, it is recommended to install stakes in plastic pipes of a suitable diameter previously hammered into the ground. This will increase the life of the fence several times.
Vertical weaving is carried out according to a similar principle, with the difference that each rod is recommended to be fixed both from above and from below so that the structure does not stagger.
Video: how to make wattle from hazel twigs in the country
Caring for the finished tyn
On average, the service life of the fence does not exceed 5-7 years. After this period, the fence begins to deteriorate. The main "enemy" of a wicker fence is dampness, which causes the supports and the lower part of the structure to rot. To prolong the life of this product, it is necessary to prevent the accumulation of water under it. It is also undesirable for dense and tall grass to grow under the wattle fence, since increased humidity is created in the thickets.
For protection, you can use antiseptics or matte varnishes. They will protect the aerial part from moisture. If you prefer a varnish coating, then it is advisable to use matte compositions, as the gloss will look unnatural. Annual treatment with protective compounds will help to maximize the life of the wicker fence.
A wicker fence is easy to make with your own hands, even outside the city. In this case, financial costs will be minimal.