How to make stained glass. Frozen glass mosaic: we make stained-glass windows with our own hands. Types of technologies for the manufacture of stained glass windows
In this article, we will consider a do-it-yourself film stained glass window, what are its features, advantages and disadvantages. Stained glass craft has been developing since ancient times and as soon as the technique of patterned colored glass is not improved. There are already a lot of technologies and each of them has its own application.
Firstly, the construction industry continues to use the method of gluing pieces of various colored glasses using metal soldering. This technology is unchanged in the design decoration of premises. But it wasn't always like that.
Stained glass windows were not used in the decoration of residential premises for a very long time and were used only in cathedrals and temples, so the artists did not immediately raise their hand to the "holy". And only towards the end of the 19th century crafts with a creative bias began to develop at high speed, as the chemical industry provided new paints, materials and technologies. Many artisans, in particular the artist and later the famous glass designer Louis Comfort Tiffany, showed great interest in experimenting in creating artistic paintings with various materials on all sorts of previously unthinkable surfaces. He created a method of stained glass that is still used today, named after him - stained glass Tiffany.

There are specialized workshops that make stained glass windows to order, although the technique of creating a stained glass window from pieces of glass is also available at home if the necessary materials are available.
The work requires professional tools - a blowtorch, grinding equipment and a diamond glass cutter. Also, as a consumable, you need to stock up on colored glasses, copper tape, tin wire and soldering acid.
According to the sketch of the drawing, markings of the drawing are applied to the glass with a marker and cut into pieces, the pieces are then polished and envelop all the details with copper, then they are assembled like a mosaic on a flat surface and soldered. This work is very difficult for beginners, beautiful work may not turn out right away.

There are also special stained-glass stained-glass paints that imitate colored mosaics on glass. The advantage is ease of getting started. It is enough to remove the glass and start painting. You can create artistic painting with paint no worse than on paper - play with paint colors, mix several colors, draw with dots and thin curls. But such paints are used in small works, so it is quite difficult to distribute them, they dry quickly and leave stains. Therefore, for the extensive details of the pattern, a very neat kind of stained glass art with colored self-adhesive film is used.

This type of stained glass requires the purchase of a special translucent film for stained glass and aluminum or lead strips.
A simple lesson
Film stained glass is also not an easy task and is not cheap. But regarding the fact that this creative art is used in decor, and also in terms of service life it will delight your eyes for a long time, it is worth at least once to make yourself beautiful, for example, on the window. The master class will help you quickly and easily make such beauty.
For work, we need glass, a stationery durable knife so that it can cut lead wire and film, a roller, preferably rubber, scissors, lead tape, a sketch of a drawing, a set of color film.

First, let's prepare a drawing, you can draw it yourself, remember that you still have to cut out the details on it, so it's better not to get carried away in small details. The easiest way is to print ready-made traditional stained glass patterns. Some examples will be provided at the end of the article.
Now we take the glass, clean it of dirt with microfiber and glass cleaner on both sides. If lint or stains remain under the film, they can ruin the whole look.

Glue the lead tape along the outline of the picture, then turn it over. We cut out pieces of film from a colored tape, using our stencil, and paste it on the reverse side. On top of it, we again glue it with tape, we get a kind of double-sided stained-glass window, as shown in the photo.


Ideas for creativity
There are several ways to cut the film into mosaic details. If it is transparent, put a drawing under it and circle it with a pencil or a thin pen. Also, for a stained glass window, you can use some additives of an opaque film, then these details are cut out of the picture as if through stencils, or transferred through carbon paper. Film stained glass is also convenient to do with illumination from below. At home, the glass should be placed on a stand on a hill on a frame, and a lamp should be placed under the bottom.
The oldest example of stained glass art that has survived to this day dates back to the 7th century BC. As strange as it may sound, the process of making stained glass is so simple that even children can learn how to make stained glass with their own hands.
Stained Glass Styles
For a long time the existence of this type of creativity, the technology for creating glass drawings with your own hands has improved significantly. New types and technological features have appeared.
Having studied all the techniques, you will be able to choose the right one, each time planning new interesting stained-glass windows.
Classic way
The classic technology for creating stained-glass windows with their own hands has been preserved to this day. The master draws sketches on the main glass, cuts them out, and, according to these blanks, prepares the details of the future composition from colored glass. The particles are inserted into a pre-prepared forged frame.
After the installation of colored glass is completed, the iron partition is sealed for greater strength. The finished product is a beautiful picture of large geometric elements with a clearly defined metal outline.
In ancient times, wide openings of buildings were decorated in this way. Especially often stained-glass windows were used to decorate windows in Christian and Muslim churches - the ideas for drawings were taken from biblical and Koranic motifs.
The beauty of the classic method is that it allows you to connect large parts with your own hands. Unfortunately, the design turns out to be quite voluminous and heavy, so it is not recommended to use it to decorate the ceiling. In addition, rough metal does not make it possible to draw a pattern from small curved parts.
Tiffany stained glass
The improved technology was developed by the founder of the Tiffany jewelry company, Louis Tiffany, at the turn of the 19th and 20th centuries.
He came up with a rather simple solution, thanks to which the stained-glass windows began to look different. Instead of lead rods, Louis began wrapping glass parts with thin copper strips with his own hands. As a rule, the strip protrudes slightly above the plane of the part.

After drawing up the drawing, the parts are treated with flux to prevent rust and soldered to each other. The protruding edge of the copper tape is leveled above the glass surface, creating additional protection against falling parts from the frame.
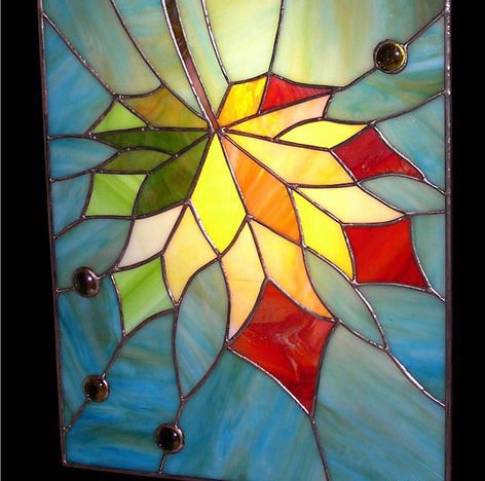
Thanks to the Tiffany technique, stained glass windows have turned into real works of art! Fine filigree patterns, consisting of small particles, allow for a smoother color transition and naturalness of the image.
Tiffany stained glass can be used to create almost any product due to their lightness and beauty.
fusing glass
The amazing fusing technique allows you to create a variety of products - from glass inserts in doors and furniture to painted dishes. But this method is too laborious to make stained-glass windows of large sizes with your own hands.

The peculiarity of the technique is that colored elements are laid out on top of the main transparent glass. The workpiece is sent to the furnace, where, under the action of high temperature, the parts are fused into each other. This way you get colored glass without an iron partition.
Another disadvantage of fusing is that it is difficult to find a kiln in which large items can be placed.
Pseudo-stained glass
Modern technologies have given people the opportunity to create stained glass windows with their own hands without learning the laborious process of forging, metal processing and glass cutting.
All you need is a piece of transparent glass of a certain size and a special film with colored patterns that allows light to pass through. There are several types of film:
- self-adhesive - a sticky layer is applied on one of the sides of the material;
- a film that needs to be attached to glass using a special colorless glue.
Film stained-glass windows help to save on interior decoration, while maintaining an interesting appearance of glass.

In addition to the film method, the use of special stained glass paints is also widely used. Transparent gel-like mixtures are applied to the workpiece in the form of a specific pattern. After they harden, the glass takes on the appearance of a transparent stained glass product.
This technology is so simple that children's kits for creativity have recently begun to appear, allowing you to create painted stained-glass windows with your own hands.
Tiffany stained glass: master class
Tiffany stained glass is very easy to create even at home. Prepare colored glass shards, glass cutter, thin copper foil - foil, soldering iron, grinder, flux, soldering tin.
- Create a blank sketch - the more T-shaped connecting lines in the drawing, the stronger the details of the stained-glass window will hold.

- Print out 2 life size copies of the sketch. Number the pieces on each sketch and cut one of them along the seam lines.
- The second whole sketch is pasted over with adhesive tape and inserted into a wooden working frame.

After working on the sketch, you can proceed to the preparation of parts.
- Attach the cut out parts of the first sketch to the fragments of a certain color.
- Take the glass cutter and start cutting out the colored element, holding the tool at a 45 degree angle to the surface. Try to cut the part in one continuous line, keeping a constant pressure, otherwise you may get chips and cracks.

- After the glass cutter, microcracks formed in the glass. Barely tapping on it, you can separate your part.
- Use a sander to smooth the edges of the glass and give them a rough texture before the next steps.
- Now wrap the piece with copper wire. Use foil - a special thin long copper material with one adhesive side.

- Bend and smooth out the protruding edges of the foil on the product.
- Install the finished element on the general drawing with the help of nails driven around.

- When all the parts are in place, remove the nails and flux the gaps between them.
The preparatory stage is completed - you can start soldering!
- Put the tip of the tin wire to the joint and heat it on top with a soldering iron. Thus, gradually process all the seams with your own hands. Do not keep the soldering iron in one place for a long time - you can overheat the foil and glass, and also melt too much tin.

- After completing the soldering of the pattern, remove the wooden frame and bring the iron blanks to the sides of the picture.
- Using tin, solder them with the image at the points of contact with the seams.
Leave the product to cool in a dry, ventilated area for an hour or two. When it reaches room temperature, wash the painting well with a sponge, water and degreasing detergents.
Now your creation can be hung on the wall or placed on a shelf.
Filled stained glass: master class
Try to make flooded stained-glass windows with your child - the kid will surely enjoy the process of non-standard drawing. The main thing is to follow the safety rules: after all, your main material - glass - can lead to injuries and cuts.
Prepare stained glass paints - these are easy to find in large office supply stores - and a small square piece of glass. Pre-insert it into the frame with rounded corners to protect the child from sharp edges.
With dark color paint, draw thin sketch lines on the glass with your own hands. The most commonly used color is black. You have defined hollow areas. Near the black color, but not on it, drip several times with a color tint - it should spread over the cell on its own.

You can create beautiful stained-glass windows with your own hands for decorating a candlestick by watching the following video.
With this technique, you can decorate a glass frame for a photo, a locker door or a window in a nursery.
A self-made stained-glass window will give your room originality and unusualness. Things for the interior, made independently, have a significant advantage over serial production. This article will discuss 4 ways to make stained glass windows with your own hands.
The first way to make stained glass windows
Do-it-yourself stained-glass windows require stained glass. Glass cut to size is thoroughly washed and degreased. The selected drawing is performed on a sheet of paper in full size. The contours of the drawing are transferred to the glass with black oil paint using a thin brush. For these purposes, you can adapt a rubber can with a tip from a medical needle. The paint in this case is diluted to the required viscosity. It should be remembered that, transferring the contours of the pattern, you should not touch the degreased surface with your hands.
You can separate fragments of a stained-glass window using narrow slats or halves of twigs that are glued to the glass.
Another way to apply the outline of a pattern to a stained glass window is with epoxy resin, to which aluminum or bronze powder is added. This composition is conveniently applied to the contour lines using an old tube of toothpaste.

Now you can start coloring the image. Paints for stained glass at home are prepared on the basis of:
- food gelatin;
- glue BF-2 (or other similar adhesive compositions);
- colorless furniture nitro varnish.
To obtain paint for stained glass based on gelatin, gouache or aniline dye is added to its solution, which is used to dye fabric. The pattern is painted with the resulting compositions. Contour lines do not allow different shades to mix, so you do not have to wait for the previously painted adjacent area to dry. Gelatin-based paints are not flammable, practically non-toxic, they can be used even indoors.
Paints for stained-glass windows based on BF-2 are made from light grades of glue, diluting it with acetone by half. Alcohol-soluble paint, ink or ballpoint pen paste is added to the resulting solution. Such paint thickens very quickly, so it must be used in a short time.
Paints based on furniture nitrolac are prepared as follows. The varnish is diluted with a special solvent twice. Artistic oil paints of the desired color are added to the resulting composition. It should be remembered that the proportion of paint should not exceed 10% of the prepared composition. Work with solvents must be carried out in a well-ventilated area and comply with fire safety regulations.

After the paints have dried, the surface of the stained-glass window is covered with a colorless varnish so that the glass can be washed with water.
With the help of thin slats, beer and Epsom salts, the glass door can be painted antique. The wood is painted under bog oak and the slats are positioned so that an imitation of fine-grained devitrification is obtained. For glass processing, a solution of the following composition is prepared: a glass of beer and a pack of Epsom salts. For better dissolution, the beer can be slightly warmed up. The solution is applied with a sponge on the horizontal surface of the stained glass window. Of course, the glass must first be well washed and degreased. When dry, Epsom salts form decorative patterns of yellow-brown color. After drying, the glass is covered with a protective layer of varnish.
The second way to make stained glass
After developing a sketch of a stained-glass window, cover it with glass on which the stained-glass window will be made. It must be clean and fat free.
The first method of making stained glass is based on the use of soluble colored fabrics such as acetate silk, which dissolves easily with acetone and nitro varnishes. Cut out pieces of thin fabric of the required configuration and color according to the pattern of the future stained glass window. Cover the glass with a thin layer of transparent nitro varnish and dry. Then the same nitro-lacquer is applied to separate zones, and patches of the workpiece are glued to them. Gluing must be done as accurately as possible, since the fabric begins to dissolve almost immediately, and it will be impossible to move it. After gluing the flap to the place allotted for it, coat it with nitro-lacquer on top and proceed to the next one.

After filling all the glass with stained glass elements, apply another layer of nitro-lacquer, and on top of a couple of layers of parquet. The next step in making a stained-glass window with your own hands is the manufacture of a pseudo-frame. To do this, epoxy resin is mixed with a hardener in a ratio of 1: 8~10. The resulting mass is mixed with talc and aluminum or bronze powder until the mixture acquires a metallic sheen and does not spread over the glass. Then the resulting mass is filled into a confectionery syringe or a used toothpaste tube and squeezed out with an even roller along the outlines of the stained-glass window. In this case, it is important to avoid intersections between the lines, since the rollers should not run into each other.
We recommend that you perform all actions with nitro-varnish in a well-ventilated area or in the open air, and with epoxy resin you need to work with rubber gloves. The solvent for epoxy is gasoline.
The third way to make stained glass windows
You can make a stained glass window from broken glass and silicate glue. First you need to develop a full-size stained glass drawing on a piece of paper. The image must be in color. When developing a sketch, a drawing from a postcard, poster or magazine illustration is taken as the basis. It should be borne in mind that a dark outline plays an important role in the drawing, so its drawing should be expressive, but simple and constructive. The completed sketch must be pasted on the reverse side of the glass on which the stained-glass window will be made, with the front side to the glass. Then, with a thin brush and quick-drying paint in black, dark brown or dark blue, the contours of the image should be applied to the glass. Now you need to pick up colored glass. Useless car lights, used filters, glassware, etc. will do. Glasses must be broken into fragments of the required size. The stained glass is performed as follows. Glass with a sketch pasted on it should be laid on a horizontal base, for example, on a table, face up.

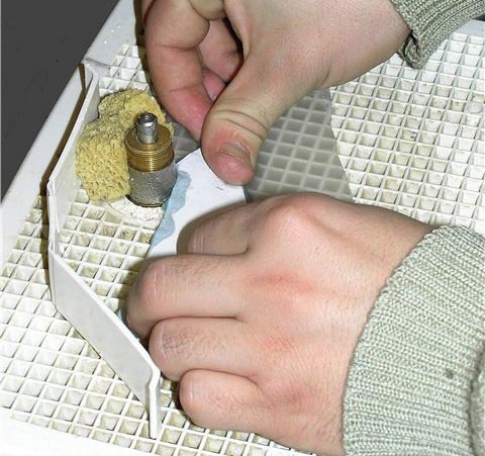
Then its surface must be degreased with ammonia, a layer of silicate glue (liquid glass) is applied to it and a mosaic of colored glass fragments is laid out based on the pattern. The stained glass ornament can be laid out in sections that are limited by contours. After 4-6 hours, it is necessary to fill the surface of the finished stained-glass window with glue so that it covers all the protruding fragments. To prevent the glue from running off the glass, you can lay out a restriction of wooden slats around the stained-glass window, attaching them with plasticine.
A continuous layer of silicate glue smooths out the roughness of the stained-glass window, as a result of which its surface becomes wavy and shiny and transmits light well. In order to obtain a continuous color layer during the manufacture of a stained-glass window, you need to prepare a slurry by mixing silicate glue with crushed glass, and lay it evenly on the surface of the glass with the end of the brush. Epoxy glue or polyester resin can be used instead of silicate glue
Alexander Poltavets, head of the art stained glass studio, says about stained glass:
Sometimes it is very difficult to find glass of the right color. However, from any hopeless situation, you can always find two ways out. Colorless glass can be painted with zapon varnish. Aniline paints are also used as a dye: yellow - auramine, rivanol; blue - methylene blue; green - brilliant green (can be purchased at a pharmacy); red - rhodamine. In order for the coating to be uniform, the surface of the glass is doused with varnish, allowing the excess to drain. If the glass is exposed to strong sunlight, it is better to use glyphthal lacquer to paint the glass. It is a solution of artificial resin (glyphthal) and aniline paint of one color or another in wine alcohol. If there is no zapon or glyptal varnish, you can prepare an alcohol colored varnish of the following composition:
- 500 ml of ethyl (wine) alcohol,
- 1 g aniline paint,
- 1 g shellac.
The fourth way to make stained glass
It is possible to make a stained-glass window from whole colored glass using the following technology. We prepare a sketch of the stained-glass window and fix it on the back of the transparent glass, as in previous cases. We cut out sections of the pattern of the required configuration from whole colored glasses. We make a "dry" set of stained glass on a transparent base glass. The space between the pieces of colored glass is filled with a solution of the following composition: cement - 1 part, sand - 3 parts, glue (PVA type) - 1 part. For convenience, during this operation, you can even take a plastic container from under the shampoo, into the cork of which a glass or plastic tube with a diameter of 4-5 mm is inserted. Before pouring, the edges of colored glass at the junction with silicate glass are carefully smeared with a solution using a wooden stick. After drying, the main filling is performed. With this treatment, the solution does not leak under the colored glass, and the stained-glass window turns out to be neat.

It is today that glazing technologies have reached such heights that a window can be of almost any size, shape and color, and our ancestors had to puzzle over filling window openings. This is how the stained-glass window appeared - a translucent panel made of pieces of colored glass or thin stone plates. In this article we will look at how to make stained-glass windows with our own hands, which are still relevant today. And not only as a form of art, but also as an opportunity to diversify almost any interior. Consider:
- what stained glass manufacturing techniques are used today;
- ways to create stained glass windows with your own hands;
- How to make a Tiffany stained glass with your own hands.
Stained glass window techniques
The popularity of mosaic pictures is largely due to the possibility of their self-production in various ways. Depending on the materials and technology, it can be not only stained-glass windows, but also various decorative elements. These are ceiling lamps, and designer flower pots, and door inserts, and furnishings, and framing of interior arches, and much more. Today, there are several common techniques for making stained glass windows with your own hands.
Soldering
Stained glass classic. The plot according to the sketch must be assembled from separate glass fragments (stained glass smalts), which are fixed together with lead, copper, tin or brass. Each smalt is wrapped in a forged or cast "lace" and soldered with the rest.

Now this method has been somewhat modified and a soft metal tape (folia) - copper or brass - is used for edging.
A striking example of modern soldering is the famous Tiffany stained-glass windows, this is almost a household name that has spread to the very technique of creating a stained-glass window using foil.
Plots from various small details are collected, soldered and framed, the technology allows you to create any form, not just flat panels.


facet
For stained-glass windows, thick glass, from 6 mm, is used, all sides of each element are chamfered at a small angle, which ensures the refraction of light. Faceted stained-glass windows are made of special types of glass - lead and potash, the first is heavier, but gives a strong optical effect, the second is lighter, but the rays do not play in it the same way. The most spectacular are the combined facet stained-glass windows of both types of glass. Due to the thickness and severity of the elements, such paintings are assembled only in an aluminum profile. Therefore, their second name is aluminum stained-glass windows.

fusing
A more complex technique, but stained-glass windows can also be made voluminous and more spectacular, it is possible to make multi-layered pictures or figures. Multi-colored glass elements are stacked according to the plot, baked and rolled, the boundaries of the fragments can remain clear or layered, showing the texture of the pattern, unattainable in other techniques.


Etching
The relief on the glass is formed in the process of surface treatment with special acids, stencils are used, along the contour of which the pattern is etched.

Application (film stained-glass windows)
This is not exactly a do-it-yourself technique for creating stained glass windows, although the result is something similar, it is a method of making an imitation using a glass or plastic base, multi-colored stained glass films and special metal tape. The pattern is gradually created on the base by gluing a layer of matte film, and the contours of the image are pasted over with adhesive tape to give a relief pattern.

Painting (fill)
It is also an imitation technique, only the drawing is not glued, but painted on glass with your own hands with special stained glass paints. The painting turns out to be more transparent, and the filling gives brighter, more saturated stained-glass windows. The contours in this case are first drawn with thicker lines with contour paste, to give texture, or also pasted over with tape / wire. Requires artistic skills.


DIY stained glass windows
Not all techniques are suitable for self-creation of stained-glass windows at home, since it is unlikely that everyone has forged or cast metal strips, bevel cutters with aluminum profiles or furnace equipment lying around in the pantry. Theoretically, you can get hydrofluoric acid, but you have to breathe in fumes, and it is difficult to guarantee a pattern, and not a burn. Therefore, home craftsmen are left with the Tiffany technique and two imitations to choose from.
Tiffany stained-glass windows require certain equipment, and the work is quite painstaking and time-consuming, while painting and pouring can be done by any novice stained-glass artist, and even with children. But if Tiffany is a full-fledged stained-glass window that can be inserted even into a window, even into a door, then the imitation of a classic stained-glass window still betrays itself, even if the pattern is mirrored on both sides.
stained glass tiffany
Consider soldering using foil, which you can buy at any art store, as a way to create a real Tiffany stained glass window.
Picture - when choosing a drawing, you should avoid too complex lines, then not only cut them out of glass, but also process and connect them, it is better to focus on figures with smooth curves and, to begin with, from medium-sized parts. A sketch can be taken from the Internet, there are a lot of options for patterns in various techniques, taking into account the specifics of stained glass painting. You can draw on your own, provided that the desire is supported by at least minimal skills. If none are observed, it is better to use standard blanks.


cutting - the sketch is transferred to thick cardboard and cut into parts (numbered). To leave space for soldering, the contour of the smalt should be deeper than the contour of the template by 0.5-0.7 mm. The template is applied to the glass and outlined, and then the part is cut out of the glass.
More likely to cut a shape, rather than ruin the glass, on a hard, flat surface, using a quality diamond glass cutter (with a curved cutting edge) and not making sudden movements.
Sheet stained glass costs decently, to save money, you can use the old battle. Before taking on smalts, it is advisable to practice cutting ordinary glass with curved lines in order to fill your hand.

Treatment - the edges of each part must be processed with a glass grinder.

But this is an expensive pleasure and more often bars No. 220-240, 12-20 mm wide, are used for fine-tuning smalt, at least square and semicircular, triangular is needed for complex elements when there is a line curving inward.
The bars must be strong, corundum or garnet will do, sand powder will not take glass.
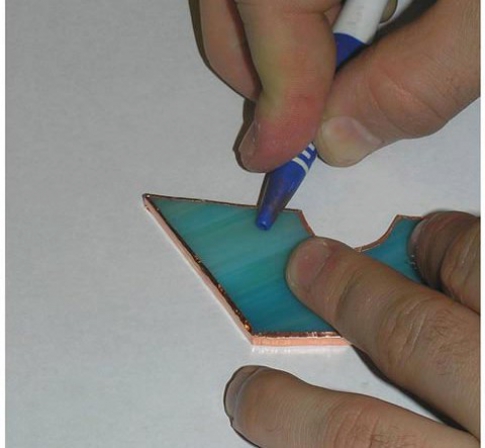
When grinding, the smalt and the bar are lowered into a suitable container with water. After grinding, each smalt is wrapped around the contour with foil, the edges are rolled up (the tape is leveled and pressed with a piece of wood or plastic). After the edges, the ends are smoothed and once again passed around the entire perimeter.

Assembly - professionals recommend cutting, processing and laying smalts one at a time, but this is a personal matter for everyone. Assembly is easier to do on a blueprint machine. For lack of it, you can put a transparent sheet of plastic or thick glass between the supports and highlight it with a table lamp. It is even easier if there is a coffee table with a glass top - thin fabric, tracing paper (stencil) and go. Illumination is necessary to prevent gaps between smalts; when laying them, they are tightly adjusted to each other or to the borders of the pattern. The stencil is fixed with two strips - on the left and above or on the right and above (for left-handed people), the layout starts from the corner, gradually filling the entire pattern.

Flusovka - the assembled stained-glass window is crimped with slats from the remaining sides, making sure that the parts do not protrude upwards or into a corner, if necessary, add edges, smooth and press. Ideally, the stained glass window is sorted out again in order to evenly cover both the edges and the ends with the flux, but you can simplify the task by carefully going over the edges of each part with a richly moistened brush or cotton swab. The flux is chosen semi-active, with borax, the remnants of the active can corrode the binding over time.
Soldering - differs from the usual radio engineering both in equipment and in the method of execution.
To solder Tiffany, you need a special soldering iron, which has a bronze nickel-plated tip (short, white with a characteristic sheen).
The power of this tool is only 100 W, it heats the elements to the right temperature, but the solder does not stick to it. Ordinary, tin-lead solders are not recommended, because they can crack smalts. Therefore, for Tiffany it is better to use solders with cadmium additives (POSK-50-18, Avia-1). You can get by with POS-61/61M solder, but it is softer and not as strong.
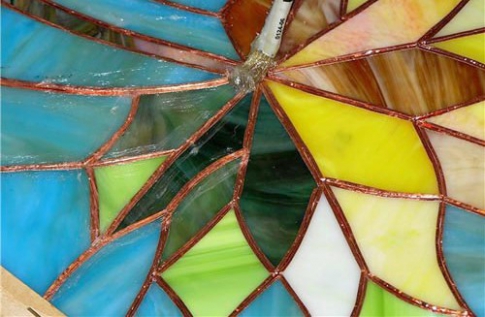
Tiffany is soldered in a capillary way in two stages - first, along the contour of the smalt, they pierce with solder melt about a centimeter (the thread is as wide as a sting), without touching the parts with a soldering iron and solder. It is not recommended to go through a large area in one approach if the stained-glass window is large. They pass a fragment the size of a man's palm, let the stained-glass window cool down, and continue until every detail is dripped through. In the second pass, each seam is soldered, applying solder along the contour of each smalt and heating until it seeps through the seam and covers the joint from the inside.

framing - the finished stained-glass window is soldered to a profile frame, rectangular, if it is a flat panel, or figured, if it is a ceiling or other decorative element. The frame cleaned and degreased (with alcohol) is covered with flux from the inside, and the stained-glass window along the edge from the front and side. The frame is applied to the composition or the composition is inserted into the frame and soldered, like smalts, in fragments, if a gap remains, it is also fluxed and soldered.
flushing - part of the manufacture of stained glass, necessary to remove the remnants of the flux, no matter how hard you try, but it is collected not only in the seams, but also on the smalts. Today, the easiest way to get rid of these stains at this stage is to treat the stained glass window with a sponge dipped in dishwashing detergent, after which the product is washed and dried.
Patination - if you already take on Tiffany, you should fork out for a special colored glass, sheet or broken, since the film or paint still looks worse. But patination will not harm such a stained-glass window, but only emphasize its beauty. Careful application of the finished composition to the binding is carried out with gloves and a respirator, and the room should be well ventilated. If dirty - feel free to wash, wipe and in conclusion - gently polish with a soft cloth. If necessary, the metal frame is closed with a decorative frame made of wood or imitation.

Regardless of the chosen technique, a stained-glass window made by one's own hands will not only decorate the house, but also delight with the realization that you can handle the most ancient of arts.
Hello dear readers!
I won’t lie - I often like to “get away” from city life and spend a couple of weeks in my summer cottage.
I didn’t particularly bother with the arrangement of this place, but recently I wanted to change something in appearance.
I decided to start with windows. And you know, I really liked the result. Now my house stands out brightly from the others.
Now I will tell you how to make a stained-glass window on glass with your own hands. I will also tell you about what materials may be needed for this.
Stained-glass window is a great way to decorate the interior, give windows and interior door inserts nobility and sophistication. And if earlier it was a very time-consuming and expensive process, accessible only to individual craftsmen, today it is really possible to do it yourself.
A similar effect is easy to achieve through the use of stickers or the technique of painting on glass with special paints.
The use of stained glass in the interior
Many centuries have passed since the invention of glass for stained glass, and mankind still admires the narrow and long windows of temples and cathedrals, palaces and houses of the rich nobility of the Late Middle Ages. In those days, any glass was an expensive luxury, especially stained glass. They were made on the basis of a cellular metal pattern, into which segments of smalt and colored Murano glass exactly corresponding to the pattern were inserted.
The word "stained glass" is of Latin origin, where vitrum is translated as "glass", but now it is used to refer to colored drawings on glass. Until now, numerous pilgrims and sightseers of historical monuments are impressed by the images of saints on glass, which transmits light through colored cells.
Breaking stained glass with biblical scenes in an Orthodox church or Catholic cathedral was considered blasphemy, especially since they had been created for decades.
Stained glass painting has long gone beyond religious buildings. Today, stained glass on glass is back in fashion, and the most varied subjects are used. Stained glass artists offer more and more new techniques that reduce the cost of creating glass inserts shining with colors.
This special highly artistic decor is able to give the interior of the apartment a more expensive and respectable look.
And today stained-glass windows are widely used wherever they are appropriate:
- window panes;
- large plafonds of ceiling lamps;
- false windows with illumination;
- interior doors;
- glass partitions for zoning large areas;
- graceful countertops of small tables in the living room;
- frameless interior glazing;
- translucent screens between 2 adjacent rooms;
- multi-level and suspended ceilings;
- sliding cabinet doors;
- fireplace screens;
- table, floor and wall lamps;
- * translucent inserts in the ceilings;
- inserts on wall niches;
- art objects and souvenirs.
Note!
You can choose transparent or opaque stained glass, depending on the overall task.
If it is important that the light partially penetrates the room, but what is happening behind the partition is not visible in detail, choose opaque glass for stained glass:
- stained glass screen in the bathroom (in the shower room);
- glass partition between kitchen and bathroom;
- impenetrable interior doors with an insert in the bedroom;
- partition between toilet and bathroom.
Attention: It should be borne in mind that a colored impenetrable stained-glass window only partially transmits light, so it is inappropriate in an apartment where there is already insufficient lighting.
But on the south side, a do-it-yourself stained-glass window will become an appropriate light filter, for example, stained-glass windows on glass, photo:
Advantages and disadvantages of stained glass inserts
Mastering the art of stained glass painting is within the power of anyone who wants to make stained glass windows on glass with their own hands. It is useful to master the glass painting technology for decorating personal space, and then you can use it as additional income.
And while a beautiful stained glass window is a real art, you don't have to be an artist, many masters use ready-made sketches for intricate drawings with clear boundaries on the glass.
Self-made stained glass is a fascinating process, reminiscent of children's "coloring books", where within the finished contours, each cell of the picture is filled with a certain color. And it also resembles a children's kaleidoscope with colored glass between the mirrors, where it is so exciting to observe delightful patterns.
An important advantage is that each stained-glass window is unique, even if a ready-made sketch was used. Any image is obtained as a result of the choice of a particular technique, the method of applying and selecting dyes and cell boundaries.
Obtaining the selected picture of stained-glass windows on glass is an interesting activity that even a schoolboy can master. It is interesting to make it for the whole family, being careful when working with glass, the edge of which can be temporarily pasted over with masking tape.
If you work with acrylic paints, then you do not need any special devices. The traditional technique of making stained glass and metal requires a separate workshop. And some methods of glass etching involve the use of chemicals.
Helpful advice!
Drawing on glass, with proper organization of work and with a ready sketch, can be completed quite quickly. And if you have artistic skills and a delicate taste, then making stencils and stained-glass windows on glass with your own hands is a great hobby or a way of creative self-realization.
In this case, you can try which stained-glass windows will be most interesting:
- drawn;
- cut;
- glued;
- soldered.
The simplest methods of drawing a drawing have their drawbacks - the drawing may be unstable. The simplest loose image has to be done between 2 glasses in a frame, keeping it as a souvenir so that it does not wash off.
But this is more about children's creativity. And if you decide to decorate the apartment with real works of art, using special paints on glass, the stained-glass window should be elegant and attractive.
It is unlikely that “something” special will come out the first time, you will have to practice several times in order to practice to master the technique.
Attention: Remember that any glass can break, including stained glass. Therefore, it is advisable to first consider whether there is a possibility that the insert will be broken. In some cases, it is better to use ready-made foldable film, which will not allow fragments to scatter, for example, if you do not carefully slam a glass door.
Varieties of techniques for stained glass painting
Stained glass on glass used to be performed by the most time-consuming method, when a metal pattern was made, consisting of cells. Then, a piece of glass of a certain color, cut exactly to the shape of each cell, was inserted into each free gap.
The most difficult thing was to make symmetrical images - the metal patterned grid could not match in shape, and each fragment was cut separately. The glass had to be fixed, and even so that there were no gaps that let air and water through.
The classic soldering method is still used today, but less expensive, labor-intensive and inexpensive stained glass painting techniques are applicable in domestic conditions.
The most popular techniques today include:
- frosted stained glass;
- "Tiffany";
- in the technique of "casting";
- in the technique of "fusing";
- in the Plastic Lead technique;
- stained glass windows;
- film stained-glass windows SGO;
- facet technique;
- "etching" technique;
- technique of "molding";
- laser engraving;
- painting with acrylic paints;
- combined stained glass windows.
How to make a stained-glass window on glass with your own hands with the most accessible methods is worth understanding in more detail.
1. We put together pieces of cut colored glass, which form a mosaic canvas. Each fragment of the composition is inserted into a metal frame-stencil made of tin or sheet copper.
The metal parts will have to be soldered, but this has to be done without glass, so it is important to think about how to fix the glass in these cells. The finished drawing will resemble real expensive stained glass.
2. Segments of a colored translucent film are laid out on the glass, like an appliqué, with a pattern thought out in advance - along the contours drawn with a special disappearing marker.
Further along the borders, a special paint is applied in the form of a dark border with a tube, or any resinous solution that sets quickly. The finished image is covered with another glass of exactly the same format and carefully glued along the edges.
Double glass with internal pattern is quite practical, it is inserted into a frame or wooden window frame.
A similar method - inserts of thin colored glass (transparent, frosted or sandblasted) are also inserted between two glasses. Such double or triple colored glasses for stained-glass windows are the heaviest, therefore they are not recommended for furniture doors.
3. On sale you can find ready-made colored smalt, which, in the form of fragments cut and polished along the edges, are simply glued onto glass. Plastic crystals or artificial “pebbles” for embroidery with a flat back are also suitable, as well as small gems or flat beads.
They can be planted on glass with "liquid nails", for example, in the form of a vine. In this way, it is easy to decorate vases, glassware and souvenirs.
The method is suitable for those inserts that do not need to be cleaned partly - pebbles and smalt can be accidentally scraped off. However, this hand-made stained glass window, sparkling with crystals, looks luxurious, especially with backlighting.
4. Drawing on smooth or sandblasted glass is applied with special paints that require heat treatment. After firing in the oven, a durable stained glass pattern is obtained, which is not afraid of cleaning.
A similar method is an imitation of stained glass painting, where acrylic paints are used without oven treatment. The drawing will turn out resistant, but you should not wash such glasses. Such stained-glass windows are successfully used in windows with double frames with an inward pattern, where the glass is not washed often, as it is outside.
Where can I get stained glass stencils?
The beauty of the initial sketch determines the final result. And if you try to draw “something there” on your own, it is unlikely that such a stained-glass window will be highly artistic. Even if you take more advantageous plots - roses, peacocks or fish, it is important to respect the proportions of the picture, color balance and overall composition.
The choice of plot should be justified by the functionality of the room. Fantasy flowers, angels, beautiful half-naked maidens, Amazons, leopards are suitable for the bedroom. Elegant abstraction, symmetrical ornaments that are in harmony with the overall theme of the room will suit the living room.
If they are looking for stained glass windows suitable for the bathroom, stencils are selected with aquarium fish, something on a marine theme.
Note!
Any abstract image or neutral theme, for example, a firebird, is suitable for a partition of a walk-through corridor.
An image for a certain interior style is selected in accordance with the characteristic theme for such a design:
- sakura branch - for the Japanese style;
- curls "rocalia" - for rococo;
- the stroke of the whip is typical of Art Nouveau;
- intricate abstraction - Art Deco, etc.
It is best to use ready-made stencils that can be purchased:
- in shops for artistic creativity;
- from artists who own this technique;
- print popular "pictures" from the Internet (the uniqueness of your stained-glass windows will suffer).
For those who know how to draw, it is best to take the illustrations you like as a basis, choose a suitable plot and develop your own sketch.
Attention: It is important to take into account the scaling of images, because when transferring a small sketch to a large glass, the proportions will be distorted and there will be a lot of empty space. Therefore, a small sketch is preliminarily drawn into squares - for a better increase in the picture.
Sometimes at the stage of completion you have to draw elements to fill in the voids. Ready-made stencils for stained-glass windows in full size do not require refinement. Traditionally, stained glass drawings look beautiful, where a thin graphic frame and floral ornament are combined.
Tip: Do not rush to fill the stencil drawing with paints. If you have a choice, experiment with color on drafts. Sometimes the replacement of the background or central elements not only changes the overall impression of the picture, but also forms an aura in a room with stained glass windows. For example, cold blue or purple flowers should be changed to shades of warm colors for the living room or cold colors for the bathroom.
What paints to use for stained glass windows?
1. Solution based on nitrolac NTs-2141 (or similar, other marking). You will need art oil paints and a solvent. In a separate container, nitrolac is diluted with the addition of a solvent (less than half).
A pea-sized artistic paint or a drop of pigment for construction work is added to the finished emulsion. We check the intensity of the paint on the glass, if it is not enough, we add more.
Glass must first be degreased by wiping with a solvent such as acetone. A high-quality lacquer for a turn should be transparent, well-spreading, not curled up on the glass with bald spots.
2. Solution based on BF-2 glue. The emulsion is diluted on the basis of a solvent and any dye soluble in alcohol. For example, they use ballpoint pen ink - blue, purple, green and red.
Glue and solvent are mixed in a glass jar, where the dye is added drop by drop to the required saturation. We try with a brush on the control glass.
3. On a gelatin basis and dyes for fabrics. Gelatin (5-6 gr.) in the form of a paste is brewed with hot water, where diluted liquid paint is gradually introduced.
You can first apply an image, then outline the boundaries, but it is better to first make a “coloring” grid. Such a pattern requires fixing - after the bend dries, the glass is coated with a colorless nitro-lacquer.
Helpful advice!
Stained glass painting with silicate paints is used by artists for heat treatment. Special chemical components create a mirror or matte surface on stained-glass windows. Some techniques are not available for home painting, for example, an engraved stained glass window, which is created on special equipment.
The simplest method is to use ready-made stained glass or mirror stickers.
source: http://strport.ru/mebel-i-predmety-interera/vitrazh-na-stekle-svoimi-rukami
Stained glass windows with their own hands. Create your stained glass window at home
This page is dedicated to those who decided to try to make stained-glass windows with their own hands. Here you will find a description of manufacturing technologies, materials and tools used.
Below is an illustrated step-by-step instruction that will allow you to make a stained-glass window using the chosen technology with your own hands.
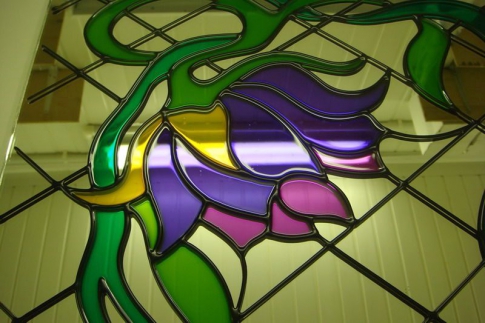
Tiffany stained glass windows are made from fragments of colored glass.
Stained glass window. You create your masterpiece using paints on glass and contour.
The first step to making stained glass windows with your own hands
To make stained-glass windows with your own hands, you need to decide on the technology. Then study the materials and tools that you will need. And finally start making.
Technology Choice
Tiffany
Real stained glass windows are made from pieces of colored glass. They are both the most beautiful and the most difficult to manufacture. Currently, the most popular stained glass manufacturing technology is the tiffany technology.
Do-it-yourself stained-glass windows using Tiffany technology will exceed all your wildest expectations. Detailed description.
Film stained glass windows
Film stained glass is a kind of application. Only film is used instead of colored paper. The quality leaders sold by us are the films of the English manufacturers Decra Led and Rega Led.
To simulate a seam, a self-adhesive tin tape is glued between the fragments. The works made by the hands of professionals are very beautiful, despite the fact that the film is inferior in appearance to glass.
flooded stained glass windows
Filled stained-glass window is glass, on which the outline of the pattern is applied with thick paint and is 1-2 mm wide and 1-2 mm high. The contour forms areas into which thinner paint is subsequently poured.
DIY Tiffany stained glass
Necessary tools and equipment:
- Roller glass cutter. Rotating head, roller with automatic wetting.
- Nippers, at least two types, for breaking off small and long parts.
- Glass edging machine. We opted for Kristall 2000.
- Light table. Height 80 cm. Tabletop - glass, lamps under the tabletop over the entire area. Not required for small items.
- soldering iron
- Black felt-tipped pen
- Protective glasses
- Skillful hands
Materials required for work:
- Glass selected in accordance with the sketch. Usually, for 1 m2 of a stained-glass window, with details that have a curvilinear shape, at least 2 m2 of glass is required.
- Special copper or brass foil.
- Tin POS-61.
- Soldering acid.
- Patina. Depending on the desired color of the seams - black or copper. To obtain a copper seam, you can use an aqueous solution of copper sulfate.
Sketch and drawing development
When developing a sketch, it should be remembered that glass is a rather fragile material, which means that it is rather capricious in processing. For example, it is not possible to cut a part with an internal corner using a glass cutter. For such parts, a special jigsaw is required, but due to its high cost, it is not considered here.
After the sketch is ready, a drawing should be made, which some call “cardboard”. It is a sheet of paper or film with a life-size outline of a stained-glass window pattern.
If you will be working on a light table, the paper should be transparent enough so that the outline of the design can be clearly seen through the art glass when the lamps under the tabletop are turned on. If the contours of the parts are transferred to the glass in a different way, the transparency of the paper does not matter.
When assembling yourself, be sure to follow all safety rules. Work only with protective goggles.
Cutting fragments of art glass
When cutting out a part, if it has curvilinear shapes, the original pieces of glass are chosen in such a way, if you are not a professional, that they protrude beyond the contour of the part by at least 4 mm on each side.
By running the glass cutter roller over the glass, you make a scratch along which the glass is supposed to break. The cutting pressure should not be too strong. If the line along which the glass is supposed to be cut has one or more bends, lightly tap under the scratch left by the glass cutter.
If possible, the part to be obtained should be firmly fixed on the surface of the table, while the likelihood that it will remain intact will be greater. The inner radius in the details is cut out in several stages. In order to comply with the dimensions and not get a product that, as a result, does not fit in the place prepared for it, you should start from the perimeter of the product.
The internal details of the future stained-glass window should be broken into fragments. Each fragment should also start from the perimeter. Details located inside the fragments are cut out in place, after soldering the outer ones.
Parts processing
Processing the edge of the part After the part is cut, it must be processed on a Kristall typewriter. The edge of the part is processed so that sharp corners do not damage the copper tape. With this procedure, you can correct the shape of the part.
Before soldering, the end of each part, around the entire perimeter, should be wrapped with copper or brass tape.
Finished, turned and wrapped parts are laid out in accordance with the pattern and, for a start, they are seized in several places with tin. Before soldering, the seams are wiped with soldering acid.
Assembly
After the last detail is prepared for soldering and laid in its place in the overall composition, you can proceed to soldering the stained glass window. Try to evenly distribute the tin along the seams, achieving a smooth, convex seam. It is necessary to solder on both sides.
Tiffany stained glass made by your hands is ready.
Do-it-yourself stained-glass windows
I want to remind you that a classic stained-glass window is a work of art of a pictorial nature, made from pieces of colored glass. Filled stained-glass windows are an imitation, but with the right approach, it looks very dignified.
The main advantages of flooded stained-glass windows are the relative ease of manufacture and almost any form of detail.
To make a stained-glass window, you will need:
Developed independently on opaque paper.
2. Contour.
The contour is used to simulate the seam between the details of the stained glass window. As a contour, a special contour paint with a thick consistency or a special contour tape is used. Contour paints are available in various colors. Such as: black, copper, gold, etc.
3. Base.
The jellied stained-glass window can be executed on any firm surface. But the main surface is, of course, glass. The base can be a simple piece of glass, a glass or a vase.
4. Stained glass paints and varnishes.
When choosing a paint, it is important to consider how you will apply stained glass paint. Both thick stained glass paints and glass varnishes can be poured onto a horizontally located surface. From a surface located at an angle to the horizon, liquid paints and varnishes can spread.
Note!
Glass varnishes are used when the product must remain more transparent. Paints such as Plaid's Gallery Glade are much thicker than clearcoats and allow you to work even on vertical surfaces. With thick paints, you can achieve the effect of glass relief and make multi-colored stains.
5. Paint dispenser.
Since any liquid has its own surface tension, paint often has to be forcibly distributed over the surface of the part to be poured. The dispenser has the shape of a pencil, with a tip sharp enough to be able to drive the paint into the sharpest corner of the poured fragment.
source: http://www.aghouse.ru/vitraji_svoimi_rukami/
How to make a stained glass window with your own hands, draw on glass
Previously, only cathedrals, theaters, mansions of wealthy people were decorated with stained glass windows, but times are changing and today this type of art is available to everyone.
Stained-glass windows can decorate doors, loggias and balconies and various interior items. Colored glass and various paints are used as material for stained glass.
There are several ways to make stained glass windows:
First way
Use pieces cut from a single colored sheet of glass. Each piece is part of your composition. The cut pieces of glass are fixed in a pre-made metal stencil, after attaching the stencils are soldered, as a result, a stained glass image is formed.
Second way
The stained-glass window is made of colored glass smalt and two sheets of transparent glass. A drawing is laid out of smalt on a transparent sheet of glass, and a second transparent glass is covered on top. The stained-glass window is fixed in a frame made of wood or metal.
Third way
The stained-glass window is laid out from the details of the ornament (cast glass), then the fragments are fastened together with resin.
Fourth way
Transparent glass is painted with paints. After drawing the pattern, the glass is fired in a furnace at a temperature of 540 - 5600C.
Fifth way
Multi-colored smalt is laid on a transparent sheet, attaching them to the glass surface with synthetic glue.
Sixth way
Imitation of a stained-glass window - painting on glass with paints that do not require heat treatment.
But, unfortunately, most of these methods are not entirely suitable for home conditions, and are mainly used in specialized stained glass workshops.
To create a stained glass window at home, the sixth method is suitable using paints for painting on glass.
So how do you make a stained glass window at home with your own hands?
To do this, we need paints that can be used to paint on glass. Fortunately, the variety of products for decorative design is so large that it is not difficult to find such paints.
Below we have given only a few addresses of stores where you can buy paints for painting on glass. Not so long ago, paints for painting on glass appeared, the use of which does not require high-temperature processing.
It is enough to apply them on the surface and wait until they dry.
We will need:
- picture;
- sheet of glass;
- glass-grapher;
- contouring paste in a tube (it mimics the lead tape used in
- stained-glass windows, and allows you to define clear contours for the picture);
- paints for painting on glass;
- brushes (soft, high quality, it is advisable to rinse them first so that the pile does not come out during work)
glass painting process
Clean the surface to be painted with warm soapy water or an alcohol-based cleaner.
With the help of a glass pencil (glassographer), a drawing is applied to a previously dried surface, if it is difficult for you to apply a drawing immediately to a glass surface, you can make a drawing you like on white paper, which we then put under the glass.
Helpful advice!
With a contour paste imitating lead (for convenience, it is usually available in tubes), we separate the areas of the pattern that are different in color
We are waiting for our contour to dry completely
We apply the paint with neat, light movements of the brush, if a more intense color is needed, then we apply the paint in several layers. After waiting for the previous one to dry.