Scrapbooking family chronicle - a do-it-yourself vintage family album. Master class on creating a photo album
Who among us does not like to be photographed and photograph loved ones and loved ones? Over time, we accumulate a huge number of photographs at home, which, of course, we want to preserve and pass on to future generations. Therefore, today we will discuss with you ideas for decorating a family photo album with your own hands. It would be nice to make this pleasant activity one of the most basic traditions of the family, doing all the creative work of designing a family album together.
Scrapbooking family chronicle - do-it-yourself vintage family album
Scrapbooking is one of the techniques for creating and designing family or personal albums with your own hands. Where, in addition to photographs, newspaper clippings, postcards, buttons, drawings and other memorabilia are added that carry a story about you and your loved ones. Thanks to this art, instead of an ordinary album, we will get a whole story about the life of your family. The cover of the photo album can also be given an original look. Decorate it with some memorabilia - for example, a ribbon to which you can attach an amulet, or yellow maple leaves. On the cover you can put a beautiful inscription symbolizing something important only for you and your family. 


Making a family album in the form of a genealogical tree
Try to make your own family tree of your family and attach it to the title page of the photo album. It will not be difficult - indicate all the closest relatives that you remember and whose photos you can find in the family archive. First, add photographs of the most distant ancestors to the album, and finish the design with photographs of our days. Such a self-made photo album will be of interest to absolutely everyone - both the older generation and the younger. After all, considering it, you will have the feeling that you are reading a real saga about the history of your own family. 

How to make a family album with children's pages - ideas for designing a children's family album
Of course, one of the most important events in every family is the birth of a child. We always want to decorate this chapter of our life somehow in a special way. After all, even the smallest detail matters. We have a great many photographs of growing children, because we want to capture every moment of the life of a little man. And it can be very difficult to choose some individual photos from them to put in an album. But still try to select the most characteristic photographs that most clearly reflect important moments in the life of your baby. At first, these can be your photos, where the baby is still in your tummy. Next - an extract from the hospital. A newborn baby gets acquainted with family members and closest people. First smile. First steps. Walks. Deep sleep. Breakfast. For any mother, all these moments are incredibly important and everyone will be remembered forever. Also in the photo album you can attach the first hairs of the baby, make decoration from the first booties, ribbons, from a lace baby scarf or bonnet. Do not forget to describe next to the photographs the events that are depicted in them. Over time, it will be possible to add your child's drawings and various school or sports trophies and certificates to the photo album. 


Well, hands came to prepare a master class on making a photo album from scratch)))
This is always a very inconvenient process, because. you need to have time to take a picture with one hand, and with the other, cut the paper and glue the details at the same time)))
Many operations are done so quickly and almost unconsciously that sometimes you don’t have time to fix such moments)))
Nevertheless, I made this MK! Of course, it is better to watch and repeat everything live, but many do not have the opportunity to attend a live Master class, they have to learn from photographs.
I am ready to answer your questions and help you as much as possible)
1. First, prepare the paper. For the manufacture of photo albums, special scrapbooking paper is used. It does not contain acids that can spoil your photos in the future and its quality is the so-called archival quality, that is, the paper should look perfect for at least 70 years. Many needlewomen manage to print the pattern they like on a color printer, but I recommend not experimenting. Scrapbooking is a fairly new trend in Russia, at most a dozen years old - during this time it is quite possible that the pages printed on the printer on acid-rich paper have survived. But do you hope that the album will be considered by your grandchildren, great-grandchildren and other subsequent generations? What will happen to your photographs in 40 or 70 years? It seems now - it's so long ... And time flies very quickly and you always need to remember about the future)
In addition, handmade albums are very expensive and it will be very disappointing if after 20 years the photos are hopelessly damaged, and the paper simply crumbles from antiquity (for ordinary paper of non-archival quality, the shelf life and shelf life is 25 years maximum).
Before starting to create an album, decide on a theme (decide at least for whom the album will be created - for a boy or a girl, a man or a woman, a colleague or a close friend), so as not to get a mixture of styles in the end.
Since this album was created for a newborn girl, the paper was chosen accordingly.
The number of sheets is selected individually, according to your idea.
To decide on the range, initially take a little more paper than you need, lay the sheets side by side and choose pairwise combinations that you like best and that look harmonious side by side.
Pair separation is necessary in order to make harmonious album spreads that will not drown out or spoil each other.

2. Preparation of tools and decor. In addition to paper, you will need scissors, double-sided scrapbooking tape (it is made on the basis of special glue), a craft or stationery knife, edge and corner punches, ribbons, lace, flowers, buttons and other decorative elements that you want to use in the album.

I usually collect everything that I would like to use, and in the process of work I sweep away the unnecessary, choosing only the most necessary parts.

I store buttons and small items (brads, anchors, etc.) in containers, sorted by color. So it is more convenient to select according to the scale.

For tapes, for example, there is such a container in which coils of tapes are stored in compartments. If necessary, pull out as much as you need, cut off and the rest of the tape remains in the container. Very comfortably.

3. Compiling a composition. When I make an album, I lay out the sheets in pairs - the way they will be placed in the album. This is necessary to arrange all the elements harmoniously so that one page does not conflict with another.
We lay out the necessary elements on the pages, look, add something, remove something.
Gradually we begin to attach the decor.

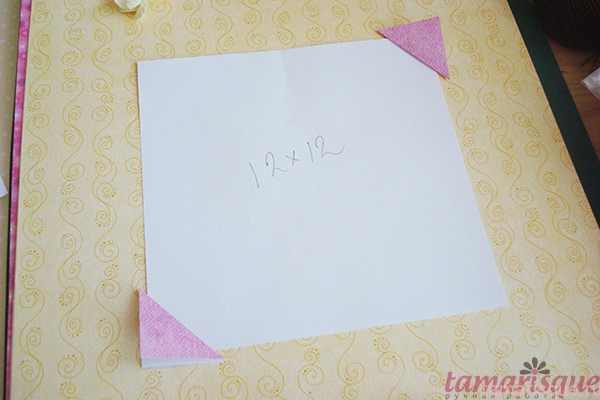
4. Making corners. When I didn’t have a hole puncher for photo corners, I made do with homemade corners. I really like them and still use them often. They are reliable and plump, I like them much more than the corners from the hole punch)))
Draw squares on the back of a sheet of paper. I take as a basis the width of the metal ruler - the side of the square is 2.5 cm - this is enough.

Cut out, fold diagonally right side out and walk along the edge of the cut with a pad of paint. Again - use special scrapbooking materials in your work, they are developed specifically for archival paper and photographs. This pleasure, of course, is not cheap, but it is spent wisely, and for example, I don’t have crazy expenses for such consumables - everything is even.

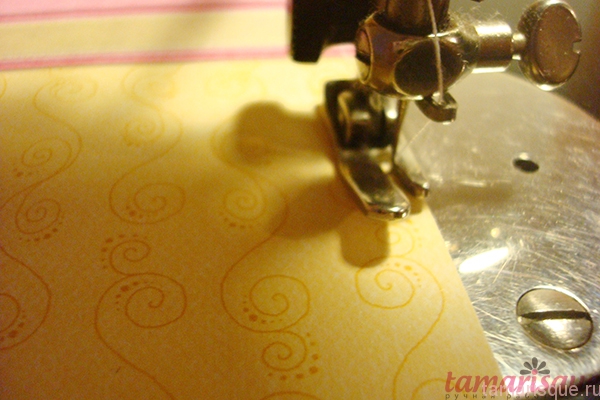
Next, apply to the sheet. A little trick - I cut out templates from paper according to the size of photos (12x12, 10x15) and do not measure each time with a ruler - I just put the template where I need it, try on the corners and sew it on.
A few stitches on a typewriter - and your corner is ready!

After sewing, be sure to bring the threads to the wrong side, tie knots and fix with adhesive tape - this is necessary to secure so that everything holds tight.

5. Fixing frames. In this album, I used ready-made frames from the set. They are fastened to the base with small legs and these burr legs need to be cleaned with a regular nail file so as not to spoil the look.
The movements of the nail file must be done in one direction so as not to damage the paper fibers.
The edges of frames made by hand from binding cardboard are also processed.

Next, I had to not just glue the frame, but raise it to a level, add volume. This is solved with the help of voluminous double-sided tape. You can use both squares and a solid tape.
We fix the adhesive tape on 3 sides of the frame, the fourth remains so that you can insert a photo there.


I glued the other frame with wood glue. Many now very widely use hot glue guns and the popular Moment Crystal glue .... Oh... Don't do this when you're working with paper, and in particular with a photo album! You cannot guarantee yourself or your clients that after 5-10 years this glue will not crumble to dust or damage the photos! Remember - you can only work with paper with glue intended for it! Now there is a very large choice, the same thick PVA, or for example, there is a very inexpensive wood glue - it is generally ideal, dries quickly, grabs perfectly and does not spoil the paper!
6. Fixing the decor. Well, as I just wrote above - try to sew on all the decor))) HB threads will not harm the album, and the look will be unique, hand stitching will only add additional attractiveness - you must admit, it's better than hot melt drops, just like it came off the Chinese conveyor belt ?))))

First we sew a leaf, then a branch of sakura.

We fasten the seams on the reverse side.

We pin the brads. Brads is such a thing, like a beautiful bead that has legs. And these legs hold onto the paper from the back.
First, with a thick binding needle, I make a puncture in the right place.

Then I insert both legs of the brads into the puncture.

And on the back side of the legs I move apart in different directions. From above, it is also recommended to close up with tape.

This is roughly how it works.

I glue transparent glass droplets to complete the look. Terrible evening light distorts very much (((

7. Fixing the tape. I put this procedure in a separate paragraph, because you often have to work with ribbons in scrapbooking and the process must be debugged.
The tape must be ironed before use so that there are no creases. Then it will not disappear anywhere and every defect of the tape will be visible to the naked eye .. Alas.
Glue double-sided tape on the back of the tape, remove the protective layer, turn the tape over and attach it evenly to the page. When sticking the tape, make sure that the tape lies perfectly flat, otherwise the tape will fix any bend!


They put a ribbon, smoothed it, wrapped the ends on the wrong side of the page and smoothed it again. This method will help in the future to flash the pages without worrying that the tape will lie wrong. Of course, this method is not mandatory, you can only fix the edges of the tape on the wrong side, it all depends on your idea.

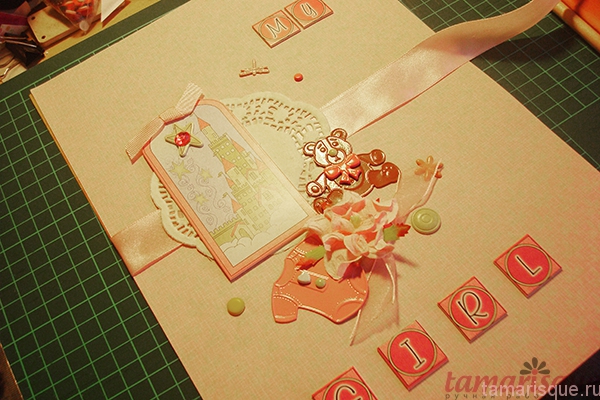
We stick a frame from the set on the tape with adhesive tape and a beautiful inscription on top. The inscriptions can be used ready-made, or you can do it yourself.

Glue drops.

We sew flowers, and this is what happened in the end:

8. Making a photo box. I think it's interesting to consider how to make a mini-box for several photos. It happens that you need to put a lot of pictures on the page - how to do it optimally?
For such purposes, mini-boxes are used, consisting of 3-4 mini-pages fastened together, where you can place photos. When folded, such a box takes up no more space than 1 photo - the savings are obvious!)))
So, we take two sheets of paper measuring 15x10 cm, and on one sheet along the long side we make a valve, about 1-1.5 cm wide. With a hole punch, we cut the corners for the photo on one leaf, which will be the base, and glue the cut corners to the other.

Glue the valve of the top sheet to the wrong side of the base.

To the page of the album, where we plan to attach the box, we attach a ribbon or, as in this case, two waxed cords of different colors. The length should be 3-4 times the width of the box (in our case, if the box is 10 cm wide, we choose the length of the tape 30-40 cm).

We attach our box on top in an open form, base to the album page and sew along the edge on a typewriter (or by hand seam). We bring the threads to the wrong side and fasten.

Close the box and tie with cords. All. On the top of the box, you can write something or place another photo. In this example, 3 photos fit, but you can also increase the number of inner pages of the box and just put a few photos inside - the cords are tied, nothing will be lost!

I'll dwell on the details a bit. Sometimes I want to emphasize some elements on the page, for this I use bulky tape and bring the elements to a higher level.

Try and use different materials - here, for example, an ordinary paper napkin was used under a glass - you glue it where necessary, cut off the excess.


A very beautiful decor turned out using a regular picture and lace around the edges.

Tied a bow - sewn on. Very pretty and no frills. By the way, when using ribbons on a page, be sure to process the edges over a candle or a lighter so that the cuts do not crumble when used.

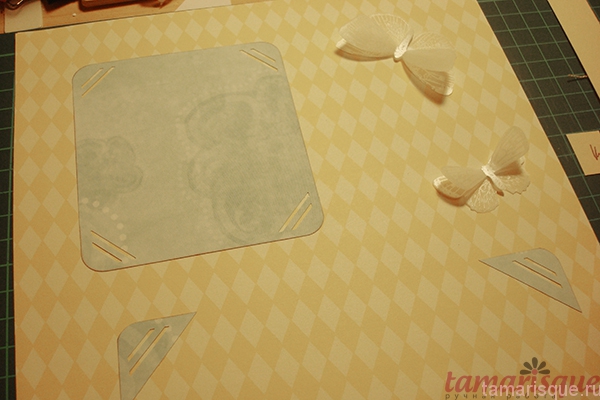
Tracing paper butterflies are very simple shapes, cut out the outline of the butterfly, glue a couple more wings on top and you're done!
9. Cover. Despite the fact that the cover is the very first page of your album, it is better to do it at the very end. It should reflect the general mood of the album and this is best done when you have tormented with the pages, felt them well and can easily create a unique cover!
We select a suitable sheet of paper (do not forget that there will also be a back cover, so everything should be harmonious), attach the tape.
For the cover, it is better to choose stronger and wider ribbons, as they will be constantly pulled - open-close, etc. I fix the tape with adhesive tape, I also strengthen it from the inside.

In parallel, I work with the back cover - there is no special decor, but the ribbon should be at the same level as on the first cover.

I glue the lace paper to the ribbon and attach the decor details. At this stage, you can still twist-twist, remove-add, that is, compose a composition that completely satisfies you. Next, we begin to gradually sew and glue. Somewhere I use double-sided tape, somewhere I sew it, I fix it with brads - I listed all the methods above in detail, nothing has changed, the principle is the same.
10. Connection of pages. Phew. Finally got to the end. One more push, one more try, as they say))))
Here's a little background. I'll tell you first about what materials I use and why.
When we have created the pages of the album, they need to be connected. But not just like that, but put inside, between them, something solid that will keep its shape. Many use incomprehensible cardboard, even corrugated cardboard, as far as I know, from ordinary boxes, glue it all with a thick layer of the moment, rejoice and give it to the client ...
As I wrote above, these are pathetic attempts to reduce the cost of production. Buying (or picking up in the trash) a box is much easier and cheaper than spending money on high-quality bookbinding cardboard and the right paper glue. Is it really beneficial? Let's see. The cardboard used in the packaging is made from such waste that you cannot even imagine ... All this waste is ground into flour, filled with glue and sheets of low-quality paper are cast, from which then corrugated and other packaging cardboard is made. I think that even without delving into the details, we can confidently say that such cardboard is not suitable for us, it is clearly not of archival quality and in general there is no quality in it.
Binding cardboard is also not all good. There are very cheap types of such cardboard, which consist of resins and acids, which can directly damage our album, even if these cardboard seals are inside the pages (believe me, a chemical reaction will occur even in this case).
Clay Moment. This is a separate song. Not only will you spoil the album with this terrible substance, you will also inhale until green devils in your eyes ... After all, the Moment stinks terribly. Do you need it?
I could describe in detail the chemical composition of materials here, but it is very long and tedious, if you are interested, you can find information in tyrnetiks, read, think. Or just trust me as a print production technologist. No wonder I learned wisdom for many years?))))
Well, I rejected all your consumables, and what should I do now? How to be? Where to run?
There is an exit. First, you can buy quality binding board that meets all the requirements of scrapbooking. If you are too lazy to bother, you can use the second option, which I use almost always when making albums.
We will use regular watercolor paper. here the whole trick is that paper acids and resins also greatly interfere with watercolor artists, so paper is made for them that is free from such impurities. That is, ordinary watercolor paper. In terms of density, it is certainly inferior to cardboard, but in practice, albums with such a base are very popular, easy to use, much lighter in weight and lower in cost.
So, since our album sheets were cut into A4 format, we take watercolor paper of the same format. With double-sided tape we go a little along the edges of the sheet and in the middle. Remove the protective layer and carefully place the finished album page on top. It is very important that the edges match. small deviations are acceptable, this can be corrected later, but there should not be obvious shifts.
After we have fixed the page, we turn it over, and on the back of the watercolor sheet we do the same operation - adhesive tape, album page.
Be careful - the pages must match in serial number! Otherwise, you will be confused!
We also glue the pages that fall on the cover to the watercolor sheet, but it is better to two - to make it tighter.
After gluing the pages, you should get such a sandwich:
1. Page (face up)
2. Watercolor paper
3. Page (face down)
When all the pages are fastened in pairs and watercolor paper is laid between them, we begin to stitch.
We sew on a typewriter, you can use your hands, but for a long time. Do not forget that the pages already have ready-made elements that can be very voluminous, control the process, support it with your hands somewhere, align it somewhere - that is, carefully stitch all the edges.
Of course, you can not sew all the pages, but glue them with the same carpentry glue. But it seems to me that this method is not very convenient - firstly, glue is consumed in huge quantities, secondly, you need to dry each page for a long time and thoroughly (in conditions of our high humidity, this is difficult to do, the paper begins to warp if drying fails), and thirdly , if something is glued incorrectly, you will have to redo the entire page, and sometimes this is simply not possible.
On the typewriter, all edges are fixed, inside it is glued with adhesive tape - this is a “dry” method, you can be sure that the product does not deform from moisture (my clients have been using albums for quite some time, they say everything is fine), and if you made a little mistake when sewing, you can dissolve the seam and stitch again. Well, again - the line adds comfort))
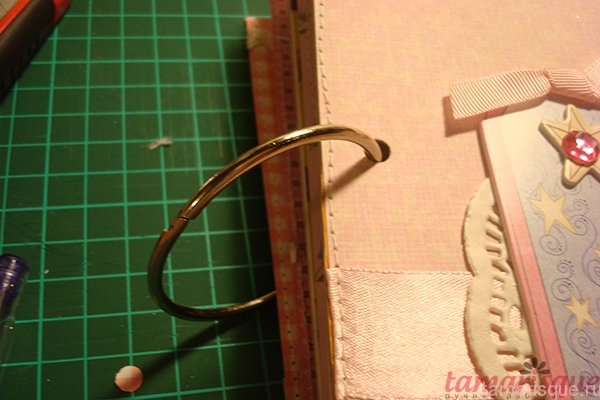
After stitching, you can make holes for fastening. We punch from the side of the spine.
I do this with an ordinary clerical hole punch. For more complex holes (where you need to adjust the distance), of course, it is better to use a professional one.
Be careful - see which side you are punching with a hole punch! It's easy to get confused, but it's almost impossible to fix!

We open the ring, put the pages in order and close the ring.

To complete the rings, you can tie ribbons, lace, put on beads, if the diameter allows - in general, decorate and complete the album with such strokes.
This is roughly how it would work:

I tried to talk about the key points in the creation. Of course, you can show and tell for a very long time, I will be glad to answer your questions)))
If you want to know some points in more detail, write in the comments, I will do separate small master classes specifically for each process.
Photo is a memory and pleasant emotions. If you print them, try making an original photo album. Consider original ideas and study a few workshops.
Each mother will be pleased to receive as a gift a beautiful exclusive album made by the hands of a loved one. Such materials and tools will be required;
- thick corrugated cardboard;
- split rings for paper;
- hole puncher;
- cardboard;
- colored paper;
- felt-tip pens or markers;
- drawings (thematic images of angels, babies, baby nipples and bottles, strollers);
- dense fabric;
- ruler;
- scissors;
- pencil;
- ribbon;
- glue.

Manufacturing instructions
DIY manufacturing:
- Prepare your cover. From thick corrugated cardboard, cut two pieces of the same size.
- Cover both sides of the cover with fabric, gluing it with all-purpose glue. The edges of the material should be on the inside.
- Glue paper to the inside of the cover pieces to cover the edges of the material.
- Cut out pages from cardboard.
- Use a hole puncher to make holes in the cover and cardboard. Assemble the album by stringing the pieces onto detachable rings.
- Glue a piece of tape to the cover from the inside edges to make ties.
- Decorate the album with images of babies, nipples, strollers, toys, bottles. Glue a few on the cover, decorate the pages with the rest.
- Cut out squares from colored paper, make pockets out of them on several pages, gluing along the edges on three sides: side and bottom.
- Write on the pockets the inscriptions: "My first hair", "My tag" and so on.
- On several pages, write something like "My first words", "My achievements", "My weight and height". There will be photos corresponding to the topics.
Wedding photoalbum
Try to make a scrapbook wedding photo album, popular in 2017-2018. Would need:
- fabric (for example, canvas);
- millimeter paper with markings;
- scissors;
- synthetic winterizer;
- paper (plain white or special for scrapbooking with patterns);
- cardboard;
- glue;
- paper rings;
- hole punch or awl;
- ribbon;
- images for page decor;
- beads or rhinestones.

Instruction
- Determine the dimensions of the photo album. Using graph paper (can be replaced with a regular ruler), mark the cardboard and padding polyester. For the cover, you will need two pieces of cardboard and two synthetic winterizers.
- Glue a synthetic winterizer to one cardboard sheet - this is the back of the album.
- In the front of the cover there will be a window for a photo of the newlyweds. You can make it rectangular, square or heart-shaped. From the remaining segment of the padding polyester, cut an opening. Glue soft insulation to cardboard.
- Start wrapping the cover with fabric. Cut out two pieces of canvas material, adding 1.5-2 cm to the dimensions of the album on each side. Glue one piece to the back of the cover, stretching the fabric and fixing the edges with glue.
- In the other segment, cut out a window for the photo. Glue the canvas material to the front of the cover.
- Decorate the borders of the photo window with beads or rhinestones, gluing them with glue.
- Cover the inside of the cover with paper.
- Make a bow out of the tape, glue it to the cover in front next to the window.
- With a hole punch or awl, make holes in both parts of the cover along the edges, insert eyelets into them.
- Next, make holes in the cardboard pages, collect the album.
- Decorate pages with beads, thematic images: doves, rings, hearts. They can be purchased at the scrapbooking department or printed on a color printer.
- You can put a photo in the window on the cover, but you can leave this right to the recipients of the gift - the newlyweds.
Family
You can make an original family album with your own hands according to one of the instructions described above. You need to make a cover, cover it with fabric, put all the parts together with the help of rings. It is advisable to supplement the holes with eyelets for aesthetics. 
Family photo album design ideas:
- The cover can be signed by writing “Family photo album” or “Family ...” (instead of an ellipsis, there will be a surname).
- One or more pages can be allocated for poems about the family.
- You can make a family tree. To do this, draw the outlines, print an image of a tree on the page or glue it.
- At the roots, make frames for photographs of older family members. Make a chart moving up to the youngest relatives. On one side are the relatives of the husband, on the other - the wife.
- Set aside one page for wedding photos.
- You can select a page for each family member, paste his photo and write a few words about the biography.
Photo album for a boy
 If the owner of the photo album is a boy, use the following ideas for decoration:
- Divide the album into parts to reflect all areas of life in photos. You can immediately identify sections and give them names: “My sports life”, “My best friends”, “My close relatives”, “My achievements”, “My studies”, “My favorite activities”.
- Inside the cover or on the front page, write something about the owner of the album: date and place of birth, full name, short biography, interesting facts, and so on.
- Make room for a poem about boys or specifically about the owner of the photo album. You can take a ready-made version or compose a verse yourself.
- Complete the product with drawings that can depict mischievous boys, sports equipment (ball, boxing gloves and pear, gymnastic rings), certain activities (games, study).


For girl
A photo album intended for a girl should turn out to be gentle, romantic and sweet. Use purely girly jewelry, consider preferences and interests. 
Design options and tips:
- You can divide the entire volume into parts by age periods: starting from birth and continuing to the real age of the girl.
- Select several thematic sections: "My hobbies", "My family", "My friends", "How I have fun", "How I study", "My pet". Supplement each part with images, inscriptions, verses.
- For decor, use rhinestones, beads, ribbons.
- Complete the album with drawings that reflect the gender of the child. It can be jewelry, dresses, whispering girlfriends, kittens, soft toys.
Anniversary photo album
 A photo album will be a wonderful gift for an anniversary, if you try and make it yourself. Prepare:
- thick cardboard for the cover;
- cardboard for pages;
- universal quick-drying glue;
- ruler;
- eyelets and a special punch for them;
- double sided tape;
- decor;
- scissors;
- ribbon;
- scrapbooking paper;
- dense material (for example, linen, cotton, jacquard).

Master Class
- First, make blanks for the cover. Cut out two identical parts from cardboard, having previously determined the dimensions of the product. If you have old large boxes, then you can use them.
- Cut out pages that should be slightly smaller than the cover to make the product look neater and more aesthetically pleasing, and the edges won't rub off.
- Glue double-sided tape to one of the blanks around the entire perimeter. Cut a piece of fabric from the fabric, adding to the size of the cover on each side one and a half or two centimeters for wrapping.
- Glue the material to the front side of the workpiece. On the other hand, also glue the tape around the perimeter, bend the edges of the material and fix them. Next, glue a sheet of cardboard with glue to cover all the excess. On cardboard for an aesthetic appearance, glue scrapbooking paper. In the same way, design the second part of the cover.
- Cut out the inscription “To the hero of the day” or “In honor of the anniversary” from the cardboard. Cut out the same inscription from scrapbooking paper and stick it on a cardboard base. Fix the decor with glue on the front side of the cover at the top.
- If there is a good photo of the hero of the day, you can stick it in the very center of the cover, and instead of a frame, use decorative elements, such as beads, overlaying the perimeter with them.
- Start assembling. From one edge of the front of the cover, make holes with a punch, insert eyelets into them. On sale you can find a special manual eyelet installer, and it is much more convenient to use it. Make holes and install accessories in the back of the cover, keeping the same gaps as in the front (pre-mark up so as not to be mistaken).
- It remains to make holes in the pages. Apply markings to make the product even. There is no need to install eyelets in the pages.
- Assemble the album using tape. Start penetrating it from above or below, then pass through the holes, moving in the opposite direction. Tie the ends into a bow, fixing it with glue for reliability. Cut off all excess.
- On the first page or on the inside of the front cover, write a congratulation, wishes, poem.
- Decorate the item. Choose jewelry taking into account gender, hobbies, age, lifestyle of the hero of the day. You can divide the album into parts, highlighting several sections by areas of life: family, work, hobbies, entertainment. Decorations can be thematic: for example, a fisherman will appreciate the scenes of catching fish, a hunter - guns. Images can be drawn by yourself (if you have artistic skills), found in magazines, searched on the Internet and printed on a color printer.
How to make a binding for a photo album with your own hands
A large album must be bound, and for its manufacture you will need:
- cardboard;
- thick paper;
- scissors;
- ruler;
- pencil;
- cotton cloth or gauze;
- tape or braid;
- universal glue.

Description of the album binding process
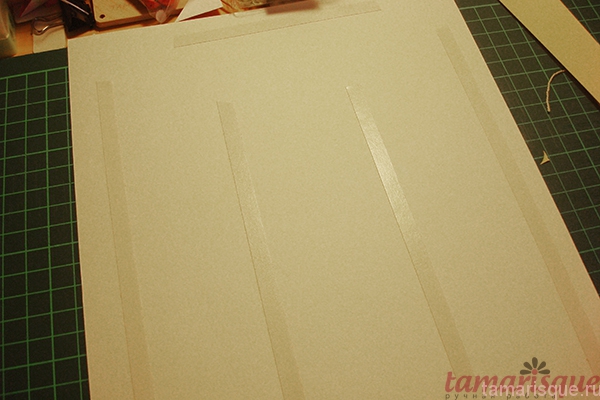
- Cardboard sheets will act as pages. To connect them, cut out strips of paper 2-2.5 cm wide and equal to the height of the future album.
- In the center of each paper strip, use a pencil or ruler to draw a strip about 3-4 mm thick. The free space left between the pages will allow you to decorate the product with voluminous decorations - paper flowers, ribbon bows.
- Cut all corners of the strips at an angle of 45 degrees.
- Bend the strips along the drawn stripes. Glue the folded sides to the edges of the pages. Assemble the entire album, taking care to fix evenly to ensure a neat and attractive look of the photo album.
- Start making the binding. Cut a piece of gauze or cotton fabric: the length will be equal to the height of the album, and the width will be the thickness of the product plus 2-2.5 centimeters.
- Carefully glue pieces of tape or braid to the top and bottom edges of the future binding so that the binding does not have protruding threads and looks aesthetically pleasing.
- Glue the binding to the album at the junction of all pages on the outside.
- Cut out a spine from paper: the length is equal to the height of the product, and the width is the thickness of the photo album plus two or three centimeters. Glue the strip to the top and bottom edges of the binding with braid. The spine should protrude 1-1.5 cm on each side. Glue the cover to these protruding parts.


Video instructions for making binding - Scrapbooking
If you decide to make a photo album with your own hands, study the master classes and ideas presented in the article, choose the option you like and start making. Success in creative work!


Instruction
Create a photo album The program for creating photo albums is AntWorks FotoAlbum. Download it from the official site. Download the program to your computer and open it. Click File - Create Album. Enter the name of the photo album in the window that opens and upload photos from your computer to it by clicking on "Add". If you want to select the entire folder with photos, then select "Add Folder". Click Create.
Design an album cover and view photos When you start the program, a list of photo albums will be presented on the left. Selecting one of them, all his photos will appear on the right. Creating photo albums involves accompanying images with a number of effects. You can make an album cover by pressing the F9 key and selecting the line "Cover Art". To set up a slideshow - F7, run a slideshow - F6, view photos in full screen mode - F5 (all this is in the "View" tab).
Add Music to Photo Album Press F8 to add music files from your computer. A playlist window will open, select "Add" in it. Save the song you want for the album by clicking OK.
Make a video from photos Select an album, go to "Tools - Create Video" or press the keyboard shortcut Ctrl + F. In the "Create a video" window in the "Images" tab, left-click the photos while holding down the Ctrl key. In the adjacent "Settings" tab, set the video parameters you need (frame size and time, music in wave format, etc.). After that click "Create".
Make a collage of photos To do this, select photos in the album with the left mouse button + Ctrl. Go to "Tools - Create Collage", define the style (stack, grid, horizontal or vertical) and click "Create". If you are not satisfied with the position of the photos in the selected style, then click on "Create" until the program selects the position that suits you. Then save the collage.
Make an HTML gallery An electronic photo album can be uploaded to the Internet. Select "Tools - Create HTML Gallery - Template/Simple". Designate a directory, i.e. folder on your computer where the html album will be saved. Enter the name of the html page in Latin letters, select/upload a template (if you are creating a gallery using a template), name the gallery, click "Next", set the necessary parameters, then - "Forward" and "Finish". Now the photo gallery with html-code can be placed on the site.
Related videos
Sources:
- How to make a photo album | Creating a photo album in AntWorks FotoAlbum
- photo album on computer
- Where to create a photo album online?
Modern technologies allow any computer user to edit their own video or movie. This can be done using both more professional programs - Pinnacle Studio and Adobe After Effects, as well as standard ones that come with Windows, such as Windows Movie Maker. It is on the example of Windows Movie Maker that we will analyze the creation of a simple video.
Instruction
Open Windows Movie Maker. It is on yours regardless of the version of Windows. To do this, use the "Start" button, the "All Programs" link.
Click on the "Import media" button and indicate to the program those files that you plan as material for, these can be - and audio files, as well as static images -. The files you specified will be copied to the working folder of the program - "Imported Media Files".
At the bottom of the program you will see the editing area, it can be displayed in several modes ( -switch - in the lower left corner of the window): in the "Storyboard" mode and the "Timeline" mode. The latter gives you a lot more about the editing materials: the duration of the video and audio fragments, the text of the titles superimposed on the frames. The Storyboard mode is useful for bringing files from the Imported Media folder into the pasteboard, and for applying effects and transitions.
Drag the required files in the correct order to the pasteboard. In the Timeline mode, by highlighting a file, adjust the duration of its display in a future video.
Select Transitions from the drop-down list at the top of the window. You will see transition options that you can use between any two fragments in the pasteboard. Adjust the transitions in your video by dragging them to the pasteboard.
In the same way, adjust the "Effects" for each file separately.
Save the video by choosing one of the options in the "Publish to a selected location" menu. You can save the video on your computer, on a DVD, or send it by email.
Related videos
Sources:
- how to make your video in 2018
To date, websites bring their owners a good income. But in a competitive environment, it is necessary to constantly maintain your resource in the TOP, otherwise users and search engines simply will not find it. One way is to fill the site with video content.

Instruction
There are many services on the World Wide Web that allow gallery on the resource for those users who do not have enough disk space in their computer memory to accommodate large video files. Video is stored on these services, it is played through them. Another advantage of this method is the relative ease of implementation. Of these services, YouTube is the most popular.
If you want to make a video gallery on your site, first place the video on YouTube.com. If you are not registered on it, be sure to go through this procedure. First of all, as in most cases, create an account. Click on the appropriate button to go to a page where you will have to enter the following data: date and year of birth, country of residence, indicate gender and click on the box called "Accept".
Please read the terms and conditions of YouTube beforehand. Then enter the address of your mailbox, enter a new password twice. After that, carefully type the characters (captcha) that are presented in the window). Registration completed.
Click on the button labeled "Add Video". On the page that appears, click on the same button. After that, select the video to download that is on your computer. Click on "Open".
Come up with a name for your site, write tags for search robots, in the drop-down box, select the category in which the video file will be presented. Complete the posting procedure on the site by clicking on the button called "Save Changes". Be aware that the maximum size of the placed file is no more than 2 GB, and the playback time is 15 minutes.
In order for the video to be played on your resource in the HTML code of the page, write down the link and the HTML code.
Photo albums are able to keep the memory of important moments of life for many years. In order for your album to be designed as interestingly as possible and to please not only you, but also your guests, you can design its cover yourself.

You will need
- - colored and shiny paper;
- - jewelry (beads, rhinestones or sequins);
- - glue;
- - velvet or staple;
- - gilded braid;
- - Photo.
Instruction
One of the most suitable ways to design any photo album is an application. Choose a story for her in accordance with the theme of the album. For example, to decorate a collection of children's photographs, colored and shiny paper, as well as shiny jewelry - beads, rhinestones or sequins, are suitable. Create a composition suitable for the age of the child. For the smallest, you can make an application with animals and cartoon characters. Older children will especially like models of cars, boats or planes. The album looks good with paper decorations in the form of beautifully dressed dolls or flowers.
The cover of the photo album, designed for both photographs and adults, can be covered with velvet or staple. Choose a color depending on the preferences of the child or other family members. In the center of the cover, put the best, in your opinion, photo of a child, newlyweds or other people important to you. The edges of the album can be carefully pasted over with gilded braid or other original decorations. Decorations made of thread or yarn will also be appropriate.
A wedding photo album provides a variety of suitable design options. The main place in the composition here can be occupied by an application of the newlyweds' favorite flowers. Lovers of everything bright can make a cover of contrasting shades - red and green, black and white, etc. Those who prefer the classics should choose calmer tones. Decorate the central area of the cover with two wedding rings made of gilded paper or the best joint wedding photos. Creative people can also use various wedding accessories for applique: flower petals from the bride's bouquet, bows and ribbons from the cortege decoration, etc.
Related videos
You can make an interesting slide show from family photos. To create the simplest version of a slide show, Microsoft PowerPoint is suitable. This program is designed to create spectacular presentations. Microsoft PowerPoint is highly functional and is part of the Microsoft Office software suite.

You will need
- - Personal Computer;
- - installed program Microsoft PowerPoint;
- - Photo.
Instruction
Create a separate folder and save the photos in it, from which you will make a slide show. Remember the location of the folder.
Open the Microsoft PowerPoint program. In the Control Panel, click the "Insert" tab and select the "Photo Album" section. In this section, you need to select the "Create Photo Album" option. A dialog box will open in which you must select the command "File or disk".
After clicking the "File or disk" button, specify the path to the folder with the desired photos. In the Add New Pictures window, select multiple photos to create a slideshow using the Shift key. Click Paste. The photos will open in the Photo Gallery dialog box. Click Create.
Click Paste. The photos will open in the Photo Gallery dialog box. Click Create. All selected photos will be displayed on the right side of the monitor.
In the Control Panel, select the View tab. In this tab, click the "Slide Sorter" button. In this mode, you can change the order of the slides. To do this, select the desired slide with the left mouse button and drag it to the place of another slide. The photos will be swapped.
Click on the "Normal" button in the "View" tab. On the first slide, change the name of the slideshow.
In the Control Panel, click the Animation tab. In this tab, you need to select the type of transition between slides from those offered by the program. In the "Slide Change" field, check the "Automatically after" box and select the time.
To create an interesting presentation, you need to overlay music on a slide show. To do this, go to the "Insert" tab in the control panel. Click the "Sound" button. The program will offer a choice of several positions. Select "Sound from file". In the Insert Audio window that appears, select a music file to accompany your presentation. Click OK. A dialog box will appear asking "Do you want to play sound during slide show?". Click the "Automatic" button.
To set automatic slide transitions, go to the "Slide Show" tab. Open the Presentation Setup window. In this window, set the following options: slide show - automatic, slides - all, slide change - by time.
Save the document. To save, select the file type "PowerPoint Demo" with the file extension - *ppsx. Assign a name and specify the path to the folder to save the slideshow.
Tip 6: How to make your own wedding photo album
A photo book, unlike in memory, will never let you down, it is a clear evidence of the best moments of life, which include a wedding.
Modern technologies make it possible not only to capture happy moments in the life of lovers, but also to save colorful, bright pictures for many years to come. Without a statute of limitations, when there is no yellowness on paper and small cracks in the upper corners.
Become the author of your own love story. Choose the best wedding photos and make a photo book out of them. Unlike ordinary photo albums, you can pass it on to the next generations!

You will need
Instruction
Select the desired photobook template. Currently, 6 templates are available on the site, corresponding to the most popular album sizes.

Upload and arrange photos in special frames, add text.

When you click on the image, a window will pop up in which you can edit the colors, size or slope of the image. You can also add frames, clipart and choose a background.

The next step is to view your photobook. Click the "View" button in the lower right corner of the screen. If you like everything, then you can proceed to checkout. If you need to change something else, then click on the "Edit" button.

Complete your order by choosing a convenient delivery and payment method. If you have any difficulties, use the video instruction in the "Help" section or an online consultant.

Related videos
note
The online photo editor “accepts” images no larger than 10 MB. Simply put, if your photos are overweight, use the offline version by downloading it to your computer. And then every detail marked by the camera will fully appear in the picture.
Useful advice
The quality of printed photobooks does not depend on the physical size of the photos. Do not use pictures from which a poster can be printed.
The size of the photos should be approximately the same size as those in the already printed photo book in order to get really sharp, vibrant shots.
One of the most important characteristics that determine print quality is the number of DPI (dots per inch). It is optimal to use pictures with a resolution of 300 DPI.
Proper selection of paper means a lot for the future safety of your photo gallery. Choose from the standard Colotech paper or, for special occasions, our exclusive non-yellowing EverFlat paper.
Sources:
- Wedding photoalbum
Beautiful photos deserve to be inserted into an unusual photo album. You can order it from a scrapbooking master or create it yourself from improvised materials.

You will need
- - file folder;
- - cardboard;
- - fabric, ribbons, laces, laces;
- - beads, glass beads, buttons;
- - glue, threads, needles, jewelry and more.
Instruction
Buy a file folder of any size, such as A4, A5 or A6. Get a strong durable cardboard of the appropriate size, it will serve as the pages of the future album.
Cover the front and back of the folder with a thick, bright fabric, do not cover the spine, otherwise the fabric will fold into folds when the album is opened. It is better to paint this part with opaque paint. Make a hem of the fabric in the place where the spine begins, carefully glue it, fold the material along the edges of the crust, glue it from the inside. To hide the edge of the fabric, glue cardboard or thick colored paper on the inside of the front and back peel.
Decorate the album cover. Sew large buttons to the material, make a loop of elastic or ribbon, sew to the back of the folder so that a stylized clasp is formed. You can also use old strap buckles. Decorate the surface of the folder with pieces of leather, ribbons, appliqué. If you are preparing an album from a trip, arrange a folder in the appropriate style - glue waves from ribbons, steamers assembled from newsprint, seagulls from feathers.
Cut out sheets of cardboard suitable for the folder size, round off their edges. Create a unique look for each page of the album, decorate them on one side only, it is not necessary to stick photos on the back side.
Here are some page decorating ideas. Glue a light fabric onto cardboard with PVA glue, write the lyrics of a song that means a lot to you with a gel pen. Place photos on top of the text. Or roll a transparent tape into a loose tube, fasten it with a thread on one side, fluff the resulting one, make stems from ribbons or laces. Broad leaves can be made from pieces of skin. Place all the details at the bottom of the page, stick it, fix the photo at the top. Cut out leather or substitute flowers with four to five petals. Choose thick bright threads, make two stitches crosswise in each flower in the center, like a button. Fasten the thread from the wrong side. Fill the free space on the page with flowers.
A photo album is the most convenient way to store and display photos. In our time of digital technology, photo albums have become more of a souvenir item than a means of storing photographs, so an exclusive photo album will be valued more than purchased in a store. Namely, such a photo album, unlike other photo albums, you can make yourself.

You will need
- Files
- Heavy paper
- Photo
- Foil
Instruction
A photo album can be made in many ways. The easiest is to remember how our grandmothers made it. They took an album or a notebook with thick sheets, cut holes in the sheets for the corners, or glued the corners. Less often, they simply pasted a photograph onto a sheet. They painted the pages with paints or felt-tip pens, signed the date of the picture and who is depicted on it. The cover of such an album was pasted over with colored paper or foil.
In our twenty-first century, you can always buy a folder with files of any format in an office supply store. Printed remains only to invest. It is not difficult to decorate the cover of the folder, it is enough to paste over it with velvet or soft leather and decorate it with rhinestones.
Now there is a fashion for photo albums - they are often for weddings and. To make such an album, a lot of work is not required. The box should be pasted over with wrapping paper or cloth, decorated with bows, beads or rhinestones, put inside in the same way decorated
Children grow up very quickly, so I want to capture every moment of their lives. We live in a world of modern technologies, in connection with this, every modern baby has a huge number of a wide variety of photographs from birth to today.
To prevent your photos from getting lost in multiple devices, it's a smart idea to print them out and collect them in one photo album. And to make it as individualized as possible, try to assemble the album yourself.
Scrapbooking technique- a popular trend among modern masters. This technique allows you to display in the works all your knowledge, skills and abilities in the field of creativity. Scrapbooking involves the use of various materials, such as scrap paper, curly scissors, stamps, acrylic paint and many others. Together, these materials give a finished composition, which may differ depending on the chosen theme, style, method of design and decoration.
A do-it-yourself baby photo album is a great practice for a beginner scrapbooker. Assembling the pages of your first album is not so difficult, and gluing photos and designing a photo album will allow you to develop the skills of composition and the taste of the master. Creating a children's photo book does not require much effort and time, and the result is able to exceed all expectations and not only please, but also surprise all households and guests.
The scrapbooking technique continues to win the hearts of craftswomen around the world. To make a photo album for children's photos with your own hands, you will need:

The list contains interchangeable items, for example, the eyelet installer can be replaced with a regular hole punch, and the glue with double-sided tape. Choose materials that are familiar and comfortable for you to make the task easier.

How to make a children's photo album with your own hands
Following a simple step-by-step master class, you can make a beautiful album for children's photos:

What materials to fill the photo album
The album can be filled not only with photos, but also useful information about the child, which he will be interested to know about himself: when the first tooth fell out, when he took the first step, words or sounds, favorite activities in the first year or even a month of life. It is the “first” events that are the most touching and wonderful.

The album can be designed throughout life, so leave a few blank pages at the end of the photo book. The child, when he grows up, will be able to continue the album or even pass it on by inheritance, pasting photos of his children. Then a homemade photo album will turn into a real family heirloom!
Making a children's photo album is a pleasure! Each hand-made page is filled with a special energy that cannot be felt when flipping through the pages of a purchased photo album. Do not be afraid to craft and create something with your own hands, and then your work will become a decoration at home and the pride of relatives and friends!