Barometer from a jar and a balloon. Encyclopedia of technologies and methods. From an old oiler
Ekaterina Tretyakova
How to show children changes in atmospheric pressure? We don't usually notice barometric pressure, but changes in it can cause dramatic changes in the weather. The device of modern barometers very difficult for preschoolers to understand. So I decided to do homemade instrument for measuring atmospheric pressure.
A device for measuring atmospheric pressure is called barometer. To make it, you will need a balloon, a glass jar, a drinking straw, an elastic band, a toothpick, scissors and duct tape.

Cut off the end of the balloon with scissors.

Pull the ball tightly over the neck of the jar. Then firmly fix the balloon on the jar with an elastic band.

Using duct tape, attach a toothpick to one end of the straw.

We fix its other end with adhesive tape on a balloon stretched over a jar. A straw with a toothpick will serve as an index arrow barometer.

Preparing a vertical panel with designations: in the upper part - the sun, in the lower part - a cloud; in the middle - a scale of divisions. Also on the panel we have a schematic image of the action barometer.
At high pressure, air presses on the ball, and the arrow rises. At low atmospheric pressure, the air pressure from the can increases on the ball, it rises, and the arrow falls. At high atmospheric pressure, the weather is usually fine, while at low pressure, it is usually cool and rainy.
Following your barometer for several days, children will notice: with any change in atmospheric pressure, its arrow will rise or fall.
Related publications:
Panel "Butterflies". For work you will need: a set of colored paper, scissors, glue, a pencil. Cut out many strips of colored paper wide.
So summer has come, somehow, on a walk, the children and I saw a butterfly gracefully fluttering over the flowers, we really liked it. Butterfly.
Master class "Clock". These clocks can be made with the children of the preparatory group and learn the time from them. 1. Cut out the base for the template.
Master class for teachers "I myself am a master of arts and crafts"“If you can teach a child in childhood to feel beauty, to be amazed at the wondrous creations of human hands, the beauty of nature, then grow up.
Snowdrops... people have always been amazed by the ability of snowdrops to grow under the snow. This is the name of all plants that bloom in early spring. In juice.
Summer is a wonderful time of the year for everyone. Classes can be held on the street, and if you combine several classes into one, then there is an integrated one.
On the threshold of the holiday is the day of lovers, how wonderful it is that someone, someone loves. We made valentines for our children with the children of the 1st junior group.
It is not always possible to buy a barometer, so I want to propose the design of a home barometer, which will show atmospheric pressure with some accuracy.
The barometer (see figure) consists of a bottle with transparent glass, a glass tube and a cork. The bottle is one third filled with water, it is better to take distilled water, since ordinary water blooms in a year. Water can be slightly tinted. A hole is made in the cork into which a glass tube is inserted. The junction is covered with plasticine. Now it remains to plug the bottle with a cork. The barometer is ready. When atmospheric pressure begins to change, the water level in the tube will change. If air bubbles begin to come out of the tube, then the pressure is very high, and this is for clear, stable weather, at such a time there is a good bite. If water starts pouring out through the top of the tube, the pressure is low, you can expect a storm, but you should not go fishing.
The simplest do-it-yourself barometer
Such a barometer can be made from a small tin oil can with parallel sides.
Pick up a cork that tightly closes the only hole of the future barometer. Before you put the cork in place, you need to make a hole in it of such a diameter that you can pass a transparent tube-straw for cocktails through it. However, it is better to use a glass tube with an inner hole diameter of 1.5 - 2.0 mm.
The container is 2/3 filled with tinted water, a tube with a cork is inserted into the hole, while in the tube

Fix such a barometer on a stand with a vertical ruler. You can calibrate it by taking readings from a real barometer.
Instead of a metal container, you can use any small glass bottle. After filling with tinted water and fitting the stopper with the tube, add some water to the tube. Since the body of the barometer is rigid, when the pressure increases, the water level will decrease, and when it decreases, it will rise.
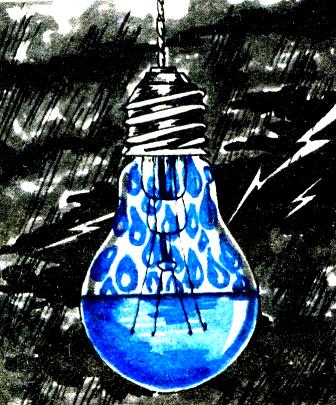
Burnt out light bulb barometer
Take a burned out electricallight bulband where the base with the threaded part begins, carefully drill a small hole with a diameter of 2-3 mm. This should be done very carefully, otherwise the balloon may crack or break.
Here is the easiest way to drill glass. At the point where you marked the hole, apply a drop of machine or sunflower oil. Take the abrasive powder from medium-grained sandpaper and add it to the oil drop to make a viscous paste, a little thinner than toothpaste. Then clamp the copper wire in the drill chuck. Its diameter should match the size of the hole you want to drill. Gently clamp the lamp base in a vise. And wrap the glass flask with a towel or rag. You need to drill very carefully, applying minimal effort.
When the hole is drilled, fill it with tap water, filling the glass flask halfway. Then add two or three drops of ink or a piece of indelible pencil lead to it and mix. The barometer is ready.
It remains to wait until the inner wall of the flask dries out, and hang the barometer between the window frames. It is best on the north side, where direct sunlight will not fall on it. If the windows face south, install at the top of the window. After a few hours, you can take readings. Our barometer can predict the weather for the day quite fully. Overcast or partly cloudy awaits us, or it will rain a little, long, short-term, maybe thunderstorms ...
True, you need to know some features in order to decipher the testimony:
If the inner walls light bulbscovered with small drops of condensed water - tomorrow it will be overcast, but without precipitation.

If the walls of the light bulb are covered with drops of medium size, and vertical dry stripes form between them - partly cloudy.
If you want to know in advance about changes in the weather, then you can make a barometer with your own hands. This device shows changes in atmospheric pressure, by fluctuations in which you can predict the weather.
So, if the atmospheric pressure falls, then precipitation is possible and the weather will worsen, and vice versa, if the atmospheric pressure rises, then we can talk about the improvement of the weather. Of course, you can trust the reports of hydrometeorological centers or watch the weather on weather websites, but it’s better to have a similar device in your house and focus on its readings.
Barometers are produced and sold in different types, but you can make a device that responds to fluctuations in atmospheric pressure at home.
These interesting "tricks" will help you navigate the weather, and they do not require complex technologies or materials to make them. It turns out that a kind of barometer can be made even from spruce branches.
spruce barometer
 Siberian hunters have long known that the branches of coniferous trees tend to fall before precipitation and are understood in anticipation of sunny clear weather. Even dry spruce branches retain this feature, so they can be used to make natural barometers that will show weather changes 8-12 hours before the change.
To make such a barometer, you need a piece of a dry small tree trunk (25-30 cm long) along with a branch 30-35 cm long. The trunk with a branch is cleaned of bark and attached to a plank, which is hung on the wall. In this case, the branch should be located so that when lowering and raising the free end of the branch, it moves parallel to the wall and does not touch it. Raising a branch signals clear weather, and lowering it means bad weather.
You can even attach a metal or plywood scale to the board with risks every 1 centimeter. After some time of use, it will already be possible to determine the possibilities of the branch and sign the indicators "precipitation", "variable", "sunny"
light bulb barometer

For this barometer, you will need a burnt out incandescent light bulb. At the beginning of the threaded base, a hole with a diameter of 2-3 mm is drilled. Drilling must be done carefully and with minimal effort so that the glass does not crack. Through the resulting hole, clean water is poured up to half the flask. Add 2-3 drops of ink to it.
Next, they wait until the inner walls of the flask dry out, and hang a barometer bulb between the window frames of the window, preferably from the north side. If the windows are located on the south side, then the light bulb should be hung at the top of the window. After a few hours, you can take readings.
- If the inner walls are covered with small droplets of condensate, then there will be cloudy weather without precipitation.
- With droplets of medium size, between which dry vertical stripes have formed, partly cloudy weather is expected.
- Large drops near the surface of the water in a light bulb and a dry neck indicate that precipitation will pass by.
- Drops of water on the north side of the bulb indicate rain the next day in the afternoon.
- If the inside of the bulb is covered with large drops of condensate, then there will be short-term rains. And if the drops become larger and flow down, then most likely there will be a thunderstorm.
- If the walls of the bulb are completely dry, then the weather will be fine.
You can use such a barometer in spring, summer and autumn at temperatures above zero.
fir barometer
 A fir twig 10-12 cm long is cut off. Needles are removed from it, except for one. The twig is attached to the plank so that the fir needle can freely fall and rise.
A plate with a twig and a needle must be brought to the oven so that moisture evaporates from it. In this case, the needle rises and it will be necessary to make a “sunny” mark with the number 1. Then you need to bring the device to the steam, and when the needle goes down, then mark the number 10 and write “Rain”. Between these marks mark the risks into ten divisions.
A homemade barometer should be placed in a shady place, away from direct sunlight. Such a device can be built during a hike and learn about weather changes in advance, focusing on the position of a small fir needle.
Fir cone barometer
 Even a barometer can be made from a fir cone. This device can predict weather changes hours in advance. To make such a homemade barometer, you need two flat wooden planks and a dry pine cone.
Two elements are cut out of the boards: a base square with a side of 70 mm and a sidewall measuring 70x150 mm. The ends of the blanks are treated with a large file and the surfaces of the boards are cleaned with sanding paper. Connect the elements with glue and fix with small nails as shown in the figure. A scale is cut out of cardboard or thick paper with divisions and designations of sunny and rainy weather. At the sidewall, a large dry spruce cone is fixed to the base. A dry straw with a paper arrow at the end is glued to one of its scales from below.
The device will work based on the fact that the scales of spruce cones are pressed tightly against each other in humid air and vice versa open in dry weather. A homemade barometer should be placed on the balcony or outside the window, and with its help it will be easy to determine whether there will be precipitation or sunny clear weather today.
bottle barometer
 For such a homemade device, you will need a transparent bottle, a glass tube and a cork. The bottle is filled with distilled water by a third. For better visibility, water can be tinted, and distilled water is used due to the fact that ordinary water can deteriorate after a while. A hole is cut in the cork into which a glass tube is inserted. The hole around the tube is covered with plasticine or sealant. Stopper the bottle with a cork with a tube, and the homemade barometer is ready. When atmospheric pressure changes, the water level in the tube will change. When air bubbles begin to come out of the tube, this will mean that the atmospheric pressure is high and the weather will be clear. If water pours out through the top end of the tube, the pressure is low and the weather will be rainy.
Home hydrometeorological center
A homemade hydrometeorological center can be made using two thermometers. One of them is wrapped with wet cotton wool or a cloth and lowered into a jar of water. You need to make sure that it is constantly wet. The table below compares the readings of both thermometers and determines the weather.

Content
Almost all natural materials are very susceptible to environmental conditions and weather events. For example, wooden products in humid air become larger in size, the skin softens, and a pine cone opens its scales in dry weather.
Cone weather forecaster
To make a device that will predict the upcoming change in the weather, you can use one of the properties of natural materials - cones. It is not difficult to make it with your own hands, and the process will become interesting for both adults and children.
To make the device, you need to take two small, even wooden planks and glue them together, so that one of them is the base, and the second serves as a side wall. On a piece of cardboard, you need to draw a kind of scale with images of the sun and clouds.
A dry cone is attached to the edge of the base board, and a dry blade of grass is glued to one of its scales. When the air in nature is dry, the scales will open and the blade of grass will show in the sun. And if the weather deteriorates and rain approaches, the scales will close, and the blade of grass will point to the cloud.
Making a barometer from a light bulb
A light bulb for making a barometer with your own hands needs to be taken burned out, and at the base of the base it is necessary to drill a small hole. There is one good way to do this neatly. In the place where there should be a hole, a drop of oil is applied - vegetable or machine. To it you need to add a little abrasive powder from sandpaper. Mix both ingredients on the glass, and insert a copper wire of the desired diameter into the drill chuck.
Before drilling a hole, wrap the glass part of the light bulb with a small piece of cloth or towel, and clamp the base itself, if possible, with a vise. You need to drill a hole at minimum speed, without applying any effort.
When the hole in the light bulb is ready, water is poured into it, about half of the total volume, and then you need to add a few drops of ordinary ink or a small part of the chemical pencil lead. The mixture is mixed, and the light bulb is suspended with a tight rope or fishing line.
A homemade barometer must be fixed between the window frames, but so that the sun's rays do not fall on it. When the inside of the glass is dry, you can take readings, for this you need to remember what this or that state of the flask means.

For example, if small drops of condensate form on the inner walls of the light bulb, cloudy weather should be expected in the near future, however, most likely, without precipitation.
If the drops of condensate are of medium size, and vertical strips of dry glass can be replaced between them, this indicates variable cloudiness in the next day. It is worth preparing for precipitation in nature if large drops appear on the walls of the light bulb. And if they are so big that they flow down, the rain will be heavy and lingering.
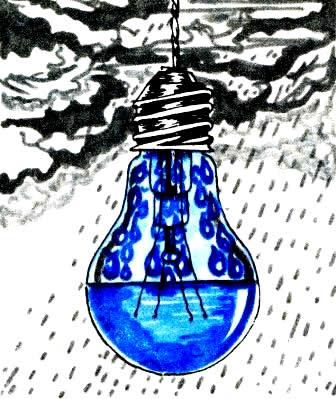
When it rains outside the barometer, you can also understand how long it will go. If the inner surface of the light bulb has already become dry, then soon the precipitation will stop, and dry sunny weather will set in outside the window.
You can use such a barometer, made on your own, only at a positive temperature outside, in frost its readings will be incorrect. And in the summer it will be interesting and informative for the whole family to observe the changes in his readings, and then the changes in the weather.
There are many folk signs that allow you to determine what the weather will be like tomorrow. Here are just a few of them:
The weather will improve tomorrow
1) if cumulus clouds appear in the morning, which will disappear by evening;
2) if in the evening after a bad weather the sun comes out and there are no clouds in the western part of the sky;
3) if the smoke from a fire or chimney rises in a column;
4) if cumulus clouds move across the sky in the same direction as the wind near the ground;
5) if it is quiet and cool at night, and the moon sets in a clear sky.
The weather will get worse tomorrow
1) if the wind does not subside by evening, but intensifies;
2) if cumulus clouds appear in the morning, which by noon will take the form of high towers or mountains;
3) if clouds of all types are simultaneously visible in the sky: cumulus, "lamb", cirrus and wavy;
4) if smoke from a fire or from chimneys spreads along the ground.
If you were at home and did not observe what was happening outside the window last night, a barometer may come in handy for predicting the weather.
You can use the clues of nature, or you can try to make a barometer with your own hands. Next, we will give several methods for making simple barometers, found in the study of the magazines "Lefty" and the appendix "For skillful hands" to the magazine "Young Technician".
Light bulb barometer.
It is necessary to take an electric light bulb, and where the base with the threaded part begins, carefully drill a small hole with a diameter of 2-3 mm. This must be done very carefully, otherwise the cylinder may crack or break.
The easiest way to drill glass: at the point where you marked the hole, apply a drop of machine or sunflower oil; take abrasive powder from medium-grained sandpaper and add it to an oil drop to make a viscous paste, a little thinner than toothpaste; clamp a copper wire in the drill chuck (its diameter should correspond to the size of the hole you want to drill); gently clamp the lamp base in a vise, and wrap the glass bulb with a towel or rag.
Carefully drill the hole using minimal force. Pour tap water into it, filling the glass flask halfway, then add two or three drops of ink or a piece of chemical pencil lead into it and mix - the barometer is ready.
When the inner wall of the flask dries out, you can hang the barometer between the window frames, and best of all on the north side, where direct sunlight will not fall on it. If the windows face south, install at the top of the window and after a few hours you can take readings. The barometer can predict the weather for the day quite fully. Overcast or partly cloudy awaits us, whether the heat will set in, or it will rain a little, long, short-term, maybe thunderstorms ...
You need to know some features in order to decipher the readings of such a barometer:
1) the inner walls of the light bulb were covered with small drops of condensed water - tomorrow it will be overcast, but without precipitation.
2) the walls of the light bulb were covered with drops of medium size, and vertical dry stripes formed between them - partly cloudy.
3) if the walls are partially covered with large drops of dew, expect short-term precipitation.
4) from top to bottom and drops, growing larger, flow down - there will be a thunderstorm.
5) large drops only at the surface of the water, and the neck of the light bulb is dry - the rain will pass by, 30-60 km from your places.
6) it is raining outside the window, and the walls of the light bulb have become completely dry, without fog and droplets - tomorrow the weather will be fine.
7) if dew drops appear only on the north side of the cylinder, expect rain tomorrow afternoon.
You can use such a barometer only if the air temperature is above zero, that is, in spring, summer and early autumn.
Pine cone barometer.
Wood, leather, other organic materials, even our hair are sensitive to any changes in weather conditions - in humid air, the hair becomes longer, the skin becomes softer, and the tree changes volume ... For example, in the rain, the scales of a pine cone are pressed closer to each other, and in dry weather, on the contrary, they open, which makes the cone become ruffy.
This property can be used to make a simple barometer that predicts the weather for several hours ahead. To make a barometer, you will need two flat wooden planks for the base and sidewall. Connect them with glue, reinforcing them with small nails, as shown in the figure, cut out a scale from thick paper, draw divisions and two signs on it: the sun and an umbrella, attach a large dry pine cone to the base at the very sidewall. Glue another dry blade of grass with a paper arrow at the end to one of its lower scales.
Install a barometer on the balcony or outside the window - and, please, with high accuracy, it will tell you whether to take an umbrella with you that day.
Photographic plate barometer.
Another amazing barometer design for photography enthusiasts.
Find a black and white negative of a landscape that shows both water and vegetation, take a glass plate and expose the negative on it. Then develop and immediately after washing, dip for 15 minutes in a 10% solution of cobalt nitrate, bypassing the washing stage, dry the plate and carefully paint over the trees, shrubs and grass depicted on it from the side of the emulsion with a thin layer of porous, easily permeable yellow paint, for example, watercolors or gouache. After the paint dries, frame the plate - the weather barometer is ready, and in order not to damage the fragile layers of emulsion and paint, place it between the glass of the window frame.
The sky and water on the photographic plate will turn blue, and the vegetation will turn green as dry weather approaches, but as the weather deteriorates, the image on the plate will also fade: the sky and water will turn gray, and the leaves and grass will turn yellow. The principle of operation of such a barometer is based on the fact that cobalt nitrate crystals deposited on the photoemulsion layer change their color depending on the humidity of the air: with a high moisture content they become colorless, and in dry weather they become blue, in those places that are covered with paint, two colors - yellow and blue - mix to form green.
Such a simple barometer predicts the weather quite accurately.
Barometer from a fir or pine branch.
To make such a barometer, it is necessary to cut a branch from a young fir or pine. After separating from it a segment 10 cm long with a thin long needle growing on the side. Then take a flat board or plywood 150x100 mm in size and nail a prepared piece of fir to it so that the needle can move freely (see Fig.) - the barometer is ready. Only it needs to be graduated: bring the device to a hot stove or stove - the heat will straighten the needle and rise up, where it stops, make a risk; bring the device to a stream of steam escaping from the kettle spout - the needle will go down due to moisture, mark the second risk here. Connect the risks with an arc and divide into several equal parts, it remains to make the appropriate inscriptions, as in the figure.
Fix the barometer on a stand with a vertical ruler, you can calibrate it by taking readings from a real barometer.
You can also use any small glass bottle instead of a metal container, after filling with tinted water and installing a stopper with a tube, add some water to the tube. Since the body of the barometer is rigid, when the pressure increases, the water level will decrease, and when it decreases, it will rise.