Storage of axes in the garage. Do-it-yourself garage arrangement - ideas for storing spare parts and tools. Make use of vertical and ceiling space
Garage tools are indispensable items for every car owner. Quickly unscrew the bolts that secure the wheel, and then change it, drain and fill in fresh oil and antifreeze, even just clean the car windows from snow or ice - all this will be done with a tool that should always be at hand.
It includes garden and construction equipment, often stored in such premises. This article offers recommendations on how to store tools in the garage competently, how to make some products with your own hands.
What tools are needed in the garage
Equipping the garage with everything necessary is made based on the preferences of its owner. Features of the performance of repair or other types of work determine the presence of various equipment and tools in the garage. Despite the wide variety of jobs, it is desirable to have some garage tools in every room.
These include:
- A set of keys, better with a special ratchet.
- Set of heads.
- Screwdriver set.
- Pliers.
- Wire cutters.
- Round nose pliers.
- torque wrench, which allows you to choose the right tightening torque and ensure high-quality wheel fastening, this is especially important when replacing it on a car.
- A set of mounts.
- Universal clamp.
- Retaining ring remover.
- Chisels.
- Set of magnets.
Various electric and pneumatic tools also facilitate the performance of repair work.
It can be:
- Electric drill.
- Impact wrench.
- Bulgarian.
- Grinder.
- Electric lift.
- Welding machine for complex repairs.
Motorists purchase many tools and devices at their own discretion, and some even make them themselves.
How to make a pipe bender
Homeowners often need to bend pipes or strips of metal, for example, when making their own greenhouses or laying a plumbing system. There are many solutions to this problem. One of the options is shown in the photo.

To make a pipe bender you will need:
- Wood.
- Three polyurethane keel rollers for a boat trailer, which are fixed with tougons on the shafts from scrolling.
- Steel angles that hold the rolled pipe in a perpendicular position and prevent it from bending into a spiral.
- Stud and nut or threaded plate. These elements are needed to tighten the roller from below. Each time the pipe is rolled, the nut or threaded plate is tightened by half a turn. If you need to make a bend of not a large radius, and the circle turned out to be of the correct shape, it may be necessary to make from 50 to 100 runs.
- Handle with bracket, to rotate the pressure roller.

Pipe bender - bottom view
The order of work has the following sequence:
- Wooden blanks are cut out.
- Holes are drilled for axles.
- Axles with rollers are assembled.
- Bearings for the axles are inserted into the vertical racks.
- The assembled nodes are mounted on the base of the pipe bender, guide corners are attached.
- Guide plates are fixed on top of the base rack.
- The upper part of the tool is assembled. A shaft with a roller and a handle is inserted, a stud or a long bolt is installed from below for the clamping nut.
Particular attention in the manufacture of tools should be given to the distance between the rollers. Each pipe has a minimum bend radius. The greater the distance between the rollers, the larger it will be.
In this case, less bending force is required, and the end of the pipe will remain unrolled. The stroke of the pressure roller must be made as long as possible.
These points must be taken into account at the design stage and it is necessary to provide for the possibility for the rollers to change their position if necessary. Therefore, in order for the pipe bender to be used repeatedly, the dimensions of the tool must be taken with some margin.
How to make a screw clamp
To attach the pipe bender to the workbench, as well as to perform other work, you will need various clamps. The price of a large number of products of different sizes is quite high. Therefore, if there is a desire, such designs can be made independently.
To make a screw clamp you will need:
- Profile metal sheet, approximately 10 millimeters thick.
- Metal rod with a thread on one end M10.
- Several nuts M10.
The manufacturing process includes:
- A bracket is marked on a sheet of metal. To do this, you can use the finished product or prepare a template yourself, at your discretion, taking into account the requirements of operating conditions and the required dimensions.
- The workpiece is cut out. In this case, it is better to use an acetylene torch or a gas cutter.
- The edges are cleaned with an angle grinder and the burrs are removed.
- On the smaller side of the bracket, several M10 nuts are welded or a hexagonal bar up to 50 mm long with an M10 thread for the entire length in the center of the part.
- An M10 thread of the required length is cut on a round bar with a diameter of 10 millimeters.
- A protective coating of all elements with oil or nitro paint is carried out to protect against corrosion.

A homemade garage tool can also have a more complex manufacturing process that requires special equipment and skills.
Tip: Before using a homemade garage tool, you need to make sure of its quality, and most importantly, its reliability when working with it.
How to properly store tools in the garage
If it is quite difficult to make a garage tool with your own hands, then each owner of the premises can perform the correct and convenient placement of the tool in the garage.
In this case:
- To properly organize the space where small parts will be placed, you can equip several rows of long shelves along the wall (see), where you can then place garage tools.
- Large items are placed in plastic containers, large-capacity boxes or special boxes.
- Small fastening tools can be stored in makeshift blocks using small food containers. A metal washer is glued to the bottom of it with superglue, and attached to the wall through a rail with a magnetic strip.
- It is convenient to hang a small tool in the garage on hooks that are attached to a long wooden strip fixed on the wall.
- A special stand on the wall is perfect for storing frequently used tools.

- For hacksaws and bow saws, metal brackets are made that can be nailed to the doors or screwed with small screws.
- Power tools in the garage are perfectly stored on racks (see) or shelves.

Tip: Store power tools in the winter in the packaging in which they are sold, these can be portable plastic boxes with a handle, which will protect the product from the negative effects of moisture and mechanical damage.
- Garden tools with long handles can be attached to special metal hooks.
Tip: For mowers, wheelbarrows, concrete mixers and other large-sized equipment, special racks should not be made. And metal hooks should be placed closer to the garage door.

- It is convenient to store a semi-automatic welding machine or another type of apparatus on a special trolley. Its use has the following advantages:
- welding equipment is easy to deliver to the place of work;
- it is possible to fix a gas cylinder for welding, which does not have good stability;
- saving space in the room.

It is not at all difficult for a garage owner who knows how to handle welding to make such a design himself.
How to fix the tool in the garage, place different shelves, racks and other equipment correctly to ensure convenient use of it, the video will tell. Convenient, serviceable and always at hand the right tool - comfort in the garage for any car owner.
Today we’ll talk about how to clear your garage of unnecessary things that have filled almost its entire area. 6 amazing recommendations from famous experts and designers will help you out perfectly. Have a tidy day for yourself!
1. Use vertical and ceiling space
This rule is especially important if you are going to park your car in the garage. Janet Henry, a competent architect, advises to paint the wall and hang the necessary tools on it. Thus, you will not take up precious square meters.

You do not have to spend a lot on the manufacture and installation of small storage sheds. And what a result!

In any hardware store you can find special holders and metal hooks for heavy items.

Choose furniture that will not interfere with the organization of various details.

2. Global cleaning
Designer Ivan Prefer from New Jersey (USA) recommends following the “start from scratch” rule. Only in open and free space will you understand which areas are best used for certain types of activities.

3. Decide what to keep, what to give, and what to throw away
Getting rid of clutter is incredibly rewarding. And never regret throwing away things (like a broken tennis racket that you don't need). Don't forget to dispose of hazardous waste.

4. Reasonable grouping
Chris Carey suggests putting items of the same type (such as detergents or toiletries) on a large shelf or putting them in a separate box. And a few coats of paint, hooks and cute stickers will transform your garage beyond recognition.

When entering the house, it is better to place clothes and shoes. Large items that are used every day, hang on the wall or ceiling to save space, or use.

5. Purpose
Think carefully about what your garage space will be used for. Professional Mikki Lesowitz-Soliday from California (USA) advises turning this building into a studio where different designs can “meet”. To do this, it is worth dividing the room into a zone, each of which will be designed for its own types of things.

Instead of trying to cram things into different corners, build a long, narrow closet for them. So you free up space, for example, for a sewing station. Everything will depend on your interests.

6. Fun labels
To mark each shelf or drawer that is filled with nails, screws and bolts, stickers or stickers will help you.

So you can perfectly organize the workspace. Thanks to the containers with inscriptions, hooks and bags, all the necessary elements will be in perfect order.

Garage for a man is the second home where he spends most of his free time. In order not to get lost in the amount of inventory that is stored in the garage, we will put everything in its place. We will analyze the issues of zoning and landscaping, learn how to make shelving, workbenches and practical holders for large and small things with your own hands.
Zoning the premises - we divide the garage into functional areas
If you are starting a project from scratch or are thinking about redevelopment of the garage, a good option for building is a two-tier space zoning. On the top floor there will be a workshop, in the bottom - a basement and a pit. We will analyze an approximate plan for the location of zones in the upper part of the garage, taking into account the convenience and specifics of the room.
Zone No. 1 is transitional. Equip a place for items that you will need when you leave the room: racks for outerwear and shoes, a shelf for keys, a mobile phone, bags. The transition area should be close to the door, not cluttered with the work platform, racks and other items.
Zone number 2 - for household items. This space can be organized to store items that you need in everyday life. If you have pets, construct a small rack for food, canned goods. for newspapers, coffee machines, electric kettles and microwaves. The site can also be used for storing things in bulk that do not fit in the cellar.
Zone No. 3 - shelving. There may be several sites for mounting high racks, depending on the area of \u200b\u200bthe workshop. We store garden tools, spare parts, equipment for work in them.
Zone number 4 - auxiliary. Here we store large items and things that you rarely use. For example, leisure equipment, holiday decor. Optionally, the corner can also be equipped with a rack for storing summer and winter tires.
Zone number 5 - a sports corner. Take a place for bicycles, roller skates, scooters, make a net for balls. Provide hooks, holders and nets for them so that nothing rolls and stays firmly in place.
Zone No. 6 - workspace. Equip this area with maximum comfort. Provide a universal workbench for gardening, woodworking and auto repair, convenient sliding cabinets, shelves for storing small items. And don't forget lighting. The window will be a big plus, in its absence, use artificial lighting by connecting several 60 and 80 watt lighting lamps.
Inspection pit and basement - we equip with comfort
Car repairs can be carried out without a viewing hole. However, an experienced car enthusiast knows that it is more difficult to get to the details of the bottom of the car in this case. The back and neck get tired quickly, you have to constantly take an uncomfortable position, and finding the right tool is also difficult. An observation pit with a basement helps the master get rid of all these problems. The first thing to start with is fitting the pit to the growth of the master. You should not touch the ceiling with your head and reach the details of the lower part of the car. We add 10 cm to your height, the final number will be the comfortable depth of the viewing hole. We select the length and width of the opening according to the dimensions of your car, starting from generally accepted standards. We strengthen the side parts of the recess with metal corners and sheathe with a board. This finish will extend the life of the walls and floors.

Do not forget about the lamps and storage niches in the sides of the pit, in which you can put the necessary tools and parts for car repairs. For ease of descent, provide a ladder or steps and a ceiling with which you can close the pit after completion of work. Make it from ordinary boards or automate it with a lifting mechanism. So you do not drop the tools into the pit and protect yourself from accidental slipping down.
An additional plus of arranging a viewing hole is. It can store canned food and vegetables for the winter. When building a cellar, do not forget about ventilation and a lamp at the entrance.
When building a pit from scratch, consider an important point - the level of groundwater. It should be below the floor of the pit and cellar. For the construction of walls, use durable materials (foam blocks, M400 concrete).
Basics of installation and design of shelving structures
Before placing, decide on its size. Its dimensions should not interfere with work, clutter up the garage space and interfere with the turn of the car. The best option is to install the rack against the wall. The height of the rack depends on the size and number of things. The lower shelves are reserved for storing large items (jacks, fuel cans, a welding machine). We also place the tires at the bottom or provide a separate shelf for them higher. So that the rack does not bend from the weight of the weight, we pay special attention to the lower part of the structure. We make it from a thick board or sheet of metal. Depth, width and spacing between the shelves of the rack is selected individually. Given the average dimensions of equipment and parts, the dimensions vary from 0.5 to 1 m.

To strengthen the structure on the sides, we use vertical and transverse metal corners. After welding the corners, we assemble the frame according to the project, clean and prime the beams. If the frame is made of metal, cover it with an anti-corrosion compound. After assembling the supporting parts of the rack, we cut the boards of suitable length. We also treat them with impregnation and open them with enamel. We fasten the boards with screws, we monitor the tight fit of the shelves to the frame. To fix the rack to the wall, we use large anchor bolts. To make it more convenient for you to sort the tools, we bolt a container to the side of the rack, where we put screwdrivers, car testers and other little things for work.
Workbench - preparation of the workplace of the master
One of the main elements of arranging a garage is a workbench. This is the workplace of the master, which is given special attention. Before designing, we calculate the free space and draw the project according to it. We weld the frame of the workbench from profile pipes and metal corners. The average height of the workbench is 0.9–1 m. This parameter depends on the height of the master and preferences to work sitting or standing. After assembling the frame, we cover it with an anti-corrosion primer. We lay the base of the countertop from a thick board 7.5 cm thick. If there are no boards, we fasten 7 sheets of thin plywood together, seating them on PVA construction glue. After fastening the sheets, we put them under the press so that they are finally fastened together. We cover the base of the countertop with a metal sheet 5-6 mm thick, cover it with an anti-corrosion primer.

We cut off the excess parts of the sheet with a grinder or a metal file and finally attach it to the screws, drilling holes for fasteners in the wooden base of the countertop. Such a surface is suitable for both carpentry and locksmith work. If desired, we equip the workbench with retractable or sliding cabinets with shelves. We hang a perforated screen on the wall above the workbench. Here you can hang the tools that you most often use in your work, providing shelves, hooks for them, as well as home-made designs for nuts, bolts, self-tapping screws.
A simple floor rack option for tires
It's hard to imagine a garage without a set of replacement tires. Most often they are stored in bulk. To solve this problem, consider a simple rack that does not require special carpentry skills. If you have space in your garage, a floor stand option is the way to go. As an example, consider a two-tier rack that holds two sets of tires with a tread width of 265 mm. Floor rack dimensions:
- width - 1.1 m;
- depth - 0.5 m;
- total height - 1.83 m.
- the distance between the shelves is 0.7 m.
If you store truck tires in the garage, the dimensions need to be recalculated. When choosing lumber widths, keep in mind that they can support a load of approximately 180-220 kg, depending on the weight of your tires. We recommend taking wooden bars with a section of 1.5x3.5 inches. To assemble the front of the rack, we saw off two beams 183 cm long. These will be the side parts of the frame. We cut out 3 front partitions 1.1 m long. To connect the front to the back, we saw off 6 planks of 0.5 m each.

Floor Tire Rack
We connect the side supports at the upper base with a longitudinal partition. Moving down in increments of 0.7 m, we attach two more longitudinal partitions to the supports. After that, we drill holes for 6 short strips and fasten them to the screws on the sides opposite the longitudinal partitions. The front frame is complete.
Similarly, we collect the back of the rack and fasten it to the front frame. For reliability, we tighten the structure with straps on the sides. The shelf is ready, we load it with tires. In order for the rack to serve for a long time, we cover it with impregnation for wood, paint it and open it with varnish.
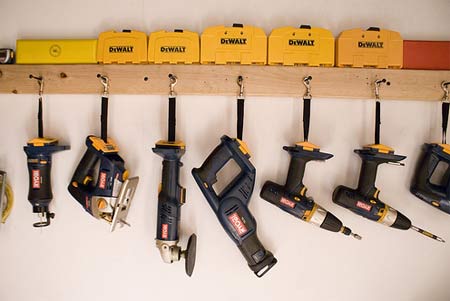
Hanging shelf for cordless power tools
A practical and beautiful option for storing cordless tools is a hanging shelf with holders. At the bottom of the shelf there will be a drill, a screwdriver of various capacities, and on the upper part of the structure there will be devices for charging batteries. There is no need to store power tools in a case, everything is at hand. The shelf saves space and hangs on the wall. To assemble it, we prepare a board with a wall thickness of 2 cm. We measure the dimensions of power tools in order to select the optimal size of the slots. We cut out short strips for attaching tools. For example, to hang 5 power tools, you will need 4 strips 2 cm thick. Such a gap will allow you to hook a drill, a screwdriver, securely fixing them in the support. We make vertical strips higher, we fasten them together with self-tapping screws.

The working height of the side parts of the structure is 23 cm. The part protruding beyond the upper edge of the shelf plays a decorative role and serves as a limiter for chargers and tools. We calculate it individually, starting from the height of the equipment. We saw off two shelves, connect them with T-shaped stands for power tools and sidewalls, not forgetting to first attach square strips of size 2x2 cm to the inner parts. We fasten the top shelf in 11 cm increments from the bottom shelf. The structure is ready. It remains to cover the shelf with a primer for wood, if desired, paint and varnish. We hang a mini-rack on the wall, fill it with tools. Here is the order.
Simple designs for cutters, keys, files and fasteners
To make the workshop in the garage look neat and the master could find the tool and fasteners he needs at any time, we will construct several simple and convenient hanging structures. We prepare a thick foam and attach it to the wall on a plywood substrate 3 cm thick. We fasten both parts together with liquid nails or PL 500 mounting adhesive. We wait a few hours until the structure is firmly set. Due to the porous structure of the foam, sharp and rotating objects easily enter and are firmly fixed in the material. We insert bits, drills, cutters, crowns, keys, screwdrivers, awls, hubs, files into the foam. The ideal place for the foam panel would be the wall above the workbench. If a perforated screen does not hang over it, this is a good option to diversify the interior and concentrate cutting tools in one place.

At the wall next to the power saws, make a small stand for storing grinding wheels and cutting discs. Take ordinary disposable or old plastic plates, cut them lengthwise into two equal parts. You will get semicircular pockets. We seal the cut edge with tape, hiding and decorating sharp corners. We repaint the coasters with a spray can in the desired color and fasten them to the wall with bolts in three places, from below and on the sides. Storage pockets are ready, insert grinding wheels and saw blades into them.
So that containers with nuts, bolts and self-tapping screws do not clutter up the workspace, use the idea to create suspended structures. For the first option, prepare plastic jars. Remove the cover and attach it to the wooden shelf with self-tapping screws. Fill the jars with fasteners and other small items for work, screw tightly to the lid attached to the shelf. The number of designs depends on your needs. Hanging storage jars can fill the entire bottom of the shelf. This design saves usable space and is very practical.
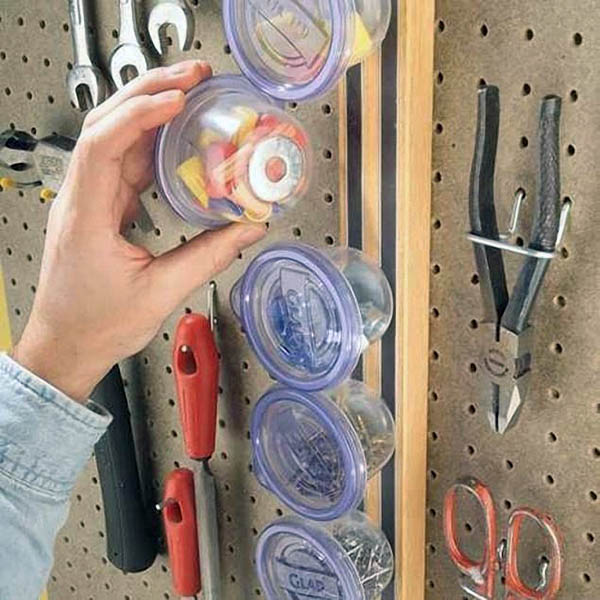
We make another original mini-rack for storing small things in the garage from food containers on a magnet. Using super glue, attach a round magnet in the form of a washer to the bottom of the container. We attach a wooden rail with magnetic stripes to the perforated screen. Inside the containers we store screws, nuts, bolts, self-tapping screws and other little things that are lying around in the drawer of the workbench. Hang the boxes on a magnet.
Order in the garage means convenient open storage of all frequently used tools and compact storage of various little things "in reserve".
Often the garage and home workshop are combined, so all tools and supplies should have a convenient storage system.

As soon as the storage system becomes not very convenient for regular maintenance, the garage again turns into a spontaneous warehouse.

To store tools in the garage, it is better to use open shelves. It is very convenient if these shelves are removable.

In the garage of the workshop, it is necessary to place not only the usual set of tools for a car enthusiast and a home craftsman, but, sometimes, a garden tool and camping equipment.

Make the most of the entire height of the room. In plastic boxes just under the ceiling and on the floor, you can put those things that you use from time to time. A toolbox for a car enthusiast and a home craftsman, but, sometimes, a garden tool and camping equipment.

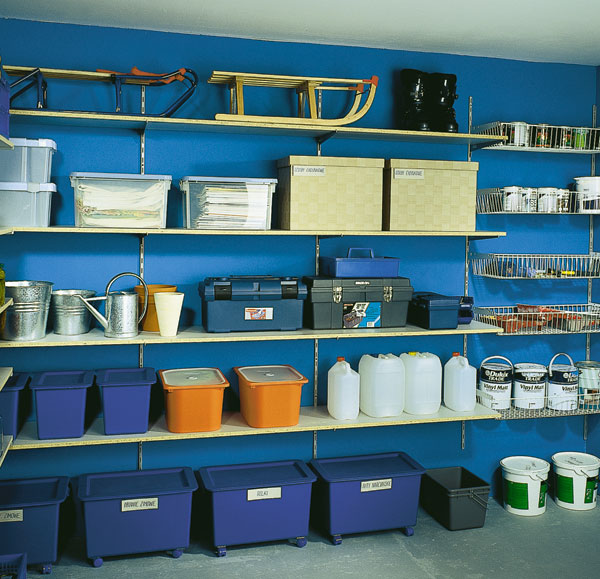
The garage tool storage system uses the entire wall area as a stand. Separate sections-shelves for storing tools and consumables are hung on horizontal rails.

Wooden guides are used here, but it is better to use metal pipes for these purposes. If over time the guide, which we see in the photo, crumbles, a box with a heavy tool may fall right on your leg.

Such an organizer for storing consumables can be made by yourself from plywood sheets, which are connected by loops in the form of a book.

The closable toolbox for the DIYer makes it easy to keep the garage organized.

Metal nets are convenient for storing paint cans, fertilizer bags, etc. 


The metal rails and metal shelves not only guarantee safe tool storage, but are also easy to clean. 

The owner in the garage has a lot of necessary little things and each of them has its own way of storing.

Each owner has his own range of activities and a different number of tools. But a convenient organization of work always causes a desire to do something else.
Take the time to clean up your garage.

Each owner has his own range of activities and a different number of tools. But a convenient organization of work always causes a desire to do something else.
Take the time to clean up your garage.

Each owner has his own range of activities and a different number of tools. But a convenient organization of work always causes a desire to do something else.
Take the time to clean up your garage.

Simple and convenient. Store your tool wisely! If you don't have a garage and you store all your tools in a small box on the balcony, then even there you can organize a small working closet.

Let's continue for the happy owners of the garage. We have a convenient way to store clamps

Some storage ideas can be found in stores that sell tools.

But in our garage, not only tools. We also have pipes, planks, necessary pieces of plywood and plastic.

It is not difficult to assemble such a ceiling structure from pipes in your own garage.

For scraps of plywood, plastic, etc. you can make such a wall rack.

Even a dozen boards can create a mess in the garage. Let's make a simple storage structure.

Large sheets of plywood and drywall are best stored this way - in an upright position.

Another convenient way to store long pipes and all kinds of planks in the garage.

A small workbench can also serve as a storage place for boards and pieces of plywood.
Hello, friends! Agree, in the spring it is tempting to sort out all the blockages that have accumulated over the winter and bring perfect order in all parts of the house, in the adjacent territory and in additional buildings. But, often, having spent all the enthusiasm and strength to destroy the mess inside the house, the hands never reach the cleaning at other planned objects.
For example, let's take a garage - a very significant economic facility. What we just do not store in it, in addition to the car, in fact, for which it is intended. The garage often turns into a real dump. There we take everything that is still a pity to throw away, but we no longer want to keep at home.
And do not be surprised if one day, opening the garage door, boxes with piles of old magazines or children's toys of children who have grown up long ago will fall on your head from nowhere. And the place for your favorite car will be filled with all sorts of junk, such as faulty bicycles, TVs, broken furniture and numerous boxes with trifles that have not been needed for a long time.
Actually, there will be no place left in the garage for a car - let it get wet under the snow and rain. And these are extra costs. After all, caring for your four-wheeled friend can prolong his life, and also (taking into account the prices for new cars) significantly save the family budget. If this is about you, it's time to get down to business, armed with the necessary equipment, desire and advice from experts who in this case "ate the dog."
Tidying up the garage
Let's start with an external update. Winter frosts, snow and wind, for sure, did their job: somewhere the roof leaked, the paint was peeled off, something needs a radical replacement, and something only a light repair. Armed with the necessary material, paint and tools, we eliminate all the consequences of winter bad weather. Roof inspection and repair. If necessary, we put the door in order, lubricate everything that could rust from dampness and moisture. We clean the area adjacent to the garage from debris and last year's leaves.
After that, we go inside the room and act according to a previously developed plan. The main mistake many of us make is the misuse of garage space, which over time turns it into a big dump. And in order to clean up the garage once and for all, you need to know what and how long we store in it. So step number one is sorting.
At this stage, large garbage bags will come in handy. We look through everything that is in the garage: sort it out, sort it out, and throw everything that is not needed without regret. To do this, it is best to pull everything out of the garage outside. And, alternately opening boxes and boxes with accumulated family “heirlooms”, we lay out their contents in two piles: “leave” and “throw away”.
In order not to be mistaken, when sorting, you can use the “rule of one year”: if during this time you never needed a thing, most likely you don’t need it at all.
Everything that fell into the “leave” pile is again neatly put into boxes. It is convenient to store tools, clothing and small sports equipment in inexpensive plastic containers that reliably protect against moisture and rodent pests (cardboard boxes in this case are not very good). In addition, they can be folded along the walls without cluttering up the parking space. Boxes can be signed in capital letters, which will help, if necessary, quickly find the right thing.

You can give some things from the “throw away” pile to those who need it, or even sell something. The rest should be thrown into the landfill without regret. Before you put the remaining things on the shelves and racks, you need to clean them and the entire room from dirt, dust and debris (if possible, using water and detergents).
In fact, the garage is a great storage space. But the interior space must be organized in such a way as to maximize the use of all its surfaces for placement. This will require shelving, shelves, cabinets, awnings and hooks, which must be positioned so that the garage door can open and close freely, and the car can drive in and out without interference.
You can place storage systems not only along the walls, but also along their entire surface vertically up to the ceiling, including grabbing the ceiling space.
The best way to rationally use the garage space is to build shelves on the walls. Hanging wooden or mesh shelves are suitable for storing not very heavy things. If it is supposed to store bulky items that weigh a lot, you can organize structures from shelving (finished metal or wooden, made by yourself). To save space, they can be installed from floor to ceiling. It is convenient to store large items on them, such as, for example, wheels or tires, large heavy boxes, garden tools, detergents.

To organize the working area, it is advisable to build a folding table-workbench, which is fixed to the wall and, if necessary, unfolds. To do this, you can use the countertop of an old table or a sturdy wooden door left after repair. Legs can be made from a piece of metal pipe and mounting material. And above the table, you can build a panel with a set of frequently required tools. As tool holders, fixtures for plumbing pipes of various sizes can be used.
For storing small things and tools, small plastic boxes with a large number of cells, folding container boxes and capacious containers with a lid are suitable. You can also use large plastic boxes to store vegetables. These storage systems are inexpensive.
All space intended for storage can be divided into separate thematic zones, for example, for storage:
- sports equipment (bicycles, sleds or skis, walking poles)
- gardening equipment
- equipment for cleaning the territory (snow plows, lawn mowers)
- tools for car repair and maintenance.
Bulky bikes, especially if there are several of them, can be fixed with special hooks to the wall or even on the ceiling, using a special ceiling bike rack for this.

What we use constantly throughout the year should be in sight. Therefore, these items are placed on racks in the area of easy access.
Disposal of garbage and unnecessary things
Everything that is thrown out of the garage must be delivered to its destination, and make it a rule for yourself not to accumulate garbage in the garage in the future. To do this, you can find a suitable container, something like a wooden box or a thick cardboard box, where you can throw everything you don't need. The main thing is that the wastebasket falls into your field of vision every time you leave the garage, and, as it were, signals you that you need to take the accumulated garbage with you when you leave.
It may not be possible to do everything in one day. And, most likely, it will be so. But you should not be upset about this. The main thing is to start this work and, of course, bring it to the end, planning several days for its implementation. It would be nice to involve your household, relatives and friends in this work - a cheerful company always works faster.
After cleaning and organizing storage systems, it often turns out that there is not so little space in our garage. A clean, slightly updated and once again pleasing to the eye favorite garage will surely improve your mood and give you a sense of satisfaction from the work done.
The right thing in a well-organized space can be found in a matter of seconds - and this saves time and nerves. After all, everyone is familiar with the situation when it sometimes takes not just minutes, but whole hours to search for some urgently needed tool that should definitely lie somewhere. And at the same time, what stormy emotions accompany this process, from time to time interrupted by angry tirades against their family, who allegedly once again got everyone somewhere. Bye Bye…