Products from bottle caps with their own hands. What can be made from wine corks: ideas for crafts from bottle caps with your own hands (100 photos). Cork furniture can also be made
Content
If you have accumulated wine corks that are a pity to throw away, but you don’t know how to use them, this master class is for you. Today we will tell you what surprisingly simple, but interesting, and most importantly, useful things you can do yourself from wine corks.
Seal
Pick up a pencil and draw an interesting symbol, letter, or some animal on one end of the cork. Using a penknife, cut out the image so that it protrudes above the main part. It turned out your personal seal, having painted it, you can make prints on letters, postcards, walls, decorate them, or play with children.
Volumetric letters and pictures
To make large letters in 3-D format, you need a lot of traffic jams. You can make one or two letters - monograms, or you can write whole phrases. Without sufficient experience, it will be difficult to make a beautiful picture, but everyone can give a heart from corks to loved ones. Such letters and pictures will become a stylish, exclusive wall decor in the room or kitchen of your apartment. Another use for them is the backdrop for a home photo shoot.

Cabinet handles
A broken cabinet handle won't be a problem if you have a wine cork and a screw. Every man and even a woman can slightly sharpen the cork and screw it to the door. It will be temporary until the acquisition of a suitable new handle or permanent, which has become part of the interior, you decide. By the way, if it harmoniously fits into the environment, you can replace the rest of the whole furniture handles with wine cork handles - this way you will add a special charm to your apartment.

Chandelier
To make it, we need at first glance incompatible things: a grate from an old fan, wine corks and twine. Having strengthened the holder of a lamp suitable for the lamp in the fan grille, and hanging wine corks at different levels with the help of twine, you will get a designer chandelier of your own making. By changing the height of the suspension of plugs and their number, create new masterpieces.

Framework
Boring frames for photos and pictures can be revived. To do this, we will cut them: into halves or several plates along or into circles across the cork and stick them on the frame. You can also use whole corks, gluing them horizontally, vertically, herringbone or placing them on the base. It all depends on the effect that you want to get with this or that arrangement.

cat toy
By tying or sewing a cork cover from dense fabric, you can make a toy for your purring pet. He will love the new object for playing and sharpening his claws. You can make a mouse out of cork by pulling a fur cover over it with a tail and ears sewn or tied. Perhaps the new toy will become more interesting for the cat than shoes and furniture, it will protect them from damage by sharp teeth and claws.

Holders
Holders for business cards, cards, notes, names of those invited to the celebration can be made in two ways. In the first case, a wire twisted from one end in a circle is screwed into the cork or, decorated with beads, beautifully wrapped around with wire. In the second case, on the corks fastened together with an elegant ribbon or elastic band, a horizontal incision is made into which the desired piece of paper is inserted.

Candlestick
An atmosphere of warmth, comfort and romance can be created with the help of two glass containers or glasses, one of which is two to three times larger than the other, and wine corks, poured into the space between the containers. To add the right touch to a romantic setting, use scented candles.

Hanger
In a country house or in the country, a hanger made of a planed board and wine corks attached to it with a screwdriver would be appropriate. It is quite simple to manufacture and interesting from a design point of view. Having processed the board with stain, drying oil, varnish, you can give it the desired color.

Giraffe
To make this interesting animal - interior decoration, we take a wire and make a frame, glue it with several layers of paper and glue corks on top of the paper, pressing tightly against each other and the base. We do not regret the glue, otherwise everything will fall apart.

Panel for notes
Often you need to leave some information to loved ones. We write notes, phone numbers and leave it all in a convenient, accessible place for review. By creating a special panel of wine corks, the problem of the placement of all these little things will be solved. Now, using needles and pins, we fix the sheets of paper. We and our loved ones will always be aware of the latest events in the life of the family, and it will not be difficult to find a phone number that you suddenly need.

Seedling tags
Housewives sow several types of plants in boxes with seedlings, not to mention different varieties of the same vegetable or flower, and then they forget what and where they sowed. There will be no confusion if you write the name of the sown crop on the cork. Drill a small hole, stick a stick in it and place this mark in the seedling box.

Canape skewers
For the manufacture of skewers, we need wine corks cut into circles, toothpicks and elements of their decoration: beads, ribbons, twine or thread in several additions, fabric for hearts, glue and everything that you can use to revive the skewers. Your guests will appreciate your creativity.

fridge magnets
For magnets, we need a magnetic strip, glue and a wine cork sawn in half lengthwise. With its help, you can attach a list of proposed purchases, family notes, photos, necessary phones and other important information to the refrigerator.

Hot stand
With the help of a glue gun, sandpaper, satin ribbon, a knife and several dozen wine corks, it will not be difficult to create a hot stand yourself, because it is always more pleasant to use something that is made by oneself than a purchased similar thing. We cut the corks in half, give them a cylindrical shape, clean the sides and glue them together in the form of a circle, hexagon or octahedron. We glue the outer edge of the stand with satin or other decorative ribbon, braid. If you make a loop from the same finishing tape on the side, the hot stand will become even more functional. You can use corks without cutting them in half, then the hot stand will simply be twice as high.

bird house
We cut out the bottom, walls and roof of the house from thick cardboard. We glue the walls with whole or cut along wine corks, and cover the roof with a “tile” of circles cut across the corks. It turned out a very beautiful home for birds - a real fairy-tale house. Do not forget in the process of working about the round inlet and a small stick on which the birds stand before they get into the house. By making such a beautiful birdhouse, parents can tell a lot of interesting things about birds and their habits to children, and at the same time teach the younger generation to take care of wildlife.

Decorations
Here you can turn into reality all the most interesting ideas and fill in the missing elements of jewelry. Jewelry corks can be used whole, for example, to create a pendant, or cut lengthwise and across to make earrings. Beads, beads, wire, fishing line, paints, fabric and threads with a hook for tying corks will become your faithful assistants in creating an exclusive collection of jewelry.

Jewelry storage organizer
Fashionistas with a large arsenal of jewelry know firsthand how hard it is to keep them in order, allowing you to quickly find the right thing. Beads get confused in caskets, and choosing the right earrings is also a difficult process. Keeping all the jewelry in plain sight becomes especially relevant in a hurry. You can simplify the task of storing and choosing the right jewelry with the help of a frame, on the bottom of which corks are glued in whole, in halves, in circles, or in combination. By making a few hooks, you organize the storage of beads and bracelets, and earrings can be stuck directly into the wood or between corks.

tabletop
Such a spectacular and original countertop is easy to make yourself by gluing wine corks to an existing countertop with liquid nails and varnishing it with a matching color. It will be difficult to keep the original appearance of such a countertop for a long time, but it looks gorgeous!

keyrings
Stock up on accessories for key rings in a specialized store and let your imagination run wild. Make and beautifully sign key rings for the whole family and various frequently lost keys. You can decorate them any way you like.

flower pots
Miniature flower pots are suitable for small plants or seedlings that will need to be transplanted over time. Hollow out a hole in the cork, fill it with earth and plant a tiny plant. To prevent the pots from tipping over, a magnetic tape is glued to the cork and fixed, for example, to the side surface of the refrigerator, closer to the window.

New Year decoration
All kinds of Christmas trees, Christmas toys and deer figurines can also be made using wine corks. This will require glue, paper, paints and decorative elements. A fairly tall Christmas tree can be made using a cone-shaped base, on which paper is glued, and corks with a round base on top of it to make needles.

Vase
By gluing the side surfaces of the corks together, you can create such an interesting vase for storing vegetables, fruits and bread. In order for her to get the same shape as in the photo, work should start from the bottom, gradually forming the edges of the vase. In conclusion, we cover it with a non-toxic varnish. For greater safety, we put food products on an openwork napkin.
boats
Glue two or three corks together, use a toothpick and paper to build a sail and send the boat to conquer the water. Children will enjoy the process of such a simple and interesting shipbuilding, and boats made by different children can compete in beauty, stability and speed.

decorative ball
We take the foam as a basis and cut a ball out of it. Using paint and a brush, color it brown, and also brown one of the bottoms of each cork. Using a glue gun, glue them on the ball and get a new interior decoration, which, in harmony with the books, will take its place on the bookshelf. It can also be hung, if you attach a loop before sticking the corks.

Rugs
The wood from which wine corks are made is a durable material, so a rug made of them will last you a long time. It can be made from whole corks glued together and placed in a metal pallet, or from halves of corks cut along, glued to a rubberized base. The first option is more acceptable for the hallway, and the second - for the bathroom.

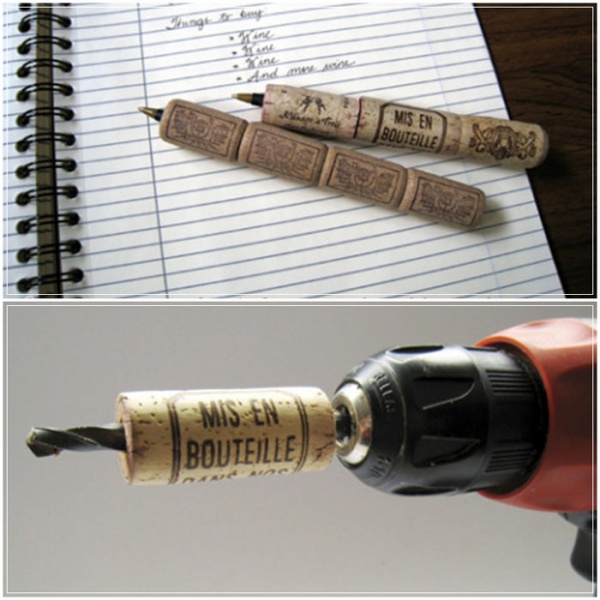
Pen
Drill a through hole in several plugs, and in the one that will be the top one in the handle,
leave the wood at one end without drilling to the end. Insert ink or gel paste of suitable diameter into the resulting channel and use the new pen, surprising everyone around.
Filament curtains
To create filament curtains, you will need fishing line (or rope) and, depending on your design decision, multi-colored beads or paints and a knife. You can fix the resulting threads to a horizontal thread attached to a planed, varnished board, which is attached to the wall or in any other way that suits you.

Shade
Glue wine corks to the plastic lampshade, leaving gaps between them. Light will mysteriously penetrate through them and create an atmosphere of warmth and comfort in the room.

If you want to decorate your home with cork products, but you can’t collect the right amount of them, don’t be discouraged - you can buy them in specialized stores with interior goods or in online stores. Create your own unique collection of products from wine corks, enjoy the process and the results!
Post Views: 596
Glass containers, unlike plastic bottles, are reusable. For example, a beautiful wine bottle, in which you can store home-made wine, will not only preserve the taste of your drink, but will also be more appropriate on the festive table. Very often, factory-made bottles are closed with a cork stopper, which cannot be re-closed - as a rule, it becomes several times larger than the neck of the bottle. Even if you cut the cork with a knife, the initial tight closure of the bottle cannot be achieved, moreover, the cork is not very durable. And if we are talking about a 10-liter bottle, then no old cork will do at all. In the recent past, our grandmothers closed bottles with corn on the cob. Agree during technological progress to close the bottle in this way is outdated and inconvenient. In our article, we will tell you how to make a cork for a 20 l bottle with your own hands, so that it is beautiful, convenient and reliable.
DIY silicone stopper for a bottle
Such a peculiar and useful craft can be done in several ways. Next, we will consider the most interesting of them.
Method number 1
How is a cork made? To make a cork for a ten-liter bottle, you need to prepare the following components in advance:
- Plastic 100-gram cup for molds;
- Starch;
- Silicone sealant.
Important! 3 plugs come out of one package of silicone sealant.
- Pour ¾ of a package of starch on the table, make a recess.
Important! To prevent silicone from sticking to the table, you can put glass on the surface.
- Using a professional silicone gun, squeeze the silicone into the starch funnel.
Important! The amount of silicone coincides with the size of our workpiece, namely a plastic cup.
- Then you should mix silicone and starch until smooth. To prevent silicone from sticking to your hands, dip them in starch and start kneading the ingredients, similar to kneading dough.
Important! When kneading silicone, it is important to achieve such a consistency that the dough is not too hard and does not have loose formations. Otherwise, the finished cork will let air through. The ideal mixture for the production of cork should resemble plasticine and not stick to the hands.
- The dough for the workpiece must be thoroughly mixed so that the silicone is completely saturated with starch, roll it well on the table and give it a conical shape.
Important! The more starch the mixture contains, the stiffer the cork will be.
- Then sprinkle a little starch on the prepared cork so that it does not stick to the plastic cup and easily comes out of it at the end of production.
Important! To get rid of excess air, make small punctures on the bottom of the glass with a needle or awl.
- Next, we place the raw materials in a plastic cup, twisting tightly and evenly distribute the mass throughout the container.
Important! It is not necessary to use a blank in the form of a glass. If it is problematic to choose a blank for your bottle, roll the cork tightly with your hands, measure its diameter with a caliper, and leave to dry on a flat surface.
- In this form, we leave the workpiece to dry for 3-4 hours. After the time has elapsed, we remove our cork from the workpiece.
Important! To speed up the drying process, after 30 minutes, place the container next to a hot surface or place it near the radiator.
- With a kitchen knife, you can trim all the bumps or reduce the diameter of the finished cork.
Important! Silicone sealant has a specific smell. To get rid of it, you need to place the finished cork first in hot water, then in cold water with the addition of soda for a while, or simply take the product out into fresh air.
The cork is elastic and tightly closes the neck of the bottle. It is perfect for a 10-liter threaded bottle and a bottle with a conical thread, they are also called “Cossack” bottles.
Important! For lovers of wine production, a hole should be drilled in the cork so that air comes out of the bottle. To do this, the diameter of the hole should be slightly smaller than the drainage that you will use.

Method number 2
The next method is quite laborious and requires much more time to manufacture than the previous one. But for those masters who like to tinker with the tool, you can use this option.
To make a bottle stopper using the method that we will discuss next, you will need to prepare some auxiliary tools, namely:
- Tin can from peas or corn;
- soldering iron;
- Gun for liquid silicone;
- Sandpaper;
- Building hair dryer;
- liquid silicone.
Sequencing:
- At the first stage of cork manufacturing, a mold should be made into which liquid silicone is poured. To do this, cut off the top and bottom in a tin can, as a result, we get a cylindrical blank.
- Then cut the workpiece vertically to make a rectangular tin.
- Measure the diameter of the neck of the bottle with a compass, twist the tin to the desired size from the bottom, gradually expanding it upwards.
- When one edge meets the other, put notches at the top and bottom, connect the notches with an oblique line and cut with scissors.
- Carefully use your hands to give the workpiece a conical shape, observing the size along the entire length of the workpiece.
- Expand your workpiece and sand the beveled and even edge of the tin with sandpaper.
- Connect the two cuts end-to-end to each other, fix the workpiece in this position along the entire length with a soldering iron. You get a cone glass without a bottom.
- Next, you need to solder the bottom. First, clean the bottom cut of the workpiece with sandpaper.
- Take one of the cut parts and solder the bottom with a soldering iron, trim the edges with scissors.
- Next you need to solder the handle. For its manufacture, you can use a rigid wire or a metal tube.
- Sand the location of the handle and the edge of the wire for better adhesion of the material. The silicone cork mold is ready, now you can start making the cork itself.
- Take a building hair dryer and set the temperature to 120 degrees.
Important! A building hair dryer will serve to heat the mold so that the silicone does not harden during filling and evenly distributes it inside the mold.
- After the mold has warmed up, use a glue gun to fill it with liquid silicone.
Important! The tin mold should be constantly held over a stream of hot air.
- Once the silicone is completely poured into the container, leave it to harden.
- Finally, use pliers to bend the soldered edge and pull out the cork.
DIY bottle caps
You can quickly and without tools make an alternative to bottle caps.
Method number 1
To implement this cork option, you will need a plastic bottle with a cap that matches the diameter of the bottle neck.
Manufacturing sequence:
- Fill a plastic bottle with up to half of the water, tightly close the lid.
- Turn over and lower the bottle into the neck of the bottle.
- The device tightly and securely closes the glass container.
Important! For winemakers, it is necessary to drill a through hole in the lid and bottom of the plastic “cork”, pass the hose and close the neck of the wine bottle.

Method number 2
From old wine corks that do not fit the diameter of the neck, you can make new creative corks. For this you will need:
- Kitchen knife;
- cork stopper;
- PVA glue;
- Wooden spools with threads of different colors.
Preparation method.
Hello dear readers! Continuing the theme of unusual decorative elements, I would like to bring to your attention crafts made from wine corks.
But first, let's look at what this notorious wine cork is. Natural corks are made from the bark of the same name (cork) oak. Moreover, the bark from the tree in question is removed once every 10 years, the highest quality corks are those that were made from a 50-year-old oak.
The production of cork takes place in several stages: the bark is removed from the tree and stored in specially provided warehouses for a year. After that, the bark is processed under the influence of high temperatures, and cut into layers. The resulting layers are cut into strips, from which the corks themselves are then machined - cylindrical in shape. After that, the corks are polished, impregnated with wax and, by burning, put the name of the winemaking organization.
Types of traffic jams.
- Natural solid cork is a solid cylinder carved from cork oak bark.
- Pressed cork is made from cork chips and wood glue (the production process is based on pressing the necessary components).
Where to buy wine corks?
Let's get back to our main topic... if you are planning to create a decor from wine corks, then you will need a large number of these same corks. The best option, of course, is the methodical accumulation of traffic jams left over from various festive events, but since this process is still unnecessarily time-consuming, you can go the simpler way by ordering the material in question on the Internet (in online stores, the price ranges from 300 rubles per 100 corks).
What to do with wine corks.
Well, we figured out this issue, perhaps, we will begin to consider products from wine corks.
1. Cork vases.
Small vases look great for one small flower, such vases can simply be placed on the table, but as for me, they look the most advantageous when mounted on the wall.


The following variants of decorative vases are based on the painstaking gluing of wine corks. Such vases look incredibly stylish, and definitely emphasize any interior design. 
2. Decorative "bucket" for bottles.
Such a product, tied with an elegant white ribbon and complemented by large rhinestones, can serve as the centerpiece of a festive table.
3. Products from wine corks: Christmas wreath.
In Russia, festive New Year and Christmas wreaths are not yet very popular, but interest in them is clearly felt, so why not make a wreath yourself using such waste material as wine corks.


 4. Decorative figures from traffic jams.
A cork heart looks really unusual, just imagine how great it will look in home decor for Valentine's Day.
The cork ball cannot be ignored either, I think it may well act as an independent decorative element, in fact, it can be fixed on the ceiling in any room.


 5. Crafts from wine corks: toys or figurines.
The cork giraffe looks the most creative, although, in principle, the rest of the figures are perceived extremely positively. If you still have toy parts (legs, ears, handles), then you can easily create such beauty in a split second!


 6. Cork pencil case.
To make such a pencil holder, you will need glue, corks and a tin can. Corks should be fixed on the surface of the jar in the form of hedgehog needles. By the way, each cork can be cut in half, so the “needles” will be the most optimal length.
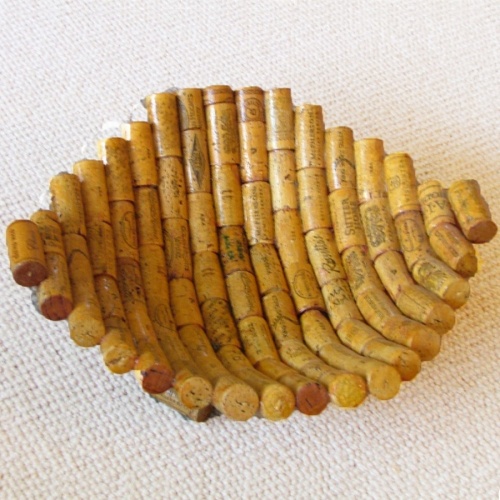
 7. Cork basket.
The use of wine corks requires a creative approach, just look how great this cork basket looks, which can be used as a candy or bread box.
 8. Cork chair.
Wine corks in the interior can appear not only in compact products, but also in more global ones, such as armchairs. Interesting idea, right?!


 9. Kitchen "apron" from wine corks.
Wine corks can be used to decorate a kitchen apron, but since they will be difficult to clean if dirty, care should be taken to protect them. To do this, place wine corks behind a transparent glass screen.
 10. Table lamp.
Such an unusual lamp will become the main decoration of any interior. Its subdued glow will certainly create a cozy and unique atmosphere.
 11. Cork chandelier.
The base of the chandelier is made from the front part of a floor fan, the top row of corks is fixed on metal rings, the subsequent rows are on rope segments. By the way, we have already considered the options for using ropes, you can read the review.
 12. Floor cork mats.
An excellent solution is the use of corks to create floor mats, they are not afraid of moisture and look nice!

 13. Wall panels.
Corks can be placed in frames or create a frameless product. It looks equally stylish, both round panels and square ones. Such crafts from wine corks will wonderfully fit into the interior of a bedroom or living room.


 14. Printing from a wine cork.
If you need to create small identical drawings, and drawing images by hand is too painstaking, try cutting out the necessary figure on the base of the cork. After preparation, the resulting print is dipped into the paint and left on the selected surface, the required number of prints.
 15. Decorations for the New Year.
Such pendants will perfectly decorate the Christmas tree. And the pendant in the first photo can be used as a wrist bracelet.

 16. Cork tray.
A very good solution for making corks - a tray. Moreover, it seems to me that this is the best solution for using corks, wood and glass look so harmonious, framing such a simple waste material as a wine cork.
 17. A product made of cork - a candlestick.
Such a candlestick can be made in a matter of seconds, and how well it will fit into the interior of a house or apartment. To make it, you will need corks, a gel candle, a large glass or a vase. We pour corks into the vase, place a glass with a gel candle, and fill the side spaces with corks.
 18. Hot stand.
Such a stand is already a kind of classic, pay attention to how expensive the model looks framed with a wooden frame. In addition, I can not ignore the product, pulled together with a metal cord (collar), simply, quickly and beautifully!


 19. Stand for a glass.
Such beautiful, harmonious coasters will definitely please your friends, and they will not forget to put the glass in a specially provided place.
 20. Cork birdhouses.
Cork bird houses look really great, the overall thoughtfulness of the image is really impressive. The model in the first photo is especially admired, sometimes you even forget that this is a birdhouse, and not a real village hut!


 21. Stand for jewelry.
Owners of jewelry of various sizes will like this cork stand. To make a stand, you will need plywood or chipboard, a picture frame and corks. We fix the frame on a chipboard sheet, and glue the corks on the inside of the frame, carnations can be fixed on the corks, and decorations can already be hung on them. You can see additional jewelry storage options, or you can study photos with jewelry cabinets.
 22. Photo frame.
Cork can be decorated with both picture frames and photo frames, this frame will look most harmoniously in the interior of the kitchen.
 23. Cork box.
Pay attention to how great the box looks, created from wine corks, covered with transparent varnish and complemented with pieces of rope and burlap.
 24. Wine cork curtains.
Cork curtains look very stylish, and regardless of whether it is a shortened model or a long one. But separately I would like to note the cork curtains, complemented by beads, they look really fashionable! Bead curtains can be viewed.


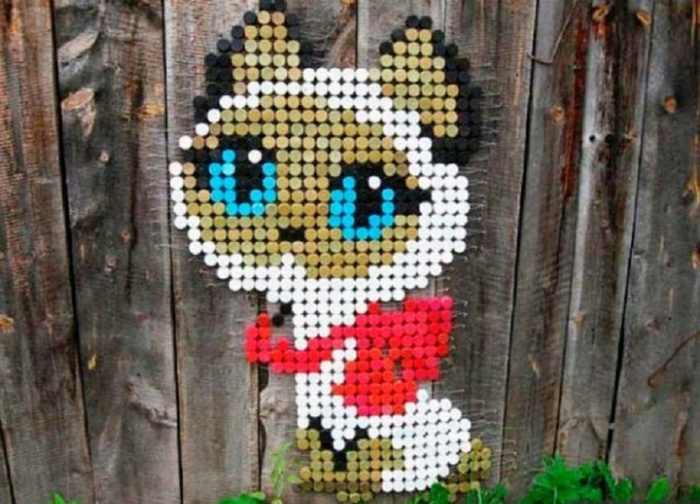
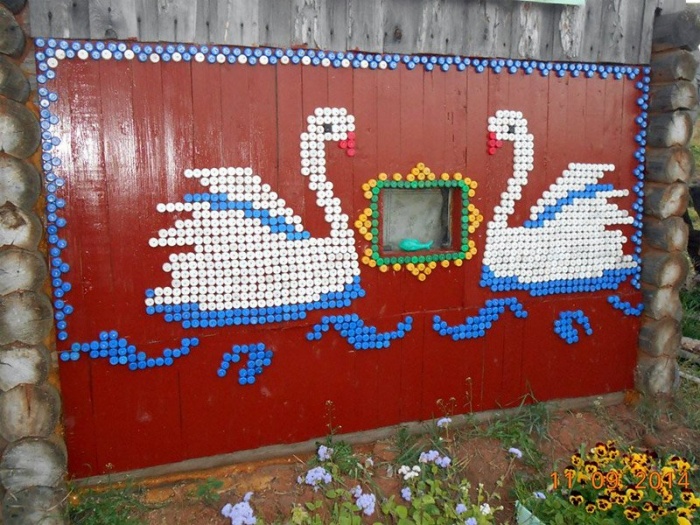
The craftsmanship of folk craftsmen knows no bounds. Some create masterpieces from plastic containers, while the creativity of others is based on the manufacture of paintings from corks from plastic bottles. The places of application of original crafts are different: the walls of houses, fences and even paths. Various technologies for forming funny images will help you choose the right option for your own needlework from corks.
mosaic art
The everyday use of plastic bottles in everyday life is a source of ideas for their subsequent use. But collecting empty containers for crafts is much easier than finding the right amount of traffic jams. The process can take a long time, so most craftsmen involve all their immediate surroundings, including relatives, friends, colleagues and neighbors, in collecting plastic bottle caps.

Comment! It is better to choose a drawing for a panel in advance in order to determine the need for the color scheme of traffic jams and their quantity before the start of collection.
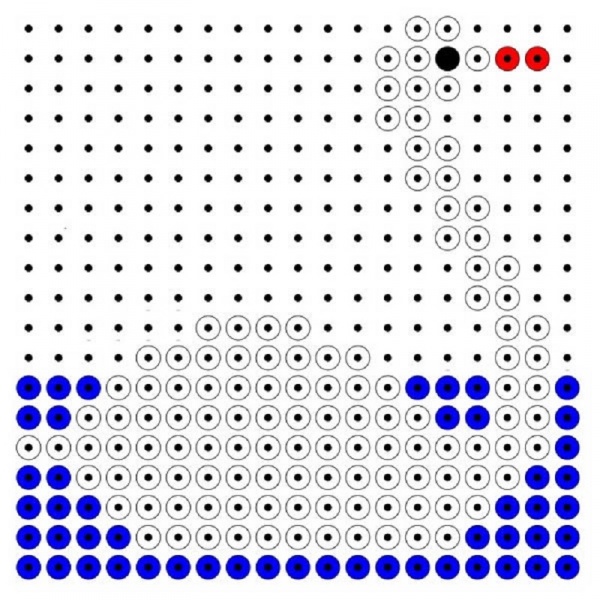
For beginners, it is better to start with simple schemes, where a low level of complexity is combined with a small drawing size. Having mastered one technology, you can try to arrange the next picture in a different way.

Mosaic making has several directions. Depending on the location of the picture, the methods of forming pictures from traffic jams also differ. Painstaking and skill will require the creation of an independent mosaic, not tied to a specific surface.

The main steps for creating a mosaic based on plastic bottle caps are as follows:
- As a sample, a diagram of the picture is applied on cardboard of appropriate sizes. For these purposes, a ready-made cross-stitch pattern may come in handy.
- Corks are pre-sorted by color.
- Focusing on the sketch, the caps of plastic bottles are interconnected with glue designed for plastic.
This technology is not widely used. It is much more practical to attach corks to the surface. Various simple pictures show the following photos:

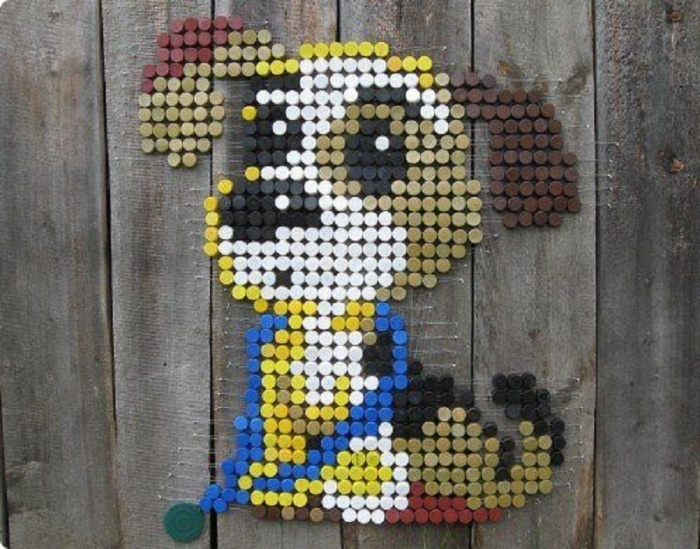
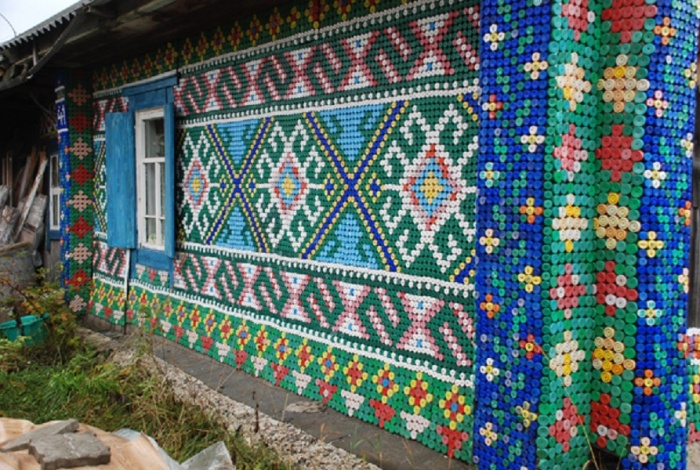
Wall or fence decoration
A wooden house or fence is an ideal surface for a cover painting. If access to the place where the panel is planned to be placed is difficult, the mosaic is made out on plywood, and then fixed in the desired area. A striking example is the design of a balcony railing.

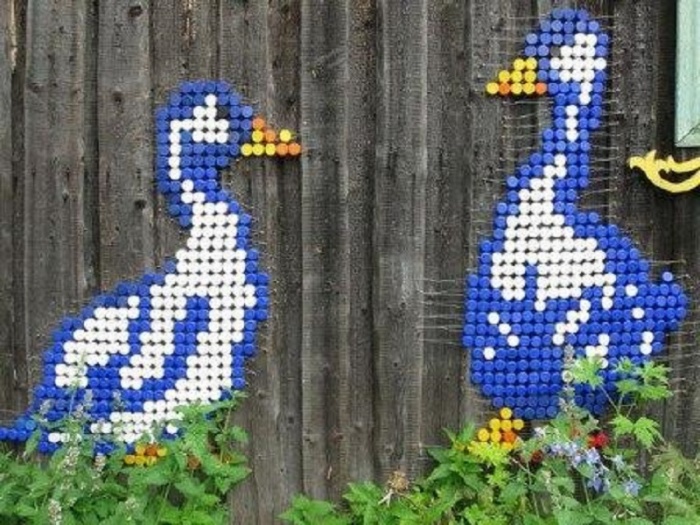
Summer cottages are the most popular for decorating with cork paintings. All images can be conditionally divided into two groups: an ornament repeating after a certain interval or full-fledged drawings. The process consists of the following steps:
- Depending on the size and complexity of the image, a diagram is drawn on cardboard or a sketch is applied immediately to the surface to be designed. The outlines are made with colored paints that match the palette of the picture.
- Fastening is carried out with carnations, the length of which corresponds to the height of the plugs and the thickness of the plywood or boards.
- Caps from plastic bottles can be fixed to the wall from the outside or inside.
Attention! If the corks are nailed down, the recesses will quickly become clogged and spoil the attractiveness of the picture. Regular cleaning of the surface can be a solution to the problem, but it is much more practical to attach plastic bottle caps upside down.
There are several other reasons why corks are fixed upside down:
- In the case of reverse fixation, you will need to pick up a miniature hammer that can fit inside the lid, or the studs will stick out, which will not add aesthetics to the picture.
- A correctly laid out picture can be additionally decorated by covering the seams and voids with a tinted solution. The appearance of the mosaic will improve significantly.


You can decorate with a picture of corks not only a wooden surface. If you want to decorate a brick wall, turn to a different fixing technology. The most common option is to use an adhesive mixture for fixing tiles. A cement composition identical to plaster will help save money. The solution is applied to a small section of the wall, after which the plugs are fixed in accordance with the existing sketch. It is important to keep the proportions and make the composition of the correct consistency, otherwise the corks from plastic bottles will shift before the solidification process begins.

If there is a large picture in the design plans, it will take an extremely long time to collect a complete set of corks, so it is better to order new caps of the desired color on the basis. Pictures from corks from plastic bottles of the scheme are presented below:

Useful rugs
You can build an original picture not only on the surface of the wall. Mats woven from caps from plastic bottles have practicality. This craft perfectly massages a tired back, successfully relieving muscle tension. Yes, and trampling on a rug made of plastic bottle corks with your feet will be good for your health. After all, the feet contain nerve endings leading to all internal organs. For work you will need:
- A simple painting scheme. Usually choose a geometric pattern.
- Corks from plastic bottles of the desired color range.
- Awl and line.

Action algorithm:
- All covers are pierced at four points according to the principle of the cross.
- The pattern of the picture is laid out from the corks.
- Each row is strung on two rows of fishing line.
- You can collect rows separately or string them all sequentially on a fishing line with a snake.
- Then the rows of corks are pulled together, the excess ends of the fishing line are cut off.


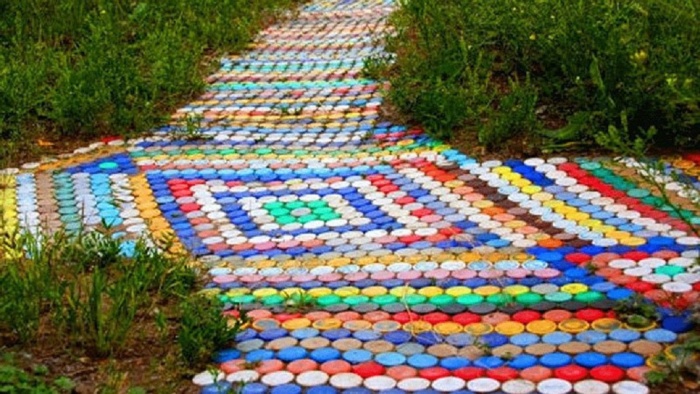
Original tracks
Another non-traditional scope of plastic plugs is the design of garden paths.
Attention! Paths made from bottle caps are slippery in winter. Therefore, it is better to decorate with original paintings those places in the summer cottage where movement in the cold is not expected.
Materials for creating floor paintings:
- multi-colored corks of plastic bottles;
- sand and cement;
- building glue;
- formwork boards.
Design technology:
- On the site, the markings of the future track with the picture are applied.
- If grass grows on the surface, the soil layer is removed. A trench 10 cm deep is being prepared.
- A formwork is installed along the perimeter of the trench, which is fixed with pegs from the outside.
- As a drainage cushion, gravel or coarse sand is poured at half the height of the trench.
- In addition to sand and cement, glue is added to concrete. The resulting consistency of the solution under the picture from the corks from plastic bottles should be easy to pour out of the container.
- After filling a small section of the trench, the covers are pressed in a certain order to form the chosen pattern of the picture. Corks are recessed almost to the very bottom, their height should be the same.
- It remains to wait for the complete drying of the solution. Duration depends on weather conditions. The remains of cement are removed from the picture from the covers with a brush with a hard bristle.
At the final stage of the design of the track, the formwork is removed from the traffic jams. A photo will help to admire the results of other people's labors:

As you can see, there are many options for decorating pictures from the details of a plastic bottle. By choosing the appropriate method, you can transform the design of a summer cottage with minimal funds.
Where to put wine corks? In new masterpieces for interior decoration!
Wine corks are the most valuable material for making decor and useful gizmos for home and garden. From these seemingly useless waste, you can create anything - from useless miniature souvenirs to full-fledged furniture. Inspired by the ideas, most likely you will want to build crafts from wine corks with your own hands, and then one question will arise - where to get the corks? It is unlikely that you will be able to accumulate them on your own; you will have to find friends working in cafes and restaurants.
Useful little things for the home
Wooden corks are made from a unique cork tree - it is not afraid of moisture, resistant to mold and decay. Crafts from corks will serve for a long time, wherever you find a use for them - in the living room, in the kitchen, on the balcony, in the bathroom, in the country yard or in the garden. Additional processing of the cork tree is not required, but if desired, it can be varnished or painted in the desired shade.
If there are very few traffic jams, then pre-cut the existing raw materials into circles of the same width. From such circles you get an original stand for a hot cup or plate. The elements can be glued together tightly to each other, fastened with a stapler or stitched in a checkerboard pattern with a fishing line. In the first case, a solid product will be obtained, and in the second, a flexible stand.


The thickness of the stand is easy to vary, and if you lay the corks horizontally, you get a completely different masterpiece. Such crafts from champagne corks with your own hands can be made not only for yourself, but also as a gift.

Taking a wooden board as a basis, it is easy to make a convenient holder for keys or jewelry. Attaching plugs is simple with screws. To maintain a single style, it is recommended to glue the board with cork wallpaper.

A little more imagination and unnecessary wine corks turn into stylish candlesticks for decorating candles, photo frames, and bread baskets.


Bath mat or curtain - fashionable creative
Whatever bathroom rugs are made of, cork outperforms many other materials here because it is not afraid of moisture and mold. To make this practical craft from wine corks with your own hands, both whole parts and halves are suitable. The mat can be solid or with holes. Corks are connected with a fishing line or glued to a rubber base. It all depends on the number of parts and your own preferences.


Wine cork curtains look spectacular in any interior, and if you don’t want to decorate your apartment with them, hang them on the balcony or in the country. To make this is as easy as shelling pears - the design is assembled on a fishing line, like ordinary beads, or with the help of metal fasteners.


If there is nothing to do - funny souvenirs
Looking at funny photos of cork crafts, it's impossible not to smile. Such trinkets are easy to make on a free evening or weekend. The main thing is that fun crafts do not need a lot of details, and some masterpieces generally consist of one element, which is easy to get after a romantic evening.


If you enjoy creating crafts from wine corks, you might come up with something of your own, such as a luxurious chandelier or floor lamp, an eco-friendly necklace or bracelet, a coffee table or a bed tray.
We wish you creative exploits and good mood! Check out our tutorials to get inspired to get creative.