How to make ice balloons from balloons. How to make ice balloons from balloons? How to decorate the yard with colorful ice balls: ideas, photo tips
Western countries have long been practicing decorating for the New Year not only the interior of houses, but also the streets, paying special attention to the decor of the backyard territory. For example, icy New Year's decorations for the street are very popular with them, but such decor is quite suitable for our latitudes. Moreover, making street decorations from ice is very easy, as well as fun, entertaining and completely inexpensive. In fact, to make ice outdoor decorations, you will need water, a couple of decorative elements (we will discuss this in more detail below), a suitable mold, as well as a capacious freezer or severe frost outside.
How to make street decorations out of ice.
How to make an ice wreath.
Festive wreaths can decorate the branches of trees or shrubs.
Method number 1. We take a ready-made pudding mold with a vertical insert in the center. We spread bright berries and green twigs (spruce, fir or arborvitae) along the bottom of the form, fill the form with water. We send the form with water to the freezer, until the water completely solidifies. After the water turns into ice, pour hot water into the basin and immerse the form with ice in it, with a sharp change in temperature, the ice inside the form will melt along the edges, and you can easily pull out the wreath. Backwardness is only to hang a wreath on a satin ribbon.

Method number 2. We take ready-made small forms for puddings, put the composition from the berries and branches of the arborvitae on the bottom, fill each mold with cold water and put it in the freezer. After the water turns into ice, the form can be immersed in hot water for literally one minute, pull out miniature wreaths and hang them on trees with ribbons.

Method number 3. In the center of a round deep shape, we set a glass or a jar, put twigs, berries, leaves, citrus peels around, and pour in water. To prevent the jar in the center from floating into it, you can pour water or pour stones. It remains to set the form in the cold, wait until the ice hardens, pull out the wreath and hang it on a ribbon.

Method number 4. In a baking dish with a vertical insert in the center, lay out acrylic snowflakes and Christmas balls, pour in a little water, put the product in the freezer. When the first layer of water freezes, lay out a few more balls in a circle, pour in water again and put in the freezer, after freezing add more balls and put the mold in the freezer for the last time, take out the wreath, tie a ribbon and hang the product on a street tree.


Photo of ice wreaths.


How to make ice balls.
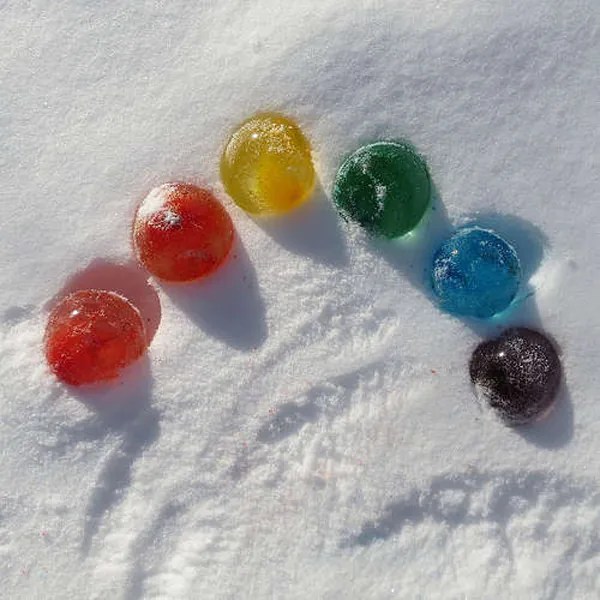
Method number 1. We prepare the required number of balloons, pour water into them and pour out the food coloring, mix the water inside by shaking the balloons. We tie the balls and set them in the freezer or on the street frost. When the water inside the balls hardens, cut the shell with a knife and take out the colored ice balls.


Method number 2. You will need a special form for making ice balls (for drinks), you can put berries or sprigs of spruce on the bottom of this form, as well as put hanging ropes, pour in water and put in the freezer until completely solidified.


How to make an ice candlestick.
Method number 1. In the center of the food container we put a glass with stones (for weighting). We pour in water and lay sprigs of spruce or arborvitae on top, and also pour viburnum, lingonberry or dogwood berries. We put the mold in the freezer, after the water hardens, we take out the candlestick and put a lit candle in the center.


Method number 2. We take two different-sized bottles of 1.5 liters and 0.5 liters, cut each bottle in half, put the smaller bottle into the larger one, fix them with adhesive tape, put berries, leaves and tree branches between the walls, pour in water, and send the product into the freezer. After turning the water into ice, we take out the future candlestick from the mold, and put a lit candle inside.

Photo of various ice candlesticks.


Ice tree pendants.
Round flat pendants are made as follows, various berries, twigs or flowers are laid out on the bottom of a flat round plate, everything is filled with water, a pendant thread is laid on top, the composition is placed in the freezer, then pulled out, separated from the plate and hung on trees.


Ice stars.
- To make stars, you can use ice molds in the form of stars or baking dishes, to create ordinary stars, fill the molds with water and freeze in the freezer.
- To create colored stars, you must first add food coloring to the water.
- For bright compositions, you can put berries, various twigs, leaves, or add glitter into the molds.

Ice cubes.
We lay out various flowers or fruit slices in square-shaped ice molds, pour water here and freeze. Then we take out the ice cubes and decorate them with street flowerpots, tree branches and other yard elements.

Ice shards.
We paint the water blue, pour it into a rectangular shape in a thin layer, send the mold to the freezer, after hardening, hit the ice surface with a kitchen hammer, select beautiful fragments and put them somewhere on the street.

Icy heart.
Method number 1. At the bottom of a round plate, lay out the pebbles in the form of a heart, fill it with water and put it in the freezer, then take out the product and place it with an edge on a flat surface.

Method number 2. We put berries and pine needles in a heart-shaped baking dish, send the form to the freezer, then remove the product from the form and put it somewhere in a conspicuous place in the yard.


How to make ice garlands.
In the ice mold, lay out a dense woolen thread in a circle, pour in water, and put the mold in the freezer, after the water hardens, gently pull the end of the rope, all the ice should pop out of the mold. To get a colored garland, the water must first be tinted with food coloring.
Instead of an ice mold, you can take the base from a box of chocolates.


How to effectively decorate the house for the New Year:
Christmas decorations made of ice will help you quickly, simply and inexpensively decorate the site for the upcoming holiday. If you have not yet tried to create street decorations from ice, then we recommend that you urgently correct the situation, we assure you that you will definitely like this pastime.
The website "Dekorol" reminds its readers that you have the opportunity to receive notifications regarding the release of new reviews to your mail (fill out the subscription form in the sidebar).
Multi-colored ice balls can serve as an excellent material for any art object. You can simply scatter them in the garden or in the yard, around the territory of the kindergarten, or build or decorate some kind of structure, make snowmen (especially if you freeze water in rubber gloves), etc. We settled on the construction of a colorful pyramid of 400 ice balls.
This is my second and I hope not my last post in this community. In the fall, with volunteers from the city of Glazov (Udmurtia), we added bright colors to the gray everyday life of the city, and now we have taken on winter street art.
We chose a city park as the location for our winter art object. Firstly, there are more children here, and secondly, there is the House of Sports nearby where you can get water for balls. We talked with the heads of organizations - they gladly agreed to help us.
Where did the idea come from? Surely, many have come across a guide to making ice balls with the addition of food coloring more than once. 
According to the "recipe" everything turns out easily and simply. In reality, it turned out to be much more difficult. But as always. Firstly, nowhere is it indicated how long the ball freezes? How much water should be poured, the better to tint? It turned out, no matter how ridiculous and trite it may sound, but the ball is filled with water only under pressure - it will not work to go outside with a funnel and a "one and a half". All that remains is a faucet or a hose with water. Well, a number of subtleties that we encountered in the process.
For example, the size - it is impossible to freeze a ball of large volume (3-4 liters). At t -20, only a layer of 5-6 centimeters freezes overnight. Inside is water. She also begins to freeze, but later, and bursts the ice "shell" - the ball cracks. It was also a mistake to bury the ball under the snow - in such a "house" it hardly freezes.
Here is an example of a 3-liter ball that spent the whole night under the snow. In principle, very “working” hemispheres turned out - you can use it as a vase for Christmas tree branches, or turn it upside down, and place a lamp under it - it will be beautiful.
Through trial and error, we decided to settle on balls measuring 10 * 10 - 15 * 15 centimeters. They froze overnight in the freezer.
So, we share our method of making ice balls.
1. First of all, we prepared a gouache concentrate - 1 can per 1.5 liters.
2. Through the funnel, pour the concentrate into the ball "to the brim". You can use food coloring, in case there's a good chance someone decides to taste the giant lollipops. We took ordinary balls. You can freeze balls in the shape of Mickey Mouse, various animals, or rubber gloves (I personally froze a glove from a package of hair dye - it turned out a funny hand that can be attached to a snowman in wet snow).
3. Then we put it on the tap and "inflate". The two are more convenient: one clamps the ball to the tap, the second turns the water on / off. They tied the ball without ropes and other things - with a loop from the neck itself (or whatever it is called there)
4. At first we wanted to fill the balloons right on the street by connecting to the tap of the Sports House and bringing the hose out into the street - but the hose was frozen, we steamed it for an hour and a half, then we decided to fill it right in the toilet and drive it to the place with a wheelbarrow. So it is more economical in terms of water consumption, and more comfortable in the heat than in the cold at -25.
6. Therefore, they froze right in the park, spreading the balls in the snow. We tried not to deepen too much and place them so that the balls did not touch each other.
7. Filled the balls for two hours. During this time, the first batch was covered with a crust. Left it for another 2 hours. When they arrived, they found that the balls freeze perfectly from above, but from below, where they come into contact with snow, there is water. Conclusion - in order for the balls to freeze faster and better, they must be turned over after a couple of hours, and even better, minimize the area of \u200b\u200bcontact with snow.
Having turned over all the balls, we decided to leave them for the night, covering them from the children with snow.
However, this did not help - several juvenile vandals remembered where they saw a multi-colored carpet during the day and, having unearthed the balls, began to throw them. Fortunately, the park workers drove them away in time.
8. Most of the balls still survived. The next day they began to dig them out and, after holding a little more in the cold, take off their "clothes". Rubber is removed very easily - just tear it with a knife, keys or a stick. Some balls did not freeze to the end - they only took off their "clothes", as water poured out of them.
9. You can do anything with the received balls. These are both beautiful self-sufficient decorations and excellent building materials. Our choice fell on the construction of the pyramid.
We fix the first level with snow - so as not to disperse.
We pour water over each level - otherwise the structure will move apart due to the unevenness of the balls.
It is a pity that there was no normal camera at hand - they were filmed on the phone. But not every camera, or rather a photographer, will convey the magical play of reflections of lanterns and garlands on the edges of ice balls. And what a beauty during the day.
It was only later that the idea dawned on us that the frame of the pyramid could be made of snow, only by placing the balls on the outside. So the pyramid would have turned out 5 times more. Well, that's for next year.
There is still a week before the New Year, followed by the Christmas holidays - we hope you will take into account our experience and our mistakes, adding your ideas!
Successful creativity!
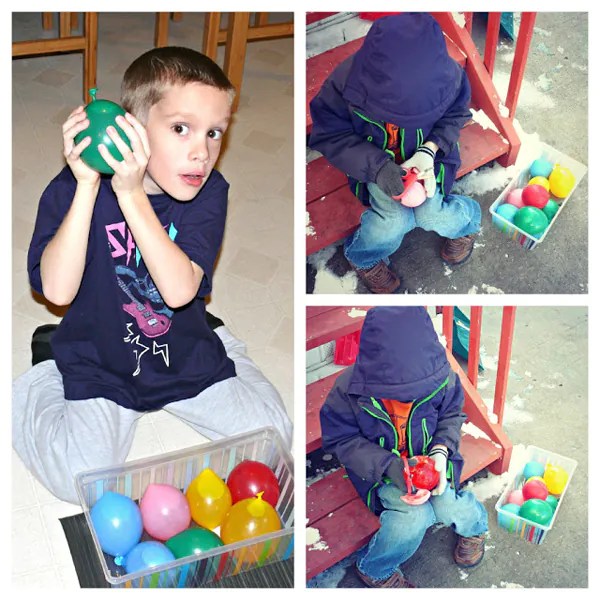
There are some entertainments for children that some parents will find quite ridiculous or even unacceptable. And I really feel sorry for the kids who are not allowed to do this kind of thing, for completely dishonest reasons, like - "These are stupid, they do not make any sense", "Don't you dare, I just washed the floors", "Who then will all this clean up”, etc. My son once found an excellent argument for my protests - “Mom, but everything that I love !!!” And I gave up, because at heart I am also a child and now we have fun together! Yesterday we will make balls of colored ice and I will tell you 10 great ways how to ... stain the whole apartment with them))) and not only ... But, more on that later, first I will show how we did them:
Buy tiny water bomb balloons. They are really very small and almost impossible to inflate with air, they are so elastic.
We want not just ice cubes, but colored ice cubes, and for this you will need food coloring of different colors - put a few drops into each ball. So, put the ball on the end of the tap, as in the photo, and carefully, in a thin stream, fill it with water. Now tie a knot at the end or, if this seems too complicated for you, use a thread.
When you are done with all the balls, place them in the freezer. In about a day (maybe earlier) they will be completely ready!
And now, as promised, 10 fun ways to use them:
- Decorate with colored ice balls, lay out beautiful shapes, patterns or drawings. Before the onset of a thaw or heavy snowfall, passers-by will be able to admire your creativity in the snow.
- Hang the balls on a tree, for example, you can decorate the Christmas tree in the yard in such an original way. To do this, initially, a thread or rope should be inserted into each ball.
- If you make a Snowman, then 2 colored balls will serve as her eyes. And, if you blind a hedgehog, then instead of prickly needles, you can lay out his back with balls.
- If you add grain or special bird food to the ball along with water, you will get excellent bird feeders. They will peck out seeds from there, and you will be able to watch the birds well.
- I do not advise throwing such balls at each other, after all they are heavy. But you can play bowling with them, breaking the kigli sticks or just throw someone further.
- Just like in winter, you can bring balloons into the yard and lay out a drawing with them. It is a pity, only, it will not be so durable, but you will observe how picturesquely it melts.
- You can draw with colored balls directly on the pavement.
- If you place the balls in a paddling pool or large basin, you will see how they melt and turn the water into different colors. You can study how two different colors mix to make a third, for example, blue + red = purple, and yellow + blue = green.
- You can arrange a snow party in the summer in the country, using artificial snow or foam, and then ice balls will be very useful to you.
- If you made refreshing drinks for guests on a holiday, instead of boring clear ice, use colored balls (made from drinking water, of course). Not only children, but also adults will like it.
With the onset of a cold and snowy winter, everything around is transformed. Leaving the house on the street, everything around is admirable, because there are fluffy snowdrifts around, which create a fabulous landscape.
If you are the owner of a country house, then you should definitely be concerned about the question - How to decorate the yard in winter, especially on the eve of the New Year and Christmas holidays.
 To make these unusual jewelry, you will need the following materials: water, any dye (food coloring or regular paints) and balloons.
As you may have noticed, very few materials are required to make such a wonderful decoration.
To make these unusual jewelry, you will need the following materials: water, any dye (food coloring or regular paints) and balloons.
As you may have noticed, very few materials are required to make such a wonderful decoration.
So let's get started...
In a separate container (this can be an ordinary three-liter glass jar or bucket), you dilute water with any dye you like. Depending on how much dye you add to the water, the color saturation of future ice balls will depend.
 So, colored water is ready! Now use the help of your relatives, friends or children and use a watering can or tube to fill balloons with colored water. If you plan to make huge colored ice balloons, then it is better to fill the balloons right on the spot, as a balloon filled to capacity will be difficult to move from place to place.
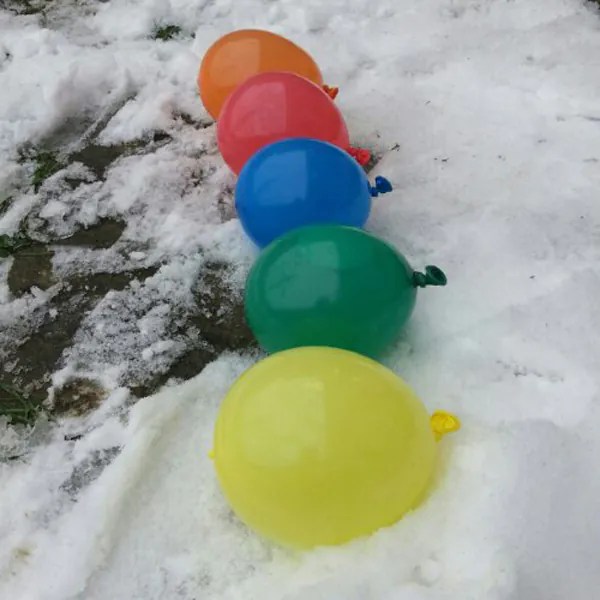 Tie a balloon filled with colored water tightly and leave it outside (in the cold, of course) until completely frozen.
 When the colorful water in the balloons is frozen, use scissors to free the colored ice balloons from the rubber shell.
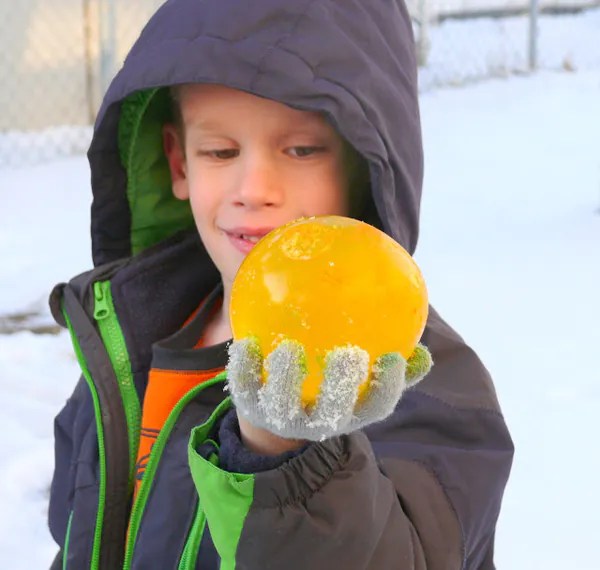
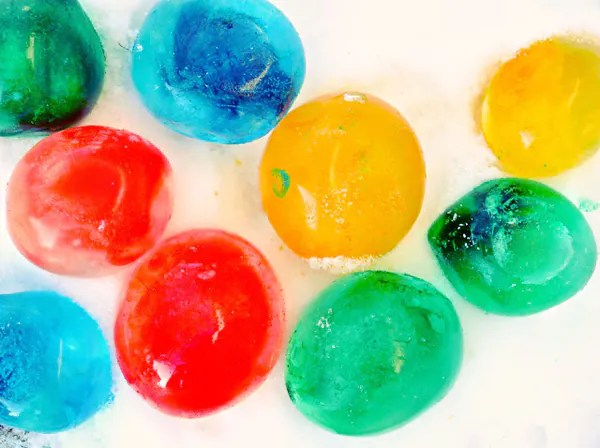 With such bright unusual ice balls, you can decorate paths, a playground, railings and steps.
To please a child or your soul mate, you can make a glowing, ice ball. Its drawback is that it will melt at room temperature, but if you decorate the yard on New Year's Eve or Christmas with such balls, then you and your guests will experience the real holiday atmosphere. The ball will glow until it melts or until the batteries in the LEDs burn out. Try to surprise your guests and neighbors with such an amazing craft.
We suggest that you familiarize yourself with the process of making homemade products.
To create a glowing ball, we need:
- expander;
- pliers;
- any marker;
- balloon;
- several LEDs;
- cup.

So let's get started. We pour ordinary water into a glass. We need 200 grams. Do not take too much water, because then we will still add it from the tap. We need this amount so that the dye can dissolve and give the water the desired shade.
We take, break our marker and pull out the cotton wool from it. We will use this cotton wool as a dye.


We throw the dye (in our case, cotton from a felt-tip pen) into a glass of water. In order for the water to be better painted over, it is better to rub the cotton wool. You can use food coloring left after Easter, and if you don’t have either, dilute some gouache or watercolor in water.


Now we take our LEDs, turn them on and wrap them with electrical tape, leaving only the light bulbs on. Electrical tape is needed to wrap the wires and the junction of the batteries. Then they will rush into the water and it is highly undesirable for the water to come into contact with the batteries.


The next step is to pour some dye diluted in water into the balloon.
After you have poured a glass of water with dye into the ball, we lower the LEDs there. Throw them directly into the water.


Next, add ordinary tap water to the ball. In size, you should get a small melon. Do not make the ball too big, it will be very difficult to place it in the freezer and the effect of the diodes will not be the same.