Ceiling cladding. Modern ceiling decoration: options. MDF panels
Modern redecoration of any room is not complete without decorating the ceiling, whether it is a simple city apartment, an elite cottage or a country house. But not every layman has an idea of how to decorate the ceiling in a room using simple materials, as well as a minimum of financial and physical costs.
Besides, the ceiling does not have to be made in a classic style- if you wish, you can even create a map of the starry sky above your head.
The main design options for the ceiling:
- whitewash;
- coloring;
- wallpapering;
- pasting with ceiling tiles;
- liquid wallpaper;
- suspended ceiling;
- stretch ceiling.
Each of these options has its own characteristics. So, not any ceiling can be suitable for painting due to an uneven surface. In such cases, it is better to resort to the use of a stretch or suspended canvas, which will hide all the constructive flaws of the builders.
Whitewash
- This method of finishing the ceiling was also used by our grandmothers. when they set up their homes. In modern homes and offices, in the corridors and in the hall, you can also often find whitewashed ceilings, because the necessary finishing materials are quite inexpensive.
- However This finishing option can only be used for perfectly flat surfaces.. Otherwise, the result may be the opposite of what you want.
- The main disadvantage of using whitewash as a finishing material is dirt.. Firstly, it is not recommended to wet the whitewashed surface, which is a serious limitation for choosing this method of finishing the ceiling in such rooms as the kitchen, bathroom, boiler room. Secondly, whitewashing leaves stubborn stains on all surfaces where the solution enters.
To avoid long post-repair cleanings, the following whitewashing technology is recommended:
- Cover the floor with plastic wrap or newspapers.
- Remove furniture from the room, and if this is not possible, cover it with plastic wrap or special covers.
- Prepare whitewash (chalk or lime).
- Whitewash surfaces with brushes one or more times.
Advice! No matter how carefully whitewashing is carried out, its splashing is inevitable, so it is recommended to cover the floor, as well as use gloves and work clothes.
Coloring
This finishing method is gaining more and more popularity. As for the whitewash option, in this case a perfectly flat ceiling is required - almost anyone who has performed this procedure at least once can tell how to finish it with paint.
Painting technology:
- sand and polish ceiling;
- prime surface of diluted water-based paint;
- carry out staining surfaces 1-2 times.

Painting the ceiling, in comparison with other methods of finishing it, has several undeniable advantages:
- special paint is not afraid of water, therefore, painted ceilings can be safely washed and even use special products;
- if desired you can easily change the color scheme of the room, just repainting the ceiling;
- this option is pretty cheap and affordable.
Pasting ceilings with wallpaper and tiles
Wallpapering
When choosing a room design option, many still stop at the usual wallpaper. This material is the best that you can finish the ceiling in residential premises on your own.
Wallpaper is great even for pasting not too smooth and cracked surfaces. This procedure is inexpensive and does not require large expenditures on materials.

The disadvantage of this method of finishing ceilings is high labor intensity. Care must be taken to ensure that air does not accumulate under the wallpaper.
This problem is especially acute for rolls with a large width. In addition, pasting work is best done together - this should be taken into account before finishing the ceiling yourself.
Ceiling tiles
As with wallpapering the ceiling, ceiling tiles do not require a perfectly flat surface. They easily hide all minor imperfections, including small cracks and not too prominent bumps.
Carefully! Ceiling tiles have a soft texture. It should be glued very carefully, otherwise traces may remain in the places of pressure, which will be impossible to remove.

Before you finish the ceiling in the room by pasting it with special plates, you need to decide where the so-called starting point will be. It is recommended to place it in the most visible corner and from there start pasting the ceiling.
The second option is to start gluing the plates from the center of the room, cutting them evenly along the edges near the walls. Irregularities in the joints of the walls and ceiling perfectly hide the ceiling plinths.
Liquid wallpaper
Liquid wallpaper or silk plaster- a great alternative to other methods of finishing the ceiling. They are able to give the ceiling special features of royal luxury and amazing grace, turning it into a real work of art.
In order to finish the ceiling with liquid wallpaper:
- Thoroughly clean the surface from dust and dirt.
- Dry the ceiling completely.
- Prime the surface.
- Apply silk plaster to the ceiling with a specially designed trowel.

However, the application of this type of plaster - very complicated procedure and requires certain skills. Therefore, before finishing the ceiling - it is better to consult a specialist.
Suspended ceiling
This option is very popular in the design of city apartments, residential buildings, as well as office space. Suspended ceiling is a metal frame attached to the ceiling and lined with removable panels.
Much is known about how best to finish the ceiling in this way. The main task is the choice of material.
Best for kitchens and small spaces plastic panels. This material is easy to clean and interacts well with cleaning agents, resistant to constant exposure to moisture and steam. It is often used to decorate bathrooms and bathrooms.

But in ordinary rooms, panels of any material can be used. The most common is drywall.
It is easy to cut and is therefore great for decorating figured suspended ceilings, which is often practiced in large halls and living rooms. Of the disadvantages of drywall boards, one can distinguish them leakage resistance.

The main "minus" of a false ceiling is that it significantly reduces the height of the ceilings. Therefore, for the design of low rooms, this method is not suitable.
Advantages of suspended ceilings:
- the possibility of changing individual plates (in case of leaks or cracks in the plates, it is not necessary to change the entire ceiling);
- the ability to hide any flaws in the ceiling, including deep cracks and relief that cannot be eliminated;
- the ability to hide any ceiling communications (pipes, wiring, etc.).
The modern ceiling is a full-fledged element, the center and accent of the interior design of the room. Modern technologies give room for the imagination of the owners of apartments and are able to make the ceiling a real work of design art. Currently, there are many materials that allow you to decorate the ceiling in accordance with your taste and at a very reasonable price for different categories of the population.
Basic rules for decorating the ceiling
The choice of ceiling covering is directly dependent on the technical characteristics of the room and its functional purpose. When choosing a ceiling design option, you must adhere to the following rules.
- In low rooms, the ceiling should be chosen in light colors. The material must have a reflective effect. This technique will create an impression of depth and. The illusion of depth can be achieved by using a glossy material for the ceiling, which will reflect the room.

- In rooms with a ceiling height below 3 meters, it is worth abandoning suspended structures, because the latter require installation on a frame, which will make the ceiling even lower.
- The width of the ceiling cornice in a low room should not exceed 10 centimeters.

- The coating material must correspond to the operational features of the room. For example, in damp rooms, you need to choose moisture-resistant coatings, and in the kitchen you can’t use fabric ones that will absorb odors and get dirty quickly.

- The ceiling must be in harmony with the decoration of the entire room in terms of style and color shades, otherwise it will turn from an interior decoration into a detail that will spoil the whole appearance of the room.

- When choosing a ceiling covering, you immediately need to consider options for organizing room lighting. You need to think over this issue before installing the ceiling structures, otherwise you will later have to change plans or disassemble the finished ceiling.


Ceiling material groups
All materials used for ceiling decoration can be divided into two types:
- simple, applied to the base of the ceiling itself;
- complex, using additional structures for mounting the coating.
When using the first group of materials, the choice of masters is small. The coating is applied to the surface or glued to it. In the second case, the variety of finishes is huge. It uses various materials and methods of their attachment to the ceiling with the possibility of creating multi-tiered structures of various shapes. An additional decoration of such ceilings are a variety of lights.

Simple ceiling coverings
If the ceilings are too low in the room, simple finishing methods applied directly to the ceiling tiles will be the most acceptable for decoration. Before applying such a coating, the ceiling must be prepared, as any irregularities will be striking and spoil the appearance of the applied coating. Even under a thick layer of paint or whitewash, all the cracks and recesses in the ceiling tiles will be visible. Careful preparation of the coating will also prevent peeling of paint or whitewash from the surface.
Painting or whitewashing
A traditional and fairly budget option for finishing. It is carried out with special compositions - acrylic or water-based paints with the addition of various colors. The downside of this finish is the pollution of the room during operation, since the paint splashes and pours during application.

For even application, you need to have some skills, as ugly streaks and streaks can form. Then the work after drying will have to be redone. Ideally, paint or whitewash is applied to the ceiling in two layers, working with a brush or roller in different directions. A simple painted ceiling, decorated around the perimeter with plastic, plaster or wooden cornices, looks neat and stylish, while its manufacture will not be expensive at all.


If you move away from the traditional finish of a painted or whitewashed ceiling, you can apply various patterns and patterns to it. This is done using a special stencil, which can be made independently or purchased at specialized outlets. The pattern can be applied over the entire surface, perimeter, corners or around the chandelier. Such decorations will give a simple ceiling originality.
Advice! It is more expedient to cover an uneven ceiling with matte paint, as a glossy one will reveal even the slightest defects in the coating. For painting, it is better to use a roller, because the brush creates ugly stripes that, when dried, will stand out sharply.


The theme of the drawing will emphasize the function of the room.
- The kitchen depicts still lifes of food and flowers, fruits.
- In the bathroom - sea shells, wave, river, waterfall.
- The nursery is decorated with drawings of cartoon and fairy-tale characters, toys.
- For the living room, images of flowers, birds, animals are suitable.
- Geometric and abstract compositions are appropriate for any room.

Stencil drawing with minimal artistic skills can be applied to the ceiling yourself. A suitable pattern is printed on a printer, transferred to thick cardboard and cut out. The finished stencil is pressed tightly against the ceiling, fastened with tape and covered with paint with a brush or roller.


Advice! It is convenient to use a sponge to apply paint to the ceiling using a stencil.

Decoupage and stucco
Embossed elements attached to a bleached or painted ceiling will give it sophistication and originality. Ready-made decorations made of polyurethane foam, polystyrene, wood, plaster of various shapes are widely represented in retail chains.


With the help of stucco elements, you can make a socket for a chandelier or decorate the perimeter. Various moldings will help separate the areas of the room.


Decoupage elements and stucco are attached to a painted or bleached surface with glue. They can be painted to match the entire ceiling or in contrasting colors. Stucco elements covered with golden paint look spectacular. Most of all they are suitable for classic interiors.

Ceiling wallpaper
The best option for the ceiling are cullet, which are highly durable and environmentally friendly. A wide selection of textures and colors of ceiling wallpaper will allow you to implement many design ideas indoors. An interesting option is the combination of wallpapering with plasterboard structures.


The disadvantage of such ceilings is their fragility, because they quickly burn out, get dirty. Alternatively, you can use wallpaper for painting, then the coating can be updated several times without a complete replacement. The average life of such a ceiling is 5 years.


An innovation in materials for finishing ceilings are. They consist of glue with the addition of cellulose chips, dyes and various decorative additives. The composition is applied directly to the surface of the ceiling tiles. Subsequently, it does not exfoliate, unlike roll wallpaper.


Ceiling tiles
Tiles are the most acceptable option for the original and self-assembly of the ceiling covering. Modern industry offers a wide selection of ceiling tiles of various materials and textures.

- Mirror- with a special coating on the surface.
- Laminated- with finishing under fabric, wood, stone, ceramics. Such tiles can be smooth and with decorative embossing.
- Pressed- It is made in the form of simple or figured forms.
- cast- from expanded polystyrene.


Tiles are an inexpensive and easy-to-install material. Mounted directly on the ceiling plate with a special adhesive. The tile is practical and durable, easy to clean. The choice of textures of ceiling tiles is quite diverse, it can be smooth and with convex patterns. The disadvantage of the tile is its instability to high temperatures.
In order for the work to be done with high quality, it is not enough to choose a beautiful and suitable tile, you also need a number of tools and materials for laying, the choice of which should also be taken seriously so that you do not have to redo or glue everything again. Read more in.

Plaster
At the same time, applying decorative plaster to it will help to level and decorate the ceiling. There are options for plastering various shades of marble, granite, mother-of-pearl. Decorative plaster is easily applied to the surface without prior leveling, does not reduce the height of the ceiling.


The disadvantage of this option is the risk of cracking during shrinkage of the building and sudden changes in temperature and humidity. In addition, it requires the use of professional skills, so you may have to use the services of craftsmen and pay for their work.

Complex structures for ceilings
This type of finish includes all options that require the installation of additional frames to install the ceiling covering. It would be more correct to call such structures ceiling systems, since they include a frame, coating material and lighting elements. It is not easy to carry out the work of installing the ceiling system on your own, since it requires the use of special technologies and special tools.
Ceiling systems are most in demand in modern ceiling design, because they create a lot of options for embodying the ideas of designers.
According to the type of fastening, ceiling systems are divided into:
- suspended;
- tension;
- hemmed.
Dropped ceilings
The design of false ceilings consists of metal rails attached to the ceiling surface, to which the covering sheets are mounted. Sheets are panels, cassettes, slats, modules from cells, MDF or chipboard with various coatings.


The suspended ceiling can be solid and consist of large sheets covering the entire surface. Sheets are cut according to the size and shape of the room and attached to the hanging rail system.
With the help of sheet material, multi-level structures with various lighting options are created. Between the main ceiling and the suspended ceiling there is some space where you can hide various ventilation pipes, wires, etc.
The coating from various modules is mounted in the same way, but, unlike the previous version, it is assembled from small elements.

Modules can be of the following types:
- tile;
- slats;
- cassette;
- cells.
The material for the manufacture of modules is drywall, plastic, glass, mirrors, wood, metal.


The advantage of this option is the ability to replace any part if damaged. It is also possible to completely replace the cover with other modules using a ready-made frame. This technique reduces the cost of repairing the flow if necessary.


False ceilings
They are made of drywall, chipboard, fiberboard, MDF, mounted on a crate. This inexpensive option will help to realize the various ideas of designers, as well as hide the unevenness of the coating and remove wires, pipes, etc. from the inside. The false ceiling can be multi-level. When used for filing a carved coating, it can turn a room into a real work of art.


The carved ceiling gives the room lightness and airiness. If you place lamps under such a coating, a spectacular shadow effect is created, giving the room a mystery, intimacy.
A stretch ceiling is a special canvas fixed to a frame installed around the perimeter of the room. A special frame is attached to the walls along the perimeter, then the canvas is stretched over it. The mounting technology resembles the tension of a canvas for paintings on a stretcher.


Stretch ceiling material is available in the following types:
- PVC film;
- polyester fabric.
The material is distinguished by a variety of colors and options for applying patterns to the canvas. Stretch ceilings allow you to combine different colors to divide the room into zones, apply photographic drawings and various patterns to the canvas.

One of the most modern options is a translucent ceiling with lights of various colors placed inside. A translucent ceiling allows you to add depth to the surface, to create the impression of a window on the ceiling.

Allows you to create various straight and curvilinear shapes on the ceiling and combine different textures and colors in the finish. Multi-level ceilings are effectively complemented by various lighting options. Patterns and drawings can be included in separate parts of such a ceiling.


For such structures, sufficiently large in area and height of the premises are required. But even a not very high room, a multi-level ceiling is able to “pull out” due to the effect of depth.


artistic ceiling
It is created using the technology of artistic painting or photo printing on fabric. This is an opportunity to give the room originality and a special chic, since absolutely any image can be applied to the material, depending on the style of the room and the tastes of the owner.

Artistic painting is most often used on stretch ceilings. For this, a fabric canvas is used, on which a picture has been previously applied. This is one of the most expensive types of ceiling covering, since such a finish is exclusive, and not every master can do it.

3D ceiling
The most modern type of finish is a stretch ceiling with a 3D pattern. Illuminated geometric shapes and various images are used for the drawing. Paintings of a cloudy or starry sky are created on the ceiling, macro images of flowers and animals are applied, and abstract drawings consisting of geometric shapes are used.

With the help of 3D images, the shape of the ceiling actually changes and unusual effects are created. Wavy patterns help to visually expand narrow and long rooms, funnels and cones in the center of the ceiling emphasize the beauty of the lamp and “raise” the ceiling, arched patterns give the ceiling depth.

Comparative characteristics of ceiling coverings
Any ceiling covering has its advantages and disadvantages. After analyzing them, you can choose the most suitable option that allows you to maintain the quality and attractive appearance of the created interior.
Table. Pros and cons of modern types of ceilings.
| Ceiling view | pros | Minuses |
|---|---|---|
| Stretch ceiling | Luxurious appearance, smooth surface, clean and fast installation, moisture resistance. The ability to withstand a large volume of water when the apartment is flooded from above. | High price, complex installation using special equipment, easily mechanically damaged surface. Film options are sensitive to temperature changes. |
| Drywall | Possibility of installation of a multilevel covering. Does not require foundation preparation. Ventilated under-ceiling space. Retains heat, absorbs noise, resistant to mechanical damage. | Low moisture resistance. Requires the construction of a frame. Needs additional finishing. The complexity of installation, requiring special skills. |
| clapboard | Naturalness and ecology. Creating a cozy atmosphere. Retains heat and absorbs noise. | It is afraid of dampness, it dries up from changes in temperature and humidity, forming cracks. |
| Wallpaper | Low price. Possibility of self-assembly. | The seams diverge, the corners exfoliate from moisture changes. They don't last long. Requires ground preparation. Burn out. |
| Suspended ceiling | Durability, ease of maintenance, resistance to moisture and high temperatures. | "Eats" the height of the room. High cost. Fragility. |
| false ceiling | Does not require coating preparation, does not greatly underestimate the height. Allows you to create volumetric structures. | Difficulty of installation. |
The choice of ceiling covering is a responsible matter. Only careful thought of the design and selection of the right material will allow you to use all the advantages and level the shortcomings of the room, creating a unique and stylish design.
Video - Beautiful modern ceilings
When planning repairs, each owner asks himself: how to finish the ceiling? Previously, this task was solved simply: the surface could be whitewashed, painted or wallpapered. But today, these options are considered only if they want to save as much as possible on repairs. The widest range of modern facing materials makes you think, because the tastes and preferences of people have changed dramatically.
Finishing options for residential ceilings
With all the variety of choices of facing materials, there are not so many ways to finish the ceiling - in particular, these are:
- painting;
- whitewash;
- wallpapering;
- pasting with polyurethane (foam) tiles;
- finishing with liquid wallpaper;
- facing with decorative plaster;
- false ceiling device;
- stretch ceiling installation.

Whitewashing the ceiling is one of the quick and inexpensive ways
The first four options are optimal if repairs need to be done quickly and at the lowest financial cost. All these methods (whitewashing, painting, wallpapering or foam tiles) are easy to perform. But here, too, there are difficulties.
- You need to know how to properly prepare the surface of the ceiling for the application or installation of facing material.
- You also need to know the rules for working with this material.
- It is necessary to decide which type of finish is optimal for rooms with normal and high humidity, in heated and unheated rooms.
So, for country houses the best choice is painting, whitewashing, wallpapering. Moisture-resistant paints, panels and tiles will be required for the kitchen and bathroom. The maximum possible color of coziness and presentability will be provided by more expensive methods of finishing: the installation of suspended or stretch ceilings, the application of decorative plaster. All of them are not only the most spectacular options for interior design, but also the most time-consuming.

When deciding how to finish the ceiling, you need to take into account the condition of its surface. If it is uneven and has many flaws, it is better to close it with hanging or tension structures than to prepare it for painting or wallpapering. In some cases, this will not only give the room a modern style, but also save money.
Having decided on the finish option, you can proceed to the choice of facing material. In this case, it is necessary to take into account all the features of the room being repaired: purpose, humidity level, degree of natural light (solar). Further, they act in accordance with the step-by-step instructions for installing the selected finishing material.
How to paint the ceiling
Painting the ceiling will certainly emphasize all its irregularities. Therefore, the requirements for surface quality are the highest. It should be understood that the cost estimate will need to include the cost of not only paint, but also primer.

In addition, you will need to buy:
- brushes;
- roller;
- paint tray;
- putty;
- spatulas (metal and rubber).
Painting or whitewashing the ceiling will cost less than the installation of suspended or tension structures. However, you need to prepare for the fact that the finishing process will not be easy. All work performed at height and on the upper floors is labor-intensive.
It will facilitate the task of using an airbrush (included in the package of vacuum cleaners of older models). But in this case, you will need shelter for walls and furniture - plastic wrap, fabric or paper. Another important point when using paint: protection of the eyes and respiratory tract. In this regard, high-quality ventilation of the room must be ensured.

You can also use a spray gun to paint the ceiling. In the photo - airbrush HAMMER PRZ150A
Paint selection
The main task in this type of repair is the right choice of paint. For ceilings often use water-based or water-dispersion. It is not difficult to understand the peculiarity of these compositions: the coatings of the first group (water-based) are washed off with water, while the second group is not.
An important characteristic of any paint is the degree of moisture resistance. This parameter is usually indicated on the label of the container. You definitely need to pay attention to it, otherwise there is a risk of buying some kind of paint for dry rooms to finish the ceiling in the bathroom. This error will lead to peeling and cracking of the coating, which will require redoing the work performed.

- water-based or water-dispersion;
- based on acrylic resins;
- silicate;
- silicone.
Surface preparation technology for painting
Step 1. Remove the old finish: paint, wallpaper or tile. To complete the task, you will need a spatula with a metal sheet. Close attention is paid to plaster. You need to check how tight it holds, and remove any loose particles.

Step 2 Seams and cracks are sealed with putty or cement-sand mortar.

Step 3 With the help of a broom, brush or rags, the remains of small particles of plaster, paint or wallpaper are swept away.
Step 4 Apply the first coat of primer. It is needed to ensure the strongest possible adhesion of the paint to the surface of the upper floor. In addition, the primer composition allows you to even out minor flaws, which provides a more spectacular look after staining.
Step 5 Before applying paint around the perimeter of the ceiling, masking tape is glued along the walls. It will protect the walls from accidental smears and smudges.
Work performance rules
The process of applying paint is simple and straightforward. But there are rules that will help you do the job efficiently and avoid such troubles as unsightly stains and gaps in the plaster.

First of all, you need to learn that the approach to painting surfaces with a roller and a brush is different. When applying paint with a brush, try to keep it at an angle of 35 ° -40 ° and make strokes evenly, in one direction. In order to assess the quality of the work performed, they move away at a distance of 1.5-2 meters and, tilting their heads at 30 ° -40 °, look at the painted surface. If gaps are visible, apply an additional layer of paint.

When using a roller, the layers are applied next to each other so that each next overlaps the previous one by 5-7 cm. When applying the second layer, the direction of the strokes should be perpendicular to the first. This will avoid gaps in the plaster. Painting hard-to-reach places is done with a brush.

The basic rules for working with a brush and roller are given below.
- To apply the first layer, a more liquid composition is used (water-based and water-dispersion ones are diluted with water in a ratio of 1:10).
- In order to avoid gaps and streaks, the first coat of paint is applied in W-shaped strokes.
- A common mistake when painting a ceiling is a strongly wrung out brush or roller. You need to understand that the best result can be achieved when applying the first stroke with a rather thick layer, which is subsequently smeared across the ceiling with the same pressure of the working tool.
Video - How to paint the ceiling with your own hands
Ceiling decoration with decorative plaster
Applying decorative plaster is an effective way to decorate a room. It allows you to transform the room quickly and at the lowest material cost. But you will have to work hard: plastering is not an easy process.
A variety of textures of decorative plaster allows you to find exactly the type of ceiling finish that will emphasize the style of the room. When choosing a composition, it is necessary to take into account the type of surface to be treated. If the ceiling is wooden or plasterboard, hygroscopic mixtures cannot be used. In this case, compositions based on polymers or acrylic are optimal.

When choosing decorative plaster, it is important to consider its environmental friendliness. This parameter is especially important if the finishing is done in a room intended for children. In this case, it is recommended to choose mixtures based on cement, lime, minerals, marble chips.
Types of decorative plaster
The composition of decorative plaster includes filler, additives, binder. Additives are needed to give the product certain properties: antiseptic, water-repellent, bactericidal. Depending on the type of binder, the following types of plaster are distinguished.
- Mineral. Made on the basis of cement and lime mixtures, traditionally used for outdoor work. A well-known representative of this group is decorative bark beetle plaster.
- Polymer. Mixtures of this type are made on the basis of acrylic resins. Such coatings are highly moisture resistant, able to withstand sudden changes in temperature. The composition includes additives that provide plasticity.
- silicate. In these mixtures, the binder is liquid glass. Plasters of this type do not differ in plasticity, but are ideal for decorating complex surfaces with cavities and elevation changes. Often used for finishing concrete ceilings.
- Silicone. Made on the basis of silicone, the composition includes a small filler: crumbs of marble or sandstone. These mixtures are durable, have a dust-repellent property.

Acrylic-based decorative plaster is an excellent choice for finishing ceilings in rooms with a high level of humidity: in the bathroom, pool or kitchen. Due to the excellent plasticity of such plasters, very beautiful textures are created under the skin, stone, velvet. When choosing the type of composition, you can focus on the table.
Table number 1. Characteristics of plaster mixtures.
| Properties | mineral plaster | Polymer (acrylic) plaster | silicate plaster | silicone plaster |
|---|---|---|---|---|
| Binder | Cement | Acrylic | Liquid glass | Silicone |
| Steam capacity | high | Low | high | high |
| Degree of moisture absorption | high | Low | Medium | Low |
| Type of additives | Inorganic | Inorganic and organic | Inorganic | Inorganic |
| Degree of elasticity | Low | high | Medium | high |
| Abrasion resistance | Low | high | high | high |
Finishing options with decorative plaster
Depending on the properties of the compositions and the size of the filler included in them, patterns of varying complexity can be created on the treated surfaces. Manufacturers have made it easier for the consumer to choose and classify plaster mixtures according to the type of application and the final result.


Technology for applying decorative plaster
To obtain a structural and textured coating, different tools are used. But the difference between these types of surfaces is conditional. The only difference is that the structural mixture provides relief due to the filler included in its composition, and the textured one - due to the pattern on the roller.
For finishing the ceiling in residential premises, Venetian plasters are most often used. There are several techniques for applying compositions of this type. The simplest and most popular is given below.
Step 1. Perform a thorough preparation of the surface, leveling the slightest height differences on the ceiling and sealing the seams and cracks with putty.

Step 2 Apply 1-2 coats of primer.
Step 3 Along the walls, in their upper part near the ceiling, tapes of masking tape are attached.
Step 4 If the mixture is not tinted, pigment is added. The consumption of the mixture is from 600 g to 1.5 kg per 1 m2. The more complex the drawing, the greater the material consumption.
Step 5 The plaster is applied with a metal spatula in layers on a previously dried surface.

The essence of applying Venetian plaster is to create a multilayer structure. The pattern of each layer is determined by multidirectional strokes with a spatula. A beautiful textured surface is obtained by applying 2-4 layers of decorative plaster.

Do-it-yourself installation of a stretch ceiling
The most spectacular and durable decoration of the premises is the installation of a stretch ceiling. Manufacturers offer two types of canvases: fabric and PVC (based on polyvinyl chloride). Each of these materials has its own merits. You can choose matte or glossy materials. Seamless PVC films are easier to stretch, so they are more often used for interior decoration.
To fix the canvas, choose one of the following methods:
- harpoon;
- glazing bead;
- clip-on.
The first requires a special fixative - a harpoon. This is the name of a durable PVC strip, one side of which is equipped with protrusions. Thanks to them, the canvas is firmly held in the profile. The films are attached to the harpoon by cold welding.

With the glazing bead method, the edges of the film are pressed against the walls with wooden slats - glazing beads. This method is simple in execution, but gives a less spectacular result than the harpoon one. The clip-on fastening method is used when mounting fabric sheets equipped with special clips around the perimeter. These devices are attached to the profile installed along the walls.
To install a stretch ceiling, you will need the following tools:
- plastic or aluminum profiles;
- fasteners for fixing the profile (self-tapping screws, dowels);
- spatula with a narrow metal blade;
- building hair dryer (if the ceiling is film);
- drill;
- stepladder (two stepladders will be required for greater convenience of work);
- roulette;
- level.
The harpoon method of installing tension webs is the most convenient, which is why it will be discussed in today's article.
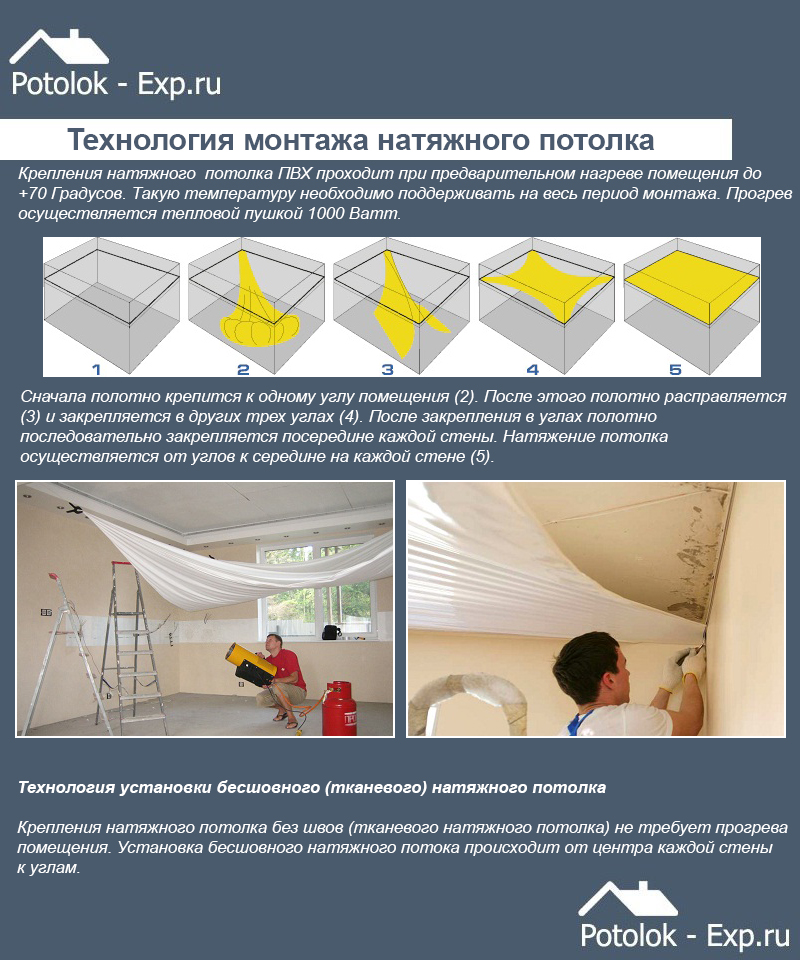
Note! You need to know the width and length of the room, because the canvas itself should be wider than the distance between the walls by about 10 - 15 cm.
Table number 2. Stages of work.
| Stages, illustration | Description of actions |
|---|---|
| In modern apartments, the height of the corners can vary significantly. To install a stretch ceiling, it is necessary to draw horizontal lines on the walls 4 cm below the ceiling so that when they intersect they form a single plane. For this purpose, it is recommended to use a level, laser or water level. |
| A profile (baguette) is installed along the marking lines. To do this, drill holes, insert dowels into them, fasten the profile with self-tapping screws. |
| The canvas is unfolded and each corner is wound into a baguette. The harpoon is pushed into the profile opening with a metal spatula. The work is carried out in a preheated room, the optimum temperature is 40 ° C, therefore, if a PVC film is mounted, when the canvas is deployed, it is attached at the corners to the "crocodiles" and heated with a building hair dryer. |
| At opposite walls, they begin to alternately fill the edges of the canvas into a baguette. |


In completing this task, it is mandatory:
- find the middle of the free part of the canvas and start the harpoon in profile;
- then go to the opposite wall and repeat the action;
- after which they find the middle of the next sagging part of the canvas and lead it into the harpoon;
- go to the opposite wall and do the same work.

During the stretching of the film, the room is continuously heated. You can do this with a heat gun. If it is not possible to use this equipment, the film is heated with a building hair dryer. With this method of mounting a stretch ceiling, it is important not to overheat the canvas and not melt it.

False ceiling device
Despite the emergence of new ceiling design technologies, plasterboard finishing is still relevant. From this material, you can build both unpretentious single-tiered and spectacular multi-tiered structures.

Tools and materials for work
To install a plasterboard ceiling frame, you will need the following materials:
- metal profile PN 28/27 and PP 60/27;
- self-tapping screws SMM 3.5 / 51;
- suspensions;
- crabs.
The main element of the frame is racks made of metal profile PP 60/27. Manufacturers offer products of different lengths: 2.8 m, 3 m, 4 m. You can buy individually or in packs (12 or 18 pieces each). Guides are located along the walls adjacent to the ceiling. In addition to these materials, one-level suspensions and profile connectors, which experts call "crabs", will be needed.
From the tools you will need:
- cordless screwdriver;
- drill or puncher (for drilling holes in the walls and on the ceiling);
- scissors for metal (for cutting metal profiles);
- marker, tape measure, lace, square, plumb line (for marking);
- construction bubble level at least 80 cm long.
Plasterboard ceiling frame configurations
Beginners in this business can have no doubt: they can build not only a simple single-level ceiling, but also complex multi-tiered structures. There is only one requirement: to understand the principle of constructing a frame from a metal profile.


Suspended plasterboard ceilings are good because they allow you to radically change the space of the room with the help of spectacular intricate shapes. Spot lighting of curly protrusions and depressions will create a charming atmosphere of comfort and respectability in the room.
In order to mount the curly frame, you will need to bend the metal profile PP 60/27 so that it repeats the contour of the figure conceived by the designer. This task is not difficult, but it will require accuracy, attentiveness and slowness.

In order to give the metal profile the desired shape, it is necessary to trim its side plates in increments of 4-5 cm. After that, the bar is gradually bent in the right direction.
A multi-tiered (multi-level) frame for a false ceiling is erected in accordance with a previously drawn up scheme. All dimensions and distances must be indicated on it. When drawing up a diagram, it is necessary to focus on the following rules.
- The optimal distance between the mounting points of the guides is 40-45 cm.
- The optimal distance between suspensions for a single-level ceiling is 40 cm, for a two-level one - in accordance with the figure, but not more than 40 cm.
- If you plan to do spot lighting, when determining the location of the first line of the frame, the dimensions of the fixtures are taken into account (for small ones, a 5-8 cm indent from the ceiling is enough, for large ones, you will need to retreat 12-15 cm).
- The optimal distance between the uprights PP 60/27 is 60 cm.
Wall and ceiling markings
The first step in installing a plasterboard ceiling is marking. The correctness of further work depends on how accurate it will be. Therefore, this task must be carried out thoughtfully and slowly.
You will need the following tools:
- plumb;
- bubble level 1.2-1.5 m long;
- water level;
- laser level;
- level.
The easiest way to mark up is using a level or laser level.

Wall marking for profile mounting PN 28/27
Step 1. Work begins from one of the corners of the room (previously it was the lowest corner of the room, but today this is no longer relevant).
Step 2 In this corner, at a distance of 3-5 cm from the walls, a thread with a plumb line is pressed to the ceiling. Mark the direction of the vertical on the adjacent walls.


Step 3 According to the vertical line from the flow, the distance is measured downwards at which the first tier of the frame will be located.
Step 4 At this point, a self-tapping screw is screwed in, to which a long thread is tied.
Step 5 Along the wall, they go to its second corner and do the same work there.
Step 6 Pull the thread between the two corners so that it is horizontal. This will help the square, which is set at a right angle to the intersection of the vertical markings and the stretched thread.
Step 7 Draw a line on the wall with a marker or pencil.
Step 8 Similarly, markup is applied to all other walls. The result should be a perimeter along which guides PN 28/27 will be installed.
Installation of a single-level ceiling frame
The height and direction of the supporting racks of the frame are adjusted with the help of suspensions. Their installation is the first thing to do before proceeding with the installation of the carrier profile. Suspensions are mounted on the ceiling in accordance with the scheme of the frame. The first profile posts are installed in the direction of the longest wall of the room. The distance between the carriers is 55-60 cm.
The order of further work.
Step 1. The first carrier profile is installed: its end is inserted into the guide, it is covered with “legs” of the suspensions located in its path, fixed with self-tapping screws. Make sure that the direction is strictly horizontal. This will help the threads stretched during marking and the level.

Step 2 Install load-bearing profiles over the entire ceiling area.

Step 3 They complete the work by laying drywall sheets: sheathing. Sheets are attached to the profile with self-tapping screws. When performing this work, it is important to install the sheathing sheets so that the gaps between them are minimal. Solid sheets must be fixed perpendicular to the long guide profiles. Docking of sheets should be carried out in the middle of the profile. For high-quality fastening, work is best done by two people.
The sheets are fastened with self-tapping screws, and the latter are recessed into the sheathing material by 2-3 mm. The step between the screws should be 25-30 cm (3-4 cm from each corner of the sheets). Chips should not form on the edges of the sheets when screwing in the screws. If damage does occur, the self-tapping screw must be removed, and a new one screwed in 3-4 cm.

Step 4 When the ceiling is sheathed, overwrite the gaps with putty. After it dries, all irregularities are smoothed out with a special grater in which a grinding mesh is installed. After that, the ceiling is ready for painting, tiling or wallpapering.

No cracks! Neither GKL sheets nor load-bearing profiles are fixed to the guide profile 28/27 (on the wall), i.e. the walls and ceiling should not be tightly connected. For a suspended ceiling, GKL with a thickness of 12.5 mm is used. When cutting sheets, a chamfer of 22.5 degrees is made on the edge. Sheets are fixed in a run!
Video - Step-by-step instructions for installing a plasterboard ceiling
The ceiling in the room occupies a considerable area, so its decoration should be approached responsibly. Sometimes, even an interior thought out to the smallest detail looks unfinished if the surface above is not involved in creating the overall look of the room.
The options for finishing the ceiling are diverse, and it will not be difficult to choose the most suitable material in accordance with the design concept, the level of complexity in manufacturing and financial capabilities. The most common methods of finishing the ceiling, which will be confirmed by the corresponding photos, will be discussed in this article.
Types of materials and methods of finishing the ceiling
There are many options for finishing and decorating the ceiling, the choice of which depends on several criteria:
- Purpose of the premises and microclimatic indicators in it. For example, the bathroom is characterized by high humidity, so the ceiling finish material must be moisture resistant. In the kitchen, in addition to humidity, there are temperature changes and pollution, so the ceiling must adequately withstand cleaning. In the bedroom, special requirements are placed on the environmental friendliness and vapor permeability of the ceiling;

- From the size of the room and its height. In a low room, the suspended ceiling structure will “absorb” at least 10 cm, but will allow you to adjust the geometry of a narrow or too wide space. Glossy surfaces reflect light and visually enlarge the room, while matte surfaces gently scatter light rays;

Finishing in the apartment should be in harmony with the interior of the room.
- From the style of the interior. A trendy multi-level stretch ceiling is suitable for modern interiors, while a white flat surface would be appropriate for a classic design or country style;

- From the level of difficulty. Some types of finishes can be done by hand, in other cases, work must be done by qualified specialists;

Bright glossy, photo
- From financial opportunities. There are finishing materials, the price of which is affordable for everyone, and more expensive ones, up to elite ones, for example, wooden panels made to order from precious woods.

To make a choice, you need to know about the types of finishing materials and their properties. Some finishing options should be considered in more detail.
Finish options
Whitewash

This method of surface finishing has been known for a long time. And before the advent of finishing materials, it was the only budget way to create a finish coating. It is still used in the repair of premises that do not particularly pretend to sophistication - the ceiling is smooth and white.

This method of finishing has its positive and negative sides:
- Lime-based material has the most affordable cost;
- Ceiling decoration can be done on its own, without involving specialists and without special building skills;
- The material is environmentally friendly, so it can often be found on the ceilings of children's and medical institutions;
- The white smooth ceiling is versatile and will look good in any interior;
- It is the whitewashed ceiling in combination with wooden beams that will emphasize the flavor of the rustic style in the room.

Bedroom interior in country style, photo
Among the disadvantages of whitewashing, the following can be noted:
- This coating has a short service life;
- due to its properties, it is not resistant to moisture and pollution;
- Due to the high degree of hygroscopicity, the lime surface cannot be washed;
- Over time, the integrity of the coating is violated - it begins to flake off and crumble;
- Does not have a special decorative effect;
- The coating requires frequent updating;

- A thorough and complex preparatory process is required before whitewashing - the base must be puttied, plastered and primed;
- The process of renovating an old lime coating requires the removal of the existing layer and careful preparation of the base;
- The production process of this type of finishing work is associated with the formation of a large amount of dust and pollution;
- The coating does not hide the irregularities and defects of the base.

Coloring

Painting is a more practical way to finish the surface (see). Moreover, with the advent of modern decorative embossed paints, the ceiling can acquire an original appearance. In addition, the paint can have any shade and quality of coating - glossy or matte.
- With the help of paint, you can decorate the ceiling with artistic painting, ornaments and patterns using stencils or curly rollers.

Contrasting design in the apartment, photo
- If you want to create an even white finish, you can use white matte paint for the classic interior of the room, and glossy paint in the kitchen.

- This type of finish cannot be called durable either, but with proper preparation of the base and selection of paint, it will last longer than whitewashing. The substrate must be carefully prepared before applying the paint.
- First of all, the base is examined for the presence of leaks from above, and they are eliminated when detected. Otherwise, moisture will cause the paint to peel off.
- Before applying paint, the base is leveled, cracks are sealed and primed. The quality of the preparatory work will be the key to uniform distribution of paint over the surface, its durability and aesthetic appearance.

At a cost, painting with water-dispersion compositions is one of the budgetary finishing methods that are relevant for any room in the house.
The positive qualities include the following:
- Affordable cost;
- The process of applying paint to the ceiling does not require special skills;
- The paint is resistant to moisture, steam and temperature extremes;
- The paint dries in a short time, so such repairs can be considered quick;
- Water-dispersion paint is environmentally friendly;
- A wide range of colors allows you to choose the right shade for any interior;
- Painting will be an excellent solution for low rooms.

Important! You can apply paint on any base, but it is necessary that the metal parts be pre-treated with anti-corrosion compounds.
Among the shortcomings of this material, the following can be noted:
- Short operational period;
- Careful preparation of the base with the complete removal of the old coating - plaster or whitewash;
- The paint does not hide the irregularities and defects of the base, so it must be carefully leveled;
- The material requires periodic updating. Glossy paint on the ceiling in the kitchen does not absorb odors and dirt, but grease stains settle on its surface.

Plaster

Another common inexpensive finishing method is its decorative plastering:
- This material is environmentally friendly;
- Possesses vapor permeability;
- Creates an even monolithic coating;
- Depending on the internal filler, it has a different degree of relief;
- Can be dyed in any color and varnished, which allows it to be used in the kitchen;

- It is combined with many finishing materials in the interior;
- Hides imperfections on the surface when applied, therefore, does not require a complex procedure for preparing the base;
- Is a non-combustible material;
- Has an affordable price.

One of the positive qualities of this material is the possibility of applying the composition in a mechanized way. To do this, use a special plastering machine or spray gun, with which the mixture is supplied under pressure and evenly distributed over the surface.
This method of application allows you to save material, as it is dosed and covers even the most inaccessible places.

At the same time, the speed of work execution increases several times. The coating is embossed and resembles a “fur coat” in texture.
After applying the entire composition to the ceiling, the plaster is smoothed with a spatula, resulting in an original pattern. When stained with paint, a two-color relief coating is formed.

Important! Working with plaster, especially on the ceiling, requires certain skills, so it will not be possible to do the work on your own.
Wallpaper

One of the inexpensive types of ceiling decoration is pasting them with wallpaper. Special preparatory work is not required - only the elimination of obvious irregularities and primer coating. And minor flaws, for example, pores and small sinks on a concrete base, roll material can hide.

Wallpaper in a modern interior in an apartment, photo
Of the positive qualities of such a finish, the following can be noted:
- Affordable material cost;
- Environmental friendliness;
- Aesthetic appearance and a variety of patterns and colors will allow you to choose the material for any interior solution (see);
- Some specimens have embossed and embossed patterns on their surface;
- Wallpaper can be combined both with each other and with other finishing materials, creating a unique look of the room;

- allow, if desired, to change the color scheme of the interior without removing the decorative coating;
- A quick way to give the room a new look - the work is carried out relatively quickly, and is not associated with the formation of a large amount of construction waste and pollution;
- No special skills are required to perform the work.

Among the shortcomings, it can be noted that the wallpaper is not suitable for rooms with high humidity. In the kitchen, wallpaper can be glued in the dining area, and above the work area, it is better to use a more practical coating.
Since wallpaper is a rolled material, a seamless coating will not work. To glue the wallpaper with high quality, you will need the help of a second person.

Wallpapering is considered short-lived, and due to the complexity of the repair, it has lost its popularity. They were replaced by a modern material called liquid wallpaper.
Liquid wallpaper

This finishing material is also called "silk plaster" if it contains silk fibers. In terms of texture, this material really resembles a plaster composition, and it is called wallpaper due to the fact that it contains cellulose fibers.

Finishing with liquid wallpaper
- Application instructions are extremely simple - the mass is distributed with a spatula;
- Forms an even monolithic coating, masking the imperfections of the base;
- It can have any shade and decorative fillers;
- Liquid wallpaper can be painted and varnished, increasing their moisture resistance;
- The material is environmentally friendly, therefore it is successfully used in children's rooms and bedrooms;

- Possesses sound and heat-insulating qualities;
- Repairable - the damaged area, if it is a scratch, can be moistened and smoothed with a spatula. Deeper damage can be repaired with fresh mortar;
Important! It is recommended to purchase liquid wallpaper with a small margin, so that if necessary, use it when repairing the coating. The remains of the unused mixture will also work, which can be stored in a frozen form, and before use it is enough to soak it with water.

Niche decorated with liquid wallpaper
- With the help of stencils and the use of a composition of different shades, complex patterns can be made;
- The coating belongs to the category of durable;
- Vapor permeability;
- Working with this material does not require special building skills;
- Liquid wallpaper does not fade under the influence of the sun if they contain silk fibers.

Among the shortcomings of this material can be noted high cost. If the wallpaper is not varnished, then they will absorb odors and moisture.
Styrofoam tiles

They have a decorative appearance, thanks to a relief surface with a different pattern. You can pick them up for any interior: from classic to discreet modern minimalism. With this finish, you can quickly repair the ceiling.

Of the positive qualities of this material, the following can be noted:
- The tile has an aesthetic appearance;
- It can be dyed;
- Polystyrene products can be of any size and shape;
- The tile has a small weight, so it does not exert a special load on the base;
- The slight thickness allows it to be used in low rooms;

From polystyrene boards
- The tile masks minor irregularities and defects on the ceiling;
- It is a durable material with proper operation and installation;
- Has an affordable price;
- The work does not require special skills, and simple installation allows you to repair the ceiling in a short time.

Important! The tile relief resembles stucco, so you need to be careful when choosing a pattern - it will not be relevant for every interior.

You can additionally decorate with a border - it will give it a complete look and hide the joint between the ceiling and the wall.
Suspended structures

Suspended ceiling systems are popular for many reasons. They look aesthetically pleasing, allow you to get a perfectly flat ceiling surface or an original multi-level design.
They also hide communications: electrical wiring, pipes, and, due to the indentation from the base surface, allow you to mount point sources of lighting.

The principle of fastening a suspended structure is that a system of fasteners and suspensions is fixed to the existing ceiling, on which a frame of metal profiles or wooden slats is mounted. Then the selected material is fixed on the frame - drywall, wooden slats or panels.

The presence of the frame allows you not to make a thorough preparation of the base - it is enough to clean it from dirt and falling off parts of the finish.

Layered design with spot lighting
The disadvantages of finishing include the fact that the design inevitably takes the height of the room, so it is not recommended to install such a ceiling in low rooms.
Suspended plasterboard ceiling

Drywall is most often used in suspended structures. It is easy to process, so it allows you to make fragments of various shapes.
With the use of drywall, perfectly flat or multi-level surfaces are obtained. Using an LED strip, you can create the effect of a "floating ceiling" if you place it around the perimeter of the structure.

Drywall sheets are made from pressed gypsum and cardboard on both sides. The material has an affordable cost and relatively low weight.
The disadvantage is the instability of the material to the effects of liquid. In the kitchen, it is recommended to use moisture-resistant drywall, and in the bathroom it is better to refuse this material.

Plasterboard ceiling can be painted with paint, plastered, wallpapered. Another advantage is the possibility of performing heat and sound insulation of the room, when laying the appropriate material inside the structure.

Important! Before painting the plasterboard ceiling, it is necessary to putty the joints and attachment points of the self-tapping screws.
Placement of point light sources should be considered in advance. To do this, it is recommended to make a scale drawing of the ceiling, and transfer the markup to the mounted ceiling. Multi-level backlit structures look especially impressive in combination with a PVC stretch fabric.

Drywall is an environmentally friendly material, so it can be used in children's rooms and bedrooms.
With the help of multi-level plasterboard structures, you can visually divide the room into separate functional areas, or adjust the geometry of the space. It is worth remembering that multi-level structures should have outlines in accordance with the style of the interior. Smooth lines emphasize the graceful curves of modern furniture, strict laconic forms support the minimalist style, etc.
Using panels, battens and slabs in a suspended structure

The frame of the suspended structure can be sheathed with plastic, metal slats, or panels with a mirror surface. Modular elements are used more often on a single-level ceiling structure.
This material is low cost and easy to install. Such a false ceiling can be rack, panel and cassette.
![]()
Rack suspended ceiling is made of plastic, aluminum or steel slats.
Of the positive qualities of such a ceiling device, the following can be noted:
- Long service life;
- The slats are made of moisture-resistant material, so they can be used in rooms with high humidity such as a kitchen or bathroom;
- Reiki are easy to mount, so no special building skills are required;
- The ceiling made of metal slats is hygienic, environmentally friendly, does not rot or burn.

Of the shortcomings, deformation of the rails over time can be noted.

Plastic panels are easy to install and do not require special experience when working with them. Of the positive qualities can be noted:
- Easy installation;
- Moisture resistance of the material;
- Aesthetic appearance, due to the large number of shades and textures;
- Plastic is easy to care for and does not absorb odors.

Among the shortcomings, the instability of the decorative coating to the effects of sunlight, from which the plastic burns out, can be noted. The panels are fragile material - this must be taken into account during installation. The material is not fire resistant and releases toxins when ignited.

It is worth noting that when finishing the ceiling with plastic panels, a monolithic coating will not work, and pollution can accumulate at the joints. The surface of the panels has a glossy sheen, which can visually make a small room lighter.
Other types of suspended ceiling systems
Of course, the ceiling design is not limited to stretch and plasterboard options.
We will talk about what ceilings are in this part of the article:
- We have already mentioned glass stained-glass windows built into the design of suspended ceilings (see). I must say that glass for these purposes can be used not only natural, but also organic or, as it is also called, acrylic.
- Hardboard has a much higher margin of safety and is lighter in weight. Therefore, large acrylic glass can be used in ceiling structures. Hardboard, like ordinary glass, is matted by sandblasting, patterns can be applied to it.

Acrylic hanging panels
- Recently, another way of decorating the ceiling has been revived - drapery with fabric. As they say, the new is the well-forgotten old. Back in the Middle Ages, boudoirs and living rooms were decorated this way. And look how stylish and expensive this interior looks.

- You can use absolutely any fabric - even satin, even chintz. Only designs with stripes and geometric patterns are avoided. There are several ways to attach the material to the ceiling. This is gluing, and pulling on the frame, the use of adhesive tapes, fastening with brackets to wooden slats.
- This type of decor is not so common, yet it is not very practical. Fabric is fabric - it gets dirty, gets wet, and tears. Yes, and the cost of such a finish is rather big.
- If you really want to use natural material in decoration, they often turn their attention to wood, bamboo, cork. Here's an example for you: the walls of the room are covered with cork, and the ceiling is decorated with bamboo panels.

Stretch ceiling

The design of the ceiling with a stretch fabric has recently gained great popularity. The canvas is made of PVC film or fabric. In the first case, it can be glossy or matte, in the second - only matte.
PVC film ceiling can be used in any premises, fabric only in "dry". Structural stretch ceilings can be single or multi-level. They have high decorative qualities - thanks to a wide range of colors and the possibility of applying various patterns and images.

Important! A distinctive feature of PVC film is its small width - no more than 3 m. Therefore, it is possible to form a butt joint, which is so small that it is invisible to the naked eye. The fabric sheets are up to 5 meters wide, making them a seamless covering in standard living spaces.

- The main advantage of a PVC film ceiling over a fabric web is its moisture resistance.
- Such a ceiling can be washed and it is able to save the room from flooding from above, holding a large volume of liquid, which can later be drained by bending the edge of the canvas.
- The disadvantage of PVC film is that it is easily damaged by mechanical stress and does not tolerate low temperatures. Therefore, when washing the PVC ceiling, it is necessary to remove jewelry from your hands so as not to accidentally damage the canvas and not use PVC fabrics in unheated rooms.

Important! When washing a glossy ceiling, do not use abrasive cleaners and hard sponges that can scratch the surface.
Fabric ceilings are more durable, but they are afraid of moisture and will not protect from flooding from above. In addition, the fabric absorbs odors, so such ceilings are not used in the kitchen.
Stretch ceilings, like plasterboard ceilings, can be performed at several levels, and allow you to mount spotlights.

The red flowers on the stretch canvas blend harmoniously with the shade of tiles on the walls in the bathroom.
Important! When ordering a stretch ceiling, it is necessary to discuss with the master at the stage of measuring the room where the sources of artificial light will be located, since the holes for them are cut out at the stage of fabrication.
Of the shortcomings of the stretch fabric, only the high cost and the impossibility of self-manufacturing and installation can be noted. This is done by specialized firms whose employees have the necessary skills, tools and equipment.
The process of installing a stretch ceiling is fast, and is not associated with the formation of construction debris.

Tension structures, like drywall, allow you to hide defects in the main ceiling and communications. You can also choose the height at which the canvas will be located.
Wooden panel ceiling

Panels made of natural wood can be used to decorate the ceiling of any room, except for the “wet” one. This is an environmentally friendly, vapor-permeable material with a rich natural pattern and texture.

Wooden panels have a long service life and do not require repair for many years with proper operation. The material has low thermal conductivity and high sound insulation properties. A warm shade of natural wood creates a special homely atmosphere and comfort.


The cost of some products made to order is quite high. There are several most common types of wooden ceiling finishes.
| Lining and Eurolining |
|
| Decorative wood panels |
|
| MDF panels |
|
| Cork panels |
|


ceiling design with moldings
To give the surface a complete look, various flexible elements made of expanded polystyrene or polyurethane are used. It can be ceiling skirting boards, moldings, frieze.
They differ only in their configuration.

So:
- It's not just about decorating the joints between the ceiling and walls. Finishing the ceiling with a frieze allows you to create various geometric shapes and patterns on its surface. The frieze is fixed with putty or glue, depending on the surface to be decorated.

- Moldings and baguettes in cross section are somewhat larger than the frieze. Finishing the ceiling with molding can be done both along its perimeter and as a decor for the borders between the levels of the suspended structure.
- Using moldings, you can structure the ceiling by dividing it into squares or rectangles. This technique creates the effect of a suspended cassette ceiling, especially if it has spotlights.

- To decorate the ceiling, you can also use such details as interior baguettes. There was a time when they were used only for framing pictures.
Not so long ago, they found application in interior decoration. They are made from various materials: from foam to wood.
Baguettes can be designed for painting or have a finished decorative coating, three-dimensional relief. They vary in width and can be used not only for finishing the ceiling, but also for walls, door and window openings, and curtains.
The video in this article will tell you about which option for finishing the ceiling can be done in the apartment.
Many apartment owners come to the decision to make repairs with their own hands. This, of course, requires a lot of effort, but the savings are more than noticeable. Most of the funds are spent on building materials and tools. If the work is done on your own, then no one needs to pay for it.
However, you should take into account the fact that not all of your dreams about a new apartment interior can be realized without using the services of professionals. Some materials sold in hardware stores require specific skills, work experience and a certain amount of skill. If you are not confident in your own abilities and are doing repairs for the first time, then it is better to use the “proven methods” that will be easy even for a beginner in such a difficult area as repair.
In this article, we will look at do-it-yourself ceiling finishes. Some are suitable for absolutely everyone, only people who already have experience in finishing work should pay attention to others.
Do-it-yourself ceiling made of plastic panels
The main advantage of this method is that you will not need to prepare the ceiling for decoration. It does not require long-term leveling, puttying, plastering and primer. You can even leave the wallpaper on the ceiling if it doesn't peel off.

In order to fix the plastic, you need to make a frame to which the panels will be attached. The cost of plastic is low, the speed of installing panels depends on your skills. The first 2-3 panels may take longer, but the next ones will be fastened very quickly. An excellent option in terms of the ratio of time spent and the price of materials.

Another plus of plastic panels is moisture resistance. That is why the ceilings in bathrooms, utility rooms and toilets are usually finished with plastic. A wide selection of colors and textures is also an advantage of this method.
The only (doubtful) disadvantage of this method is that plastic is not considered an environmentally friendly material. But different people have different opinions on this.
Bottom line: you can make a ceiling from plastic panels with your own hands not only quickly, but also inexpensively.
Do-it-yourself plastic ceiling - video
Do-it-yourself ceiling decoration with wallpaper

Wallpaper has long been used not only for wall decoration. Depending on which wallpaper you choose, repairs can turn out to be quite cheap or quite expensive.
A clear disadvantage of this method is the need for preparatory work. You will need to remove the previous ceiling covering (if any), then level the ceiling, putty it, prime it, and only then proceed with wallpapering.
When calculating funds, do not forget to include plaster, putty and primer in the estimate. Also, the preparatory stage will take time, because each layer must dry.

Perfectly flat ceilings are rare, and making them so without experience is not easy. If you stick even the most beautiful wallpapers on an uneven ceiling, they will not look very good, because the joints, gaps and bends of the ceiling will become noticeable.
Among the advantages of this method are relatively quick and easy installation, a huge range and quick replacement if necessary (if the wallpaper fades, they can be changed to others without re-preparatory stage).

Bottom line: it is best to use wallpaper for finishing the ceiling with your own hands, if there are no defects on the surface. A fast way to fit any budget.
How to glue wallpaper on the ceiling - video
Do-it-yourself plasterboard ceiling

If the ceiling in your apartment is far from ideal, then drywall finishing is a great solution. First you will need to mount the frame to which the drywall will be attached. This building material is one of the most popular on the market, since even beginners can easily work with it, and more experienced apartment owners can create real works of art from drywall. Tiered plasterboard ceilings will help visually highlight a certain area of the room or simply decorate your ceiling.

We do not recommend that you use multi-layer structures in small rooms and in rooms with low ceilings. To visually enlarge the room, use the "concave" ceilings. And ovals and radii will help to give a large room coziness.

Another plus of this material is that it can be used in damp rooms (exceptionally moisture-resistant drywall): bathrooms, toilets, pantries.
The only obvious drawback is the need for additional work after installation. You will need to carefully putty the entire surface to hide the joints.
Bottom line: an inexpensive, but time-consuming way to finish the ceiling with your own hands.
There is also such a finishing option as stretch ceilings. However, the process of installing a stretch ceiling is quite laborious and requires certain skills. Therefore, you are unlikely to be able to independently install a stretch ceiling with your own hands. It is better to contact a specialized company that carries out both tailoring and installation of stretch ceilings. For residents of the south of Russia, we recommend buying stretch ceilings in Rostov from the RostovPotolok company, since it has established itself as a team of professionals in its field and has been on the market since 2006.
How to make a plasterboard ceiling - video
Do-it-yourself ceiling painting

This option has been used in the decoration of apartments for many years and does not lose its relevance. The main advantage of this method is its durability and reliability. You do not need to be afraid of the "flood" arranged by the neighbors from above, the ceiling, finished with paint, can easily cope with such a misfortune.
However, painting the ceiling requires the most serious preparatory stage. If you want your ceiling to look great, then it must be not only perfectly flat, but also perfectly smooth.
To do this, you will have to remove the existing coating, cover the ceiling with putty and carefully bring it to perfect smoothness with sandpaper (or a special mesh). This is a difficult job that requires not only time, but also accuracy. If you “remove the excess” in some place, then you will have to putty the ceiling again. Achieving the perfect ceiling for a non-professional will be very difficult.

The advantages of painting the ceiling with your own hands is that you are not limited in the choice of colors and textures. There are paints with different effects: matte, glossy, with mother-of-pearl, fluorescent (glow in the dark). You can even find paint that creates the effect of stretch ceilings.
Bottom line: a great way to finish the ceiling with your own hands, if you have a ready-made flat surface. Otherwise, the repair will require a lot of time, effort and money.
How to paint the ceiling with your own hands - video