Floor carpet tiles: photo, installation, reviews. What options for laying tiles on the floor are there? Laying floor tiles with carpet
Carpet tiles (tiled carpet) are essentially the same carpet, only modified and having a number of advantages.
Carpet tiles: what is it?
Carpet tiles are squares of carpet with a stronger, reinforced base and a pile made of a special material. The dimensions of carpet tiles are usually 500x500 mm (50x50 cm), and can be 600x600 mm.
What does it consist of
The basis of floor carpet tiles is made from bitumen, or polyvinyl chloride, and fiberglass acts as a reinforcing material.
Thanks to this basis, the tile becomes durable, resilient and hard to bend. All this is done so that after laying the edges and corners of the material do not bend and fit snugly against each other.
Carpet tiles are not afraid of moisture, temperature fluctuations, and the effects of detergents.
As for the pile, it is most often made of artron - a unique material that does not allow dirt to pass to the base of the coating. Thus, dust and dirt will not settle at the base of the pile and can be easily removed with a conventional vacuum cleaner.
 Composition of carpet tiles
 Pros and cons of carpet tiles
Advantages of carpet tiles
- Easy assembly and dismantling. Even a housewife can cope with laying carpet tiles (if she reads this article to the end).
- It is easy to choose the quantity for a certain area, which proves a more economical consumption of material. Unlike a roll, which is not always possible to find a width suitable for the dimensions of the room and which has to be bought with a margin of 15-20%, modular carpet tiles are sold in squares and are easily selected by quantity.
- The carpet tiles do not contain toxic substances and components. Initially, this material was developed for residential premises. Moreover, even after exposure to high temperatures, the coating does not emit harmful substances. So carpet tiles can be laid on a warm floor and not be afraid of the consequences.
- Due to its composition, carpet tiles have excellent sound and heat insulating properties, increased wear resistance, and are more resistant to mechanical stress than conventional coatings.
- Tiled carpet opens up ample opportunities for the implementation of design ideas. The combination of multi-colored tiles allows you to create a unique and unique floor design.
- Easy transportation. To transport carpet tiles, a regular car trunk is suitable, and in order to transport a roll of carpet, you have to hire trucks and movers.
Flaws
The main disadvantage is wear in high traffic areas. The joints of the carpet tiles do not withstand intense mechanical stress and it begins to peel around the edges or peel off.
But this minus is easy to eliminate if you purchase a tile in reserve, because the old material is easy to remove and lay new squares in its place.
How to lay carpet tiles
Laying carpet tiles is not a difficult process and sometimes it can turn into an exciting activity, because the material is also called carpet mosaic tiles. As with any floor covering, a prepared subfloor is required.
Surface preparation
The subfloor must be clean, dry and sound. Remains of glue, other flooring, dust, debris, etc. should be removed from the surface.
All defects must be removed, and gaps and cracks must be repaired with means for repairing one or another type of surface (putty, rub, cover, etc.)
Material preparation
Carpet in tiles must acclimatize, that is, take the temperature of the room in which it is planned to be installed. To do this, the coating should be left in the room for 24 hours.

The minimum humidity in the room during operation should be 75%, air temperature 15 degrees Celsius.
Advice! Packages with tiles do not have to be opened completely, it is enough to remove the side parts so that air can circulate well between the segments. Do not stack packages of more than 8-10 pieces on top of each other.
Carpet tile laying technology
First of all, you need to markup. This stage is mandatory, especially if multi-colored tiles are to be laid. If the marking is uneven or absent, the edges between the segments of different colors will stand out and the appearance of the floor will suffer from this. A straight line is drawn in the center of the room and you can already “dance” from it.
Laying tiled carpet begins with laying out the central row. We lay the tiles (without fixing) along the marked line, starting from the entrance to the room. It turns out that the drawn line is the junction between two rows. After laying looked - everything is ok? If yes, then we begin to fix the tiles to the floor surface.
Usually, a double-sided adhesive tape is included with the material for fixing the tiles. Its fragments are glued under the corners of the segments, that is, one piece of adhesive tape holds four corners. Glue should be sequential.
Step by step work in the photo:


The rows extreme to the walls may have to be cut. It is not difficult to do this - we measure the distance from the wall to the edge of the last row with a tape measure and cut a piece of tile of the desired size with a sharp knife.
And you can do it smarter:


Installing carpet tiles on your own is actually not difficult. We have described the traditional mounting technology. But for greater originality, the coating can be laid diagonally. In the photo below, there are several ways to lay carpet tiles.

Carpet tile adhesive is usually not used, fastening is carried out using double-sided tape. However, in some cases, if the surface does not allow sticking adhesive tape, you can apply a special adhesive fixation. The fixative is applied with a roller and will allow you to move the segments on the surface.
Advice! On the back of the tile there is an arrow that indicates the direction of the pile. By laying the material in one pile direction, the floor surface will look like a single unit. But you can experiment, as, for example, in the picture below.

Photo with options for laying carpet tiles

1. Material preparation
By their very nature, textiles must adapt to the atmospheric conditions prevailing after they have been installed and during use. Before installation, Interface carpet tiles must be unpacked and left in the room where they are to be installed for at least 24 hours at a temperature of at least 16°C.
2. Installation conditions
2.1 Floor preparation
Before installing Interface carpet tiles, you must determine the location and depth of cables, heating elements and water pipes in the floor screeds and complete all preparatory work, including the installation of floor sockets with protective plugs. The base must be solid, dry and free of debris. The old flooring as well as adhesive residues must be completely removed and, if necessary, treated with a floor leveling compound (see Fig. 1), taking into account local conditions and in accordance with the recommendations of the manufacturers. To ensure the correct application and complete drying of the leveling compounds, it is necessary to carry out and complete all preparatory work in a timely manner.
2.2 Waterproofing
The screed design must provide an effective waterproofing layer at or below ground level, or in areas of possible moisture penetration.
2.3 Subfloor
The subfloor must meet the requirements of BS 5325 or relevant national or European standards. The choice of specific leveling compounds depends on the type of subfloor and other requirements such as high impact resistance, etc.
2.3.1 Concrete floor
The new concrete floor must be cured (gained strength) and fully waterproofed. The humidity level must not exceed 75% (measured with a hygrometer). The old concrete base should be smooth and even. If chemicals are used to remove the previous coating, or if abrasion of the surface is found, resealing is recommended.
2.3.2 Vinyl tiles
Damaged tiles should be repaired with a leveling compound as described in section 2.1, or replaced with new ones, removing traces of wax or surface treatment.
2.3.3 Wooden floors
 The floor must be level, smooth, dry and clean. Before laying plywood, chipboard or fiberboard, worn or uneven boards should be replaced with new ones, or the surface should be leveled by sanding, planing or applying mastic and bolted in the center, set back from the edges by 100 mm (for more information, see page 10). Fig. 2 and BS8203 requirements).
2.3.4 Parquet floor
Provided that the parquet boards are smooth, strong, even and securely bonded to each other, a layer of plywood, chipboard or fibreboard is required for laying them, as indicated above. In the case of using parquet on the lower floors, the floor structure must include a waterproofing layer. If these conditions cannot be met, the parquet boards must be removed and the subfloor prepared as required.
2.3.5 Particle board
A chipboard floor must meet the requirements of BS 5669 and be free of wax, polyurethane or other types of waterproofing. Uneven floors must be leveled according to the instructions given for wooden floors.
2.3.6 Ceramic tiles, porcelain stoneware, marble, etc.
All cracks and irregularities must be repaired and traces of chemical treatment removed. Joints must be filled with suitable grout. If there is a possibility of moisture penetration, the base should be covered with a layer of bitumen, remove the foam and apply a layer of leveling compound 3 mm thick.
2.3.7 Bituminous floor
The subfloor must be level, clean and dry. NB Glasbac® should not be installed directly on a bituminous floor. Before installation, the floor must be leveled.
2.3.8 Raised floor or low profile cabling system.
The floor must be smooth, even, clean and dry.
2.4 Floor heating
Interface Carpet Tiles can be installed on underfloor heating provided that the surface temperature of the floor does not exceed 27°C. Floor heating must be turned off for at least 48 hours before installation.
PLANNING
3.1 Tools
A metal ruler, a chalked cord, a construction knife for a carpet and a square. For tiles measuring 25 x 100 cm (slats) - a meter square.
3.2 Measurements
 Using standard tile laying methods, determine the center of the room and the baseline from which the laying will begin (see Figure 3). The resulting sectors should have a central angle of 90°. It may be necessary to move the chalk cord off center to ensure that the perimeter tile is not cut more than halfway.
In some cases (if there are doorways or partitions), the baseline will not be in the center of the room. For planks, especially in traditional herringbone laying, measurement accuracy is an important requirement for correct installation.
When determining the baseline for the herringbone and the direction of the pattern, it is recommended to consider the following main factors:
- The longest wall of the room;
- The direction of the tile pattern towards the main architectural features, for example, towards the main entrance or reception.
3.3 Fastening method
 Carpet tiles with patented Glasbac® and Graphlex® backings are designed to be installed with adhesive-fix or "loose lay" installation within a 2 x 2 m mesh stabilization grid (see Fig. 4). This mesh must be attached using an approved means with the addition of a roller tackifier. Carpet tile installation may be subject to specific national building codes, if applicable. The tackifier should be applied in 100 mm wide strips forming a 2 x 2 m grid and left to dry completely in accordance with the manufacturer's instructions.
3.3.1 TacTiles™
Interface Carpet Tiles can be installed with TacTiles™. The requirements for preparing a subfloor for laying tiles with TacTiles are similar to those for laying with adhesive fixation. For more information about TacTiles and how to use it, see the TacTiles Installation Guide.
3.3.2 Raised floor or low profile cabling system.
 (see Fig. 5). Special precautions must be observed:
- Do not apply an excessive amount of adhesive-fixation in order to avoid its penetration between the panels and their bonding;
- Under no circumstances should the fixing adhesive be poured directly onto the panel;
- Use a roller to spread the fixing adhesive evenly over the surface;
- Allow the adhesive to dry completely before installing carpet tiles.
NOTE!
Alternatively, approved double-sided tape or TacTiles can be used.
3.3.3 Fixing tiles around the perimeter of the room
 The first row of whole tiles laid along the walls and all cut tiles laid around the perimeter must be securely fixed with adhesive fixation or adhesive tape (see Fig. 6). To avoid displacement of tiles laid along the open perimeter, it is also necessary to pay special attention to them when laying.
INSTALLATION
4.1 Start laying
 Starting from the baseline, carefully place one row of tiles along each chalk line and secure them securely (see Fig. 7).
All Interface products have arrows on the underside to indicate the direction of the pile. There are several different tile laying methods: no arrows, monolithic laying, checkerboard, brick, masonry and bi-directional laying. As an option, below is a description of the laying of 25 x 100 cm tiles (slats) in a herringbone pattern. With any installation method, the direction of the arrows printed on the underside of the tiles will help to create the correct pattern. For specific installation recommendations, please refer to each specific collection's catalogs, specifications, and Interface product catalogs.
NOTE! Carpet tile collections that can be applied with the arrowless installation method also have arrows on the backing of each tile, the direction of which can be ignored during installation, as their design is chaotic and does not have a specific pattern.
| all arrows point in the same direction - the pattern is also known as "carpet" or "linen". | |
| Chess (Quarter turn): every second tile is set with a 90° rotation to each other in a checkerboard pattern - the pattern is also known as a "checkerboard" or "mosaic". | |
| "Brick" (Brick): all arrows point in the same direction, tiles are laid with an offset to the right/left equal to half the side of the tile. | |
| "Stonework" (Ashlar): | |
| tiles are laid regardless of the direction of the pile and the arrows on the substrate. | |
| a laying method in which the arrows on the tiles can be directed in opposite directions, creating the effect of a monolithic laying. | |
| Planks 25 x 100 cm"Stonework" (Ashlar): all arrows point in the same direction, tiles are stacked with an up/down offset equal to half a tile. | |
| « Herringbone "(Herringbone): L-shaped laying of tiles. A similar method is often used when laying wooden parquet. |
4.3 Alignment
Since the tiles are laid end to end, constantly check where they are joined by checking them with your fingers and leveling them.
4.4 Stretch
 At all stages of laying, pay special attention to the seams, trying to ensure that the tiles are tightly joined to each other, and the ends of adjacent tiles are in contact.
The pile of the tile should be combed in the opposite direction, place the tile on the floor, connecting its edges tightly with adjacent tiles and avoiding getting the pile into the joints (see Fig. 8).
In places of loose connection, the tiles may diverge, which, in turn, affects the quality of the flooring. Also avoid using excessive force when laying the tiles as this can cause them to bend.
4.5 Sequence of laying (see Fig. 9).
4.6 Cropping
4.6.1 Perimeter
Place the tile face down, carefully measure and trace the cut line on the backing. (see Fig. 10). Cut the backing with a knife along the ruler.
NOTE! The tile can also be cut from the front side.
4.7 System “Computer watchman” (computerguard)
All Graphlex® products have received a special patented Computerguard® treatment to dissipate static electricity. It is important to remember that the back of the tile should be in direct contact with the subfloor surface to ensure the best dissipation of static electricity. In the case of using a wooden subfloor, its entire surface must be treated with adhesive-fixation. The basis of Glasbac® products consists entirely of conductive material.
4.8 Stairs and vertical surfaces
4.8.1 Interface Carpet Tiles can be installed on stairs if appropriate guard rails are used (for corners and steps)
4.8.2 Tiles installed on steps, risers and any other vertical surfaces must be fixed with an approved adhesive, following the manufacturer's instructions.
4.8.3 It is necessary to ensure accurate and tight joining of tiles around communication holes and technological expansion joints. Under no circumstances should expansion joints be leveled, grouted or covered.
COMPLETION OF WORKS
It is not permitted to walk and/or move furniture on partially laid carpet tiles, all tiling work must be completed, including around the perimeter of the room. In some cases, heavy furniture or wheeled vehicles can move the coating. To avoid such situations when moving heavy objects, it is recommended to cover the carpet with sheets of plywood or fiberboard.
SPECIAL INSTRUCTIONS FOR INSTALLING STRIPS
Tiles measuring 25 x 100 cm (slats).
For the Urban Retreat 501 and Net Effect Two collections, the following installation methods are possible:
For the herringbone laying method, the planks can be positioned in two ways, each of which requires special training.
 The first type of herringbone laying is formed by laying the planks L-shaped, but the baseline can be either at an angle of 90º (type A) or at an angle of 45º (type B). For type A, the planks can be laid at an angle using chalk cord as described in section 3.2. For the correct formation of the L-shaped laying of two planks, it is necessary to constantly check their evenness and angle using a square (see Fig. 11).
Type B is more complex and requires additional work, diagonal lines. Determine the center focal point for the desired pattern and mark the center and baseline with chalk line as described in Section 3.2. Use a square to make sure the chalked cords form a right angle.
The center line conveys the direction of the pattern, but to ensure that the pattern is centered, you may need to measure and draw a work line parallel to the center line. For planks, measure 18 cm and fix the chalk cord parallel to the center line. This will be the baseline from which the laying will begin.
 Where the work line intersects with the base line, draw a diagonal at an angle of 45º. Using a square, check that these lines form a right angle, then lay the first plank along the diagonal line, starting from the intersection of the work and base lines. Place the next plank in such a way that an L-shaped laying is formed, and with the help of a square, check whether the tiles are laid evenly: the first two planks determine the correctness of the entire laying at an angle of 90º. Keep following
this drawing, constantly checking the evenness of the tiles with a square (see Fig. 12).
The slats can be secured with adhesive fixation or Tactiles (see section 3.3 for more details).
WARNINGS
- Interface Carpet Tiles are produced in batches, the colors of which may vary slightly depending on the batch of yarn used to produce the batch of tiles. Lots of products are determined by the appropriate labeling of products. It is not recommended to stack products from different batches in the same room, except for products with this method of stacking, where batch compliance is not required (for example, no-shooter method). The contractor or other authorized persons, upon acceptance of the products, are responsible for checking the quality of the delivered products and checking the conformity of the product lots before signing the delivery note. Directly during the acceptance of products, the integrity of the packaging is checked, as well as the presence of the appropriate marking. When laying the product, the installation method recommended for the given product and the room must be followed. At the same time, all authorized persons must visually assess the quality of the laid products. The maximum possible area on which a visual assessment of product quality is made cannot exceed 100 sq.m. If during the laying process there is a suspicion that the product does not comply with the original specification, batches and color shades (different colors) of the product, the Contractor or persons authorized by him are obliged to stop all work on laying the product and immediately inform the supplier of this product or representatives of Interface about the identified discrepancies.
- Cut and loop pile products may show temporary pressure marks resulting from packaging, shipping and storage. This temporary effect is characteristic of all types of carpeting, which will eventually disappear, the tufts of pile will rise and the carpet will return to its original shape.
- Any modification to the installation procedure above may void the warranty. Interface is not responsible for defects resulting from installation methods other than those specified in this manual. Reading these instructions is subject to the terms and conditions of sale of Interface.
- Occupational health and safety. Adhesives and floor preparation materials must be used in accordance with the manufacturer's recommendations and with precautions to ensure safe handling of the product. In addition, instructions for the control of substances hazardous to health and labor protection from the respective manufacturers of adhesives should be obtained.
Laying carpet tiles is a process that requires a responsible approach. Considering that the material belongs to the category of "premium" floor coverings, any defects and mistakes made during installation are the risk of additional costs and time, and effort, and money. If your goal is to get a high-quality result with an official guarantee, then cooperation with the HIT-KOVRY company will be an extremely profitable solution.
We work with any kind of flooring and are ready to take full responsibility for installation. It is within the competence of our craftsmen to create a perfectly even, beautiful and reliable floor, demonstrating excellent aesthetic and operational characteristics. Installing plain carpet tiles or patterned material? We are capable of tasks of any complexity. Just contact the HIT - CARPETS company, and the result of our work will 100% meet any expectations!
Why is laying carpet tiles with "HIT - CARPETS" profitable?
For several years now, we have come to the aid of new and regular customers in order to once again prove that the quality of work can and should be at its best, even if the price of laying carpet tiles is minimal. Our customers enjoy a full range of benefits, namely:
- Carpet tiles are laid from scratch, in a turnkey format. All the client needs to do is to tell us about his wishes, specify the location and operating conditions of the flooring. Taking into account indicators of humidity, average temperature, permeability and other factors, our specialists will find the best solution.
- We provide a personal guarantee that carpet tiles will continue to perform their original functions without restriction. Laying is carried out only by professionals who know everything about the dismantling of the old flooring, cleaning and leveling surfaces, tiling and other related procedures. You can use carpet tiles for a long time without worrying about wear and tear.
- The cost of flooring work remains unchanged from the moment the contract is concluded and until the delivery of the customer's result. We lay carpet tiles responsibly and never go beyond a price that is comfortable for the client. You know in advance how much the upcoming procedures will cost, and you can plan your budget without fear.
Please note that you can use not only the help of the employees of the company "HIT - CARPETS" for flooring, but also choose the appropriate material from our range. We work with exclusively proven products and we are sure that you will be satisfied with both the appearance of the finished floor surface and its condition after several years of operation.
Registration of the application for departure of the master is carried out directly online. The consultant's visit is available for clients in Moscow and the Moscow region. The specialist will not only provide detailed advice on new flooring at a particular facility, but will also be able to acquaint you with samples of all flooring options presented in our online catalog.
Do you want to know the details of cooperation with the company "HIT - CARPETS"? Call the number listed in the "Contacts" section and get expert advice right on the phone!
When planning a renovation using ceramic tiles, there always comes a time when you need to decide which scheme for laying tiles on the floor will suit you best. The floor tile differs not only in color embodiment and ornament, but also in the shape of the samples. And if you correctly use this floor material for laying, you can completely change the interior of the room for the better.
What should you pay attention to when choosing a tile laying method?
There are various ways to lay tiles on the floor, but which option is ideal for your particular case, we will try to figure it out by answering a few questions:
- First of all, you should pay attention to the area of \u200b\u200bthe room in which the repair is being carried out, and to its shape. After all, a certain floor tile can visually expand or, conversely, reduce the space. And if the scheme for laying tiles on the floor is correctly chosen, as well as the shape of the tile and its colors, you can achieve simply incredible results.
- When choosing an ornament for the floor surface, you should not lose sight of the location of furniture and decor elements, including plumbing.
- The issue of lighting in the room is also extremely important. If it is not enough in the room, you should choose floor tiles in light shades.
- Before laying the tiles, you need to objectively evaluate the quality of the rough base. If the flooring has small defects, they are removed using a conventional cement-sand mortar. When there are large differences in height, especially if more than 2/3 of the surface is in pits, crevices and other irregularities, experts recommend pouring a new screed.
Important! Regardless of which floor tile installation methods you like, it is worth buying a tile with a small margin. This additional 10% of rectangular or square shaped supplies will ensure a quality deck. This is useful in cases where, in the process of work, you spoil something or find a tile with a defect.
Floor tile options
There are different types of laying ceramic tiles on the floor. True professionals in their field are trying to create an exclusive and beautiful floor, combining the basic methods of masonry. When laying tiles, they rely on three basic methods, namely:
- laying tiles diagonally;
- classic smooth way;
- offset installation or, as it is also called, brickwork.
Moreover, you can create various compositions thanks to the skillful combination of tiles of various colors and ornaments. This is how chess masonry and mosaic variation appeared.
There are also complex options for laying floor tiles, such as labyrinth, loft, herringbone, wicker, parquet or carpet. But these masonry methods should be used in certain conditions, embodying the intended interior design.
To figure out which laying of rectangular and square tiles on the floor will suit you best, you should familiarize yourself with the technique of laying them.
Classic way
This is the easiest and most popular way of laying tiles on the floor. To implement this method, no skills are required, and anyone can cope with such a task.
 Room design with classic installation of tiles on the floor
 The tiles are laid in rows without shifting. The most difficult and responsible task in this case is to maintain the evenness and regularity of the rows, so that the picture as a result is concise.
 Classic floor tiling
 If you prepare a rough base for arranging the floor in a quality manner, installation work will not be too laborious, and it will be easy to complete them in a short time.
Laying rectangular ceramic tiles on the floor, including square ones, has a number of positive qualities. First of all, this is the period of work, because you can’t call it long. Moreover, there is less tile consumption, because it is laid evenly, and is cut off only at the edges.
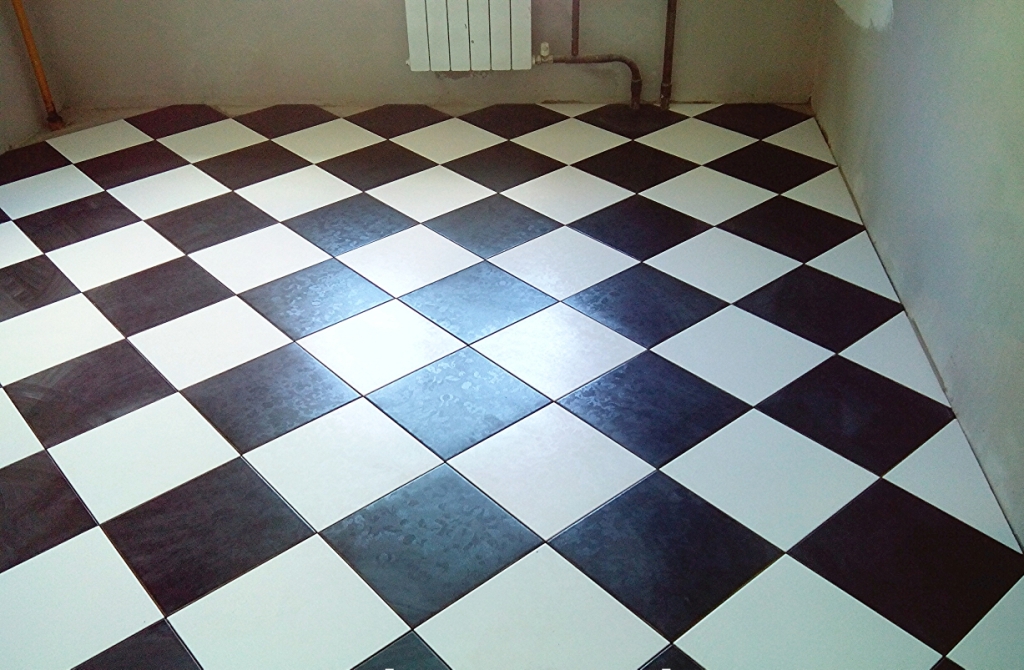
If you use in this case a square tile of two different colors, you get a pattern that is called "chess". This is an interesting option for decorating rooms. Experts recommend using it for decorating a kitchen or small-sized rooms.
 Chess method of decorating the floor in the kitchen
 Brickwork
Laying tiles apart is often also called brickwork. This option for arranging the floor is even simpler than the first. After all, there is no need for strict observance of the evenness of the longitudinal masonry. Installation of tiles of the next row is carried out with an offset of half the tile, it turns out an imitation of brick laying. And if you make a mistake by 1-2 mm, then no one will notice.
 Laughing laying tiles apart
 So that in the process of installation work there are no additional difficulties and interruptions, it is worth remembering: if the first row began with a whole fragment, then the next one will be performed from a half. To maintain the evenness of the longitudinal seams, it is worth using special crosses.
 Interior design with brickwork on the floor
 Diagonal tiling method
Laying tiles at an angle can be done on the basis of the classical method or the staggered method. This masonry got its name due to the fact that it is performed in the direction from one corner to the opposite.
Important! Before using diagonal masonry, experts recommend creating a clear drawing that will display the specific location of individual fragments. If you plan to use several colors of tiles or individual samples with a pattern, this should also be drawn up on the drawing.
 Diagonal laying of ceramic floor tiles
 To properly cut the tile diagonally, you need to have certain work skills. And if you do not own them, it is better to entrust this task to professionals.
If you use staggered diagonal tiles, this will visually lengthen the room. Please note: do not expand, but lengthen.
 Diagonal masonry with a checkerboard pattern
 Herringbone style
This method implies a successful imitation of parquet masonry. It is particularly neat and looks quite presentable, involuntarily attracting attention. That is why it is worth paying special attention to the quality of installation.
Important! To implement herringbone laying, it is worth purchasing only rectangular tiles.
 Decorating the floor with the herringbone method
 If you want to achieve some visual expansion of the room, it is worth using narrow tiles. This will significantly increase the time of work, but the result will definitely please you.
When you want, on the contrary, to add coziness to a large room, it is recommended to use rectangles of large width.
Shear masonry method
This laying method is perfect for loft style. In this case, both large and small ceramic fragments are used.
Important! In order for the laying of tiles with a shift to be equipped as it should, it is recommended to involve specialists, since you need to know your business to perform such a complex job.
The difficulty lies in the possibility of distortion. After all, even one small mistake can reduce all efforts to zero.
 Floor design according to the shift technique
 labyrinth
This tile laying option is also called braided. Its embodiment may be different, but the meaning remains the same. Small squares appear inside the intertwining stripes, differing in color or ornament.
 Wicker on ceramic floor
 To create stripes, you need to select tiles in the shape of a rectangle, while squares are used for decoration inside. When buying consumables in a store, do not be too lazy to immediately collect a small area of \u200b\u200bthe floor to avoid size mismatches.
Such styling looks very rich and solid in the interior of any room, especially if the colors are chosen with taste.
Deck
This method aims to imitate a deck board. In this case, a slight alignment is provided with strict observance of the equality of distances over the entire surface of the flooring.
 "Deck" - a strict imitation of wood flooring
 Carpet
 Carpet in the hallway
 If you want to emphasize the surface of the floor, it is recommended to use the "carpet" masonry method. For this method, at least two colors of tiles are used, framing the pattern around the perimeter. Experts advise using this masonry method for large rooms, although this is also an acceptable option for a corridor.
Thus, the choice of the method of laying floor tiles depends both on personal preferences and on objective factors: the size and purpose of the room, its illumination, financial capabilities and skill level.
At Inter-Pol, you can choose and buy different types of carpet tiles, but also order a service for its installation. Today, such an original coating as carpet tiles is gaining popularity, which you can buy both at home and in the office. Tiled carpet is a modular coating that has many undeniable advantages. Like a regular carpet, it provides sound and heat insulation and creates comfort in the room, and thanks to the ability to combine tiles of different colors, lengths and direction of the pile, it allows you to create interesting design solutions. Most often, carpet tiles in Moscow are used in office premises, but there are also options for apartments and country houses.
Carpet tiles in the office
If an office carpet is used as a floor covering, then after a while it will most likely take on a not very neat appearance due to the fact that the coating will be trampled near the door and in other passage places, so-called "paths" will appear. But laying carpet tiles allows you to get a coating in which worn out elements can be easily replaced, because. during installation, a special fixative (adhesive composition) is used, which allows up to 4-5 local replacements of carpet tiles. If carpet tiles are selected, the price per m2 depends on their performance characteristics. There are several types of tiles:
- needle-punched;
- loop;
- with cut pile.
The latter is mainly used in residential areas. The method of attaching the pile affects the durability of the tile, so when choosing, you need to focus on the patency of the room. There are also two types of carpet tile base: bituminous resin or polyvinyl chloride composition (PVC). In order for the tile to have a clear geometry, it is produced with the addition of a reinforced fiberglass layer, like a "sandwich": two layers of resin are separated by a layer of fiberglass. This technology provides high strength, resistance to bending deformation and the ability to withstand high loads. EIf the budget allows, choose bitumen-based tiles of famous world brands - this carpet tile, the price of which is somewhat higher, has a more regular shape and clear geometry, because. practically does not shrink and thus does not lead to deformation. The composition of the pile also affects the performance. As a rule, the composition of the pile is made of polyamide, polypropylene or wool. The latter, for obvious reasons, has a high cost. The first two types of pile are more common. Polyamide is a more durable and reliable material, unlike polypropylene, and has a higher cost.
In our online store there is a large selection of carpet tiles in stock, wholesale and turnkey service are discounted. With an area of 100 m2, we will deliver samples for laying free of charge in Moscow within the Moscow Ring Road.
Carpet tile laying technology
In general, the technology of laying carpet tiles at first glance seems quite simple,  but in reality it requires the use of a special tool, technological awareness and of course a wealth of experience with carpeting.
In most cases, the cost of laying carpet tiles does not differ significantly from the cost of laying carpet offered by Inter-Pol. In cases where designer carpet tiles are needed, the price per m2 may increase depending on the complexity of the task. Also, the condition of the floor before laying affects the cost. If additional work is needed to prepare the floor, and not just laying carpet tiles, the price will increase slightly. In order to calculate the exact cost of work at your facility, call us and we will make you a detailed commercial offer indicating all work processes and all necessary materials.
Laying of carpet tiles by "Inter-Pol" company - VIDEO
In this video, the employees of our company have laid carpet tiles and carpet from Forbo according to a design project for SkyEng, an English language distance learning company.
Laying carpet tiles price of work
| Name of works | Unit measurements | Price |
|---|---|---|
| Carpet laying | m2 | from 180 rubles |
| Carpet laying with pattern selection | m2 | from 250 rub |
| m2 | from 180 rubles | |
| Carpet tile flooring according to the design project | m2 | from 250 rub. |
| Dismantling works | m2 | from 50 rub |
| Foundation preparation | m2 | from 50 rub |
| floor grinding | m2 | from 50 rub |
| Self-leveling floor device (up to 10 mm, more than +100 r) | m2 | from 180 rubles |
| Foundation repair | m2 | from 50 rub |
| PVC skirting board installation | m.s. | 100 rub |
| Installation of carpet plinth | m.s. | from 120 rubles |
| Installation of interior trims (threshold) | m.s. | 350 rub |
Order carpet tiles
Leave your carpet tile flooring to the flooring professionals. Some of our professionals have over 15 years of experience! We will carry out the work according to all technical conditions, quickly and at the same time without loss of quality.