Installation of an electric fan on the UAZ 469. Installation of electric fans on the UAZ. Pros and cons of viscous coupling
Owners of the UAZ Patriot SUV are aware of such a vehicle problem when, in hot weather, the engine heats up and reaches 100 degrees Celsius. This, of course, is an unpleasant sight, which is observed mainly on hot summer days, when the temperature outside is +30 degrees and above. The reasons for the heating of the engine of the UAZ Patriot SUV are known - the fan cannot cope with its properties. In this article, we will consider why the fan, which is designed to cool the radiator of the UAZ Patriot SUV engine, does not cope with its functions, and we will carry out minor repairs to eliminate this problem.
Let's start with the fact that the engineers of the Ulyanovsk Automobile Plant are equipping UAZ Patriot SUVs with fans for cooling the radiator, which are driven by a viscous coupling.
The viscous coupling is a mechanism presented in the form of two flat disks. The viscous coupling allows you to transmit torque through a special fluid based on silicone.
The principle of operation consists in several plates mounted on the driven and driving shafts. They rotate in containers with a liquid that changes its properties when heated. When the liquid is agitated as the drive shaft rotates, it changes its properties (expands) and thereby creates pressure in the chamber. As a result, the discs of the driven shaft engage, setting it in motion.
Such a viscous coupling is the fan drive on the UAZ Patriot SUV. Everything is fine, if not for such a minus, which gives impetus to the search for its elimination. This disadvantage is that the viscosity of the liquid depends on the speed of mixing. During braking of the UAZ Patriot car and engine idling, the fluid loses its properties as a result of slowing down the rotation of the drive shaft. This causes the cooling fan to slow down and the temperature in the engine gradually rises. This phenomenon occurs when you have to stand in a traffic jam in the summer heat or move over rough terrain at low speed. Although the viscous coupling is an innovation, its use on the UAZ Patriot SUV is unsuccessful. We will consider how to fix the problem of engine overheating below, but for now we will list the disadvantages of using a viscous coupling.

Scattered impeller blades
Cons of viscous coupling
The disadvantages of using a viscous coupling on an UAZ Patriot SUV include the following factors:
- The instability of the engine temperature, which varies depending on the speed of the crankshaft.
- Difficult access to rollers and belts.
- There is no way to force the engine cooling fan to turn on.
- Unstable fan speed. It is possible for the fan blades to come off, which is fraught with a breakdown of the radiator. As a result, it becomes necessary to replace the radiator and install a new fan.
There is no way to repair it. If the product does not function, then the repair is no longer appropriate, and it needs to be replaced with a new one.
Theoretically, repair of the product is impossible, but practically possible. To do this, two holes are drilled in the viscous coupling hole, through which bolts are threaded and fixed to the drive disk. This repair allows the fan to rotate regardless of changes in fluid viscosity.
To get rid of this problem, it is necessary to install an electric fan instead of a viscous coupling. Such a system is much more reliable, efficient, and, most importantly, rational. The advantages of such a system are discussed below.
An electric fan instead of a viscous coupling: advantages
The advantages of installing an electric fan instead of a viscous coupling are:
- Maintaining a constant engine temperature.
- When the car is stopped and idling, the engine does not heat up.
- Access to the belt and rollers is released, which simplifies their replacement.
- Possibility of manual inclusion of the electric fan of cooling of the engine.
- In addition, if one fan fails or it fails, then in this case two units are installed that compensate for each other's work if necessary.

So, we found out that instead of a viscous coupling for cooling an SUV engine, it is rational to install an electric fan. To do this, you need to remove the viscous coupling from the UAZ Patriot SUV.
Removing the viscous coupling
Removing the viscous coupling is not particularly difficult and is done by hand with the necessary tools. But you still need to know the process of removing the product and some important points. So, the removal of the product is carried out in the following order:
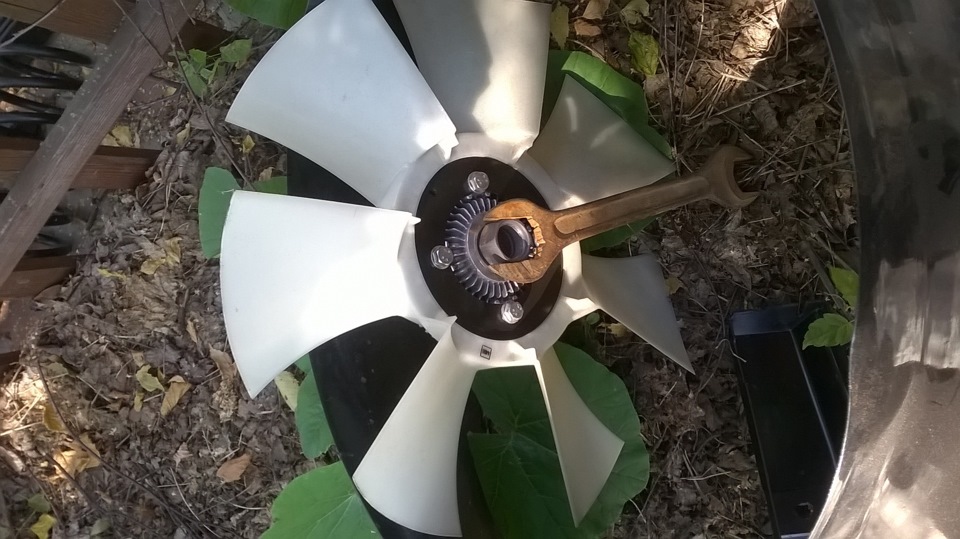
Removing the viscous coupling is much easier, since for this it is necessary to unscrew the four fixing bolts around the perimeter of the product and remove them. After that, you can remove the viscous coupling and proceed to the next stage of work.
Installation
Installation or replacement of a viscous coupling with electric fans is carried out at home. First you need to find a frame with electric fans that are suitable for installation under the cooling radiator of the UAZ Patriot SUV. There are several options, and each driver chooses the one he likes best, or the one that he can get.
Therefore, the electric fan of a Toyota car can be taken as a basis. The video below provides complete information about the installation of the structure.
So, for this you need to do the following:
- Remove the minus terminal from the battery.
- You need to remove the radiator shroud.
- Place the electric fan in front of the cooling radiator.
- The fixing of the structure is carried out in regular holes.
- The supply wires of the products are being laid. The video shows their placement.
- The cable is connected to the vehicle control system via a thermal relay.
- You will need to replace the thermostat with a new one and do not forget about a new seal.
- Finally, the casing is put on the radiator, and we proceed to check the system.
We start the engine and check how the system heats up. When the sensor reaches 90 degrees, the first electric fan should work. You must first set the response temperature of the first and second products. The second should work at a temperature of 93-95 degrees.
This completes the replacement of the viscous coupling with an electric radiator cooling fan.

Homemade fan shroud
Purpose of the casing
The viscous coupling casing on UAZ Patriot off-road vehicles of different years of production has different designs. Some have a steel and massive casing, which becomes a real barrier to access to the belt and rollers. Later models in the design have a plastic casing. The main purpose of this element is to protect engine parts from possible separation of the blades. Therefore, the casing must be present both on viscous fans and on electrical devices.
This should be summed up and it should be noted that after the electric fan has been installed, cardinal changes are observed. In particular, the engine now runs at a constant temperature, which extends the life of its component parts.
You can check your CBM and reduce it if needed!
In the engine cooling system of the UAZ Patriot there is such an element as a "viscous coupling" or, as it is sometimes called, a "fluid coupling" - on which the fan is located. It is necessary for protection against overheating and is activated only when the engine temperature begins to go beyond the operating temperature.
The viscous coupling on the UAZ Patriot is designed in such a way that it is not rigidly connected to the engine crankshaft, but through special disks, between which there is a working fluid. When starting a cold motor, the viscous coupling spins at a very low speed, much less than the number of engine revolutions.
Then, as the engine warms up, the metal plate in the front of the viscous coupling heats up from the radiator and bends outward, which releases a special ball that closes the hole in the inner disk. It turns out that the working fluid has nowhere else to go and it remains between the disks.
The working fluid used is a special, so-called "dilatant", based on silicone. When heated and stirred, it expands and becomes more like a thick glue. Further, the fan speed increases to eventually catch up with the crankshaft speed. A serviceable clutch turns with little effort when the engine is turned off.
Pros and cons of viscous coupling
Let's start with the cons, because it is because of them that the owners prefer to install electric fans on the UAZ Patriot instead of a viscous coupling. And the most significant disadvantage, perhaps, is poor engine airflow at low speeds - for example, in traffic jams or when driving over rough terrain at low speed. After all, the efficiency of the viscous coupling directly depends on these very revolutions.
In addition, there are other disadvantages:

And what are the advantages?
- A simple and fairly reliable design that can work for years without any maintenance.
- It is installed on the UAZ Patriot from the factory, so you do not have to modify anything if it is replaced.
- Does not create a load on the electrical part of the car.
As you can see, the viscous coupling has more disadvantages, so many Patriot owners eventually come to the idea of replacing it with electric fans.
How to remove the viscous
Usually, it is not difficult to remove the viscous coupling from a UAZ Patriot car, although if the device has not been removed for a long time and the bolts are “sour”, a hammer may be needed. So, the sequence of actions is as follows:
About the electric fan
The electric fan covers all the disadvantages that the viscous coupling had. After installing it, it will be difficult not to notice the following improvements:
- The engine will stop overheating in traffic jams.
- You can force the electric fans to turn on at full power at any time, even while standing still, or program them to turn on by temperature.
- The electric fan will not take power from the motor.
- You can install two electric fans at once for reliability, if one of them breaks down or is not enough for normal cooling, the other will play its role.
- Opens access to rollers and belts.
From the factory on a UAZ Patriot with air conditioning, a so-called “spark” is placed in front of the air conditioner radiator (from the side of the street) - two electric fans in a plastic case. But they have little effect on the main radiator, and besides, they make a lot of noise. Therefore, if you have already decided to install electric fans instead of a viscous coupling, you can safely remove them.
Installation process
To install an electric fan, it is not at all necessary to visit the service, everything can be done independently at home. First of all, it is necessary to select or make a base for electric fans (frame or "screen"), suitable for the size of the motor cooling radiator.
 Dimensions of a homemade screen, so that nothing touches the body anywhere
 Fasten the fans to the frame with studs, close all gaps between the electric fan and the frame with door seals - this is necessary to create a directed cold air flow for effective radiator blowing. A regular plastic (or iron) viscous fan cover is needed exactly for the same.
Electric fans can be picked up from another car, there are various options, choose the most affordable for you. Alternatively, you can take electric fans from a Toyota Celica car as a basis, ordering their delivery from Vladivostok, as the person from the video did.
The following electric fans are also suitable: "Termal 404615S" - analogues: "Nissens 85616", "Sat ST-DTW1-201-0". An electric fan from the Volga or VAZ 2110. In some cases, it is not necessary to make a home-made screen; everything stands on "native" mounts. In the case of "Termal 404615S" nothing will have to be redone.
The best way to install electric fans is one in which everything is connected to the connectors of regular electric fans, then you do not need to purchase additional equipment, such as:

You will only need to set the temperature for turning on the electric fans in the engine control unit (make it lower), because from the factory these values \u200b\u200bare too high. Recommended for a new one with a lower opening temperature. On this, the procedure for replacing the viscous coupling with electric fans can be considered completed.
Connection: mechanics
For a long time I wanted to put electric fans, and now, finally, my hands have reached. Two LSA electric fans from VAZ-classics and two diffusers from VAZ-2108/2115 were bought.
He drained the antifreeze and removed the radiator, because. there was no other UAZ radiator at hand ...

We dismantle the standard impeller-meat grinder. We put thick washers under the bolts so that they do not touch the pump body

Example on a radiator. With the naked eye you can see what is superfluous here

Circled in red is what is cut off without hesitation
Then we begin to cut only thoughtfully and after careful calculations.
to fasten the diffusers together, cut off the excess right along the edge of the diffuser. There is no point in cutting anymore, because. the fan in the diffuser sits very tightly, from the edge of the blades to the wall of the diffuser about 3 mm. I twisted the diffusers together with M8 bolts, which sat very well in the regular holes.
In photo 3, you can clearly see that the diffusers protrude beyond the radiator. So, the outer parts must be cut right at the end of the circle and perpendicular to the upper and lower radiator tanks. The choice fell on the grinder and welding due to the fact that the diffusers are stamped in three planes. It is almost impossible to bend the edge of the diffuser into a corner for attaching to the radiator without damaging the diffuser itself.
Therefore, only "cut". Cutting off the excess and bending as we need (from the cut we make a corner with one shelf 20 mm), the other shelf repeats the bends of the diffuser, because. cut off from him. We cook carefully and with tacks, because. metal - foil. We clean the seams and put fans in order to make sure that the diffusers did not lead when welding.


You can see how the welded edge of the diffuser is bent. Radiator spacers slightly bent so that they do not touch the diffuser

You can see how the welded edge of the diffuser is bent.

The distance from the pump to the diffusers is about 10-15 mm. The pinch bolt between the diffusers is visible. Tightened with an M5 screw through the sleeve

"Volgovskaya"; pipe in the upper branch pipe with a TM-108 sensor at 92-87 degrees

The sensor is in the down tube at 87-82 degrees. "Volgovskaya" pipe does not fit in diameter, because dangles in the pipe like a pencil in a glass. I welded the nut, additionally smeared the welding seam with sealant


We bend the radiator strut so that it does not touch the diffuser
Haven't hooked up the electrical yet.
According to my idea, each fan will be controlled by its own relay and triggered by its own sensor.
Those. the algorithm of work as planned is as follows: if too hot coolant comes out of the engine, the sensor is triggered at a temperature of 92-87 degrees C. and one electric fan turns on. If there is not enough cooling in the radiator and the second sensor is triggered at the temperature of 87-82 degrees C at the outlet of the radiator, then the second electric fan turns on.
Purchased:
radiator electric fans 2103-08 LSA 2 pcs.
Diffusers 2108-2115 2 pcs.
"Volgovskaya" pipe in the upper branch pipe 1 pc.
TM-108 sensors 2 pcs. - 70 UAH.
Electric fan relays and connectors 2 pcs.
Clamps D40-60 mm 2 pcs.
Connection: electrical
Yesterday I connected the electric fans according to the scheme:

each fan is connected according to this scheme.
I used a 5-pin relay 75.3777. One leg in the chain is not involved.
Contacts 30 and 86 closed a loop between them. In front of the loop I picked up such a 20 amp fuse

I control the fans from the cabin with the following toggle switch:

previously unscrewed the screws from the toggle switch. The "mother" connectors fit on the contacts of the toggle switch like native ones
Last night, while testing, I noticed the following:
1. The motor warms up almost twice as fast.
2. In anticipation of checking the work done, I even stuck a neutral in the razdatka, and a gear in the gearbox to create a load. Just in case, a 5-liter carbon dioxide fire extinguisher was removed from the trunk and stood "on the lookout" (otherwise the hell knows what I made with wires).
3. When the temperature was reached by the sensor in the cabin, the right fan turned on (which is paired with the sensor at 92-87 degrees) and after one and a half to two (!) Minutes it turned off. The temperature on the instrument in the cabin fell almost before our eyes. Those. on the highway, the fans will be silent, and the (first) will work only in the village at traffic lights. Anyway, I think so...
4. To turn on the second fan on the "automatic", you probably need to crawl through the muddy plowing and pull some kind of ballast along with you ...
For two days I sat with a soldering iron and soldered wires to the contacts, but then I gave up on this thankless task, did not take pity, went to the car market and bought a crimp for car terminals. I crimped the whole scheme in one evening, for three hours ...
Here is an example of an indication of the operation of electric fans:
almost at the very end of the video, on the tidy, first one yellow signal lamp lights up, then the second. Which indicates the inclusion of one or another electric fan ...
Purchased:
crimping - 85 UAH. (in the future, it will come in handy on the farm)
fuses (2 pcs) - 14 UAH.
connectors "mass" (round) and "mother" 20 pcs. -10 UAH
wire with a cross section of 2.5 squares 10 meters - 100 UAH.
relay 75.3777 with connectors 2 pcs. - 40 UAH
three-position toggle switch - 12 UAH.
signal lamps with sockets 2 pcs - 20 UAH
https://www.drive2.ru/l/1544611/, https://www.drive2.ru/l/1562397/
Installation of electric fans on UAZ
Sergey "ss"
The first step is to dismantle the old casing and the old fan. So that the standard screws for fastening the pump pulley do not cling to the pump itself, it is necessary to report the washers to the thickness of the standard fan.
The second step is to prepare the casings of electric fans (EV). To do this, cut or saw off the extra ears and cut out the extra edge of the metal (Fig. 1)
And also make cuts on the opposite side of the side so that it is possible to bend the edge (as shown in Fig. 2) 
Now you can fasten the casings at 3 points (2 regular holes on the ears and drill one with a 6.5 mm drill at the point of contact between the fan rims perpendicular to the plane of the ears).
Having made the incisions, we straighten the folded edge and in the same direction we bend the edges along the lines 90 degrees along each line (should look like in Figure 3) 
Next, you need to carefully measure the locations of the holes. To do this, either remove your radiator, or find a similar one somewhere and, having attached it, measure it out! Then, with a 6.5 mm drill, drill holes at the measured points.
You take a metal tube with a hole of 10-15 mm and cut out "bushings" from it, which must be inserted between the planes like such washers stretched in space (shove a bolt into the hole of the tube).
Now we need to attach the electric motors. To do this, you remove the fans from them (do not lose all sorts of small parts!) You knock out the regular riveted bolts, straighten the ears, put the fans back on and through the rubber bushings (to reduce vibration) fasten the motors to the casings.
Next, you remove the radiator fasteners (if you haven’t removed the radiator before), and install the assembled structure in its native place. The "extras" of the radiator will have to be slightly bent to put them in place. If the design touches the pump pulley, it is necessary to bend the radiator forward using these extensions. I got a distance of about 2 cm.
Next is the electrical issue. The wiring diagram is on electric fan control unit, which can be bought in Moscow at the Mitinsky radio market (metro Tushinskaya) place N-14. Manufacturer's website.
Chief
Installation requires:
- 2 fans. Ours are suitable from AZLK, VAZ (four- or eight-blade, in principle, it doesn’t matter, I took 8.) or BOSCH 0130304245 (the latter is better and more reliable, but also more expensive). Ours is better to take in the store - a lot of "left"
- 2 fan shrouds from Oka or VAZ 2108(09)
- 1 threaded pipe for a fan sensor from the Volga, or an electronic device to turn on the fan (controlled from a standard temperature sensor)
- 1 activation sensor (preferably from Moskvich at 87-82 gr, or from the classics at 92-87 gr). Beware of the "leftists" - without the stigma of the Quality Control Department and marking!
- a universal relay, wires (section 2.5 mm) and a 30 A fuse (I used a bimetallic one), male-female connectors and preferably a relay block.
We act like this.
It is advisable to remove the radiator or take it from somewhere as a template. On the casings, we cut off all the available legs and pins for attaching to the radiator. We fasten them to each other through two holes in the stamping with M8 bolts (in this case, you will have to cut the joined flat part a little). The result is a horizontally double casing. The outer edges of the casing will protrude beyond the radiator - they need to be bent "forward" in the direction of travel by making small cuts from the edges (approximately at the level of the "circle" for the fan). The "upper" and "lower" parts of the casing are slightly bent in place (with a radiator from 3160 it fits anyway). As a result, the casing covers the entire "honeycomb" part from the edges of the standard casing mounting plate. Next, through the mounting holes of the regular casing (there are 4 of them), we outline and drill 4 holes of 6 mm in the new casing. We screw M6 bolts 25-30 mm long into the radiator. Thus, we get "studs" for attaching a new casing. In order not to deform the casing when tightening the nuts, you need to either make spacers, or (as I did) screw several nuts under the casing, achieving the same effect.
Having installed the fans in the casing, we try everything in place (to the radiator). The casing should be tightly fixed, and the fans should not cling to anything. It is advisable to lay a strip of rubber or polyethylene foam between the casing and the radiator tubes - in order to avoid rubbing. We build a tube with a hole for the sensor into the lower radiator hose and screw it in.
It remains to assemble everything and connect the electrician. We throw one wire of the sensor to ground, and the other to the foot of the 85 relay. Leg 86 is connected to the ignition, and to the remaining extreme legs we hook "+" through the fuse and "+" to the fans (it is blue). We put the black wires from the fans to ground.
It remains to check everything in action. To begin with, with the ignition on, we close the sensor contacts - the fans should turn on and turn off when opened. Well, then we warm the engine. If you're lucky and the sensor is normal, they should turn on at 90 and turn off at 85 degrees.
The thermostat reacts to the temperature at the engine outlet, and the sensor - at the radiator outlet. That is, the sensor sets the temperature to which the water cools in the radiator. That is, it cannot "overcool" the engine. But you can raise the operating temperature.
P.S. It is really useful to disassemble the motors and check for quality (especially how the magnets hold), and lubricate at the same time.
Rearranging the fans on the contrary allows you to eliminate the "dead zone" during the operation of the propellers. It is approximately 3-4% of the total area of the radiator. A lot or a little - everyone decides for himself. In addition, the blades "more correctly" become in the diffuser, reducing the "backflow". At one time, I studied this issue very carefully. The fact is that in the Oka or the eight, the fan is "sandwiched" between the engine and the radiator. Those. every millimeter matters. Therefore, the design of the casing is not very "competent". For example, on the 41st Moskvich (where there is no size limit), the fan is moved 2-3 cm away from the radiator and the suction is almost uniform over the entire area.
AVG
1. Fans, in my opinion, it is necessary to take 8-blade ones, immediately disassemble, lubricate, assemble everything for sealant, which should not be spared.
2. Casings, I took Okovsky - the cheapest. Modify with a grinder, so as to press one against the other and rivet. Further, the corners along the entire length from the top to the bottom, it is also better to walk with a riveter. The bottom corner fits well into the groove on the radiator. You attach this construction to the radiator, prepare two vertical corners, and when applying, we determine where they need to be stuck in order to get into the native holes for attaching the old casing.
You may have to fill up the radiator forward, especially if the power steering is standing. I bent the regular radiator rods into the letter "G", cut it off, cut the threads and brought it out forward in the direction of travel, it turned out conveniently, but only two nuts stick out in the area of \u200b\u200bthe hood buttons.
3. There are no questions about the relay, regular VAZ fans consume about 10A. At the same time put the toggle switch 3-position. In the middle of the load, on one shoulder 12v clean, on the other through the relays.
It turns out: the middle position is "forced off", and the extreme ones are "on for life", "on automatically".
4. Regarding the control unit. In my opinion, you can put in cars either only something highly reliable, consider technological, and blocks soldered on the knee, I would think. Although, without conditionally, the solution has its advantages, for example, adjusting the response threshold, but once again I say my deep IMHO - the simpler the better. The gizmo sensor is not reliable, but it does not take long to change it. I screwed it in with a RAF adapter I bought in the store, a rarity. Some solder brass bushings into tanks.
5. Wires. For a thicker fan - 2.5 sq. mm, for a sensor, it doesn't matter, at least 0.5 It's better not to save on earth wires. RostovDriver
 for mounting to the radiator, I cut out two adapter plates (25x400 in size) which I screwed to the native radiator mounts, and already screwed the resulting structure to them, much of the plate can be seen in the upper part of the photo
Since this whole structure could hardly fit by clinging to the pump shaft, I had to remove the standard radiator rods and slightly tilting it forward (do not forget to loosen the lower fasteners before that) fixed it with long pins and drilled holes in the radiator shaft with a bolt (I don’t know how to fix it correctly name, but when you tilt the radiator, it will become clear where to drill where to turn). These moments are not visible in the photo, because then I screwed the sidewalls covering the radiator into place, they became a little crooked, due to the casing of the fan diffusers, but they became.
 I really didn’t want to torment the radiator by inserting a switch-on sensor into it, so I bought a Volgovskaya pipe and a sensor at 87-92 degrees, since the radiator is slightly tilted forward, it was easy to insert the pipe into the cut of the pipe between the radiator and thermostat.
 We connect all this through a relay and through a toggle switch in case it is necessary to turn it off, for example, in front of the fords. Photo "relay". I did not give forced inclusion, because I do not see the point in this.
Tests have shown that all this economy starts to blow like hell at a temperature of 92 on the indicator and stops at 80. The trouble is that at idle, the generator cannot cope with the neighbor turned on and the discharge is in progress. There is an idea in the future to install another sensor somewhere else, to a different temperature, so that they do not always work together.
It may also be necessary to cover the parts of the diffusers protruding from the sides of the radiator, because in this way a tangible part of the air does not go through the radiator, but bypasses it from the sides, and the efficiency of the system drops, further tests will show the need to do this, but for now I will not.
Although the article is about the ZMZ 514, it is also relevant for the UAZ Patriot with the ZMZ 409 engine. The viscous coupling is completely loose, the backlash is just terrible and when you turn off the engine there is a terrible rattling sound from the fan. The new one was expensive, I don’t remember exactly around 2000 rubles. I decided to throw out this useless device and put the fan without it. I opened the hood of my old UAZ 31519 with the UMZ 421 engine, where the fan is attached with four bolts directly to the pulley. I measured it and it turned out that the holes on the fan for the bolts are exactly the same as on the pulley of the 514th, that is, it can be removed and installed. I decided to buy a new fan, but I didn’t find one from 412, but I found a plastic fan from a gazelle, which also fits in holes and in diameter. You need to put a spacer under the fan so that it bulges forward a little. They are sold, but I had an old one from the GAZ 66 engine (the delivery can be seen in the photo, below the Gazelle fan). But the central hole of the spacer needs to be bored a little, otherwise it will not lie close to the pulley (there is a small side). Fortunately, the aluminum spacer and the side were easily machined with a drill bit (photo below). It will be a little problematic to install the pulley, spacer and fan so that the holes are in one row, because everything needs to be tightened with one bolt, so first you need to tighten one guide pin and put everything on it and then everything will fall without any problems.


I connected Sparka to the standard fan connectors, and because. the control unit is flashed with non-standard firmware, then the fans turn on perfectly by the on-board computer at 95 and 97 degrees. Also, when installing this twin, it is possible to turn on two fans at the first speed and at the second speed (which I did), i.e. now, when the temperature reaches 95 degrees, two fans turn on at the first speed, when the temperature reaches 97 degrees, the second speed turns on.

After the tests, the following happened: on the highway, the temperature stably keeps at around 91 degrees, in the city the fans periodically turn on at 95 degrees and bring the temperature down to 91. .to. The fans turn on to second speed.

But for more efficient cooling, I will still close the remaining slots: about 2 cm on top and 2 cm on the right. This should increase the efficiency of the fans and they will cool the engine faster.

READ ALSO ON THE SITEThis article will present a step-by-step tuning of the Lada Priora car to increase its power. We started our modernization of the car in a slightly wrong order, that is, replacing the standard exhaust system with a “forward flow”. This is due to the fact that... One of the most popular domestically produced hatchbacks among motorists is the VAZ-2114 model. But this car is very far from ideal, and the owners themselves have to bring it “to mind”. And they do it through alterations and moderni... I bought 2 DAK5 front and rear Toyota Hilux Surf in the spring of 2013. Put closer to the summer one in the rear axle. I ran it with a molybdenum additive (as recommended) for 1000 km, having traveled gently on asphalt to another city and back. ... There is no doubt that buying your car exhaust parts can be confusing. There are so many brands to choose from and knowing which parts will work together is critical to an efficient exhaust system and great sound.... |