Crafts for giving with your own hands from improvised. Wooden crafts for the garden (51 photos): buildings, paths, fences and supporting walls, decorative bridges. Flower bed, furniture and playground decoration. cat made of plastic bottles
People who have a plot in the countryside and their own garden are lucky, not otherwise, because even on a small plot of land you can work well and profitably and have a great rest in the company of friends.
The summer cottage allows you to work in the fresh air and admire the surrounding landscape in moments of relaxation.
There is an opinion that the most important thing in the country is the beds, but the design of the site also plays an important role. The dacha should bring not only benefits, but also aesthetic pleasure.
Advantages and feasibility of country crafts
Outside the city, you can grow vegetables and fruits, and work on the decor of your site. The earth is the ideal place for the realization of creative ideas.
To decorate the land, use ideas for decorating the site and homemade crafts from improvised materials. It is things made by oneself that allow you to create an atmosphere of comfort, they will add a little sweet rural romance to country life.There are many methods for decorating a summer cottage, new items and various creative ideas for using things that have become unnecessary are constantly appearing - each method is interesting in its own way.

DIY ideas for giving, photo
A country house with an original decorated garden plot will become a summer residence for your family. An ordinary piece of land can be turned into a fabulous place. And decorative gizmos made by your own hands will help to complete this task. Walking along country paths decorated with fancy gizmos is a great pleasure.
Important! Crafts for giving perform not only a decorative, but also a practical purpose: working on a garden plot and having a tea party in the evenings is much more pleasant, contemplating decorative creations created by one's own hands.Garden decor ideas
Consider some interesting ideas of useful and beautiful things for garden decor that you can do yourself. With the help of original garden decor elements, you will transform the site. Moreover, you don’t even have to spend money on buying decorations for the garden, because you will make them with your own hands from the materials at hand and thereby save yourself from unnecessary expenses.
Before you start implementing decor ideas, study the things that are available on the farm in the country.

DIY crafts in the country, photo
For landscape design, all sorts of items that you have forgotten about, and things that are considered unnecessary, will come in handy.
Advice! Do not throw away old things, they will still come in handy! Keep them in the country - then there will be something to use for decor when a new idea appears or inspiration visits.Try yourself as a designer to create beautiful decorative gizmos, you do not need a professional education. Use everything that is at hand: materials left over from the construction site, logs, tires from cars, old pieces of furniture, even ordinary plastic bottles will come in handy. Such "trash" will help equip the cottage.

DIY garden crafts, photo
Flower beds in old crockery
The main decoration of any garden are flowers - they are on every site. Even if the cottage serves, first of all, as a place for vegetable growing, any housewife will definitely sow at least a couple of rows of petunias or plant tulips.
Old dishes will help to give originality to compositions of flowers. Suitable pots, large cups. You can use a cart and even toilet bowls for this purpose.

DIY crafts for giving, photo
cement planter
Make an unusual cement planter. Dilute the cement, soak the old material in the solution. Cover the bucket with a cloth and let it dry in the sun. Paint the dried product.
A planter with an original design is a creative little thing that will decorate the site.
Flower bed
Is there a bed lying around in the country that you haven’t used for a long time? Fill the base with earth and sow perennial flowers.
A flower bed is an unusual, but effective design solution. A riot of colors guaranteed!

DIY garden crafts, photo
Wooden flower beds and flower beds from barrels
The hostesses plant flowers on the plots for decoration in order to admire the bright inflorescences throughout the summer. Flowerbeds broken several years ago, provided that you do not want to transfer them to another place, update. For example, make a picket fence using sticks of wood, or a vine to weave a flower bed that looks like a basket.
Flower beds made of vines or brushwood look unusual, because the flowers seem to grow from small houses. Decorate a suburban area with huts from a vine.
Flowerbeds made from barrels are unique. Paint the barrels and, if your creativity allows, paint them, fill them with earth, and plant petunias or other flowers. Old umbrellas will help protect the flowers from the scorching sun.

Beauty in the country with their own hands, photo
Flower garden in galoshes
The most suitable shoes for giving - galoshes. Old galoshes do not have to be thrown away: turn them into a flower bed.
Degrease the surface of the galoshes and cover with a primer. Paint the shoes with white paint and stick on the napkin pattern. Dilute the green paint and use a sponge to work around the pattern to age the surface. Top with several coats of varnish.

Do-it-yourself country crafts, photo
This way you give old galoshes a new life instead of throwing them in the trash.
Flowerbeds-galoshes are suitable for sowing daisies, phlox.
Flower bed made of natural stone
In dachas, stone paths are often made, after which unused pebbles remain. Put the excess material into action - decorate the flower garden with stones. One option is to lay out the stones in layers around the perimeter of the site, forming the sides of a certain height.
Experienced designers and those who have the ability to do this can create a whole work of art. Compositions of stones with growing flowers look great, made like large bowls, flowerpots with a wide neck or baskets.
Pebbles (pebbles) are also placed inside the containers, and flowers and ornamental plants are planted along the edges.

Do-it-yourself decoration of a summer cottage, photo
Flower garden from a car tire
Car owners probably have old tires. Tires are suitable for creating original flower pots.
Cut one side of a car tire so that there are teeth and paint them any color you like.
Flower beds and figurines from plastic bottles
Owners of cottages who like creativity show remarkable imagination when decorating a garden plot. Summer residents are well aware of how to make the site beautiful at the expense of improvised things. Plastic bottles will bring to life a lot of creative ideas.
Plastic is a material that is easy to work with, easy to cut and bend.
A five-liter plastic bottle can be turned into a cute pig. The original flowerbed-piglet is suitable for seedlings and flowers. In a plastic flower garden, you can also grow lawn grass. The advantage of a piglet bed is that it is easy to carry from one place to another.
Advice. For a large plot, make a family of plastic pigs: the plot will be very realistic.Plastic bottles are also suitable for creating cute figurines for decorating a garden plot. Gifted in terms of creativity and imagination, summer residents can easily make beautiful figures from bottles of various shapes. Don't throw away the bottles; This also applies to other plastic containers.

Simple ideas for giving your own hands, photo
A plastic bottle can really be turned into beautiful butterflies. You will need eggplants, scissors, stained glass paint, wire and beads.
First make sketches, then cut off the neck of the eggplant and bend it inward, fixing it with a paper clip. Transfer the sketches to the eggplant and decorate.
Cut out the dried butterflies, then slightly bend the wings and shape them. Make the body of butterflies out of wire, decorating with beads.
Wooden decorative elements
The tree allows you to make aesthetic gizmos with your own hands. In summer cottages there are old trees - cut them down and put them into action. From stumps, pieces and saw cuts of wood, real masterpieces are made for decorating the garden.
To create wooden crafts, you will need tools designed for woodworking. From wood they make fabulous heroes, funny faces. Wooden figurines are very popular: gnomes, bunnies. Wood is also a suitable material for making garden furniture.
Summer residents make tables, small chairs, paint and decorate them with beautiful carvings. Little men are collected from wooden stumps, the nose and eyes are made from thin twigs, and the hair is made from bark.

DIY wooden crafts for the garden, photo
Lacquer coating will help protect wooden crafts from insects.
Hemp bird feeder
An old stump or sawn tree trunk is suitable for a bird feeder. Titmouse and sparrows will fly to the feeder to eat grains not only in the cold, but also in summer, and you will get the opportunity to watch them.
Hollow out the inner contents from a piece of wood without touching the sides. The bird feeder is ready: hang it on a branch outside the window of a country house or in the garden.
The second option is a bird house. Hollow out a hole in the stump and place the stump vertically, make a roof from planks.

Do-it-yourself garden crafts made of wood, photo
You can also make a feeder from small twigs. A twig feeder will bring rustic charm to the decor of the cottage. Want to make a birdhouse but don't know how? Replace it with a twig structure - it's much easier to make.
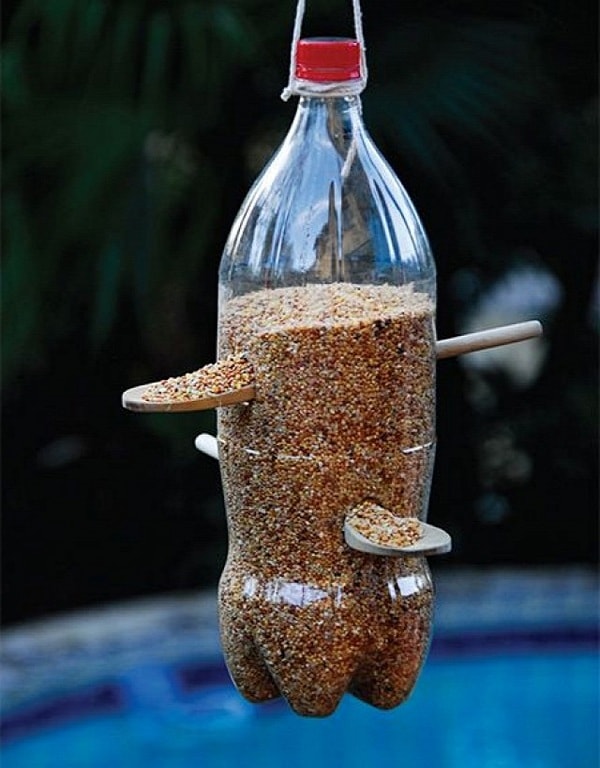
Give children the opportunity to watch fluttering birds, make a feeder using a plastic bottle: it will not take much time. A plastic feeder is easy to make: make two holes in the bottle, stick in wooden sticks and pour in the grains. Nothing complicated!
Decorative garden figurines
An idea for those who love hand-made. It’s real to make figurines for the garden that are not inferior in beauty to store ones and not pay fabulous money. It will take material and, most importantly, imagination. If there are no ideas, look at the photo with examples of homemade products for country design. Gypsum, remaining building materials, mounting foam are suitable for creating figures.
Make a cat figurine out of hemp. Lay the stump on its side and draw a cat's face on the cut.
Cut out triangular ears from plywood, attach them to the base. Thin twigs are suitable as a mustache.

Crafts at their summer cottage with their own hands, photo
stone pond
Make a stone pond in the garden or in the yard: with the help of natural stone, you can create a beautiful pond of any configuration.
Decide on the size of the pond, dig a small pit, seal it and fill it with water, lining it with natural stone in a circle. It is ideal to use a flat stone.

Interesting crafts in the country with their own hands, photo
Bull from hay
The dacha evokes associations with village life. The villagers are engaged in cattle breeding. What can be done decorative crafts in a rustic style?
Install a bullock from hay in the yard of your dacha. Make a wire frame and cover it with hay.

Funny crafts for giving their own hands, photo
Cork fence decoration
You can even make crafts for country design from ordinary plastic bottle caps. You need a lot of corks, but in the summer you always drink a lot of lemonade and mineral water, so there will certainly be bottles and caps for them.
Cork is a suitable material for creating aesthetic patterns for decorating fences. An ordinary chain-link fence, decorated with corks from eggplants, is suddenly transformed. Lay out animal images or geometric shapes from traffic jams. Color the resulting drawings, making the composition creative and more colorful.

Do-it-yourself country decorations, photo
Ideas for crafts for garden decor and photos with examples of decorating a personal plot with homemade crafts will be useful to both amateurs and craftsmen. It is difficult only at first glance, in the process of work you will see how interesting it is, and you will understand that it is possible to realize any original ideas in country design.
Homemade things are a great way to beautifully decorate a summer cottage with cute and cool homemade products.
There are plenty of options for decorating a garden plot with your own hands, the main thing to achieve a successful result is the desire to create and imagination.Creative crafts for home, summer cottage and garden are easy to make from improvised material: use old, unnecessary things to good use. Barrels, tires from cars, clay jugs, uprooted stumps - any rubbish will be used: all this can be turned into presentable and original crafts.

Original ideas for giving your own hands, photo
Create a unique design in the country by decorating the site with things made by yourself. Crafts made by the hands of summer residents are unique: they make it possible to transform the garden and the territory adjacent to the house. Do not be lazy, and then you will not only implement bold ideas in decorating a suburban area with your own hands, but also enjoy the process.
The result of the work of your hands will delight both you and the guests who come to the country. Relaxing in a beautifully designed summer cottage is much more pleasant than in an ordinary garden. Make a little effort, show your imagination, and the decor of the garden plot will delight even passers-by.
Video
We offer other novelties of country decor - watch a video about crafts for decorating a garden with your own hands:
A country house with a plot for most people is not only a place where you can have a good rest, relax and relieve accumulated fatigue, but also room for creative inspiration. Each owner wants to transform and decorate his personal plot in any way possible for this. Some plant beautiful ones, others try to come up with an original one, others begin to make crafts or, fourth ones make crafts for the garden with their own hands. We will focus on the latter in detail in this article. We learn the latest news, novelties and the main trends of the summer season.
DIY garden crafts (photo)
To create an original art object for your garden, it is not necessary to run to the store to buy material. You can make your new creations without them. Take a look around. After all, for sure in your household there is something that you have not used for a long time for one reason or another.
It can be a broken bike, an old, leaky bucket, worn out tires and tires accumulated, leftovers, basins, barrels of unnecessary shoes and much more. Giving new life to all these used things is very simple, the main thing is not to be afraid of experiments.

A visual diagram of how to make a decorative well for a summer residence with your own hands


First you need to decide for yourself in what style you want to see the design of your garden. In Provence style, or Art Nouveau, or whatever you prefer. Taking into account the characteristic features of each direction, as well as your own preferences, you should proceed to its design and decoration.
DIY crafts for the garden can be not only an aesthetic addition to your garden, but also carry a functional component that can be useful in the household.


Natural materials will also help decorate your garden. Field boulders, river stones, tree trunks and their stumps, clay, glass, etc. All this will bring beauty and improve the habitat on your site.
The most important thing is the pursuit of perfection, it will help create a unique and beautiful decor for your site.
Stones for garden decor
flat stones- a real find, especially if they are large. You can draw anything on them. And most importantly, making crafts for the garden with your own hands from stones is exciting and fun, especially with children.
Large stones may just decorate the garden, and medium-sized stones will serve as excellent helpers in the garden. It is necessary to take pebbles in the shape of a certain fruit or vegetable, draw it on it and put it in the garden in accordance with the drawn one. The garden and garden will immediately be filled with bright colors.

Stone Ladybugs - Design Crafts by Amanda


Do-it-yourself figurines for the garden (photo)
If you decide to decorate your garden yourself, remember that here you need to feel the fine line between the stylistic direction of the garden and a sense of proportion. Since when decorating a garden, going too far with the number of figurines or choosing the wrong image of decorative figurines can easily spoil the aesthetic appearance of your site.
After all, you must admit that the figures of a red riding hood, a baba-yaga, a kolobok or other fairy-tale character in a Japanese garden will not look entirely appropriate. A green lawn decorated with a large number of artificial palm trees will look even more strange, under each of which there will be a gnome figurine.
Based on the requirements of landscape design, try to choose images of figurines in unison with the main direction of the style of your site.


Crafts for the garden from tires and tires (photo)
Using old car tires as a material for making garden decor has long been a common practice for many people. For this, absolutely all tires of any diameter are suitable.
Having a number of fresh and practical ideas in your head, as well as certain skills in stabbing and cutting tools and fixtures, you can turn a boring piece of rubber into a beautiful art object, thereby decorating your garden in an unusual way.
There is nothing complicated in this work, and as practice shows, it takes less than one hour to make crafts for a garden with your own hands from car tires, even for a novice master.


A little imagination and the old tire has found a new life in the form of a children's swing "overweight"


Tire products are just the case when you don’t need to spend too much time on DIY garden crafts and invest a lot of money to purchase expensive materials.
The scope of old car tires, where they can be used as a material for making crafts, is huge. Starting from the design of ordinary flower beds and flower beds, ending with full-fledged playgrounds for your children. Garden Tire Crafts- these are simple, cheap, well-proven products, the constructive forms of which know no boundaries.


Crafts for the garden from improvised materials (photo)
In order for the garden crafts you created with your own hands to retain their original appearance for as long as possible, try to choose the right source material for them. Also important is the thorough application of paints and varnishes.
For open air, modern synthetic acrylic paints are ideal, which are distinguished by reliable resistance to constant changes in air temperature and ultraviolet radiation.


In such a responsible matter as decorating a garden with your own hands, absolutely any little thing that has been gathering dust on your site for more than one year can come in handy. As experienced gardeners say, in the country there is nothing unnecessary and nothing superfluous!
To give a special chic to your creations, experienced designers recommend using various sequins, beads, beads, colored glass, etc. as a decor. With their help, you can create an original image of fairy-tale characters, gnomes, small figures of animals or insects. Well, if you add a little magic to the surface of the products, in the form of fluorescent paint, you can enjoy the beauty of your garden not only during the day, but also at night.


New ideas for the garden that will inspire you (photo)
Everyone wants their yard to look nice and cozy. It's so nice to admire this beauty during warm summer evenings. To do this, you need to spend a lot of time and money, because often purchased decor items are quite expensive and, unfortunately, not everyone can afford it. And yet, even from this situation, there is an excellent budget way out - to make crafts for the garden with your own hands.
First of all, of course, it is worth taking care of the improvement of the site:
- Pay due attention to paths, paths, trees, flower beds and flower beds;
- Also, do not forget about the recreation areas (, ), where you often like to relax on warm summer evenings. They must look perfect.
If we talk about more interesting projects, then we can aim at creating decorative mini-garden or other decoration. Best of all, the miniature will look surrounded by small figurines and various figurines.


A pond decorated with artificial lilies or swans will look no less beautiful. If doing waterproof DIY garden crafts difficult for you, then you can easily buy them in specialized stores. There you will surely be able to find suitable products that will harmoniously fit into landscaping your garden.
It is important to remember that some products (especially those made of cheap plastic) are afraid of strong temperature changes. Therefore, if necessary, in the winter, everything can be moved from the street to a more secluded place where it will not be threatened by the cold.


DIY master class - everything for the garden (photo)
Many decorate their garden using classic techniques for this - beautiful figurines of little gnomes, unusual birds, as well as funny and funny little animals. This style of design for the site is very popular, especially for those who have small children. It has been proven that the fabulous atmosphere created in this way in the garden has a beneficial effect on the development of the child.
If you supplement the garden with a drinker or bird feeder, then in addition to improving the aesthetic beauty of the site, you will make a significant contribution to saving starving birds in winter. Thus, you will teach your kids to love all life on earth from a very early age.


Garden decor - photos of the best DIY crafts
If recently there was a construction or repair on the site, then some building materials, such as cement, probably remained. You can create great DIY garden decor.
- To do this, you need to find the largest leaf, a leaf of burdock or water lily is perfect;
- Then a layer of cement should be applied to this sheet, not very thick, but not thin either. In order for the sheet to stand later, it must be even and smooth on top, otherwise the sheet will have to be dug into the ground;
- After that, you need to wait about 5-6 hours, until the solution is completely dry, turn over, remove the sheet from the cement and now the decor is ready.
To manufactured DIY concrete crafts hands did not look too gloomy, you can glue colored pebbles in the middle or just paint the sheet in any color.


Wall decor with flower pots (photo)
Flowers are beautiful decor idea. If there is an empty boring wall on the site that needs to be decorated with something, then hanging flowers and photo frames will be a great option.
- To do this, you need to find empty tin cans or unnecessary flower pots, preferably the same size;
- Holes are made on the sides through which you need to pass a rope or chain. It will be a latch to hold crafts on a vertical wall;
- If the wall is wooden, then you can simply drive a nail into it, if we are dealing with a brick or block wall, then we cannot do without a puncher and anchor dowels;
- Around the pots, which can be painted as desired, you can hang frames with photos or children's drawings.
Also, clay products will look very beautiful and impressive on the wall, which will give an image reminiscent of a building from old Russian fairy tales.


Beautiful garden- this is not a dream, because today you can make any dreams come true. By decorating your site with original and beautiful crafts, you will not only transform its appearance, but also make it different from the rest.
In creating decor items, the main thing is fantasy and some skills that come with time. A little perseverance, and everything will definitely work out. Faithful helpers in this exciting process will be your own hand-made crafts for the garden with your own hands.
Each owner of his own is a potentially happy person. At the dacha, you can not only enjoy outdoor work, have a barbecue party, but also give free rein to your own imagination. Here, handmade crafts for the garden will certainly come in handy. All novelties, best examples and practical advice on their implementation are in this material.
Read in the article
The best garden and garden design ideas with your own hands: photos of flower beds and their main types
Few owners leave the land without work. It is a pleasure for a city dweller to poke around in the black earth and enjoy every flower and sprout. Even a kind of competition arises between neighbors in the plots: who will grow the most luxurious tomatoes or break the most colorful flower bed.

Just in the organization of flower beds there are several secrets, thanks to which you can "score points" in the dacha competition.
The main types of flower beds
"Strict" flowerbed of regular flowering. Its main features are clear geometric shapes, the frequency of planting and the simultaneous flowering of all plants. These are not often used on because they fade quickly and require a complete replacement of the content. On city streets this work is carried out by municipal services. They grow flowers in a greenhouse and plant them in a flowering state to decorate streets and squares.

All-season flowerbed. This flower garden is arranged in such a way as to accommodate plants with different flowering periods. It can be anything, including irregular shapes. Groups of frost-resistant plants can settle here, which will delight the eye until the snow falls, meadows of primroses, perennials with a summer and autumn flowering period. If you choose plants wisely, such a flower garden will not require annual planting. All care will be reduced to the replanting of plants that died for some reason.
About form and content
The second stage of planning a flower garden is to determine its shape:
- Multi-level flower garden. The surface, consisting of several different levels, will immediately attract attention. You should not immediately take on a large pyramid - just try your hand at a small version. This design is not difficult to water and take care of it - a pleasure.
 Flower garden - pyramid
Comment
Landscape designer at VENUS DESIGN studio
Ask a Question“Before you start creating a flower garden, do not be too lazy to read information about the features of the selected plants and the rules for caring for them. It is better for forgetful summer residents to sketch out for themselves a small memo for each flower with important information.
- Blooming carpet. A very attractive flower garden. It consists of many low plants planted in a certain order. The alternation of shades of green and colorful buds form intricate patterns. This beauty has only one drawback - time-consuming care. Planting such a flower bed is a long and painstaking task. Watering can only be from a hose, otherwise there is a risk of trampling tender sprouts.

Note! Plants of different heights can come into conflict in the flower bed. Too high will hide the low ones from the sun and will not allow them to develop.
- Flowerbed on the wall and other vertical options. Do not immediately aim at creating a complex vertical composition. Try experimenting with . As pots, you can use plastic bottles, pipe trimmings, old shoes. All this is fixed on a vertical surface and filled with earth. A flowering fence will undoubtedly become the highlight of the garden.

Idea! It is not necessary to plant only flowers in a flower bed. Try placing bright kohlrabi, juicy lettuce and delicate green carrots there. It will be not only beautiful, but also a useful decoration of the garden.
- Flowerbed-solo. In such a flower garden, plants of only one species. Roses, dahlias, chrysanthemums, gladioli are planted in mono-flowers. The more plants, the more attractive the flower garden.

And a few more examples of decorating a garden and a garden with flower beds with your own hands in the photo:


flower beds
Trying our hand at sculpture
For a summer cottage, it is absolutely not necessary to build statues in full growth, unless it scared them from feathered predators. Small funny figurines of animals or fantastic characters will give the garden a cute charm. You can make them from any material: from the remains of building materials to old pots and lemonade bottles.
Admire the photo: do-it-yourself wooden figurine

Most often, gnomes can be found in gardens; in different cultures, they are considered the patrons of all plants. You can cut a little man out of a stump and paint it with bright acrylic or sculpt it out of clay and plaster.

The second option requires the manufacture of a reinforcing structure so that the sculpture does not fall apart from an accidental touch.

The base for a small sculpture can be cut out of styrofoam or a cured piece of building foam. and then coat it with putty. After the layer dries, it needs to be sanded and painted. On this basis, animals are especially good - squirrels, hedgehogs, birds - storks, herons, ducks, owls.

Important! Such sculptures must be properly placed in the garden. Frogs, snails and ducks have a place near a pond or fountain, owls and squirrels - on a tree, and a curious gnome can look out from a rose bush.
Such original ideas of sculptural decoration for the garden, made by oneself, will delight the eye for more than one year.

garden figures
The magic of painted stones: photos and practical tips
No offense will be said, but crafts made from household waste cannot be compared with the natural charm of wood and stone. These materials fit into any garden design in a natural and noble way.

Stones suitable for painting must be collected in advance. The best place for this is the bank of the river or the sea. Large smooth pebbles are a great option. You should not stop only at perfectly even specimens. The original shape can be a great stimulus for fantasy coloring.

Idea! Porous boulders can also become an art object if painted yellow, I put a plaster mouse next to it.
If you can’t find a suitable stone, it doesn’t matter. You can just make it from or . You do not even need to invent a form for pouring. It is enough just to make a recess in the ground or sand, cover it with polyethylene - and you're done. Cement or gypsum can be tinted with tinting paste. To save on mortar, stones can be made hollow.

Advice! It is better to cast a large artificial stone without moving far from the place of future installation.
For stone painting, it is better to use acrylic paints for the following reasons:
- dry quickly;
- perfectly applied to the surface of the stone;
- safe at work;
- not afraid of moisture;
- do not fade from the sun.
Before starting work, the pebbles must be washed from sand and dirt and dried thoroughly.

The first layer is PVA glue. He act as a primer. You can paint only after the soil is completely dry. The second layer is the background paint. It is evenly applied to the entire surface and also allowed to dry completely.
The third layer is the drawing itself. You can first sketch a sketch of the future picture on paper and transfer the diagram to the stone with a pencil.

Idea! If complex ornaments or landscapes are not yet obtained, try painting pebbles with emoticons. Another option is ladybugs. They are very easy to complete.
This is how stone crafts for the garden are made with their own hands. All novelties can be used to design flower beds, garden fountains and paths.
For example, pebbles with the image of frogs and fish will be harmoniously located near the pond, the edges of the paths will be emphasized by products with ornaments.
For example, we offer a photo of original DIY decor ideas from pebbles:

 Ladybugs and frogs on pebbles - water lilies
Idea! If you draw crosses and tac-toes on the pebbles, the children will have something to do on the lined playground.
garden stones
Crafts for the garden with your own hands: all the novelties and crazy ideas
In addition to those listed, you can build an incredible number of other country tricks with your own hands. Photo examples and numerous master classes will help in mastering this exciting activity. Here are some original ideas, perhaps some of them will come in handy on your site:

For the manufacture of flower beds, a case from an old grand piano or upright piano is suitable. Small musical instruments, fastened together, can become a support for loaches.
 Mirror in the garden
 The old large mirror can no longer find a place in the house? No problem. Do not throw it away, especially since it is a bad omen. If you hang it on a fence in a dark corner of the garden, it will add light to the plants and visually enlarge the territory.

Antiques and antiques are great decoration for the site. Everything can be used - from a spinning wheel to vintage irons.
 Wonder - benches
 This necessary element of the garden can be made from a variety of materials and decorated with flowers or carvings. If you install solar-powered lanterns next to one, it will be unusually pleasant to listen to the trills of cicadas here in the evening.
 Arches in the garden Fence as art - object Refreshing fountain
 Or a fountain can change the climate of a site. Plants will like the constant humidity in the air. It is easier to breathe near the fountain, and goldfish can be settled in a small home pond. There are different options for designing a garden pond.
Decorative fountains and panels
Article
Caring for a summer cottage is not limited to weeding beds and planting new plants. The aesthetic side of the issue is also worth paying attention to if you want to give the garden a proper appearance. However, faced with the high prices of garden decorations in stores, many abandon this idea, considering it too costly. Consider how you can make original crafts for the garden with your own hands: all the new items and some traditional options.
Do-it-yourself garden decor is a great opportunity not only to decorate the territory in an original way, but also get rid of a lot of unnecessary things in the house. For crafts, various unused items are suitable that can find a new life as a garden decoration. Here are just a few options for what you can use as a base:
- used tires;
- old unnecessary furniture and vehicles;
- dishes, plastic bottles, jars;

- old household appliances;
- clothing and footwear;
- pieces of pipes or fittings;
- stumps, branches or snags.
We are accustomed to throwing all this away as unnecessary trash, while with proper design any of these elements can become a worthy decoration of the garden.
Do-it-yourself crafts for giving, garden, yard
It is worth starting the design of the site by studying photos of crafts for the garden and garden with your own hands. Looking through the available options, you can accurately repeat the solution you like or come up with your own based on it, adapting it to existing conditions, opportunities and preferences.
The simplest traditional design option for flower beds involves the use of pots, flowerpots or ordinary wooden boxes. For the same purpose, old tires are suitable.

Another option for decorating a garden is to use garden sculptures made from natural materials or any unnecessary items. Here are some simple ideas that don't require too much effort to implement:
- the easiest way is to use branches and stumps, which are always enough in garden plots. With their help, you can create sculptures of animals, castles and more. Such an element will be an excellent decoration for a flower bed, an area near a gazebo or lawn;
- you can make a sculpture of concrete or cement, using a special form for this, into which the composition is poured in liquid form;
Helpful advice! Any cement or concrete structures require additional reinforcement. To avoid the destruction of the sculpture or the appearance of cracks, reinforcement must be laid in the foundation.
- abstract figures can be made using wire or rebar. Two options are possible here: leave the structure hollow inside or fill it with earth, after wrapping it with burlap or mesh. In the second case, you can use the sculpture as a basis for planting;

- a traditional garden scarecrow can be made using waste clothing. Contrary to prejudice, such an element may well become a worthy decoration of the site, especially if you use the image of some famous character as an idea for its design.
In order for the made element to retain its original appearance for a long time, it is very important to choose the right finishing materials for it. First of all, this concerns the used paints and varnishes. Acrylic paint, cold enamel or paint designed for glass work is best suited. A durable varnish will provide reliable protection for the coating.
Browse waste garden craft ideas. So, you can get rid of a lot that is a pity to throw away, giving it a new life and at the same time decorating the local area. A great example would be DIY garden crafts from computer disks.

Crafts for the garden with your own hands from improvised materials with a description
Spring garden crafts differ in what materials you need, as well as in the complexity of manufacturing technology. Consider a few not too complicated options that can be implemented with minimal time and effort.
Do-it-yourself crafts for giving: photos and instructions for creating painted stones
Using stones to decorate a garden is a classic technique that has been used for a long time. However, it is not necessary to keep their original appearance. Elements decorated with an original pattern will look much more interesting. For example, you can paint stones under cacti, thus creating an interesting decor element.

Technology for making cacti from stones:
- with the help of dark green paint applied to the stones, the base of the cactus is created;
- then, using a lighter shade of green and a thin brush, characteristic stripes and dots are applied;
- dried stones are covered with a layer of varnish and placed in pots or flowerpots, previously filled with stone chips.
Another option involves the use of larger stones to decorate a summer cottage. With the help of paint on their surface, you can depict various animals, houses, cars, etc. The easiest way is to initially draw a drawing with a simple pencil, and then decorate it with acrylic paints.
Helpful advice! Such elements will be an excellent decoration of the territory if you have a decorative pond in your country house.

Original design of flower beds and flower beds with your own hands: new items of all crafts
Speaking of decorating flower beds, it means a number of the most diverse elements that can transform the appearance of even the most ordinary flower bed. Sizes, as well as color solutions are practically unlimited, and you can choose the option that will look most advantageous on your site:
- using ordinary bricks or stumps, you can create flower beds called "alpine hills". The main thing is to provide the elements with a good connection with each other so that the design is strong and reliable;
- using a small motor, you can make a small one, decorated with flowers on all sides;
- crafts from tires for the garden are very popular. There are many design options for flower beds with their help, both the simplest and hanging and multi-tiered;
- you can fill with earth and plant flowers inside almost any unnecessary element, including torn boots, ceramic dishes or furniture.

Helpful advice! Be sure to consider using hanging elements to decorate your garden. Decorations placed on several levels look much more advantageous.
Crafts from plastic bottles for the garden: photos and descriptions of the best ideas
A huge amount of a wide variety of plastic containers is thrown away as garbage, while bottles can be an excellent raw material for making many original garden decorations. Consider some interesting ideas for their use with step-by-step instructions for making.
Palm tree from plastic bottles for decorating a summer cottage
In order to make a palm tree from plastic bottles, you will need the following set of materials:
- bottles of brown and green plastic (preferably several different shades);
- sharp scissors;
- awl;

- rods for the base with a length of at least 25 cm (metal or willow can be used);
- metal bushings;
- tubes with a diameter of 2 cm;
- high voltage cable (preferably 12-14 mm).
First of all, you need to cut the brown plastic bottles into two parts to get their bottom plus a small margin. In the lower part, you need to make a hole of such a diameter that the twig of your choice passes through it. We also cut the green bottles, but in such a way as to separate the bottom and about 1 cm above it. After that, the bottle is cut lengthwise into 3 equal parts (up to the point where the narrowing to the neck begins). In this case, you need to save the neck.
In order to make the leaves look like real ones, the edges are cut in such a way that notches are obtained. After that, the finished elements can be put on the cable. As a result, we get branches, which will later be attached to the trunk. One tree should have 7 branches.

After that, you can begin to assemble the structure: the rods are securely fixed in the ground, forming a base. The easiest way to achieve this is to pre-weld them to a sheet of metal, placing them at a different angle of inclination. After that, tubes are attached to them and bushings are put on. The length of each rod should correspond to the number of brown details that will be arranged in a row and another 3 cm margin for leaves.
Related article:
Photo examples for registration. Plants and garden structures in decoration. Optimal zoning options.

Having assembled the structure, it is securely fixed in the place where it will be installed. Most often, such an element is located near small artificial reservoirs or flower beds.
Helpful advice! If you use rods of different diameters, you can create a whole composition that imitates an oasis.
Do-it-yourself gnomes from plastic bottles: photos of crafts for the garden with a step-by-step description
How well the figures of garden gnomes look in the design of plots, we know from fashion magazines and modern films. But not everyone knows that such beauty can be made from improvised materials. Consider how you can make such an ornament without spending a lot of effort and money on it.

Since the gnome needs to be large enough to be visible in the garden, a 5 or 6 liter plastic bottle should be taken as a base. In addition, you will need paints for decorating, brushes, an awl, glue that can glue plastic parts together, as well as various little things that you want to decorate your creation with: a beard, eyes, a strap, etc.
First of all, you need to paint the bottle in the main color. This must be done from the inside to avoid washing off and damaging the layer. The easiest way to do this is to pour the paint inside and twist the container so that only the bottom 2/3 of the container is colored. It is important to wait until the paint is completely dry.
At this time, you can start preparing the details for decoration. For their manufacture, plastic bottles of a smaller volume are perfect. By applying paint with a brush, you can make a sleeve gnome from small containers. If you paint the bottom of the bottles in beige, you can make them look like hands.

The connection of these elements is carried out by cutting holes of suitable diameter and additional fixation with wire and special glue. In the same way, we fasten the gnome's nose, made from an ordinary cap.
Helpful advice! The easiest way to draw eyes and lips is using a regular brush and paint, but for the best effect, you can purchase ready-made elements designed for dolls.
In order for the figurine to be stable enough and not fly away at the first gust of wind, sand or earth must be poured inside the barrel.
The original design of the site: garden crafts from mayonnaise buckets
You can also make beautiful and original decorations for the street using such an unusual element as plastic mayonnaise buckets. The main condition is that the design is resistant to external factors and looks beautiful. Therefore, it is imperative to open the finished craft with waterproof varnish.

Other subtleties that must be observed are to take into account the future location of the craft. For example, if it is located under a canopy or in a gazebo, then it is quite acceptable to use various fabric or paper elements.
Installing or fastening flower pots from a mayonnaise bucket also matters. By themselves, they are light enough that they must be filled or fixed to ensure stability. If you fill the buckets with earth and flowers, then they, on the contrary, will be quite heavy, so if you plan to hang them, make sure the rope is strong and reliable in advance.
Helpful advice! You can always attach the installed bucket to the surface with self-tapping screws or glue, thus ensuring the most durable fixation.

Prepare in advance all the materials necessary for work: paints, brushes, waterproof varnish, napkins if you want to do decoupage, as well as other small items that will serve as decoration, such as beads, pebbles, beads or small insect figurines that you can buy in store.
Ideas for a garden and a kitchen garden with your own hands: a flower pot from a bucket for mayonnaise
Making a planter out of a bucket of mayonnaise is the easiest and most common option that is used to decorate the garden. In this case, the best design is obtained if you use the decoupage technique. So, you can not only create bright colored pots, but also make whole works of art: unique and inimitable. Moreover, this technique will be a great solution for those who are not very good at drawing.
In order to make the original pot in this way, you need to follow the following algorithm:
- the bucket must be degreased by wiping it, for example, with alcohol;
- then use a sponge and apply one or two coats of white paint to the surface;

- while the paint is drying, prepare the napkin elements that you like with the pattern. Thematically, it can be anything: flowers, animals, patterns;
- separate the top layer from the napkin, the one on which the pattern is applied;
Helpful advice! For a more aesthetic appearance of the finished pot, the edges of the napkins used are recommended not to be cut, but to be carefully cut off. So, the joints will be almost invisible.
- apply a layer of PVA glue to the bucket and carefully attach and straighten the pictures from above;
- after complete drying, open the finished product with varnish.
Crafts from tires for the garden with your own hands
The areas in which old car tires can be used cannot even be listed. And the design of the suburban area is no exception. Home-made playgrounds made using this material, as well as flower beds and flower beds, are very popular. On the network you can find many different workshops for crafts from tires for the garden with your own hands. Consider a few simple design options.

The most primitive option is a round flower bed made from a car tire. It is difficult to call such a creation a masterpiece, however, with proper design, it can also serve as a decoration for the garden. A little more complicated, but much more spectacular - a flower bed of several tires, located one on top of the other.
To give interesting effects, you can use tires of different diameters, placing the larger one on the bottom and gradually reducing the size. Hanging flower beds from tires also look great. If you leave the disk inside and properly fix it, then earth can be poured inside. The main thing is to take care of a reliable fastening, since the total weight of such a structure will not turn out to be too small.
Crafts from polyurethane foam for the garden and vegetable garden with your own hands: photo examples and tips
Another unusual material that has also found its use in decorating a garden exterior is polyurethane foam. Due to a number of characteristics, such as light weight, ease of processing, insensitivity to rain and temperature changes, this material is extremely suitable for garden crafts. This solution will be an excellent alternative to do-it-yourself gypsum crafts for the garden.
The first thing you should pay attention to is the manufacturer's recommendations indicated on the cylinder with the purchased mixture. By itself in the cylinder has a liquid consistency and hardens due to contact with air. As a rule, it takes 10-12 hours for it to dry completely.

Helpful advice! Do not forget about personal safety measures in the process of working with polyurethane foam. How exactly to protect yourself - you will also be prompted by the information provided by the manufacturer on the cylinder.
Here are some simple tips for working with this material:
- polyurethane foam does not like cold, so it is better to work with it at positive air temperature;
- before starting work, the cylinder must be thoroughly shaken;
- in the process of squeezing the foam, hold the can with the cap down. So, the gas from the cylinder will not come out, and you can use all the foam that is in it;
- observe the recommended (usually 10-15 minutes) interval between coats. Otherwise, the uncured foam may fall off under the weight of the following layers;
- to make it more convenient to work with foam, you can use a special mounting gun.
DIY Foam Garden Craft Ideas
Looking through a photo of a garden with your own hands, for the design of which figures from polyurethane foam are used, you can see that the possibilities of this material are practically unlimited, and with its help you can create a wide variety of sculptures. However, in order for the figure to turn out to be strong, it is necessary to provide it with a strong and reliable frame. For this purpose, you can use plastic or tin bottles, as well as wood, wire or fittings.

For example, to make a snail, it is enough to follow a simple algorithm:
- on a pre-prepared surface (you can do this on a regular table covered with oilcloth), apply the first layer of foam, which will become the base;
- after drying, apply a second layer of foam and insert a plastic bottle into it, which will act as the snail's neck;
- cover the plastic bottle with foam and give it the desired shape with your hands;
- the head and horns of the snail are also shaped by hand;
- to make a shell, apply foam to the body of the snail, giving it an appropriate rounded shape. At this stage, you can insert a small bucket or pot into the shell, designed for planting flowers;
- using the same foam, make characteristic curls on the snail shell. Use paint and foam to decorate the resulting craft.
A foam frog can be made as follows:
- use an old pot and jar as a base. Fill them with foam and let dry. The pot will play the role of the body, and the jar will become the head of the frog. In order for the structure to be solid, it is recommended to fasten the parts with a wire;
- in order for the frog to have legs, use a sufficiently strong wire, also covered with mounting foam;
- give a characteristic shape to the foam that has not yet hardened with your hands;
- use the paint to give the frog the color you want and give it the eyes.

To give stability to the resulting figures, sand can be poured inside the containers used. Then it will turn out to be more stable and will not succumb to strong gusts of wind. All inaccuracies and extra pieces of foam can be easily removed with a clerical knife, giving the sculpture the most accurate shape. And in order for the foam figurine to serve you longer, you can additionally apply a layer of putty on it, which will perform a protective function.
Helpful advice!In the process of decorating garden sculptures, you can use LED lighting. So, in the evening, the figurine will glow, and create a unique festive atmosphere in the garden.
Decorating your own garden is easy, and there are many ideas you can use for this purpose. After all, not only flowers and trees can help you properly arrange the territory. DIY crafts will be a great alternative to purchased models, giving your site a unique look and adding a unique zest to its appearance.
Today, to create a truly amazing landscape design on a personal plot, it is absolutely not necessary to hire a professional and spend huge sums. After all, every owner of a country house or cottage can easily decorate the territory.
And you can do this with the help of crafts for the garden and garden, made by yourself, without the use of expensive materials. They look not only beautiful, but also original.
At the same time, no special skills are required to create them. It is enough just to have a desire and a little free time.

Unfortunately, many people are still convinced that creating beautiful things with their own hands is not only difficult, but also quite expensive. However, the designers are sure of the opposite. After all, the materials that are used to create crafts are almost never expensive.

The only exceptions are those cases when the owner of the site himself wants to use expensive materials. You can make sure that this is indeed the case after viewing the catalog, which contains all the new crafts for the garden and backyard.
Flowerbed made of stone
If ornamental vegetation grows on your personal plot, you can safely use such a flower bed. Any flower garden can attract attention if it is properly ennobled.

To create such a design, you do not need to use stones of the same size.

On the contrary, some negligence will look more impressive. Therefore, you can safely use cobblestones of different sizes.

Experts say that you can use stones of various shapes and colors to build a flower bed. However, it is strongly recommended to use materials from the same color range in order to create a truly sophisticated piece.
Pay attention to the photo of crafts for the garden, which shows this composition. If you look closely at the photo, you will notice that the flower bed is multi-layered. In other words, to create it, you will need to lay out not one layer, but several.

It is worth noting that you can not just lay out a flower bed in the form of a rectangle, square or circle. Having shown imagination, you can turn your flower garden into a kind of bowl, basket or flowerpot with such a wide neck that would fit several bushes with flowers.

In this case, it all depends on your imagination and the availability of free time.

wooden crafts
But a personal plot can be decorated not only with the help of stones. Wooden crafts for the garden, in which there are an abundance of flower beds, are especially popular. This option is also ideal for those people who have a damaged flower garden in the garden.
If there is no way to transfer it, then you can update it with the help of crafts. The simplest example is ordinary wooden fences, which consist of small boards or branches. You can design them quickly and easily.

If you have enough free time and materials in reserve, you can build not just a decorative fence, but a wicker basket or even a hut.

Any flower garden in a similar design will look luxurious. However, it is worth considering that when using such weaves, you should pay due attention to their fastening. Indeed, otherwise, you risk building an extremely flimsy structure that will not last long.

cute hedgehogs
You can use crafts from improvised materials as decorating elements for the garden, which look not only original, but also funny. A very popular craft is the hedgehog.
Note!


To make it, you will need an ordinary empty bottle and hemp rope for winding. To ensure that the ropes are securely fixed, staples or glue should be used as a binding element.

In order for the hedgehog to look as natural as possible, you should take care of such trifles as the nose and eyes.

Some masters are of the opinion that it is enough to paint these elements with black paint. However, if you want your craft to look as natural as possible, you can sew the eyes and nose separately.

You can attach them to the product with glue. Thus, the mount itself will be invisible, but at the same time very reliable.

Ordinary grass will serve as thorns for the hedgehog. Therefore, if you have several small accumulations of grass on your site that you don’t have time to clean, you can quite successfully disguise it with the help of this craft.
Note!


Plastic peacock - as the main decoration of the garden!
But not only hedgehogs can decorate your garden. A creative peacock-shaped bottle garden craft will become a real star and the center of the whole composition.

To create it, you will need to stock up on some set of materials:
- Multicolored plastic bottles.
- Multicolored tape.
- Wide tape.
- Synthetic foam.
- Glue gun.
- abrasive mesh.
- Plastic pipes.

Once you have purchased the entire set, you can start creating crafts. Cut out peacock feathers from plastic bottles. They should all be different sizes. Each feather should be cut along the edges to make a light fringe.

The body of the bird is cut out of foam. The joints that form in this case are sealed with a wide adhesive tape. We attach two plastic tubes that will serve as paws to the body.

The beak is cut out of the bottle and, after folding into a cone, is attached to the head. Next, using a glue gun, attach the feathers to the resulting figure.
Note!


Remember that the feathers on the chest should be shorter than those on the back and tail. You can decorate the tail with small oval parts cut out of colored electrical tape. The crest is made from a bottle and attached to the head.

Pay attention to the instructions on how to make a beautiful craft in the form of a peacock in the garden, which is presented below. It describes in detail and with illustrations the entire front of the work.

Photo DIY garden crafts


